deerhunter496
Active member
- Joined
- Sep 28, 2014
- Messages
- 27
How do I get to that thread?


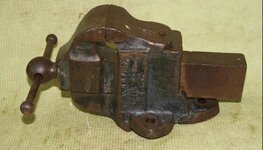
Sorry for that mysterious delete, Drives. Totally different vise. Nothing special, but I knew I could get it at an uninformed price, and I was trying to get some info on it while I was at the flea market before deciding to cart it home. All good. Thanks.Lug: looks like we helped enough.
How do I get to that thread?
Hopefully Carla or KMScott will see this and chime in....maybe post it over to the vise repair thread?
I've seen people try to use a MIG on castings like this, but I wasn't impressed with the results. It might have been the operator, but I think somewhat it would be the wire isn't really that compatible with ductile iron.
I've had really good results lately TIG welding Wilton base parts using Inconel rod based upon a suggestion by KMScott (he was kind enough to send me some filler rod when I ordered some parts). It's nickel-based, and that's probably why it works so well with cast parts.
The problem with the break on yours is that it's the pad that takes virtually all of the load when you tighten the swivel lock, so it's got to be pretty strong.
I wonder if you could weld it as best as possible the way it is, and then weld a support across the crack on either side of the bolt hole? Something like a 1/4" wide strip that you could put a bead all the way around would help strengthen things. It wouldn't be pretty, but it would be hidden in use.
Colin: if you maybe put up a post in the Wanted section and or Classifieds here that you might want to trade for a Wilton C0, C1, C2 and you'd pay cash to make up the difference of the value maybe some member might need a small Wilton. not saying it's worth $200 without a swivel, but it's still a good vise without one and it's worth something as is.
if you only have room for one vise i kind doubt a 3 inch bullet would be my ONLY VISE.
good luck
Thank you all VERY much for the info - this is exactly why I love this place! I'm glad I decided to ask instead of just breaking out the welder. And I apologize I didn't post this in the repair thread - I did not know there was a separate thread for that. My bad.Colin. Mig isn't the best for something with that much stress on it. not with ordinary wire anyway....
I would attack that one like this:
- Clamp the broken bit in place (looks to be a clean break)
- Tap drill it for the largest countersunk screw to think you can get away with on each side.
- After the tap drilling, tap the main piece.
- Clearance drill the small part, then countersink it so the head is less than flush.
- Now you can secure the bit for the next operations, but first, grind the "Vee" you need - fairly deep. Assemble it with good quality screws.
- I would braise, if you have access the inconel is a better choice, or you could get some Nirod for arc welding and use that with TIG....
- PREHEAT the assembly.
- Weld/Braise...
- Cool slowly. The old school trick is bury it in hot sand (bucket of dry sand on a Coleman stove works...) You can also leave it in an oven and slowly reduce the heat before turning it off and letting it finish cooling with the door closed.
- After cooling, re-tighten the screws, as I'd bet they got loose...
 But on the positive side this gives me an excuse to ditch it in favor of one that, as Drivesitar mentioned, will likely suit my needs better. I had been thinking this for a while but figured it'd be neat to keep the one that came with my first house.
Here is a Hollands 13 with 3" jaws like the Reed but built much different. It is larger then the Reed 103R and heavier. I added a new handle and a alum/bronze washer as well. Replaced the rear nut pin with a larger diameter one and tightened the backlash to where I like them at 12 o'clock to 2 o'clock. This one to is ready to get back to work with the new replaceable jaws like the Reed.
Eddie, I remember back when I was racing Stock Cars and was always pulling tie rods ends off and the quickest way was a shock treatment by hitting the side of the female portion of the 7 degree tapered knuckle joints and they just fell off. So that being said you can not do the same with a vise since vises are so soft and not made from nodular Iron which I believe the drag linkage was made from and could handle the hammer hits. Shocking the pin, heating causing it to grow that will break the rust seal is the best way I found to remove tapered pins. I make replacement pins out of 300 series SS which is very soft steel and really not a good choice except for the corrosion resistance but should not deform like a aluminum pin would. Good luck.
Reading and looking a long time, but first post. Bought 2 bullets. $ 110
Some rough wear, but smooth. 6/71 date and 1/71 date from the local swap meet. One swivel, one not. 2.5 inch jaws.
Is there an organization for protection of vises from neglect, abuse and endangerment? If not there needs to be one (Lord knows that there is one for every other cause, why not abused and endangered vises?).
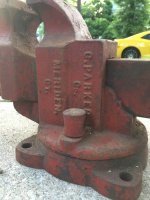
Here is a prime example: a 100 years old beautiful CP 205 vise with holes drilled into it everywhere. The vise seems to be in fair shape. It seems jaw inserts are missing and three of the visible holes might be the jaw insert pin holes (the fourth pin hole is not visible). Also missing is the swivel arm. May be someone tried jury rigging some kind of jaw inserts (there are even horizontal holes drilled into the surface of the jaws) but there seems to be holes every which way too.
Couple new ones
View media item 712773" Dohm Wilson (well this only has Wilson on the tag) rotating multi use jaw, quick release.
£31.50 delivered
View media item 712764 1/2" Paramo quick release, good order, just needs a clean and oiling really, local pickup, £15
also got a dozen good, mostly British made files for a £ a piece.
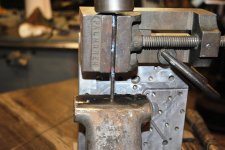
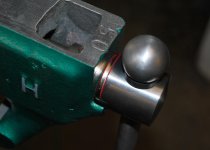
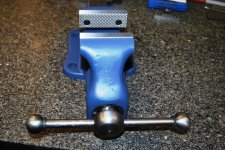
Finished up this little Wilton C0, double pin today. I made new pins out of stainless so they wouldn't get rusty. I really like how it turned out. I didn't bother with new jaws, a new handle, or even running the handle on the belt sander as that just seems to make them rust worse. I tried to keep my cost and time down on it so this could be a user for somebody, not a museum piece.
I think the last one I saw like this on eBay went for something crazy like $625...yikes!


Reading and looking a long time, but first post. Bought 2 bullets. $ 110
Some rough wear, but smooth. 6/71 date and 1/71 date from the local swap meet. One swivel, one not. 2.5 inch jaws.
That a very nice restore, but on top of that, I just love the look of dual pin C0. The machinists vise are great vise, but the next pic of the 500S looks so bland compared to the character of the C0......nice vise.


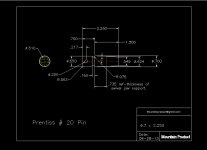
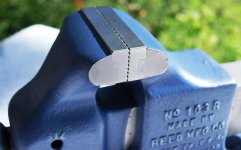
One question: would anyone know the approximate shape of the jaw swivel pin or perhaps have a picture. I'll be making a new one and would like to have it as correct as possible.
Tom B
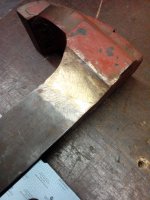
I just thought I had a grease covered vise with a spray bomb paint job. After the first round of cleaning the problem showed up
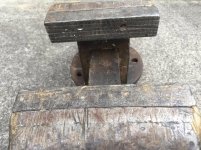
A nice brazing job but it has been broken just the same. I'll finish cleaning it and put it back together and move on to the next one.
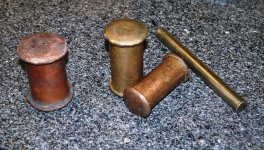
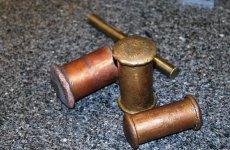
KM--thanks, that's perfect! I haven't extracted the bolt yet but have been giving it a daily shot of Kroil. I'm a little hesitant to really try and wring it out, not knowing how much force the vise casting can take. I have some brass drops that I use as drifts similar to your copper and may try heat and shock if the Kroil doesn't loosen things up. If I need to, there's enough space between the underside of the bolt head and the vise to cut the head off and then drill the bolt.
Thanks again for the dwg.
Tom B.


Here is a Hollands 13 with 3" jaws like the Reed but built much different. It is larger then the Reed 103R and heavier. I added a new handle and a alum/bronze washer as well. Replaced the rear nut pin with a larger diameter one and tightened the backlash to where I like them at 12 o'clock to 2 o'clock. This one to is ready to get back to work with the new replaceable jaws like the Reed.
KM--thanks, that's perfect! I haven't extracted the bolt yet but have been giving it a daily shot of Kroil. I'm a little hesitant to really try and wring it out, not knowing how much force the vise casting can take. I have some brass drops that I use as drifts similar to your copper and may try heat and shock if the Kroil doesn't loosen things up. If I need to, there's enough space between the underside of the bolt head and the vise to cut the head off and then drill the bolt.
Thanks again for the dwg.
Tom B.


Hi all,
Here's an old gizmo of a vise! Anyone seen one of this vintage.
Thrumcap

Great restores Kevin, all your projects are flawless. For some that didn't know, Hollands dated some f their vises and they stamped the year right on the bottom of the Dynamic. Not all but a few.

Some recent ones. Erie #102 Stephens 5" jaws prentiss ? 2" jaws athol #614 3" jaws


Sent from my iPhone using Tapatalk
That Stephens is um...interesting...
Are you referring to the handle being broken?
Sent from my iPhone using Tapatalk