
You are using an out of date browser. It may not display this or other websites correctly.
You should upgrade or use an alternative browser.
You should upgrade or use an alternative browser.
let's see your craftsman block grinders
- Thread starter emeraldcoupe
- Start date

DonkDonk
Well-known member
Is there a date stamped on the bottom plate?
I believe that model had a long run... '64 through '74/'75.
If you have the eye shields, are they metal-framed glass or plastic? Any evidence of a lamp?
It’s stamped 1964... didn’t realize it was that old. It didn’t have any eye shields on it when I got it.
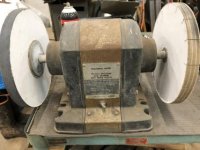
Here is mine. Not one of the cool older ones, but it runs smooth. I set it up for sharpening knives. I need to clean it up though.
How do you like those paper wheels? I bought a set awhile back but hated the grit wheel: a hassle to glue the grit and it was too coarse for my knives. Ended up selling them (on a simple arbor setup), but admit that the slotted honing wheel was pretty good at producing the microbevel.
McBrownie
Well-known member
This is my very clean 1/2hp commercial that I got from exmaxima a few years ago. It has always been a really smooth running machine that I only use for light-duty jobs. No nasty rust removal with this one. Lately, it developed a "pulsating hum" instead of the normal steady hum. So, ordered a set of 6203ZZ metal shielded bearings and, in less than 45 minutes, had them installed. In fact, I didn't even take the time to snap pictures. It's back to running like new. The old original bearings did have slight "click" to them. I timed the spin down times - 1 1/2 minutes with the original bearings, 1 minute with the new ones.
View media item 81151
View media item 81151
cajunfirehawk
Well-known member
This is my very clean 1/2hp commercial that I got from exmaxima a few years ago. It has always been a really smooth running machine that I only use for light-duty jobs. No nasty rust removal with this one. Lately, it developed a "pulsating hum" instead of the normal steady hum. So, ordered a set of 6203ZZ metal shielded bearings and, in less than 45 minutes, had them installed. In fact, I didn't even take the time to snap pictures. It's back to running like new. The old original bearings did have slight "click" to them. I timed the spin down times - 1 1/2 minutes with the original bearings, 1 minute with the new ones.
Care to share your bearing R&R technique?
ckadams00
Well-known member
Hi everyone, I have a couple of grinders posted in here way back but I picked one up at a pawn shop today and it is a bit of a puzzle. Quick skim through this forum (very quick, absolutely possible I missed someone with the same) and I had no luck at Vintage Machinery either in the photo section or the manufacturer index.
I'll post photos asap - since the whole photobucket fiasco I have yet to set myself up with a photo host (I'm still bitter).
Anyway - it is a CM 397.19571. I can't remember what the last digit - '1' signifies. I have seen reference to 397.19570 and 397.19580 (1966) - so this is pre '66. Also, the 19580 models are 1/3 HP and mine is a 1/4.
What has me puzzled is: there is an indent (but not punched out) oval for the water basin and NO holed anywhere for an on/off switch. The original band in intact. I haven't plugged it in - but considering I've never seen any CM machine without an on off switch I'm puzzled.
Thoughts or ideas?
Here are some pics. It looks all original and was never wired for a switch (never seen that). The cosmetics on the outside were a bit worn but once I cracked it open - it hardly looks like it was ever used. The windings are dirt free, the bearings spin like new, the felt bushings look like new. Little bit of surface rust here and there. It is NOTICABLY smaller and lighter than my 1/4 hp from 1959.
Attachments

ckadams00
Well-known member
McBrownie
Well-known member
Care to share your bearing R&R technique?
Maybe I should have taken pictures! I believe that TorqueMan has posted some detail write ups here:
https://www.garagejournal.com/forum...=torqueman+grinder+bearing+replacement&page=4
So, here are the highlights:
Remove the wheel guard covers
Remove the wheels
Remove the wheel guards
Remove the 4 screws holding on the center tin.
Remove the 3 long bolts holder the motor cover halves together
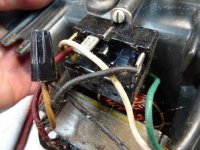
I did snap this picture in case I forgot where wires went:
View media item 81154
I had to remove the two red leads on the capacitor to be able to remove the left half of the motor cover.
Remove the motor stator
Remove the bearing felts and springs.
Then I have a vise that is able to grab the bearings like this when they are still on the stator:
View media item 81152
I then tap on the end of the stator with a soft-faced hammer. You could also use a block of wood. Just make sure not to beat up the threads.
To reinstall, i put the stator in hole in my workbench. A Black and Decker WorkMate also works well. Then I use a piece of 3/4" conduit to tap the new bearings on. You want to make sure that you apply force to the inner race. Otherwise you could knock the bearing apart.
View media item 81153
I've never had a hard time taking a bearing off, but if they are stuck, i think a little heat from a propane touch is enough to loosen them up.
Re-assemble in the reverse order.
Hope that helps
cajunfirehawk
Well-known member
Maybe I should have taken pictures! I believe that TorqueMan has posted some detail write ups here:
https://www.garagejournal.com/forum...=torqueman+grinder+bearing+replacement&page=4
So, here are the highlights:
Remove the wheel guard covers
Remove the wheels
Remove the wheel guards
Remove the 4 screws holding on the center tin.
Remove the 3 long bolts holder the motor cover halves together
I did snap this picture in case I forgot where wires went:
View media item 81154
I had to remove the two red leads on the capacitor to be able to remove the left half of the motor cover.
Remove the motor stator
Remove the bearing felts and springs.
Then I have a vise that is able to grab the bearings like this when they are still on the stator:
View media item 81152
I then tap on the end of the stator with a soft-faced hammer. You could also use a block of wood. Just make sure not to beat up the threads.
To reinstall, i put the stator in hole in my workbench. A Black and Decker WorkMate also works well. Then I use a piece of 3/4" conduit to tap the new bearings on. You want to make sure that you apply force to the inner race. Otherwise you could knock the bearing apart.
View media item 81153
I've never had a hard time taking a bearing off, but if they are stuck, i think a little heat from a propane touch is enough to loosen them up.
Re-assemble in the reverse order.
Hope that helps
Thanks, I have torquemans great info, I am just always interested to see how others change theirs and we are all eager to learn tips or tricks from one another.

Last edited:
cajunfirehawk
Well-known member
Ditto, me either...Craftsman grinders made in '63 and earlier were cast iron, and, in general, '64 and after were cast aluminum.
That's really interesting. I've never seen a wire nut in an original grinder.
I'm assuming the black wire in the nut is from the cord. You could add a switch between the wires in the nut.

ckadams00
Well-known member
Craftsman grinders made in '63 and earlier were cast iron, and, in general, '64 and after were cast aluminum.
That's really interesting. I've never seen a wire nut in an original grinder.
I'm assuming the black wire in the nut is from the cord. You could add a switch between the wires in the nut.
Has anyone seen one of these without a switch? I never have. Seems very odd that you would plug/unplug a grinder . . . .
EOC_Jason
Well-known member
I've never seen one without the switch, I was thinking about it last night. Really odd..
With a remote switch you could still have the switch on front and just leave it 'on'... Doesn't make sense...
With a remote switch you could still have the switch on front and just leave it 'on'... Doesn't make sense...
torqueman2002
Well-known member
I seem to recall see an early 1/4-HP rtop w/o a switch.Has anyone seen one of these without a switch? I never have. Seems very odd that you would plug/unplug a grinder . . . .
I looked through my pictures, but could not find the example.
I did find a pre-Block 1/4-HP, with a wire nut, though. I think it is original to the grinder, all other bits-n-pieces look original - ie: the power cord and funky 'strain-relief'.
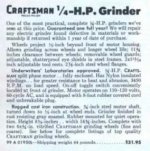
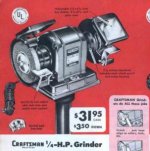
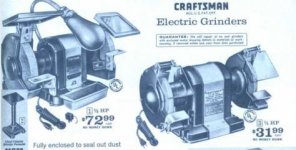
OK, I found a 1/4-HP in "sears-craftsman-1964-power" catalogue/catalog.
I wonder why a 1/4-HP with a power switch (but no wheel guard covers) was $32.50 in the 1955 catalogue. Could it be Sears' attempt to hold the price point, by de-contenting their products?
The switch is back in the 1966 catalogue for $38.99.
Attachments


Last edited:
torqueman2002
Well-known member
Nice detective work TM!
The description says the eye shields are safety glass. They look more like the plastic shields. Did they make a different style of glass shields?
The earliest style were metal framed, came in 2 sizes, and were laminated glass.
Later styles were a plastic.
")
Attachments
Last edited:
torqueman2002
Well-known member
I think the text is wrong, probably the technical writer 'carried-over' some old/incorrect information. Where's the editor?!That's what I thought. I think either the description is incorrect or the illustration is incorrect.
Then there were a couple styles of plastic shields too.
They had it correct in the 1966 catalog. I am missing the 1965 catalog.

It looks like in 1964 there were both, the 1/2 & 1/3-HP had metal frames, the 1/4-HP plastic.
Yes, the plastic eye shields had at least 2 different styles. These pictured below and later ones with horizontal lines/ridges on the upper-underside.
From the 1974/1975 Power and Hand Tool Catalog
Attachments


Last edited:
torqueman2002
Well-known member
"1964 was a pivotal year for grinders. I(t) was the first year for:"
Nice summary!
Nice summary!
ckadams00
Well-known member
1964 was a pivotal year for grinders. I was the first year for:
- cast aluminum body on 1/4, 1/3 & 1/2 hp
- plastic eye shields on 1/4 hp
- split phase on 1/3 hp
- 6" stone on 1/3 hp
- 1/2" arbor on 1/2 hp
- 0 degree lamp on 1/3 & 1/2 hp (1/2 hp went back to a 90 degree lamp in '66)
- removable quench tray on 1/3 & 1/2 hp
Mine is stamped March 25, 1965 - so I got one of the first ****** models!

Torqueman thank you for the detective work, that is the exact 1/4 frinder I picked up, no on/off switch. Having to unplug a grinder seems extra unsafe in my opinion. Frank Lee as you pointed out, the difference between my 1/4hp 1959 and my 1/4hp 65 is incredible. Not only is the '65 about 20lbs lighter, the 59 is 4.5 amps and the '65 is only 2.5 amps.
Last edited:
ckadams00
Well-known member
I'd like to put a switch on this grinder but looking at my '59 doesn't help and looking it up online doesn't either - I don't want to fry anything. No capacitor on this one, just leads from the winding, a starter relay and the power cord. If I wanted to put a switch in line anyone able to tell me how to connect it? I don't want to fry the little guy.
I'd like to put a switch on this grinder but looking at my '59 doesn't help and looking it up online doesn't either - I don't want to fry anything. No capacitor on this one, just leads from the winding, a starter relay and the power cord. If I wanted to put a switch in line anyone able to tell me how to connect it? I don't want to fry the little guy.
Follow the power cord coming into the grinder, and install the switch into the black (hot) lead.
Bobioz1
Well-known member
Nice detective work TM!
The description says the eye shields are safety glass. They look more like the plastic shields. Did they make a different style of glass shields?
Could be just bad artwork. Says it has spark arresters, but none are shown.
Bobioz1
Well-known member
I'd like to put a switch on this grinder but looking at my '59 doesn't help and looking it up online doesn't either - I don't want to fry anything. No capacitor on this one, just leads from the winding, a starter relay and the power cord. If I wanted to put a switch in line anyone able to tell me how to connect it? I don't want to fry the little guy.
You could use a foot switch. I have them on my portaband table and 1" belt grinder. Work great. One of my few harbor freight purchases.
EOC_Jason
Well-known member
Yeah I was thinking about how some of the old CMan stuff didn't have power switches, instead they had like that power-strip looking thing for an on-off switch... Or they just expected people to be suicidal...
A foot pedal for a grinder wouldn't be the best at least not for me. Constantly adjusting your footing and location would make it hard to keep constant power going.
A foot pedal for a grinder wouldn't be the best at least not for me. Constantly adjusting your footing and location would make it hard to keep constant power going.
Bobioz1
Well-known member
Yeah I was thinking about how some of the old CMan stuff didn't have power switches, instead they had like that power-strip looking thing for an on-off switch... Or they just expected people to be suicidal...
A foot pedal for a grinder wouldn't be the best at least not for me. Constantly adjusting your footing and location would make it hard to keep constant power going.
They make on/off and momentary switches.
torqueman2002
Well-known member
Keith Rucker, has posted a YouTube video: "Scanning Publication Reprints for the VintageMachinery.org Website. The first 21 min of the 28 min video he demonstrates how he scans books.
At about 21:30, he then shows how to navigate and upload scanned documents on the VintageMachinery.org website.
I know members have manuals they acquire and/or are looking for. This video can be a big help sharing/finding publications.
<iframe src="https://www.youtube.com/embed/MIk8Drn2kE0?rel=0" allow="autoplay; encrypted-media" allowfullscreen="" width="560" height="315" frameborder="0"></iframe>
Last edited:
PurpleZj
Well-known member
Just picked up this 1/2hp block grinder. Looks to be in great shape other than a crack in the base. Any ideas on how to fix the base would be greatly appreciated.


Sent from my iPhone using Tapatalk
Sent from my iPhone using Tapatalk
torqueman2002
Well-known member
Metal Epoxy has worked for me on a similar crack on a cast aluminum Block.
EOC_Jason
Well-known member
Devcon or JB Weld would probably work.
If you know someone with good TIG welding skills?
If you know someone with good TIG welding skills?
Block parts always show up on Ebay... here's a listing for $15 shipped.
https://www.ebay.com/itm/Vintage-Craftsman-6-Bench-Grinder-End-Frame-Right-Hand-Side/282878056726?hash=item41dcd89916:g:cOYAAOSwz~paJFuP
https://www.ebay.com/itm/Vintage-Craftsman-6-Bench-Grinder-End-Frame-Right-Hand-Side/282878056726?hash=item41dcd89916:g:cOYAAOSwz~paJFuP
torqueman2002
Well-known member
Devcon or JB Weld would probably work.
If you know someone with good TIG welding skills?

BlueHeart
Well-known member

Outlawmws
Well-known member
Work some some super glue into the crack and clamp it shut; let dry, keeping it clamped; then back fill the cavity area around the crack with JB Weld and call it a day.
Last edited:
Outlawmws
Well-known member
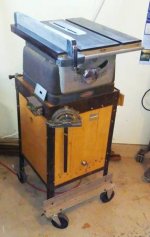
I went to go look at a Craftsman Table Saw I found on CL yesterday and he had this sitting in the garage. He said he has another one in his shop just like it.
So did you buy it?
BlueHeart
Well-known member
So did you buy it?
No. I was looking at the table saw because the one I bought from my neighbor a month ago has the dreaded "angle gear" issue. I was hoping his would be in better condition. It was, but he was asking $150 for it and it didn't have the cast iron side extensions. I paid $90 for mine and it came with a Craftsman Belt/Disc sander and all the accessories. Including some "C" shaped attachments that I don't what they are for?
He did come down to $100 w/o the mitre, but I think that's too much.
Maybe I should ask him to bundle the grinder in, but I don't know what's a good price?
BlueHeart
Well-known member

BlueHeart
Well-known member
bubinga
Well-known member
that is quite reasonable.Block parts always show up on Ebay... here's a listing for $15 shipped.
https://www.ebay.com/itm/Vintage-Cr...056726?hash=item41dcd89916:g:cOYAAOSwz~paJFuP
Metal Epoxy has worked for me on a similar crack on a cast aluminum Block.
+1
You can fill the hollow void behind that crack with epoxy. It will be fine.
Rileysan
Well-known member
Torqueman, I know you've posted this information before, but I can't search the forum using the browser on my phone. I'm looking for high quality 7" & 8" wire wheels. Would you mind posting that here again?
Thank you!
Thank you!
trijeff
Well-known member
I'm sure they're not the absolute best out there, but the Kobalt 8inch from Lowes is about a million times better than the porcupine creating HF cr@p. I did some pretty ******** wheeling and I don't think it even lost one wire. After using the HF there is wires everywhere ... in me, on the floor, etc. Night and day performance difference, really not that big of a price difference.
EOC_Jason
Well-known member
Torqueman, I know you've posted this information before, but I can't search the forum using the browser on my phone. I'm looking for high quality 7" & 8" wire wheels. Would you mind posting that here again?
Check eBay for Osborn, Weiler, and one other USA company I can't think of right now... You can usually find a good 8" USA made wire wheel for ~$20 shipped or less... They don't shed wires like chinese ones...