To avoid these ads, REGISTER NOW!

Above 1200 Sq/FT Restored 1930's Auto Shop

Wokspaces above 1200 squarefeet.
OP
B

BB767

Well-known member
Joined
Dec 24, 2009
Messages
3,724
Location
Philo, IL
There is a on-going post in the Hot Rod Forums regarding the 2010 Power Tour and the Route. It includes maps and other information.

http://forums.hotrod.com/70/7593835/power-tour/2010-power-tour-countdown-maps-pictures/index.html

One of the posts (page 3 I believe) links to a map with the "unofficial" route:

http://maps.google.com/maps/ms?hl=en&ie=UTF8&msa=0&msid=102712979471276098324.00047697ac57046659354&ll=41.017211,-90.703125&spn=3.303079,6.28418&z=8

I hope this helps!

I plan to be in Springfield on Sunday, June 6 to watch the cars roll into town and spend the day gawking at everyone's rides!

Perfect, thanks rrudd2. That should help other folks too.

Thomas
 
To avoid these ads, REGISTER NOW!
OP
B

BB767

Well-known member
Joined
Dec 24, 2009
Messages
3,724
Location
Philo, IL
Thomas, what was the most modern thing/item you found in the shop? The Pepsi-Cola?

What a great question! I really had not thought of that till now. Excepting car parts and just considering shop items or equipment a couple things come to mind right away. One is a 30 ton press.


LiftRmSE2005sm.jpg


Here it can be seen to the left behind the go kart, which is standing on end, front wheels pointed right.

30TonPresssm2.jpg


This is it freed a last in "as found" condition.

30TonPresssm1.jpg


I equipped it with a hydraulic jack controlled by air. I used this to install "C" clip eliminators on the rear axle of the Chevy II among other things. Judging from the decal with the American flag I'd say it's from the late '60's or early 70's. Like the Wilton horizontal band saw, the press functions as is so I haven't cleaned it up as yet. I'll be getting to it......one of these days!

Thomas
 

Hiball

Well-known member
Joined
Apr 30, 2009
Messages
14,027
Location
Missery
Hello Thomas, Little update on your jacks. I have the First one completely done and Load tested. I have the second one completely dismantled and currently soaking in some Simple Green/Water Mix. I didnt find any suprises or pieces that needed to be Replaced etc. I expect to be installing the next kit when i get back from work probably Friday or so. I will follow up with some pics next time im at the shop.

Steven
 

Alcohol

Well-known member
Joined
Sep 26, 2007
Messages
92
What a great question! I really had not thought of that till now. Excepting car parts and just considering shop items or equipment a couple things come to mind right away. One is a 30 ton press.


LiftRmSE2005sm.jpg


Here it can be seen to the left behind the go kart, which is standing on end, front wheels pointed right.

30TonPresssm2.jpg


This is it freed a last in "as found" condition.

30TonPresssm1.jpg


I equipped it with a hydraulic jack controlled by air. I used this to install "C" clip eliminators on the rear axle of the Chevy II among other things. Judging from the decal with the American flag I'd say it's from the late '60's or early 70's. Like the Wilton horizontal band saw, the press functions as is so I haven't cleaned it up as yet. I'll be getting to it......one of these days!

Thomas
Thomas,,I currently use a press just like this today,,bought it new off of one of those machinery jockey's who travel around the country with a pickup full of stuff....bought it in 1980 new for $200
 
OP
B

BB767

Well-known member
Joined
Dec 24, 2009
Messages
3,724
Location
Philo, IL
Thomas,,I currently use a press just like this today,,bought it new off of one of those machinery jockey's who travel around the country with a pickup full of stuff....bought it in 1980 new for $200

Alcohol thanks for that. It's from North American Tool Co. I have never heard of them. It was used in the manufacture of some VERY heavy duty trailers (see below) that were manufactured in the shop starting in 1976. Don't know exactly when it was purchased. I was told the first time it was used the whole upper press cocked sideways.

30TonPresssm1.jpg


Take a look and you'll see that they had to "beef up" the upper press with some diagonal bracing to prevent it from cocking sideways. Those are the rusty, unpainted angle iron struts just on either side of the jack. They beefed it up in other areas too and now it functions perfectly.


TrailersJWS2sm.jpg


Here is an original photograph taken of the first one of the trailers they made and used the press for. Don was the mechanic in the shop and extremely talented. He was the force behind the manufacture of these trailers.

TrailersJWSsm11.jpg


This is another style they made. This is parked on the road in front of the house, shop to the left out of frame. Orange paint over spray was seen on parts of the outside wall of the shop in spots behind the Terraplane until I removed it. I also found vestiges of orange on some of the equipment. Don was killed in an accident a year or two after this and everything in the shop started to ramp down from that time on.


Thomas
 
Last edited:
OP
B

BB767

Well-known member
Joined
Dec 24, 2009
Messages
3,724
Location
Philo, IL
Here are some follow up pictures.

FlatHeadPartssm3.jpg


A bushel basket full of flat head V8 parts. These belong to the previous shown engine.

FlatHeadPartssm1.jpg


Just some of the NOS parts found with it. These are electrical parts, a coil and a set of points.

FlatHeadPartssm4.jpg


I looked in the oil pan and inside the crumbling box is where the valve train parts were. There is a large tub full of more parts for this engine that I haven't looked in yet.

BellHouseAnsensm1.jpg


For you old school drag racers you'll recognize this.

BellHouseAnsensm2.jpg


It's an Ansen scatter shield.

BellHouseAnsensm3.jpg


NHRA ( National Hot Rod Association ) APP (Approved). Certified old school racing parts.

BellHouseAnsensm4.jpg


It probably dates from the early 60's. Guessing it's for a Chevy.

BellHouseAnsensm5.jpg


This was used as a safety device. Normal bell housings are made of aluminum. This is steel. It will better contain the flying parts in case a flywheel or clutch explodes in racing applications.

BellHouseAnsensm6.jpg


The lip on the bottom helps to corral flying parts and contain them within the scatter shield. I use a Lakewood scatter shield on my present Chevy II. Your feet and legs are very vulnerable to injury because of the close proximity to the flywheel and clutch. My chief pilot would take a very, very dim view of me calling to tell him of my unavailability for a while because of a racing......um, incident. :rant:
I also found what appear to be Halibrand magnesium wheels with white wall, pie crust racing slicks. I'll get some pictures of them once I work my way over there.

HouseJacksm1.jpg


A better view of the house jack.

HouseJacksm2.jpg


Close up.

I've now got some good pictures of the trip hammer ( remember it? ) which I'll get on here shortly.

Thomas
 

STORMEASTON

Well-known member
Joined
Sep 8, 2009
Messages
304
Location
Foggy Bogg, Wisconsin
There is a on-going post in the Hot Rod Forums regarding the 2010 Power Tour and the Route. It includes maps and other information.

http://forums.hotrod.com/70/7593835/power-tour/2010-power-tour-countdown-maps-pictures/index.html

One of the posts (page 3 I believe) links to a map with the "unofficial" route:

http://maps.google.com/maps/ms?hl=en&ie=UTF8&msa=0&msid=102712979471276098324.00047697ac57046659354&ll=41.017211,-90.703125&spn=3.303079,6.28418&z=8

I hope this helps!

I plan to be in Springfield on Sunday, June 6 to watch the cars roll into town and spend the day gawking at everyone's rides!


Look for the 05 Mustang two tone gray/black, that will be us and be sure to wave!
 

Leevon

Well-known member
Joined
Mar 23, 2007
Messages
215
Well, all I can say is WOW and a sincere Thank You for the inspiration. I am going to turn the TV off and get back into my garage. :bowdown:
 
OP
B

BB767

Well-known member
Joined
Dec 24, 2009
Messages
3,724
Location
Philo, IL
Now I will discuss among other things how the walls were taken from the bare block to the finish interior surface as well as other various aspects of the rebuild.

Northrm06sm1.jpg


This is the north room in early 2006. This is after everything has been cleared out, new windows have been installed.You can see how the windows were shorten up by two blocks worth. Shorting them up kept them above the new bench back splash and provided a space where I could put electrical outlets between the bottom of the window and top of the bench.. The top of the concrete block wall is 8' tall. The new lumber at the top of the pictures is where we moved the rafters up 2' as previously discussed. To provide a means of attachment for the FRP wall board we built conventional 2 X 4 framing inside. I did use pressure treated wood for the floor plate which was anchored to the concrete by tap-cons.

NorthRmShop2sm.jpg


Here is the same space with the FRP installed. I've checked and I do not have any photographs showing the walls framed and no FRP installed but it's completely conventional, nothing unusual to show. Guess that's why I didn't take any pictures! You can see shorting up the windows gave me wall space under them for outlets. Notice that the overhead door tracts are above the new ceiling height of 10' which resulted in the ceiling in that space needing to be raised even higher.

NorthRmRaisedCeiling1.jpg


Reverse angle view of the ceiling. The ceiling needed to be " stepped " higher to clear the 12' X 12' overhead door in this area. That's the door opener in the center.

NortnRm10sm1.jpg


This is the same space currently. Electrical outlets are at the 4' level.

FabRm05sm1.jpg


This is the fab room early 2006 looking into the north room. The broom to the left center is leaning on the wall of the original shop which separates the fab room from the north room. The top of that wide doorway in the center is 8' tall and the new ceiling rafters show that the ceiling has been raised by 2 '. Red handed broom to the right is where the Pepsi machine will stand. Lines on the floor are grinding marks in preparation for the floor tile.

FabRmMid1sm.jpg


I've posted this picture before but it works well in conjunction with the one above it. The dark area on the left is the backside of the original shop wall. Light area in the center is where a window used to be.

NWChevyIIsm.jpg


This is the space as finished, picture again previously posted.

LiftRm12sm.jpg


This is the lift room in spring of 2006.You can see some of the framing under the FRP by the windows and doorway. The wire hanging down by the left is one of the speaker wires for the ceiling speakers. Yellow romex wire over the doorway is for ceiling light fixture.

Liftrm10sm3.jpg


The same space finished and in use, 2010.

LiftrmWidow10sm1.jpg


Here's a close up of the window detail. Windows are non opening, insulated glass. The wide sills resulted from a combination of concrete block walls and 2 x 4 framing. It's handy space as long as you don't let " clutter " accumulate on them. To keep the wide sills from possibly sweating from condensation due to it's close proximity to the concrete block, I used 1" high density Styrofoam board under the FRP all around the window openings.
More material is being prepared..........:D

Thomas
 
OP
B

BB767

Well-known member
Joined
Dec 24, 2009
Messages
3,724
Location
Philo, IL
Well, all I can say is WOW and a sincere Thank You for the inspiration. I am going to turn the TV off and get back into my garage. :bowdown:

Welcome to the thread Leevon. Way to go! Turn that TV off and make/do something with your hands!! My wife and I haven't watched commercial TV in years. We've also never had cable and have no plans for it. Blame or credit my parents for that. I was raised being told TV will rot your brain, really.:wtf: As a kid I never believed them but I sure do now. I would never have accomplished what I have if I'd watched it.

Thomas
 

klogan121

Well-known member
Joined
Jan 23, 2010
Messages
113
Location
Linden, MI
Welcome to the thread Leevon. Way to go! Turn that TV off and make/do something with your hands!! My wife and I haven't watched commercial TV in years. We've also never had cable and have no plans for it. Blame or credit my parents for that. I was raised being told TV will rot your brain, really.:wtf: As a kid I never believed them but I sure do now. I would never have accomplished what I have if I'd watched it.

Thomas

There are some good shows on TV, its not all garbage.:shocking: I enjoy DIY shows, auto-related shows (Gearz, Trucks, Horsepower TV). Stacy David, who hosts Gearz (on Speed channel) is a great auto mechanic/fabricator who encourages his audience to get in the shop and build something... anything, because that is what it is all about!! :thumbup:
 

Chevelle69

Member
Joined
Feb 28, 2010
Messages
11
Location
Hull, Illinois
There is a on-going post in the Hot Rod Forums regarding the 2010 Power Tour and the Route. It includes maps and other information.

http://forums.hotrod.com/70/7593835/power-tour/2010-power-tour-countdown-maps-pictures/index.html

One of the posts (page 3 I believe) links to a map with the "unofficial" route:

http://maps.google.com/maps/ms?hl=en&ie=UTF8&msa=0&msid=102712979471276098324.00047697ac57046659354&ll=41.017211,-90.703125&spn=3.303079,6.28418&z=8

I hope this helps!

I plan to be in Springfield on Sunday, June 6 to watch the cars roll into town and spend the day gawking at everyone's rides!

Thanks so much for the info, it really helps. Unfortunately the Power Tour is not going to be as close to me as I'd hoped......Oh well, the old station needs more work to be presentable, anyway. Hope to get pictures of it and the new shop on here soon. Thanks again!!!!:beer:
 
OP
B

BB767

Well-known member
Joined
Dec 24, 2009
Messages
3,724
Location
Philo, IL
There are some good shows on TV, its not all garbage.:shocking: I enjoy DIY shows, auto-related shows (Gearz, Trucks, Horsepower TV). Stacy David, who hosts Gearz (on Speed channel) is a great auto mechanic/fabricator who encourages his audience to get in the shop and build something... anything, because that is what it is all about!! :thumbup:

I know I was a little harsh and was just kidding about the rotting brain part. No doubt there is wonderful and educational stuff on the tube. In fact these days there may be TOO much good stuff. One good program leads to another and another etc and before you know it hours have gone by. Some people use it as a means to relax, great. It comes down to a personal choice I guess. Instead of watching somebody do something I'd rather BE that somebody doing something. Time in the shop is what I do to relax, because that is what it is all about. Truly not trying to be judgmental and I'm sorry if it came across that way. Thanks for taking a moment to take me to task. :)

Thomas
 

klogan121

Well-known member
Joined
Jan 23, 2010
Messages
113
Location
Linden, MI
I know I was a little harsh and was just kidding about the rotting brain part. No doubt there is wonderful and educational stuff on the tube. In fact these days there may be TOO much good stuff. One good program leads to another and another etc and before you know it hours have gone by. Some people use it as a means to relax, great. It comes down to a personal choice I guess. Instead of watching somebody do something I'd rather BE that somebody doing something. Time in the shop is what I do to relax, because that is what it is all about. Truly not trying to be judgmental and I'm sorry if it came across that way. Thanks for taking a moment to take me to task. :)

Thomas
I agree with you to though that there is a lot of garbage on TV... reality shows, news (especially cable). A DVR comes in handy for us, record a show, if it *****, delete! Plus, I can fast forward all the BS commercials. :bounce: Like you, I would rather be out in the shop or yard doing something rather than be stuck to the couch! :spit:

Kevin
 
OP
B

BB767

Well-known member
Joined
Dec 24, 2009
Messages
3,724
Location
Philo, IL
Absolutely beautiful! Before AND after!

Well thank you CreteCoater. I'm well aware that there was a certain charm to the original shop and in it's own way a pretty cool place to look at. However as a place to do work, in any kind of a timely basis, it was awful. Back then besides being physically uncomfortable with poor lighting, unsecured etc I personally like it now sooooo much better. Each has its own merits but as a work space I'll take it as it is now, hands down, no question. Maybe that means I'm getting to be old and like my creature comforts I don't know. :dunno: Did the best I could to strike that balance between preserve the old and work with the new.

Thomas
 
To avoid these ads, REGISTER NOW!
OP
B

BB767

Well-known member
Joined
Dec 24, 2009
Messages
3,724
Location
Philo, IL
Sad to see you have to put security bars on the windows and doors....

Fubar, you know it really is sad isn't it?? Originally I wasn't going to do much. Where I live it's just never been a problem in the 50+ years I've lived here. But just before I started to bring in equipment there was a rash of break-ins and thefts of equipment in a couple of towns and several farms nearby. ( they have since been caught are in a correctional institution, so to speak) Some places were hit multiple times. It never happen in my town but it was near enough that I felt it would be unrealistic to think it wouldn't or couldn't happen here. That resulted in consulting with friends in law enforcement, security companies etc. I came up with ways that aren't too onerous or physically clumsy and yet still effective. You can do just so much. That's the way of the world I'm afraid.

Thomas
 
Last edited:

Yonnee

Active member
Joined
Aug 6, 2008
Messages
38
Location
Beyond Cranbourne, Vic. Australia
I too live in a small town, and while you would think that there wouldn't be anyone in the town that would do such a thing, we're close enough to neighbouring larger towns, and the outskirts of a major city, that we have to realise that these low-life's can and do travel. I purposely have not put windows in my shed for this very reason.

And I'm still very much enjoying this thread Thomas. And I read that Chris' is now doing a framing course just to put up "before pics" around the shop as I suggested. :thumbup: You two just don't do things by halves, do you? :lol:
 

Rudyjr

Well-known member
Joined
Dec 28, 2009
Messages
555
Location
Central Ohio
Thomas, I have been trying to follow this thread and I am sorry if this question has been asked before. Can you give me any information (source &approx cost)on the FRP that you used on the walls and ceilings of the shop. I really like the look and the way that it reflects the light. Thanks, Jim
 
OP
B

BB767

Well-known member
Joined
Dec 24, 2009
Messages
3,724
Location
Philo, IL
Thomas, I have been trying to follow this thread and I am sorry if this question has been asked before. Can you give me any information (source &approx cost)on the FRP that you used on the walls and ceilings of the shop. I really like the look and the way that it reflects the light. Thanks, Jim

Hi Jim and thanks for trying to follow the thread! I've kind of jumped all over with the information I'm afraid. No need to be sorry at all for asking the question. The cost of the FRP panels I used was around $65.00 per panel, delivered, give or take. This was for 1/2", 4' X 8' on OSB. I got mine from my local lumber yard,and any lumber yard should be able to supply it. Remember I used Fiberglas Reinforced Panels, not plastic. There is similar appearing material for 1/2 that cost but it's not Fiberglas and not nearly as durable. Do a web search and you'll readily find information on it. If you want, I will post contact information for the company my lumber yard got this material from.
If you search this thread long enough you'll also find the post on the panels and what I have done on this and past projects to install it.This is the third building I've used it in and plan on using it in the garage of my retirement home when I build it. It's great material, though up front pricey.

110Garagesm2.jpg


This is the first project I used it on in 2004, the year before I restored the shop. This building has 9' tall walls.

110Garagesm1.jpg


Reverse view of the same building. Note the reflections on the ceiling in both pictures. The panels have a high gloss finish. Great for light reflectivity! Jim if you need more information and or can't find the post regarding the FRP and it's installation, please let me know. We're all friends here and we all help each other out to everyone's benefit, right. :thumbup:


I also think it would be helpful if I put an index together for finding various posts in this thread. This would help everyone including myself find material in here!
More material is on the way............

Thomas
 
Last edited:

Boosted1

Well-known member
Joined
Nov 25, 2007
Messages
1,679
Location
Georgetown, KY
BB767
I have asked about this material before and also am more interested.
Another question I have is install method. You mention FRP on OSB. However, I don't see any fasteners so I assume the OSB is screwed to studs first, them the FRP panel glued? Is that right?
Thanks
 
OP
B

BB767

Well-known member
Joined
Dec 24, 2009
Messages
3,724
Location
Philo, IL
BB767
I have asked about this material before and also am more interested.
Another question I have is install method. You mention FRP on OSB. However, I don't see any fasteners so I assume the OSB is screwed to studs first, them the FRP panel glued? Is that right?
Thanks

I checked with my local lumber yard and they get FRP from a distributor called "Nudo" phone # 1-800-862-4132. Nudo doesn't make FRP, they are a distributor for it. They should be able to tell you where you can get it locally.

As for installation, it comes already laminated . On this thread, look on page 17, Post #326 and you will see several pictures with scraps of FRP leaning against walls with the Fiberglas side up or the OSB side up. On page 27, Post #539, sixth picture in the bathroom shows the FRP installed but not trimmed out and the screw heads clearly shown at the edges of the panels. A "T" trim strip is then installed to hide the screw heads.The panels can also be glued on with Liquid Nails or fastened in the middle of the panel with a product called a " Drive Rivet " which I get from the same place as the panels.

DriveRivitssm1.jpg


I fastened all the panels on the various ceilings by gluing them and with Drive Rivets used down the middle of each panel and screws on the edges. Here you can see what the Drive Rivets look like installed. The heads of the Drive Rivets are the 3 little white bumps seen down the center of the panel to the left of the ceiling fan. You can also see the "T" trim strips installed which cover the screw heads along the edge of each panel.
If anyone needs more clarification on installation please ask. That's what the purpose of my posting the shop restoration in the first place was for, to share information. If you have questions , there are many others who do also. Thanks for your continued interest. :thumbup:

Thomas
 
Last edited:

Boosted1

Well-known member
Joined
Nov 25, 2007
Messages
1,679
Location
Georgetown, KY
Thanks. That is what I was looking for. I knew the edges were trimmed, but I was wondering about fastening other that the edge for a 4 x 8 sheet.
 
Last edited:
OP
B

BB767

Well-known member
Joined
Dec 24, 2009
Messages
3,724
Location
Philo, IL

That looks like it. As you can see there are several options for the core material, thickness and size that the Fiberglas is laminated to. I specified OSB ( Oriented Strand Board ) for my core material but you can get plywood, wafer board, plastic sheets etc. In my first building I had 9' walls so I used 1/2", 4' X 9' OSB. Contact the Nudo folks and I'm sure they can advise you for your needs.

Thank Titus for posting that. :thumbup:

Thomas
 
OP
B

BB767

Well-known member
Joined
Dec 24, 2009
Messages
3,724
Location
Philo, IL
For those who have stuck with me so far, here are better pictures of trip hammer that was used in blacksmith work. For you blacksmith aficionados, now is the time to speak up. I don't have much information on this, other than it worked. I doubt that I'm using the correct terminology for the various parts. :dunno:

TripHamersm1.jpg


This is the jaw that moved up and down.

TripHamersm2.jpg


The upper pulleys and flat drive belt.

TripHamersm3.jpg


Stepping on this bar engaged the pulleys to power the hammer.

TripHamersm4.jpg


Side view of the pulleys and flat drive belt.

TripHamersm5.jpg


TripHamersm6.jpg


TripHamersm7.jpg


This is the base that held the lower jaw. It was bolted to the shop floor. Made by Novelty Iron Works, Dubuque Iowa

TripHamersm8.jpg


Base again. I have no idea as to the age of the hammer. Before 1900?? It is all my John Deere tractor can do to lift the base. I'm guessing 600 + lbs.

LineShaftsm1.jpg


This is the overhead line shaft used to power both the trip hammer and the camel back drill press. The line shaft was powered by a belt from an electric motor.

LineShaftsm2.jpg


I'm not a blacksmith, nor do I want to become one. These will need new homes at some point. Ebay I suppose.

Thomas
 

Adam McLaughlin

Well-known member
Joined
Oct 13, 2008
Messages
1,843
Location
Santa Rosa, CA
I just have one question here:

How did you get all of this great hardware? Didn't any of the family members want to pick through the pile of things and take what they wanted? Wasn't there six kids, one of whom was a ham and a E.E.? Those people usually have a keen interest in tools, hardware, etc. as they are hands-on do-er types.

I am very surprised that none of the family members wanted to keep some of this

Adam
 

BrokeEF

Well-known member
Joined
Dec 24, 2008
Messages
341
Location
Elgin, IL
From what I remember he let the family have first shot at anything they wanted before he started. Some of them took some good things, but there was such a large amount of stuff that he got left with some gems.

Sean
 
OP
B

BB767

Well-known member
Joined
Dec 24, 2009
Messages
3,724
Location
Philo, IL
I just have one question here:

How did you get all of this great hardware? Didn't any of the family members want to pick through the pile of things and take what they wanted? Wasn't there six kids, one of whom was a ham and a E.E.? Those people usually have a keen interest in tools, hardware, etc. as they are hands-on do-er types.

I am very surprised that none of the family members wanted to keep some of this

Adam

From what I remember he let the family have first shot at anything they wanted before he started. Some of them took some good things, but there was such a large amount of stuff that he got left with some gems.

Sean

You are correct BrokeEF. I asked the family to go through everything in all buildings. I never suggested that I'd like them to leave so and so tool or equipment. I wanted them to feel free to remove whatever they wanted and I would be happy with what was left. I guess I should have been a little more clear when I used the term "kids". The oldest son, the E.E., at that time was in his 70's, and in a care giver home in poor health, while the youngest, my buddy, was in his 50's. The term "kid" is a relative thing! There was a lot of material, equipment removed. Keep in mind that there just was a lot there. There is also the possibility that with most everything buried, it was not worth the effort to dig it out. To get to the trip hammer for example, it took my son and I a few weeks to finally reach it while cleaning out the fabrication room.

Thomas
 

oberst

Well-known member
Joined
Jan 8, 2008
Messages
205
Thanks again for taking the time to show us this time capsule - what is the story with the wood drying by the line shaft? Looks to be clear fir or something nice like that?
 

Stuart in MN

Well-known member
Joined
Sep 8, 2005
Messages
23,089
Location
Minneapolis
http://www.metalmeet.org/ may be a good place to market that trip hammer, those guys are always looking for vintage metal working equipment.

Jesse James recently started a series of videos on his website about metal forming and shaping, showing how to build motorcycle gas tanks, etc. They're pretty good, without all the baloney that was included on the Discovery TV shows, and you can see all the different types of old metalworking machines he has in his shop. Among all the other machines I'm pretty sure he has a trip hammer very similar to that one.

edit: A couple guys asked just where to find those videos on Jesse's site so I figured I'd post it here in case others have the same question: The videos are in the Rant forum section, he calls them Metal Church. It looks like there's five episodes so far, but you have to sign up to get in the forum. However, it looks like they're on Youtube as well - go there and do a search on 'Jesse James Metal Church'. and they all pop up.
 
Last edited:

Rudyjr

Well-known member
Joined
Dec 28, 2009
Messages
555
Location
Central Ohio
Thomas, Thanks for all of the info on the frp. This thread is some of the most enjoyable reading I have ever encountered on the internet. It is truely amazing to see someone who appreciates history like you do.
 
OP
B

BB767

Well-known member
Joined
Dec 24, 2009
Messages
3,724
Location
Philo, IL
The original air lines were iron pipe and the air compressor in the shop when I bought it was a single stage, 60 gallon vertical unit. It was operating fine and a son took that for his home shop. Since I was going to use a bead blasting cabinet I knew I would need a large air source.

AirCompsm1.jpg


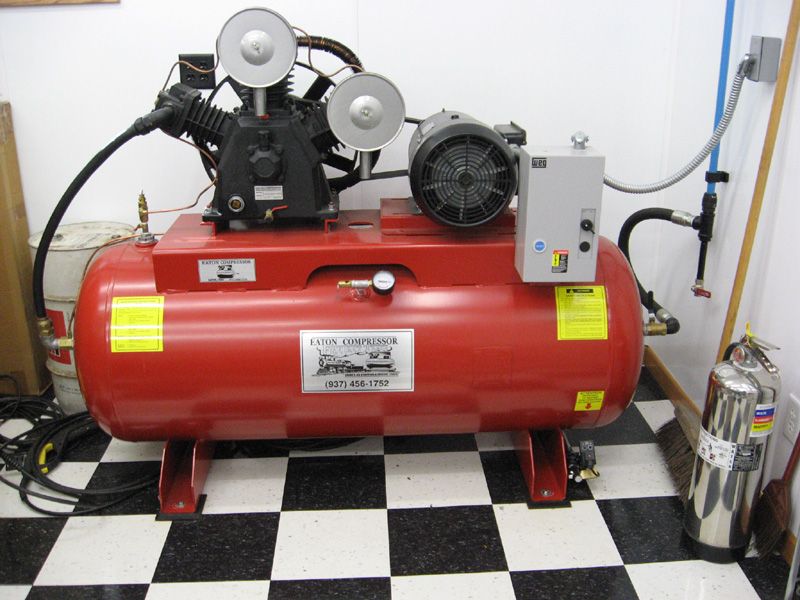
This is what I decided on. Made by Eaton in Ohio, single phase, 10HP, 3 cylinder, 120 gallon. Go to their web site if you want more info. Suffice it to say it's a rugged unit made to be serviced when the time comes and has a host of clever features. Two that really attracted me was the fact that it runs at half the rpm than on most compressors, turning only 1750 rpm. That helps the pump run cooler, last longer and is much quieter in operation at 73 db. The other is a run on feature which is useful when I'm bead blasting or otherwise using large volumes of air. With this feature engaged the electric motor never turns off, but the valves on the pump open so that it's not pumping. When air in drawn down the valves reengage and it starts pumping again. Cycling on and off this way continuously. The advantage of doing this is that you're not starting and stopping the electric motor. That is what most of the electrical draw is from, starting the motor up. It takes very little power to run the motor with the pump free wheeling.

AirLinesm17.jpg


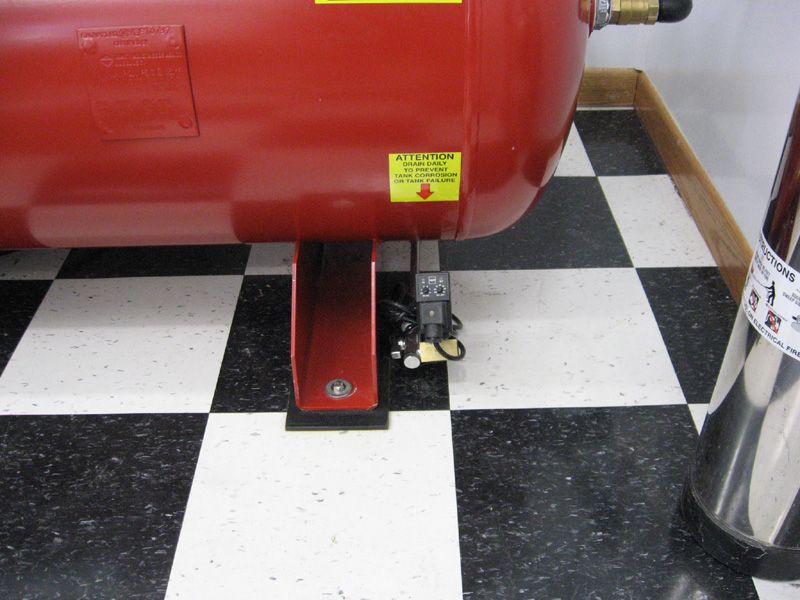
The air compressor also featured an auto drain on the tank. This unit automatically purges water from the bottom of the tank on a schedule that can be set up on this unit. It can be set to how often ( every 5 minutes or every hour etc. whatever you want) and for what duration ( 1 second purge, or 5 sec, 20 sec etc. )

AirLinesm2.jpg


To connect the pump to the shop air line I had a local hydraulic shop make up a short flexible line. It's 1" ID ( inside diameter)

AirLinesm3.jpg


I put a drain valve right at the bottom of the first vertical line.

AirLinesm4.jpg


At Eaton's suggestion I hung the first 20' of horizontal line with a slight slope back to the tank. Almost all the moisture will condense in this amount of line and then run back to the tank where the auto drain will purge it from the system. It's important to drain water out of the tank frequently and doing it this way makes it seamless and hassle free. I'm not doing any painting with this system so this is all the water separator I need.

AirLinesm5.jpg


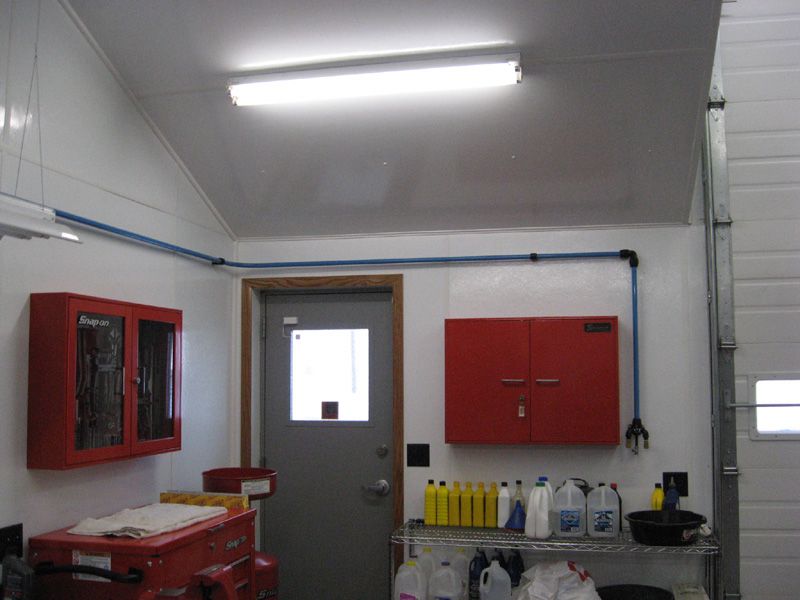
This is across the room from the compressor.

AirLinesm6.jpg


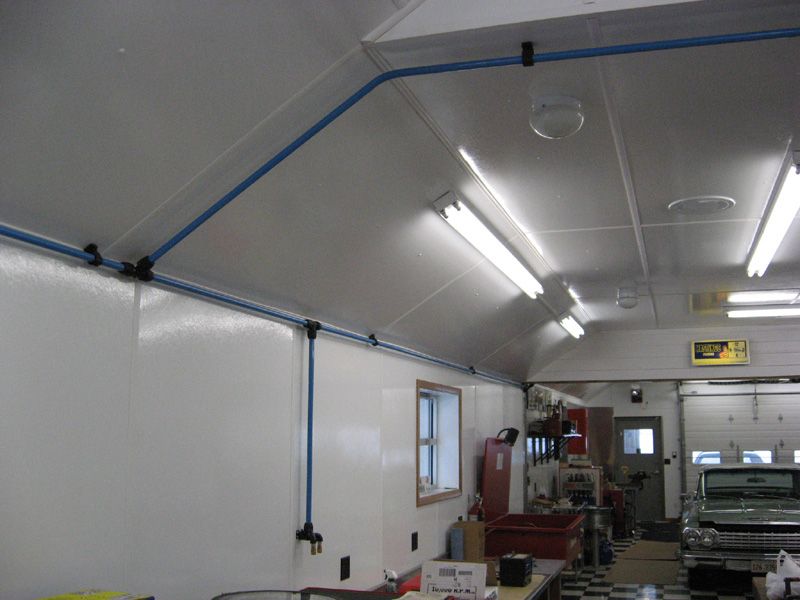
As the air line moves toward the other end of the shop. This is German made, powder coated aluminum pipe as previously discussed. You can bend it with a conduit bender. This is a link to the manufacturer, curtsy of Shocker from page 15, post #299, thank you sir. :thumbup:
http://www.transairaluminumpipe.com/

AirLinesm7.jpg


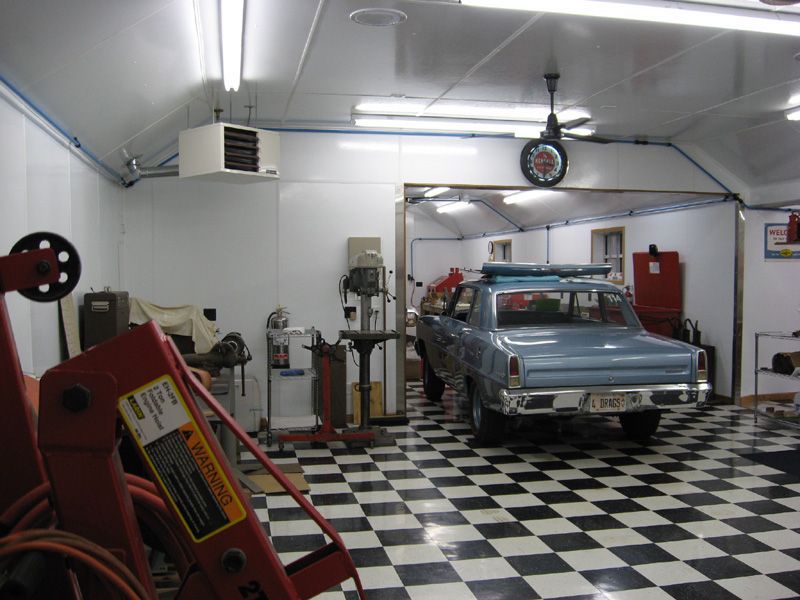
As the air line enters the fab room on the right.

AirLinesm8.jpg


Notice you can't see any writing on the air line anywhere. I made sure to turn the printing toward the wall. I just like the cleaner look.

AirLinesm9.jpg


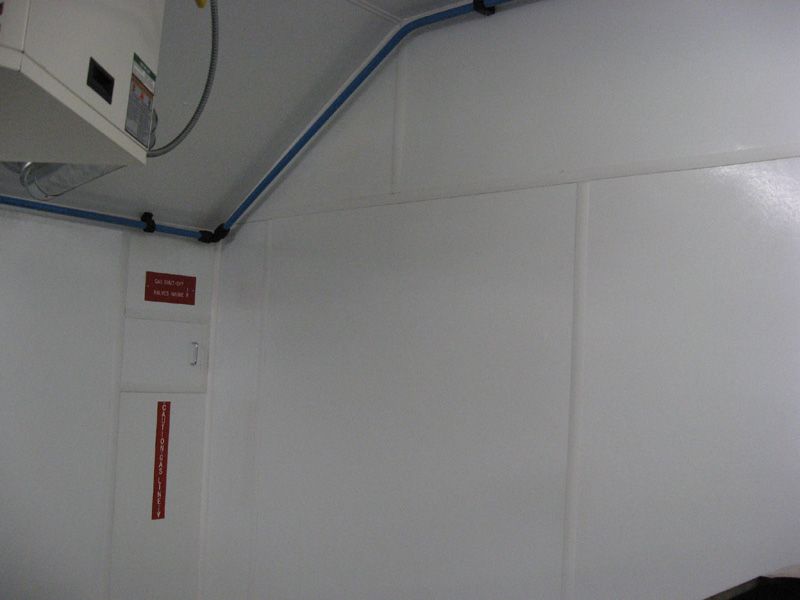
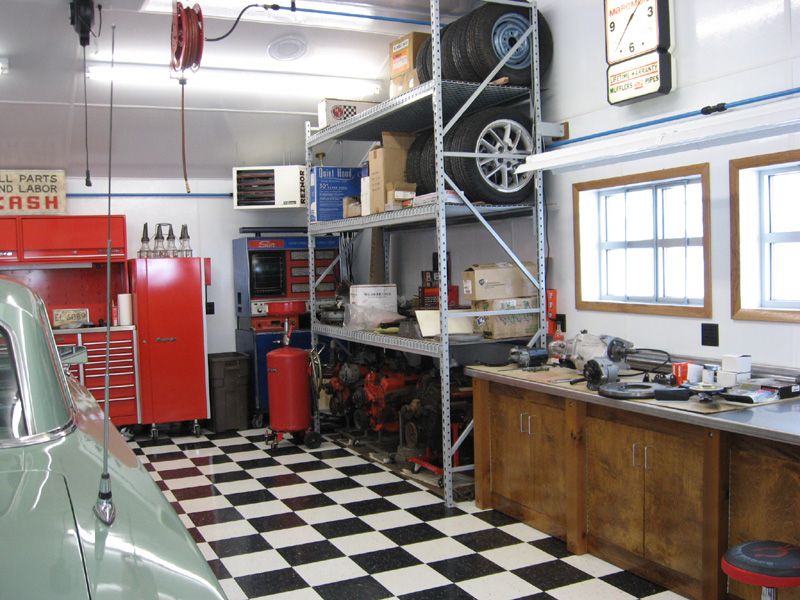
A closer look at some shop details while we're here.This is where the furnace gas lines and valves are located. In case I'm hit by a bus and can't pass this information on to the next occupant of the shop they won't go drilling holes on the wall around here........ I hope! :eek:

AirLinesm10.jpg


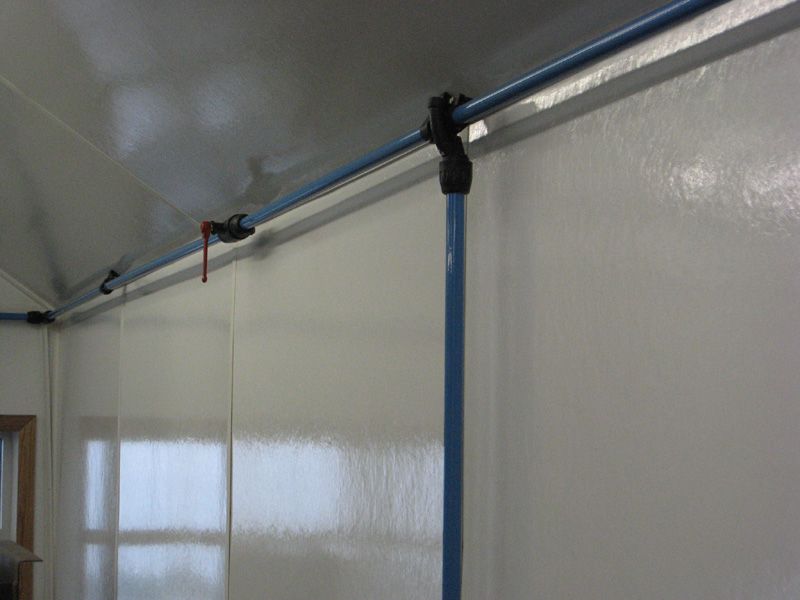
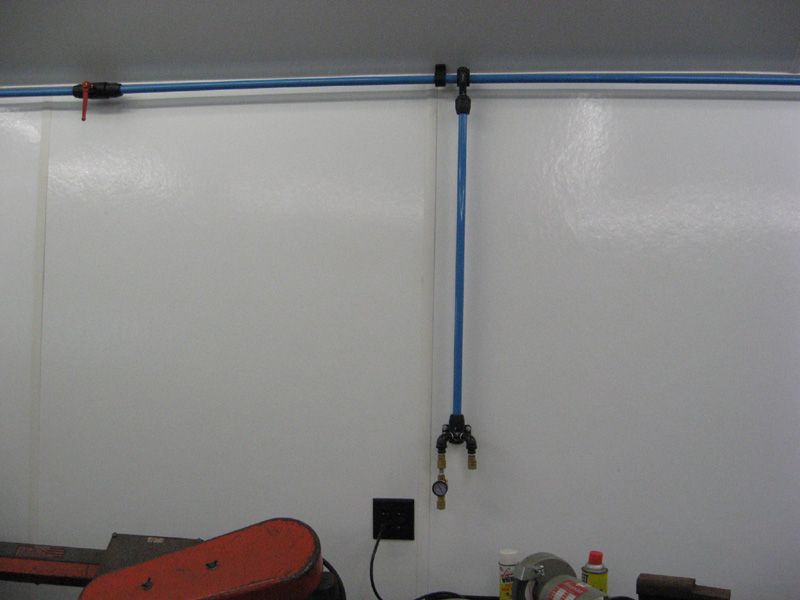
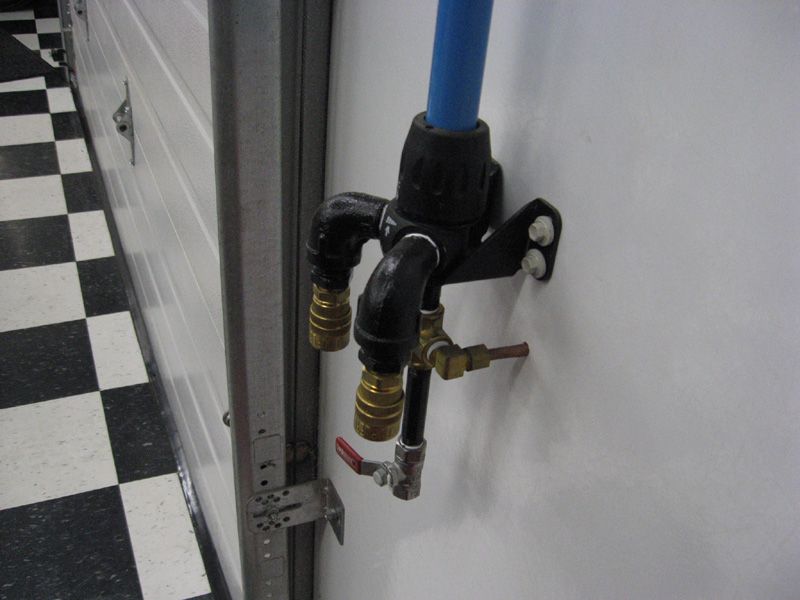
One feature of this air line system is that for the drops, it takes air from near the top of the horizontal line. Any water that might be in the line travels along the bottom of the horizontal line and doing it this way prevents water from going down the drop into your air tool. Nice.

AirLinesm11.jpg


On all the drops I used a double outlet. The increased cost was only fractionally more so why not? :dunno:

AirLinesm12.jpg


Here is a close up of how I ran air through the wall to my outside wall mount 1953 ECO Air Meter. Since this is the end branch of a line I put a drain on it.

AirLinesm13.jpg


This is how it enters the lift room.

AirLinesm14.jpg


AirLinesm15.jpg


Look closely and you'll see polished, stainless steel acorn nuts holding the hose reel to the ceiling. Well why not?

Airlinesm16.jpg


The end of the line so I installed another drain line.

For better or worse, thread to be continued........

Thomas
 
OP
B

BB767

Well-known member
Joined
Dec 24, 2009
Messages
3,724
Location
Philo, IL
Thanks again for taking the time to show us this time capsule - what is the story with the wood drying by the line shaft? Looks to be clear fir or something nice like that?

You guys notice everything don't you?! :D That is a few hundred board feet of some nice clear, cherry lumber. I had the same Amish mill that did the oak inside the shop saw the logs. This stash belongs to my son. I happen to have a fairly complete wood shop at another location full of old machines.

Jointersm2.jpg

This is a Yates American 16" jointer. It has a 4 knife cutter head. The in feed and out feed tables are 4' long each. You get pretty straight boards that way. Weights approximately 2,150 lbs, all cast iron construction, making it very stable.

Jointersm1.jpg


The jointer was manufactured in 1944. My electrical panel in the background turns the shop 220V 3 phase into 440/480V 3 phase. We are the second owners. Bought it and the planer at auction from the foundry where it was installed new in 1944. They both were used in the pattern makers shop.

Planersm1.jpg

This is the Yates American 18" planer as purchased.

Planersm2.jpg

I did the restoration of this and the jointer in 1980.

Planersm3.jpg

How it turned out. 3 phase, 7.5 HP, 480 volt. Yates American is still in business and helped me with the paint colors so I could restore these machines back to as new. The oldest power machine in the shop is a Delta unit from 1928, still with it's original paint, decals and motor. It seems my love of all things old knows no bounds! :dunno:

You guys got me off topic....... again. You can see I'm easily led astray! :bounce:


Thomas
 
To avoid these ads, REGISTER NOW!
Top Bottom