
You are using an out of date browser. It may not display this or other websites correctly.
You should upgrade or use an alternative browser.
You should upgrade or use an alternative browser.
Above 1200 Sq/FT T.h.e...e…x….p…..a……n…….s……..i………o……….n
- Thread starter MAYOR28
- Start date
Wokspaces above 1200 squarefeet.
Sorry if this was explained above...but why are you chamfering the edges?
When we put the plywood upstairs, try as we might, we couldn't get all of the edges lined up nice a crisp. The chamfers accentuate the edge and hide a gaps or mismatches. The over looks is very uniform even though I know there are a lot of variations in the gaps.
Overall all, a little more work, but I really like the look so far. We'll see what it looks like with paint on it.

I has been a busy few weeks here, but with a great deal of help from the wife, I have been able to get most of the plywood up. Only the South wall is left, but I had to do some re-wiring there.
Here is the current state (you can also see the furring strips we got on the ceiling):


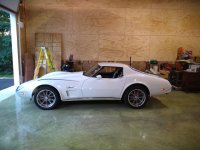
And, for the first time, the Vette is home:

...
Here is the current state (you can also see the furring strips we got on the ceiling):
And, for the first time, the Vette is home:
...
Attachments


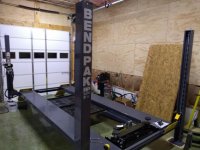
Next came the monumental task of delivering and installing the LIFT.
I had both the lift and the rest of the interior metal (ceiling & wainscoting) delivered to a local hardware store that offered to forklift it off. Once both packages had arrived, I scheduled a roll-back from a local towing company to deliver it to my house. This worked out pretty well, but the driver was not able to get the delivery into the garage, we had to settle for more stuff on the driveway for now.
Here it is at the hardware store:

Let's get this thing home!


Easy does it:

"Yeah, just set it here on this 1000lb capacity dolly." - Idiot Me

....
I had both the lift and the rest of the interior metal (ceiling & wainscoting) delivered to a local hardware store that offered to forklift it off. Once both packages had arrived, I scheduled a roll-back from a local towing company to deliver it to my house. This worked out pretty well, but the driver was not able to get the delivery into the garage, we had to settle for more stuff on the driveway for now.
Here it is at the hardware store:
Let's get this thing home!
Easy does it:
"Yeah, just set it here on this 1000lb capacity dolly." - Idiot Me
....
Attachments


Following the delivery I had scheduled the arrival of some help to assist with the erection of the lift. My friend was more than willing to trade manual labor for future Lift Time. It took us the better part of the day to get the structural bits assembled.
I plan to do a longer write up, but the short version is this:
Complete (took about 20 hours to put together and get moving):

Dog tax:

...
I plan to do a longer write up, but the short version is this:
0. Try to find the directions in your crate, fail; go print them; realize they are basically toilet paper; throw them in the trash. Watch Chappy's Garage Youtube video instead
1. Its not difficult.
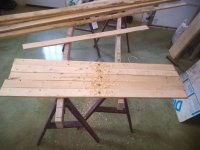
2. Have lots of scrap wood for cribbing (like lots).
3. Have an engine crane/hoist.
1. Its not difficult.
2. Have lots of scrap wood for cribbing (like lots).
3. Have an engine crane/hoist.
Complete (took about 20 hours to put together and get moving):
Dog tax:
...
Attachments

Last edited:
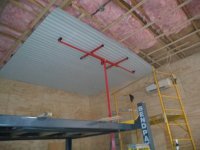
The LIFT Lives!
Setting up the final bits was rather time consuming, but I think I got it pretty well sorted. Once the truck was on it, it seems like one of the cables has a little more stretch (maybe) than the others, so the lock all aren't engaging at the same time anymore.

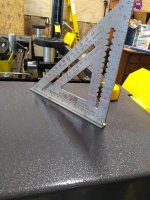
I used a 12" speed square to help level every corner. You can just barely make out the laser level in this pic:

And finally, the Vette is home:

I know the time-honored debate about bolting down these 4 post lifts. But I am curious if anyone has issues with the swaying/wobbling with vehicles on the lifts. I think I am going to bolt it down because of this wobble.....
...
Setting up the final bits was rather time consuming, but I think I got it pretty well sorted. Once the truck was on it, it seems like one of the cables has a little more stretch (maybe) than the others, so the lock all aren't engaging at the same time anymore.
I used a 12" speed square to help level every corner. You can just barely make out the laser level in this pic:
And finally, the Vette is home:
I know the time-honored debate about bolting down these 4 post lifts. But I am curious if anyone has issues with the swaying/wobbling with vehicles on the lifts. I think I am going to bolt it down because of this wobble.....
...
Attachments


I posted about the lift wobble over in the Gen Discussion forum. Not much help there yet. Anyone have suggestions?
Link to the other thread:
Bendpak 4-Post Stability
Link to the other thread:
Bendpak 4-Post Stability
Finallygotit
ALLIANCE MEMBER


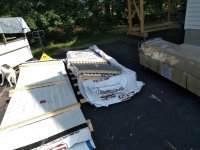
So, when we got the lift delivered, they also delivered the steel for the ceiling (both in the garage and in the loft). It has been sitting outside since the beginning of July, so I was a little worried that it would be rusted  .
.
But it did not!
Here it was on delivery day:

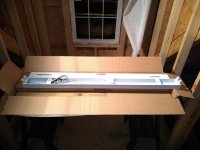
Step 0 was to add supports for the LED lights (only needed if you forget to align your furring strips to the lighting layout). I predrilled these on the ground so that I could align the holes and pull the wires through.

Step 1: Predrill the panels on the ground before hoisting over your head.
Step 2: Curse a lot, sweat, yell, and screw panels into the furring strips.

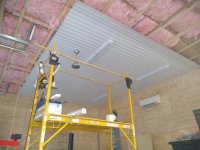
We did 2 panels the first day......not great progress, but it looks great.
Step 3: Work smarter not harder, borrow your friends drywall lift, buy the needed extension, and do more work. With the lift I was able to put the next panel up all by myself. Then the wife helped with the next 2.

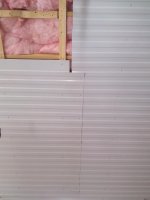
I was worried about the seams since I didn't realize the my panels had a built in lock edge (thing), so the seams are now facing the way you come into the garage, which was the opposite of the way I wanted it. But with the lock edge, the panels look super crisp.
..
.But it did not!
Here it was on delivery day:
Step 0 was to add supports for the LED lights (only needed if you forget to align your furring strips to the lighting layout). I predrilled these on the ground so that I could align the holes and pull the wires through.
Step 1: Predrill the panels on the ground before hoisting over your head.
Step 2: Curse a lot, sweat, yell, and screw panels into the furring strips.
We did 2 panels the first day......not great progress, but it looks great.
Step 3: Work smarter not harder, borrow your friends drywall lift, buy the needed extension, and do more work. With the lift I was able to put the next panel up all by myself. Then the wife helped with the next 2.
I was worried about the seams since I didn't realize the my panels had a built in lock edge (thing), so the seams are now facing the way you come into the garage, which was the opposite of the way I wanted it. But with the lock edge, the panels look super crisp.
..
Attachments

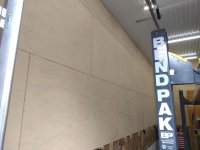
If anyone is looking for a source for building metal, I cannot recommend Bridger Steel enough. Their service and product continues to show quality.
86turbodsl
Well-known member
So, when we got the lift delivered, they also delivered the steel for the ceiling (both in the garage and in the loft). It has been sitting outside since the beginning of July, so I was a little worried that it would be rusted
But it did not!
..
My ceiling steel sat outside for about 10 years. (yes, you read that right) and was not really rusted either. I think it must have awesome rustproofing or paint or something.
Quick question for any experienced steel ceiling hangers:
Do you make sure that the individual panel seams do NOT meet in the middle, but are slightly staggered (see below for example)?

Or do you just let the seams line up with one another? Like this:

I am worried that the seams lined up with create a large over lap at the centerline (C/L), due to the "Lock-Edge" built into my panel. I will need to cut a panel or two anyways at the far end, so cutting a sliver at the beginning of the second row is not a big deal.
'Lock-Edge' shown here:

...
Do you make sure that the individual panel seams do NOT meet in the middle, but are slightly staggered (see below for example)?
Or do you just let the seams line up with one another? Like this:
I am worried that the seams lined up with create a large over lap at the centerline (C/L), due to the "Lock-Edge" built into my panel. I will need to cut a panel or two anyways at the far end, so cutting a sliver at the beginning of the second row is not a big deal.
'Lock-Edge' shown here:
...
Attachments


Last edited:
86turbodsl
Well-known member
Your question makes no sense to me. I hung my own steel in my shop. 3 rib steel is pretty standard. I started at one corner, and hung to the opposite wall, then started another row and so on.
Green Hell Mustang
Member
Excellent build! I love the layout.
I had a question about the plywood for wall covering. What made you ultimately decide to go with plywood? Sorry if I may have missed it earlier in the thread. I love the idea, but was curious about the benefits over other materials.
I had a question about the plywood for wall covering. What made you ultimately decide to go with plywood? Sorry if I may have missed it earlier in the thread. I love the idea, but was curious about the benefits over other materials.
Ease of DIY installation, finished looks nice (I'm going to whitewash it so you can still see the grain), a little cheaper than finished drywall, and now I can hang anything anywhere. Only the really heavy stuff will need to find a stud, everything else can just get screwed right to the half inch plywood.Excellent build! I love the layout.
I had a question about the plywood for wall covering. What made you ultimately decide to go with plywood? Sorry if I may have missed it earlier in the thread. I love the idea, but was curious about the benefits over other materials.
...
86turbodsl
Well-known member
Pretty much why i have plywood on my first 8' of wall too. It's very convenient and not that much more than drywall.
And don't forget the durability!
And don't forget the durability!
Any thoughts on the layout question???
Quick question for any experienced steel ceiling hangers:
Do you make sure that the individual panel seams do NOT meet in the middle, but are slightly staggered (see below for example)?
Or do you just let the seams line up with one another? Like this:
I am worried that the seams lined up with create a large over lap at the centerline (C/L), due to the "Lock-Edge" built into my panel. I will need to cut a panel or two anyways at the far end, so cutting a sliver at the beginning of the second row is not a big deal.
'Lock-Edge' shown here:
...
86turbodsl
Well-known member
Your ceiling steel is different from mine. I used white liner panel, it's the same pattern as the exterior stuff everybody seems to sell. No lock edge. I do have a little thicker section where the 4 panels overlap. It's not really noticeable. It is 14 feet up. How hard will you stare at your ceiling?
I need some help once again.......
I have gotten all of the plywood up, and the ceiling & lights are now in place (more to follow on that).
My question is this: What kind of 'sealer' can I put on the plywood walls that will help protect the wall from splatter, water, etc?
I was looking at Polycrilic, but boy is that expensive! Now I am thinking about getting some outdoor sealer (like deck or patio sealer LINK) Or potentially something made for floors (like THIS).

..
I have gotten all of the plywood up, and the ceiling & lights are now in place (more to follow on that).
My question is this: What kind of 'sealer' can I put on the plywood walls that will help protect the wall from splatter, water, etc?
I was looking at Polycrilic, but boy is that expensive! Now I am thinking about getting some outdoor sealer (like deck or patio sealer LINK) Or potentially something made for floors (like THIS).
..
Attachments
GLTHFJ60
Well-known member
Lots of stuff you can use. I'd probably lean towards spar urethane, as it'll be chemical resistant. Laquer can work too.
Either can be sprayed.
Either can be sprayed.
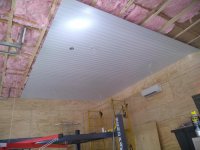
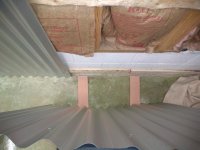
The ceiling was much more difficult to install that I thought it would be, but that seems to be the theme of this build......
The metal was all sourced from Bridger Steel, they delivered it to a nearby hardware store (they had a forklift and were happy to help me out), then I paid a roll-back to deliver it the rest of the way to my house.
The panels are 36” coverage, and were cut to just over 13.5’ length to allow for an overlap in the middle.
We started off with 2 panels. We did these by hand, 2 people on scaffolding and 1 person at the wall on ladder. It was miserable. We needed a better solution…….

Enter the drywall lift. I had a buddy who recently did the same thing, so he bought a drywall lift (but not the extension for higher ceilings). I found the extension needed, and bought it. It made all of the difference.

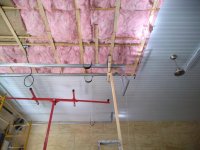
We would predrill the panels on the ground, and make the cutouts for the outlets/light wiring. Cutouts for the lights are just a 2” diameter knock-out size that we fished the wire through. The hole through the furring strip is only ½”, so it is protected from the metal edge by that and the plastic grommet on the back of the light itself.

Then a whole lot of rinse and repeat.
..
The metal was all sourced from Bridger Steel, they delivered it to a nearby hardware store (they had a forklift and were happy to help me out), then I paid a roll-back to deliver it the rest of the way to my house.
The panels are 36” coverage, and were cut to just over 13.5’ length to allow for an overlap in the middle.
We started off with 2 panels. We did these by hand, 2 people on scaffolding and 1 person at the wall on ladder. It was miserable. We needed a better solution…….
Enter the drywall lift. I had a buddy who recently did the same thing, so he bought a drywall lift (but not the extension for higher ceilings). I found the extension needed, and bought it. It made all of the difference.
We would predrill the panels on the ground, and make the cutouts for the outlets/light wiring. Cutouts for the lights are just a 2” diameter knock-out size that we fished the wire through. The hole through the furring strip is only ½”, so it is protected from the metal edge by that and the plastic grommet on the back of the light itself.
Then a whole lot of rinse and repeat.
..
Attachments


We had to support the door tracks during the installations. We just clamped a 2x4 T to a ladder. Worked like a charm.


And here you can see the overlap that I had asked about previously. Looks pretty good now, but I have gone back and added a screw to every valley in the panel, whch really helps tighten up the seam.

...
And here you can see the overlap that I had asked about previously. Looks pretty good now, but I have gone back and added a screw to every valley in the panel, whch really helps tighten up the seam.
...
Attachments

gasgas17
Well-known member
Any clear finish on the plywood will give you a wipeable surface. Just make sure you give it a quick sanding after the first coat as the it will raise the grain slightly. A pole sander with 220 will work just fine. The newer round sanding heads will prevent tip over/marking the plywood with the pole sander. I just use quick-dry polyurethane in my enclosed trailers.
Thanks for the tip.Any clear finish on the plywood will give you a wipeable surface. Just make sure you give it a quick sanding after the first coat as the it will raise the grain slightly. A pole sander with 220 will work just fine. The newer round sanding heads will prevent tip over/marking the plywood with the pole sander. I just use quick-dry polyurethane in my enclosed trailers.
Unfortunately, I had already raised the grain with my whitewash. I should have realized that would happen; rookie mistake.
I went with Polycrylic, one coat all over, with a second coat on the lowest 4' of the plywood panels.
...


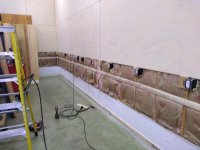
The corrugated paneling will allow me to access the electrical if I ever need to run new circuits or fix something. It also covers up the block foundation nicely.
Step 1: Add furring strips to the block wall and the studs.

Step 2: Cut around the outlets since I measured poorly....

Step 3: Space the panels off the ground slightly, this allowed me to adjust the fitment along the way if the concrete was not perfect (which it wasn't). That is a 1/4" shim.


Step 4: Screw everything in and add the corner pieces!

I still need to do the garage door wall (small areas), but I am not sure what I am going to do under the window next to the man door, so I am holding off for now.
Next: Add the outlet "rail" trim.
...
Step 1: Add furring strips to the block wall and the studs.
Step 2: Cut around the outlets since I measured poorly....
Step 3: Space the panels off the ground slightly, this allowed me to adjust the fitment along the way if the concrete was not perfect (which it wasn't). That is a 1/4" shim.
Step 4: Screw everything in and add the corner pieces!
I still need to do the garage door wall (small areas), but I am not sure what I am going to do under the window next to the man door, so I am holding off for now.
Next: Add the outlet "rail" trim.
...
Attachments


I convinced the wife to come help me! While I was installing the corrugated paneling, she was painting trim and the outlet "rail."
We were going to paint everything outside, but then we both came to our senses and decided to use the nice big conditioned space upstairs.....duh!
(this is a view of the upstairs, currently a mess.....)

...
We were going to paint everything outside, but then we both came to our senses and decided to use the nice big conditioned space upstairs.....duh!
(this is a view of the upstairs, currently a mess.....)
...
