To avoid these ads, REGISTER NOW!

The Everything 3D Printer Thread

OP
B

BoilermakerFan

Well-known member
Joined
Apr 17, 2006
Messages
2,188
Location
Indianapolis, Indiana
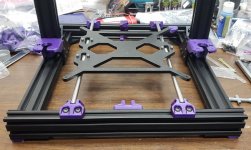
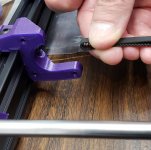
Sounds like it's twisted. Looking down on plate, it would have rotated a degree or so, so that the plug that is sensed is to far off spec to be compensated. I did the same thing with a bed heater cover. Needed to loosen rails and realign it.

I've checked everything... It's measuring square...

I'm going to readjust everything and try one more time, but...

I ordered the BTT002 controller with TMC2209 drivers, a couple extra drivers, and a 24V heatbed from Biqu.

Today I ordered the Bear Full Upgrade with custom printed parts from RatRig in the UK. It was cheaper to buy the kit from them, have them print the parts, and ship it to me from the UK than to order the kit from ALL3D Makers and order the printed parts off Ali or eBay... Plus I get the custom purple and the rest of the filament on the spool. I did order the Z axis tall kit and X/Extruder hardware kit from ALL3D.


So my plan is to assemble the Bear Upgrade stock and use my current X-axis/extruder setup. Switch over to the BTT002 board and see if I can get it running correctly again. Assuming that works, which it should, I will print the Bear x-axis parts and perform that small upgrade.

Then later I will order all the new axis/extruder motors to move to the 320mm Z height and upgrade to 24V. Final phase is to move to a SKR v1.4 Turbo board, BL Touch, and either a Duet3D display or the TFT35 touch screen.

The only thing I still need to order right now are new LMUU8 bearings. I will order all new rods when I order the new 320mm steppers.

Oh, also picking up the E3D thermistor and heater that have the detachable leads.
 
Last edited:
To avoid these ads, REGISTER NOW!

Gator-J

Well-known member
Joined
Jun 11, 2012
Messages
47
Location
St Johns, FL
I've checked everything... It's measuring square...

I'm going to readjust everything and try one more time, but...

I ordered the BTT002 controller with TMC2209 drivers, a couple extra drivers, and a 24V heatbed from Biqu.

Today I ordered the Bear Full Upgrade with custom printed parts from RatRig in the UK. It was cheaper to buy the kit from them, have them print the parts, and ship it to me from the UK than to order the kit from ALL3D Makers and order the printed parts off Ali or eBay... Plus I get the custom purple and the rest of the filament on the spool. I did order the Z axis tall kit and X/Extruder hardware kit from ALL3D.


So my plan is to assemble the Bear Upgrade stock and use my current X-axis/extruder setup. Switch over to the BTT002 board and see if I can get it running correctly again. Assuming that works, which it should, I will print the Bear x-axis parts and perform that small upgrade.

Then later I will order all the new axis/extruder motors to move to the 320mm Z height and upgrade to 24V. Final phase is to move to a SKR v1.4 Turbo board, BL Touch, and either a Duet3D display or the TFT35 touch screen.

The only thing I still need to order right now are new LMUU8 bearings. I will order all new rods when I order the new 320mm steppers.

Oh, also picking up the E3D thermistor and heater that have the detachable leads.

So, as someone that kinda follows this thread, how much of your original machine will you have after this upgrade?
 
OP
B

BoilermakerFan

Well-known member
Joined
Apr 17, 2006
Messages
2,188
Location
Indianapolis, Indiana
Hmmm... my original machine was a Mk2 that I just upgraded to a Mk2.5S.

I'm buying hardware to eventually have a complete, stand alone 32-bit i3 320mm Bear/Zaribo. The original Mk2.5S will be reassembled from the parts I pulled during the upgrade process. That will be all Prusa except the BTT002. That Mk2.5S will be sold to a friend or donated to my wife's school. I'll keep the Bearibo 320mm.

A round about answer, but it comes back nearly full circle.
 
OP
B

BoilermakerFan

Well-known member
Joined
Apr 17, 2006
Messages
2,188
Location
Indianapolis, Indiana
I don't know if you guys play the currency game or follow the US Dollar, but the dollar is really strong right now vs. Euros. I saved at least $20 ordering from the UK vs US including the extra shipping cost.
 

bmxdad

Well-known member
Joined
Feb 18, 2014
Messages
2,539
Location
Puyallup, WA
I don't know if you guys play the currency game or follow the US Dollar, but the dollar is really strong right now vs. Euros. I saved at least $20 ordering from the UK vs US including the extra shipping cost.


I looked and couldn't find the TALL kit. I have a MK2 mmu and would like a little more Z.
 
OP
B

BoilermakerFan

Well-known member
Joined
Apr 17, 2006
Messages
2,188
Location
Indianapolis, Indiana
My Rat Rig Bear Upgrade and printed parts arrived today.

I love the Galaxy Violet color.
 

Attachments

  • 20200401_205213.jpg
    20200401_205213.jpg
    112.6 KB · Views: 90
  • 20200401_205230.jpg
    20200401_205230.jpg
    119 KB · Views: 104

Cruzan80

Well-known member
Joined
Jul 22, 2015
Messages
4,150
Location
Denver, CO
So by talking with people on the Prusa forum, I essentially have something akin to a mk2-ish, with some upgrades. However, the frame needs to be completely rebuilt. Looking at getting pre-cut 20/20 extrusion and priming other parts myself. Anyone have an opinion on which 20/20 upgrade they like? Bear, Haribo, etc? I will be buying all of it piecemeal, instead of as a kit.

Anyone have a recommendation on a good heated bed to replace the POS that I have on it?

Sent from my Phone 2 using The Garage Journal mobile app
 
OP
B

BoilermakerFan

Well-known member
Joined
Apr 17, 2006
Messages
2,188
Location
Indianapolis, Indiana
The Bear Upgrade is 2040. The Haribo and Zaribo use 3030.

The Bear Upgrade instructions show the lengths you need of the 2040 extrusion and you can total up all the braces, plates, fasteners, and t-nuts through the instructions as well.

I'm impressed with the Bear Upgrade so far. The T-nuts are just the cheap stamped steel ones, but I haven't felt the need to replace any of them with better ones.

My printed parts are in PLA and they are stiffer than PETG. I'm actually glad I went with the PLA instead of the PETG I originally ordered. Rat Rig had the violet parts already printed in PLA so they sent me a full spool of the PETG. The only parts that need to be in PETG are the extruder carriage parts. And I'm keeping those black.

Note, since you do not have a MK3, a few of the parts you need to print are different in order to allow the use of the limit switches. The files you will need are on the GitHub pages for either the Bear or Zaribo so just make sure you print the correct ones.

You can also find the improved control board case and door on Prusa's site.

My Y-axis motor mount is for a MK3 so I have to rig up the Y-axis limit switch until my new control board arrives. It's still taking a scenic tour of China. It's been shipped for over 2 weeks.

I'm to the point in my build that I need to tear down my MK2.5S all the way down. Kind of a PITA since I just spent the time to do the first upgrade... oh well.

I ordered a new MK52 24V heated bed from Biqu with my controller. When I get it, I'll let you know how it compares to the genuine Prusa. Zaribo also sells the Mk52 beds in 12V and 24V. You'll need a 12V version.
 

Attachments

  • 20200404_195938.jpg
    20200404_195938.jpg
    112.4 KB · Views: 63
  • 20200404_230622.jpg
    20200404_230622.jpg
    155.2 KB · Views: 73
Last edited:

850xpeps

Well-known member
Joined
Aug 6, 2017
Messages
1,365
So I’m looking at 3D printers and would like a little help/advice.

Toss up between ender 5pro, prusa mk3 , cr10s, and artillery x1. If you guys don’t mind giving your opinions on them, I’d appreciate it.
 

WoodsTruck

Well-known member
Joined
Jan 12, 2013
Messages
1,019
I cannot compare one to the other.

I bought an Ender 5 last summer and it was very easy to assemble, level and use. I wanted a point and shoot printer as I have plenty of other irons in the fire to keep my mind busy. So far it hasn't given me any issues.
 
OP
B

BoilermakerFan

Well-known member
Joined
Apr 17, 2006
Messages
2,188
Location
Indianapolis, Indiana
So I’m looking at 3D printers and would like a little help/advice.

Toss up between ender 5pro, prusa mk3 , cr10s, and artillery x1. If you guys don’t mind giving your opinions on them, I’d appreciate it.

You're kind of all over the place price and build volume wise...

IMO, the X1 isn't even in the same league as the others so i wouldn't even consider it unless I was shopping for a parts donor to essentially gut and upgrade to get rid of the ribbon cable

The Prusa MK3 is the most expensive with the smallest build volume. For that trade off you get incredible support and generally, a supported upgrade path as they introduce new tech to the printer. But I'm still not sure I could strongly recommend it over either Creality.

So to me your choice boils down to the Ender5 Pro and the CR10 V2, not the CR10S. Both have a ton of upgrades and mods available to print or buy. The Ender5 is a CoreXY machine so it could possibly be a little more tricky to trouble shoot later if you start to have an issue.
 

850xpeps

Well-known member
Joined
Aug 6, 2017
Messages
1,365
You're kind of all over the place price and build volume wise...


IMO, the X1 isn't even in the same league as the others so i wouldn't even consider it unless I was shopping for a parts donor to essentially gut and upgrade to get rid of the ribbon cable


The Prusa MK3 is the most expensive with the smallest build volume. For that trade off you get incredible support and generally, a supported upgrade path as they introduce new tech to the printer. But I'm still not sure I could strongly recommend it over either Creality.


So to me your choice boils down to the Ender5 Pro and the CR10 V2, not the CR10S. Both have a ton of upgrades and mods available to print or buy. The Ender5 is a CoreXY machine so it could possibly be a little more tricky to trouble shoot later if you start to have an issue.


Ya I understand they are hard to compare. Maybe the mk3 and ender5 a little closer to size.

So can you fill me in on what a corexy machine is? I know the cr10 is a bit more money but also a larger ability for print size. I’m just a hobby guy that’s what’s to make parts for myself. I didn’t know there was a cr10v2. When I get a chance tonight I’ll try to some reading on it.
 

banjopete

Well-known member
Joined
Oct 5, 2014
Messages
300
Location
Edmonton, Alberta, Canada
This counts as it's all 3d printer related. As to the question, I've had only an ender 3 to compare to but I also wanted plug and play with little fuss which is what I got. It's not completely hands off but it's been excellent to me

Using the cnc router my ender 3 helped me make I put a door on v2.0 of my 3d printer enclosure.IMG_20200405_090751_140.jpg20200404_090407.jpgIMG_20200405_090751_138.jpg

Sent from my SM-G960W using The Garage Journal mobile app
 

850xpeps

Well-known member
Joined
Aug 6, 2017
Messages
1,365
So the cr10v2 looks to have some nice features. But one page mentioned it cannot print with 2 filaments? Why would this be?

So the ender 5 pro would require a a glass bed where as the cr10v2 has? Correct?

What would must have upgrades to an ender 5 be that would bring the cost closer to that of the cr10v2?

Also seen mentioned that it was direct drive then in the next paragraph it says a direct drive can be added. Sorry for the newb questions.
 

bdbecker

ALLIANCE MEMBER
Joined
Nov 18, 2015
Messages
5,542
Location
Iowa
So the cr10v2 looks to have some nice features. But one page mentioned it cannot print with 2 filaments? Why would this be?...

It can print different filaments, just not at the same time (only one extruder). Some printers have dual extruders so two different filaments can be loaded and used on the same print. Looks like the CR10V2 is capable of running PLA, ABS, PETG, and TPU.
 

WoodsTruck

Well-known member
Joined
Jan 12, 2013
Messages
1,019
Any suggestions on using a glass bed with the Ender 5?

I picked one up but haven't used it yet. Using the factory magnetic print bed I have to print a raft for good adhesion and it consumes a lot of filament just for the raft. My understanding is I can use the glass bed and print directly to it but looking for any suggestions first.

Thanks.
 

850xpeps

Well-known member
Joined
Aug 6, 2017
Messages
1,365
It can print different filaments, just not at the same time (only one extruder). Some printers have dual extruders so two different filaments can be loaded and used on the same print. Looks like the CR10V2 is capable of running PLA, ABS, PETG, and TPU.


Ya I knew. I just thought it weird that they mentioned it.

It only listed pla and abs. And I’ll most likely wanna use pla and petg. I haven’t done enough reading yet to see if a different driver is needed. Or why it said that.
 

bdbecker

ALLIANCE MEMBER
Joined
Nov 18, 2015
Messages
5,542
Location
Iowa
Ya I knew. I just thought it weird that they mentioned it.

It only listed pla and abs. And I’ll most likely wanna use pla and petg. I haven’t done enough reading yet to see if a different driver is needed. Or why it said that.

From what I'm reading, most people print PETG at 235-240C nozzle temp, 70-80C bed temp. As long as whatever printer you are looking at can hit those temps, you should be able to print PETG.
 
To avoid these ads, REGISTER NOW!

850xpeps

Well-known member
Joined
Aug 6, 2017
Messages
1,365
Ordered the cr10v2 from creakily website. Didn’t necessarily need the size but with direct drive and glass bed and being $60 more than the 5pro. I figured it’s a wash.

Plus I couldn’t find an available 5pro in Canada.
 

pwhittle

Well-known member
Joined
May 9, 2011
Messages
252
Location
Woodstock, GA
I just bought an Ender 3 from Amazon, assembled it, and the filament feed is not working. Swapped cables at both ends between Filament and X-axis to confirm the cables and motors work, and that leaves the control board.

I messaged the seller to se what their response is.

Paul


Sent from my iPad using The Garage Journal mobile app
 

bdbecker

ALLIANCE MEMBER
Joined
Nov 18, 2015
Messages
5,542
Location
Iowa
My MIL works in a nursing home. One of the precautions they are taking these days is that they now have to wear surgical masks all day. She mentioned to Wife yesterday that she (and her coworkers) are starting to get sores on their ears, some even getting cuts and bleeding from the elastic bands chafing on their ears. Wife started looking around for ways to fix it and found these 3D printed hooks.

https://3dprint.nih.gov/discover/3dpx-013410
https://www.thingiverse.com/thing:4249113

The nice thing is that, unlike a lot of the other 3DP PPE projects that are floating around right now, these are actually approved by the NIH for use in clinical settings. So if you guys were looking for a project that could make a difference right now, maybe reach out to someone you know in the health care field and see if they'd be interested in something like this. They print fast - I'm averaging right around 30 minutes a piece (batch of 18 takes right around 9 hours).

View media item 102485
 
Last edited:

pwhittle

Well-known member
Joined
May 9, 2011
Messages
252
Location
Woodstock, GA
I just bought an Ender 3 from Amazon, assembled it, and the filament feed is not working. Swapped cables at both ends between Filament and X-axis to confirm the cables and motors work, and that leaves the control board.

I messaged the seller to se what their response is.

Paul


Sent from my iPad using The Garage Journal mobile app


Never mind. They let me know that the print head had to be up to temperature before it will activate the filament stepper.

Rookie error.

Paul


Sent from my iPad using The Garage Journal mobile app
 

youinreverse

Well-known member
Joined
Nov 9, 2015
Messages
128
Location
SLC
My MIL works in a nursing home. One of the precautions they are taking these days is that they now have to wear surgical masks all day. She mentioned to Wife yesterday that she (and her coworkers) are starting to get sores on their ears, some even getting cuts and bleeding from the elastic bands chafing on their ears. Wife started looking around for ways to fix it and found these 3D printed hooks.

https://3dprint.nih.gov/discover/3dpx-013410
https://www.thingiverse.com/thing:4249113

The nice thing is that, unlike a lot of the other 3DP PPE projects that are floating around right now, these are actually approved by the NIH for use in clinical settings. So if you guys were looking for a project that could make a difference right now, maybe reach out to someone you know in the health care field and see if they'd be interested in something like this. They print fast - I'm averaging right around 30 minutes a piece (batch of 18 takes right around 9 hours).
I've been printing these non stop as well. I had someone in a local Facebook group asking if anyone could make some so I stepped up. I'm printing about five every two hours.

I'm a lot more comfortable printing something like this that isn't made to prevent the spread of the virus, but still makes a difference. I don't really want the liability of homemade PPE. The woman I'm giving these to to distribute says the healthcare workers at her clinic are loving them and they make the masks much more comfortable.
 

850xpeps

Well-known member
Joined
Aug 6, 2017
Messages
1,365
8e33b82af8f1208204745ffb423c8469.jpg

It’s here. Set it up and try it out
 

Attachments

  • 8e33b82af8f1208204745ffb423c8469.jpg
    8e33b82af8f1208204745ffb423c8469.jpg
    20.8 KB · Views: 15

jwmelvin

Member
Joined
Oct 21, 2014
Messages
17
I've been using my i3 mk2s a good bit lately.
I made some cleats to hold my lathe toolholders:
lathe_tools.jpg

A vacuum connection for the disc sander:
discsander_vacuum.jpg

A light for the bench grinder:
benchgrinder_light.jpg

And a PAPR for use around the shop:
PAPR.jpg

Edit: hm, images with imgur links didn't work.
 
Last edited:

850xpeps

Well-known member
Joined
Aug 6, 2017
Messages
1,365
SWEET!

My Biqu order from the END of March is still sitting in China. I'm becoming very annoyed with their excuses. They keep blaming it on the freight forwarders.


My creality came from China in little over a week. Amazon stuff took 3 weeks lol
 

bdbecker

ALLIANCE MEMBER
Joined
Nov 18, 2015
Messages
5,542
Location
Iowa
...And a PAPR for use around the shop:
PAPR.jpg

That's pretty cool - is that something you came up with, or did you get the files from somewhere?
 

850xpeps

Well-known member
Joined
Aug 6, 2017
Messages
1,365
Having some petg blues.

add64010469e996683030b81389d179c.jpgb8388665331c4853d721af9929142105.jpg

It seems to want to clump when it’s doing close infill.

I managed to print a keychain. 245 degree nozzle and 92 bed temp for first layer then 240 and 85 after that. It turned out not bad. But still couldn’t get other prints to work.
 

Attachments

  • b8388665331c4853d721af9929142105.jpg
    b8388665331c4853d721af9929142105.jpg
    287.4 KB · Views: 7
  • add64010469e996683030b81389d179c.jpg
    add64010469e996683030b81389d179c.jpg
    35 KB · Views: 9

WoodsTruck

Well-known member
Joined
Jan 12, 2013
Messages
1,019
I have been using 245/85 with my PETG as per the instructions.

It works good for what I'm doing. I have been battling bed adhesion though so I tried the Creality glass bed thinking that would be the trick. I thought I did a reset on the bed height and the glass was too high and ground off the end of my nozzle.
 

vpd66

Well-known member
Joined
Mar 1, 2010
Messages
709
Location
Central Wisconsin
I have been using 245/85 with my PETG as per the instructions.

It works good for what I'm doing. I have been battling bed adhesion though so I tried the Creality glass bed thinking that would be the trick. I thought I did a reset on the bed height and the glass was too high and ground off the end of my nozzle.


I switched my Ender 3 to a glass bed and it took quite a bit of time to get the bed leveling and limit switch adjusted right because the glass was thicker. I've also been having good luck with sugar water for adhesion on the glass plate.
 

850xpeps

Well-known member
Joined
Aug 6, 2017
Messages
1,365
I have been using 245/85 with my PETG as per the instructions.


It works good for what I'm doing. I have been battling bed adhesion though so I tried the Creality glass bed thinking that would be the trick. I thought I did a reset on the bed height and the glass was too high and ground off the end of my nozzle.


I went to 245/95 on my creality glass bed and it was adhereing. So I think I got that fixed. But can’t seem to figure out why it won’t do small infills without bunching.
 

bdbecker

ALLIANCE MEMBER
Joined
Nov 18, 2015
Messages
5,542
Location
Iowa
I went to 245/95 on my creality glass bed and it was adhereing. So I think I got that fixed. But can’t seem to figure out why it won’t do small infills without bunching.

From what I'm reading about printing PETG is that its all about finding the sweet spot between speed and flow. If the flow seems good, you may need to slow down the travel speed a little.
 

jwmelvin

Member
Joined
Oct 21, 2014
Messages
17
That's pretty cool - is that something you came up with, or did you get the files from somewhere?

Thanks. I started with my own design using a smaller fan and 3M filters, here. Then I saw someone else's similar project, and modified my own for version 2 to use Milwaukee batteries and a larger fan; I kept an option to use 3M filters or to use Roomba HEPA filters (which are a lot more available and cheaper these days). In use around the shop, the HEPA filters seem to work very well. All the parts are my own design in Fusion 360. It could use some more detail work, and revision to use easily available tubing (I used some anesthesia tubing I had laying around).
 
To avoid these ads, REGISTER NOW!
Top Bottom