To avoid these ads, REGISTER NOW!

40X60 Shop Build - Washington State

theundermount

Well-known member
Joined
Jan 17, 2016
Messages
489
Location
ON
great looking kit, I play tamas as well, I still have my first set of tamas I bought almost 20 years ago
 
To avoid these ads, REGISTER NOW!

drivesitfar

Well-known member
Joined
Oct 23, 2013
Messages
36,051
Location
Pacific Northwest
Krucks: i'm hoping you are just too busy to post and everything is ok. is it?

any cool new tools or a few pics of the inside of your cool garage to post please do cause it sure looks great from the outside.

Cheers
 
OP
K

KrucksGarage

Well-known member
Joined
Jul 10, 2011
Messages
400
Location
Washington State
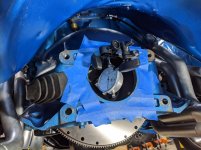
Working in the shop doing a conversion on a 65 El Camino from a Muncie 4-speed to a Tremec TKO 5-speed.
 

Attachments

  • IMG_20191123_172307.jpg
    IMG_20191123_172307.jpg
    151.1 KB · Views: 199
  • IMG_20191113_184707.jpg
    IMG_20191113_184707.jpg
    130.5 KB · Views: 209
  • IMG_20190802_230641.jpg
    IMG_20190802_230641.jpg
    151.6 KB · Views: 219
OP
K

KrucksGarage

Well-known member
Joined
Jul 10, 2011
Messages
400
Location
Washington State
I just received my second floor lumber package today. I'll be building a 15x40 room above the 9x8 door. Overhead height on the shop floor will be 9' below the joists and the room above will have 8' ceiling height.
 

Attachments

  • IMG_20200320_221141.jpg
    IMG_20200320_221141.jpg
    148.9 KB · Views: 199

GeddyT

Well-known member
Joined
Jun 17, 2015
Messages
1,243
Location
Bellingham, WA
Now THAT's a shop! I wish I had the room/money/soil to build something like that. I'm glad this popped to the front page, as I saw "Washington state" and dug right in. Amazing how close I am and yet how different our soil is. Mine is pretty much rock/clay stew.

Hope you're back in good health after the fall, and I'm looking forward to the plans for the upstairs room.
 
OP
K

KrucksGarage

Well-known member
Joined
Jul 10, 2011
Messages
400
Location
Washington State
Now THAT's a shop! I wish I had the room/money/soil to build something like that. I'm glad this popped to the front page, as I saw "Washington state" and dug right in. Amazing how close I am and yet how different our soil is. Mine is pretty much rock/clay stew.

Hope you're back in good health after the fall, and I'm looking forward to the plans for the upstairs room.

Thanks for the feedback! I'm glad you enjoyed looking at the build. I've had a lot of fun with the project. I have a long ways to go any it'll take me a while to get it where I want it. I'd love to insulate, drywall and heat it but that's going to have to come later. Biggest thing in my sights after this part is a two post lift, but we'll see when it makes sense to buy one. I think the best part about this project is my wife and I will be designing what to do in the room together so we can both enjoy it, looking forward to that. I'll have to get over and check out your thread. Thanks!
 

tadams72

Active member
Joined
Dec 21, 2011
Messages
43
Location
Seabeck, WA
Krucks,

Is the additional room/space part of the original design or added after the fact? If after, did you have to have to do anything special with the county? Asking as I will likely do something similar with ours as funds become available sometime after the initial structure is in. Thanks.


Sent from my iPad using Tapatalk
 
OP
K

KrucksGarage

Well-known member
Joined
Jul 10, 2011
Messages
400
Location
Washington State
It was planned since the beginning, I spoke to county and engineers about it before getting drawings made up. just getting around to it both with time and financially. I talked to them about it and it was a non issue because it's not a living space with plumbing, etc. Just a room. This is the reason I designed one door to be shorter than the others, to make room above to do this project. The trusses above this room are attic trusses as well, so I'll install a pull-down stair set in the ceiling and have another 12x15 room above that for whatever, not even sure what I'll do with that space yet, but I have it sub floored already, per country instructions before final, strange as that is because it's currently 18 feet in the air with no way to access. Go figure...lol.
 

tadams72

Active member
Joined
Dec 21, 2011
Messages
43
Location
Seabeck, WA
Yeah the county is a funny animal. Looking forward to see how the room looks. Our 40x60 plan is opposite of yours (60 deep). I’ve got a 40’ diesel pusher I need to fit.


Sent from my iPhone using Tapatalk
 
OP
K

KrucksGarage

Well-known member
Joined
Jul 10, 2011
Messages
400
Location
Washington State
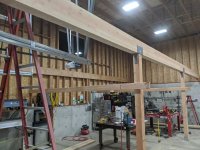
Had a busy week this week. First of two weeks off work, focused on getting the framing for the new room moving along. Here we had just set the posts and rigged the glue-lam beam into place. This step took a lot of measuring and laying out to get everything plumb and square. We shot in a reference line onto the three adjacent walls with a laser, and pulled vertical comparison measurements from the top down and dropped reference lines onto the floor using a plumb-bob. Drilled and anchored post base brackets and then set the beam. I tried rigging the beam in one piece but it wasn't going to go in without a lot of cutting of the building and I wasn't willing to do that so I cut the beam above the second post (right side post in the picture), and set it in two pieces, which is going to work out great.
 

Attachments

  • IMG_20200323_165908.jpg
    IMG_20200323_165908.jpg
    152.6 KB · Views: 268
  • IMG_20200323_181336.jpg
    IMG_20200323_181336.jpg
    154.8 KB · Views: 272
  • IMG_20200323_201934.jpg
    IMG_20200323_201934.jpg
    153.3 KB · Views: 275
OP
K

KrucksGarage

Well-known member
Joined
Jul 10, 2011
Messages
400
Location
Washington State
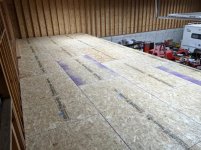
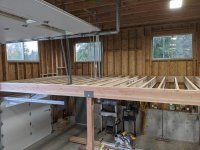
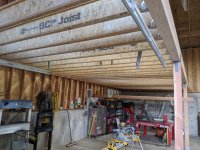
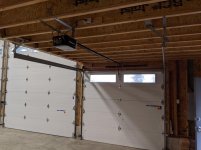
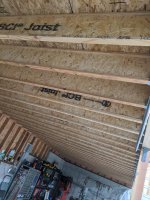
After the posts were set and the beam in place, I ran through and placed all the joist hangers. We had already installed a laminated ledger board on the side, front, and back walls as well. Used all Simpson strong-tie hangers and assembled those with the common 10d tico nails. I went with the engineered I-joists since they're straight, strong, and simple to install. Be sure if you use these that you get the proper hardware and hangers for installation due to the wider flanges, etc., But I highly recommend. After the joists we're set, I used slings to set the 3/4" T&G subfloor up above. This made it a whole lot easier than pass-up method. You can still see the old garage door brackets that extend up into the truss system, I worked around these until the joists were installed, and then with the door shut, removed all the track brackets and rehung the door system under the new floor.
 

Attachments

  • IMG_20200325_103707.jpg
    IMG_20200325_103707.jpg
    153.5 KB · Views: 237
  • IMG_20200325_094740.jpg
    IMG_20200325_094740.jpg
    154.1 KB · Views: 225
  • IMG_20200324_175411.jpg
    IMG_20200324_175411.jpg
    154.5 KB · Views: 231
  • IMG_20200324_175216.jpg
    IMG_20200324_175216.jpg
    151.9 KB · Views: 228
  • IMG_20200324_175200.jpg
    IMG_20200324_175200.jpg
    155.8 KB · Views: 229
Last edited:
OP
K

KrucksGarage

Well-known member
Joined
Jul 10, 2011
Messages
400
Location
Washington State
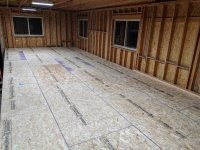
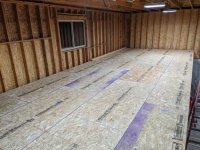
We got the subfloor all installed and what a difference that made with putting things in perspective! Although, it did make the garage feel a little smaller! It is really nice to have a visual of what this room will look like. My wife really stated to get engaged now that she can see what were working with and we've been having a lot of fun in the evenings discussing fun ideas for the layout in the room. I installed the subfloor using tite-bond adhesive, and screwed it down, vs. using the common ring shank nails. I don't want any squeaks and regret not using screws in our house. Next step is building the wall along the inside edge.
 

Attachments

  • IMG_20200325_205629.jpg
    IMG_20200325_205629.jpg
    135.6 KB · Views: 185
  • IMG_20200325_205717.jpg
    IMG_20200325_205717.jpg
    151.6 KB · Views: 186
  • IMG_20200325_205714.jpg
    IMG_20200325_205714.jpg
    151.6 KB · Views: 192
  • IMG_20200325_203426.jpg
    IMG_20200325_203426.jpg
    152.4 KB · Views: 175
  • IMG_20200325_203348.jpg
    IMG_20200325_203348.jpg
    152 KB · Views: 168
  • IMG_20200325_203409.jpg
    IMG_20200325_203409.jpg
    151.7 KB · Views: 164
  • IMG_20200325_203339.jpg
    IMG_20200325_203339.jpg
    152.4 KB · Views: 174
OP
K

KrucksGarage

Well-known member
Joined
Jul 10, 2011
Messages
400
Location
Washington State
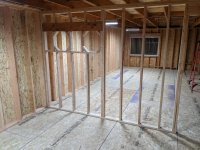
Yesterday I spent the day working on the wall. I framed and sheathed 8' sections on the deck, leaving extra sheathing on the bottom edge to overlap the beam below, and lifted them into position, I felt that 16' sections would be a little heavy and unwieldy to get into position. I used some 2x material between the trusses and a 2x8 ran lengthwise for fastening the top plate to, which also lends an edge for drywall installation later. You can see here how I rehung the garage door track and opener below the floor. I have I little more wall structure to complete, then one interior wall, install the exterior door, and move into wiring. I plan to pick up a split ductless HVAC unit and install that before wiring.
 

Attachments

  • IMG_20200327_174555.jpg
    IMG_20200327_174555.jpg
    148 KB · Views: 209
  • IMG_20200327_174425.jpg
    IMG_20200327_174425.jpg
    153.6 KB · Views: 199
  • IMG_20200327_174353.jpg
    IMG_20200327_174353.jpg
    153.5 KB · Views: 205
  • IMG_20200327_174324.jpg
    IMG_20200327_174324.jpg
    156.3 KB · Views: 213
  • IMG_20200326_130214.jpg
    IMG_20200326_130214.jpg
    154.8 KB · Views: 219

drivesitfar

Well-known member
Joined
Oct 23, 2013
Messages
36,051
Location
Pacific Northwest
Krucks: that is some nice addition to your garage and happy to hear your wife likes it and also has a space out there for her hobbies.

just curious did you nail or use lag screws to attach the 2x8 or 2x10 to the back wall of your garage that supports your floor?

happy to hear you are still moving forward on your cool garage plans and I bet it not only takes a huge chunk of you bank account, but also a huge amount of your time.

it looks great and I bet you are happy to have the space to work on your cool stuff.
 
OP
K

KrucksGarage

Well-known member
Joined
Jul 10, 2011
Messages
400
Location
Washington State
Krucks: that is some nice addition to your garage and happy to hear your wife likes it and also has a space out there for her hobbies.

just curious did you nail or use lag screws to attach the 2x8 or 2x10 to the back wall of your garage that supports your floor?

happy to hear you are still moving forward on your cool garage plans and I bet it not only takes a huge chunk of you bank account, but also a huge amount of your time.

it looks great and I bet you are happy to have the space to work on your cool stuff.

Hey Drives!!

Thanks buddy!! Been a while since I've updated... Good to hear from you.

The ledger on the back and sides is a laminated 2x12, the back (side of garage) on the 40' side is a one piece ledger. I used the standard 3-5/8" Fastenmaster ledgerLOK hex head lag screws, they are a purpose built fastener for that application.

I used the 10d (commonly referred to as "Tico" nails) to attach the joist hangers to the ledger.

It does soak up some resources but the payoff will be well worth it and give the whole family a fun space to enjoy. The shop itself had been a great benefit, and I've been able to work on all my junk out of the weather. Probably the best part is working on projects with my dad, friends, and neighbors. I really enjoy having friends over and wrenching together, and having the ability to help others out when I can.
 
Last edited:

Jayman17

Well-known member
Joined
Feb 6, 2017
Messages
3,815
Location
Seattle, Wa
Hi, I just discovered this thread. Congrats on a great looking shop! I always like to see guys in WA building their shops. Looking forward to seeing how you finish out the upper room, that is a big room! :bounce:
Love your welding table too,

Jay
 
OP
K

KrucksGarage

Well-known member
Joined
Jul 10, 2011
Messages
400
Location
Washington State
Hi, I just discovered this thread. Congrats on a great looking shop! I always like to see guys in WA building their shops. Looking forward to seeing how you finish out the upper room, that is a big room! :bounce:
Love your welding table too,

Jay

Thanks Jay! I'm glad you enjoyed the thread. The room I'm working on is 15x40, but will be partially divided.
 
To avoid these ads, REGISTER NOW!

GeddyT

Well-known member
Joined
Jun 17, 2015
Messages
1,243
Location
Bellingham, WA
So is the mini-split just for the upstairs rooms or for the whole shop?

If you're worried about noise from the shop being disruptive in the upstairs room, look into mineral wool insulation. They even make some that's specifically rated for soundproofing, although I can't see how it's any different from the thermal insulation variety. Costs more than fiberglass, but WAY easier to install and otherwise better in every way.

Looking real good, and I'm still jealous of all that space!
 
OP
K

KrucksGarage

Well-known member
Joined
Jul 10, 2011
Messages
400
Location
Washington State
So is the mini-split just for the upstairs rooms or for the whole shop?

If you're worried about noise from the shop being disruptive in the upstairs room, look into mineral wool insulation. They even make some that's specifically rated for soundproofing, although I can't see how it's any different from the thermal insulation variety. Costs more than fiberglass, but WAY easier to install and otherwise better in every way.

Looking real good, and I'm still jealous of all that space!

The mini split system is just for the room, it'll be a while before I insulate and drywall the rest of the building. After that I'll install a larger unit on the shop floor.

Great advice on the mineral wool insulation, thanks I'll look into that. I'll have a drum set in there so that would be a smart thing to look into!
 
OP
K

KrucksGarage

Well-known member
Joined
Jul 10, 2011
Messages
400
Location
Washington State
What are your floor joist rated for with your installation? Also whats the dimensions of them?
These are the Boise BCI 11-7/8" joists. The flanges are 2" wide. They have specific design hangers that are different than the solid lumber joist hangers, hardware, spacing, etc. You can buy different sizes of joists and do all kinds of engineering and design things with them. What I like is they're straight as an arrow, lighter, and stronger than traditional lumber. Not written down, but in casual conversation it was discussed that this design will support every bit of a 50+ PSF rating similar to a home. I could put a gun safe or just about whatever I want as long as the heavy items like that are along the sides. I don't intend on having anything that heavy in the room though.
 
Last edited:
OP
K

KrucksGarage

Well-known member
Joined
Jul 10, 2011
Messages
400
Location
Washington State
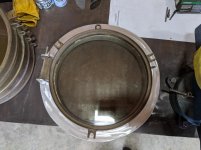
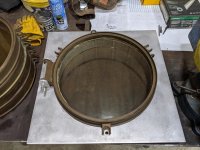
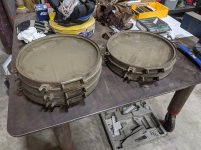
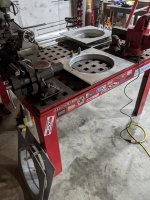
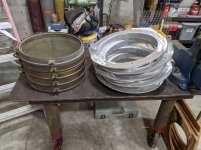
I'm going to incorporate these port hole windows, ship's wheel and telegraph into my upstairs design. I got these out of a remodel of a family member's house. They were set up pretty cool looking out over an in-ground swimming pool. I'll have three of them looking out into my shop and the other two will be in an interior wall looking between two rooms with a live edge wood bar top I'll build later. I think it will be a fun feature and kind of in memory of a family member who passed on that designed these into the room they came from. In the pictures you can see the way the mounting brackets came out as squares. For my application I'll be surface mounting them on the interior over ship lap so I cut them round and rewelded the hinges to work in that configuration. I'll trim out the opposite sides with a wooden flange that should look pretty cool. You can see how I framed these in on the next post.
 

Attachments

  • IMG_20200329_212309.jpg
    IMG_20200329_212309.jpg
    155.1 KB · Views: 132
  • IMG_20200329_212300.jpg
    IMG_20200329_212300.jpg
    149.9 KB · Views: 128
  • IMG_20200329_201016.jpg
    IMG_20200329_201016.jpg
    156.1 KB · Views: 134
  • IMG_20200329_132338.jpg
    IMG_20200329_132338.jpg
    148.5 KB · Views: 120
  • IMG_20200328_223206.jpg
    IMG_20200328_223206.jpg
    150.3 KB · Views: 121
  • IMG_20200328_214116.jpg
    IMG_20200328_214116.jpg
    153.1 KB · Views: 116
  • IMG_20200328_214107.jpg
    IMG_20200328_214107.jpg
    119.2 KB · Views: 135
Last edited:
OP
K

KrucksGarage

Well-known member
Joined
Jul 10, 2011
Messages
400
Location
Washington State
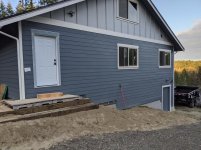
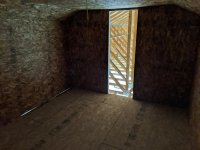
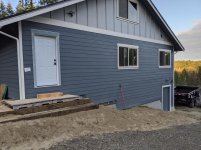
I tried to show here how I decided to frame in the port hole windows. This worked out pretty well and after drywall it will all work out great. There are several ways to frame round holes like this but this I felt was simplest and would allow for ready drywalling. I also just framed in the man door and cut that hole. I originally was doing to punch through the back wall but changed my mind and came through the side. Later I'll build a small deck, stair, and rail system to go from there shop to the loft room. For now the railroad ties will have to do!
 

Attachments

  • IMG_20200402_185827.jpg
    IMG_20200402_185827.jpg
    153.2 KB · Views: 172
  • IMG_20200330_193510.jpg
    IMG_20200330_193510.jpg
    125.2 KB · Views: 152
  • IMG_20200401_213808.jpg
    IMG_20200401_213808.jpg
    157.6 KB · Views: 150
  • IMG_20200401_213245.jpg
    IMG_20200401_213245.jpg
    151.5 KB · Views: 153
  • IMG_20200401_213222.jpg
    IMG_20200401_213222.jpg
    153 KB · Views: 158
  • IMG_20200401_212558.jpg
    IMG_20200401_212558.jpg
    153.4 KB · Views: 155
  • IMG_20200401_212513.jpg
    IMG_20200401_212513.jpg
    152.9 KB · Views: 167
OP
K

KrucksGarage

Well-known member
Joined
Jul 10, 2011
Messages
400
Location
Washington State
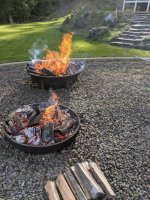
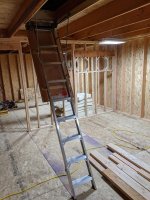
Yesterday I got my attic room insulated and sheeted in. When I built the shop I ordered 8 attic trusses to go over the big room (2nd story) which is 15x40, the attic above (3rd story) is 10x15 in the trusses. I just installed a simple pull-down stair system to access the space. The vertical hole will be for a 24x80 interior door that I'll use to access my truss system for future lighting work, insulation, etc. I just haven't bought one yet. The main room will have a ductless mini split system since it's a split room and I'll cut in a vented pass-through to get heat into the attic room which I think will work good enough. Not sure what I'll do with this little space yet but have a couple fun ideas. After installing one more 4x6 window, which is already framed in, I'll be into wiring all the electrical outlets, fixtures...etc. things are moving along pretty well so far. Took a nice break this afternoon and had a nice fire to burn up some scraps!
 

Attachments

  • IMG_20200404_172136.jpg
    IMG_20200404_172136.jpg
    150.9 KB · Views: 167
  • IMG_20200402_194306.jpg
    IMG_20200402_194306.jpg
    148.2 KB · Views: 151
  • MVIMG_20200403_211100.jpg
    MVIMG_20200403_211100.jpg
    132.8 KB · Views: 153
  • IMG_20200403_212237.jpg
    IMG_20200403_212237.jpg
    136.5 KB · Views: 146
  • IMG_20200403_211109.jpg
    IMG_20200403_211109.jpg
    148.5 KB · Views: 146
Last edited:
OP
K

KrucksGarage

Well-known member
Joined
Jul 10, 2011
Messages
400
Location
Washington State
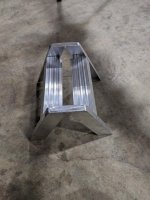
Had a leftover ladder section from trimming the attic later to fit so thought I'd chop it up and make a little step stool! Just need to add braces but might be handy for something...
 

Attachments

  • IMG_20200405_181018.jpg
    IMG_20200405_181018.jpg
    97.6 KB · Views: 119
  • IMG_20200405_181011.jpg
    IMG_20200405_181011.jpg
    102.8 KB · Views: 112

OOBER

Well-known member
Joined
Dec 2, 2012
Messages
153
Location
Kansas City
Awesome shop!

Thanks for keeping up with the updates and thorough explanations. I learned a lot reading through :thumbup:
 

drivesitfar

Well-known member
Joined
Oct 23, 2013
Messages
36,051
Location
Pacific Northwest
Krucks: good to see and hear that your framing is solid and well planned out. I personally love the brass port holes and I honestly can't say I've seen even one of those installed in a GJ garage so looking forward to seeing the finished job (maybe in person too someday).

I've always loved your fire pits and what a great home and setting you have there.

keep up the great work!!
 

GeddyT

Well-known member
Joined
Jun 17, 2015
Messages
1,243
Location
Bellingham, WA
Krucks, I forgot to mention a few weeks ago that I was down in your neck of the woods to get one last dirt bike ride in before the apocalypse. Thought about this thread as I was heading to Belfair.
 
OP
K

KrucksGarage

Well-known member
Joined
Jul 10, 2011
Messages
400
Location
Washington State
Krucks: good to see and hear that your framing is solid and well planned out. I personally love the brass port holes and I honestly can't say I've seen even one of those installed in a GJ garage so looking forward to seeing the finished job (maybe in person too someday).

I've always loved your fire pits and what a great home and setting you have there.

keep up the great work!!

Thanks Drives! :thumbup:

Hope things are well with you guys up there. I'm excited about the port holes too, should be a fun little feature when it's all put together. I'm going to wire in some port/stbd lighting up there too that I can flip a switch and turn on. I like little oddball unique features like that to keep things interesting, and it's a fun conversation topic due to where it came from. I look forward to sharing as it comes together! I'm sure when all the chaos blows over (COVID-19 for future reference) we'll get together and talk shop! good to hear from you my friend. :beer:
 
OP
K

KrucksGarage

Well-known member
Joined
Jul 10, 2011
Messages
400
Location
Washington State
Krucks, I forgot to mention a few weeks ago that I was down in your neck of the woods to get one last dirt bike ride in before the apocalypse. Thought about this thread as I was heading to Belfair.

I hear you there! I've spent a lot of time riding through the woods in Tahuya, great place to get out in the trails. I used to know it like the back of my hand out there, but it's been a little while for me. I just picked up a CRF-50 from a friend for my little guy and he's tearin' it up on the property with that thing so maybe I'll have get on a bike again here soon and take a run out there. I'm overdue. Stay healthy up north!
 
OP
K

KrucksGarage

Well-known member
Joined
Jul 10, 2011
Messages
400
Location
Washington State
Since I changed the internal design layout in this space, I framed in another 4x6 window by the man door the other day inside the room but can't cut it away until the new window shows up. I ordered that today, so probably a few weeks out on that one.

I also laid out the wiring plan today and have a shopping list of materials to get that part of the project moving forward.

The exterior photo gives an idea of where the added window will be located to the right of the man door, and I think it will look like it belonged there all along when complete.
 

Attachments

  • IMG_20200407_201009.jpg
    IMG_20200407_201009.jpg
    146.2 KB · Views: 122
  • IMG_20200402_185827.jpg
    IMG_20200402_185827.jpg
    153.2 KB · Views: 119
Last edited:
OP
K

KrucksGarage

Well-known member
Joined
Jul 10, 2011
Messages
400
Location
Washington State
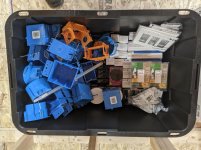
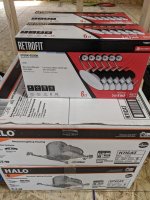
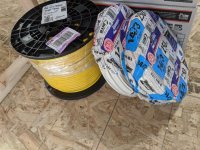
I picked up all my electrical materials and ready to start wiring up this new room. Going with the retrofit recessed lighting LED conversion kits. I wasn't going to put cans in because I don't care for that bright light in my eyes like usual but these will all be on dimmers with lenses so it should be pretty decent. The small room will also have a drop center light for over a table (or maybe pool table?) Each room will have it's own 3-way switch for each set of lights, so I can control the whole space from either side.
 

Attachments

  • IMG_20200411_132231.jpg
    IMG_20200411_132231.jpg
    153.3 KB · Views: 99
  • IMG_20200411_132242.jpg
    IMG_20200411_132242.jpg
    134.4 KB · Views: 96
  • IMG_20200411_132247.jpg
    IMG_20200411_132247.jpg
    157.6 KB · Views: 89
OP
K

KrucksGarage

Well-known member
Joined
Jul 10, 2011
Messages
400
Location
Washington State
I picked up these cool old school neon signs from my Dad yesterday. They've been on the shelf in his shop for longer than I've been alive. He was a grocer and these came from one of his stores years ago. I'm going to install a switched outlet for these in the room. I love the OLY one, local heritage!
 

Attachments

  • MVIMG_20200411_165254.jpg
    MVIMG_20200411_165254.jpg
    158.5 KB · Views: 85
  • IMG_20200411_165843.jpg
    IMG_20200411_165843.jpg
    152.8 KB · Views: 100

drivesitfar

Well-known member
Joined
Oct 23, 2013
Messages
36,051
Location
Pacific Northwest
Krucks: I love the new window up next to the top door (was that door always there too). are you making a small wood platform with a ramp or stairs to it to use that door or maybe a little deck alongside that side of the garage to look out at your property and fire pits?

neither were my favorite beer, but COOL SIGNS!!

HAPPY EASTER!!
 
To avoid these ads, REGISTER NOW!
Top Bottom