
You are using an out of date browser. It may not display this or other websites correctly.
You should upgrade or use an alternative browser.
You should upgrade or use an alternative browser.
Between 265 & 485 SQ/FT Nick's Two-Car Detached Vdub Garage
- Thread starter nicholam77
- Start date
Workspaces sized between 265 and 485 squarefeet.
sawduststeve
Well-known member
Nick,I like your style, I mean, REALLY like your style, pencil marks don’t line up, buy more Festool, Great work fella 

All the trim work, arcs and skirtings , around the door look very neat and tidy, you must be pleased") . I have various nail/ pin guns for work, but the latest purchase was a 23g headless pin gun, made by Arrow, I love it, it’s my favourite gun at the moment. I do a lot of onsite glazing and trim,and with this I don’t have to follow up with filling all the nail holes. I should have bought one years ago.
. I have various nail/ pin guns for work, but the latest purchase was a 23g headless pin gun, made by Arrow, I love it, it’s my favourite gun at the moment. I do a lot of onsite glazing and trim,and with this I don’t have to follow up with filling all the nail holes. I should have bought one years ago.  :
:
I had an air gun in which the piston stuck and blew everything backwards once, but once I opened it up, freed everything up and greased it all, away it went.
Keep safe
Steve
All the trim work, arcs and skirtings , around the door look very neat and tidy, you must be pleased
. I have various nail/ pin guns for work, but the latest purchase was a 23g headless pin gun, made by Arrow, I love it, it’s my favourite gun at the moment. I do a lot of onsite glazing and trim,and with this I don’t have to follow up with filling all the nail holes. I should have bought one years ago. : I had an air gun in which the piston stuck and blew everything backwards once, but once I opened it up, freed everything up and greased it all, away it went.
Keep safe
Steve
Small update:
Yesterday during baby nap time I tried to fix my errors on the MFT worksurface inner frame by Dremel-ing off the pocket screw tips.
Then I resawed a piece of 3/4" plywood to 1/8" thick on the table saw to glue as a shim on the outside of the frame I made a little too narrow. No pic, so that's probably confusing, but I'll show more later.
Also ordered track saw guide rail supports:

I decided to just get the Festool parts vs. try to make something, or go with the 3rd party, but more expensive, Right Angle Design supports.
This bench has been a LOT of effort and $$$ just to cut square pieces of plywood, but on the few shop projects I've been lining up pencil marks the errors have shown through. I'm really hoping it's going to be the foundation for some future house furniture projects that *hopefully* I can achieve a more professional level of squareness and accuracy.
Nick your accuracy will continue to improve as you progress on. You will look back on old projects or take them apart and think Why the hell did I build this way?
Remember you become a master craftsman by learning to hide your mistakes as you did with the 1/8" plywood. Most people are going to have no clue there is a mistake hiding in there.
As a few others have said I fixed my Bostitch Braid nailer with a few parts. The same parts as yours broke. I got them off of Amazon but I do have the parts list so that helped.
Keep the projects rolling,
Bret
OP
nicholam77
Well-known member
I look forward to see how you integrate the Festool ones into your MFT style bench. I’m in the middle of making my own benches in the shop and am stuck in analysis paralysis.
It will be pretty much identical to this video from Guy's Woodshop. I hear you about analysis paralysis. I am not even done with this project and I am already second guessing aspects of it.
Would love to see what you come up with, please let me know if you make a post on it!
Nick,I like your style, I mean, REALLY like your style, pencil marks don’t line up, buy more Festool, Great work fella
All the trim work, arcs and skirtings , around the door look very neat and tidy, you must be pleased
I had an air gun in which the piston stuck and blew everything backwards once, but once I opened it up, freed everything up and greased it all, away it went.
Keep safe
Steve
Ha, too funny. The trim was fairly easy to put back on since it was already cut and fitted from before. But yes, everything went back together well. It was almost, dare I say, fun??

I fully agree, not having to deal with nail heads or filling holes is pure bliss.
Hope you and your family are doing well, Steve!
Nick your accuracy will continue to improve as you progress on. You will look back on old projects or take them apart and think Why the hell did I build this way?
Remember you become a master craftsman by learning to hide your mistakes as you did with the 1/8" plywood. Most people are going to have no clue there is a mistake hiding in there.
As a few others have said I fixed my Bostitch Braid nailer with a few parts. The same parts as yours broke. I got them off of Amazon but I do have the parts list so that helped.
Keep the projects rolling,
Bret
Thanks for the encouraging words, as usual, Bret.
Here is a pic of the plywood spacer going on:
Already used the pin nailer again to tack it in place while getting clamps on. I don't have a million clamps so I used some maple boards to even out the pressure. The 12" F clamps are my favorite, would be nice to have more of those.
Been quite busy with work, but looking forward to getting back to the bench, soon.
OP
nicholam77
Well-known member
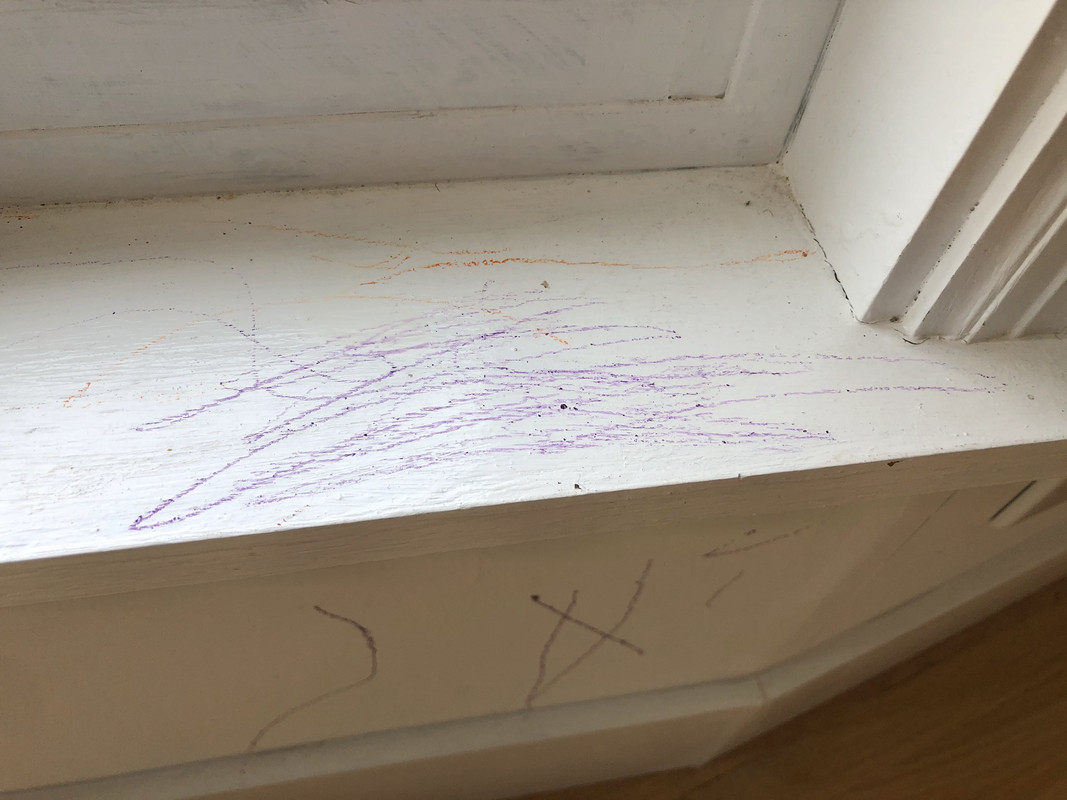
The great thing about painting all our walls and trim white is it makes a perfect drawing canvas for my daughter's crayons. 
OP
nicholam77
Well-known member
Magic erasers will become your/your wife's best friend
Haha, totally! Already got some on Amazon, worked great!
Mr. Roboto
Well-known member
Nick,
Just getting caught up now. Everything is looking good as usual (aside from your nailer breaking, that is unfortunate!)
The floor looks awesome, and even better now that all the base trim is back in place. It looks like a easy floor to clean up as well - great for someone with kids. Your mini kitchen reno really came out great.
Whats the next project?!
OP
nicholam77
Well-known member
As part of Covid-19 precautions I've been spraying things down with alcohol. I sprayed some iced coffees while they were sitting on the console table in our living room and the alcohol ruined the finish.  Oops!
Oops!

I sanded it down. I used the Festool sander because of the dust collection indoors, it is truly awesome.
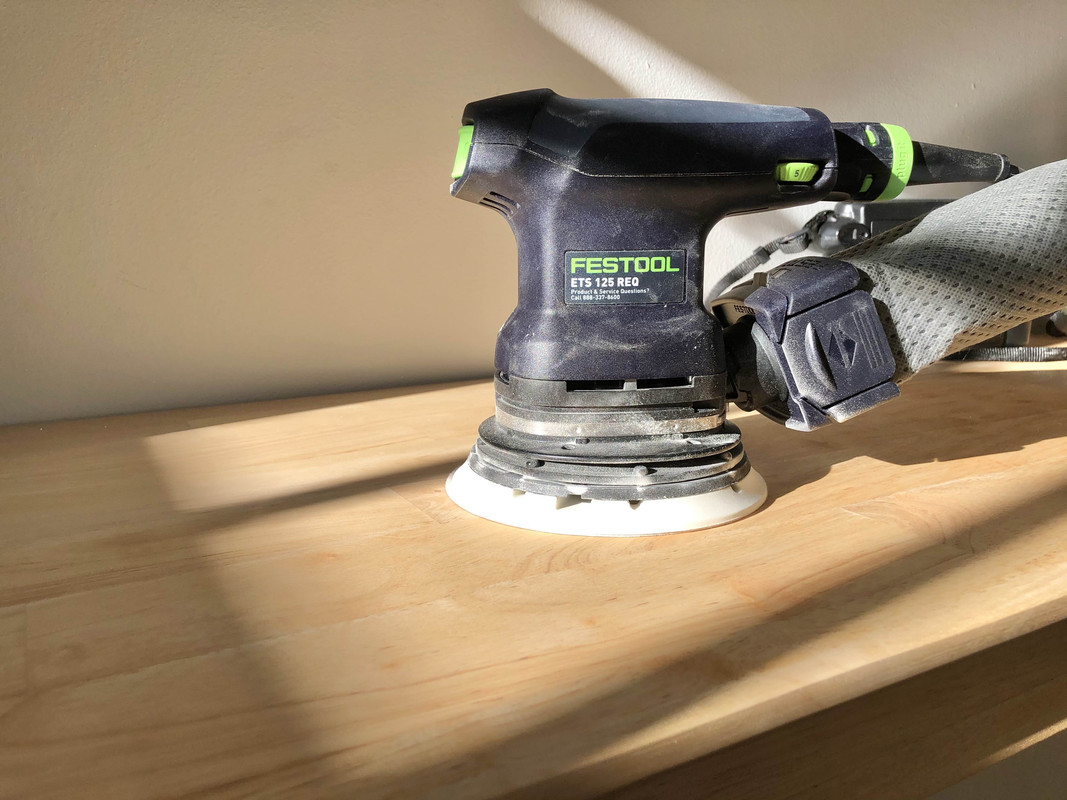
However I still think there is something not right about how it jerks around. I tried unscrewing and resetting the sanding pad, which seemed to help a bit, but it still tugs and pulls in weird ways, even with out the vacuum attached. With the pad off I noticed it has some sort of counter-weight or brake thingy that might be throwing it off? As much as I don't want to send it in for repairs I think I am going to contact Festool and see what they say. Because despite it's other good qualities I am still a bit disappointed in it.
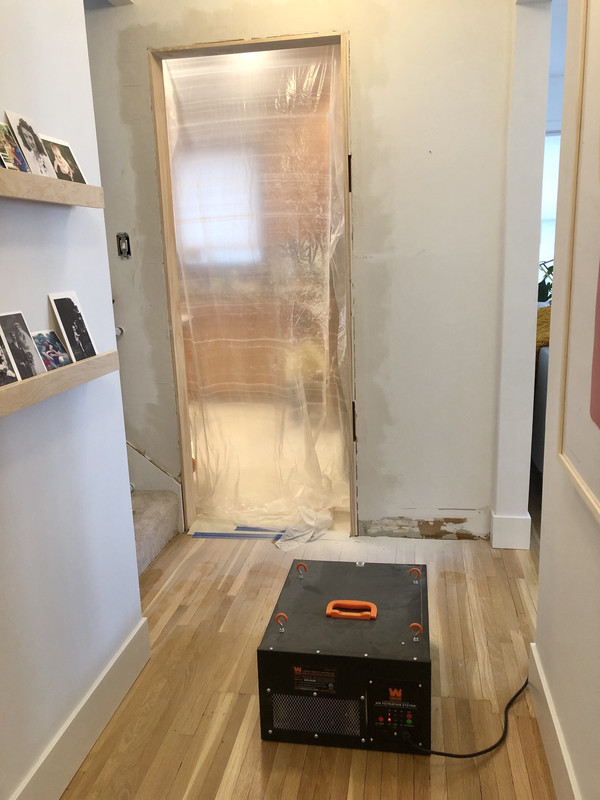
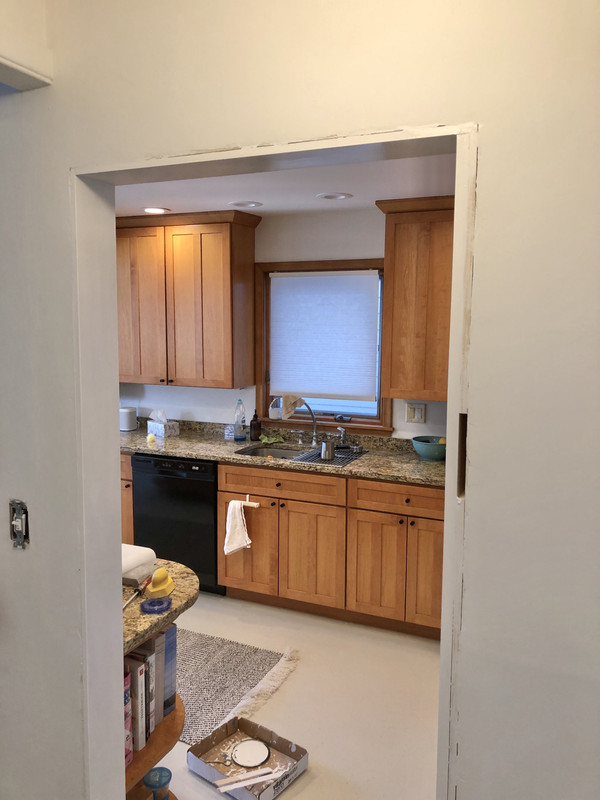
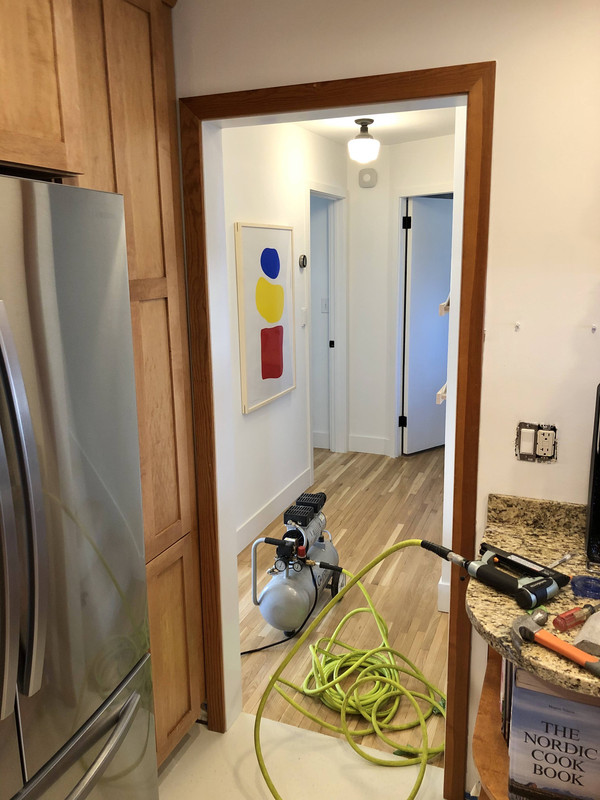
Continuing with the kitchen project I started to prep the kitchen-hallway passage. I chickened out on the drywall mudding approach and will just be putting the casing back on. On one side I had to space out with some plywood where I had removed some drywall that was in bad shape.
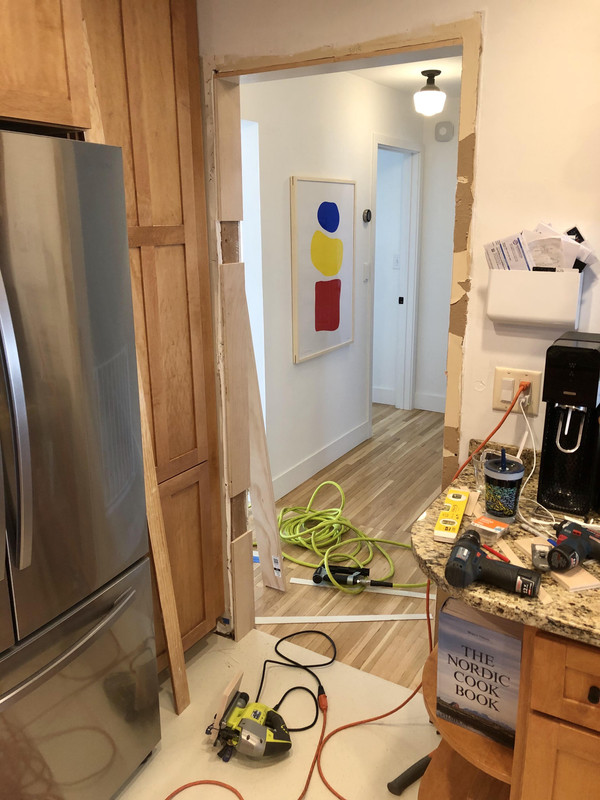
I didn't have enough that's why there's some gaps.
Next I marked the jamb pieces, some select pine boards I got at Home Depot. I had wanted to do hardwood like maple, but I needed them to be 1/2" x 4 5/8", which doesn't exist at big box stores. Only 3/4" thick. Without a planer or bandsaw I knew I would never be able to resaw maple on my table saw so I went with pine. I figure no matter the material eventually it is going to get beat up with kids running around.
Hey Bret, we are square twins
Resawing the pine:

Kind of a ********-clenching maneuver but got it done safely.
Used the track saw to crosscut to length. It was faster than dragging the miter saw out of the shed.
Last bit was to notch out for the unevenness between the kitchen and hallway flooring.
I love using this pull saw and it always makes me want to get into hand tool woodworking!
Ripping these boards relieved some stress and they had a little bend. Used some clamps to help keep things aligned, and then tacked it in.
Pretty tight fit:

Now cleaning up the drywall surround a bit and off to skim it out.
Then filling the pin holes, caulk, prime, paint, casing... it never ends!

Oops!
I sanded it down. I used the Festool sander because of the dust collection indoors, it is truly awesome.
However I still think there is something not right about how it jerks around. I tried unscrewing and resetting the sanding pad, which seemed to help a bit, but it still tugs and pulls in weird ways, even with out the vacuum attached. With the pad off I noticed it has some sort of counter-weight or brake thingy that might be throwing it off? As much as I don't want to send it in for repairs I think I am going to contact Festool and see what they say. Because despite it's other good qualities I am still a bit disappointed in it.
Continuing with the kitchen project I started to prep the kitchen-hallway passage. I chickened out on the drywall mudding approach and will just be putting the casing back on. On one side I had to space out with some plywood where I had removed some drywall that was in bad shape.
I didn't have enough that's why there's some gaps.
Next I marked the jamb pieces, some select pine boards I got at Home Depot. I had wanted to do hardwood like maple, but I needed them to be 1/2" x 4 5/8", which doesn't exist at big box stores. Only 3/4" thick. Without a planer or bandsaw I knew I would never be able to resaw maple on my table saw so I went with pine. I figure no matter the material eventually it is going to get beat up with kids running around.
Hey Bret, we are square twins
Resawing the pine:
Kind of a ********-clenching maneuver but got it done safely.
Used the track saw to crosscut to length. It was faster than dragging the miter saw out of the shed.
Last bit was to notch out for the unevenness between the kitchen and hallway flooring.
I love using this pull saw and it always makes me want to get into hand tool woodworking!
Ripping these boards relieved some stress and they had a little bend. Used some clamps to help keep things aligned, and then tacked it in.
Pretty tight fit:
Now cleaning up the drywall surround a bit and off to skim it out.
Then filling the pin holes, caulk, prime, paint, casing... it never ends!
OP
nicholam77
Well-known member
Nick,
Just getting caught up now. Everything is looking good as usual (aside from your nailer breaking, that is unfortunate!)
The floor looks awesome, and even better now that all the base trim is back in place. It looks like a easy floor to clean up as well - great for someone with kids. Your mini kitchen reno really came out great.
Whats the next project?!
Thanks for stopping in Roboto! And thank you, ultimately I am happy with the floors, too. Marmoleum is essentially linoleum, and yes it is very durable and easy to clean. I have noticed it mars easily from shoes etc, but easy to clean up and might just be me noticing it more on the light monochrome palette. While linoleum used to be widely used in homes, especially in kitchens, I do feel it's kind of a unique flooring choice in this day and age and I like that it has a subtle modern interpretation to it.
As much as I wish the kitchen was finished, there are lots of little things left to button up. Patching some holes, finishing the hallway passage, the curved toe kick sections on the stove side, changing over all the outlets and switches and cover plates to white ones, and more. Additionally I have some other "small" projects in mind like some floating shelves and a utensil organizer for the silverware drawer. Awhile back I started doing soft-close hinges and I still have 50% or more to go. I want to convert to soft-close drawer slides as well, but that will likely happen over time due to cost, or maybe prioritize select cabinets. And the last big kitchen project, hopefully this summer, whenever this damn coronavirus nightmare is over, will be countertops and sink and faucet.
Outside of that, the biggest immediate projects I hope to finish during the summer are my tracksaw station, built-ins for the living room, some toy storage for my daughter (trying to create a play room), and I have a bunch of artworks to frame.
And don't worry, after that I have many, many, many projects already in the brain, large and small.
dwlachowicz
Well-known member
I'm very impressed with all of your work Nick! I've always been one to work on cars/engines, but never got into woodworking. Spending some time on this site has me very intrigued. Looking at your thread and the various builds it is all very impressive. Keep up the good work!
OP
nicholam77
Well-known member
[mention]nicholam77 [/mention]
You’ve likely already found them but ahturf.com had decent deals on soft close slides
I've not used them but recall the name from Lilscorpion's thread. Thanks for the reminder, when it's time I will definitely check them out!
I'm very impressed with all of your work Nick! I've always been one to work on cars/engines, but never got into woodworking. Spending some time on this site has me very intrigued. Looking at your thread and the various builds it is all very impressive. Keep up the good work!
Thank you! I've never done any serious car work, but I think there is some crossover. If you do serious engine/car/fab stuff, you might like woodworking for similar reasons. I mostly got into it from a purely homeowner DIY perspective, but it blossomed from there, and I still feel like I'm on just the very tip of the iceberg. It's fascinating to me, creating something out of nothing, and relying on yourself to do that. But one downside if you have a small space is storing the tools! At least I've found it very tough to prioritize both car + woodworking. Thanks for checking out my thread!
OP
nicholam77
Well-known member
Small updates:
Tracksaw Bench
My rail guide pivot and support has not shipped yet. Customer service won't answer me. Starting to wonder if they even have it stocked.
I did order some T-Track the other day. At first was going to do Incra, but realized it was going to be very expensive!! I did some research and happened across another company, Orange Aluminum, which was a much better deal and they shipped it out same day. According to the internetz it will accommodate the Festool Quick Clamps I love so much.
Kitchen
Got the mudding done. No matter what you do sanding drywall compound is always a dust mess. I put up poly to protect the kitchen, wore a mask, brought my air filtration box inside, and shopvac'd right after. But still a haze in the air.
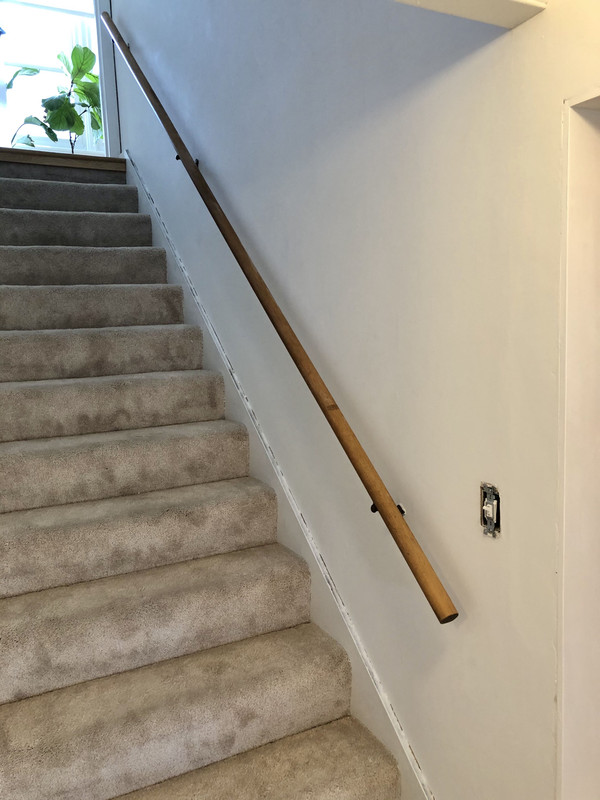
Removed the rest of the cove moulding on the stair strings and skimmed that out too while I was at it.
Despite being in "quarantine mode", it's hard to find dedicated time for projects, so I try and just do a little each day. This morning I finished up painting.
I think my mudding came out pretty good this time. It's always super satisfying to put paint on and watch the lines disappear into one color.
Mother Nature has been taking us on a wild ride here in MN the past week. One day 70 F, the next day 25 F and snowing. One day it snowed and melted several times throughout the day, alternating between sunny and snowy fog.
Here's a quick video from the front door cam:

Back in the 30's now I lit another fire the other day to use up the last few logs.
I'm ready for the nicer weather already, working from home and not being able to get outside much is a drag!
Tracksaw Bench
My rail guide pivot and support has not shipped yet. Customer service won't answer me. Starting to wonder if they even have it stocked.
I did order some T-Track the other day. At first was going to do Incra, but realized it was going to be very expensive!! I did some research and happened across another company, Orange Aluminum, which was a much better deal and they shipped it out same day. According to the internetz it will accommodate the Festool Quick Clamps I love so much.
Kitchen
Got the mudding done. No matter what you do sanding drywall compound is always a dust mess. I put up poly to protect the kitchen, wore a mask, brought my air filtration box inside, and shopvac'd right after. But still a haze in the air.
Removed the rest of the cove moulding on the stair strings and skimmed that out too while I was at it.
Despite being in "quarantine mode", it's hard to find dedicated time for projects, so I try and just do a little each day. This morning I finished up painting.
I think my mudding came out pretty good this time. It's always super satisfying to put paint on and watch the lines disappear into one color.
Mother Nature has been taking us on a wild ride here in MN the past week. One day 70 F, the next day 25 F and snowing. One day it snowed and melted several times throughout the day, alternating between sunny and snowy fog.
Here's a quick video from the front door cam:
Back in the 30's now I lit another fire the other day to use up the last few logs.
I'm ready for the nicer weather already, working from home and not being able to get outside much is a drag!
dwlachowicz
Well-known member
We got snow Tuesday night, woke up to an unpleasant surprise of coverage Wednesday morning. And it's currently snowing as well. This better be the last of it
OP
nicholam77
Well-known member
Workbench. So. Messy.
This tracksaw station project is really taking a toll on it.

Thanks! I'm no pro and haven't done anything fancy like taped joints. Just a lot of skimming and feathering. I'm sure a pro would be 10x more efficient, but I keep at it until it's decent looking. It's no fun though! Bigger jobs like the bathroom and removing popcorn ceiling in the hallway I've hired out.
I think we're out of the woods here. Time for summer!
I've been quietly making some progress on stuff... just waiting for more progress to post instead of piecemealing every little step. I should have an update soon.
This tracksaw station project is really taking a toll on it.
It's looking great Nick! Man, drywall joints are one thing I decided early on to have someone else do
Thanks! I'm no pro and haven't done anything fancy like taped joints. Just a lot of skimming and feathering. I'm sure a pro would be 10x more efficient, but I keep at it until it's decent looking. It's no fun though! Bigger jobs like the bathroom and removing popcorn ceiling in the hallway I've hired out.
Your making progress Nick. We have had unusually cooler days here as well but no White stuff thank goodness. Low 40's at night is unheard of here once we hit Spring.
Bret
We got snow Tuesday night, woke up to an unpleasant surprise of coverage Wednesday morning. And it's currently snowing as well. This better be the last of it
I think we're out of the woods here. Time for summer!
I've been quietly making some progress on stuff... just waiting for more progress to post instead of piecemealing every little step. I should have an update soon.
Trapps
ALLIANCE MEMBER
Nick, the place is looking great. Concealed errors will bug you, no one else though, as others have stated. For those things you are really bothered by you'll go back and correct it...
Mud is a PITA. Your comment on efficiency is spot on; I can do it but a pro will be done faster and better by a significant margin. I suppose this is due to drywall mudding being as much 'art' as it is process and only through lots of experience can one become proficient. At least that's how I view it.
This is a daily dilemma for me. Sometimes I fail. It's ok and a part of the GJ addiction so many of us have.
Mud is a PITA. Your comment on efficiency is spot on; I can do it but a pro will be done faster and better by a significant margin. I suppose this is due to drywall mudding being as much 'art' as it is process and only through lots of experience can one become proficient. At least that's how I view it.
I've been quietly making some progress on stuff... just waiting for more progress to post instead of piecemealing every little step. I should have an update soon.
This is a daily dilemma for me. Sometimes I fail. It's ok and a part of the GJ addiction so many of us have.
Nice progress which the quarantine mode doesn't seem to slower much. Floor turned out great! Even though I'm not doing much woodworking currently, I still like to read your thread with the good photos and solutions. Also, showing some things that didn't go as plan can help us readers, and we all know you won't make the same mistake again, so you're again one experience more wiser.
Madone_si
Well-known member
Just finished reading your whole thread. Amazing progress on garage build and good to see you are learning in the process. Remember every mistake is a way to learn for next time and buying new toys (tools!) is way of life for most of us on here, I do love a new tool to add to the collection and use as do I think most of us GJ people do
I am like you I like to make stuff but it must be function and tidy in the garage.
Keep up the great work.
I am like you I like to make stuff but it must be function and tidy in the garage.
Keep up the great work.
OP
nicholam77
Well-known member
Nick, the place is looking great. Concealed errors will bug you, no one else though, as others have stated. For those things you are really bothered by you'll go back and correct it...
Thanks, man!
Nice progress which the quarantine mode doesn't seem to slower much. Floor turned out great! Even though I'm not doing much woodworking currently, I still like to read your thread with the good photos and solutions. Also, showing some things that didn't go as plan can help us readers, and we all know you won't make the same mistake again, so you're again one experience more wiser.
If anything, quarantine has given me a little extra time here and there.
I'll try to share more of that, trust me, I'm always making mistakes!
Just finished reading your whole thread. Amazing progress on garage build and good to see you are learning in the process. Remember every mistake is a way to learn for next time and buying new toys (tools!) is way of life for most of us on here, I do love a new tool to add to the collection and use as do I think most of us GJ people do
I am like you I like to make stuff but it must be function and tidy in the garage.
Keep up the great work.
Wow, that's dedication, thanks for reading! I learn something on every project and I'm always trying to improve. The key for me is not forgetting what I've learned
I do love new tools... glad we have that in common!
OP
nicholam77
Well-known member
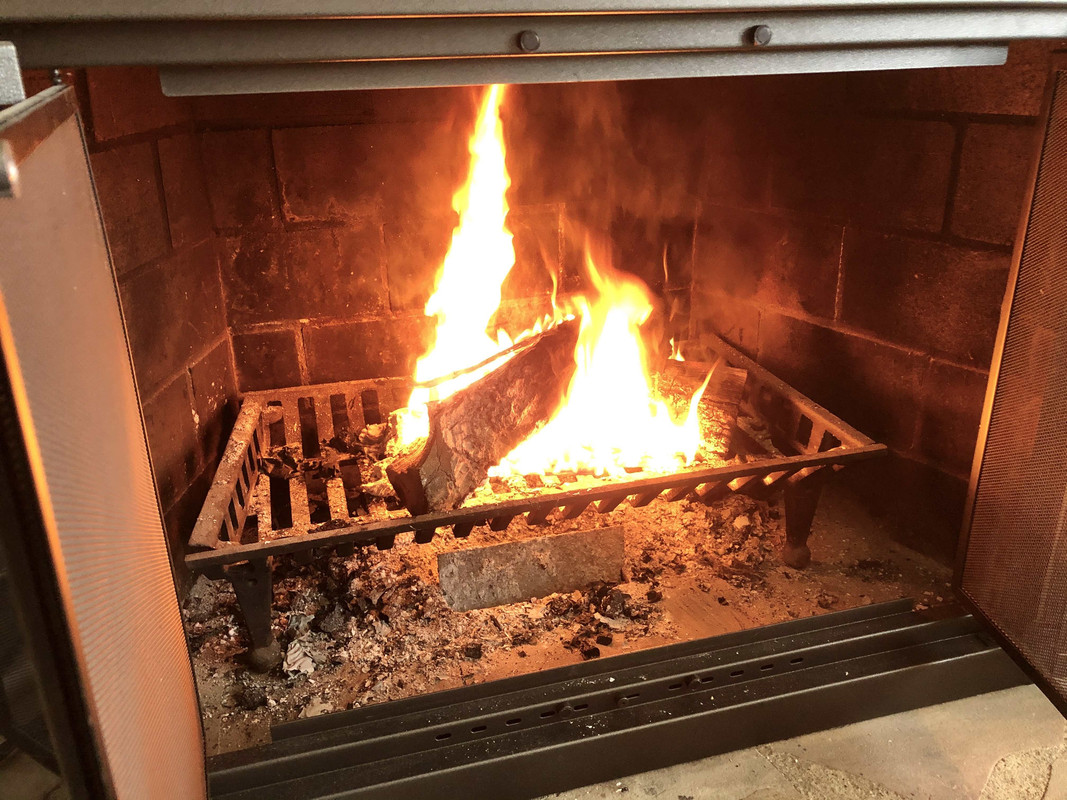
I am working on an update, but I'll just leave this here for now. Today was rainy. And cloudy. All day long. I had a slow day at work (working from home), but due to the rain I just didn't feel motivated to do anything.
So I lit a fire.
It's the last of my firewood on hand and I decided to try an "upside down" fire. I've done about 10 fires in this house and always feel like I have to constantly tend to them and can't sit back and enjoy it. Figured I was doing something wrong or maybe something wrong with my setup.
Well, this "upside down" fire worked a treat.

It's pretty much what it sounds like. Big logs on bottom. Then medium. Then small splits, then newspaper and tinder on top.

Supposedly burns cleaner, and requires little to no tending, as the hot embers trickle down and light the progressively larger layers below as it burns.
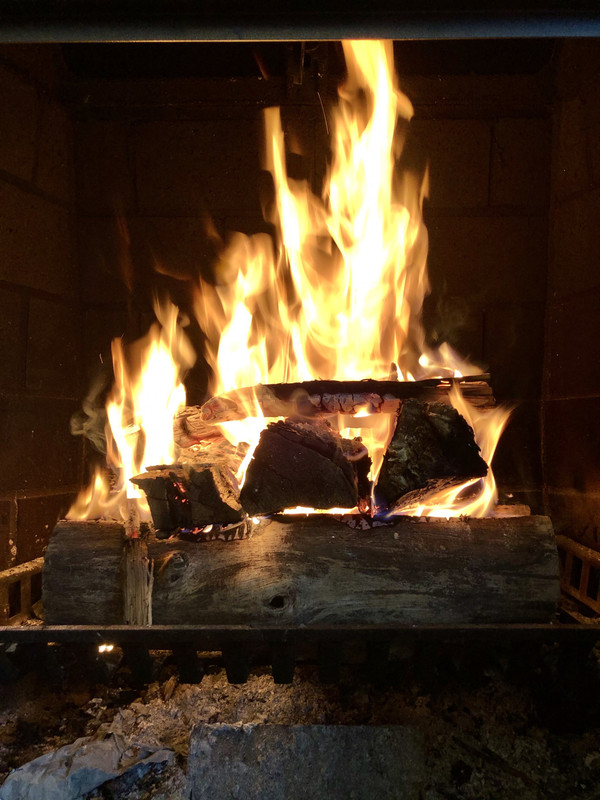
I was surprised, it definitely worked as advertised! In fact I was so confident in how it was going I went to the kitchen to make a latte.


Enjoyed that coupled with some light reading material. One can dream
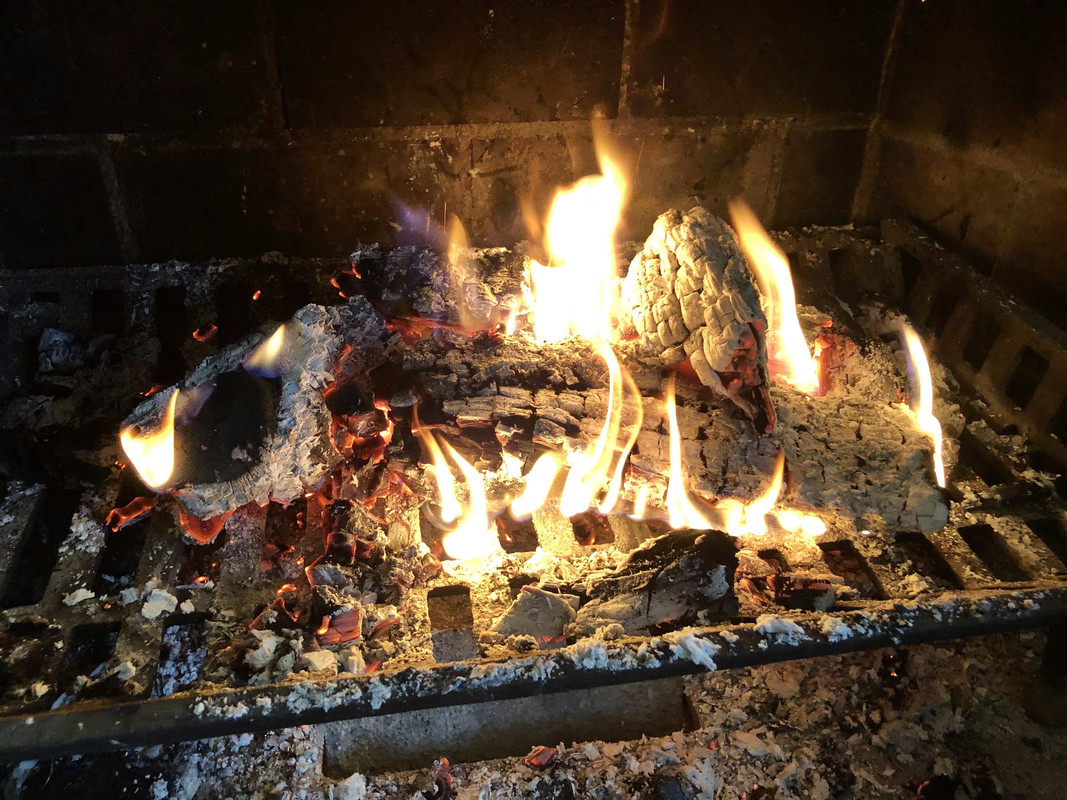
After 1.5 hours of good hot flame, I was left with thoroughly burned logs and extremely hot embers.
The best part is I got to actually enjoy it, instead of fight to keep it alive the whole time.
I don't know if it was the rain or the fire or both, but hunkering down and getting cozy for a couple of hours... and it doesn't seem like this quarantine is so bothersome after all.
Actual project content to come soon.
So I lit a fire.
It's the last of my firewood on hand and I decided to try an "upside down" fire. I've done about 10 fires in this house and always feel like I have to constantly tend to them and can't sit back and enjoy it. Figured I was doing something wrong or maybe something wrong with my setup.
Well, this "upside down" fire worked a treat.
It's pretty much what it sounds like. Big logs on bottom. Then medium. Then small splits, then newspaper and tinder on top.
Supposedly burns cleaner, and requires little to no tending, as the hot embers trickle down and light the progressively larger layers below as it burns.
I was surprised, it definitely worked as advertised! In fact I was so confident in how it was going I went to the kitchen to make a latte.
Enjoyed that coupled with some light reading material. One can dream
After 1.5 hours of good hot flame, I was left with thoroughly burned logs and extremely hot embers.
The best part is I got to actually enjoy it, instead of fight to keep it alive the whole time.
I don't know if it was the rain or the fire or both, but hunkering down and getting cozy for a couple of hours... and it doesn't seem like this quarantine is so bothersome after all.
Actual project content to come soon.
OP
nicholam77
Well-known member
The fire looked like a success, I'd try the upside down fire myself but our fireplace is fake
Haha, I've wrestled with getting a gas insert, partially due to convenience with kids (hard to find time to dedicate to wood burning fire, would be nice to flip it on for 15min here and there
), and also efficiency, it would do wonders for my living room in winter. But the one I wanted was going to be $7k installed, and there are just too many other things I want to get to, first. Maybe one day.
OP
nicholam77
Well-known member
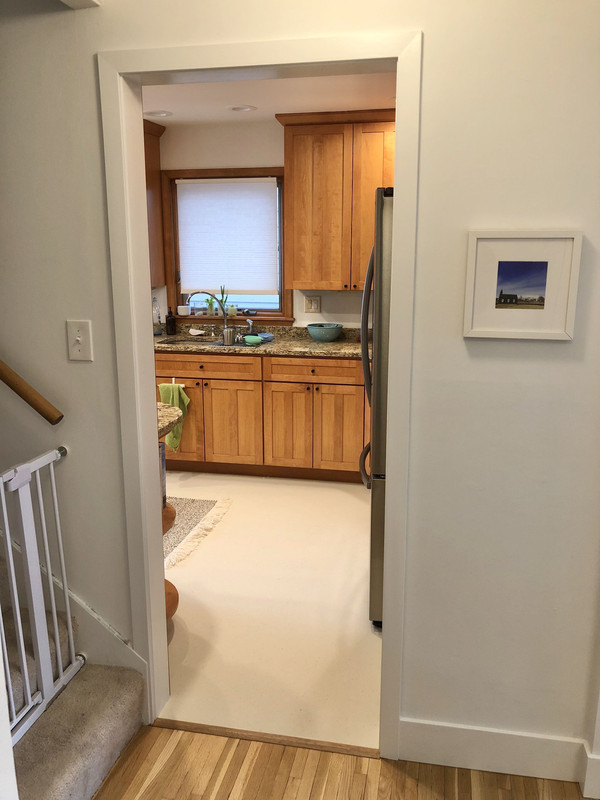
Finishing the Kitchen Passageway:
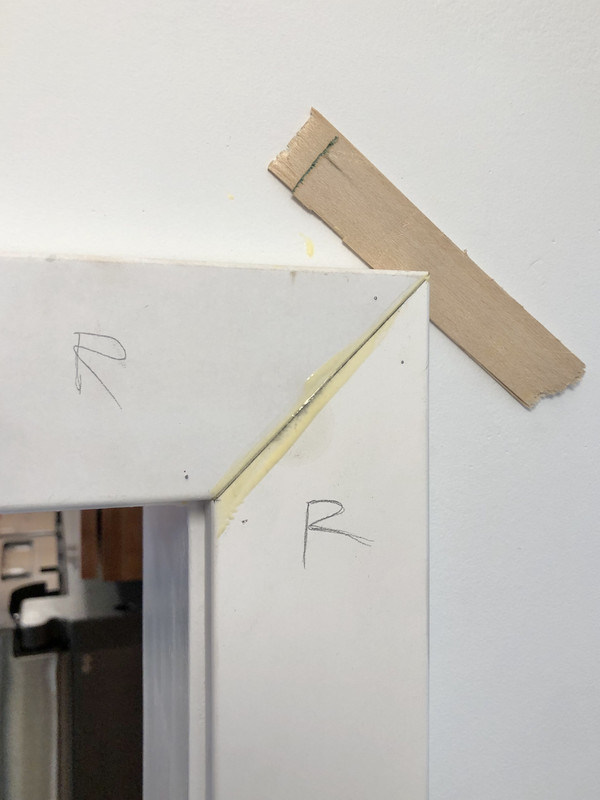
Got the original trim tacked on the kitchen side. Only had to adjust one miter.
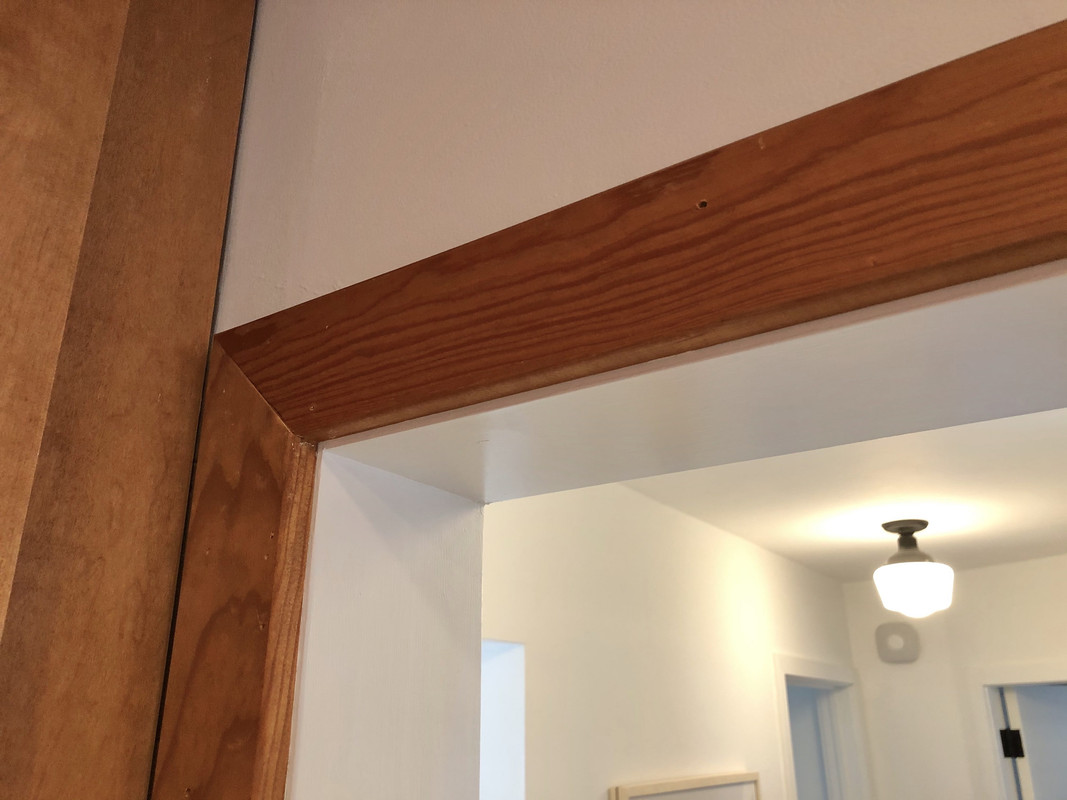
On the other side I did the same MDF I have throughout the living room / hall / bedrooms.
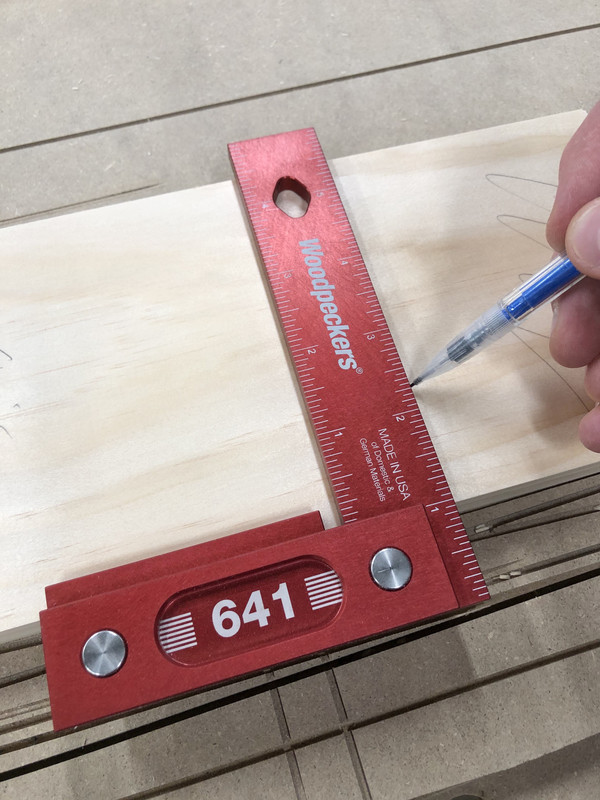
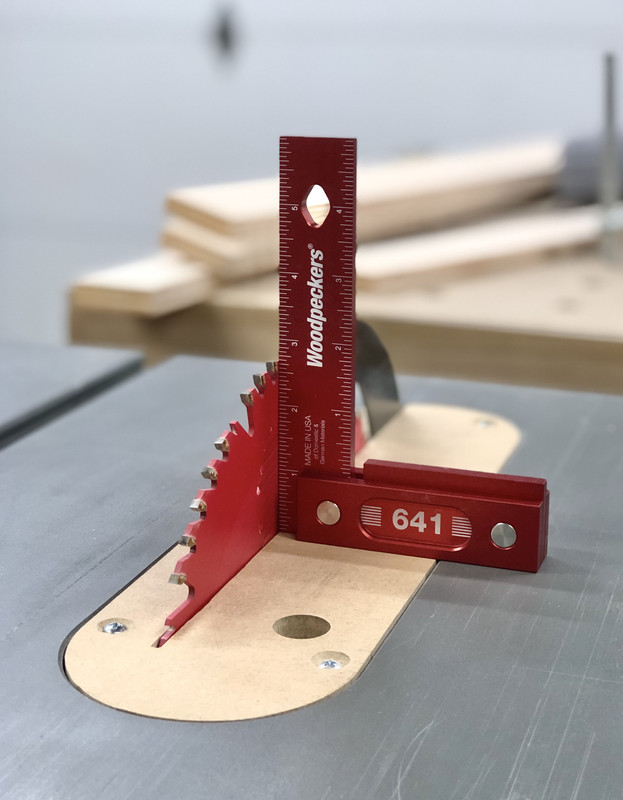
My go-to tool to lay out trim is a combination square.
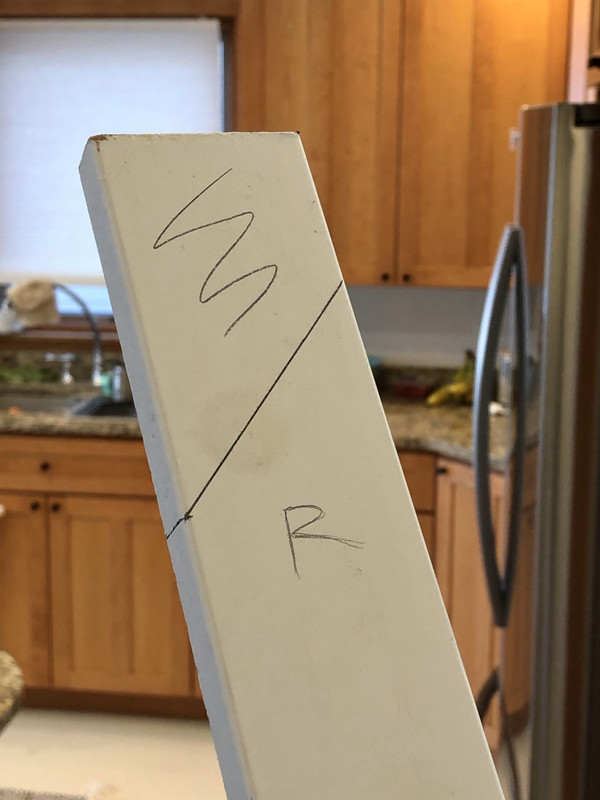
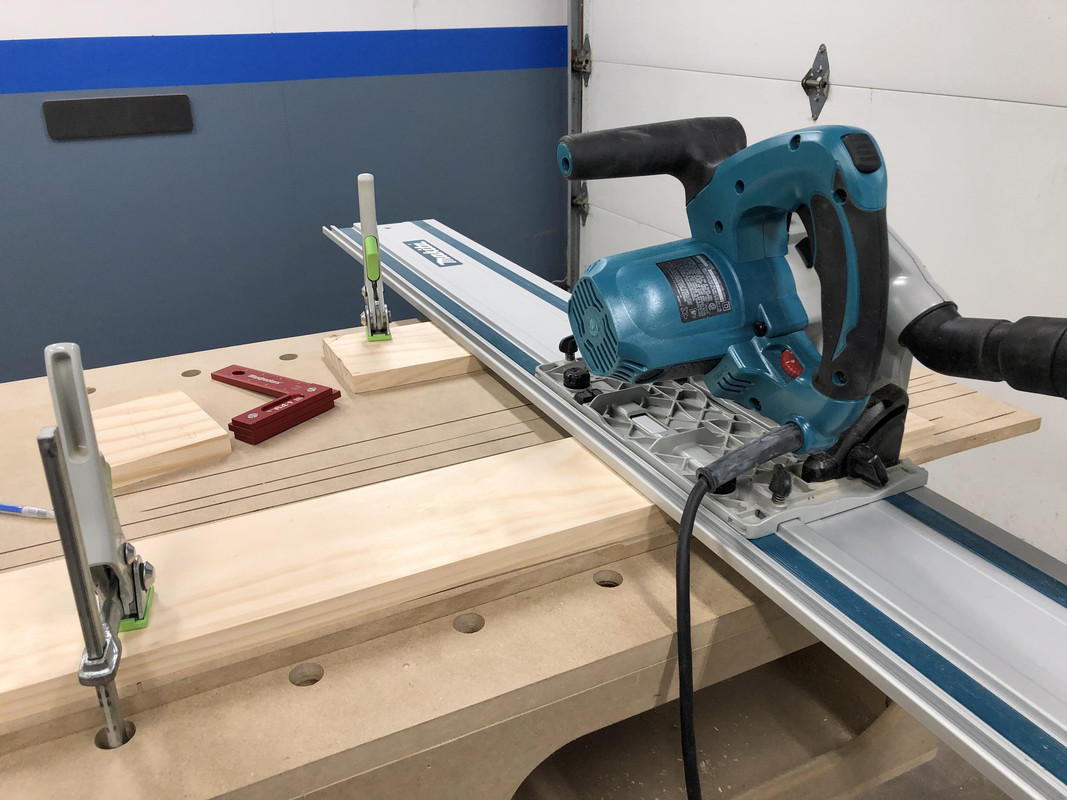
I always label my parts so I don't get confused after I take it out to the saw. I did all cuts with the track saw. It was just easier. Line up to pencil mark, BOOM, done.
On the left side I had the stair string to contend with.
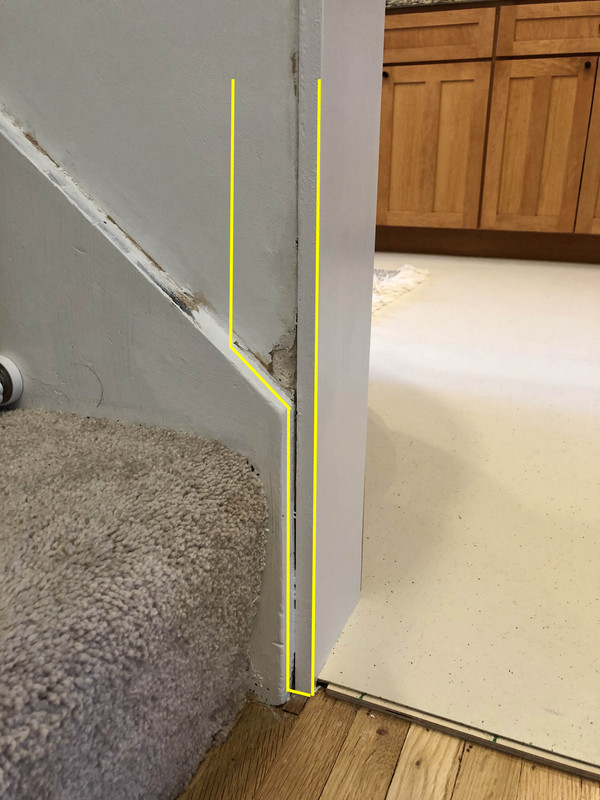
I used the combination square to take measurements and transfer to the trim.
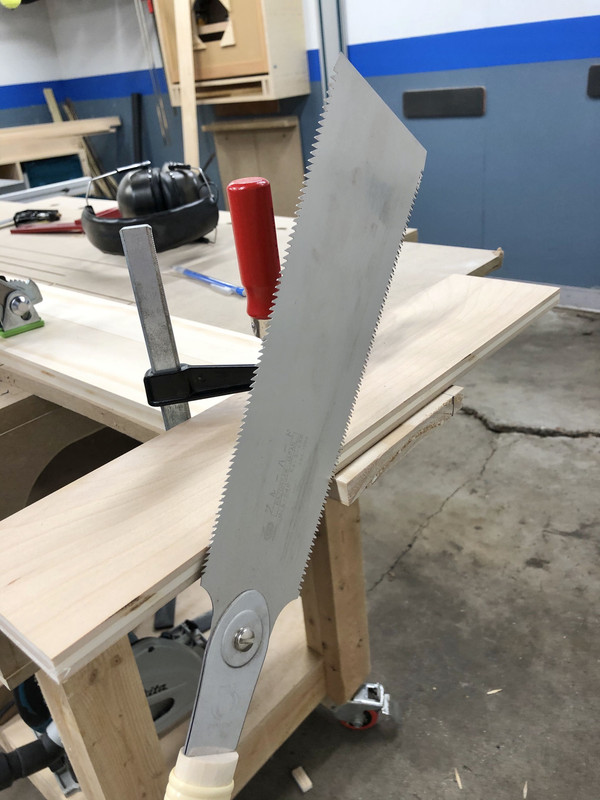
The majority I plunged with the track saw, then finished up with hand saw.
If possible I like to use the pull saw against a plywood guide block. This ensures my cut is straight, and is easier to start.
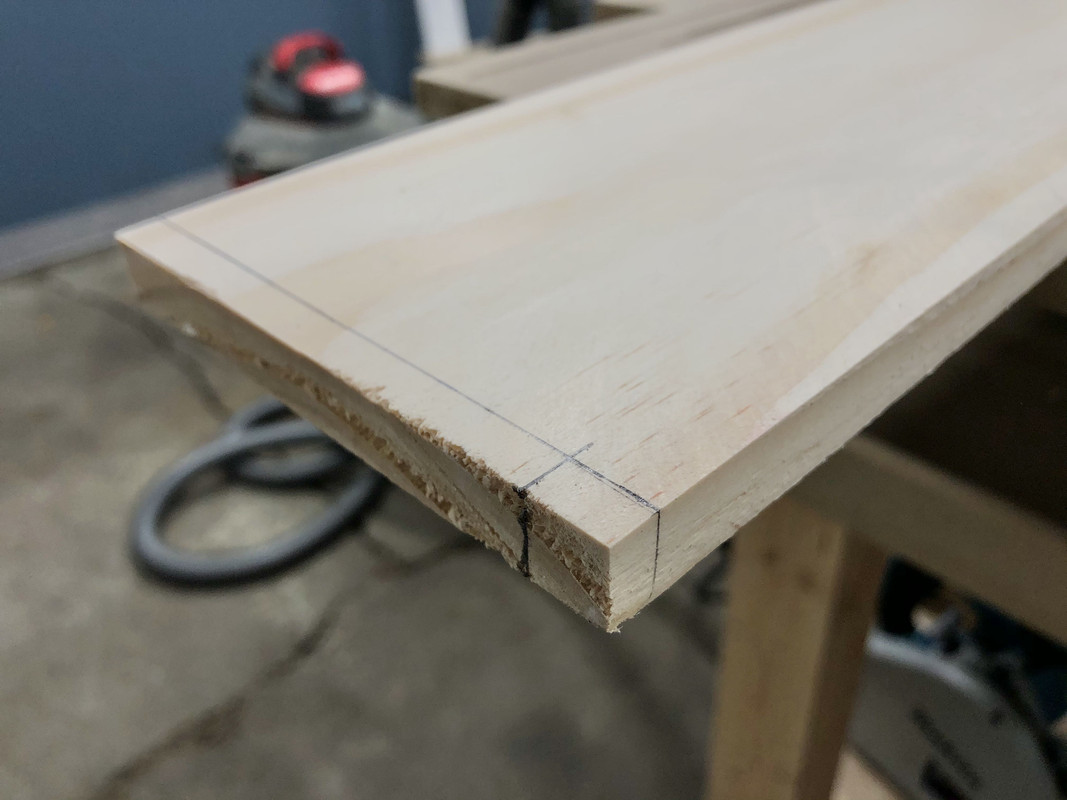
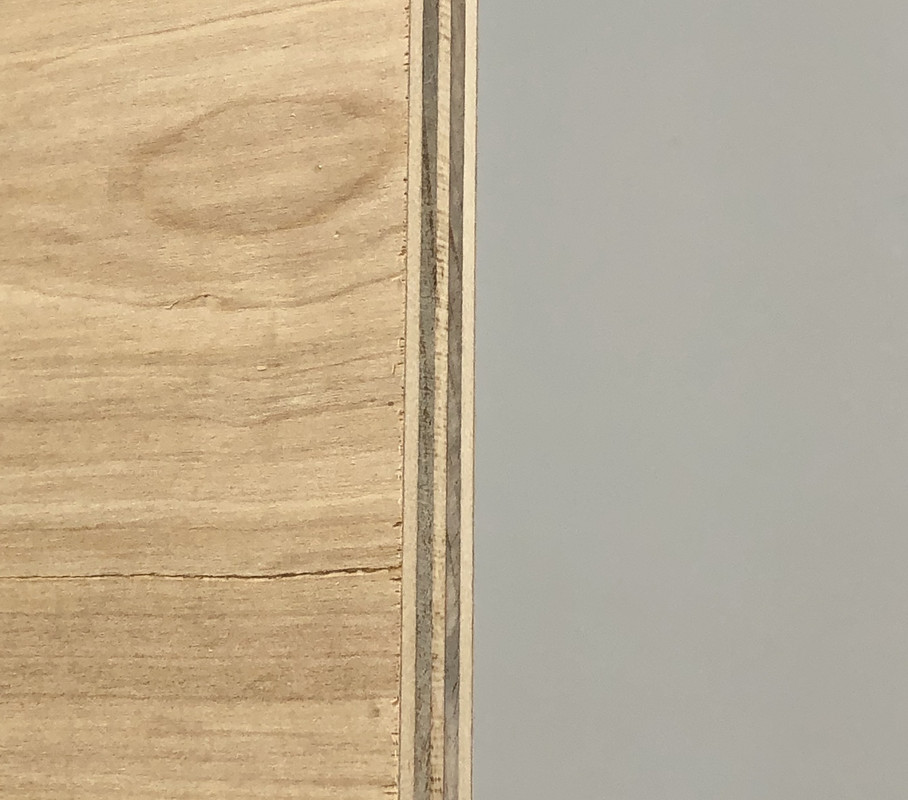
I made sure to glue my miters this time as I've had problems with others (even though tight initially) opening up during winter:
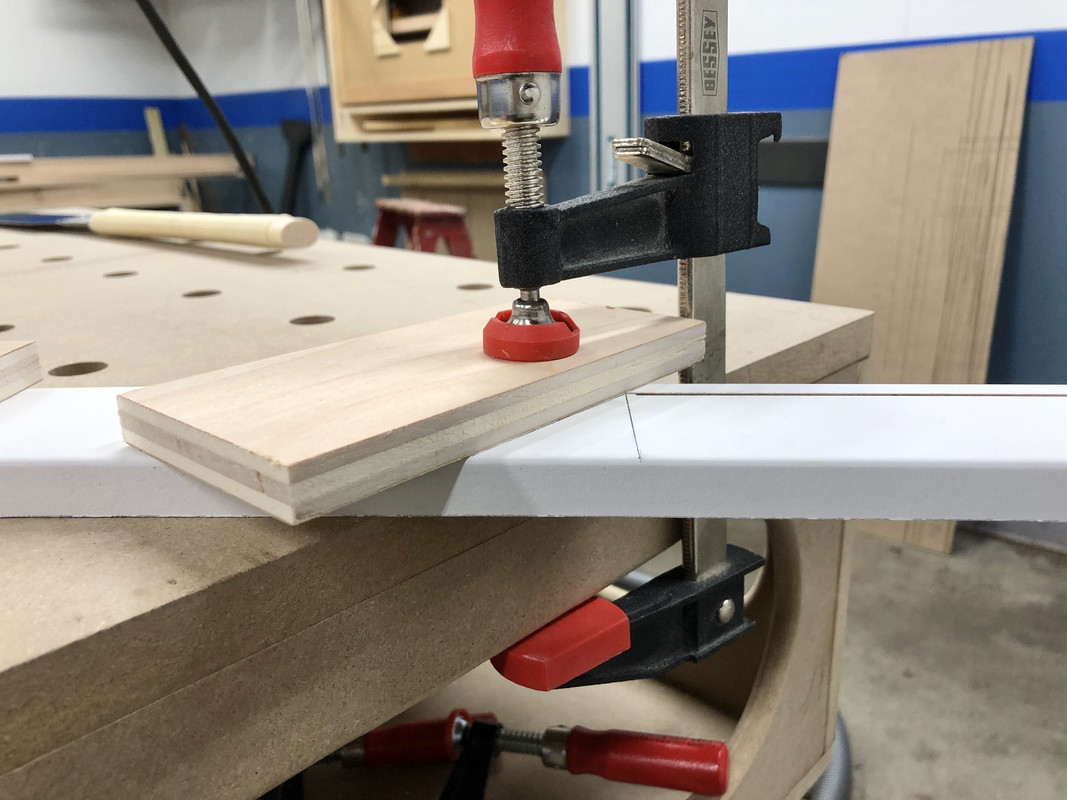
I always prioritize getting the inside edge nice and tight if the jamb and adjacent wall surface aren't flush. A shim is used here to prevent the pin nails from sucking it in on the outside. Once the nails are in the shim can be removed.
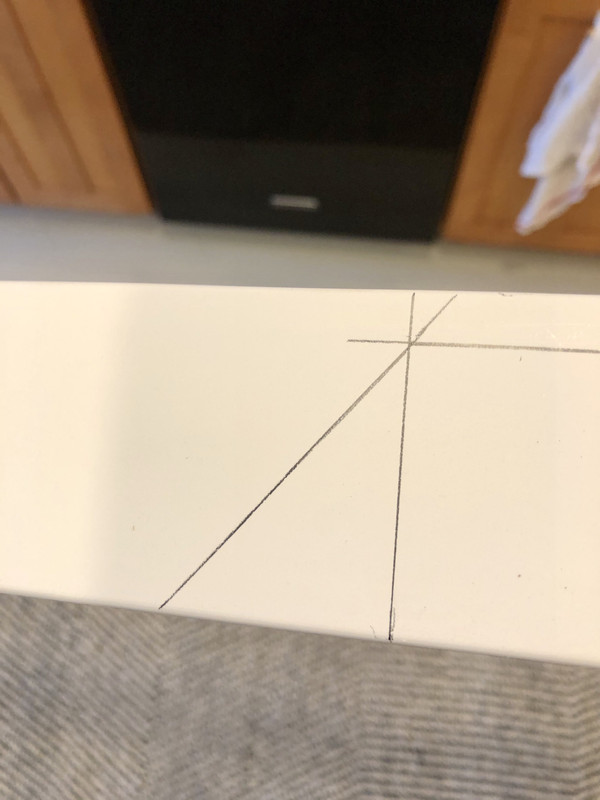
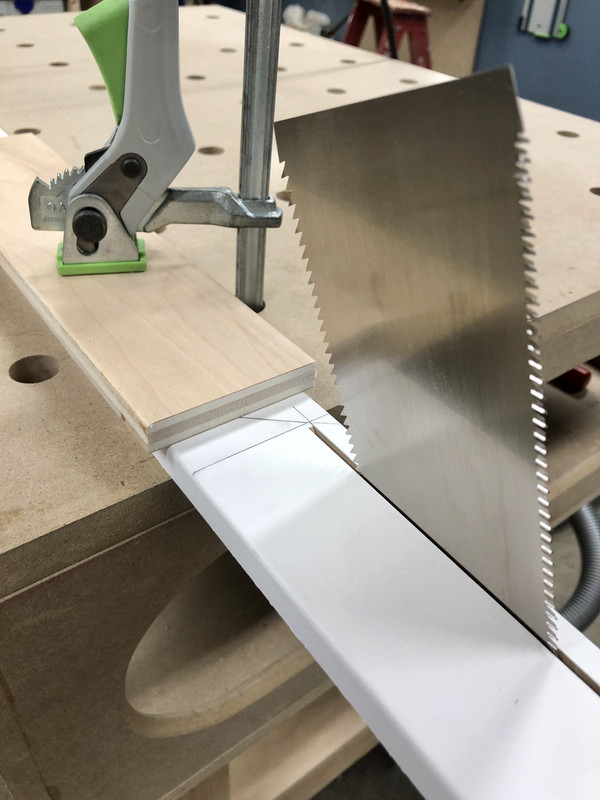
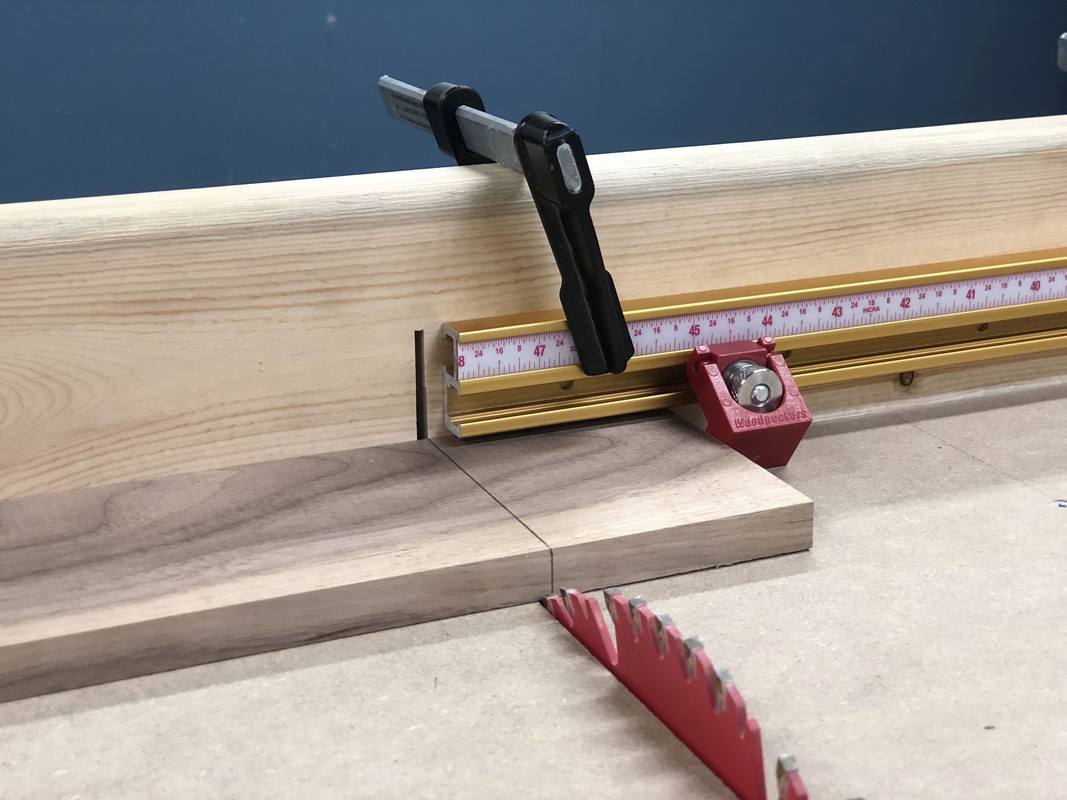
Last piece of the puzzle was the transition from the hallway oak to the marmoleum, as they are different heights. To do this I made a threshold strip out of a leftover piece of flooring. I started by ripping it into this pseudo-wedge shape on the table saw:
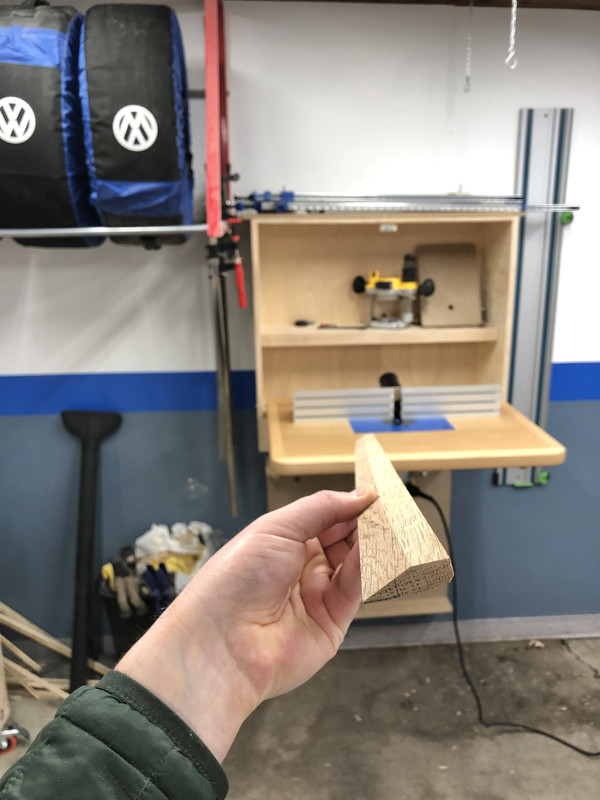
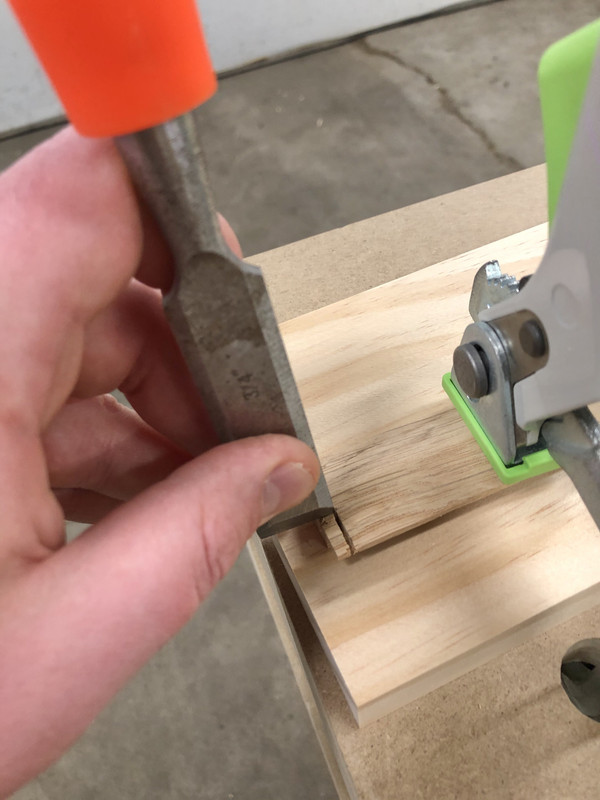
Rabbeted out the back at the router to account for some plywood underlayment at the edge of the marmoleum:
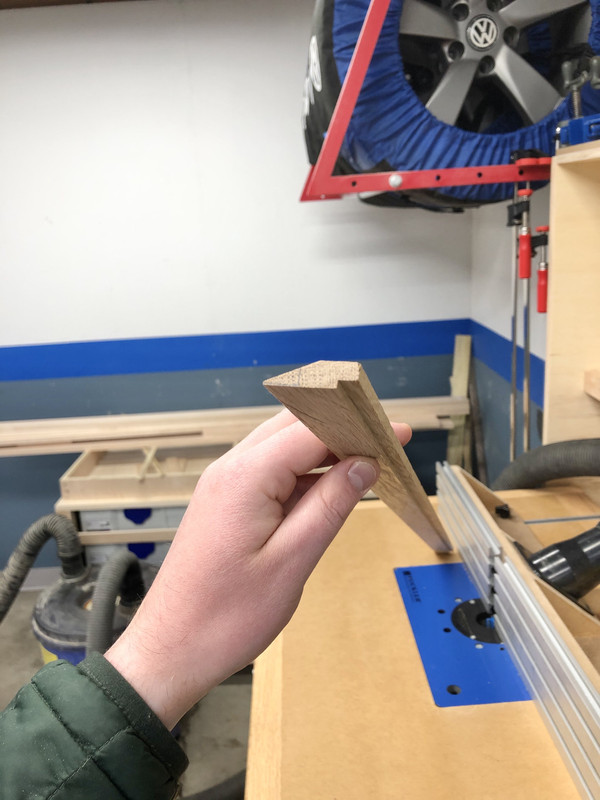
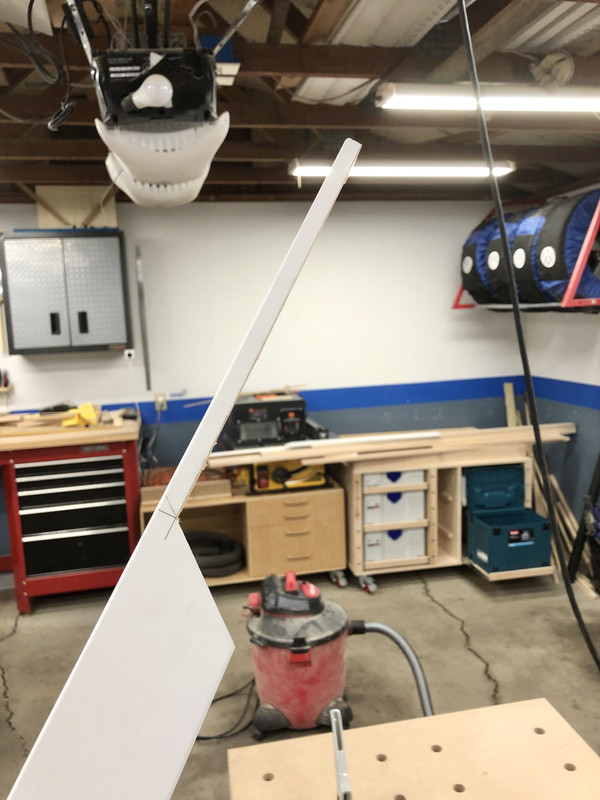
Because it would stick out past the casing I decided to notch out the ends for a more integrated fit:
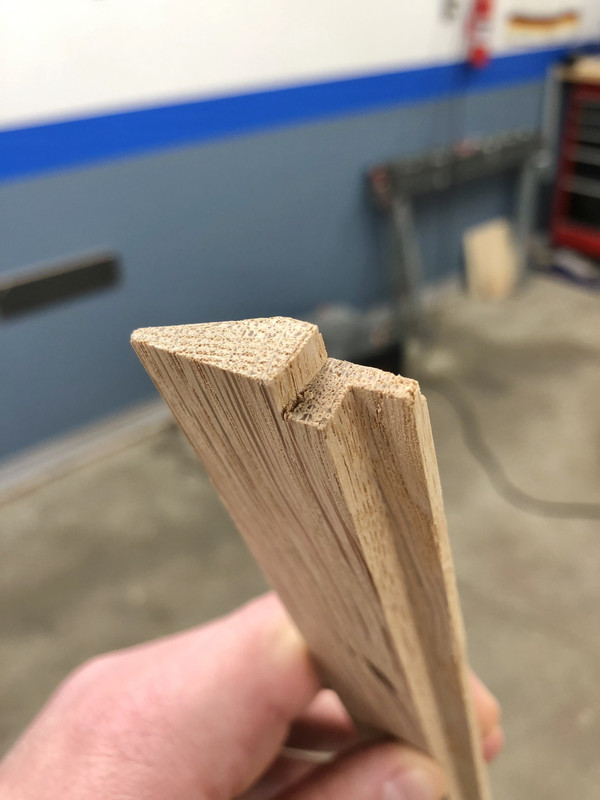
Lots of careful measuring and it fit just right. Applying the same finish as the floors, Bona sealer and clear poly top coat.
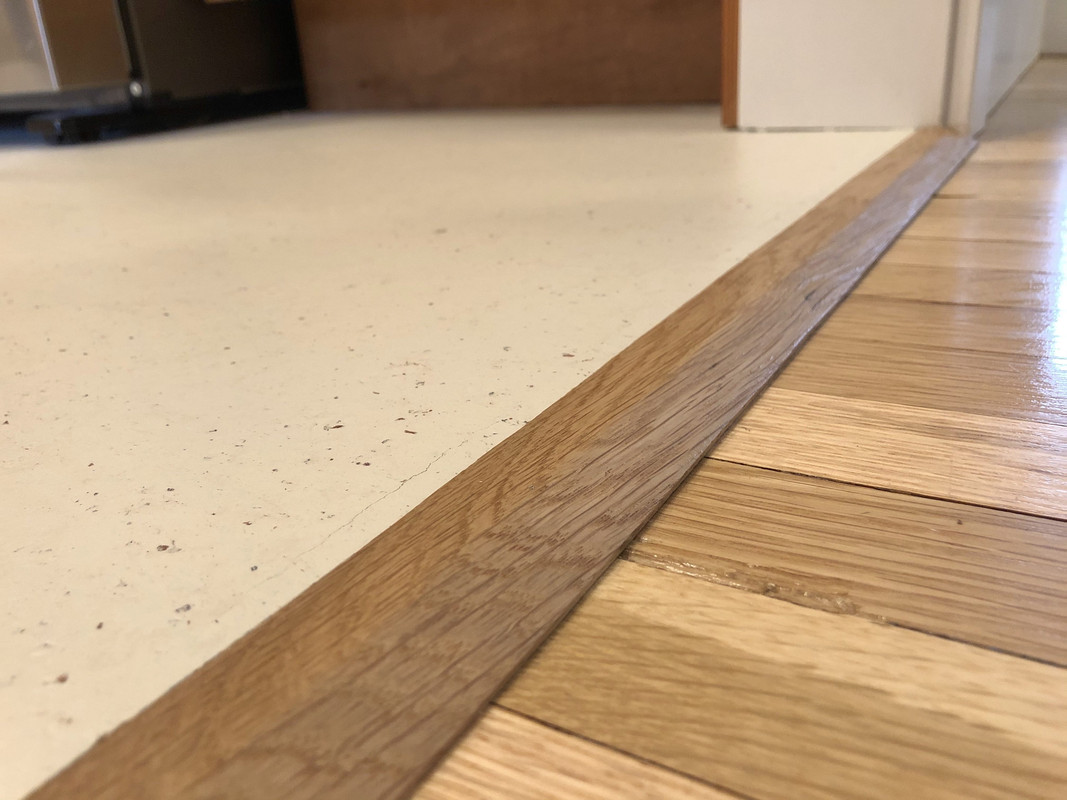
And now it's finished! (When I told my wife that she kindly reminded me that I still need to do the stairs, back door threshold, and curved toe kicks )
Got the original trim tacked on the kitchen side. Only had to adjust one miter.
On the other side I did the same MDF I have throughout the living room / hall / bedrooms.
My go-to tool to lay out trim is a combination square.
I always label my parts so I don't get confused after I take it out to the saw. I did all cuts with the track saw. It was just easier. Line up to pencil mark, BOOM, done.
On the left side I had the stair string to contend with.
I used the combination square to take measurements and transfer to the trim.
The majority I plunged with the track saw, then finished up with hand saw.
If possible I like to use the pull saw against a plywood guide block. This ensures my cut is straight, and is easier to start.
I made sure to glue my miters this time as I've had problems with others (even though tight initially) opening up during winter:
I always prioritize getting the inside edge nice and tight if the jamb and adjacent wall surface aren't flush. A shim is used here to prevent the pin nails from sucking it in on the outside. Once the nails are in the shim can be removed.
Last piece of the puzzle was the transition from the hallway oak to the marmoleum, as they are different heights. To do this I made a threshold strip out of a leftover piece of flooring. I started by ripping it into this pseudo-wedge shape on the table saw:
Rabbeted out the back at the router to account for some plywood underlayment at the edge of the marmoleum:
Because it would stick out past the casing I decided to notch out the ends for a more integrated fit:
Lots of careful measuring and it fit just right. Applying the same finish as the floors, Bona sealer and clear poly top coat.
And now it's finished! (When I told my wife that she kindly reminded me that I still need to do the stairs, back door threshold, and curved toe kicks
)
Bob Heine
ALLIANCE MEMBER
+1Man that looks fantastic Nick!
Bret
Grumblebum
Well-known member
Hi Nick, I'm looking at that Makita plunge saw daily now. Hopefully will be starting my saw cart builds soon and will need to tear down several 8'x4' sheets, I even re-read your whole thread to look over your router table build and tablesaw sled adventures as well to refresh my memory.
So I'll attribute the enablement to yourself (gives bob a break for a change)
Apologies for not having commented much here, but I do enjoy seeing what you get up to.
Cheers GB
So I'll attribute the enablement to yourself (gives bob a break for a change)
Apologies for not having commented much here, but I do enjoy seeing what you get up to.
Cheers GB
OP
nicholam77
Well-known member
Man that looks fantastic Nick!
Bret
Thank you guys!!
Hi Nick, I'm looking at that Makita plunge saw daily now. Hopefully will be starting my saw cart builds soon and will need to tear down several 8'x4' sheets, I even re-read your whole thread to look over your router table build and tablesaw sled adventures as well to refresh my memory.
So I'll attribute the enablement to yourself (gives bob a break for a change)
Apologies for not having commented much here, but I do enjoy seeing what you get up to.
Cheers GB
Keep an eye out for deals! Not sure if you're interested in the cordless version but I see that pop up on SlickDeals fairly often (although I think it's pricer than the corded to begin with).
It's glorious for ripping sheet goods, but if you need to rip 8' you'll need the big boy track, or two shorter ones of course.
I know I mention it a it a lot, but it might be my favorite tool.
The homemade router table suits my needs, but even with some cheaper materials I will say it wasn't that cost effective vs. buying a unit, or at least compared to a nice phenolic surface and mounting plate.
Table saw sled is a must!
Thanks for stopping by, GB!
OP
nicholam77
Well-known member
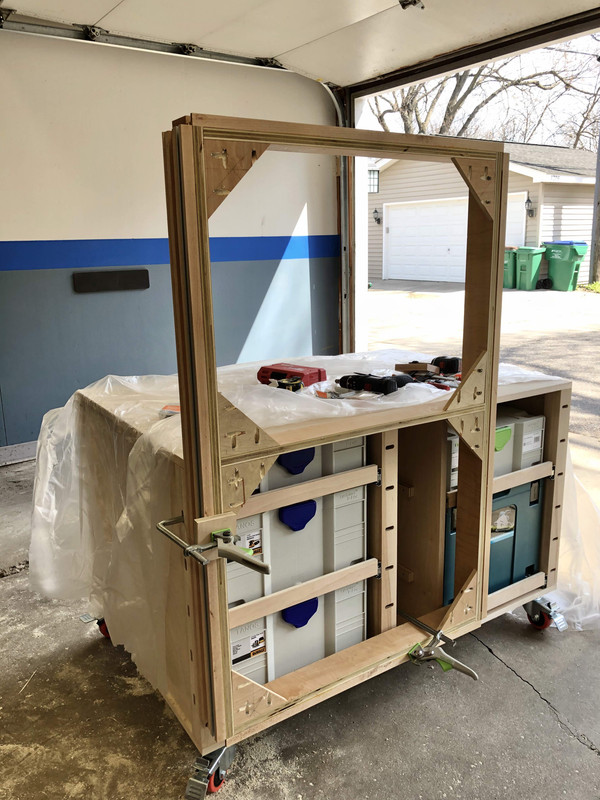
Track Saw Station Update:
Apologies in advance for the long post. If you don't care about the bench build, go ahead and skip this one.
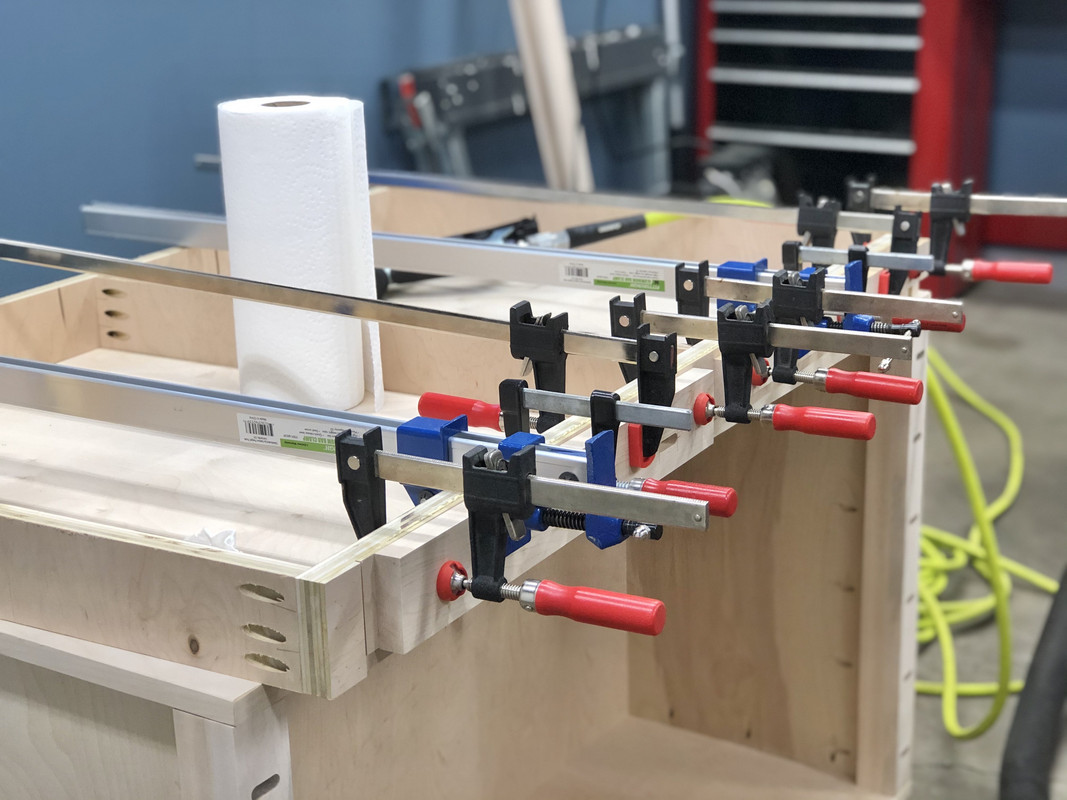
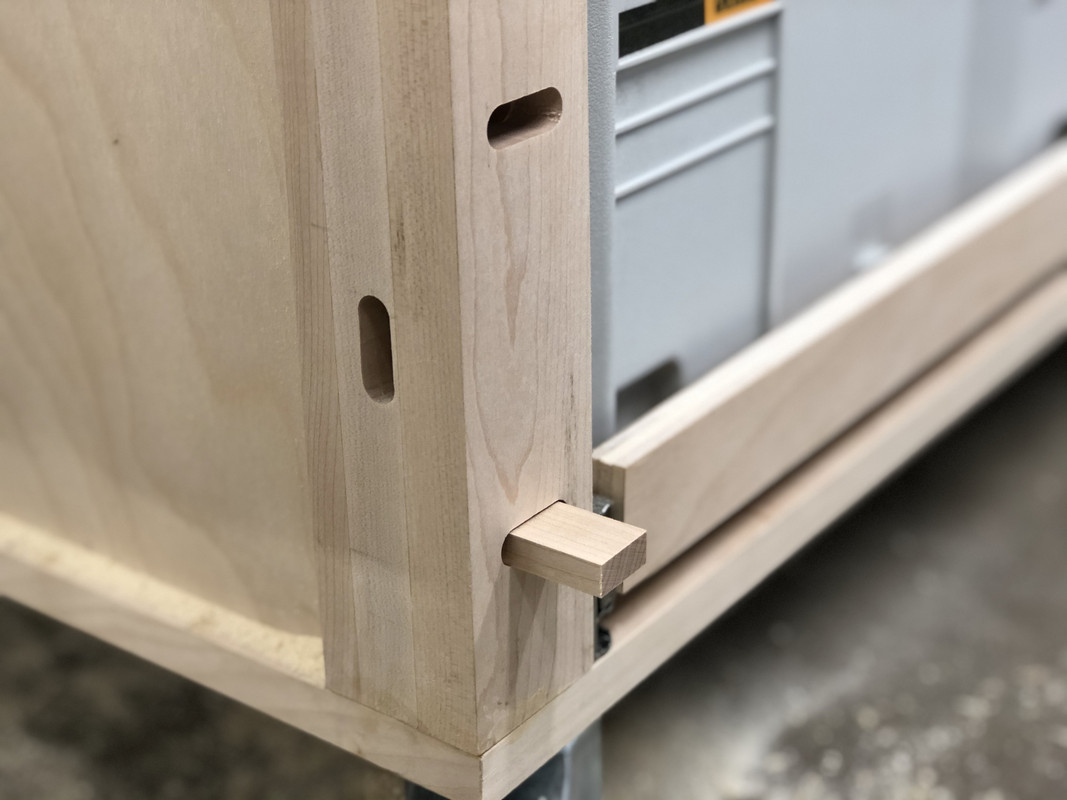
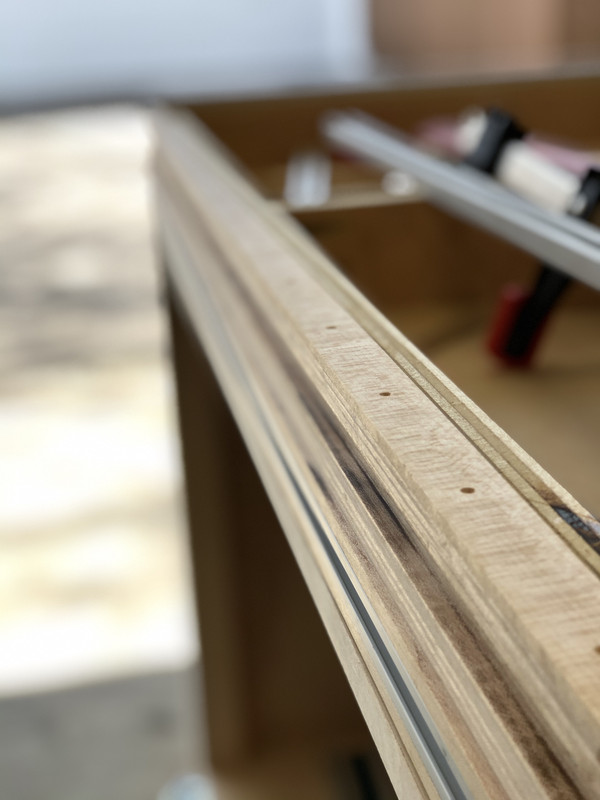
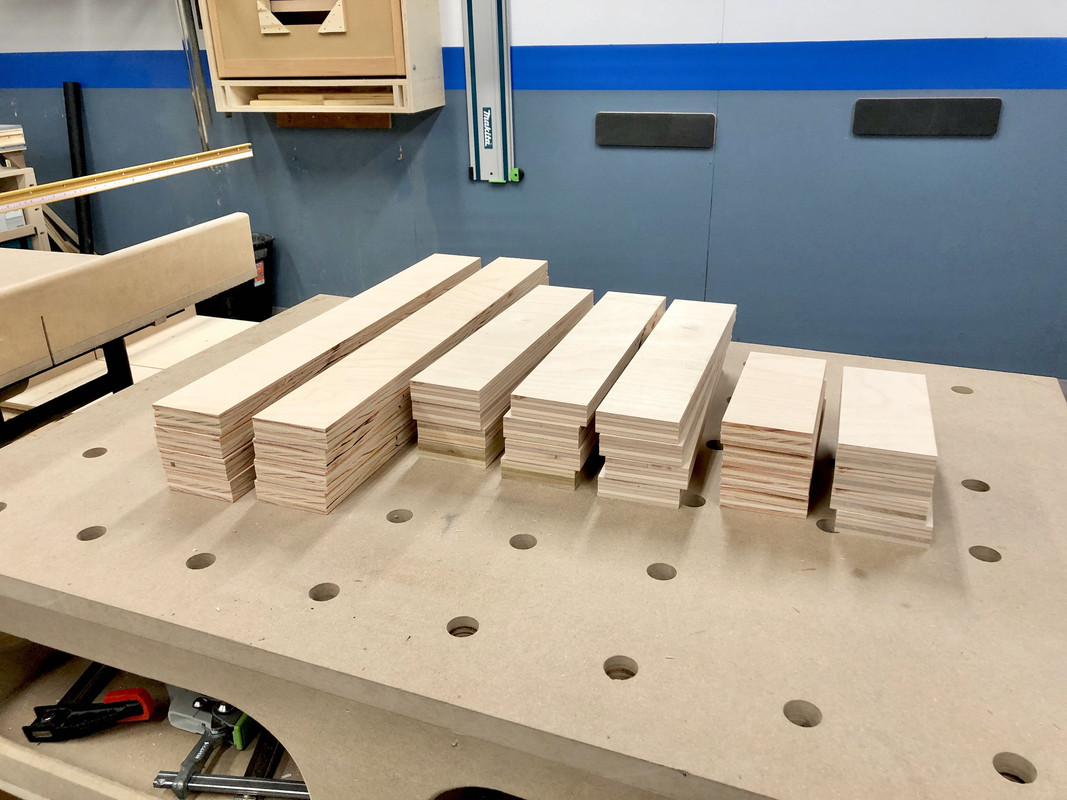
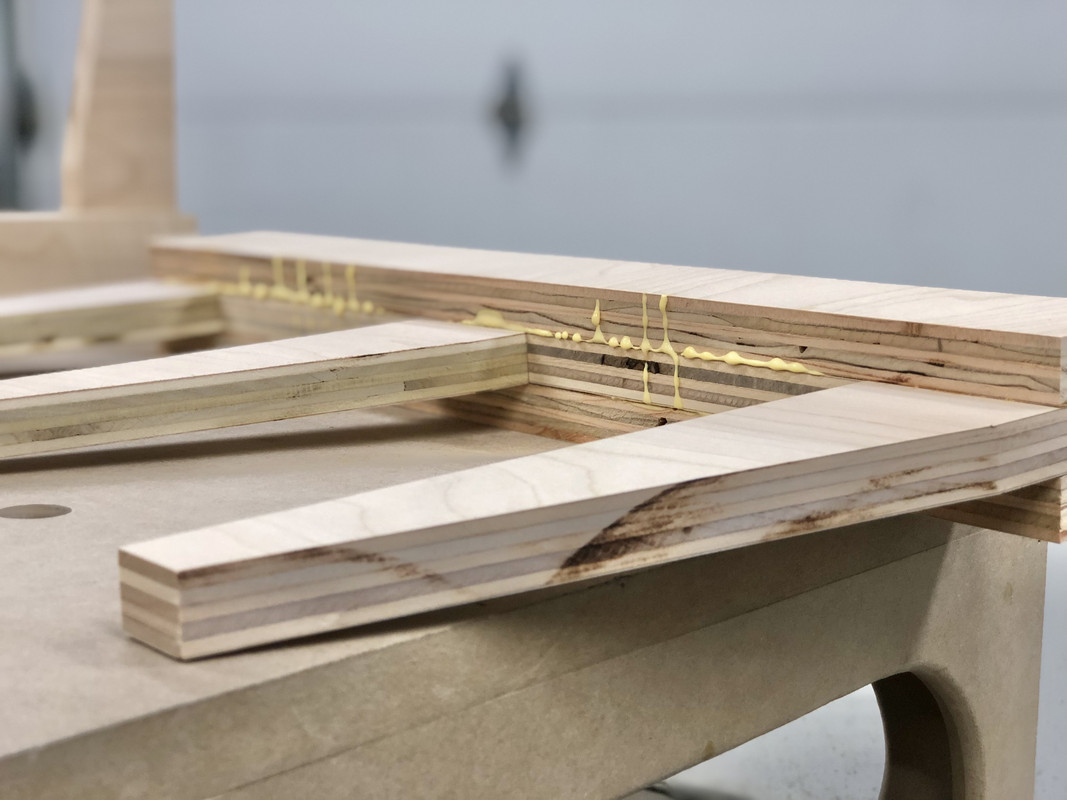
I continued by preparing the maple rails that go around the plywood frame of the "top". These needed to be dadoed/rabbeted for T-track as well as some aluminum bar profiles that will help accommodate the Festool rail supports. If you want more info on this, see Guy Woodshop's video here and FOG post here.
But first I cut to length and width:
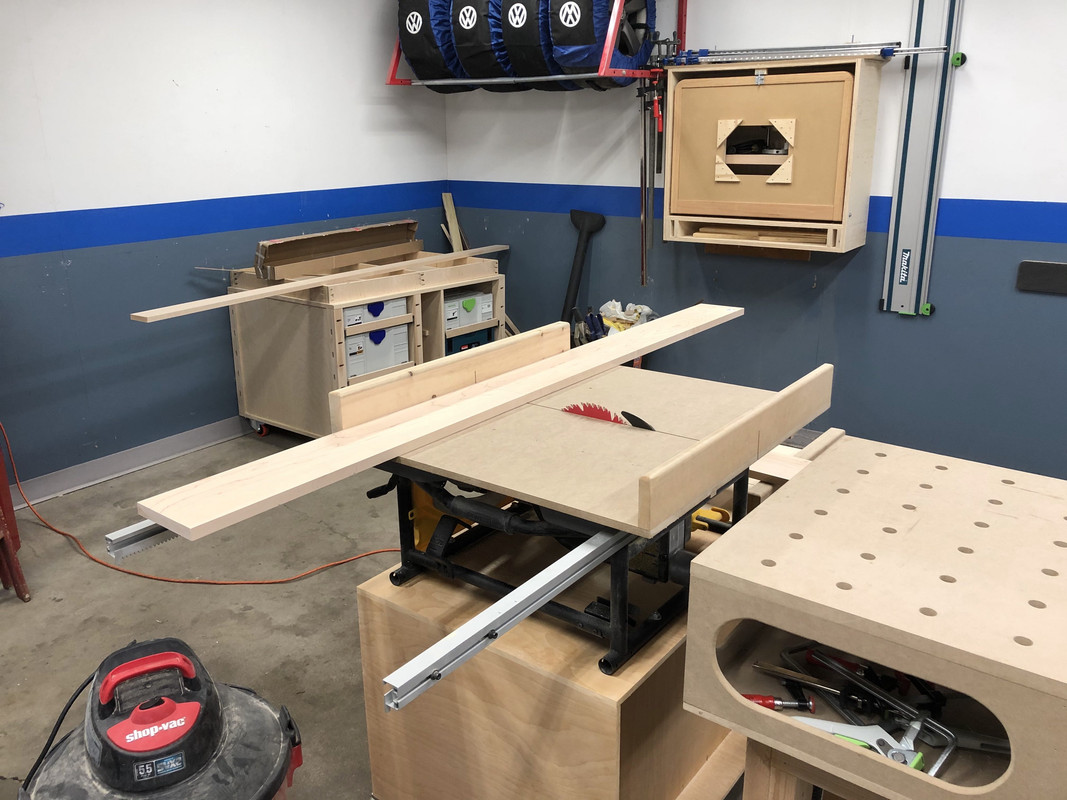
With out a chop saw set up, or a way to do accurate track saw cross cuts, cutting a long heavy board on my jobsite table saw is a bit precarious.
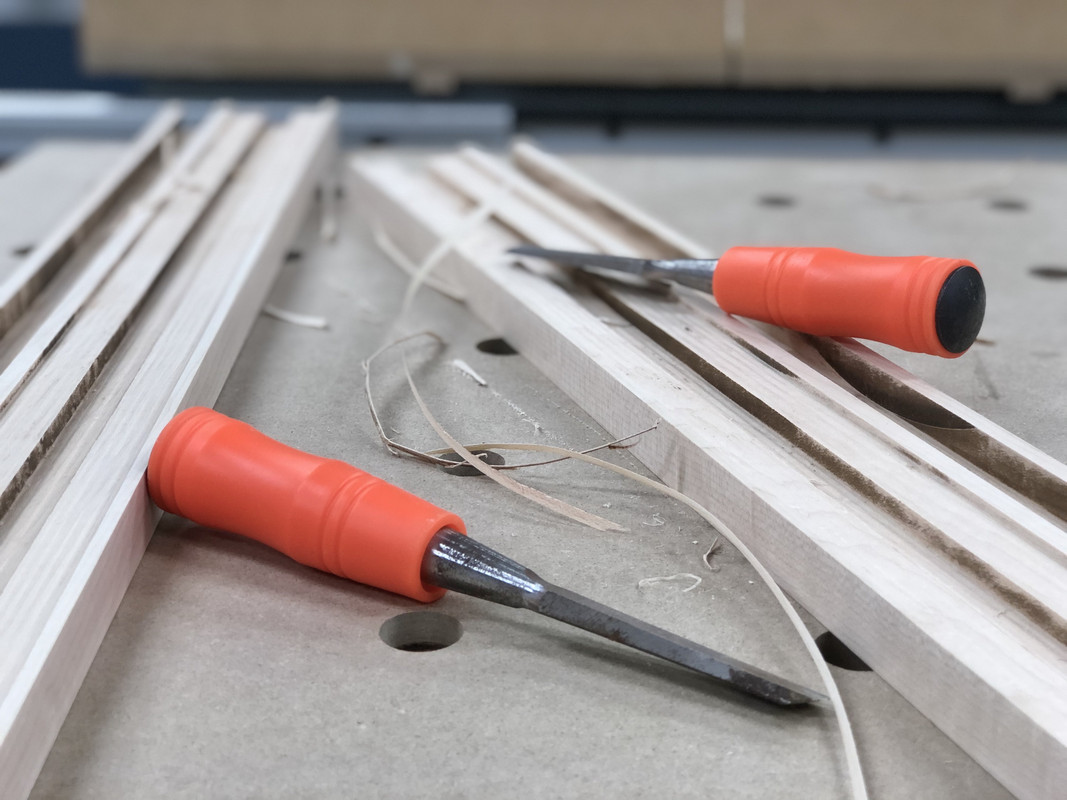
Next I cut the dados on the table saw, this is what the profile ended up looking like:

I had invested in a Freud 50T combination blade that was supposed to have a flat top cut, so I was pretty disappointed to see how "lumpy" the dados came out. I tried to clean up with my $#!tty chisels, but it didn't help much.
Then the rails were glued to the plywood frame one by one since I really need to get some more small clamps.
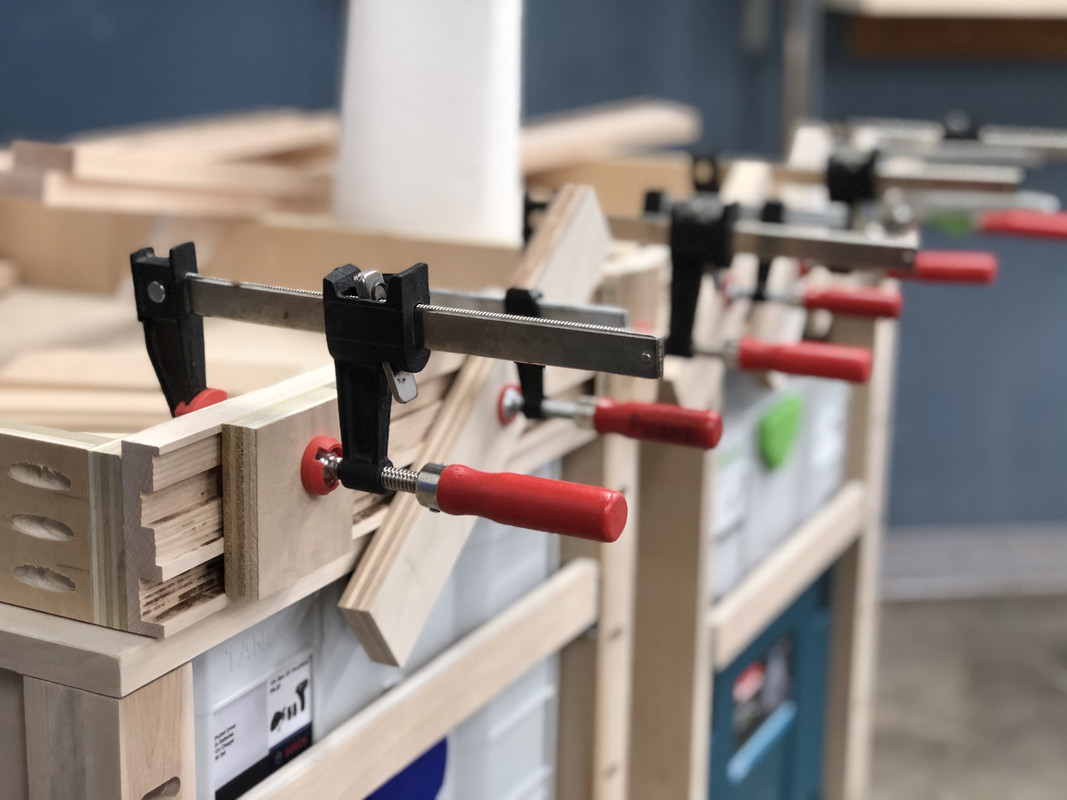
After all four rails were on, the whole thing still felt wobbly, it had some racking action. I wanted it to be solid so I added a bunch of triangle braces via pocket holes:
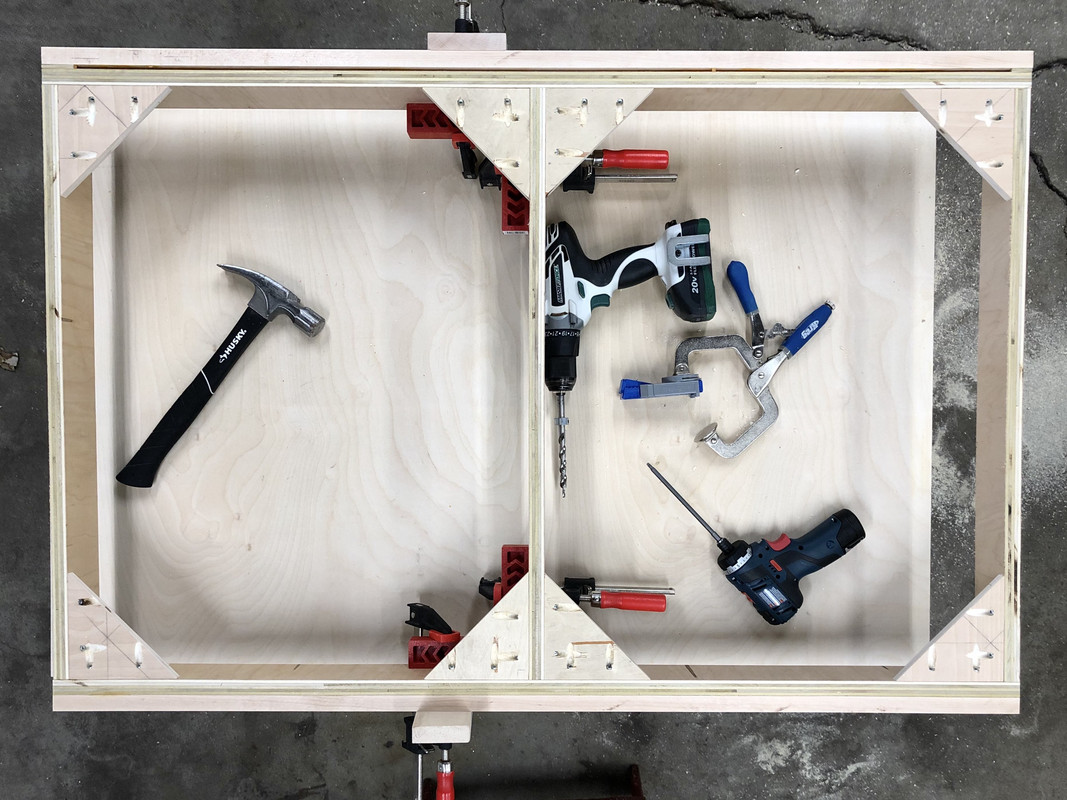
(that's the bottom)
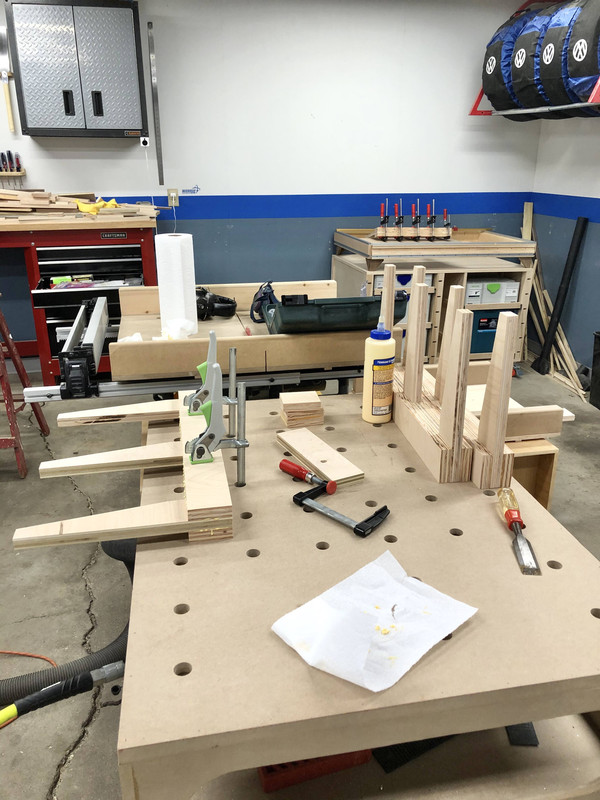
Adding some finish before putting T-track in. Still need to do finish on the bench cabinet below. Sticking with the Minwax Wipe On.


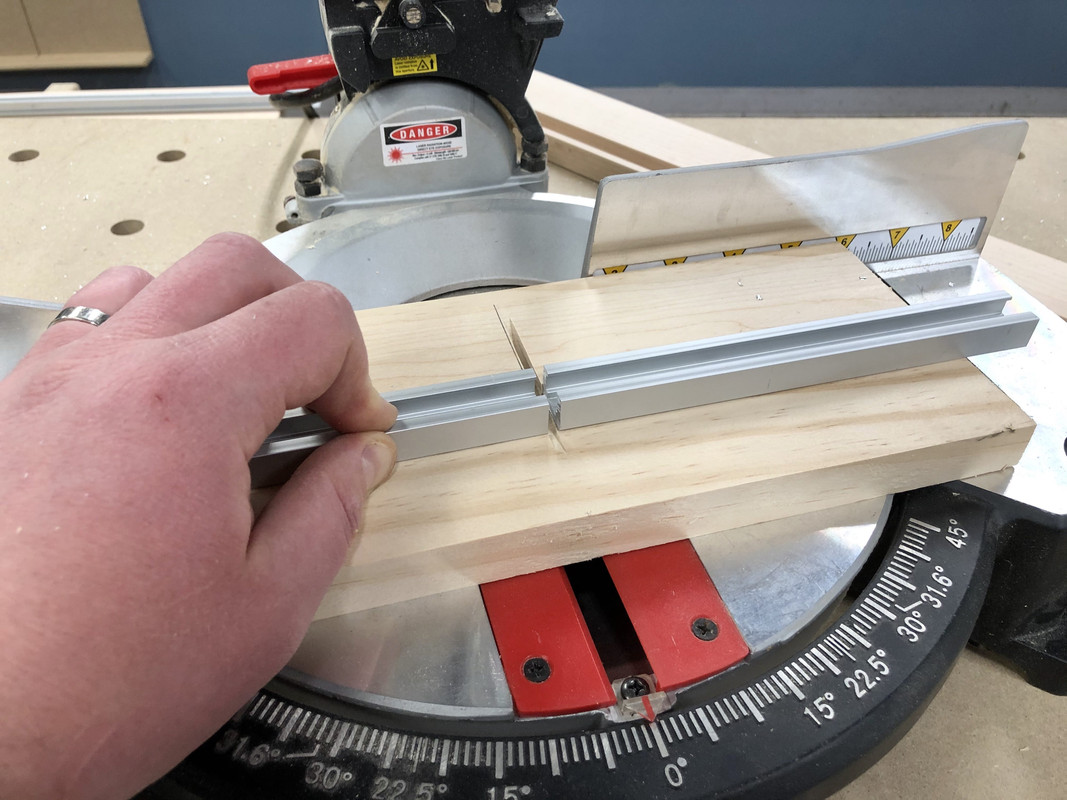
Then I cut T-track to length with this little miter saw jig:
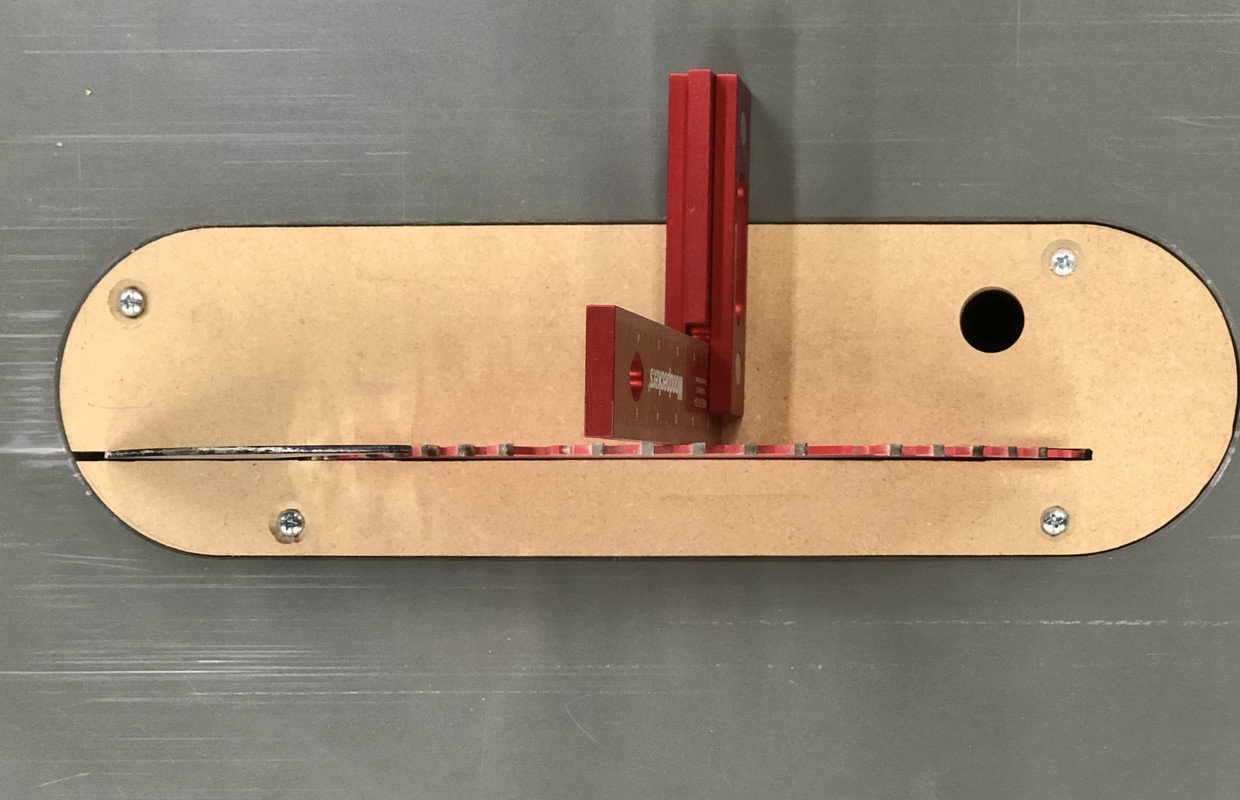
Drilling and attaching the T-track would be easier to do if the top was vertical, so I tried my new bench clamping system. Hopefully this illuminates how it works. Starting by cutting some maple tenons for workpiece supports:
Bottom of the workpiece rests on the supports, while top gets clamped in like this:
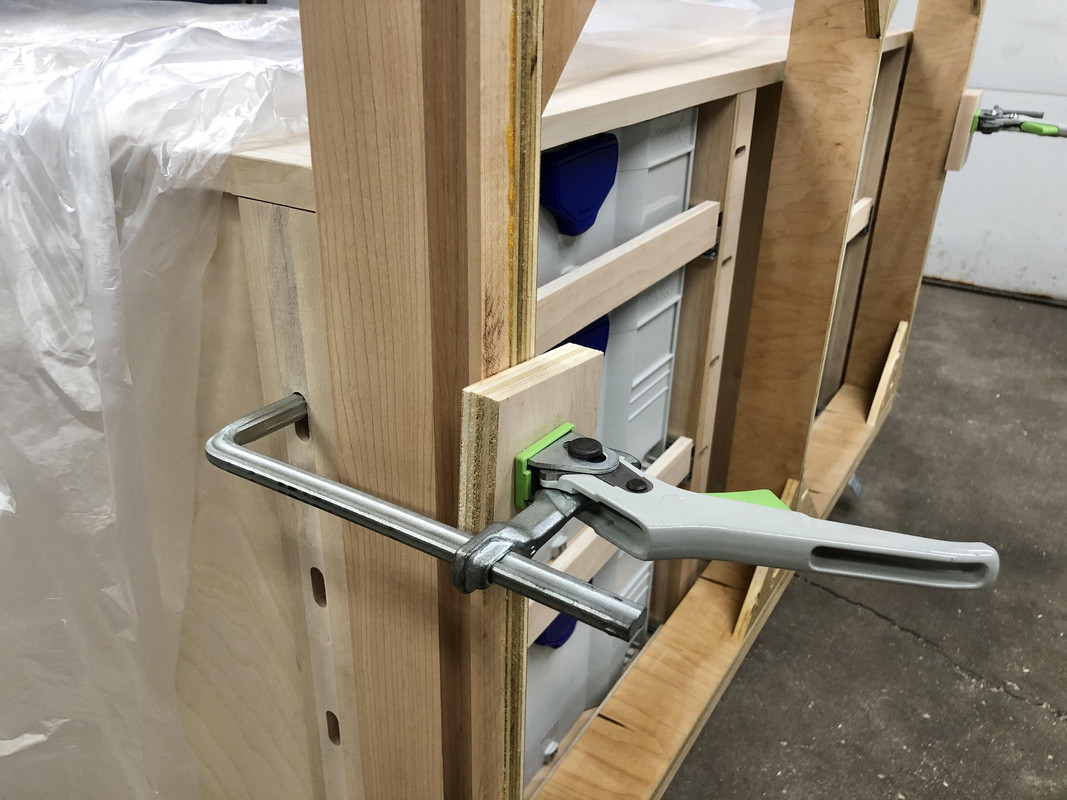
Just the two clamps and it was locked in insanely sturdy.
This made it much easier to drill and fasten the T-track. I don't have self-centering bits or center punch so I mark each center by eye with a scratch awl. It's a bit tedious.
Because of the middle leg support, it also works like this:
I made a small gap in the top T-track front and back where the track saw blade kerf will be. That way it can pass through the ends of the table without cutting into T-track.

After settling on a design for the table top "feet" I starting cutting them from some scrap walnut. I thought it would look cool.
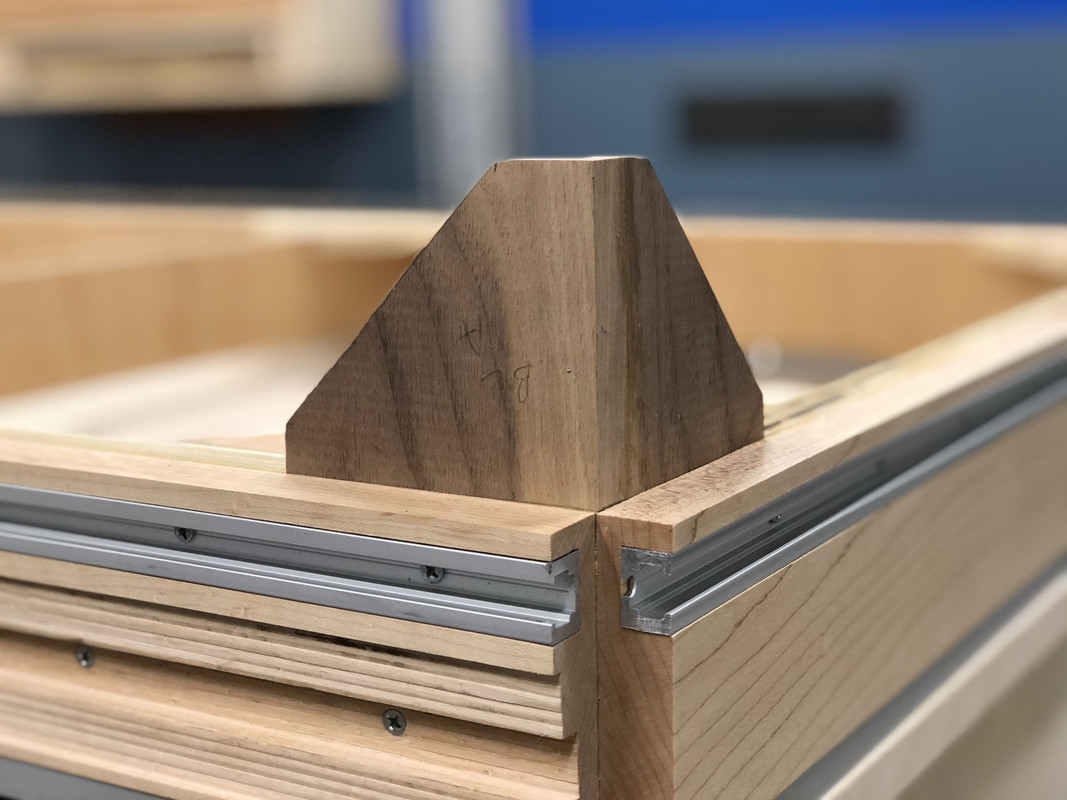
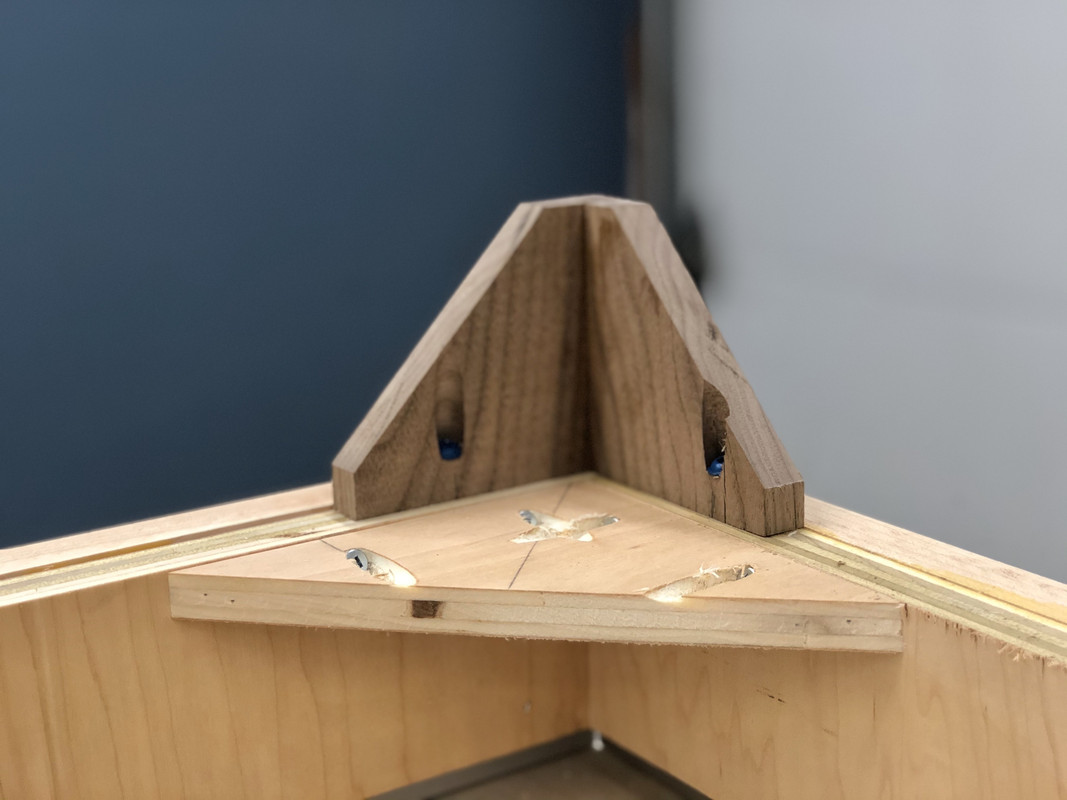
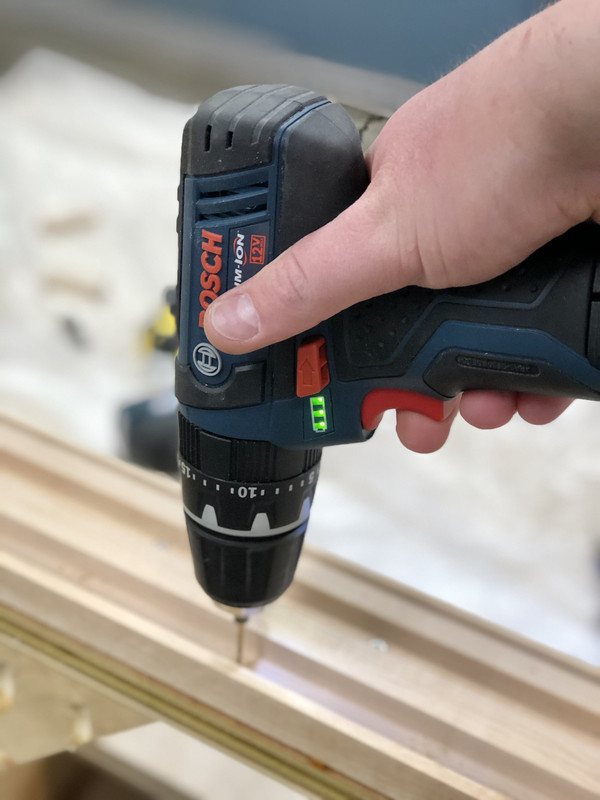
If I had a nickel for every pocket hole drilled on this project...
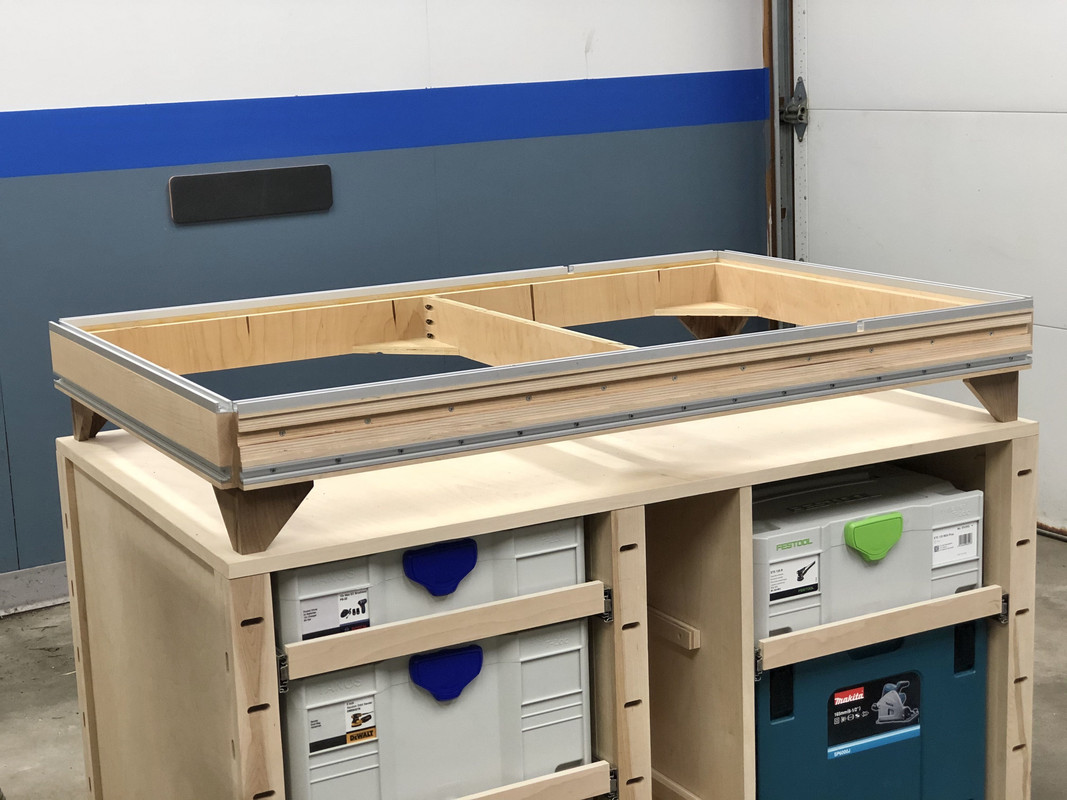
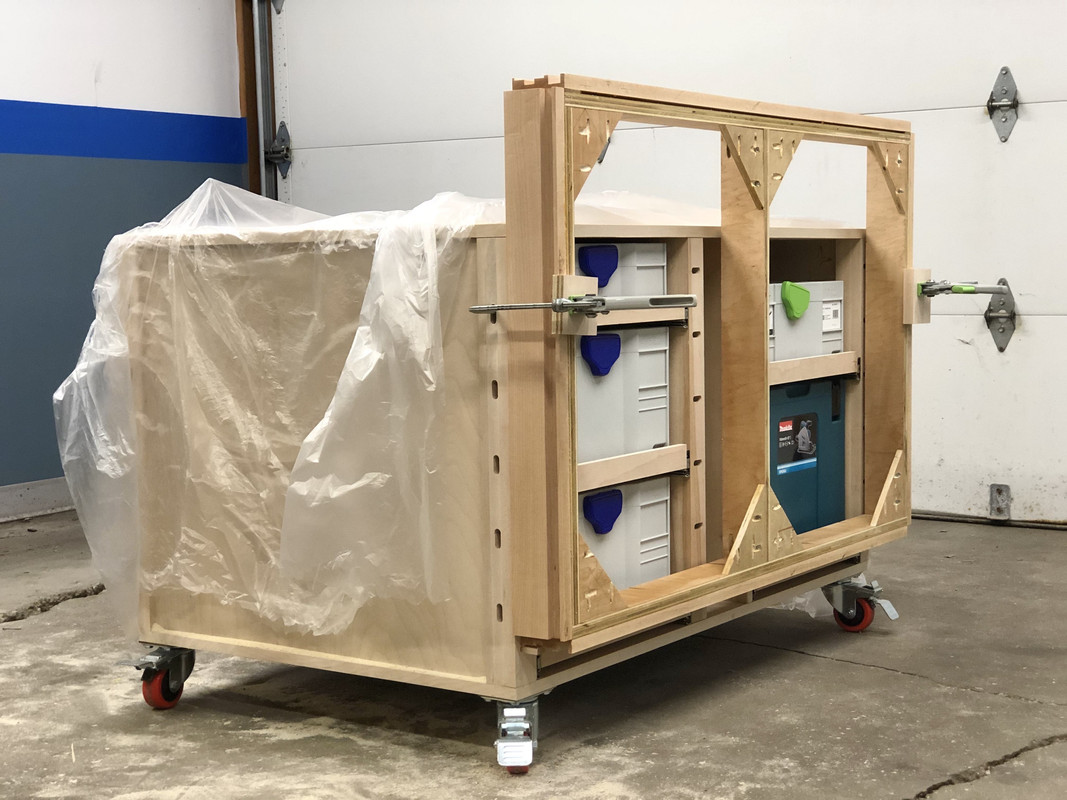
Not as much space below the table as my mini-Paulk bench, but still enough to set a clamp, small drill, or box of screws.
So what's left?
- I need to drill and attach the aluminum bar to the front and back rails. I am waiting to get the Festool rail pivots before doing this to make sure it will work
- The MDF top w/MFT hole pattern
- Some small indexing cleats for the "feet" so the top can't slide around
- Figure out hardware to attach the fence
- Sand and finish the main cabinet
Other ideas that are on the backburner:
- Replaceable zero clearance kerf strip
- Laminate the MFT top with Formica
Apologies in advance for the long post. If you don't care about the bench build, go ahead and skip this one.
I continued by preparing the maple rails that go around the plywood frame of the "top". These needed to be dadoed/rabbeted for T-track as well as some aluminum bar profiles that will help accommodate the Festool rail supports. If you want more info on this, see Guy Woodshop's video here and FOG post here.
But first I cut to length and width:
With out a chop saw set up, or a way to do accurate track saw cross cuts, cutting a long heavy board on my jobsite table saw is a bit precarious.
Next I cut the dados on the table saw, this is what the profile ended up looking like:
I had invested in a Freud 50T combination blade that was supposed to have a flat top cut, so I was pretty disappointed to see how "lumpy" the dados came out. I tried to clean up with my $#!tty chisels, but it didn't help much.
Then the rails were glued to the plywood frame one by one since I really need to get some more small clamps.
After all four rails were on, the whole thing still felt wobbly, it had some racking action. I wanted it to be solid so I added a bunch of triangle braces via pocket holes:
(that's the bottom)
Adding some finish before putting T-track in. Still need to do finish on the bench cabinet below. Sticking with the Minwax Wipe On.
Then I cut T-track to length with this little miter saw jig:
Drilling and attaching the T-track would be easier to do if the top was vertical, so I tried my new bench clamping system. Hopefully this illuminates how it works. Starting by cutting some maple tenons for workpiece supports:
Bottom of the workpiece rests on the supports, while top gets clamped in like this:
Just the two clamps and it was locked in insanely sturdy.
This made it much easier to drill and fasten the T-track. I don't have self-centering bits or center punch so I mark each center by eye with a scratch awl. It's a bit tedious.
Because of the middle leg support, it also works like this:
I made a small gap in the top T-track front and back where the track saw blade kerf will be. That way it can pass through the ends of the table without cutting into T-track.
After settling on a design for the table top "feet" I starting cutting them from some scrap walnut. I thought it would look cool.
If I had a nickel for every pocket hole drilled on this project...
Not as much space below the table as my mini-Paulk bench, but still enough to set a clamp, small drill, or box of screws.
So what's left?
- I need to drill and attach the aluminum bar to the front and back rails. I am waiting to get the Festool rail pivots before doing this to make sure it will work
- The MDF top w/MFT hole pattern
- Some small indexing cleats for the "feet" so the top can't slide around
- Figure out hardware to attach the fence
- Sand and finish the main cabinet
Other ideas that are on the backburner:
- Replaceable zero clearance kerf strip
- Laminate the MFT top with Formica
OP
nicholam77
Well-known member
A few small shop improvement projects that have been long overdue.
Fixing TS Zero-Clearance Insert
I made an MDF zero clearance insert for my table saw awhile back, but it never sat flush with the surface. It wasn't a huge issue on through-cuts, but doing the dados for the track saw bench I noticed the depth of cut was not consistent through the longer board. Not great.
I found the shortest screws I had, which were still too long, so I dremeled off the ends.
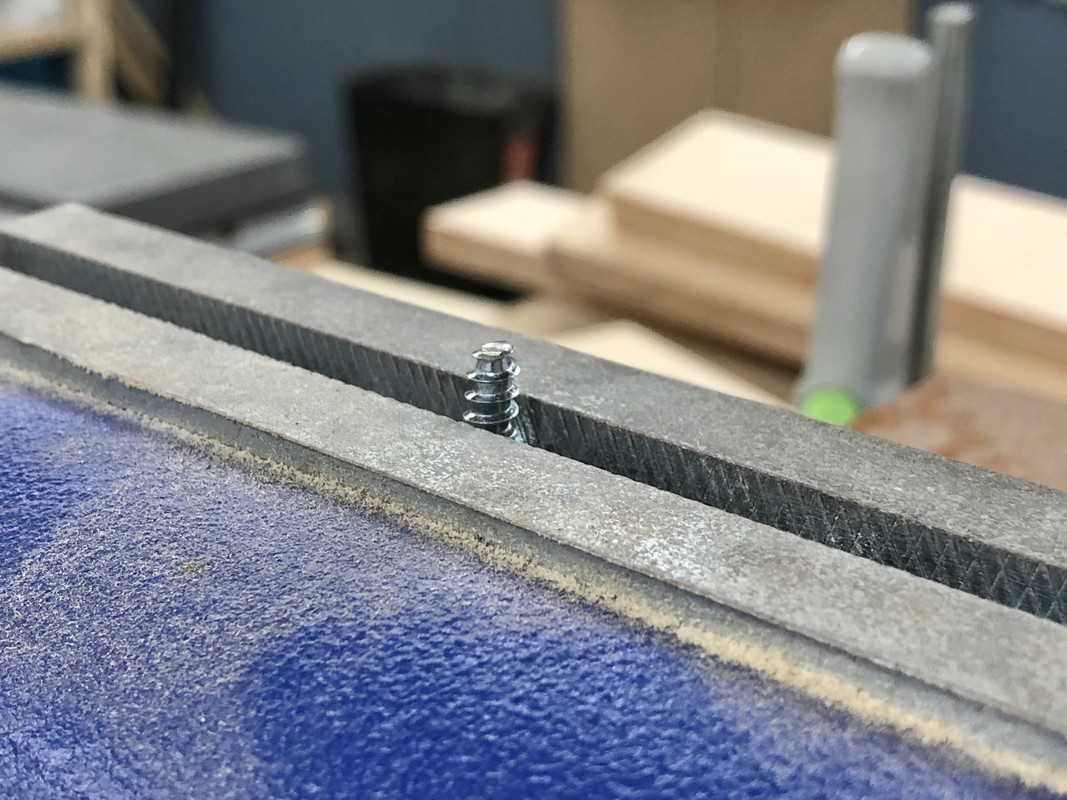
Made some deep countersinks to accommodate (in retrospect should have done Forstner).
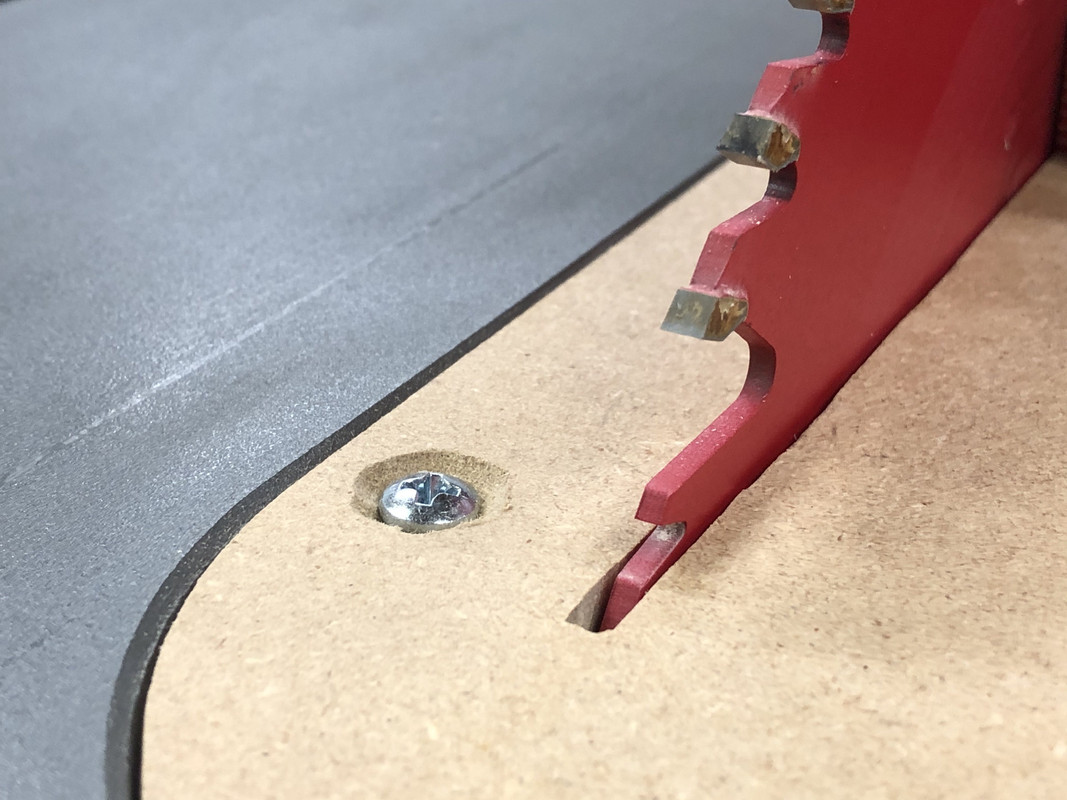
With these new leveling screws I was able to get it much closer to flat and flush. Not perfect, but close.
This greatly improved tear out on the plywood I was cutting with the combo blade, and I'm sure with my crosscut blade results would have been even cleaner.
Lumber Rack
This has been sorely needed for so long. I used to have one in the shed, but it was annoying to have to go back and forth. Right now I have a ton of scrap piled up on my workbench to the point that it is unusable. I had some plywood scrap to get rid of so I decided to make my own.
Thanks to repeatability, I've gotten good at making identical parts on the table saw. I'm hoping the tracksaw bench will provide the same accuracy for larger panels.
Essentially the lumber supports / arms are sandwiched between two pieces of 3/4" to create a simulated through mortise + tenon:
I've used this technique on other things like the MFT cart base and the old miter station with 2x4's and it is quite strong.
Glue up was assisted with the pin nailer, but other than that it's all clamps and glue.
I made 4 pieces, each with 3 support arms.
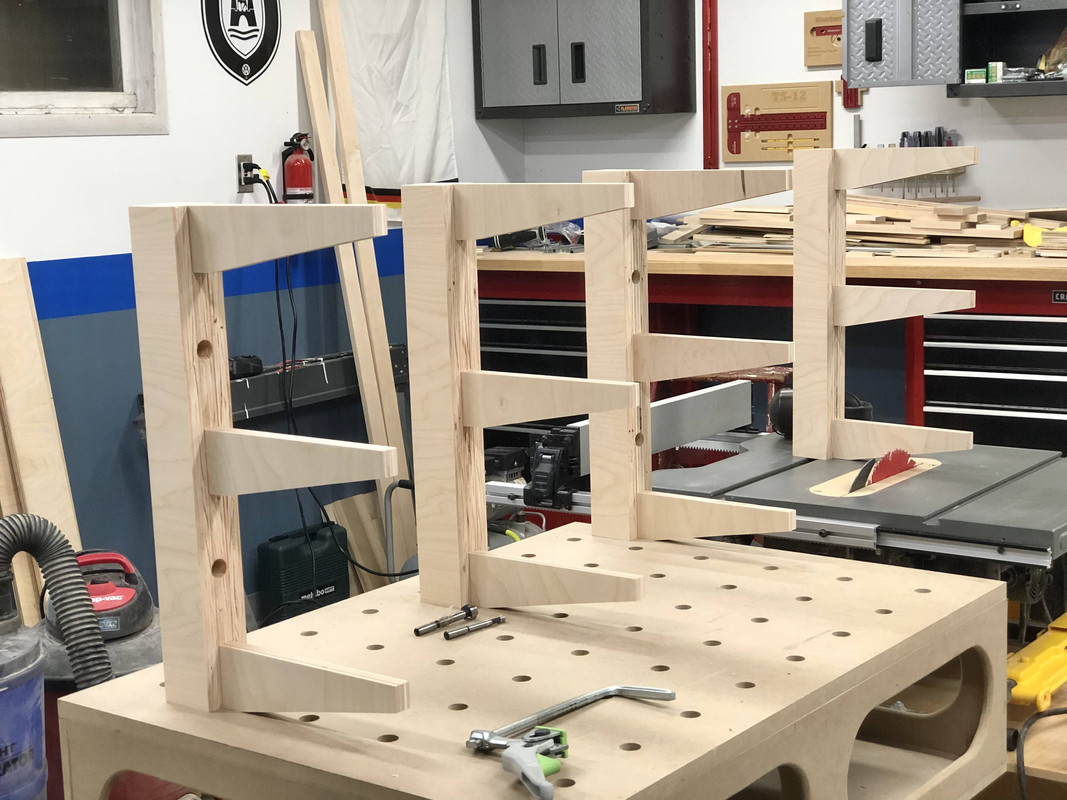
I want to space them 24" apart so I can support up to an 8' board. The question is... where to put them. These were the two ideas I was thinking of:
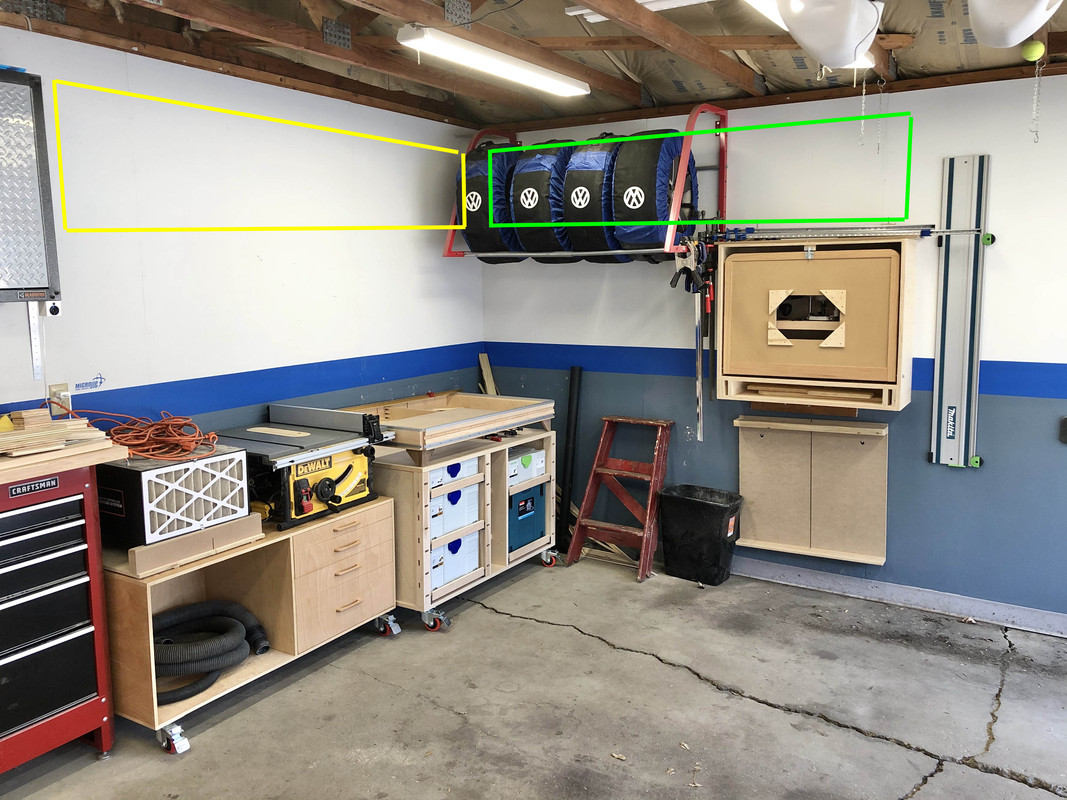
I get really hung up on these decisions. Either way I think I will have to lose the tire rack. There are a lot more tools I want to pack in this tiny garage and I'm not sure what the best use of space is or what the future holds. Any suggestions?
Fixing TS Zero-Clearance Insert
I made an MDF zero clearance insert for my table saw awhile back, but it never sat flush with the surface. It wasn't a huge issue on through-cuts, but doing the dados for the track saw bench I noticed the depth of cut was not consistent through the longer board. Not great.
I found the shortest screws I had, which were still too long, so I dremeled off the ends.
Made some deep countersinks to accommodate (in retrospect should have done Forstner).
With these new leveling screws I was able to get it much closer to flat and flush. Not perfect, but close.
This greatly improved tear out on the plywood I was cutting with the combo blade, and I'm sure with my crosscut blade results would have been even cleaner.
Lumber Rack
This has been sorely needed for so long. I used to have one in the shed, but it was annoying to have to go back and forth. Right now I have a ton of scrap piled up on my workbench to the point that it is unusable. I had some plywood scrap to get rid of so I decided to make my own.
Thanks to repeatability, I've gotten good at making identical parts on the table saw. I'm hoping the tracksaw bench will provide the same accuracy for larger panels.
Essentially the lumber supports / arms are sandwiched between two pieces of 3/4" to create a simulated through mortise + tenon:
I've used this technique on other things like the MFT cart base and the old miter station with 2x4's and it is quite strong.
Glue up was assisted with the pin nailer, but other than that it's all clamps and glue.
I made 4 pieces, each with 3 support arms.
I want to space them 24" apart so I can support up to an 8' board. The question is... where to put them. These were the two ideas I was thinking of:
I get really hung up on these decisions. Either way I think I will have to lose the tire rack. There are a lot more tools I want to pack in this tiny garage and I'm not sure what the best use of space is or what the future holds. Any suggestions?
Finallygotit
ALLIANCE MEMBER
Just curious, for the tire rack, instead of having the tires four across could you have them set up 2x2 in a new cradle that can be lifted into the rafter area to get them out of the way?
Kriesel
Well-known member
Tire storage is so tough... Especially when you have more than one vehicle with snows/summers, in my case I have four sets of tires in storage... Good stuff
I have mine on a pallet rack. No doable in your situation. But Maybe a small rack up in the rafters would work, as Dan mentioned.
I have mine on a pallet rack. No doable in your situation. But Maybe a small rack up in the rafters would work, as Dan mentioned.
Mr. Roboto
Well-known member
I’d mount the lumber rack in the green box. Although all of your stuff is on wheels, it seems the right wall would provide easier access. I like the idea of storing the tires in the rafters. If that’s not an option (and this might sound silly) could you lay them flat, next to each other in a row, on a new shelf you could build up high on a wall along the ceiling? That way you’d only lose a long barrow strip of wall the width of a tire that might be too high to be of use anyways. Hopefully I’ve described that well enough haha.
Also... I admire your dedication to taking progress pics while you are working. It’s fun to follow along. I’m bad at this, I only end up taking pics at the end of the day.
Also... I admire your dedication to taking progress pics while you are working. It’s fun to follow along. I’m bad at this, I only end up taking pics at the end of the day.
Last edited:
I can't recall of your garage had the clearance, but I built a shelf that is above the tracks of my garage door. I lay two wheels on their sides on each side of the garage door. (Your exposed rafters wouldake it easy to mount) I also built racks for my ladders on the ceiling above the garage doors. I stole my last space saver from sakurama (mid century moto meca) and hung the tracks for my TS and my long level on the inside of the garage door.
Sent from my LG-H873 using Tapatalk
Sent from my LG-H873 using Tapatalk
dcuthill
Well-known member
I can't recall of your garage had the clearance, but I built a shelf that is above the tracks of my garage door. I lay two wheels on their sides on each side of the garage door. (Your exposed rafters wouldake it easy to mount) I also built racks for my ladders on the ceiling above the garage doors. I stole my last space saver from sakurama (mid century moto meca) and hung the tracks for my TS and my long level on the inside of the garage door.
Sent from my LG-H873 using Tapatalk
Do you have a pic of this? Sounds interesting