To avoid these ads, REGISTER NOW!

Ohio 30'X40'X12' Pole Barn Garage

OutlawDrifter

Well-known member
Joined
Jan 20, 2015
Messages
3,903
Location
KS
Yeah, they definitely make a mess.

I was able to cover my 36x40x14 with 9gal of Behr paint on my OSB with a roller. Took a lot longer I'm sure, but there was hardly any mess.
 
To avoid these ads, REGISTER NOW!
OP
F

fizznizzy

Well-known member
Joined
Sep 13, 2017
Messages
54
Location
NE Ohio
I wanted some contrast to break things up, so a black belt around outlet height and a grey lower section was the plan I came up with. Didn't want to tape twice, so I left a stripe of white between the two (impatience at it's finest). Took a few hours to roll 2 coats, much faster and less messy than the spraying.

Now it looks half way decent in here

attachment.php


attachment.php


I was finally able to plumb up my Flexzilla hose reel permanently. Not the most extravagant setup, but little things like having a shutoff valve and regulator are nice. I can barely hear the compressor running with the insulation and plywood up.

Mounted the TV in the corner and started to play with a little different feng shui. I have plans to build out a work bench eventually, but I need to take some time to actually use the garage for a bit so I feel like I'm moving forward on projects.

attachment.php


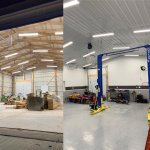
Before vs after roughly 11 months of progress:

attachment.php
 

Attachments

  • 26E5F005-C4D6-4516-A638-76A753E0FB4A.jpg
    26E5F005-C4D6-4516-A638-76A753E0FB4A.jpg
    75.4 KB · Views: 823
  • IMG_5959.jpg
    IMG_5959.jpg
    108.1 KB · Views: 827
  • IMG_5966.jpg
    IMG_5966.jpg
    78.3 KB · Views: 825
  • 5B973F7C-DF13-444E-AD17-272E9027850D.jpg
    5B973F7C-DF13-444E-AD17-272E9027850D.jpg
    141.5 KB · Views: 825
Last edited:

isonic

Well-known member
Joined
Aug 1, 2018
Messages
213
Location
Ham Lake, MN
All photos work for me except for post #82.

Sorry about the mess of the garage from the sprayer. The white walls do look nice though!
 

NUTTSGT

Super Moderator
Staff member
Joined
Sep 14, 2009
Messages
51,168
Location
Northern Central Ohio
It looks a lot bigger with the paint on the walls. Atleast it will until you start hanging stuff on the walls. Paint scheme looks great.

Curious as to why you hung the air reel so high ? It seems like you'd be losing 5' of reach with it that high.
 
OP
F

fizznizzy

Well-known member
Joined
Sep 13, 2017
Messages
54
Location
NE Ohio
It looks a lot bigger with the paint on the walls. Atleast it will until you start hanging stuff on the walls. Paint scheme looks great.

Curious as to why you hung the air reel so high ? It seems like you'd be losing 5' of reach with it that high.

It definitely needs some decoration to spice things up

The air reel is 10' longer than the barn itself. I eventually plan on putting cabinets up, so I wanted to make sure that wasn't going to be in the way. I have a bunch of vertical space to use on that wall, might as well take advantage of it
 

NUTTSGT

Super Moderator
Staff member
Joined
Sep 14, 2009
Messages
51,168
Location
Northern Central Ohio
It definitely needs some decoration to spice things up

The air reel is 10' longer than the barn itself. I eventually plan on putting cabinets up, so I wanted to make sure that wasn't going to be in the way. I have a bunch of vertical space to use on that wall, might as well take advantage of it

I just realized your shop is "only" 30x40. It looks way bigger than that with 12' side walls and scissor trusses. Heck I was thinking it was 40x60 or something that size.


:beer:
 
OP
F

fizznizzy

Well-known member
Joined
Sep 13, 2017
Messages
54
Location
NE Ohio
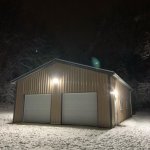
First snow in NE Ohio :3gears:

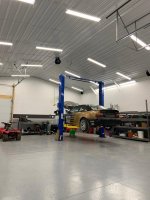
I finally got "all" of the overspray cleaned up enough for now. Starting work on the E36 and did some more reorganizing of the shelving. Utilized some of the odd sized leftover pieces of plywood from the walls to make flat surfaces on a few shelves.

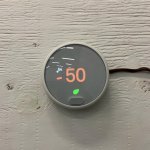
Also got a Google Nest thermostat installed. Now I can turn on the heat an hour before I go out to the barn and live my life in constant comfort. Fun fact for anyone wiring a 'smart' thermostat with a Mr. Heater Big Maxx - you will need the C (constant power) wire hooked up otherwise the thermostat sends a quick signal to the heater to allow it to charge. Without this it will cycle the exhaust fan on and off. The 80k BTU unit has an external terminal for this - it's my understanding that not all of them do, but if you take off the side access panel you can manually run a wire to the circuit board where there is a terminal for this.

Modern conveniences are changing the game and I'm not mad about it

attachment.php

attachment.php

attachment.php
 

Attachments

  • 71DBA907-9B5C-4EDF-BE40-3E11CAF65AE9.jpg
    71DBA907-9B5C-4EDF-BE40-3E11CAF65AE9.jpg
    118.9 KB · Views: 611
  • IMG_6094.jpg
    IMG_6094.jpg
    101.9 KB · Views: 615
  • F77AA4E4-0CBF-4C0A-AC8F-6272CBC167EB.jpg
    F77AA4E4-0CBF-4C0A-AC8F-6272CBC167EB.jpg
    125.7 KB · Views: 603

travisn1

Well-known member
Joined
Oct 22, 2012
Messages
152
Location
Waterloo NY
I was talking about the finished garage in general.

Does the furnace have a min temp? I guess those units don't. I know when I put the house furnace in garage of the old house it said in the manual to keep it above 55.
 
OP
F

fizznizzy

Well-known member
Joined
Sep 13, 2017
Messages
54
Location
NE Ohio
I was talking about the finished garage in general.

Does the furnace have a min temp? I guess those units don't. I know when I put the house furnace in garage of the old house it said in the manual to keep it above 55.

It's just a gas heater... I guess I had just assumed there wouldn't be any issues with a low temperature, but now that you mention it I did find this from another manual:

"Unit heaters should not be installed to maintain low
temperatures and/or freeze protection of buildings.
A minimum of 50°F (10°C) thermostat setting must
be maintained. If unit heaters are operated to maintain
lower than 50°F (10°C), hot flue gases are cooled
inside the heat exchanger to a point where water
vapor (a fl ue gas by-product) condenses onto the heat
exchanger walls. The result is a mildly corrosive acid that
prematurely corrodes the aluminized heat exchanger and
can actually drip water down from the unit heater onto
fl oor surface. Additional unit heaters should be installed
if a minimum 50°F (10°C) thermostat setting cannot be
maintained."

I'll double check what the Mr. Heater manual says...

The nest has 'safety temp' settings that allows the heater to turn on even if you have it set to off so you don't end up with pipes freezing, but obviously I have no pipes currently. Maybe someday. Sounds like I might need to bump this up to prevent condensation on the heat exchanger
 

OutlawDrifter

Well-known member
Joined
Jan 20, 2015
Messages
3,903
Location
KS
I've found the most economical temp when I'm not in the shop is 52* for my setup. Mines a little different setup with a 3-ton heat pump. Our shops are similar in size, I would think yours shouldn't be too far off.
 
OP
F

fizznizzy

Well-known member
Joined
Sep 13, 2017
Messages
54
Location
NE Ohio
I've found the most economical temp when I'm not in the shop is 52* for my setup. Mines a little different setup with a 3-ton heat pump. Our shops are similar in size, I would think yours shouldn't be too far off.

Appreciate the input. Guess I need to re-evaluate.

Fun fact, the Mr. Heater manual says nothing about a minimum suggested temp not to discredit the fact that it could cause premature failure of the heat exchanger.

I'll bump up my min temp to 50 and see how bad the gas bill gets.
 

NUTTSGT

Super Moderator
Staff member
Joined
Sep 14, 2009
Messages
51,168
Location
Northern Central Ohio
Just remember the warmer you keep it, the warmer the concrete will get. It'll become easier to heat and raise the temps when you want to work out there.


If you spend any time out there, you may find the few extra degrees in heat won't cost you much more until the 0° temps roll in. In the end, is a total $60 extra over the winter to feel more comfortable worth it ?
 
To avoid these ads, REGISTER NOW!
OP
F

fizznizzy

Well-known member
Joined
Sep 13, 2017
Messages
54
Location
NE Ohio
Just remember the warmer you keep it, the warmer the concrete will get. It'll become easier to heat and raise the temps when you want to work out there.


If you spend any time out there, you may find the few extra degrees in heat won't cost you much more until the 0° temps roll in. In the end, is a total $60 extra over the winter to feel more comfortable worth it ?

Absolutely the $60 is worth it if that's the actual difference between keeping it at 40 vs 50. The slab is definitely a consideration, but this being my first Winter with it I'm in the learning stages.

I think my garage needs more thermal mass... better buy more tools
 
OP
F

fizznizzy

Well-known member
Joined
Sep 13, 2017
Messages
54
Location
NE Ohio
Well it's not a lathe... but I did add more thermal mass in the form of a blast cabinet. Sadly I paid nearly as much for this as I did the mill, but it also requires a lot less love to get moving. I also bought a JEGS blast cabinet vacuum from super china that appears to work decent. Not a long term solution as I'm sure I'll need to upgrade in the future, but with the cabinet size being so large it doesn't get hazed up quickly.

attachment.php


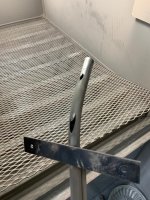
Cabinet was described as 'in perfect working condition' and of course it wasn't. The media pickup tube had a large hole worn in it. Fixed temporarily and functioning for now

attachment.php


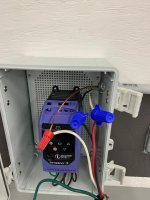
Hooked up the VFD for a test run. Seems to work well. I need to dial in the settings and put it in a box with proper conduit still. Looking for suggestions on how to mount this so it's accessible, but still protected.

attachment.php


And last update - started working on turbo things for the E36. Finally putting this garage to work :beer:

attachment.php


attachment.php
 

Attachments

  • 9970CCE8-2FF0-4DAC-A577-942AB858F7C4.jpg
    9970CCE8-2FF0-4DAC-A577-942AB858F7C4.jpg
    131 KB · Views: 766
  • IMG_6127.jpg
    IMG_6127.jpg
    112.9 KB · Views: 768
  • IMG_6187.jpg
    IMG_6187.jpg
    75.1 KB · Views: 772
  • IMG_6200.jpg
    IMG_6200.jpg
    138.6 KB · Views: 768
  • IMG_6132.jpg
    IMG_6132.jpg
    77.5 KB · Views: 771

JoshS

Well-known member
Joined
Dec 29, 2018
Messages
99
Location
Southborough, MA
Thanks for sharing your build, I've been dreaming of building a garage/workshop and just moved to a new house 2 years ago that has enough land for it and I'm starting to get serious about planning it out. I'm considering almost the exact same size/layout as you and I had a couple of questions.

With the 40' foot depth do you find that you have enough room to park a car behind the lift, if there is a car parked where it can be worked on on the lift?

I assume you would have no issues parking two cars to the left of your lift, correct?

I will be using my garage almost just like you do, for a Lemons race car and a couple of other toy/project cars. Just wondering how the size is working out and if you would change anything.
 
OP
F

fizznizzy

Well-known member
Joined
Sep 13, 2017
Messages
54
Location
NE Ohio
Thanks for sharing your build, I've been dreaming of building a garage/workshop and just moved to a new house 2 years ago that has enough land for it and I'm starting to get serious about planning it out. I'm considering almost the exact same size/layout as you and I had a couple of questions.

With the 40' foot depth do you find that you have enough room to park a car behind the lift, if there is a car parked where it can be worked on on the lift?

I assume you would have no issues parking two cars to the left of your lift, correct?

I will be using my garage almost just like you do, for a Lemons race car and a couple of other toy/project cars. Just wondering how the size is working out and if you would change anything.
I'm happy with the layout. There is plenty of room behind the lift for another car to be worked on. I have the lift spaced 6' from the side wall to allow for storage rack space and 14' (I think) from the back wall. That left enough room for an engine hoist to pull and engine comfortably without having to move the tool boxes.

Plenty of space on the other side to park 2 cars, but one space is taken up by lawn equipment and 4 wheelers for me.

At this point the only thing I wish I would have done is gone taller on the walls so I could build a mezzanine for storing bumpers and larger objects. I was limited on total building height to 18' by city regulations, but probably should have looked into getting a variance approved. Not a huge deal, but 12' walls is a weird 'in between' height where you can't really use the top 1/3 of the wall. Maybe a good place for tire racks or something...
 

travisn1

Well-known member
Joined
Oct 22, 2012
Messages
152
Location
Waterloo NY
Unit analysis is fun.

7.5min/hr = 0.125 hr
0.125hr * 24 hrs/day = 3 hrs/day
3 hrs/day * 80 btu/h = 240k btu/day
240k btu/day * 30 days/month = 7.2M btu/month
7.2 btu/month * $14.71/Mbtu = $105.91/month

Cost data came from here: https://www.amsenergy.com/fuel-cost-calculator/

(Minutes run/hr) * (cost/M Btu) * 0.96 = cost per month

OR with a little fos:

(Minutes run/hr) * (cost/M Btu) = cost per month
 

JoshS

Well-known member
Joined
Dec 29, 2018
Messages
99
Location
Southborough, MA
I'm happy with the layout. There is plenty of room behind the lift for another car to be worked on. I have the lift spaced 6' from the side wall to allow for storage rack space and 14' (I think) from the back wall. That left enough room for an engine hoist to pull and engine comfortably without having to move the tool boxes.

Plenty of space on the other side to park 2 cars, but one space is taken up by lawn equipment and 4 wheelers for me.

At this point the only thing I wish I would have done is gone taller on the walls so I could build a mezzanine for storing bumpers and larger objects. I was limited on total building height to 18' by city regulations, but probably should have looked into getting a variance approved. Not a huge deal, but 12' walls is a weird 'in between' height where you can't really use the top 1/3 of the wall. Maybe a good place for tire racks or something...

Thanks for the reply, just the type of info I was looking for. Really helps to visualize the space in the way I hope to use it. Pretty much this exact layout/footprint is what I'm leaning toward.
 
OP
F

fizznizzy

Well-known member
Joined
Sep 13, 2017
Messages
54
Location
NE Ohio
Unit analysis is fun.

7.5min/hr = 0.125 hr
0.125hr * 24 hrs/day = 3 hrs/day
3 hrs/day * 80 btu/h = 240k btu/day
240k btu/day * 30 days/month = 7.2M btu/month
7.2 btu/month * $14.71/Mbtu = $105.91/month

Cost data came from here: https://www.amsenergy.com/fuel-cost-calculator/

(Minutes run/hr) * (cost/M Btu) * 0.96 = cost per month

OR with a little fos:

(Minutes run/hr) * (cost/M Btu) = cost per month

For anyone interested in more detail behind this, it was driven from a cold day in Ohio. To sum up:

My Barn:
R19 Faced Batted Walls (4x windows, 3x insulated garage doors)
R50ish Blown Ceiling
Mr. Heater 80k forced air natural gas heater

On an Ohio day with the outside temp averaging 20 degrees, the heater ran for 7.5 min/hour on average to maintain 50 degrees (Nest thermostat keeps track of usage). The heater has been on for an extended period of time up to this point allowing the concrete and the thermal mass of everything inside to be up to temp also.

So, worst case I'm looking at an extra $105 a month. Considering the warmer days we've been having I'm guessing my first bill will come in at around $50-$75.

At $75 a month (aka $2.50 per day) average, I'm happy with the 50 degree temp. It's warm enough to work in a sweatshirt and the perfect temp to keep things balanced between constantly raising and lowering.
 

travisn1

Well-known member
Joined
Oct 22, 2012
Messages
152
Location
Waterloo NY
In comparison I'm at $15 per working day heating my uninsulated barn with a 140k btu kerosene heater. Dangit.
 

Malibu Mac

Member
Joined
Mar 28, 2014
Messages
14
Location
Anderson,IN
Great information here! Appreciate all the pictures and details. I'm in the planning stages also and this helps a bunch! After reading through this I didn't see any mention of how you installed the upper ceiling panels, lights, etc. Did you rent some scaffolding? thanks
 
OP
F

fizznizzy

Well-known member
Joined
Sep 13, 2017
Messages
54
Location
NE Ohio
Great information here! Appreciate all the pictures and details. I'm in the planning stages also and this helps a bunch! After reading through this I didn't see any mention of how you installed the upper ceiling panels, lights, etc. Did you rent some scaffolding? thanks

The ceiling panels and lights were put up with ladders. The lights were a simple enough task to do myself, but I had a couple friends help with the ceiling panels. They're not heavy, just large and cumbersome.

Scaffolding or a scissor lift would have certainly been safer, but I prefer to live dangerously
 
OP
F

fizznizzy

Well-known member
Joined
Sep 13, 2017
Messages
54
Location
NE Ohio
Haven't updated in a while, mostly because the barn itself hasn't really been getting touched. I've been working non stop on projects while trying to acquire tools and fill out my space.

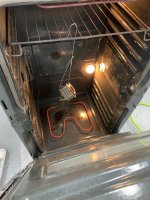
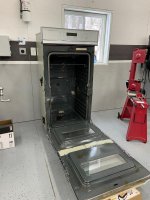
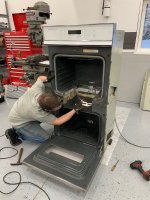
Sometimes you need to be a bit crafty to get 'high quality and expensive' equipment on a budget. To add to the function of the blast cabinet, we bought a double stacked oven on facebook marketplace for $100 in perfect working order. First step was to start cutting. With a few hours of work we now have a powder coating oven with accurate temperature control. Eventually I'd like to change the door so that it swings open from the side, but for now this works great. 10/10 would recommend.

attachment.php

attachment.php

attachment.php

attachment.php


To test the oven before I got a proper plug for it, I used the power to the VFD for the mill which now sits in a nice box on the wall with conduit and is up and running.

attachment.php


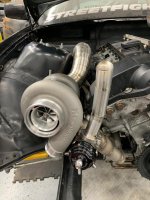
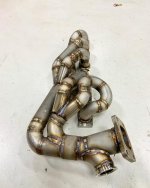
I've been making progress on the E36 turbo little by little. This is a time consuming process as I'm not trying to cut corners and I'm spending the time to learn fabrication techniques that I haven't played with yet. This is my first turbo manifold which came out pretty good in my opinion. Obviously there is always something you would go back and do better, but I need to keep moving forward. Making the manifold meant I had to buy a band saw - any excuse to acquire a new tool is a good excuse. I keep chipping away at this and I'm hoping to have it running in the next couple months.

attachment.php

attachment.php


Oh, and I just pulled the trigger on a Langmuir Systems Crossfire Pro plasma table... few months out on the backorder, but I'm excited :3gears:
 

Attachments

  • IMG_6643.jpg
    IMG_6643.jpg
    111.3 KB · Views: 263
  • IMG_6640.jpg
    IMG_6640.jpg
    77 KB · Views: 264
  • IMG_6656.jpg
    IMG_6656.jpg
    92.9 KB · Views: 265
  • IMG_6605.jpg
    IMG_6605.jpg
    82.2 KB · Views: 263
  • IMG_6995.jpg
    IMG_6995.jpg
    104.8 KB · Views: 261
  • CD7EAB21-01B7-4848-ABF2-19DAC9AA335F.jpg
    CD7EAB21-01B7-4848-ABF2-19DAC9AA335F.jpg
    96.8 KB · Views: 264
  • IMG_6606.jpg
    IMG_6606.jpg
    111.3 KB · Views: 265

bugnut

ALLIANCE MEMBER
Joined
Jul 14, 2012
Messages
4,010
Location
Central Ohio
Fizz. nice work on the powder coat oven! What a great idea! I have given thought to doing pc and Justin and you are pushing me further down the path!
 
OP
F

fizznizzy

Well-known member
Joined
Sep 13, 2017
Messages
54
Location
NE Ohio
Fizz. nice work on the powder coat oven! What a great idea! I have given thought to doing pc and Justin and you are pushing me further down the path!

Do it! It's really affordable. The Eastwood powder gun works pretty well for the price also.

How many hours did you have building that manifold ?

Keep buying tools and you're going to need to build an addition. :beer:

I don't like to keep count of things like that, but probably 60+ if I had to guess. Machined collectors, lots of fitting, beveling edges, machined a plate to bolt the flange to, custom fitting of the wastegate cutout... it adds up. All on top of never doing this before.

Good organization is a sign of efficiency. You should have seen what I had jammed into the 2 car garage attached to the house :beer:
 

zjohnson1

Well-known member
Joined
Oct 21, 2014
Messages
86
Location
Newnan, GA
Just found this thread and the similarities between us are pretty uncanny. I also work as a Mechanical Engineer, same size shop, same wall covering choice, and similar tool setups even down to the brands. Currently trying to score the old bridgeport from work. Haven't posted updates in a while but tbh I'm not sure how I even really have time to browse
 
To avoid these ads, REGISTER NOW!
Top Bottom