To avoid these ads, REGISTER NOW!

Between 265 & 485 SQ/FT Nick's Two-Car Detached Vdub Garage

Workspaces sized between 265 and 485 squarefeet.
OP
N

nicholam77

Well-known member
Joined
Dec 18, 2016
Messages
2,671
Location
Minneapolis, MN
So I did end up finishing the corner cabinet and got it delivered to my dad's house. Didn't take many pics, but it's really just more of the same.

More sanding.

IMG-2966.jpg

Cleaning up some saw marks.

IMG-2967.jpg

More biscuits.

IMG-2968.jpg

More pocket holes. And... more sanding.
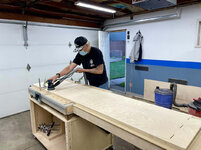
IMG-2970.jpg

No assembly pic but I'll have to go over there eventually. Maybe if I help with the install, depending on my availability.

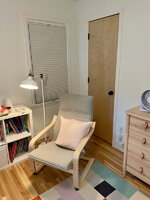
The baby is overdue (due date was Sunday), and I haven't been scheduled on a new project for work, so while we wait my wife asked me to finally finish up the closet door in my daughter's new bedroom. We switched her to a different, slightly larger adjacent bedroom, that used to be her play room. It's mostly set up, but the closet door was left 5% unfinished. Still leaning on IKEA a bit, but I'm pretty happy with how the little plywood bed and toy cubby I made are looking.

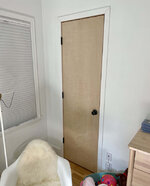
IMG-3001.jpg

IMG-3002.jpg

If you'll recall I had it installed and finished with clear polyurethane, and then it fell over and punctured. I had already installed and cased out the frame. Fortunately I had ordered the door from a lumber company, not the big box store, and they were able to make me an identical slab that should fit my existing installed jamb. And it did! But I was so annoyed at having to re-do the finishing process and wasting $180 I essentially installed it unprotected and forgot about it. The casing also needs some caulk and touch up paint.

I've been told if I don't finish it now, it will be *years* before it gets done. She might be right.

There was a small rubbing point in the lower right with the new door and the old jamb, so one again I broke out the hand plane. Damn, this thing is handy. I still **** at sharpening, but I've been using it more than I thought I would.

IMG-3013.jpg

And then back to finishing déjà vu. 6 coats (3 each side) 🤮

IMG-3014.jpg


IMG-3015.jpg
 
To avoid these ads, REGISTER NOW!
OP
N

nicholam77

Well-known member
Joined
Dec 18, 2016
Messages
2,671
Location
Minneapolis, MN
You get the "do it now, because you will never finish it otherwise" talk as well??

Sure do. 😁
And sometimes I do drag out projects. Especially boring ones. My better half is usually very patient with my DIY ventures, but when it comes to things like getting the kid rooms finished...

--------------------------------------------------------------------

So I have some important news to share!!!

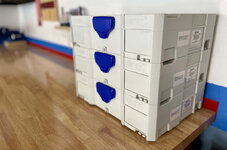
I ordered 3 more Systainer T-Loc 1's, with no real reason other than I am weak, they are being discontinued, and I got an amazing price on them:

IMG-3247.jpg


Oh and also this pesky baby boy showed up. Banana for scale.

IMG-3167.jpg

Jk he is amazing! Born 7/15/21 so that's why I've been laying low. Pretty much just been enjoying him and everybody getting used to the new family dynamic (our daughter definitely had some mixed feelings at the beginning, I think the words "I want the baby to go back in Mama's tummy" were uttered. :ROFLMAO:

I have two weeks off -- well, one more at this point -- and in the midst of it all I did manage to get her closet door finished.

IMG-3343.jpg

IMG-3347.jpg

I really love the natural birch and it's making me wish I had done this on more doors I put in our house instead of painting them white.

Other than that, just been enjoying the spaces we've upgraded and finished over the past few years. The living room has been a central zone to hang with the kids and I am really loving the contribution the "built ins" make.

IMG-3017.jpg

IMG-3213.jpg

It feels like a proper room, now.

It's about 90° and full humidity now, but next fire season I had the idea to use some of my hand plane shavings as tinder:

IMG-3330.jpg

These are cherry, they will be for a "luxury" fire. :ROFLMAO:

This morning we went for our first outing as a family of 4, to a nearby lake.

IMG-3354.jpg
IMG-3356.jpg
IMG-3351.jpg

For the first time in awhile it's been nice to kick back (despite the lack of sleep), just take a break from work and projects, and enjoy the kids, the house, and the outdoors.

Going forward, at least for a bit, I don't think I'm going to be able to keep the pace of projects up like I have been in this thread. I'm definitely not going to let the thread die, though, and I'll stay updated when I have something to share.

Cheers everybody. 🍻
 

racer-john

Well-known member
Joined
Apr 1, 2008
Messages
1,461
Location
Newmarket, ON Canada
Jk he is amazing! Born 7/15/21 so that's why I've been laying low. Pretty much just been enjoying him and everybody getting used to the new family dynamic (our daughter definitely had some mixed feelings at the beginning, I think the words "I want the baby to go back in Mama's tummy" were uttered.
That's a cute "little" baby or a very , very large banana. Hope the daughter's attitude has changed
 

Mr. Roboto

Well-known member
Joined
Dec 11, 2012
Messages
2,160
Location
New Hampshire
Sorry I am late, but congrats Nick!!!!! Happy to hear that your newest addition to the family has arrived! I hope him and your wife are both doing well, and you're managing to get some sleep. The early weeks sure can be tough. And I hope your Daughter has gotten used to him being around hahaha, I can imagine that has been a big adjustment for her!
 

bj383ss

Well-known member
Joined
Sep 29, 2011
Messages
3,166
Location
TX
Congratulations Nick!!!! My oldest turns 15 this next Sunday. Man where does the time go.

Bret
 
OP
N

nicholam77

Well-known member
Joined
Dec 18, 2016
Messages
2,671
Location
Minneapolis, MN
That's a cute "little" baby or a very , very large banana. Hope the daughter's attitude has changed

Ha, he is a big fat boy. 9 lbs 4 oz was the birth weight. Daughter has been adjusting well, that comment of hers was just on the first day 😁. No doubt a lot for her to get used to, as well as us.

Sorry I am late, but congrats Nick!!!!! Happy to hear that your newest addition to the family has arrived! I hope him and your wife are both doing well, and you're managing to get some sleep. The early weeks sure can be tough. And I hope your Daughter has gotten used to him being around hahaha, I can imagine that has been a big adjustment for her!

Thanks man! He's been a good baby so far, probably because he is on the bigger side. Easier than my daughter was in the newborn phase if I remember right. Still up 2-3 times a night, but he's just 12 days old so can't really hold it against him haha. It's definitely an adjustment for the 1st kid, I'm sure it will last some time, but overall she's been great so far.

Congratulations Nick!!!! My oldest turns 15 this next Sunday. Man where does the time go.

Bret

Thank you Bret! That's crazy. I can hardly believe my first is going on 3. I'm sure it only speeds up from here...

Congratulations Nick!

Thanks Bob!

Congratulations!

Thanks @zanyad !
Congrats!

Thanks Mark!


-------------------------------------------------------------


My dad's been working on applying finish to the pantry boxes (surprise -- General Finishes High Performance :ROFLMAO: ), as well as nailer strips etc.

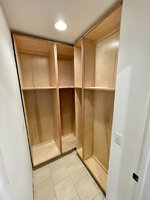
He's had one of the larger boxes in their basement entry, and one in the garage so he's been parking outside. They are just way too heavy for he and my mom to lift (they are in their early '70s) so he asked me to come help him get them in position now that the finish is on. I had a couple hours to steal away and get that done, yesterday.

IMG-3396.jpg

Kind of a disheartening amount of work left to do with all the trim bits, shelves, and doors, but I am really loving the way it looks so far.

Floor is tile so not perfectly flat, my dad will have some work cut out for him to get them shimmed, installed, cutouts for electrical boxes, etc.

IMG-3397.jpg

They'll be sucked together at the seems with some special through-pins that go through the shelf pin holes. I'm a little anxious about the shelf pins all lining up for the doors, etc. Fingers crossed.

That's all I've got for now!
 

loganb

ALLIANCE MEMBER
Joined
Dec 29, 2011
Messages
5,578
Location
Omaha, NE
The clone we'd been using (DraftSight) is no longer free; who did you end up switching to?

We went to BricsCAD for 95% of our 2D usage https://www.bricsys.com/en-us

It's an AutoCAD clone, basically all the shortcuts, keyboard commands etc work, the icon's are generally the same etc....my area runs a "add on" package on top of it to streamline our CAD workflow and it integrated with minimal work. For the vast number of the users(manufacturing engineers, quality technicians, continuous improvement tech's and similar manufacturing support roles) it was a seamless change once they got their toolbars set up as they were used to.

We trialed DraftSight a couple years ago as a potential replacement, we use SolidEdge for 3D and so it's included in our licenses since same software company. A combination of things, none of them in their own were dealbreakers but in total was going to make transitioning a headache so we never did....there was also little financial incentive at that time. Now that we had a mid 6 figure incentive...we found some more viable solutions

Nick-Congrats! Welcome to the 2 kid household! Very excited you spent substantially less time in the hospital then we did and are home and getting used to the new dynamic!

We also had the toddler want new baby to go back....think it was night 3 he was home and our 2.5 year old told Mom that "she should take little brother back to the hospital now!" Wish I had that on video to play back down the road! It's super fun watching her interact with her little brother...lacks the attention span to do it for more than a couple minutes but he's kinda boring much of the time so I get it!

And awesome work on those cabinets...your continued progress and skill building on casework is giving me more confidence in diving in on my built in dresser project once work cools down a bit and I can take some time off
 
OP
N

nicholam77

Well-known member
Joined
Dec 18, 2016
Messages
2,671
Location
Minneapolis, MN
Nick-Congrats! Welcome to the 2 kid household! Very excited you spent substantially less time in the hospital then we did and are home and getting used to the new dynamic!

We also had the toddler want new baby to go back....think it was night 3 he was home and our 2.5 year old told Mom that "she should take little brother back to the hospital now!" Wish I had that on video to play back down the road! It's super fun watching her interact with her little brother...lacks the attention span to do it for more than a couple minutes but he's kinda boring much of the time so I get it!

And awesome work on those cabinets...your continued progress and skill building on casework is giving me more confidence in diving in on my built in dresser project once work cools down a bit and I can take some time off

Thanks!! Yes, nothing as exciting / stressful as your journey to report so far. I'm glad yours is home now and seemingly doing great. To the big sisters... yeah babies are quite boring I suppose! It is fun seeing their short interactions and observations "He's so tiny!", "The baby is pooping everywhere dada!". You know.

Re: the cabinets what I've found on my amateur cabinet-building quest is the two hardest parts are 1) planning everything out ahead of time with the hardware, dimensions, drawer sizes, etc, and 2) cutting the parts squarely and accurately. To point #1, I know you're into CAD so I'm sure you've got a detailed drawing, but I've found software tools like Sketchup and Cutlist Optimizer to really give me confidence and improve the success of my work. To point #2, I put a lot of effort into the whole MFT sheet goods process, and it's worked pretty well for me, but you have a lot of nice tools and a full size table saw so I'm sure you'll have no problem getting nice accurate parts.

With similarly aged kids you won't be getting any pressure from me to get started on your project, but when you do eventually, I'll be eagerly following along!

Congratulations Nick and family! He is suuuper cute:love: Now you have someone who can renovate your kitchen when you are older;):D

Thanks T!! We like him alright 😁

When it comes to future kitchen renovators, we'll see if it's him, or my daughter, or neither of them! I could use a helper, though! So far my daughter has shown an interest in the stuff I've made and is mechanically inclined (loves to figure out how things work). Then again I grew up around my dad building stuff my whole life, but didn't really feel inclined to do much myself until I had a place of my own. But I guess it rubbed off in the end.

Thanks for stopping by!
 
OP
N

nicholam77

Well-known member
Joined
Dec 18, 2016
Messages
2,671
Location
Minneapolis, MN
Some minor updates just to keep things going:

Our big garden harvest is staring to come through.

A single, albeit giant, zucchini:

IMG-3441.jpg

Wtf do I do with a giant zucchini?

And one single apple:

IMG-3440.jpg

IMG-3439.jpg

Hopefully @jar944 doesn't get too jealous of my bounty.

In other news Minneapolis has been smokey AF due to the Canadian wildfires. Especially with the new baby we've been more or less confined to the house for a couple of days, the air quality has been so bad.


air-quality.png

downtown-haze.jpg

IMG-3476.jpg

I did manage to pick up a new tool!

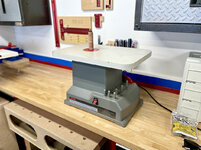
A Ryobi OSS450 oscillating spindle sander:

IMG-3503.jpg

I've set up a few Craiglist searches to notify me when certain things pop up. I'm trying to flesh out a few tools with used options, and I am happy with where my drill press got me in that regard. An oscillating spindle sander is something I could have used multiple times on past projects. In general I like to kind of get the safe bet, usually new, something I know will work well (in this case probably the Rigid EB4424??), but I've realized I can't justify doing that for every tool.

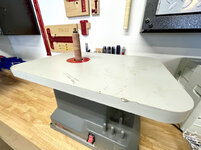
It's not in perfect shape (mostly just the table is dinged), but seems to work just fine.

IMG-3506.jpg

It's also missing the majority of the sanding drums and sleeves, and top washers, and one of the wrenches. So I have some parts to fill in, but I'm hoping even so, the cost will be worth it.

I don't know a ton about it other than it is discontinued, and seems other companies (including Grizzly and possibly others) have almost identical models available. It has a nice large 14" x 20" table. And dust collection port.

Question for anyone who has an opinion -- seeing as I have to get some new sandpaper, is there a most useful grit for these things? I feel like a common use for me will be sanding curves to a pencil line in plywood or MDF. Either to make router templates or to ease the hard angles in a design. So nothing crazy.

🍻
 
OP
N

nicholam77

Well-known member
Joined
Dec 18, 2016
Messages
2,671
Location
Minneapolis, MN
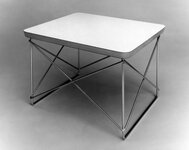
Eames LTR Occasional Table (Top)

I've mostly been trying to keep my head afloat with the kids and work this past month, and enjoy what's left of summer, but I have managed to do a small project worth sharing. I think. :LOL:

When I finished up the fireplace built ins, I had to move my cherry end table away from the couch to the other side of the room, and thus we lost a spot to set drinks, books, etc. My wife was wanting to buy some sort of casual drink table, and even though it's quite small, my mind went to the Eames LTR table, which is a tiny multi-purpose table from the 1950's:

eames-1.jpg

LTR stands for "Low Table Wire Rod Base), and essentially they are a metal wire base with a laminated plywood top. The originals were just plywood, later models had Formica on the surface. They are still made 70+ yrs later with even more options for the top like hardwood and marble. I don't really have space for a proper end table anymore due to the room configuration, and I thought this would be a nice little flexible table that could be moved out of the way when not needed. One popular concept in Modernist furniture is repeatability, modularity, and flexibility. Below you can see some of these tables in the Eames house. By grouping them in an array they become a bigger table.

eames-2.jpg

Long story short, in today's prices, they are $250-$350 depending on the materials chosen... and so we got a $15 plywood table from IKEA instead. :ROFLMAO:

Which works great. But... months later, after I had it out of my mind, I happened to be browsing Etsy and saw a metal shop offering a reproduction LRT base for $85. Typically I'm not a fan of reproductions because I think they walk a very fine line of "knock off", and despite modern / designer furniture being expensive (in my opinion often way overpriced, especially in today's world), I think there's something special about the real deal, whether it's new or vintage. But... this Etsy shop seemed like a one-man-band, hand welding these as ordered. So I bought one and figured I could make my own plywood top.

With some Google-Fu I found this Herman Miller brochure snippet from the 1970's that uncovered the specs:

LTR-1978.jpg

Because the top has radiused corners and an under bevel, I had to think about order of operations and how to achieve that. I started by making an MDF template to the right size.

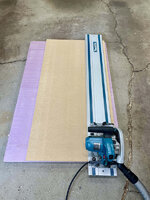
I like to start out by just ripping a clean straight edge to work off of.

IMG-3529.jpg

Really a thing like this doesn't need to be perfect and I could have easily done it with tape measure and pencil marks on the floor. But since the MFT has the capacity, why not?

IMG-3532.jpg

Keep breaking it down until it's the right size.


IMG-3534.jpg

Then I cut a piece of 3/4" Baltic Birch plywood to about 1/8" wider than the MDF on all sides.

IMG-3541.jpg

Then to get them to match, I double stick taped them together and flush trimmed the plywood to match the MDF at the router table.

IMG-3543.jpg

IMG-3544.jpg

Next was to do the corner radiuses.

IMG-3548.jpg

I couldn't find the official spec on this so went with a 20mm radius.

Next was to do the under bevel. To do this I ordered a 15° chamfer bit with bearing on Amazon. I couldn't find a 20° bit like the specs said but who cares, just trying to get close.

IMG-3550.jpg

Now perhaps the reason for the MDF template becomes clear -- the under bevel comes to a knife edge on the top, so the bearing needs a surface to ride on so the cutter can go all the way through the plywood.

IMG-3551.jpg

Shallow passes was the name of the game here. Unfortunately I did get some burning on the corners, I think I probably had the bit going too fast or moved through them too slow.

Placed the base and picked out some screws.

IMG-3619.jpg

Drilled the hardware holes on the drill press. Not necessary but I still find myself going to the DP for repeatability and accuracy, even for small tasks.

IMG-3625.jpg

Off camera did a sand and added finish (General Finishes High Performance). I thought about oiling it but I wanted to be able to set a drink on it and the High Performance is nice and durable.

Here is the end result:

IMG-3643.jpg

IMG-3645.jpg

The birch plys look really nice on one side but kind of muted on the short sides, they seemed to get dulled when I sanded them. Not sure what happened there.

IMG-3646.jpg

IMG-3649.jpg

So yeah, I like it. At the end of the day it's just a piece of plywood but it was still fun to "make". It's a cute little table and perfect for books, plants, coffee cup, whatever. I can see myself actually picking it up and moving it to where I want in the room and using it for different purposes. I really like that the base was hand made by an artisan, and that I made the top myself. Part of the appeal of modern furniture to me is that it can be very humble, utilitarian, and casual, while still being nice to look at. I actually feel more of those virtues come through by going this route vs. buying one from the store, and it still stays pretty true to the design.

🍻
 
Last edited:

loganb

ALLIANCE MEMBER
Joined
Dec 29, 2011
Messages
5,578
Location
Omaha, NE
Simple but highly functional project that fits into your space wonderfully....and you got new tools even if it was just a router bit or two....awesome work!
 

Mr. Roboto

Well-known member
Joined
Dec 11, 2012
Messages
2,160
Location
New Hampshire
Very nice! Were you happy with the quality of the base you ordered? The top came out great.

I'll bet your daughter loves this table too, perfect height for her. She will be setting up her dolls for a tea party there in no time!
 
OP
N

nicholam77

Well-known member
Joined
Dec 18, 2016
Messages
2,671
Location
Minneapolis, MN
Nice project, Nick!
Thanks!

Simple but highly functional project that fits into your space wonderfully....and you got new tools even if it was just a router bit or two....awesome work!
Thanks! Not sure how much I'll use the 15° chamfer but maybe? The corner radius jigs were something I feel like I'll make use of from time-to-time.

Very nice! Were you happy with the quality of the base you ordered? The top came out great.

I'll bet your daughter loves this table too, perfect height for her. She will be setting up her dolls for a tea party there in no time!

Thank you, yes I am happy with the quality of the base. I know nothing about metal work but the welds look nice and tidy and accurate to me. The proportions seem true to the actual based on my research. The base is powder coated, but has a somewhat rough feel. I'm sure the licensed product base is smooth and lacquered or something like that, maybe somewhat glossy. But it doesn't really matter unless you touch it.

Funny you say that, I had also thought about using it has a "night stand" in my daughter's room next to her little plywood bed. Ended up not being much room the way we set it up but who knows maybe in the future. It is a small table, so you are right, it is perfect for kids, too!
 
OP
N

nicholam77

Well-known member
Joined
Dec 18, 2016
Messages
2,671
Location
Minneapolis, MN
Shelf Pin / 32mm Cabinet Dilemma

So I haven't had time to be making anything, but ever since doing the shelf pins on my parents' pantry, I've been disappointed in how my homemade jig performed under pressure and have been thinking about a solution for the future. As I'm 99% sure I'm going to be making more cabinets for the house. Probably a lot of them. So in lieu of an actual project I thought I would ramble on about my 1st-world shelf pin dilemma. 😁

Three quick considerations:

1/ I think the Dan Pattison-style homemade jig was a great concept, but in practice it's difficult to clamp on large panels like the 8' ones I was working on, and relied too heavily on homemade stop blocks. It could probably be made to work with a CAD design, Send Cut Send, or some sort of CNC work and hardware. I just don't have the resources (time) to figure that out.

2/ For some reason I'm chasing the 32mm system. I don't know if it's with a purpose or a fools errand, but I just love the idea of taking the guesswork out of parts sizing, and the goal of the cabinet doors / drawers / doors just "clicking together" at the end because it was all planned out according to a system.

3/ I'm looking for something router-based, and fast in operation

So here are the store-bought systems I am considering with Pros and Cons.

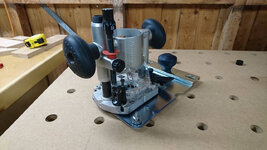
Festool LR32 "Bits & Pieces" ~$330

LR32.jpg

I say bits and pieces because there's no way in hell I could justify the $535 Systainer set, the $145 55" holey rail, and a $485 OF1010 Festool router (cheapest) for a grand total of $1,165. Insanity.

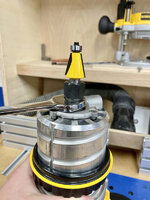
I have toyed with the idea of getting just the router plate (and adapting it to my DeWalt 618), the holey rail, and the end stops. This would be about $330 and require some engineering to make the DeWalt router work with an acrylic sub base like this:

DSC-1080.jpg

Another option would be to just get the holey rail and end stop, and make my own indexing router sled -- OR -- just get the sled and try to accurately drill one of my Makita rails with indexing holes -- but this starts creeping back into extra time and effort of DIY territory, and potential loss of accuracy.

Pros:
  • Well-reviewed, flexible, accurate system with a track record. Can do shelf pins, hinge plates, drawer hardware, and hinge cups on the doors
  • Rail is long (55") so should work for most projects without need to extend or reposition
  • Can mark drilling locations on rail with dry erase marker
  • Can place rail anywhere offering ultimate flexibility
  • Can also use rail and sled to make perfectly orthogonal MFT surfaces with 20mm cutter
  • Could possibly adapt rail to index other operations like dowels or biscuits
Cons
  • Expensive!!
  • Not 100% sure if I can get DeWalt 618 to fit
  • Would need a way to index from the front edge of workpiece accurately, might need to get something like a metric Paolini Pocket Rule, or make custom plywood stops for each scenario
  • Hinge cup ability requires extra expensive 35mm router bit
  • Sort of involved set up / calibration
I think this would be my ideal solution, I'm just held back by the price.

Bosch FSN-OFA-32 ~$220 for the kit, extra $139 for longer rail

Bosch-FSN-OFA-32.jpg

This is essentially a Bosch LR32 clone.

Pros
  • Similar in flexibility to LR32
  • Router sled can fit my router and can be used for other things like dados with nice micro adjust
Cons
  • Price -- short rail in the kit is only 31", probably too short for most cabinets. With the longer rail comes dangerously close to actual LR32 "bits and pieces" pricing and I'd probably rather have the Festool
  • Indexing pin lever isn't as elegant as LR32
  • Can't do hinge cups
  • I'd be gaining additional rails I can't use with my track saw or other products


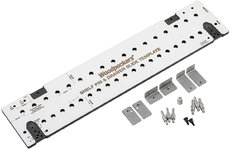
Woodpecker Shelf Pin Jig - $119

Woodpeck.jpg


Pros
  • Price
  • Can do shelf pins, hinge plates, and drawer hardware
  • CNC accuracy
  • Very little setup
  • Easy setup for drawer hardware
  • Can use locating pins to "extend the line" for long runs
  • Can do 32mm and 1" spacing and setbacks
  • Can be used on existing cabinets, although I don't see a big need for this
  • Can mark on it in dry erase marker
Cons
  • Kind of short in length, for long cabinets would need to move jig often
  • Clamps seem like they would get in the way of the router, or need to be moved often
  • No option for anything other than a 37mm setback (so if I wanted to adjust back row setback for dado/backing panel I couldn't do that)
  • Router must be lifted and placed in hole each maneuver, not as fast or elegant as LR32 sled

Sautershop MFS-3202 ~$116 Euro = 181 Euro w/shipping = $212 USD

MFS-3202.jpg


Peter Millard has a nice video on this one.


Pros
  • Can do shelf pins, hinge plates, and drawer hardware
  • Finger-style indexing with guide-bushing, looks much faster than the Woodpecker style, similar in concept to my homemade jig
  • CNC accuracy
  • Very little setup
  • Can use locating pins to "extend the line" for long runs
  • Has flexibility for setbacks (37mm, 50mm, 60mm, 70mm, 80mm, 90mm)
  • Longer so you can get a good run of holes in, probably all of a normal cabinet in one go
Cons
  • Quite large to store
  • Pretty expensive for just a chunk of CNC'd phenolic (shipping from Germany hurts!)


So yeah, not urgent, just keeping my mind busy on the future. They all have enough Pros and Cons to me that I'm truly torn on what would be the best balance of cost and function for me. If anyone has thoughts on these jigs, shelf pins/32mm hardware boring in general, or other jigs you know of, I would be super interested to hear.

🍻
 
To avoid these ads, REGISTER NOW!

Mr. Roboto

Well-known member
Joined
Dec 11, 2012
Messages
2,160
Location
New Hampshire
I don’t really have enough experience to offer advice for you on any of this, so I’ll just say buy the more expensive items. How can you go wrong :) it’s not my money! Hahaha.

Sounds like you’ve really thought things through. I guess maybe prioritize the items you’d use the most and get the biggest return on. It’s hard, seems like there are pretty big pros and cons with anything you buy these days. Rarely is there a clear bang for you buck choice with things. As time goes on, and I start making more niche purchases, I usually just wait until I can afford to buy what I want vs being disappointed and settling for something that I’ll always regret.

But, good luck! You’ve really built out your shop over the last few years. Nice to start checking off some of those “luxury item” purchases.

EDIT... I kind of failed to realize that these were all shelf pin jigs haha. They looked so different from the photos and the descriptions. So, my poor advice really isn't applicable. To be honest, I didn't even know that router based options existed. I need to read better next time! I have the cheap bench dog one from Rockler, and it *****.
 
Last edited:

Trapps

ALLIANCE MEMBER
Joined
Feb 10, 2017
Messages
2,003
Location
The Detroit Zoo
Don't forget that OFA rail adapter will run (according to internet) on your existing Makita rails.

Bosch-on-Makita-Rail.jpg

Shorter tools (WP, Bosch 31", etc.) can easily be moved and indexed against a fence clamped to the workpiece. Perfect? No. Repeatable and accurate? Yes.

Since you're clearly going to be a lifer when it comes to Home/Shop/DIY, get the setup you'll have the most success with for the long haul.

While I've been highly unproductive lately, I'll be testing the Bosch OFA 32 set up on an MFT build this fall. I'll detail it here on GJ.

I wonder if the OFA32 will work on a Festool holey?

Does not look like it:

Bosch-on-Festool-Rail.jpg

Good luck!
 
Last edited:

Bakafish

Well-known member
Joined
Feb 7, 2017
Messages
477
Location
Tokyo
Shelf Pin / 32mm Cabinet Dilemma

So I haven't had time to be making anything, but ever since doing the shelf pins on my parents' pantry, I've been disappointed in how my homemade jig performed under pressure and have been thinking about a solution for the future. As I'm 99% sure I'm going to be making more cabinets for the house. Probably a lot of them. So in lieu of an actual project I thought I would ramble on about my 1st-world shelf pin dilemma. 😁

Three quick considerations:

1/ I think the Dan Pattison-style homemade jig was a great concept, but in practice it's difficult to clamp on large panels like the 8' ones I was working on, and relied too heavily on homemade stop blocks. It could probably be made to work with a CAD design, Send Cut Send, or some sort of CNC work and hardware. I just don't have the resources (time) to figure that out.

2/ For some reason I'm chasing the 32mm system. I don't know if it's with a purpose or a fools errand, but I just love the idea of taking the guesswork out of parts sizing, and the goal of the cabinet doors / drawers / doors just "clicking together" at the end because it was all planned out according to a system.

3/ I'm looking for something router-based, and fast in operation

So here are the store-bought systems I am considering with Pros and Cons.

Festool LR32 "Bits & Pieces" ~$330

LR32.jpg

I say bits and pieces because there's no way in hell I could justify the $535 Systainer set, the $145 55" holey rail, and a $485 OF1010 Festool router (cheapest) for a grand total of $1,165. Insanity.

I have toyed with the idea of getting just the router plate (and adapting it to my DeWalt 618), the holey rail, and the end stops. This would be about $330 and require some engineering to make the DeWalt router work with an acrylic sub base like this:

DSC-1080.jpg

Another option would be to just get the holey rail and end stop, and make my own indexing router sled -- OR -- just get the sled and try to accurately drill one of my Makita rails with indexing holes -- but this starts creeping back into extra time and effort of DIY territory, and potential loss of accuracy.

Pros:
  • Well-reviewed, flexible, accurate system with a track record. Can do shelf pins, hinge plates, drawer hardware, and hinge cups on the doors
  • Rail is long (55") so should work for most projects without need to extend or reposition
  • Can mark drilling locations on rail with dry erase marker
  • Can place rail anywhere offering ultimate flexibility
  • Can also use rail and sled to make perfectly orthogonal MFT surfaces with 20mm cutter
  • Could possibly adapt rail to index other operations like dowels or biscuits
Cons
  • Expensive!!
  • Not 100% sure if I can get DeWalt 618 to fit
  • Would need a way to index from the front edge of workpiece accurately, might need to get something like a metric Paolini Pocket Rule, or make custom plywood stops for each scenario
  • Hinge cup ability requires extra expensive 35mm router bit
  • Sort of involved set up / calibration
I think this would be my ideal solution, I'm just held back by the price.

Bosch FSN-OFA-32 ~$220 for the kit, extra $139 for longer rail

Bosch-FSN-OFA-32.jpg

This is essentially a Bosch LR32 clone.

Pros
  • Similar in flexibility to LR32
  • Router sled can fit my router and can be used for other things like dados with nice micro adjust
Cons
  • Price -- short rail in the kit is only 31", probably too short for most cabinets. With the longer rail comes dangerously close to actual LR32 "bits and pieces" pricing and I'd probably rather have the Festool
  • Indexing pin lever isn't as elegant as LR32
  • Can't do hinge cups
  • I'd be gaining additional rails I can't use with my track saw or other products


Woodpecker Shelf Pin Jig - $119

Woodpeck.jpg


Pros
  • Price
  • Can do shelf pins, hinge plates, and drawer hardware
  • CNC accuracy
  • Very little setup
  • Easy setup for drawer hardware
  • Can use locating pins to "extend the line" for long runs
  • Can do 32mm and 1" spacing and setbacks
  • Can be used on existing cabinets, although I don't see a big need for this
  • Can mark on it in dry erase marker
Cons
  • Kind of short in length, for long cabinets would need to move jig often
  • Clamps seem like they would get in the way of the router, or need to be moved often
  • No option for anything other than a 37mm setback (so if I wanted to adjust back row setback for dado/backing panel I couldn't do that)
  • Router must be lifted and placed in hole each maneuver, not as fast or elegant as LR32 sled

Sautershop MFS-3202 ~$116 Euro = 181 Euro w/shipping = $212 USD

MFS-3202.jpg


Peter Millard has a nice video on this one.


Pros
  • Can do shelf pins, hinge plates, and drawer hardware
  • Finger-style indexing with guide-bushing, looks much faster than the Woodpecker style, similar in concept to my homemade jig
  • CNC accuracy
  • Very little setup
  • Can use locating pins to "extend the line" for long runs
  • Has flexibility for setbacks (37mm, 50mm, 60mm, 70mm, 80mm, 90mm)
  • Longer so you can get a good run of holes in, probably all of a normal cabinet in one go
Cons
  • Quite large to store
  • Pretty expensive for just a chunk of CNC'd phenolic (shipping from Germany hurts!)


So yeah, not urgent, just keeping my mind busy on the future. They all have enough Pros and Cons to me that I'm truly torn on what would be the best balance of cost and function for me. If anyone has thoughts on these jigs, shelf pins/32mm hardware boring in general, or other jigs you know of, I would be super interested to hear.

🍻
Makita's router rail adaptor is very good, and cheap. I documented my solution to your quandary in my thread. If I were to do it differently, I might drill the holes directly in my rail the way Festool does to ease using bottom mounted reference bars so reversing the direction was less painful. My solution doesn't easily directly reference the holes to a bottom stop on the rail, I use a magnetic puck that references from the router itself, but it is finicky. I also suspect a good "job shop" would be more than capable of precision drilling the holes in your rails at a negligible cost. Only the fact that I'm in Japan stopped me from seeking out such assistance. Everything else is simple off-the-shelf parts and 3D printing at that point.

As you will quickly discover, there is no room for slop. The easier it is to set up, and the more precise it is, the better the chance of you being happy. The hole spacing is unforgiving, and even a half a mm will kick your *** if you are a perfectionist (and if you are deep diving 32mm rails I stipulate you are...) Those MDF type things look like regret to me. Either buy the Festool, or make something as good. There really isn't an acceptable compromise I think.
 
OP
N

nicholam77

Well-known member
Joined
Dec 18, 2016
Messages
2,671
Location
Minneapolis, MN
I’ll just say buy the more expensive items. How can you go wrong :) it’s not my money! Hahaha.

Ha! That's what Garage Journal-ers do best, right? Spend other people's money? 😁

You’ve really built out your shop over the last few years. Nice to start checking off some of those “luxury item” purchases.

Thanks. Definitely a lot of tasks are easier these days. There's so much more I'd like to incorporate (like rough lumber milling) but as it stands I haven't really built much purely out of hardwood. So for now I'm trying to focus on what I've been doing the most which seems to be cabinets. Any of the shelf pin jigs I linked I would call a luxury purchase for sure, but as I learned on this big pantry project, doing THAT many shelf pin holes is a pain. So that's another thing I'm trying to weigh... how many more huge cabinet projects like that will I be doing?

To be honest, I didn't even know that router based options existed. I need to read better next time! I have the cheap bench dog one from Rockler, and it *****.

I have the acrylic Rockler one too, and yes it *****. Get you by in a pinch but it's just not accurate and almost impossible to extend beyond the length of the jig accurately. Compared to the Rockler jig, my homemade router-based jig was 1000% better. The holes the 5mm brad point router bit leave are tight, crisp, and tear out free. Fit the shelf pins like a glove. And plunging holes with a router is exponentially faster than hand drilling. I think router-based is a must for any substantial amount of work, or just if you want good quality holes.

Shorter tools (WP, Bosch 31", etc.) can easily be moved and indexed against a fence clamped to the workpiece. Perfect? No. Repeatable and accurate? Yes.

It would have been somewhat annoying on the full 8' height build I just did to keep repositioning a jig, but I'm not super bothered by that if it's accurate. Woodpecker's has a good track record with quality products, but I haven't been able to find any reviews of this jig that actually test the accuracy, especially when extending a row of holes. I would hope it's accurate, though, and having to move the jig is possibly a compromise I'd make to pay 1/3 the price of the LR32.

Clamping a fence -- I assume you mean perpendicular to the front edge, to locate the jig mid-panel? I don't see an issue with that as long as the fence is clamped square to the front, and in the exact same spot on both gables. Possible, probably, but if I'm understanding correctly still some room for setup error.

While I've been highly unproductive lately, I'll be testing the Bosch OFA 32 set up on an MFT build this fall. I'll detail it here on GJ.

Can't wait to see your build, and how the OFA 32 works for you. I'm not in a big rush on this shelf pin thing, so maybe I'll wait and see!

P.S. yes on the OFA sled fitting Makita rails, not sure it's my shelf pin solution unless I went full Bosch with their rails... but it's still on the table as a general dado track sled for my Makita rails and DeWalt router

As you will quickly discover, there is no room for slop. The easier it is to set up, and the more precise it is, the better the chance of you being happy. The hole spacing is unforgiving, and even a half a mm will kick your *** if you are a perfectionist (and if you are deep diving 32mm rails I stipulate you are...) Those MDF type things look like regret to me. Either buy the Festool, or make something as good. There really isn't an acceptable compromise I think.

Thanks @Bakafish , I've studied your home brewed solution many times. It's awesome. Sadly I don't think I have the time, tools, or resources (3D printer etc) to make something like that. Having some sort of shop drill one of my Makita rails is not a bad idea. I feel like if I did that and used the actual Festool end stops and router sled, I'd be pretty close to a working system for a competitive price.

Agree on the accuracy and need for ease of setup. My homemade jig actually started quite accurate, but where it fell apart was the plywood warped and my reference stops were not easy to set. And I didn't incorporate a "centering mandrel" on the router base, so I think being off half a millimeter with the bit centerline screwed me on occasion.

I haven't used them obviously, but for what it's worth the Woodpecker and Sautershop jigs are phenolic, not MDF, so they should be pretty durable.
 
OP
N

nicholam77

Well-known member
Joined
Dec 18, 2016
Messages
2,671
Location
Minneapolis, MN
Speaking of cabinets and shelf pins... I've been very stagnant on any sort of projects due to the newborn, but my dad has been coming over occasionally to further the pantry project by himself.

Yesterday was cutting the plethora of adjustable shelves for storage. I've operated most of the tools on this build, but I had no time so I set him up with the MFT and track saw and said have at it!

IMG-3801.jpg

IMG-3804.jpg

I believe he's going to do the iron-on edge banding on his own, too.

I snapped these pics awhile ago back at their house:

IMG-3636.jpg

So far he's managed to install them by himself, attach cleats on the tops to receive a trim piece, has ripped toe kicks, and ripped and scribed all the trim pieces (not installed yet).

As well as pass through electrical:

IMG-3635.jpg

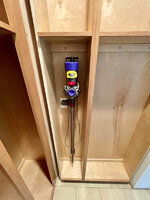
And the Dyson fits! Phew. Honestly this project has been a ton of work, but my dad has shouldered a lot of it including all the design and measurements, finishing, installation, etc. It could have been so much more time-consuming than it was for me!

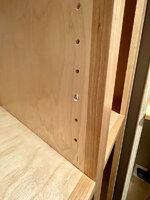
The carcasses were joined together with *** BOLTS. Yes you read that right. Apparently that's what they are called. Anywho they go through the shelf pin holes. Fortunately, they lined up close enough.

IMG-3637.jpg

At some point I'll make another trip over there for a few hours and help get the remaining trim pieces on with the pin nailer. Hopefully I'll get a more complete update then.

And then, sometime when this baby stops waking me up 3x a night (last night was 2-3 hrs of sleep!) we'll get back to the shaker doors. But at least for now my mom can load it up with shtufff.

🍻
 
OP
N

nicholam77

Well-known member
Joined
Dec 18, 2016
Messages
2,671
Location
Minneapolis, MN
Hope everyone in the U.S. had a great Labor Day Weekend!

After a hot, dry summer (precipitation, not humidity), the Twin Cities have had some amazing weather the past week and through the weekend, so I spent a lot of time outside with the family.

IMG-3862.jpg

Saturday morning, I took my daughter to Cars + Coffee again with my dad. This Camaro was her favorite car of the show, because it was "a Mama and a Baby" 😂

IMG-3830.jpg

Sunday I managed to do a car thing in the garage for once, a long overdue oil change for my wife :oops:

IMG-3836.jpg

I don't know why I still do my own oil changes. To save some money I guess. I used to get enjoyment "working" on the cars, but lately, with time at a premium, it's feeling like more effort than it's worth.

That's it for this non-update!

🍻
 

Bob Heine

ALLIANCE MEMBER
Joined
Oct 24, 2009
Messages
10,707
Location
Boca Raton, Florida
I don't know why I still do my own oil changes.
Nick, I have rarely paid someone to change the oil in my cars because It has not always gone well. First oil change at my Pontiac dealer in 1968 resulted in six vacuum hoses disconnected, cigarette lighter removed, undercoating overspray and a long scratch in the side of my brand new GTO. Never went back. Oil pan drain plug on my '72 Corvette was overtightened to the point of needing a new plug. Chrysler dealer charged me for an oil filter that wasn't changed (I mark Chr, Chv and Cad on them so I don't try to put one on that's meant for another car).

There's also no way to tell if the place uses the synthetic oil you pay extra for.
 
OP
N

nicholam77

Well-known member
Joined
Dec 18, 2016
Messages
2,671
Location
Minneapolis, MN
Nick, I have rarely paid someone to change the oil in my cars because It has not always gone well. First oil change at my Pontiac dealer in 1968 resulted in six vacuum hoses disconnected, cigarette lighter removed, undercoating overspray and a long scratch in the side of my brand new GTO. Never went back. Oil pan drain plug on my '72 Corvette was overtightened to the point of needing a new plug. Chrysler dealer charged me for an oil filter that wasn't changed (I mark Chr, Chv and Cad on them so I don't try to put one on that's meant for another car).

There's also no way to tell if the place uses the synthetic oil you pay extra for.

Great points, Bob. I have yet to find a car shop I can fully trust. I always feel like they aren't going to do a proper job, or will try to swindle me. Too bad, really. I've had similar experiences at the dealership especially, where they've removed parts (and damaged them) that didn't need to be removed, probably due to inexperienced techs. No excuse for it really, but extra painful on those special cars we like to baby like I'm sure the case with your GTO and Corvette. I would be furious!

Being a turbocharged German car (made in Mexico! 😂 ) of course my GTI is spec'd for full synthetic. I've only ever put VW approved oil and weight in it. I figure the dealership would probably put OEM, but I would never trust a chain shop like Jiffy Lube to have the right stuff. Not in a million years.

And the oil I need is expensive, so it definitely saves me money cutting out the labor and up-charge. I think a dealership oil change for my car is like $130. Less for the wife's, but still painful.

I had three cars in a row with over tightened drain plugs, the cause missing washers. Lousy 'quick lubes'.

For sure. I avoid those places like the plague. Same has happened even at the dealer with my wife's Mazda, stuff like dipstick not fully seated etc.

These are all valid points and much of why I do it in the first place. Oil changes still don't get me "excited to work on the car" like it used to, especially in winter, but I am going to stick with it for all of the reasons you guys mentioned.
 

Kriesel

Well-known member
Joined
Mar 25, 2014
Messages
138
Location
Afton, Minnesota
I stay motivated with oil changes by doing oil samples and seeing how many miles I can go on the next change. The car is at 12k, and the Duraburb is at 14k miles. Adds some "fun" to it.

But, I agree, the lack of extra time, or priority with other things has made me want to work on cars less. I've ultimately said no to working on other peoples vehicles a lot more in recent years. I used to do a lot more work for friends and family. Now I mostly focus on my own, with some more rare occurrences outside that.

Life is busy with three kids and all that job stuff... haha
 

Mr. Roboto

Well-known member
Joined
Dec 11, 2012
Messages
2,160
Location
New Hampshire
About 10 years ago, I had my oil changed at a quick lube place. I had just fractured my shoulder snowboarding, and was unable to do it myself. After about 3 miles driving home, I smelled burning oil and saw smoke. They forgot to put the oil fill cap back on. They apologized profusely and offered me 3 free oil changes, but I never returned for them, and haven’t had anyone do my oil since. So, don’t feel bad about doing it yourself! When it comes to full synthetic, there also seems to be a disproportionate mark up too, so you’re definitely saving money as well.
 
OP
N

nicholam77

Well-known member
Joined
Dec 18, 2016
Messages
2,671
Location
Minneapolis, MN
Nick, I agree completely. Only thing that helps me stay excited is the "while I'm at it" undercarriage cleaning. If you are going to replace the U-joints on the aluminum half-shafts, might as well clean them up a bit....

Well aren't you an overachiever! They look great. The only time I attempt an undercarriage cleaning is after the winter season. Although my car is 99% covered with plastic underbody trim 😂 so it's mostly just a pressure wash.

I stay motivated with oil changes by doing oil samples and seeing how many miles I can go on the next change. The car is at 12k, and the Duraburb is at 14k miles. Adds some "fun" to it.

[...]

Life is busy with three kids and all that job stuff... haha

That's interesting, I've never had my oil tested or tested it myself. VW's recommend on my car is every 10k or a year, but I don't put on many miles so I've been doing every 5k (except this last one I'm tardy on!). I actually need to get on that soon before winter. I have (or used to have, now that I've been work-from-home for over a year) a very short commute, often in stop-and-go traffic. Couple that with winter and not the best driving conditions (short trips), usually in winter my oil wouldn't even get up to temp by the time I got to the office. I've always figured due to my driving patterns and extreme weather it would be best to change the oil more often, but I would be curious to do some testing.

Can't imagine 3 kids, I'm struggling with 2!

They forgot to put the oil fill cap back on.

:rolleyes: if they can't get something that basic correct every time, makes you wonder about everything else...


____________________________________________


Still no projects on the horizon. I am missing "shop time" though. I feel like the end of summer and nice weather are slipping away.

My dad did stop by to use my garage again to trim more pantry shelves. He's edge banded them and sent me this pic of some of them in place:

IMG-4564.jpg

Corner ones still need to go in. I haven't been over to test them myself, but he said they aren't overly wobbly or anything so I guess my shelf pin jig got us through.

He also left me this on my drill press and texted me "got you a present, some real shop towels instead of the kitchen paper towels you've been using" :ROFLMAO:

IMG-4084.jpg
 
Last edited:

bdbecker

ALLIANCE MEMBER
Joined
Nov 18, 2015
Messages
5,574
Location
Iowa
You'll soon find that those blue shop towels are much nicer than the run-of-the-mill kitchen use paper towels.

That being said, I rarely use them. For whatever reason, my brain is wired to avoid using the blue shop towels and red shop rags at all cost, instead opting for the cheaper white paper towels and old t-shirt rags instead. Maybe I'll adopt the YOLO mentality someday and live it up a little in the shop. Maybe...
 

Bob Heine

ALLIANCE MEMBER
Joined
Oct 24, 2009
Messages
10,707
Location
Boca Raton, Florida
For whatever reason, my brain is wired to avoid using the blue shop towels
BD, I'm the same. I go through a dozen rolls of cheap white paper towels a year but haven't finished one roll of the blue ones in two years. Rather than the fancy red rags, I get the thin terry towels my wife uses in the kitchen, after they get stained. These terry towels used to be $19 at Costco but they've risen to $23 ($0.44 per towel seems reasonable).
Towels.jpg
 
OP
N

nicholam77

Well-known member
Joined
Dec 18, 2016
Messages
2,671
Location
Minneapolis, MN
How about some VW content? :ROFLMAO:

I saw the new ID.4 at daycare drop off this week:

IMG-4111.jpg

This is what we get for Dieselgate :LOL:

Actually I think it looks not bad for a "reasonably" priced EV. And I'm totally open to electric vehicles, but I won't be selling the GTI anytime soon.

Ok this is the last pic of the pantry I'll share for awhile. Promise.

cabinets.jpg

All the shelves and trim pieces are in, so now we just wait to do the doors until I have some time available.

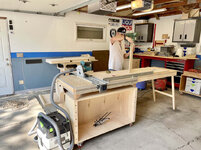
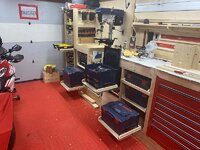
When I'm not able to work on projects in the garage, my mind tends to divert to planning instead. I'd like to make some changes in my space, although I'm not sure exactly what. Basically take what I have and make it simpler, more organized, more efficient.

IMG_4121.jpg

Some things that have been going through my mind are:
  • Paint the walls fully white (I think I've mentioned this before)
I think this would just make it cleaner and brighter and more of a woodworking space.
  • Take down the Gladiator boxes and move them somewhere else (to the shed perhaps)
  • Possibly put something else above the red Craftsman bench
    • Maybe a French cleat wall?
    • Maybe an upper cabinet SysPort?
The same could be said on the left side above the MFT and Tablesaw cart, it's a bunch of unused wall space. It would be nice to have some additional cabinets or open storage for various jigs and supplies
  • Finish my Systainer organization. I've collected a handful of Systainers, usually when I could find a good price, not necessarily when I had a specific use in mind (shame on me). I capitalized on a T-Loc closeout sale awhile back and picked up 3x really cheap T-Loc 1's that are currently empty. I also just sold my DeWalt orbital sander so that T-Loc 3 is empty. I need to figure out what's going to go in them, make inserts, and get them labeled, and then ideally get them a home where they are neat and organized.
I think Systainers (or other organizational boxes for that matter) look nicest in the shop easiest to access when part of system. So, kind of like I built into the MFT bench, but find a dedicated spot for the rest of them.

Another area I've wanted to make better use of is to the left of the router table under the lumber rack:

IMG-4123.jpg

I think that would also be a good candidate for some shallow cabinets, open shelving, French cleat wall, or floating Systainer port.

I also need to make a home for the spindle sander. I do use my old Paulk MFT cart to move heavy things around the garage or just an extra place to set stuff, but maybe it's time to let it go and build some storage under the Craftsman bench in the middle. Or get the shop vac or compressor tucked away.

All of these cabinet / shelving / storage solutions are ambitious, and I won't be getting to them anytime soon, but always kicking around ideas on how I can make my little space better.

🍻
 

Trapps

ALLIANCE MEMBER
Joined
Feb 10, 2017
Messages
2,003
Location
The Detroit Zoo
My shop is constantly, albeit slowly, evolving. Like most here. Yours will too.

I'm a fan of tool box ports and your ideas are sound. I cringed when buying all the over-travel slides, but now I am SOOOOO glad I did. Not sure of the benefit for above belt-line, but below, it's a no brainer for convenience and efficiency.
51536116268_ed0b957dc4_c.jpg

I'm out to lunch on wall painting. Because you're already bright above the belt-line, I'm not sure how much you'll gain. If you still like the color scheme, keep it.

One thing I've really enjoyed is having all my benchtop/counter space at the same height. Although I admit, at 44" mine is too tall and I'd go 42" if I had it to do over.

Relinquish the gladiator boxes to the shed and go for your own modular design (French Cleat or other) for above beltline storage. Perhaps incorporate more drop down elements on the sides while leaving the back wall a permanent full width solution with a nest (garage?) for your rolling MFT. I look at my shop every day and wrestle with wall space as prime storage real estate vs not wanting to make a small space feel even more cluttered and disorganized. As you're working with more space I think you'd be fine to utilize more wall storage options.

Good luck! :beer:

PS. If you do ever sell the GTI, you'll regret it.
 

mcgeedesign

Member
Joined
Jan 18, 2021
Messages
13
Location
Rocky Mountains
Hey Nick,
I've enjoyed randomly checking in on your thread these past few months! Not sure if you've seen this, but it made me think of you so figured I'd post: https://www.etsy.com/listing/107426...illing-system-for?ref=shop_home_recs_87&frs=1

I actually purchased an accessory for my domino from him a few months ago and told him he should make a LR32 setup...appears he listened! In the mean time I ended up tracking down a used LR32 in the old school sys, so not sure on how this 3d printed one compares but it's cool to see one in the wild!

Cheers,
Matt
 
OP
N

nicholam77

Well-known member
Joined
Dec 18, 2016
Messages
2,671
Location
Minneapolis, MN
My shop is constantly, albeit slowly, evolving. Like most here. Yours will too
Thanks Mark. Your L-boxx ports are awesome. That's basically the look and functionality I'm going for for the rest of the Systainers. To have them nicely docked somehow. Even if you consider it a work-in-progress, your space has always been an inspiration for me in terms of organization, efficient use of space, and uniformity (I like the consistent color palette and dedication to Bosch).

Most of the thinking with changing the paint was to make it less automotive themed and more woodworking themed. And simpler. Idk, jury’s still out in that one, but I do like the "OCD" ultra-clean look:

systainer-dock.png


You have some great points and I’ve actually considered some of them. I think if I got rid of the mini Paulk cart I would add an additional folding worksurface on one of the side walls. Not much room at all with the cars so it would have to be very slim, but was thinking an aluminum extrusion frame and some sort of thin top, maybe even something like HDPE. I’ve also thought of adding some French cleats on the side walls that I could temporarily dock a tool on (like the spindle sander).

Great point on even height worksurfaces. I sort of missed the boat on that one and it is something I think about. My craftsman bench is too dang high, but I wish it matched the MFT cart so I could use it better in place on the back wall.

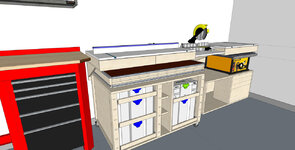
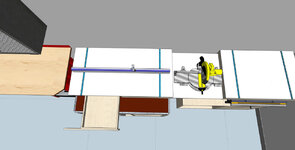
Awhile back I did have an idea to make a floating miter station with a “nest” or “dock” for the MFT and table saw carts, kind of like you were suggesting:

Garage-4-redesign-WIDE.jpg
Garage-4-redesign-CU.jpg

With some shallow drawers:

Garage-4-redesign-drawer.jpg

If it looks familiar it's because I based it on Gregor's MCMMM torsion-box Kapex station.

I've since decided I don't really need a miter station setup, but making a floating worksurface above the MFT that in can nest into is still an option.

I think I need to take some more time to figure out what I *need* and let some layouts marinate for awhile. Thanks for your thoughtful suggestions!

__________________________

And yeah, I might never sell the GTI. It's going on 6 yrs old and only has 35k miles on it 😁 . Depends on the state of cars in 5-10 yrs but if everything new is electric, or too expensive, or the used market is ridiculous, I might just have to hang onto it forever!
 
OP
N

nicholam77

Well-known member
Joined
Dec 18, 2016
Messages
2,671
Location
Minneapolis, MN
Hey Nick,
I've enjoyed randomly checking in on your thread these past few months! Not sure if you've seen this, but it made me think of you so figured I'd post: https://www.etsy.com/listing/107426...illing-system-for?ref=shop_home_recs_87&frs=1

I actually purchased an accessory for my domino from him a few months ago and told him he should make a LR32 setup...appears he listened! In the mean time I ended up tracking down a used LR32 in the old school sys, so not sure on how this 3d printed one compares but it's cool to see one in the wild!

Cheers,
Matt

Thanks Matt! I have seen that Etsy shop and the one they've made for the OF1010, but not for other brands like the DeWalt! That is very cool, I love community-based solutions like that.

A solution like this has totally crossed my mind. I do find $60 for a 3D printed part to be pretty steep, though, and I don't know how the accuracy compares but at half the price of the LR32 sled I'd almost rather go all in. Another thing I found to be very important is centering the router on the sled, even in my homemade jig (if you read far back enough you'll see some of my woes). Obviously the LR32 sled comes with the centering mandrel to achieve this, not sure how the ToolCurve 3D printed part would address that.

Unfortunately my DeWalt router is the full-size, not the trim router. So I'm not sure that specific part would work for me but I still think 3D printed is an interesting approach.

For all you guys and gals with 3D printers out there, someone actually made a full LR32 replica that maybe could be adapted to other routers. Again, no idea how good the accuracy is.

I've gone back and forth in my mind a bunch of times if I could make (or have someone make) a custom plate/sled for my router. I'm not ruling it out yet, but I'm leaning towards just biting the bullet and getting the Festool parts if I go that route. Fortunately I'm taking a break from building cabinets so I have some time to think it over!

Since you found a used LR32... what are your honest thoughts?
 
To avoid these ads, REGISTER NOW!
Top Bottom