To avoid these ads, REGISTER NOW!

Escape FROM my dream shop

To avoid these ads, REGISTER NOW!
OP
R

rmack898

Well-known member
Joined
Jan 23, 2007
Messages
3,195
Location
Honu Grove NE Florida
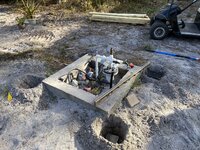
Now that I had a viable PHD, I was able to move on with the well head protection project which became paramount after both Laura and Randy ran it over prompting the PHD to be brought to the top of the "someday project list.

I used the PHD to dig the four corner holes around the well for the playground posts and poured concrete around them to keep them in place. next up was getting some 2X4's and some 8" fence pickets. These things are made out of wood. As far as I'm concerned, wood is a four letter word and I avoid it whenever possible how ever it was the right material for this job.
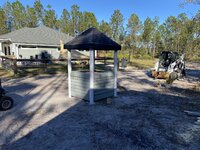
I cut the 2 X 4's to the right height and screwed them together to form a 90* angle (wood angle iron) and screwed them to the inside of the vertical pipes that support the roof.

I cut the fence pickets to length and then nailed them horizontally to the wood angle iron in a shiplap fashion between the vertical pipe. I painted the pipes white, the roof black, and the shiplap siding the same color as the house to make it blend in.

The roof is attached to the posts with metal brackets and by removing 4 screws, the roof lifts off easily in case there is a need to service the well pump.

All in all I'm pretty satisfied with how the well house came out but the bottom line is that Laura likes it and that's all that matters. The next time anyone decides to drive over the well, their vehicle will get damaged before our well.tempImageAC7jPb.jpgtempImage1bN7kZ.jpgtempImageMIWH2j.jpg
 

Uncle murph

Well-known member
Joined
Jan 28, 2021
Messages
1,476
Location
Harford county
The back story:

After retiring from a 20 year military career, I bought a commercial property and opened a business. The business took off and exceeded my business plan and put me on a roller coaster ride. Within 18 months I had a staff of 3 employees and 3 factory franchises. Game on. I worked my *** off for about 5 years, paid off all my mortgages and debt, life was good. I got to the point where I either had to expand my business or throttle back and coast. My kids were high school age and we had a serious talk about my business. Both my daughter and son had no interest in the family business that I built so I decided not to expand my business but to throttle it back and get smaller. I got rid of my staff, sold the commercial property, built a 40x40 pole barn on my residential property and continued to run my business on a smaller scale. With a very loyal clientele, and without the overhead of a staff, my business was 2x as profitable as it had been before, life was even better as I was working less and making more. I considered myself as “Semi-Retired”. I was able to spend time on the things in the shop that I wanted to do. I bought old machine tools and restored them in my more than ample spare time. Life was even better that it had been before.

It was about this time when things were really going good (as far as I was concerned) that my wife of 25 years went off the deep end. About a year later, I filed for divorce. It took over 2 years and more money than I had. In the end, I had my house, my shop, my two kids (along with 8 years worth of their college debt) and a mortgage that was almost twice what I had originally bought the house for the first time I bought it. I was 52 years old and starting over. I got a full time job for the government and now live pay check to pay check, so that’s the back story.

I have a 40x40 pole barn that is completely finished inside with almost all the machines and equipment that I could ever want. What's wrong with that you might ask…………….It’s in NJ is the answer. I want out of NJ as I just can’t afford to live here anymore. And that’s all I have to say about that. I don’t’ know where I’m going to move to, but I know it will be much farther south of NJ, east of the Mississippi River, and not in Florida. So there you have it. I have the 40x40 of my dreams with most all of the things I want in it and I want out of it. I don’t know when I’m moving but do know that I WILL be moving.

So this thread is not so much about how I built in my dream 40x40, but what I’m doing to facilitate the move of many tons to my next shop (which might not be 40x40).
So just to let you see where I ‘m starting from, here are a few pics of the build. It was a basic pole barn built by Conestoga from PA. I had a wonderful experience with Conestoga and there were no surprises. The crew showed up when they were supposed to and it was built as was promised. I will note here that my building was built in 9 hours by 5 young Mennonites that barely spoke to each other during the build. It was like they each could read the mind of the other and it was amazing to watch as they worked together to put this building up so quickly. With the building shell up, I did the concrete floor, insulated the building, did all of the electrical, plumbing, drywall, and finishing myself. Start to finish was about 8 weeks and that was due to me working solo after an 8 hour day in the evenings.

(I had some more pics but have format issues with them)
Read this beginning to end and all I can say is WOW,my hats off to you,job well done and I hope you and the Mrs get many years of joy from your efforts.
 

shortykorte

Well-known member
Joined
Sep 1, 2014
Messages
8,039
Location
Tallahassee, Fl
Watched the video on the paver installed. They were attentive in my class and their work proves their A was deserved.

Looks like y’all have a nice pool oasis now. I’m glad I wasn’t the first person to hit the well though I came close once. The blue roof was looking good. Oh well. Glad the shop is helping you get your various projects completed.
 
OP
R

rmack898

Well-known member
Joined
Jan 23, 2007
Messages
3,195
Location
Honu Grove NE Florida
I’m glad I wasn’t the first person to hit the well though I came close once.
I came close once too but Laura gets the first time prize
How does the PHD stay plumb, or doesn't it?
It has a fore and aft pivot that lets gravity take care of plumb. Side to side is dictated by the skid steer being level.
Read this beginning to end and all I can say is WOW,my hats off to you,job well done and I hope you and the Mrs get many years of joy from your efforts.
Holy **** Murph, you got way too much free time. Thanks for the well wishes.
 
OP
R

rmack898

Well-known member
Joined
Jan 23, 2007
Messages
3,195
Location
Honu Grove NE Florida
I had 2 more Grove infrastructure projects that I had to do in the last 2 months.

Item 1 was running the propane gas line to the pool heater. The pool contractor would not do it and it was my responsibility to have it done. I have a 1000 gallon underground propane tank that was owned by the local gas company that installed it. That gas company was bought out by Amerigas. Amerigas has to be the worst propane company on the planet and no way am I paying them to do this job. I'm doing it myself.

I have a first stage regulator at the tank that feeds the secondary regulator at the house via a 1/2"CTS pex line. The secondary regulator feeds the house via 3/4" galvanized pipe to 4 gas appliances. The pool heater's demands can't be supported by the existing gas line to the house.

I decided to tee in to the line after the primary regulator and run a new line to another secondary regulator just for the pool heater. The pex line is connected with a proprietary fitting from Consolidated called "Constab" fittings. I had to buy a special reaming tool to install the fittings but it was pretty simple. I bought all the Pex and fittings online. I had to rent a tiny excavator to fit through the gate if the dog pen to dig the trench to the heater. It was a one day job to dig the trench, run the line, trace wire, and warning tape, along with making the connections. I was able to get the gas line run for the heater for under $500 and that included the pipe, fittings, and Excavator rental cost. Amerigas wanted $3K to run the line.tempImageMK75rF.jpgtempImagezg3E3k.jpgtempImage0sY3zA.jpg
 
OP
R

rmack898

Well-known member
Joined
Jan 23, 2007
Messages
3,195
Location
Honu Grove NE Florida
As long as I had the baby excavator for the weekend I might as well get the most out of it.
Laura has a space picked out for her raised bed gardens in the area between the back yard and my shop. Next to the gardens will eventually be a chicken coop and neither of these spaces have a convenient water source.

I dug a trench from the well head out to the garden and chicken area and installed 2 posts with hose bibs. I used 1" black poly pipe (which has become difficult to find here) and tee'd into the line coming directly off the well. I bought 100' of pipe and had none left over.tempImageecQjRv.jpg
 
OP
R

rmack898

Well-known member
Joined
Jan 23, 2007
Messages
3,195
Location
Honu Grove NE Florida
My back has been less that cooperative with me for the better part of 2 weeks and I have been in the house and on the couch for more days than I wish. I walked out to the shop this morning, turned on the lights, looked around and then turned off the lights and walked back to the house.

About an hour later I drove to Lowes and I got a call from Craig (CB acres) and then a call from Trevor (TRM303) and they both made me feel guilty for being a lazy POS.

I got home and decided to do something. I ran 12V power to my shop sign via a wall wort on a switched receptacle. It a really minor thing but it had been on my list of things to do for way too long and I got bullied into doing something. I'm grateful for the bullying shove to do something. Maybe I'll do something tomorrow too.tempImageuVoX8W.jpg
 

Lookin4'67Galaxieconv

Well-known member
Joined
Jul 2, 2008
Messages
16,635
Location
Atlanta, GA
Started reading this on Sunday and just got caught up. Wow, what an adventure! Interesting to read and see all the things you've been doing. Thanks for documenting it. 👍
 
OP
R

rmack898

Well-known member
Joined
Jan 23, 2007
Messages
3,195
Location
Honu Grove NE Florida
Started reading this on Sunday and just got caught up. Wow, what an adventure! Interesting to read and see all the things you've been doing. Thanks for documenting it. 👍
Thanks for lookin, lookin. You must me a glutton for punishment.

Thanks to a little motivation from Toolfool, I got a long overdue project on the shop completed today. I have always needed an outside light by the man door and Toolfool posting the lights he put up along with the link on where to get them was the motivation factor that made me finally cross this one off the list. Having all my shop wiring in exposed conduit made adding a new light and timer pretty easy.

I got a push button timer that also has an over ride if I want the light to stay on all night. I used the same type of "Edison" LED that TF used but at 100 watts it's pretty bright and I may replace it with a 60 watt in the future. I'm happy with the light and happy to have that job off my list.tempImagedzOZLU.jpgtempImageI3Z7rQ.jpg
 

mybigwarwagon

Well-known member
Joined
Nov 4, 2009
Messages
4,428
Location
Vale, Nc
Thanks for lookin, lookin. You must me a glutton for punishment.

Thanks to a little motivation from Toolfool, I got a long overdue project on the shop completed today. I have always needed an outside light by the man door and Toolfool posting the lights he put up along with the link on where to get them was the motivation factor that made me finally cross this one off the list. Having all my shop wiring in exposed conduit made adding a new light and timer pretty easy.

I got a push button timer that also has an over ride if I want the light to stay on all night. I used the same type of "Edison" LED that TF used but at 100 watts it's pretty bright and I may replace it with a 60 watt in the future. I'm happy with the light and happy to have that job off my list.tempImagedzOZLU.jpgtempImageI3Z7rQ.jpg
That is pretty neat. Now you can see that huge hole out there.
 

Toolfool

Well-known member
Joined
Aug 22, 2011
Messages
4,982
Location
Tallahassee, FL
Thanks for lookin, lookin. You must me a glutton for punishment.

Thanks to a little motivation from Toolfool, I got a long overdue project on the shop completed today. I have always needed an outside light by the man door and Toolfool posting the lights he put up along with the link on where to get them was the motivation factor that made me finally cross this one off the list. Having all my shop wiring in exposed conduit made adding a new light and timer pretty easy.

I got a push button timer that also has an over ride if I want the light to stay on all night. I used the same type of "Edison" LED that TF used but at 100 watts it's pretty bright and I may replace it with a 60 watt in the future. I'm happy with the light and happy to have that job off my list.tempImageI3Z7rQ.jpg

You have great taste in lights Mac. :thumbup:
 
OP
R

rmack898

Well-known member
Joined
Jan 23, 2007
Messages
3,195
Location
Honu Grove NE Florida
SPS.....Strouty Project Syndrome

I am suffering from this in a way that almost rivals the master himself.

I still have a bathroom to build.
I still have a septic system to install.
I still have trim to install on the shop building.
I still need to install my door openers.
I still hav a floor to paint.
I still have a horizontal mill to freshen up.

I have a **** load of Honey Dew items that have been started and need to be completed.

I just took delivery of my next project but Laura insisted I complete the wall unit I started months ago before I even touch my new project.

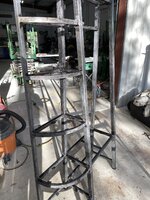
I got the wall unit all welded up last night, I sanded it today and primed it with Ospho. It will get painted tomorrow and will be placed in the house on Friday.

I figure that Saturday I will be able to get started on my new project. I have been planning this for well over a year and was kind of pushed into action watching Royce build his.
After an exhaustive search for a used unit suitable for my needs, I realized that for just a few dollars more, I could buy a new one and have a warranty.

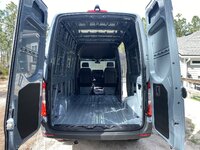
Monday I took delivery of a 2022 MB Sprinter van. It's a 144" 2WD, 4 cyl diesel. It's a clean slate and Laura and I plan to build a stealthy camper van. I plan on it taking about a year to complete, but we will use it for camping as the build progresses.

Step One: Finish Laura's wall unit.tempImageP5ZdIE.jpg
tempImageL8PCuZ.jpg
tempImagecrMkP0.jpg
tempImagexEnXiC.jpg
 

cbacres

Well-known member
Joined
May 28, 2010
Messages
5,998
Location
SW Florida
Mac, on the shop septic, look into a grinder pump unit, all you need to do is run 2” pipe and tie into the line from the house right before the inlet of your septic tank.
Ive had one on the barn for years and no issues.

Nice wall unit frame, love the ospho.

Look forward to the camper build.

And , what happened to all that clear concrete floor in the shop?😳😳🤣🤣🤣
 
Last edited:

jbmatth

Well-known member
Joined
Jun 3, 2013
Messages
5,688
Location
Northern Ok.
No joke about that wall unit, that'll do for sure, nice looking van too.
That is going to be a stout wall unit.


There is a company called Owl vans that builds a lot of stuff for sprinters.
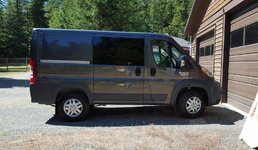
@mybigwarwagon, out of curiosity did you hear about them from Mike Rowe? Mike interviewed him on his podcast this week and I listened to it yesterday.

JB
 
To avoid these ads, REGISTER NOW!

Toolfool

Well-known member
Joined
Aug 22, 2011
Messages
4,982
Location
Tallahassee, FL
Nice purchase. Lots of build ideas on Sprinter forums and Promaster forums. I'll probably be selling my 2016 118" Promaster this year. 20160817_140656-1.jpgDSC_0143.JPG
 

mybigwarwagon

Well-known member
Joined
Nov 4, 2009
Messages
4,428
Location
Vale, Nc
No joke about that wall unit, that'll do for sure, nice looking van too.

@mybigwarwagon, out of curiosity did you hear about them from Mike Rowe? Mike interviewed him on his podcast this week and I listened to it yesterday.

JB
I had heard about the company before, buy never looked into it til the podcast. I listened to half of it yesterday. I will finish it today hopefully.
 

kj_mustang

Well-known member
Joined
Feb 9, 2011
Messages
1,213
Location
Harrisonburg, VA
I am surprised the local authority would not let you tie the shop bathroom septic line straight into the house septic system. I have a Wye in my line about 8'-10' from the septic tank, one side to the house and other side to the shop. I have 1.5 baths in my shop. 4 bedroom septic system with 4 bedrooms in the house. In Virginia, the Health Department only cares about total number of bedrooms for design of the system.
 
OP
R

rmack898

Well-known member
Joined
Jan 23, 2007
Messages
3,195
Location
Honu Grove NE Florida
I am surprised the local authority would not let you tie the shop bathroom septic line straight into the house septic system.
KJ,, The AHJ had no problem letting me tie the shop into the house system. To make the connection is about 400-500' of trenching and I have already put way too many items of underground infrastructure in to deal with trenching in a septic line from the shop.

The grand site plan for this property includes an RV pad with full hook up, the shop, and a secondary residence that we are calling the "Guest House". Everything could have been serviced by one system but the AHJ recommended a second system to service our secondary needs.

JB, the original plans for the wall unit were to include a 20 gallon fish tank that we no longer have and we never really modified the plans after the fish tank got re-homed.

Willie, I have seen some of Owl Vans stuff and they sure are proud of it. I'll take a few design ideas from them and roll my own.

John, Thats a nice looking Promaster, make sue to keep Shorty far, far, away from it.

The wall unit got finished today and brought in the house. The only thing missing is the caps for the square tube, I have caps for round, square, and rectangle tube in just about any size you can think of but I am out of 1-1/2" square. I ordered some on Amazon and they will be here tomorrow. I really don't enjoy working with wood, all that sanding and staining stuff really annoys me. I take the opportunity to use pre-finished flooring at every chance I get. It's cheap, easy, and quick. Cheap, easy, and quick seldom go together but in this case, it works.

Tomorrow starts the Van build in earnest.tempImageIXj69E.jpgtempImageqVaJba.jpgtempImageYoobcF.jpg
 

Lookin4'67Galaxieconv

Well-known member
Joined
Jul 2, 2008
Messages
16,635
Location
Atlanta, GA
The wall unit got finished today and brought in the house. The only thing missing is the caps for the square tube, I have caps for round, square, and rectangle tube in just about any size you can think of but I am out of 1-1/2" square. I ordered some on Amazon and they will be here tomorrow. I really don't enjoy working with wood, all that sanding and staining stuff really annoys me. I take the opportunity to use pre-finished flooring at every chance I get. It's cheap, easy, and quick. Cheap, easy, and quick seldom go together but in this case, it works.

Tomorrow starts the Van build in earnest.tempImageIXj69E.jpgtempImageqVaJba.jpgtempImageYoobcF.jpg
That turned out great. My wife would keep you busy making stuff like that for years! 😂
 
OP
R

rmack898

Well-known member
Joined
Jan 23, 2007
Messages
3,195
Location
Honu Grove NE Florida
It's been quite a few weeks and things have been busy here at the grove. I started making full size cardboard fixtures for the van. I only got three of them done when more pressing issues made me pause work on the van. I had a somewhat emergent project that I unfortunately can't discuss but it took almost 2 weeks and beat the **** out of me.

The brown truck has been delivering van parts and I'm starting to accumulate a good sized pile of stuff, I can't wait to get back to work on the van but it seems that there are other things that need to be done first.

I made a list of all my own back burner projects and have been chipping away at the list. I got the last of the trim on the shop installed. I have this engine hoist/shop crane that I bought 30 years ago and modified for use when I had the boat dealership. It's been sitting outdoors for probably 20 years and it needed some attention. I totally disassembled it, cleaned, prepped and painted it. The bearings in most of the wheels were shot so I just put new HF wheels on it.

The big pressing issues preventing me from working on the van are the final landscaping touches behind the house. Laura says it's not too much to do, just 4000sq/ft of sod along with the required irrigation, 1000 feet of concrete curbing and about 4 yards of decorative gravel. I'm not sure when I'll get back to work on the van.

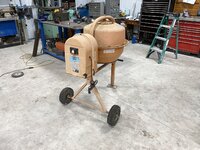
The curbing project is going to require the mixing of concrete. Let me just say that things from HF that are electric are usually garbage but there are a few gems and one of them is the mixer. I can't tell you how many bags have been through this mixer but it keeps on going and it's a winner in my book. The only thing about the mixer that I can complain about is the wheels, they are round and that's about all I can say good about them. Since I need to use the mixer and had two good wheels left from the engine hoist project, now was the time to fix the mixer.

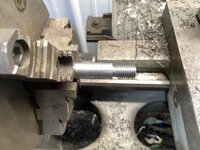
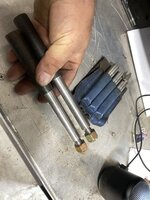
I needed to make solid axle stubs to fit into the mixer's axle tube to mount the 5/8" bore pneumatic wheels. I found some 7/8" round stock, chucked it up in the lathe and went to town. I have not made any real chips in the new shop since I moved in and it felt really good to get some QST. The 7/8" rod fit perfectly in the mixer's axle tube, I turned a section down to 5/8" for the wheels, and threaded a short section 1/2"-13 for the nut to hold the wheel on. It's been a few years since I single pointed threads and it was nice that I remembered how to do it (just like riding a bike). I will admit that I crashed the tool on the spring pass when I made the first axle. I shove the axle stubs into the axle tube and plug welded them in place. The mixer is ready to go back to work.tempImageTIUuhX.jpg
tempImage1rZEao.jpg
tempImageDo1fCA.jpg
tempImageykssDZ.jpg
 

Toolfool

Well-known member
Joined
Aug 22, 2011
Messages
4,982
Location
Tallahassee, FL
I should have gotten one of those mixers when I got to FL. I have already hand mixed over 70 60lb bags of ReadyMix for various projects around here. :dunno:
Looking forward to watching the van build. Let me know if you need woodworking help. I'll have all the machinery.
 

shortykorte

Well-known member
Joined
Sep 1, 2014
Messages
8,039
Location
Tallahassee, Fl
Sounds like you’ve been busy. Good to hear about the mixer. I have one still in the box. I should look into the axle mod.
What type of curbs are you putting in?
 
Last edited:
OP
R

rmack898

Well-known member
Joined
Jan 23, 2007
Messages
3,195
Location
Honu Grove NE Florida
That turned out great. My wife would keep you busy making stuff like that for years! 😂
Laura has no problem keeping me fully occupied

I should have gotten one of those mixers when I got to FL. I have already hand mixed over 70 60lb bags of ReadyMix for various projects around here. :dunno:
Looking forward to watching the van build. Let me know if you need woodworking help. I'll have all the machinery.
John, that mixer is required tooling for all us older folks.
I may very well take you up on the woodworking help because as you know, WOOD is a four letter word.

Yeah, BTDT. This fellow demonstrates a method of cutting threads that takes the excitement out of it:

BC,
I remember seeing that technique a few years ago but my old school mind forgot about it, I'll give it a try next time. thanks.

Sounds like you’ve been busy. Good to hear about the mixer. I have one still in the box. I should look into the axle mod.
What type of curbs are you putting in?
We are doing extruded curbing. There will be more to follow on this DEEP rabbit hole.

A cement mixer?? You repairing that sequence of potholes they call a road behind you?

That’s the security features!
We have both Hi tech and Low tech security here at the grove. The entrance road is designed to slow the intruders down so that us older folks can get a good sight picture.
 
OP
R

rmack898

Well-known member
Joined
Jan 23, 2007
Messages
3,195
Location
Honu Grove NE Florida
So we have all the landscaping on the front of the house done and now we have the back to do. A friend suggested extruded concrete curbing to help define the areas in the back so we looked at it and got some quotes. It's not cheap by any means. The lowest quote we got was $7500 for about 350' of curbing. I spent way too much time looking at extruded curbing on youtube. I found this series of videos
and convinced Laura that we should buy a curbing machine and do it ourselves.

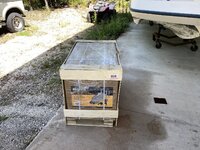
So we bought a chinese, electric curbing machine. I bought the first round of raw materials and we're going to give it a go. We're going to do small batches with the HF mixer and not push ourselves. The first ton of sand and portland cement cost us $60 and I think this should make about 150' of curb. I have to make a stand to elevate the HF mixer so that it can dump into the wheel barrel and then we can play with mixes until we get it right. It might take us a week or two but we have the time. If the electric motor and dragging an extension cord all over the yard becomes an issue, then I might put a HF predator engine on it. If we can sell the curb machine for half of what we paid when the job is done, I'll be happy.tempImage64dm0P.jpg
tempImage4rV3xA.jpg
tempImageGXChI8.jpg
 
To avoid these ads, REGISTER NOW!
Top Bottom