To avoid these ads, REGISTER NOW!

Automate Kitchen Exhaust Hood Fan using inline ECM fan - Turbocharge yer exhaust!

Denwood

Well-known member
Joined
Sep 22, 2014
Messages
4,180
Location
Thunder Bay, Ontario, Canada
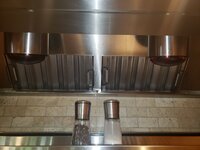
One of my goals for my ongoing kitchen install (more in my garage thread on this) was to figure out a more effective exhaust. The typical hood exhaust fan does not do well with resistance (static pressure) and the new fan was not moving a lot of air by the time it got to my high efficiency 4" exhaust port. There is a foam ball in that hood that falls back to insulate the opening (we see -35C in winter) so you can visualise air flow by seeing how high the foam ball is riding in the hood. With the stock IKEA GENOMDRIVA exhaust hood fan on high speed, it was just barely lifting the foam ball. Now my ducting is not ideal, where the 6" pipe from the hood reduces to 5" in the attic, and then 4" right at the hood. There are 2 elbows and about 12 feet of duct length. With a short run and 6" ducting all the way, the stock hood would certainly exhaust more efficiently...but alas, that is not my setup.

The fan "hack" worked out very well indeed. I tried a few variations leaving the OEM fan in place, and then decided to remove it entirely as it didn't really increase flow a lot, but it did make a lot more noise at the high speed setting. The IKEA GENOMDRIVA stock exhaust hood is rated as follows:


160 CFM (likely with zero static pressure, so no resistance)
Motor power: 240W. ( I believe this is incorrect as the fan is clearly labelled 38 watts and doesn't move a lot of air)
5.1 Sones (about 52db on low speed, high speed likely ~65db)

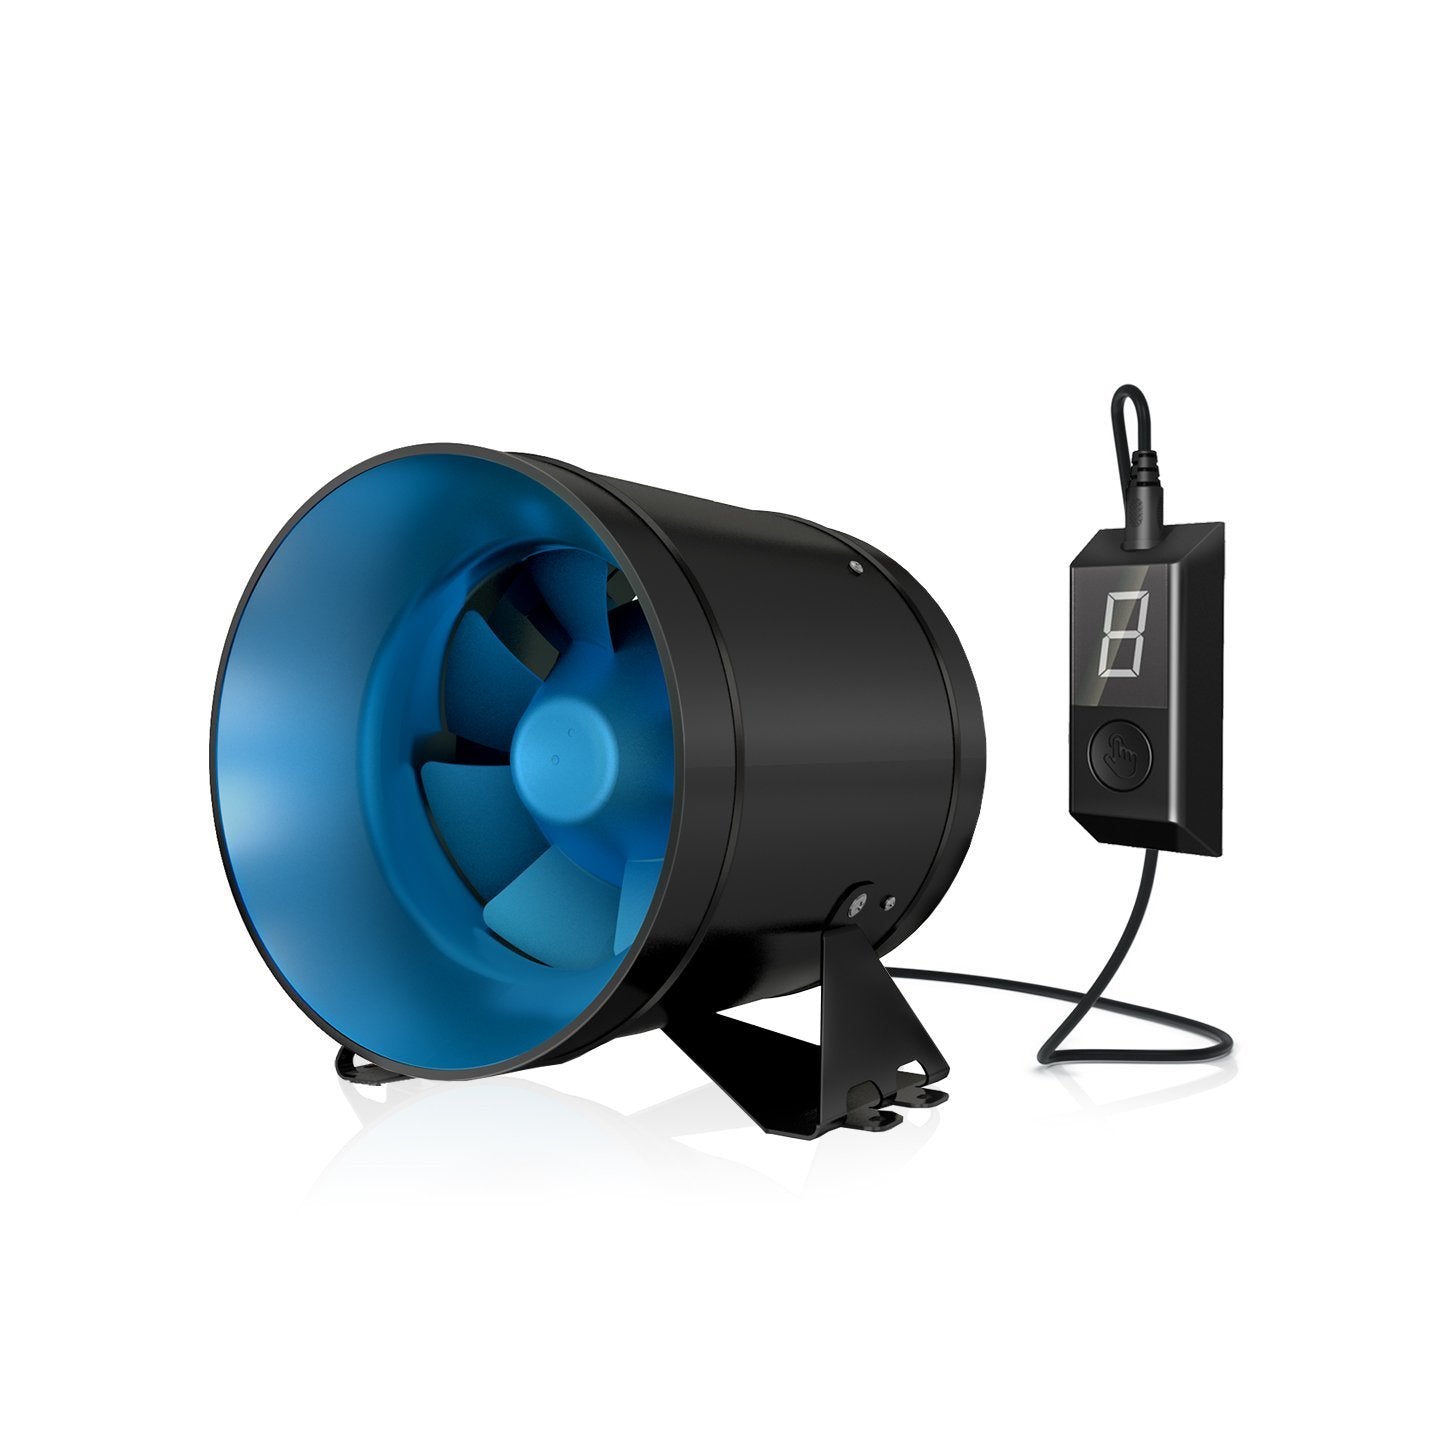
The Terrabloom 6" inline fan is a very nice unit for $100. Importantly, it has a metal case and temperature rated motor which makes it suitable for a kitchen exhaust where most code dictates metal ducting within the house envelope.


This is from their site, but if you visit, they also have videos showing the noise measurements for each unit.
  • MEET OUR NEW 2021 MODEL: Now featuring an 8-speed digital controller with numeric display. Added support for 110-220V power supply and switchable IEC socket power cord.
  • INDEPENDENTLY TESTED SPECS: Independently lab-tested performance verified by the Home Ventilating Institute (HVI) and Energy-Star Most Efficient certification. See product documentation tab for more details.
  • ENERGY SAVINGS: Built with a cutting edge brushless EC motor and dual jet type impeller, our new 6" ECMF series fans deliver 288 Cubic Feet per Minute (CFM) of Airflow using only 36 Watts.
  • QUIET & FULLY ADJUSTABLE: Choose from 2 included speed controllers. Analog granular type or digital with 8-speed presets and numeric screen. Adjust the motor speed from 0%-100% without creating any additional hum or background noise. Wireless and programmable thermostat speed controller add-ons available.
  • PWM, 0-10V CONTROLLER SUPPORT: Our EC fans support external speed controllers with popular PWM and 0-10V signal types. The fan can be connected to an external controller using a 3.5mm TRRS wire supplied with the fan.
  • COLD ROLLED STEEL HOUSING: Resists accidental damage, harsh elements and reduces maintenance in demanding applications such as ventilation of grow tents, gardens, farms, crawl spaces, attics, etc.
  • COMPACT: Only 7.25" (L) x 4.9" (W) x 6.95" (H). Ideal in applications with minimal clearance available. Mounting bracket, screws, and anchors included.
  • ETL LISTED WITH A 2 YR WARRANTY: ECMF series fans are ETL listed and Conform to UL standard 507, Certified to CSA Standard C22.2 No 113. Covered by a 2-year warranty.
-speed-controller-ecmf-150-288-cfm-36w-690230_600x.jpg

I was impressed that the fan included two speed controllers and a DIY harness as well with instructions for wiring if you want to go that way. This means you could connect it a Zwave dimmer with 0-10V (they are out there) outputs to fully control this fan. That opens up a lot of uses for these fans in my book for automated heating/cooling etc.

The fan is solidly built with a powder coated metal case, and the digital, rotary and DIY speed control bits are all included. A 120V power cord was included but I removed the plug and stripped back the ground/neutral/hot wires to connect the inline fan directly to the IKEA fan switch.

The power connection to these hoods are typically direct wired, so you'll likely have the AC power just running directly in. The connections are all behind a metal access plate accessed from under the hood.

Cutting power at the breaker, I removed the two bolts holding the 2 speed OEM fan in place and cut the three wires going to it to completely remove the OEM fan.

IMG_7174.jpg

IMG_7175.jpg

This is a pic looking underneath the range hood. Basically the range hood switch now powers up the inline fan the same whether you use the low or high speed settings on the range hood switch. Note that I wanted the OEM hood fan switch to just power up the Terrabloom inline fan to keep it simple for the family to use so wired it up as follows.

IMG_7167.jpgIMG_7168.jpg

IMG_7170.jpg

IMG_7177.jpg

This is the fan in place. If you were willing to build a duct muffler and install this in your attic space, you could likely reduce noise even further. Terrabloom also sells these fans in a silenced version which is likely well worth a look!

IMG_7171.jpg
This is the rotary speed controller for the ECM inline fan motor and DIY harness that is also included. The controllers all plug with an 1/8" plug that has a 0-ringed connector and cap. This is a nice touch for humid environments.

Speed on the fan is controlled by one of three controllers, all included in the box.

IMG_7178.jpgIMG_7179.jpg

This digital controller could be mounted beside the hood to just ramp things up if required, however I found that 5 or 6 (of 8 speeds) on the digital controller is the best balance of flow vs sound. The ECM inline fan retains the last setting when powered off, so I'll likely just set the controller on 5 or 6 and leave it in the cabinet to keep it simple for the family.

IMG_7180.jpg

This little mod makes a significant sound difference. I have made duct mufflers before for my home theatre setup so I had some acoustic duct lining (lined fibreglass, non-flammable) and galvanised screen on hand. I lined the now empty range hood box (where the OEM fan used to be) with this duct liner and placed the screen there to hold it in place. This is the view looking up underneath the range hood. The grease filter covers this opening up in normal operation. Moving the inline fan to your attic with a proper 2-3 foot long duct muffler preceding it would make a huge difference in sound, likely less than 50 db at the hood, but I am happy with 60 db as all the bits are accessible from inside the room for servicing etc. The attic space over the new kitchen is spray foamed and then filled with R80 of blown in fibreglass so is not super convenient to access.

In any case, this mini muffler setup makes a very noticeable difference in sound at the cook top.
IMG_7173.jpg

It's hard to see the foam ball floating in the external vent housing, but with the ECM inline fan at speed setting 5 on the digital controller (8 is max speed) the ball is "pinned" at the max height in the housing, and you can feel the jet of air standing below the duct which is about 10 feet off the ground. The range hood at high speed with the OEM hood fan just barely lifted the ball.

IMG_7183.jpg

Once the upper area and cabinet duct are boxed in / sound insulated, I suspect the system will quiet further.

IMG_7185.jpg

I measured the sound output of the setup about 3 feet away at 61 db (set at speed 6 on the digital controller). This is definitely quieter than the stock fan, and is moving easily 2-3 times the air. I ran a quick smoke test under the hood and 100% was captured using speed 6 (of 8) on the controller. The inline fan is much better at overcoming the static restrictions in the ducting and is therefore moving a lot more air than the stock fan. Having the exhaust fan inline also eliminates the blow back turbulence around the edges of the OEM hood fan where air is actually moving in the wrong direction. With the inline fan setup there is only suction at the grease filter so it absolutely does a better job of extraction.
 
To avoid these ads, REGISTER NOW!

Tracs

Well-known member
Joined
Feb 1, 2015
Messages
565
Location
Manitoba, Canada
Is this a new build? Or are any building inspectors going to look at this? I don't know what Ontario building codes are but I hope it's not like Manitoba. In Manitoba you can't have a range hood fan that powerful. This happened to my brother. Had a real nice imported fancy range hood. The area planning made him put a damper in it to limit flow. They said exhausting that much air from one source would draw too much outside air in other places in the house. Ridiculous but it happened.

That aside how will you deal with the negative pressure the fan will create?
 

yeldogt

Well-known member
Joined
Jan 2, 2012
Messages
18,184
What was the reason for the reduction -- why not take the larger pipe as far as possible ?

Hoods are always an issue --- does not take many turns before you get into trouble
 

acer66

Well-known member
Joined
Dec 4, 2010
Messages
4,418
Location
Western North Carolina
Is this a new build? Or are any building inspectors going to look at this? I don't know what Ontario building codes are but I hope it's not like Manitoba. In Manitoba you can't have a range hood fan that powerful. This happened to my brother. Had a real nice imported fancy range hood. The area planning made him put a damper in it to limit flow. They said exhausting that much air from one source would draw too much outside air in other places in the house. Ridiculous but it happened.

That aside how will you deal with the negative pressure the fan will create?
From 400 cfm and up you have to provide some way for make up air.

 
OP
D

Denwood

Well-known member
Joined
Sep 22, 2014
Messages
4,180
Location
Thunder Bay, Ontario, Canada
Voi, the old fan setup was much like this one and in restrospect I should have put in larger pipe before the attic sprayfoam. In any case, this fan resolves the issue, and is quieter too :)

Tracs, make up air...that is a good question. I was seriously looking at integrating a make up system that would down draft at the front of the hood, as this would make for better extraction for sure. That said, our furnace and on-demand water heater are both direct vent using outside combustion air so there is no danger of CO entering the house due to negative pressure. We also have a small ERV in the kitchen area
https://na.panasonic.com/ca/home-bu...rv-balanced-air-solution-4020-cfm-or-2010-cfm
which will definitely help with balancing. Once the kitchen reno tasks are done, I may well look at adding a makeup air solution directly to the vent simply to keep heated air from leaving the house at -35 C. I suspect you'll see this feature integrated in the lower cost hoods sometime soon.

These guys did an amazing job of a DIY hood with return air:

 
OP
D

Denwood

Well-known member
Joined
Sep 22, 2014
Messages
4,180
Location
Thunder Bay, Ontario, Canada
Yeld, larger ducts was a detail I simply missed as the old supply pipe was 5" which I figured was ok. The attic was flash and filled with sprayfoam + R80 of blown in fiberglass and the pipes were completely coated with spray foam. Going in after the fact is a real pain....so I figured I'd just try making it work as is. The 4" exhaust hood/foam ball system is restrictive, however if you actually measure the Terrabloom fan, the fan blades are 4", but they are in a ducted 6" OD pipe. This makes sense if you look at the fan blade design and curved vanes in the exhaust area. They definitely did their design work. This inline fan definitely does well with static pressure, so you can likely cheat a bit on the ducting if you need too.

Acer, yes 400 CFM for makeup, however adding makeup directly to the hood as a front down wash makes a lot of sense for more efficient extraction as in the video above. Check out how well that system works using a smoke bomb test.


The upside of my setup (alas, no return air) is that all the parts are easily accessible from the kitchen.
 
Last edited:

Voi

Well-known member
Joined
Oct 10, 2010
Messages
5,137
Location
Western South Dakota
Voi, the old fan setup was much like this one and in restrospect I should have put in larger pipe before the attic sprayfoam. In any case, this fan resolves the issue, and is quieter too :)

Well you inspired me to finally get up in the attic and look. Being that it was a cold day helped as well.

As I suspected our hood was set up to be vent-less (it's a discontinued Broan convertible model that can be set up either way).

How much space is between the two adjacent upper cabinets in your kitchen?

I have 35 & 7/8". Ideally I'd like to shoe horn the largest vent hood I can into that space. I don't mind re-doing the kitchen but that's a future project. I'd like to get the hood resolved sooner.

I'll look into converting this one but I suspect I'd rather just start over, assuming one can even find a vent hood in stock nowadays.

I learned from our last house to do this right the first time. That's a long story and let's just say there was some miscommunication and we didn't do it right and we regretted it the entire time we were there.
 

kbs2244

Well-known member
Joined
Nov 11, 2006
Messages
14,065
The problem with this install is the inline motor
Stove gas is flammable
(Exhaust hood fires are the number one cause of restrant fires)
The inline motor puts any sparks in the flammable gas flow
The factory fan would have the fan outside the gas flow
I doubt the install would pass a fire inspection
 
OP
D

Denwood

Well-known member
Joined
Sep 22, 2014
Messages
4,180
Location
Thunder Bay, Ontario, Canada
Voi, most hoods will follow the stove conventions of 30" and 36" wide. I have applied 1/2" cover panels on both sides of the vent hood cabinet set, but the cabinet itself is 30" wide, the hood is about 1/8" less than that (so 29 7/8") and I suspect any of them will follow that same convention. You'll find most of these inexpensive hoods are the same "under the hood", pun intended :)
 
OP
D

Denwood

Well-known member
Joined
Sep 22, 2014
Messages
4,180
Location
Thunder Bay, Ontario, Canada
KBS, The inline motor is ECM, the OEM is not. The Terrabloom motor ECM is also UL listed and CSA approved so I am 100% sure it would pass code here. It has a 140F rated motor and steel case. Both are requirements for kitchen exhaust. Similar to the Fantech FG6, but with a better motor and controller. It is UL 507 compliant which covers fans used in heating/refrigeration equipment.

Also, commercial and residential code is quite different...
 
Last edited:

FMB4

Well-known member
Joined
Jan 19, 2017
Messages
2,926
Use a fan designed for range hoods. Hacking a range hood fan is not a good idea imo.
 

mrvm

Well-known member
Joined
Feb 12, 2014
Messages
3,838
Location
PA
Subscribed! Appreciate this build for any new discussions, ideas and info on exhaust fans for the kitchen.
 
OP
D

Denwood

Well-known member
Joined
Sep 22, 2014
Messages
4,180
Location
Thunder Bay, Ontario, Canada
FM, essentially what I have duplicated is a hood insert combined with an inline fan. I would not just chose any inline fan though…you need the metal case and rated motor to pass code. Doing it again, I would just buy the insert and build my own hood around it.
 

LS6 Tommy

Well-known member
Joined
Dec 27, 2013
Messages
26,162
Location
Northern NJ
Nice writeup, Denwood! Not bustin', but I'd like to see the condition of hte foam ball after a couple of years of being exposed to all the airborne grease and oil...

Tommy
 
OP
D

Denwood

Well-known member
Joined
Sep 22, 2014
Messages
4,180
Location
Thunder Bay, Ontario, Canada
Tommy, that is a good question. The foam ball insulated hood setup is in use on our both our kitchen and bathroom…and in surprisingly good shape. It still air seals quite nicely so I’ve left it in service. We’re at 12-15 years with them.
 

LS6 Tommy

Well-known member
Joined
Dec 27, 2013
Messages
26,162
Location
Northern NJ
Tommy, that is a good question. The foam ball insulated hood setup is in use on our both our kitchen and bathroom…and in surprisingly good shape. It still air seals quite nicely so I’ve left it in service. We’re at 12-15 years with them.
I guess that makes it not worth worrying over.

Tommy
 

Clemson13

Well-known member
Joined
May 30, 2015
Messages
425
Neat project! I actually just started on a very similar kitchen retrofit at my place. I ended up going the other way the OP mentioned, overkill fantech fan, no blower in the hood, 8" line, and the massive like 3ft long inline duct silencer. For those who said inline fans shouldn't be used: Inline fans are the correct type for this use but you need to get the appropriately rated ones as Denwood said. The ones designed for the use even self clean by throwing the grease off of the blades so you don't have to service the fan as often.

Per my static pressure tests & the fans curve this is quieter than my fridge at 800 CFM :ROFLMAO::ROFLMAO: (Of course i have to open the kitchen window until I install a balanced makeup air system. I recommend not using the down blowing air on the front of the hood or makeup air into the hood. If you go through a bunch of the commercial ventilation studies etc with air density & current imagery you will see that you will either increase the turbulence at the front edge and lose containment of the effluent or short circuit your hood reducing your effective CFM. One of the better unobtrusive make up air locations is from behind and below the range cook top so the make up air is being pulled up the back wall.

Denwood, If you want I can throw up pictures but i dont want to highjack your thread. Im stoked for you with this setup, silent kitchens are lifechanging.
 
OP
D

Denwood

Well-known member
Joined
Sep 22, 2014
Messages
4,180
Location
Thunder Bay, Ontario, Canada
Clem, put up pictures for sure. It sounds like you have an ideal setup :) The only thing I don't like about the quieter setup (and you pretty much can't hear ours in the next room) is that it is too easy to forget to turn it off. I may just add a temp sensor and zwave relay to my setup so the system would trigger anytime there is heat under the hood, and then turn off automatically after.

I made these duct silencers for my home theatre project (to isolate the basement ventilation ) and they are surprisingly effective. They are well worth integrating to a system. I'm using fibreglass duct insulation retained by galvanised mesh so they are fire rated assemblies. Anyone looking for a factory made duct muffler, make sure they don't contain acoustic foam as that would not be fire rated...many of the grow op versions just use foam.

Clem, did you use the LD8 silencer?

Clem, your setup is the right way to do it IMHO and provides very high performance with low noise and likely costs less than a high end hood. My guess is the best makeup air location would be a slot in front of the cooktop (for an air curtain) which is a bit harder to package than one in the hood. That said, I've tried a smoke test (lit up a few scraps of paper on foil) on the cooktop and the extraction rate in the hood was close to 100%...so I figure will work fine. We have a small Panasonic ERV about 12 feet from the cook top so I figure that is all the makeup air we'll need for this setup.

More on DIY of these duct muffler units in my theatre thread here: https://www.garagejournal.com/forum/threads/woodys-works-garage.263351/post-6096192

The performance of these to knock down sound via the ducts has to be heard/measured to be believed :)

acoustic_muffler10.jpg

Here is Fantech's silencer chart. They are dropping sound levels in the 1000KHz range (where our ears are most sensitive) up to 27 db which is a huge reduction. My DIY versions use an outer pipe 2" larger than the inside bore, so they are a bit more compact. Each takes just a few minutes to make.

sil_dim.jpg
 
Last edited:
To avoid these ads, REGISTER NOW!

Clemson13

Well-known member
Joined
May 30, 2015
Messages
425
I did go with the fantech silencer. Overall, next time i will just go straight to fantech and pay what they ask. My fan from them is of fantastic quality and came with full curves and noise profile to engineer from. This go round, i got the fan from amazon warehouse where they had smashed up the inlet/outlet & control box for it. But it was all fixable in an hour and a half and only cost 85$ for a $500 fan. It would have been worth the 500.

Started off by putting in the new roof vent. Has a cage and a nice seal as well as opening the flaper to about 45deg open
215614956.jpg
000850993.jpg
PXL_20211216_023944526.jpg

2 roughly 45 deg bends that i tried to make gradual. 8ft of duct total once it leaves the kitchen ceiling. VERY short run which helps keep the static pressure down. Unfortunately it also increases noise transmittance. In this case that did not end up mattering too much as its quieter than the fridge at 800cfm (based off of fan curve and pressure drop measurements)

I rewired the kitchen so that the undercabinet lights would be powered off of the outlets in the upper cabinets and off of a switch to the right side of the range. Simultaneously, i added a switch for the light I will put up inside the hood & the variable speed controller for the hood. These are the 3 switches you can see to the right of the range in the second picture.

PXL_20211123_223338712.jpg
034120931.jpg
013337765.jpg
And all of this dang work because I dumped my GF and decided that now that I didn't have to listen to her complain about my fantastic house, shop, and dreams I would give myself the present of the range and kitchen hood that *I* wanted. I had NO idea how much work that present to myself would cause :ROFLMAO: Admittedly it has kept me busy which was a plus and likely how the scope of this project grew, grew, and then GREW.

Now I have to get around to building the hood for it. I got the finished design wrapped up in solid works over Christmas. It uses commercial type 14x14x2 baffle filters so i can just buy them and will be the maximum aesthetically tolerable capture volume so i can run the fan as slow as possible.
Capture.JPG

The upside is the 1.5k budget i made for this project (based off of building this with a Canadian Victory commercially made hood) also paid for my new toys to make the hood itself.
022255944.jpg

Denwood:
I really like those home made silencers that you made. I definitely am going to be making some up for other places in my house. Somehow I had not thought of making my own for the range hood project.
You and i have slightly different ideas on how to keep from leaving it running when not needed. I like yours better than mine. I was going to put a low pressure switch in the hood plenum and alarm when low pressure was present for an hour (With a reset button)
If you have to go with makeup air, how will you initiate it? Forced draft/ Induced draft / Switch driven / Low pressure in hood plenum driven...................
I cant figure out the final design for my makeup air yet. Luckily im in SC and have a window on the opposite wall I can just open. I think long term i want to put makeup air up the back of the range as well as out of the cabinet toe kicks.

Have you found any of the fantastic papers from California .gov on this subject? If you want i can send them to you.
 
Last edited:
OP
D

Denwood

Well-known member
Joined
Sep 22, 2014
Messages
4,180
Location
Thunder Bay, Ontario, Canada
That hood is going to be great :) Please post those links here as it will be good for the next guy stumbling across this thread.

I sold a nice 3in 1 brake/press/roller cuz I had no room in my home shop…it was still in the crate :-(

Your hood setup would likely outperform many commercial setups. My guess is you don’t see cold winters..or you insulated your ducting after the fact!

On the return air, I would just use a powered vane/duct that is energized by your fan switch. We used one in my commercial building in a room that was designed to maintain negative pressure. It was 120V so just wired to the exhaust fan wall switch. Ours was expensive as it needed a fire damper, but Broan makes a few for residential makeup applications.
 
Last edited:
OP
D

Denwood

Well-known member
Joined
Sep 22, 2014
Messages
4,180
Location
Thunder Bay, Ontario, Canada
I mentioned a few posts back on my desire to automate the range hood setup so it came on with the induction cook top being powered up, and then off when the cook top was off.

After doing some research, the best bet in doing this reliably was to install a 240V Aeotec Zwave switch on the induction cook top that in this case reports power use as well. I have no desire to power on/off the induction cook top, however this setup can do that as well, say when you leave the house etc. to ensure it cannot be left on. The little device on the top left is Aeotec's Micro Switch which turns a "dumb" switch into one that can also be controlled by automation. The existing switch (in this case the range hood fan switch) which now powers my inline fan is connected to the dry contact side of the microswitch, and line/load on the other side of the relay. This little unit fits in most electrical boxes behind an old school "dumb" switch. The OEM hood fan is removed as it performs poorly, and is much louder than the inline ECM fan. The switch remains though and gives manual control of the inline fan. I connected the micro switch in the metal connection box under the range hood.

When the 240V switch detects power use (someone fires up the induction cook top), it triggers the inline fan to come on, and then turns it off when cook top power use is back to zero watts. This is done via the SmartThings app and a simple automation...so you need a hub to make this all work.

IMG_7294.jpg

The 240 Volt switch comes with lugs for #8 or #10 wire. I soldered these along with the crimp as I'm not a fan of crimp connections.

IMG_7297.jpg

All set to install.

IMG_7298.jpg

I wired the 240V Zwave switch into the existing box so that if the switch is ever removed, the connections can just be restored in the box as a direct wire appliance.

IMG_7299.jpg

It works awesome. The inline fan controller is powered up within a few seconds of firing up the cook top. You can see the ECM fan motor controller (set to 5) which can be used to increase power. I've found 5 (there are eight speeds on the controller) is the perfect mix between noise/volume/efficiency. It's about half the volume of the OEM hood fan, and moves easily 2-3 times more air for pretty much 100% evacuation of vapour / odours etc. coming from the the cook top. About 10 seconds after turning off all induction elements, the fan powers off.

IMG_7302.jpg

The one important trick if you're trying this is that SmartThings does not use the correct device driver after you include the 240V switch into your smart hub. I had to switch the device driver to "Z-Wave Metering Switch Secure" in the SmartThings IDE before the switch started reporting power use live back to the hub. This is one of the things you get used to in automation....the frequent need to tweak a bit to get things working correctly.

The kitchen project is almost done with crown etc. left to complete :)


img_7277-jpg.1596240
 
OP
D

Denwood

Well-known member
Joined
Sep 22, 2014
Messages
4,180
Location
Thunder Bay, Ontario, Canada
Just updating this thread with a finished pic. The cook top / fan system has been working excellently now for eight months :) I haven't had to mess with it once, reset or messed with the SmartThings automations once since the initial setup. In the automation world this would be considered success :)

The pic was taken in February, hence the snow outside...ha.

img_7356-jpg.1606641
 

roc_on_the_rocks

Well-known member
Joined
Mar 14, 2010
Messages
1,519
Location
South central Indiana
Just updating this thread with a finished pic. The cook top / fan system has been working excellently now for eight months :) I haven't had to mess with it once, reset or messed with the SmartThings automations once since the initial setup. In the automation world this would be considered success :)

The pic was taken in February, hence the snow outside...ha.

img_7356-jpg.1606641
That's a beautiful kitchen! I love the cabinets. Who makes them?
 

couch67

Well-known member
Joined
Mar 18, 2016
Messages
1,398
Location
Ontario Canada
Nice job Denwood. I've been meaning to do something like this for a long time - our exhaust fan sounds like a jet engine on high speed!
 
OP
D

Denwood

Well-known member
Joined
Sep 22, 2014
Messages
4,180
Location
Thunder Bay, Ontario, Canada
Nice job Denwood. I've been meaning to do something like this for a long time - our exhaust fan sounds like a jet engine on high speed!
Thanks @couch67 :) I'd highly recommend the fan and setup, particularly now after eight months..even without the automation.

With our old standard hood and stove you could pretty much tell what was cooking throughout the house. Now, the fan's increased flow/efficiency and automation pretty much guarantee zero odour in the house. Capture is near 100% at the cook top with the fan speed controller set at 5. I just need to figure out how to do the same sort of treatment for the wall oven...ha.
 
OP
D

Denwood

Well-known member
Joined
Sep 22, 2014
Messages
4,180
Location
Thunder Bay, Ontario, Canada
Just tip here if anyone is going a similar route. I'm moving the house over from Smarthings to Hubitat.

1. The Aeotec Heavy Duty Smart Switch needs to be set to this driver to report power use (not energy use) correctly : "Aeotec Gen6 Switch device driver"

2. The Aeotec Micro relay detected just fine in Hubitat.

I used the "Rules Machine" app to turn on/off the Aeotec relay based on power use from the 240 volt switch. Works a treat and is now using local code so is quite fast.
 

Attachments

  • A4BB9C6D-78EB-43E1-8B15-C80ECDE4E70D.jpeg
    A4BB9C6D-78EB-43E1-8B15-C80ECDE4E70D.jpeg
    106.3 KB · Views: 31

Renegade1LI

Well-known member
Joined
Mar 11, 2018
Messages
4,919
Location
long island ny
I just went with a commercial hood, Ican air out the whole house in a few minutes. Has a 10" exhaust with automatic damper, works great.
 

Attachments

  • 20220921_135527.jpg
    20220921_135527.jpg
    199.5 KB · Views: 24
  • 20220921_135536.jpg
    20220921_135536.jpg
    235 KB · Views: 24
OP
D

Denwood

Well-known member
Joined
Sep 22, 2014
Messages
4,180
Location
Thunder Bay, Ontario, Canada
B
We replaced our kitchen and installed a Z-Line range hood with 700 CFM remote blower mounted up in the attic. Running on high it's quieter than our old Kitchen Aid microwave / blower combination. Run it on medium speed and we can't hear it at all.

https://therangehoodstore.com/colle...ts/remote-dual-blower-wall-range-hood-697-rd#
@Ben Glaser , that's a really slick setup. Now you just need to automate it to come on with your range :) What size is the blower intake/exhaust? I like that they have chimney extensions etc. available so you can just configure to your setup.

@Renegade1LI what model is that?
 

Renegade1LI

Well-known member
Joined
Mar 11, 2018
Messages
4,919
Location
long island ny
B

@Ben Glaser , that's a really slick setup. Now you just need to automate it to come on with your range :) What size is the blower intake/exhaust? I like that they have chimney extensions etc. available so you can just configure to your setup.

@Renegade1LI what model is that?

It’sa GE Monogram 48ss… i think it’s around 1000cfm, variable speed and quiet.
 
OP
D

Denwood

Well-known member
Joined
Sep 22, 2014
Messages
4,180
Location
Thunder Bay, Ontario, Canada
@Renegade1LI ,at that price, it better be :) That's a pretty fancy pants appliance! With a 10" exhaust, I"m sure it's moving pretty close to it's rated 1000CFM.

I think my total was under $300 for this automated setup. I'm interested in ditching the hood (which is just a shell with a few switches at this point) and going with something with a larger intake. The ECM fan at a setting of 5-6 completely evacuates the area over the cooktop, however the hood intake is pretty small (maybe 12" square) and I know a larger "funnel" on the intake would work better.

The other thing I'll likely do is move the ECM fan up into the attic as it has been dead reliable. This way I can install duct muffler at the top of the cabinets. This will bring down noise likely another 50% (it's very quiet even now) but allow me to crank the CFM a bit more. The ECM fan control ramps up to "9", but I'm only set at "5".

I think something like these would work with custom hood cladding: https://www.broan-nutone.com/en-ca/product/rangehoods/rmpe7004
or https://www.broan-nutone.com/en-ca/product/rangehoods/bbn3306ssc
 
Last edited:

Ben Glaser

Active member
Joined
Dec 4, 2010
Messages
42
Location
Elkhart Indiana
We're real happy with it. Running on low it doesn't let any smoke or steam escape into the kitchen. I won't automate because I'm no electrician and I'm old so I avoid wiring like the plague. Besides when I'm standing at my gas stove to ignite a burner it's a simple matter to just reach up and press a button to turn the fan on. Same for shutting the burner and fan off. After 70 years and living in 8 different houses with rattling noisy range hoods I was determined to have something quiet for a change.
 
OP
D

Denwood

Well-known member
Joined
Sep 22, 2014
Messages
4,180
Location
Thunder Bay, Ontario, Canada
We're real happy with it. Running on low it doesn't let any smoke or steam escape into the kitchen. I won't automate because I'm no electrician and I'm old so I avoid wiring like the plague. Besides when I'm standing at my gas stove to ignite a burner it's a simple matter to just reach up and press a button to turn the fan on. Same for shutting the burner and fan off. After 70 years and living in 8 different houses with rattling noisy range hoods I was determined to have something quiet for a change.
It is simple to reach up and flip a switch, but my wife/girls would often cook and not fire it up...now it just works whenever the induction cook top is fired up.

Ben, I hear you 100% on the noise thing. Regardless of the specs, a motor in a hood a foot or two from your face is going to be loud if it's moving any air. I did not place the motor in the attic, simply for servicing considerations as the attic has spray foam and about R70 of glass. The exhaust ducting up there is insulated with spray foam as well, so is not practical to pull apart. That said, if you can go with a remote fan in the attic (as you did), that is the best scenario for sure. What would work in my case is just moving the fan up about 18 inches, and installing a duct muffler in the cabinet. These are super effective and simple to make. These are a few examples from my theatre project as I did extensive sound deadening work. Every duct leaving the basement has a duct muffler installed.

Here is a cut/paste from that thread. This is one of those projects that are quite easy/cheap to execute and have an amazing effect on noise in a duct. The muffler material is fibreglass duct liner, so is fire rated. All parts are metal as well, so would be safe for a kitchen exhaust.

I've tested sound levels at the two upstairs vents, checking them while generating an 84db pink noise signal from my computer speakers in the basement. You can buy duct mufflers, but my situation pretty much requires building them to fit. I designed a strangely similar header and muffler system for my Westfalia van's audio conversion engine, using two different sizes of straight thru stainless mufflers. These are super simple to make, and based on a few online specs, should cut sound levels up to 30 db, in the 1khz range (where voices are centered).

Fantech has some numbers posted for their 2 and 3 foot silencers:

sil_dim.jpg

For the 5" duct, I'm using an 8" pipe with 8" to 5" reducers at both ends. This should keep flow restriction very low. Step one is to cut the 8" duct material to size. Using a square and scribe makes for a nicer muffler.

acoustic_muffler1.jpg

I picked up a duct crimping tool to simplify pipe work, particularly for the mufflers.

acoustic_muffler2.jpg

This mesh will ensure the duct muffler stays at 5" internally.

acoustic_muffler3.jpg

The simple calculation of D * 3.14 gives you the wide of mesh to cut. I cut it as below to make it easy to join the mesh to form a 5" tube.

acoustic_muffler4.jpg

Wrapping in 1" duct liner. The liner is duct rated..the smooth side faces in to prevent loose fibers from circulating. I've also sealed the exposed fiber at both ends with duct sealer. This was a mistake cut on the duct liner..I ended up with a full wrap of two layers which keeps the mesh tube nicely centered in the muffler.

acoustic_muffler5.jpg

Partially assembled. I wrapped the 8" duct material over the core, and wrestled a bit to pop the pipe seam in place.

acoustic_muffler6.jpg

Duck sealer! This came from Brock White industrial supply locally. It's water based, duct rated, easy to apply (like thickened latex paint) and quick drying.

acoustic_muffler7.jpg

Sealing the joints.

acoustic_muffler8.jpg

Sealing both ends to ensure loose fibers cannot enter the air stream.

acoustic_muffler9.jpg

They're very fast to construct. The larger one is for the 5" duct heading upstairs, and the 4" ID muffler is to manage the supply (hot) air going to the basement bath. The larger muffler is 48" (as large as I could fit in the space) and the smaller one is about 28". If you basically yell into one, the sound level is reduced by at least 50%...surprisingly effetive. I've measure reference noise levels first, so will update as the HVAC sound project is completed.

With basement pink noise (from my PC speakers) generated at 84 db, I'm measuring 47db on the 2nd floor at vent 1, and 35db at vent 2.

acoustic_muffler10.jpg
 
Last edited:
OP
D

Denwood

Well-known member
Joined
Sep 22, 2014
Messages
4,180
Location
Thunder Bay, Ontario, Canada
I took some actual CFM measure measurements of the system in use now that I have a few more tools in the HVAC department :) I did not test speeds 1-4 as they are too low for effective venting.

Speed Setting 5 - 111 CFM (this is what I have it set at for pretty much 100% evacuation)
Speed Setting 6 - 124 CFM
Speed Setting 7 - 131 CFM
Speed Setting 8 - 162 CFM

Keep in mind that the exhaust vent is about 10 feet long in total, and exits in a 4" Broan Ecovent. CFM numbers like those with (relatively high static pressure) are excellent. Speed setting 7 and 8 are pretty much overkill capturing steam/odours from cooking. 5 and 6 work great. Using the fan at speed 5, where we have it set, requires 18-19 watts of power.

And sound readings about 1 meter/3 feet from the hood:

Speed Setting 5 - 57 db
Speed Setting 6 - 61 db
Speed Setting 7 - 63 db
Speed Setting 8 - 65 db
 
Last edited:
OP
D

Denwood

Well-known member
Joined
Sep 22, 2014
Messages
4,180
Location
Thunder Bay, Ontario, Canada
Some nice feedback for the Terrabloom crew. The controller for the fan stopped working (about 1 year old) so the fan runs, but at full speed when triggered. Full speed is a bit loud and certainly we don't need 160 CFM (65 db) from the setup. I emailed Terrabloom's support today with the problem and promptly got a tracking number for a new unit. Awesome sauce :)
 
OP
D

Denwood

Well-known member
Joined
Sep 22, 2014
Messages
4,180
Location
Thunder Bay, Ontario, Canada
With all the talk of gas stoves, and a correlation with asthma (I think Nitrogen Dioxide from combustion) I figured the importance of hood exhaust is once again highlighted. In this case, we're making sure the hood runs via automation, vs relying on someone using the switch.

I posted on another project how I was controlling the speed (not just on and off) of an EC fan using the Leviton ZS057-D0Z dimmer which supports 0-10V dimming, and includes a Zigbee radio for automation via automation hubs like Hubitat.


I'm posting here for reference as Fantech is quite popular for kitchen exhaust applications. You could use a few of these Leviton switches to control on/off/speed of both the exhaust fan and makeup air as well.

One of Hubitat folks got his Fantech EC fan working with the wires as follows:

Fantech red 10v reference AND Fantech yellow 0-10v input -> leviton purple +0-10v

Fantech 0-10v GND (blue) - > leviton -0-10v (grey)

This setup gives you the ability to not only turn the exhaust fan on and off, but also manage the speed of the fan via automation. I'm doing this with my HRV setup extensively:

 
OP
D

Denwood

Well-known member
Joined
Sep 22, 2014
Messages
4,180
Location
Thunder Bay, Ontario, Canada
A few follow up notes for this thread:

1. I used an Aeotec 240 volt zWave switch to sense power use by the induction cook top. This switch works much, much better if you include it using a USB zstick to the Hubitat hub without SO security and is highly, highly recommended. This is a PITA, but worth the effort 100%. More here on how to do this: https://community.hubitat.com/t/z-wave-ghost-removal-using-a-uzb-stick-how-to/73914

If you don't do this, the device's overly "chatty" communication with the hub creates some reliability issues. If you include without SO security to the zwave network, it works exactly as you'd expect, 100% reliably.

2. Zooz has just dropped a new 0-10 Volt dimmer which is worth testing to control the exhaust fan: https://www.thesmartesthouse.com/pr...z-wave-plus-long-range-0-10-v-dimmer-zen54-lr
 
To avoid these ads, REGISTER NOW!
Top Bottom