To avoid these ads, REGISTER NOW!

What did you do "IN" your garage today?

ZRX61

Well-known member
Joined
Aug 15, 2006
Messages
28,716
Location
Solar Blight Valley, SoCal
Discovered that the ZX11 was apparently assembled around the tricky bolt on the chain guard... About lost the will to live getting that installed. All done now & discovered the easy way to do it.
 
To avoid these ads, REGISTER NOW!

NUTTSGT

Super Moderator
Staff member
Joined
Sep 14, 2009
Messages
51,165
Location
Northern Central Ohio
So yesterday after the aggravating issue of trying to refill the fuel tank in the Mustang, I attempted to prime the system to check for leaks. Once again. . . aggravation started to set in.

Battery on, ignition on, fuel pump switch on. Nothing. After some troubleshooting and 3 fuses later, I came to the conclusion, I need a new fuel pump. I paid about $175-180 for that pump when I upgraded from the old Holly blue pump. A new Holley Black 150 pump is $350.


1660166587455.png
 
Last edited:

isb cornbinder

Well-known member
Joined
Nov 3, 2010
Messages
7,073
Location
Pacific South West, BC, Canada
Does what did you do in the basement count?
At one time, a few years ago, my son and I assembled an International Harvester L110 short box pickup in the basement of our home. It was a trick we played on my wife after I asked if I might store some pickup parts in this area.
She went to Atlanta on business and when she came home she had to pass the "L" on her way to the wine cellar. Her biggest concern was, "Where is my treadmill?" (See earlier post about a weld [positioner)
Well the truck tease wore thin rather quickly, so we took the truck apart and it remains in the basement, in pieces. I still think the "L" looked better assembled, in the basement. I wish I had taken a few pictures of the truck, in the basement.
 

Attachments

  • CAB WITH TWIN WINDOWS.jpg
    CAB WITH TWIN WINDOWS.jpg
    41.1 KB · Views: 86

Old Man Roger

Well-known member
Joined
Apr 6, 2017
Messages
17,907
Location
Palm Coast Florida
Does what did you do in the basement count?
At one time, a few years ago, my son and I assembled an International Harvester L110 short box pickup in the basement of our home. It was a trick we played on my wife after I asked if I might store some pickup parts in this area.
She went to Atlanta on business and when she came home she had to pass the "L" on her way to the wine cellar. Her biggest concern was, "Where is my treadmill?" (See earlier post about a weld [positioner)
Well the truck tease wore thin rather quickly, so we took the truck apart and it remains in the basement, in pieces. I still think the "L" looked better assembled, in the basement. I wish I had taken a few pictures of the truck, in the basement.
I knew a guy who built a plane in his basement.
 

isb cornbinder

Well-known member
Joined
Nov 3, 2010
Messages
7,073
Location
Pacific South West, BC, Canada
I knew a guy who built a plane in his basement.
There was a humor around here about a man building a Duesenberg in his basement. I suppose I believe the story, because my friend is a track-hoe operator and he was the guy who excavated the back yard ramp and remove part of the basement wall to get the Duesy out.
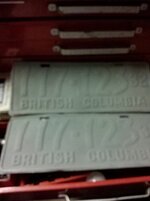
This same friend was working for a contractor who took down a local jail. They dug up many 45 gallon barrels of old British Columbia vehicle license plates. I have one pair of 1932 tags.
There is a man in the next block who has a restored 1947 Cesena 140 in his garage.
 

Attachments

  • 1932 BC plates.jpg
    1932 BC plates.jpg
    21.7 KB · Views: 70

Wiz02

Well-known member
Joined
Jul 13, 2007
Messages
2,399
Location
Southeastern PA
Discovered that the ZX11 was apparently assembled around the tricky bolt on the chain guard... About lost the will to live getting that installed. All done now & discovered the easy way to do it.
Been there done that. I don't know which feeling is stronger, satisfaction of finally figuring out the easy way of doing something or the anger at not figuring it out before you've taken the damn thing down to it's component atoms.
 

ZRX61

Well-known member
Joined
Aug 15, 2006
Messages
28,716
Location
Solar Blight Valley, SoCal
Is the trick to remove the rear set?
Bolt is directly inboard of the muffler. I took it off with a 10mm 1/4 drive wobble socket on a 12in extension.. that was at 45deg to the bolt.
Put some gloves on to get the bolt back in so I didn't get chain goop all over. Once I got it started I realized I could use a regular 10mm 1/4drive socket on a 1.5in extension fed down behind the muffler.

Here's the middle bolt on the ZRX:

IMG_20220810_163435802.jpg


Here's the same view on the ZX:

IMG_20220810_163516407.jpg

The ZX bolt:


IMG_20220810_163508310.jpg
 
Last edited:

kaymccampbell

Well-known member
Joined
Feb 27, 2015
Messages
29,627
Location
Upstate New York
Fiddled with the laser cutter. Took the Dingo and the big boxes out. Returned the Dingo. Cut a piece of pipe. Rounded the sharp corners on the cut end. Fired up the chipper for the first time in decades. Other than a little varnish in the bowl it was ready to rock.
 
  • Like
Reactions: 555

rayra

Well-known member
Joined
Dec 1, 2014
Messages
4,724
Location
Escaped from Los Angeles
Furniture / cabinetry building continues in the warm muggy garage. Out there today for far too long with 6 staples in my scalp, but I've got to move these furniture builds along.
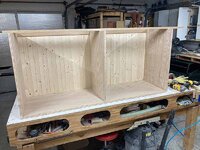
Bookcases bodies are 90% done, still have to find some base moulding and put the dental crown molding on their tops and get their shelves fitted out.
Assembled the sideboard cabinet body and fascias today. Tomorrow I'll trim out the veneer countertop with real oak and get it mounted with biscuits.
Then I can get to work assembling the jigsaw puzzle of the media cabinet for my folks.
And probably push that thru to trimming and staining / completion so I can get it delivered and out of the way.
Then finish the sideboard so I can get it in my home office and loaded.
Then the bookcases. The one on the right in the picture of the set will sit in that relation, the left will be further left atop an existing lateral file. I'm building the sideboard to match its dimensions and look so together they'll form a 7.5' counter on one wall, with the bookcases on the flanks.
That set of stuff is getting a walnut / red oak blend staining.
 

Attachments

  • furniture sideboard assembly 04.jpg
    furniture sideboard assembly 04.jpg
    30.9 KB · Views: 40
  • furniture sideboard assembly 03.jpg
    furniture sideboard assembly 03.jpg
    65.7 KB · Views: 24
  • furniture sideboard assembly 02.jpg
    furniture sideboard assembly 02.jpg
    86.1 KB · Views: 28
  • diagram office shelves 220728.jpg
    diagram office shelves 220728.jpg
    82.4 KB · Views: 21
Last edited:

mikegt4

Well-known member
Joined
Sep 12, 2005
Messages
3,279
Location
sw ohio

Flat Thunder Channel

Well-known member
Joined
May 4, 2020
Messages
402
Location
Ohio
It was playground fun last night! Not much in the garage but I did remember to empty the trash can. I was happy to get that pile of empty Sakrete bags out of the shop!
 

nadogail

Well-known member
Joined
Jan 23, 2009
Messages
32,061
Location
Coronado, CA
My new Clamp Meter arrived yesterday afternoon, spent some quality time going through its various functions.

This is the first meter with a thermocouple I have owned.
 

exranger06

Well-known member
Joined
Aug 9, 2015
Messages
1,686
Location
CT
I spent all day yesterday working on my 06 Ford Ranger. It's actually been in the garage for the last month or so, getting caught up on a lot of maintenance and repairs. I don't get a lot of free time, but I work on it here and there, when I can. Anyway, yesterday I was working on the A/C. I was replacing the compressor because of a leaking shaft seal. It otherwise worked well and the A/C was still fairly cold, so I didn’t think the compressor was eating itself and therefore didn’t buy a new condenser. Then I pulled out the orifice tube and saw this (see pics below). So I ordered a condenser yesterday. Sigh… I got the compressor swapped out, flushed out the evaporator and all the lines, and installed a new orifice tube. Now I gotta wait for the condenser to show up (Sunday, hopefully. But Fedex is shipping it so who knows if I’ll ever get it at all :rolleyes:), swap out the condenser, replace all the o-rings, and lastly add PAG oil and install the new accumulator. Then vacuum and recharge and the A/C job will finally be done.

Other things I did over the last month: replaced pass. side front wheel bearing, replaced front brake splash shields and serviced/lubed front brakes, front and rear shocks (Bilsteins, yay!), transmission range sensor, new transfer case output seal and fluid change, PS fluid change, serp. belt tensioner and idler pulley, front differential fluid change. Also ran a new 4 gauge power wire and fuse holder for my amp and an aux. fuse box for other electrical accessories.

Still on to-do list: finish fixing A/C, rear diff fluid change, new fuel filter, fix exhaust leak, and finish installing aux fuse box and wiring. Oh, and I just noticed yesterday that the transmission cooler lines and metal PS lines are looking very rusty. Not leaking yet, but they should be replaced sooner rather than later.
 

Attachments

  • orifice tube.jpg
    orifice tube.jpg
    105.7 KB · Views: 33
  • orifice tube2.jpg
    orifice tube2.jpg
    123.6 KB · Views: 34
  • Ranger.jpg
    Ranger.jpg
    210.5 KB · Views: 35
To avoid these ads, REGISTER NOW!

Uncle murph

Well-known member
Joined
Jan 28, 2021
Messages
1,484
Location
Harford county
Rode the ZRX11 today. Fan cycled on as I pulled into the garage, somewhat unusual (last time was a couple of years ago)... Altho with that said I was hauling *** on it & it was about 100deg today.
However, 7 hours later it's still hot(ish) to the touch. Probably need to investigate that.. which is a PITA as ya have to pull the tank off to get to the radiator cap. No sign of a coolant leak & the temp warning light didn't come on.
I have a Deere 5200,bought new 25yrs ago,when I first got it, I couldn’t believe how hot the transmission casting would get,I was sure there was something wrong with it (hot like you can’t put your hand on it)Several thousand hours later(it just did 90 hrs straight running a 30 kw generator on the pto)its never given me a minutes trouble or overheated.
 

rayra

Well-known member
Joined
Dec 1, 2014
Messages
4,724
Location
Escaped from Los Angeles
Countertop for the sideboard cabinet.

set the 3/4x3/4 oak strips a little proud / tall, will sand them flush with the veneer. I usually put some blue tape on the adjacent veneer so I can carefully work the oak down flush without tearing up the veneeer.

My rolling work table is big enough that I can start the media shelf unit assembly on its other half, while that countertop sets up. After I finish cooling off / drying off inside in the AC.

Good times.


eta 5:30pm enough of that. Got the counter top unclamped and set aside, got most of the media cabinet rabbet puzzle assembled and was fighting a bit of bowed plywood. By the time I got it trued and clamped / braced while the glue set, I gave up on finishing the end and top panels. So tomorrow for that.
 

Attachments

  • furniture sideboard assembly 05 top deck.jpg
    furniture sideboard assembly 05 top deck.jpg
    76.9 KB · Views: 20
  • furniture sideboard assembly 06 top deck.jpg
    furniture sideboard assembly 06 top deck.jpg
    69.4 KB · Views: 15
  • furniture media assembly 01.jpg
    furniture media assembly 01.jpg
    85.1 KB · Views: 17
  • delta table saw insert yellow.jpg
    delta table saw insert yellow.jpg
    67 KB · Views: 24
Last edited:

DeeDubz

Well-known member
Joined
Nov 20, 2019
Messages
1,454
Location
Socal
Half way done with replacing the carb on my pressure washer. I'll finish this weekend. I had a bunch of gunk in the tank. I bought a solvent to clean the tank. Replaced the carb. Should be running soon. Also painted the cage and cleaned up the plastic.
 

Attachments

  • IMG_4506 2.JPG
    IMG_4506 2.JPG
    368.4 KB · Views: 21
  • IMG_4507 2.JPG
    IMG_4507 2.JPG
    347.6 KB · Views: 16
  • IMG_4517 2.JPG
    IMG_4517 2.JPG
    337.5 KB · Views: 21

Bessy

Well-known member
Joined
Dec 18, 2012
Messages
995
Location
Ontario, Canada
I have determined today that I cannot be trusted to maintain the whereabouts of the collet wrenches for my trim router. Yes, I should have zip tied the original to the cord, but it gets in the way when you're using the tool, I find, but I'm now down 3 of them, with no luck trying to securely fasten a bit. Mildly frustrated, as one might expect.
 

LeonardY

Well-known member
Joined
Apr 16, 2011
Messages
5,110
Location
Southern California
Ran the CNC mill. I had to do a revision on some parts. I remember struggling when I first started. That memory kept me from wanting to do them over.
They were nothing complicated but I didn't know how to do tool swaps so each tool was a separate program.
Now I know how to program tool swaps. A part that took me over 30 minutes to do now takes me 5 minutes.
 

Flat Thunder Channel

Well-known member
Joined
May 4, 2020
Messages
402
Location
Ohio
I snuck out to shop after everyone was in bed for a little cylinder repair. I finally got back on Johnny #5 my old Hyster forklift. I need to get some cylinder seal kits! Any guesses on where to find the right kits? It's an old Space saver S25a model.

IMG_20220812_071409.jpgIMG_20220812_071409 (1).jpgIMG_20220812_071409 (2).jpg
 

nateo

Well-known member
Joined
Jul 4, 2018
Messages
186
Location
Embrun, ON
A year or two ago the neighbour gave us a kids "Tigger" fishing rod for my daughter to play with. She loved it but eventually the thumb button (not sure of the correct terminology) on the probably 20 year old rod went a bit wonky. She upgraded to a "Frozen" rod and I promised the "Tigger" one to my little guy, once I got around to fixing it.

Well I finally wrapped that up last night. The little plastic thumb button had two cast pivots but one had broken off, allowing it to be pressed out of alignment and go into the reel housing. After looking around the shop for a bit I settled on a piece of brass rod about the right size for the pivot and an odd shaped brass offcut to provide some support. A bit of hacking and sanding and then some epoxy and now we have a working rod again!

The broken thumb button.

20220810_230910.jpg

My brass doo-hicky. The slot in the curved piece was to allow it to sit over the reinforcing rib in the button. The curve was just what happened to be there in the strange shaped off-cut. I rounded over above the pin because I thought it was prettier!

20220810_231200.jpg

Test fit. I had to cut the one remaining pivot point off but I'm going to believe this is a more robust system than a couple of wee bits of plastic.

20220810_231229.jpg

A bit of epoxy to keep the doo-hicky in place and the rod is back together again!

20220811_212051.jpg

Yeah, I know I could have gotten a new one for $20, but I like fixing stuff, I like keeping things out of the landfill, and it was fun. Plus the girl loves fishing and it isn't really fair to take her without a rod for the guy, too!
 

rayra

Well-known member
Joined
Dec 1, 2014
Messages
4,724
Location
Escaped from Los Angeles
Too damned hot in the hot tub. Except it isn't. But I'm still sweat-soaked and taking a break for lunch.

Media shelf unit body almost complete, just needs a bit more beadboard installed on the back. Then I'll start on the trim molding at the top and bottom, and adding some adjustable feet. And possibly some shimming underneath to back up the molding skirt and give better purchase for the threaded inserts for the adjustable feet.

Sunset thunderhead from yesterday. Looking right out the garage door.
 

Attachments

  • furniture media assembly 02.jpg
    furniture media assembly 02.jpg
    90.5 KB · Views: 12
  • furniture media assembly 03.jpg
    furniture media assembly 03.jpg
    54.3 KB · Views: 11
  • furniture media assembly 04.jpg
    furniture media assembly 04.jpg
    78.6 KB · Views: 13
  • thunderhead Aug11.jpg
    thunderhead Aug11.jpg
    48 KB · Views: 22

Old Man Roger

Well-known member
Joined
Apr 6, 2017
Messages
17,907
Location
Palm Coast Florida
6AC49CE2-E346-4C78-BAB1-59D8F4C011CC.jpeg
Finally finished the AC install on the Chevelle. New front end parts, bumper, bumper filler panel, grill, headlight bezel trim. Massaging it to fit how I like, but it won’t be perfect as these cars were never perfect.
I cant remember what they're called, but those headlights would look awesome with a set of those covers people used to keep their high beams from blinding oncoming drivers. They were just a stainless cover that covered the top half of the bulb. Usually any car that had them, also used Bluedots on the tail lights too.
 

Odd Job

Well-known member
Joined
Apr 13, 2019
Messages
1,383
Location
British Colombia
Removed, sanded and painted the factory roof rack on the 25yr old Sport-Ute. Getting it spruced up for a collector plate with lower insurance premiums.
 

555

Well-known member
Joined
Nov 10, 2007
Messages
2,315
Location
Nomad-Arkansas & Georgia
A couple of fiddly little projects. Put some rusty junk in Evaporust and vinegar. Nothing of importance. Decided to knock the cobwebs off a Harley Sportster project I started a while back.
 

Attachments

  • 73 XLKR 8-12-22.jpg
    73 XLKR 8-12-22.jpg
    195.5 KB · Views: 91
To avoid these ads, REGISTER NOW!
Top Bottom