To avoid these ads, REGISTER NOW!

Between 705 & 1200 SQ/FT The Texas Barn in PA

Workspaces between 705 and 1200 squarefeet.
OP
M

madison069

Well-known member
Joined
Nov 5, 2010
Messages
4,253
Location
Monroeville, PA
I do like the concept of the clamps and they do work, but you have to tilt it just right to grab the flare nut backside. Maybe there are some out there with a smaller grove for the line to slide through. I think it was you Marc that I saw them from and I ordered a set for this job. But so far they been good at keeping the fluid from draining out of the system while I clean up the hubs and stuff.
 
To avoid these ads, REGISTER NOW!
OP
M

madison069

Well-known member
Joined
Nov 5, 2010
Messages
4,253
Location
Monroeville, PA
That’s called a “Brake fluid flush” and pays 1.5 hours flat rate! See the positive, ignore the negative! 😆
I hear ya! If it was the camaro I wouldn't be too concern about the brake system going dry. But the 2012 has that ABS and I am doing my best to keep air from building up in that thing. I don't have a scan tool to run the ABS to bleed it. Which is another justification for a scan tool.
 
OP
M

madison069

Well-known member
Joined
Nov 5, 2010
Messages
4,253
Location
Monroeville, PA
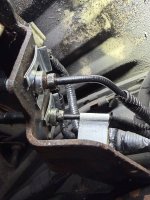
Today was miserable. Those two brake hoses that goes from the hard line under the bed of the truck to the rearend almost got me.

This spot is proof that an engineer jumped over 1000’s of virgin women just to screw a mechanic.

IMG_3986.jpeg

IMG_3989.jpeg
Getting that brake flare nut that’s closest to the frame started was a pain. The nut wouldn’t spin freely due to the plastic coating was interfering with it. I tried penetrating fluid, working the nut with a wrench, spinning the nut with a deep socket and battery ratchet, and it just wouldn’t spin freely by hand.

I ended up being squeezed between the rearend, driveshaft, muffler, and gas tank to reach this ******* while laying on the floor. I was coated in Fluid film and brake fluid during this time.

Overall it took 2.5hrs to change these two brake hoses and just an hour was spent trying to get that nut started on the hose!

The other end on the axle was a breeze to do, 30mins and I had both old hoses removed and the new ones installed.
IMG_3988.jpeg
The other end toward the bed was a challenge to get those clips off the hose and I had to work the ends out with a pair of pliers due to some rust there.

Maybe tomorrow I’ll get the rear disc brakes assembly replaced with the new parts. But I called it a night after those two hoses.
 

gearhead1960

ALLIANCE MEMBER
Joined
Mar 21, 2019
Messages
1,864
Location
Manassas, VA, a small blot in history
I feel your pain on the brake hoses. I had similar issues getting the rear brake fittings loose on Ricky. After not too much F'ing around, I remembered I was replacing the hard and soft lines and just cut off everything. Same with the lines at the rear drums, I just cut the lines and fitted a 6 point socket on the fitting....easy peazy. Sorry, you don't have it that easy.....
 

Xti04

Well-known member
Joined
Nov 11, 2016
Messages
2,366
I feel your pain on the brake hoses. I had similar issues getting the rear brake fittings loose on Ricky. After not too much F'ing around, I remembered I was replacing the hard and soft lines and just cut off everything. Same with the lines at the rear drums, I just cut the lines and fitted a 6 point socket on the fitting....easy peazy. Sorry, you don't have it that easy.....

Fixed it for him, now it is easy peazy!
 
OP
M

madison069

Well-known member
Joined
Nov 5, 2010
Messages
4,253
Location
Monroeville, PA


Too late, I already have those two in my arsenal. 🤣😂

Luckily the fitting I was fighting wasn’t rusted, but it was that plastic sheath that ford put on their lines. Looking back, I bet I could have cut that plastic sheath off a little bit and it would have fixed my issue.

I also tried to thread the brake hose on the hard line, but due to the cramp space, I couldn’t hold the hardline and turn the brake hose at the same time.

Oh well, it’s done now. I checked the fitting after pumping the pedals and I didn’t see any wetness, so I call it a success for now.
 
OP
M

madison069

Well-known member
Joined
Nov 5, 2010
Messages
4,253
Location
Monroeville, PA
I feel your pain on the brake hoses. I had similar issues getting the rear brake fittings loose on Ricky. After not too much F'ing around, I remembered I was replacing the hard and soft lines and just cut off everything. Same with the lines at the rear drums, I just cut the lines and fitted a 6 point socket on the fitting....easy peazy. Sorry, you don't have it that easy.....

It did cross my mind to cut it. But the line and nut was still good. It was the plastic sheath I think that was causing my issues.
 
OP
M

madison069

Well-known member
Joined
Nov 5, 2010
Messages
4,253
Location
Monroeville, PA
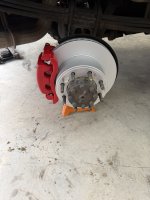
Got the rear brakes done. It went a lot faster compared to the dual line job under the bed of the truck.
IMG_3998.jpeg
IMG_3999.jpeg

These brake lines didn’t really have a good mounting bracket for them so I had to pry the old mount wires off the old hoses and reused them. I will put some zip ties on the mount wires to secure them more.

Then I bleed the brake system using a Speedi-Bleed system, it’s a nice little setup but trying to purge all of the air out I was getting some weird air bubbles. If I opened the bleeders on the calipers a lot, there would be a lot of little bitty bubbles. Then when I would close the bleeders some I would get some big bubbles and then all fluid. But if I cracked the bleeders open some more, the little bubbles would return. I started thinking that the air was coming from the bleeders threads, but not really sure.

I took the truck for a test ride and did the brake pads brake in procedure. The truck now actually rolls easily and the brakes works good. I think I will bleed the brake lines again after driving it around some just to make sure I got all of the air out. I might even use Forscan software and see if I can active the ABS bleed procedure.

Before I parked the truck in the garage I cleaned up the garage and cleaned the floor. Was the garage floor 100% stain free after the brake job, no. But it cleaned up well enough that I am happy with it.
IMG_4001.jpeg

I can probably get it cleaner with a different cleaning product then just simple green and water.

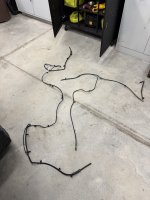
Then I started the 4WD vacuum line replacement and just as I was worried about, I ordered the wrong line. I dug into the part number I got and it was for a F150, 🤦🏻‍♂️🤷🏻‍♂️.

The new line on the left and old line on the right.
IMG_4011.jpeg

Confirming on the ford part online store I found the correct one and it will be at the house Wednesday. Till then I’ll have to lock the 4WD manually.

I cleaned up the tools and put them away and then broke down all of the boxes and put them in the bed of the truck to take to the recycling dumpster by work tomorrow.
 
To avoid these ads, REGISTER NOW!

DeeDubz

Well-known member
Joined
Nov 20, 2019
Messages
1,454
Location
Socal
I replaced my vacuum line a few years ago. My truck would buzz for 30seconds after I turned the motor off. The only way to get the think to quit was to pump the brake pedal. If I remember correctly it's not too bad of an install.
 
OP
M

madison069

Well-known member
Joined
Nov 5, 2010
Messages
4,253
Location
Monroeville, PA
I replaced my vacuum line a few years ago. My truck would buzz for 30seconds after I turned the motor off. The only way to get the think to quit was to pump the brake pedal. If I remember correctly it's not too bad of an install.
It wasn’t too bad To Take the old line off other than getting coated in fluid film.😒
 

zmotorsports

ALLIANCE MEMBER
Joined
Oct 20, 2009
Messages
21,484
Location
Northern Utah
I do like the concept of the clamps and they do work, but you have to tilt it just right to grab the flare nut backside. Maybe there are some out there with a smaller grove for the line to slide through. I think it was you Marc that I saw them from and I ordered a set for this job. But so far they been good at keeping the fluid from draining out of the system while I clean up the hubs and stuff.

Cody, I have a much, much older version of those clamps, but they are a just a squared, U-shaped piece of metal with a threaded fastener using a thumbscrew and the end that goes into the line has a rubber tip on it. Hard to explain, but I've had them for several decades and use them for brake lines as well as transmission lines and have worked very well, but not quite as convenient as the grip style you have.


Then I bleed the brake system using a Speedi-Bleed system, it’s a nice little setup but trying to purge all of the air out I was getting some weird air bubbles. If I opened the bleeders on the calipers a lot, there would be a lot of little bitty bubbles. Then when I would close the bleeders some I would get some big bubbles and then all fluid. But if I cracked the bleeders open some more, the little bubbles would return. I started thinking that the air was coming from the bleeders threads, but not really sure.

Bingo Cody. The air is being pulled around the threads of the bleeder. Not a big deal because the air is not entering the actual system itself. Just more of a note to self when this is taking place.
 

jeffcoll

Active member
Joined
Jun 10, 2010
Messages
30
Before you vacuum bleed the brakes, take the bleed screw out and put a dab of silicon grease on the threads. It stop the air leaks, and also keeps some water out of the bleeder threads making them easier to loosen next time.
 
OP
M

madison069

Well-known member
Joined
Nov 5, 2010
Messages
4,253
Location
Monroeville, PA
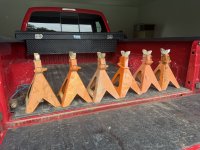
While working in the garage this morning, I started looking at my jack stands. Their old, rough, and one got bent. Before I started stripping them down to get ready for paint I decided to check into the whole harbor freight recalls. Well these particular model feel under the it’s not recalled but you can bring them in for store credit.
IMG_4041.jpeg
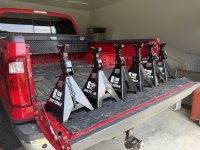
So I took all 6 in and got my store credit. Then I purchased 6 of the 6 ton Daytona jack stands and I only had to put 60 cents toward the gift card to complete the deal.
IMG_4048.jpeg


These new ones have a better foot print, looks to be better built, and has a safety pin as a secondary lock.

They should do good for what I do.


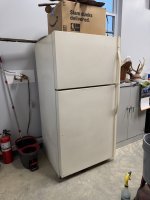
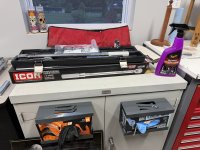
Then it was time to clean the garage some more. Starting with the stuff on top of this cabinet.
IMG_4049.jpeg

Eventually I was able to clear the majority of the cabinet tops along this wall.
IMG_4060.jpeg

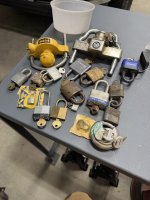
This stuff is items I need to decide what will go on the walls. Obviously the deer heads, but the other stuff I need to figure out.
IMG_4061.jpeg


Now to keep working along the back wall.
IMG_4062.jpeg

Maybe I’ll tinker some more tonight, but I’m thinking I’ll just relax also.
 

larry4406

Well-known member
Joined
Jan 27, 2006
Messages
19,654
Location
Northern Virginia
While working in the garage this morning, I started looking at my jack stands. Their old, rough, and one got bent. Before I started stripping them down to get ready for paint I decided to check into the whole harbor freight recalls. Well these particular model feel under the it’s not recalled but you can bring them in for store credit.
IMG_4041.jpeg
So I took all 6 in and got my store credit. Then I purchased 6 of the 6 ton Daytona jack stands and I only had to put 60 cents toward the gift card to complete the deal.
IMG_4048.jpeg


These new ones have a better foot print, looks to be better built, and has a safety pin as a secondary lock.

They should do good for what I do.
I have an orange pair that look like yours.

How did the recall/ exchange/ credit work if they were not the model listed in the recall? I am not sure mine have any stickers left on them.
 
OP
M

madison069

Well-known member
Joined
Nov 5, 2010
Messages
4,253
Location
Monroeville, PA
I have an orange pair that look like yours.

How did the recall/ exchange/ credit work if they were not the model listed in the recall? I am not sure mine have any stickers left on them.
So when they did the recall, they had specific model numbers that were listed as do not use as they are highly skeptical to failure. But they also listed some models that wasn't really skeptical to failure based on report but if you want to bring them back, they will give you store credit or a refund. Mine fell under the it's not known for failure but can be brought back list and they were the 38847 model. Mine surprisingly still had the stickers on them so the model number was easy to find.

The red model numbers are the 100% stop using due to reported failure models, the black are up to you if you want to bring them in.
harbor freight stands.jpg

Here is the link to the details on them.
 
OP
M

madison069

Well-known member
Joined
Nov 5, 2010
Messages
4,253
Location
Monroeville, PA
I definitely like the new design of those jackstands that have a small footplate at each corner.

For concrete stains, don't know if it will work as well on brake fluid, but it works great so far for the tacky red I got on my pavers. https://www.amazon.com/dp/B0046O5YMA?tag=atomicindus08-20
Same, that little footplate seems to be a better design then just the sheet metal edge.

I'll have to try that stuff on an old oil stain that the tenant left on the concrete driveway by the house.
 
To avoid these ads, REGISTER NOW!
Top Bottom