To avoid these ads, REGISTER NOW!

MP&C Shop Projects

To avoid these ads, REGISTER NOW!
OP
M

MP&C

Well-known member
Joined
Oct 21, 2009
Messages
4,419
Location
Leonardtown, MD
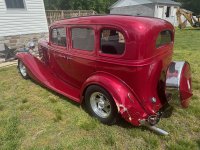
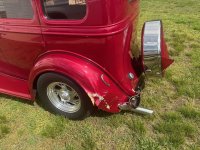
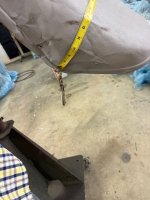
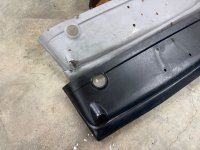
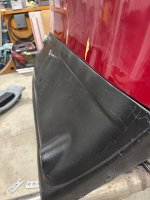
Had an insurance job in the shop, a collaboration with a local collision shop. One of those fancy, old-time looking hearse had a backing up run in with a yellow pole. The mirrors on this thing are on top of fender mounted spare tires, and let's just say they leave a lot to be desired. There is also a backup camera installed in the rear tag frame. So one end of the bumper wrapped slightly around the yellow pole and just barely hit the rear fender. My job was to straighten the rear bumper, which is made from flat polished stainless.


63364b38-181c-451b-a6ee-5b2180cae5be.jpg
(file photo)


f899311e-31d8-4202-b7f0-96158d6771f3.jpg


This close up shows how much the end moved.


819275e3-57bf-4502-a884-3a76a58733ed.jpg


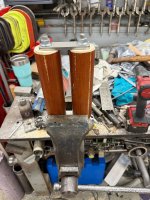
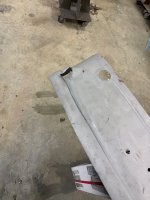
Not having a tree in the yard the right diameter, I opted for some 3" diameter wooden hand rail and some flat strap to make a leverage tool.


43a9b561-c4be-47a7-859f-a3404190c18f.jpg


9de70455-48d2-4cfd-8bdf-3baee136e6d1.jpg


a3aca564-2a5f-4ddf-8175-2c700ef8f854.jpg


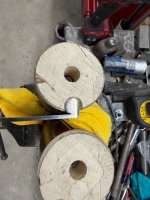
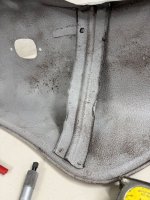
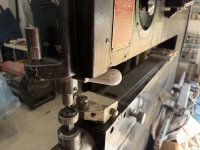
This worked well to remove most of the damage, but the end where the vertical rod is welded still wanted to curl outwards. So our tool was modified to hold the rod end, the other hand rail moved over snug, and this held things sufficient to unwrap the end. The relief cut was added using a rounded router bit..


7908bbb9-0b95-4d55-9a7a-d5c8d7c60ac7.jpg


There was a slight crease by the outer mounting bolt, so a suitable punch was made from a scrap 2x4


a29196ad-5534-4030-a25e-5d41f32b753f.jpg


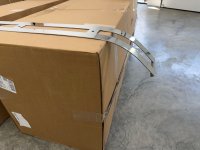
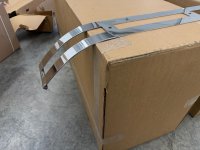
A profile template was cut out of an old shipping box and used to monitor our progress...


a0a0601d-f04b-4dd6-8763-d2a90c89513f.jpg


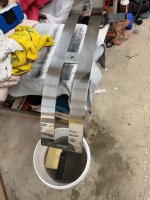
The damaged end was wet sanded up to 2500 grit and polished out on the buffing wheel to remove any trace of the yellow paint and subsequent scratches.


d6c1f40b-d48f-43d1-9846-9f106f57f09e.jpg


At the collision shop, waiting for the hearse to come out of the paint shop...


83c5756a-6513-4618-a628-54901afd8773.jpg


21865e6d-981b-49ce-9c1a-40661ada6afb.jpg


5c81eda0-3946-4188-b750-e37c0b4bb0e9.jpg
 
Last edited:

PugetDude

ALLIANCE MEMBER
Joined
Mar 13, 2013
Messages
22,667
Location
Superstition Mountains, AZ
How would you go about manually bending a 1x3/16” flat steel bar into a hoop with 22.5” inside diameter without a roller? Bbq project for a friend.
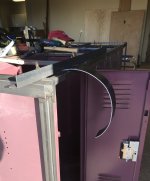
Larry, you can bump a curve that size pretty easy. That is how I did the fenders for the rolling tool bench- 1/8" x4" flat bar. I just clamped a piece of angle to the bench frame and bent it by hand. C4C2BF1D-6C92-477B-84D8-6BCBFB4B70CE.jpegTake your time, and use a radius template to ensure you don't overbend it. I would do it in two halves , calculate the diameter thru the neutral axis and trim each piece to half that length. Allow an extra 4" on each end for the flats that get trimmed off.
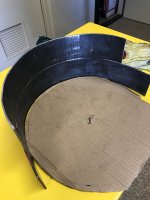
Good luck. Post your progress. 201F5F05-3024-42D8-951D-89B3C9C6B268.jpegSorry for the thread hijack, Robert. We now return to our regularly scheduled excellence.
 
OP
M

MP&C

Well-known member
Joined
Oct 21, 2009
Messages
4,419
Location
Leonardtown, MD
@larry4406 the “leverage” tool that I used to take out the incorrect bends was also used to add the correct ones back in. It’s nowhere near as consistent as a slip roll, but you’re welcome to try it out if you think it would do the trick

Sorry for the thread hijack, Robert….

More insight is a good thing
 

RifleA

New member
Joined
Sep 1, 2012
Messages
2
Location
Southern New Jersey
We went to the show about three years ago, very impressed. Even got in a tour of the plantation while we were there.
Robert, any update on the wagon? Is the milk truck still in the queue?
I‘ve been following this thread for a few years now and have reread it several times, learning something new with each pass, thank you for sharing your incredible skill set. I hope all is well with you and your family.
 
OP
M

MP&C

Well-known member
Joined
Oct 21, 2009
Messages
4,419
Location
Leonardtown, MD
Just to share our collaboration with a local collision shop on the insurance repair job on a 33 Chevy Master sedan, here we see the pitfalls of driving a vintage vehicle amongst the crazies. This car has been owned by the same family for decades. Their family travels twice a year the 3-1/2 hour drive to Ocean City, MD and back. On their last trip they had stopped for a red light, as had the car behind them. The next car back did not. The car in between was totaled, and this one needs a bit of work. One of our local collision shops is on the hook for the paint job/repair and the shop owner reached out to me to do the metalwork.


dced8fc3-a3c0-4817-ab66-6164669e64db.jpg


19f7634a-eacb-494b-bd1c-7473ab984179.jpg


c1205df7-4bfb-4089-b2b0-d2e90efcbf50.jpg
 
OP
M

MP&C

Well-known member
Joined
Oct 21, 2009
Messages
4,419
Location
Leonardtown, MD
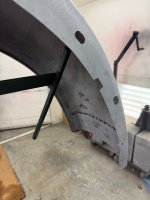
We had the tail pan and two fenders media blasted to get a better view of what we had to work with. Both fenders were bent up, although the drivers side took the brunt of it. There were some previous repairs to the running board attachment area that we'll address while we're here. These pics are after some hammer work to rough out the damage and get a better sense of where to proceed.


3109d90d-ffae-4434-9641-0c1b44bf1751.jpg


d4a41c26-97d2-4f4f-a8d1-7c8bcfcd3557.jpg


cc8f805d-f864-41c2-9509-1a1741d5395e.jpg


a6d0efbb-56a2-4b46-8bcd-45e800963563.jpg


ace637af-6642-4ea7-84a7-647c31fd49ca.jpg


c495a404-4efa-45b9-85ce-73c316ec8d1b.jpg


The fender brace for the passenger side had been hit with a tire chain or perhaps a retread that let go, and the driver's side was in pieces from the collision.


9e332369-b50b-472d-947b-c0195b7a5fc4.jpg


503c6d28-7bc8-4117-8d2d-eb1cab48f38c.jpg


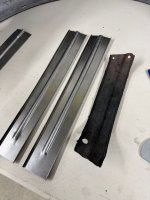
Time to make some parts. Beading dies in the Lennox...


31c8f902-e372-4a4c-8464-4b964630c7c0.jpg


We found it better to run the bead in the flat first and then add the side folds on the press brake, the next pic was a test run.


ab9ef95b-09af-49cd-9356-0787f0bca632.jpg


4bda1747-9691-49dd-a01a-0cb955e1c453.jpg


Where the originals have two bends, we thought a gradual curve that better matched the fender would give us more room for tires. This "roll" calls for a bead roller die in the wheeling machine, and some like sized spacers were used to support the brace across its width.


44de1f33-69c7-4304-ac7b-7aafe8957f96.jpg


ec93f6fb-c38c-4220-9985-6c653883f8e0.jpg


Then the right application of leeverage...


f2fb82d7-309a-43cc-9ced-f0cca42daf4c.jpg


test fit...


1297bc81-1224-42d7-8229-1a16182f4350.jpg


This design shows a bit more tire clearance....


fc95c1df-8629-4029-8dd6-43ebca832e59.jpg


17b29699-5b96-4ef1-80d0-b44843cf0be2.jpg
 
To avoid these ads, REGISTER NOW!
OP
M

MP&C

Well-known member
Joined
Oct 21, 2009
Messages
4,419
Location
Leonardtown, MD
Thanks for the comments!

And here's the benefit of posting pictures online of your work. Ted (tb33anda3rd on the HAMB) had seen pictures of the rear fenders and reached out to see if we needed any other parts. He put me in contact with someone who had an original tail pan. It has a couple of minor repairs, but for 93 years old was pretty straight and solid, much better than the ripped sample we had.


0a0b67f5-ceb1-4897-9727-c839d40fe7f5.jpg


63f53027-10bd-4370-bcc9-cd65e0475908.jpg


The smack in the rear end didn't bode well for the exhaust hangers either, the rubber isolators had ripped


0b41b1f0-20ab-4b43-a3f9-95bc648614ef.jpg


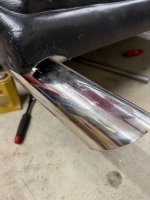
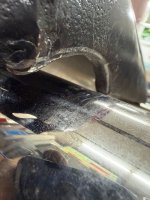
So the hangers were replaced and the tailpipes pulled upward a bit so we could add some relief openings for a more finished appearance.


77b4e2c0-a90e-4b6e-b66a-e1656501c41f.jpg


0ec8428e-93da-4b86-9bba-2f08d106e312.jpg


This "anvil" was fabricated to add the cutouts in the tail pan. The notch provides relief area for the side flanges while hammering the opening.


d480ce19-2b56-46b6-880e-16e5118df76f.jpg


For the long chrome tips, I think this makes it look more finished and less an afterthought.


54b2a323-71b9-43fb-a9fb-6613e3fc0269.jpg


We turned in about 5/16 to add some strength across the opening. Still needs a bit of fine tuning.


a40ce18f-13c1-479a-bac9-00bf15c698b8.jpg
 

Slednut

Well-known member
Joined
Dec 20, 2012
Messages
2,561
Location
Washington state
Thanks for the comments!

And here's the benefit of posting pictures online of your work. Ted (tb33anda3rd on the HAMB) had seen pictures of the rear fenders and reached out to see if we needed any other parts. He put me in contact with someone who had an original tail pan. It has a couple of minor repairs, but for 93 years old was pretty straight and solid, much better than the ripped sample we had.


0a0b67f5-ceb1-4897-9727-c839d40fe7f5.jpg


63f53027-10bd-4370-bcc9-cd65e0475908.jpg


The smack in the rear end didn't bode well for the exhaust hangers either, the rubber isolators had ripped


0b41b1f0-20ab-4b43-a3f9-95bc648614ef.jpg


So the hangers were replaced and the tailpipes pulled upward a bit so we could add some relief openings for a more finished appearance.


77b4e2c0-a90e-4b6e-b66a-e1656501c41f.jpg


0ec8428e-93da-4b86-9bba-2f08d106e312.jpg


This "anvil" was fabricated to add the cutouts in the tail pan. The notch provides relief area for the side flanges while hammering the opening.


d480ce19-2b56-46b6-880e-16e5118df76f.jpg


For the long chrome tips, I think this makes it look more finished and less an afterthought.


54b2a323-71b9-43fb-a9fb-6613e3fc0269.jpg


We turned in about 5/16 to add some strength across the opening. Still needs a bit of fine tuning.


a40ce18f-13c1-479a-bac9-00bf15c698b8.jpg
Looks great, I weld a piece of rod stock to bend the sheet metal around.

IMG_4585.jpeg
 

zmotorsports

ALLIANCE MEMBER
Joined
Oct 20, 2009
Messages
21,629
Location
Northern Utah
Great job on the repair Robert.

These two pictures are what kind of drove me away from the custom car scene in our local area in the early 2000's. I saw so many people slathering body filler over this type of swiss cheese, prepping and painting them and people bragging about the low cost they had the work done. It was hard to compete with that kind of **** workmanship in terms of pricing and I wouldn't lower my standards or cut my quotes to match as people wouldn't pay the higher price to cut out corrosion and poor work and replace properly.

I got so tired of justifying my pricing to people who really had no idea what quality work was that I just walked away. I told myself that when building sand rails and quads there was nowhere to hide such piss poor workmanship and with your work right out in the open for the whole world to see it would help to showcase my work at a higher level. Not sure it worked out the way I wanted it to as I then got tired of those clients and walked away from doing any work on powersports at all. :unsure:

Now all I want to do is get to retirement so I can build a few more cars while I'm above ground. :headscrat


We had the tail pan and two fenders media blasted to get a better view of what we had to work with. Both fenders were bent up, although the drivers side took the brunt of it. There were some previous repairs to the running board attachment area that we'll address while we're here. These pics are after some hammer work to rough out the damage and get a better sense of where to proceed.
d4a41c26-97d2-4f4f-a8d1-7c8bcfcd3557.jpg


cc8f805d-f864-41c2-9509-1a1741d5395e.jpg
 

SilverJimmy

Well-known member
Joined
Apr 14, 2012
Messages
1,781
Location
Prescott/Flagstaff, AZ
As I sit here reading this and enjoying my coffee on a nice Saturday morning I am so grateful and blessed that I was able to retire when I was 57 years old. And it really is Saturday as far as I can tell cuz I don’t HAVE to work today or tomorrow. But I am getting ready to go out by my shop and start sanding all the used pallet racking I want to put up into my shop and then I’m going to attempt my first non rattle can paint job.
I picked up a couple HF purple HVLP guns the last time they were on sale and I’ve got a gallon of RustOleum primer and satin black to try to squirt. Hopefully I won’t hang too many curtains on the racking! And I’m definitely open to any and all tips, pointers, and the best advice of “don’t do this”! I’ve seen this process thousands of times but have never tried it myself, please wish me luck, I’ll need it!
 
OP
M

MP&C

Well-known member
Joined
Oct 21, 2009
Messages
4,419
Location
Leonardtown, MD
Looking back through my thread here, it looks like I was remiss in chronicling the latest cross-country trip from Oregon. I've talked to a few of you guys about our ventures in Oregon, but basically we've been flying back and forth for well over a year now to tend to my father-in-law, who had been diagnosed with dementia. He is a combat wounded Vietnam veteran, and although there is a local VA hospital, they do not have the doctors needed for such care. It turned into a real shtshow with the state of Oregon, they had made him a ward of the state and inserted a court appointed guardian, when they legally should have reached out for his next of kin (daughter) first. After all this, it took about 18 months of court battles to get them to transfer guardianship to his own daughter. The state appointed guardian basically had a license to steal for all that time. Some examples, she had researched getting him a new stove for his kitchen as they no longer felt a gas stove was safe for him. In all that time, she has numerous entries of "researching kitchen stove" that in total amounted to about $7500 of research that never did produce a purchase. The newest vehicle he had disappeared, and the guardian never would tell my wife where it went. "Talk to my attorney" was always her response. All said and done, we found it had been "sold" to the guardian's son for about 25% of her stated value, and these funds never were put into his account. Yes, Grand theft auto by a court appointed thief. Some of the 24-7 caregivers that the guardian had hired helped themselves to silver coins and anything else of value. We were late to the party, much of it had been stolen before we got there. I took numerous videos in his woodshop to document what was there, and as it appeared I was the only one cutting grass (monthly basis), I took the tractor keys with me to ensure that wasn't sold when we returned. He had a hand built vintage style speed boat in his shop but we felt safe that it wouldn't disappear as he had built walls around it. We finally got guardianship transferred and was able to get him moved to Maryland. Then the trips could be more focused into cleaning up and selling the house and bringing home any of his personal items that we wanted to keep. He did have a 1999 Ford Ranger pickup, and I had been driving it anytime we visited to check for any maintenance/repairs needed prior to a cross-country venture. I had done a brake job, new front wheel bearings, new serpentine belt, wiper blades, etc. The front tires looked good, but the backs were older and a mismatch, so we installed two new rear tires. The oil had recently been changed, so I left that. But it seemed every time I would run an errand, there was an oil sheen on the driveway when it was damp (this was the mountains of Oregon, after all) and the level would be low. I checked all the typical valve cover and oil pan bolts, and all were snug. Everything seemed to focus on the driver's side of the engine as a source and there I am staring at this brand-new oil filter someone had installed. On a whim I gave it a turn. As it were, it took 1-1/2 turns for it to snug. Subsequent errands, including a 6 hour round trip for a FBMP used topper (for packing more stuff), saw no change in oil level, so I now felt safe that it would make the trip. It's a Ford FN Ranger, what could go wrong?
 
OP
M

MP&C

Well-known member
Joined
Oct 21, 2009
Messages
4,419
Location
Leonardtown, MD
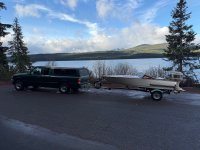
March 25, 2026, o-dark thirty. It had snowed the morning prior. (these are the mountains of Oregon, after all) The mountain pass between Eugene and Bend had the roads in real good shape, and the Ranger downshifts well. Here's a picture moment by the Williamette River just as the sun was coming up in the sky.

71da8e70-6902-4875-9185-acff43f963a9.jpg


...and a quick stop by Odell Lake.


a5ec0fd2-30cb-45e9-8231-36709ac32fad.jpg


My shortcut around Bend was a near mistake, it bypassed all of the gas stations I just knew I would pass. It's a long ways from Bend to Riley, and I had been under "E" for about fifteen minutes when I pulled into the Sinclair pumps at the Riley store. For a truck with a 19-gallon capacity, and me filling it with about 19-1/2, I think I was on the verge of pushing.

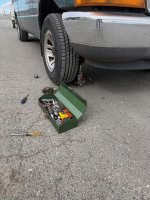
I had serviced the trailer bearings and the hub felt cool to the touch. Since I had replaced the front wheel bearings, I decided to give the front tires a quick shake. And they now seemed a bit loose. Time for some parking lot maintenance. Good thing for center caps.


9e3dd763-d2e5-4f79-8a2d-fcdbf55b4f96.jpg


95137d35-67ce-4826-ac87-f62523e4c217.jpg


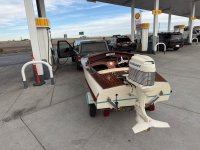
Next fuel stop in Idaho, it seems every time we pull into a gas station, the phone/cameras come out. "Can I take a picture of the boat?" Sure!!


528e0836-de30-40ee-b36a-025d0d56c76b.jpg


Last edited:
OP
M

MP&C

Well-known member
Joined
Oct 21, 2009
Messages
4,419
Location
Leonardtown, MD
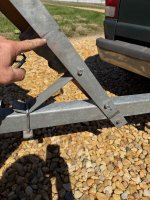
Note the above picture of the boat shows no license plate. The boat and trailer were titled in Washington state. They have a law specifically for small trailers "like boat trailers" that are under 2K lbs are exempt from requiring a tag. So let's see how that works for three days. I was rolling into Mike's neighborhood, SLC, around 9-9:30 that first night. Two trips in two years and he still goes out of town/works anytime I come through. :ROFLMAO: I'll have to plan better for the next trip two years from now. The long days drive had filled the windshield up nicely with dead bug remains, it was dark, and now it started raining. Rain-x was working, so rather than risk the big smear, I left the wipers off. Soon after heading east from the I-15/84 split, I ran over something in the road. Didn't see anything, even with no wipers I swore I never saw anything. There was a rest stop with a mile, so I pulled in to survey the situation. A walkaround of the truck showed absolutely nothing, no damage to the grill, radiator, tires all intact. Walking to the back of the trailer, I noticed the passenger fender was missing. These pictures were taken after the fact due to darkness, rain, etc, but the solution at this point was to remove said fender to keep things out of the tire.

0b6f9e3f-a811-4c6d-bb63-f84407b6c377.jpg


The rest of Utah and Wyoming was rather uneventful, comparatively, and I made it to a rest stop just shy of Nebraska to catch a few winks.

Weather forecast for Nebraska on Thursday. High winds (~40mph out of the north) and clear skies. The boat and trailer didn't care for it, and I got a good upper body workout driving through that. At my next fuel stop, I noticed the winds had taken their toll on the drivers side trailer fender. We had left Oregon with an ever so slight crack, and the high winds had split it nicely where it had been rubbing the tire. Time to remove another fender.


a386420f-41e6-4244-bde8-5b60aa6ce421.jpg


Looking at the tire rub, I thought I may need to change and use the spare and then I found it. Or didn't. I found what I had run over.


83fc8e79-3de6-482c-a08f-2262ca6c3f11.jpg


This had been installed using a 3/8 stud. One 3/8 stud. I think all the potholes around SLC had taken their toll on the mounting stud, severed it clean off, and that's what I ran over and took out the first fender. Doing a further inspection, the bracket holding the drivers carpeted support runner had shifted downward (more 3/8 bolts) again, potholes. Now I was risking tires into the bottom of the boat. I had planned a repeat stop in Hastings at the worldwide headquarters of Imperial Wheeling Machines, so I called up Pat and asked if we could do boat repairs this year. (two years ago was oil leak fixes) He directed me to the local Tractor Supply; I got two new trailer wheels/tires and some 1/2" bolts to help keep those brackets from moving again. We backed the trailer into his shop and made the needed repairs, oversizing the frame holes to 1/2" to match the slots. 3/8 bolts in 1/2" slots, not a good combination.


5151bd18-f645-440d-8fb0-559628bd2936.jpg


He had some family stuff going on that afternoon, and left me with the shop keys, his shop had a shower and a place to take a nap. I cleaned up, napped, and woke up a few hours later and hit the road again. No sightseeing in between here and Memphis, we're taking an alternate route home this trip.
 
Last edited:
OP
M

MP&C

Well-known member
Joined
Oct 21, 2009
Messages
4,419
Location
Leonardtown, MD
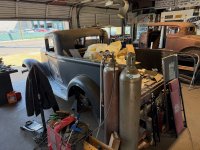
Friday, Our next planned stop, Steel Rose Metal Co. in Memphis TN.


b1c36421-911a-4265-9b3e-cb2be3c447cf.jpg


5546002d-68fe-48c0-b85e-94365e30aacb.jpg


2d4347f5-0961-47ca-932e-b983b311b373.jpg


fea5e49c-c941-4a62-951e-242bb5be7071.jpg


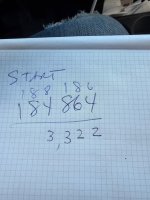
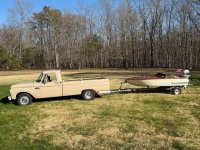
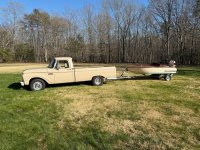
Talked shop with the owner Mike for a bit, I had last seen him at a metal shaping workshop in Belfast TN about three years back. Back on the road, stopped overnight in TN and got back on the road again in the morning. The rest of the trip was rather uneventful, thankfully. Made it home on Saturday and a good friend (Mike) came over to look at the boat and ended up helping me to wash off the 3 days of road grime so I could take it to Cars and Coffee the next day. So of course, we had to test fit it to the tow vehicle. This trip was 6 am Wednesday to about noon on Saturday, or about 3 days and 3 hours time. AND on top of that, never once did I have to add any oil. 3322 miles cross country and the oil level was still full. Believe what you hear about those Ford FN Rangers.


66_0396q.jpg


2fb7141c-4156-47f9-9f11-db894f5271ea.jpg


be0cf325-c635-4e1c-a7ef-6a4bf2a9bfd7.jpg


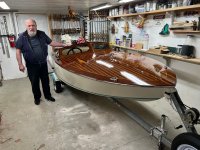
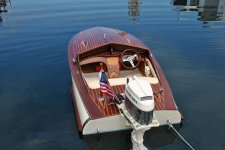
From what we can gather by the documentation he had, this was built in the early 2000's based on plans from a 1951 issue of Popular Mechanics. The Mercury on back is a 1959 and was rebuilt before it was installed. So everything is based on 1950's styling.


c26566a5-c602-4866-8d1b-298ed5e4381f.jpg


Looking back, here's a picture of my father-in-law (another Mike) that I took last fall in his shop


d19595bd-0a4b-4ff4-98d5-c74089cc9c94.jpg


Looking back even farther, pictures of the last time he had it in the water in the Port Angeles Harbor in Washington state.


4385b628-0686-4ec7-a843-43d09e6de065.jpg


c99bdfa8-5e0e-40ea-9cef-c69285fe10c6.jpg


42ed12b7-f387-4a74-b7a7-511f0db18e3c.jpg
 
Last edited:
To avoid these ads, REGISTER NOW!
Top Bottom