
You are using an out of date browser. It may not display this or other websites correctly.
You should upgrade or use an alternative browser.
You should upgrade or use an alternative browser.
Show us your welding projects
- Thread starter neonnblack
- Start date


jblnut
ALLIANCE MEMBER
It was time to put a mailbox outside the shop so people could leave stuff in there for me when I’m not home. I built it so it was portable-ish. Everything below the mailbox is solid stuff. It’s got some decent gravity and shouldn’t blow over.

zimman
Well-known member
Why do you have a Subaru badge on a Volkswagen? Just asking.
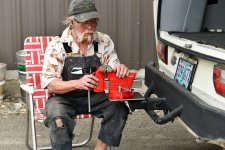
Making an accessory for the Brick--my new Vanagon--that won't make it go any faster or run better. I didn't intend to do a triple-pass weld, but I forgot to turn the heat up on the old Sparky, so pretty much it was either that or grind out all the original weld.
Looks kinda' low--but I'm lazy, so
About perfect! The vise is attached with captive nuts and wingbolts, because--I may have mentioned this--I'm lazy and carrying it as two pieces--not to mention stowing it--is much easier. Work smarter, not harder!
It's getting a couple of coats of Rusto Gloss Black right now, then into the oven--if it fits.


Zim
Old Man Roger
Well-known member
Read his screen name. 
PugetDude
ALLIANCE MEMBER
Because he read somewhere that Honda quality is going downhill?Why do you have a Subaru badge on a Volkswagen? Just asking.
Zim
Beerhippie
Well-known member
Because there's a Subaru EJ25 engine behind the badge.Why do you have a Subaru badge on a Volkswagen? Just asking.
Zim
larry4406
Well-known member
Why do you have a Subaru badge on a Volkswagen? Just asking.
Zim
Yes his van had a *** change.Because there's a Subaru EJ25 engine behind the badge.
zimman
Well-known member
Does he do rescue animals also? LOLYes his van had a *** change.
Zim
Beerhippie
Well-known member
Not real sure what this means.Yes his van had a *** change.
Having the EJ25 means 165 hp and 155 ftlb of torque, vs. 85 hp and 90 ftlb. (both optimistic) of the largest stock engine VW put in these (2.1 L Wasserboxer).
Maintenance-wise, it apples and oranges. The Suby engine is actually a modern engine, with OBDII and all. Since it's still a DO four, it feels and sounds like a hot-rodded VW.
Last edited:
Old Man Roger
Well-known member
And beer.
Beerhippie
Well-known member
Siempre, 'migo!And beer.
aka Larry
Well-known member
Cross post from the RV thread:
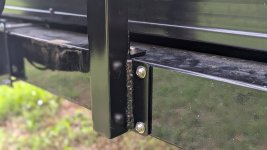
The wife told me she wanted a rack to hang wet items to dry like swimsuits, towels, etc. I'd never seen one, but figured I could come up with something, and I built this.
The vertical mast is 1-1/2" square steel tubing that I welded to a 1/8" thk x 4" square plate. I installed stainless-steel rivet nuts into the bumper and attached it with (5) 1/4"-20 stainless-steel bolts.
The (4) horizontal arms are 1" square aluminum tubing, covered with pipe insulation. The arms are bolted to (8) tabs I welded onto the mast. These arms stayed locked into place during transport via M8 stainless-steel sping-loaded pull pins.
I spent more than I needed to because I used all stainless hardware, and had steel plate and mounting tabs laser-cut by SendCutSend.com, but everything fit perfectly, so it was worth it IMO. Bottom line is she was very happy with it. We're headed to the beach this weekend for the A250 celebration so we'll get to test it out soon enough.
Here are the pics:



The wife told me she wanted a rack to hang wet items to dry like swimsuits, towels, etc. I'd never seen one, but figured I could come up with something, and I built this.
The vertical mast is 1-1/2" square steel tubing that I welded to a 1/8" thk x 4" square plate. I installed stainless-steel rivet nuts into the bumper and attached it with (5) 1/4"-20 stainless-steel bolts.
The (4) horizontal arms are 1" square aluminum tubing, covered with pipe insulation. The arms are bolted to (8) tabs I welded onto the mast. These arms stayed locked into place during transport via M8 stainless-steel sping-loaded pull pins.
I spent more than I needed to because I used all stainless hardware, and had steel plate and mounting tabs laser-cut by SendCutSend.com, but everything fit perfectly, so it was worth it IMO. Bottom line is she was very happy with it. We're headed to the beach this weekend for the A250 celebration so we'll get to test it out soon enough.
Here are the pics:
Last edited:
jblnut
ALLIANCE MEMBER
Quick little fix on my Robo Rock Bucket. One of the roundy bands has cracked from having rocks beat the snot out of it for 50+ hrs each spring and fall and must have said “enough!!”

I glued a piece of scrap on, smacked it with a hammer and said “that ain’t going anywhere”. So it’ll last forever now.

I glued a piece of scrap on, smacked it with a hammer and said “that ain’t going anywhere”. So it’ll last forever now.
pancholasvegas
Well-known member
- Joined
- Nov 6, 2017
- Messages
- 265
Don’t laugh fellas - I’ve had this old space heater I nabbed out of the scrap for a little while now, as it had some handy looking shapes and whatnot.
Got a new daughter so that means a new pedal car -
Got what I wanted out of the space heater, scribed some lines and cut the holes. Got the first one in.
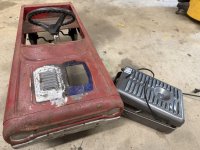
Trimmed up the other side and in she went.
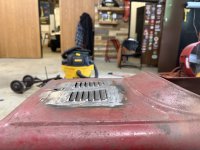
Gotta let those piggies breathe! Ended up using the TIG on the second side, much preferred over the MIG. Wanted to use this as an excuse to get the settings somewhat dialed in - the louvers mic’d out somewhere between 26 and 24 gauge and the pedal car is about 19 or 20 gauge depending on where it’s moved around.
Got a new daughter so that means a new pedal car -
Got what I wanted out of the space heater, scribed some lines and cut the holes. Got the first one in.
Trimmed up the other side and in she went.
Gotta let those piggies breathe! Ended up using the TIG on the second side, much preferred over the MIG. Wanted to use this as an excuse to get the settings somewhat dialed in - the louvers mic’d out somewhere between 26 and 24 gauge and the pedal car is about 19 or 20 gauge depending on where it’s moved around.
Terra Nova
Well-known member
Wrapped up a project that’s been on the back burner for a while.
Garden bench for the Mrs. Made of 2x2 square tube and composite decking.
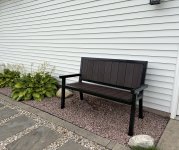
Garden bench for the Mrs. Made of 2x2 square tube and composite decking.
WoodsTruck
Well-known member
- Joined
- Jan 12, 2013
- Messages
- 1,039
Paint or powdercoat?Wrapped up a project that’s been on the back burner for a while.
Garden bench for the Mrs. Made of 2x2 square tube and composite decking.
Terra Nova
Well-known member
Paint or powdercoat?
The bare frame ended up sitting outside over the winter so it had a nice layer of surface rust unfortunately. Which fortunately is perfect for POR15. Added their chassis black topcoat over that. Should be plenty durable to sit out in the elements. We will see.
Old Man Roger
Well-known member
Love it.Don’t laugh fellas - I’ve had this old space heater I nabbed out of the scrap for a little while now, as it had some handy looking shapes and whatnot.
Got a new daughter so that means a new pedal car -
Got what I wanted out of the space heater, scribed some lines and cut the holes. Got the first one in.
Trimmed up the other side and in she went.
Gotta let those piggies breathe! Ended up using the TIG on the second side, much preferred over the MIG. Wanted to use this as an excuse to get the settings somewhat dialed in - the louvers mic’d out somewhere between 26 and 24 gauge and the pedal car is about 19 or 20 gauge depending on where it’s moved around.
jblnut
ALLIANCE MEMBER
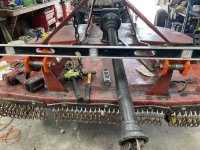
The combine is in the shop undergoing some repairs that’ll likely add up to more than the value of the fixed up machine but it’s what I have and I don’t intend to get rid of it anytime soon. We decided this plate was worth rebuilding so it got removed and plated with some 304SS.
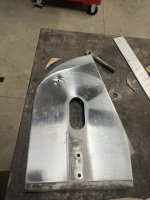
Pops getting after it with the grinder smoothing things out so nothing catches on the way by.

He reinstalled it before I could get a decent picture but it’s done and back in place. One thing done, probably 268 more to do

Pops getting after it with the grinder smoothing things out so nothing catches on the way by.
He reinstalled it before I could get a decent picture but it’s done and back in place. One thing done, probably 268 more to do
notenuftoys
Active member

kaymccampbell
Well-known member
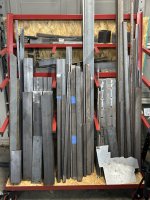
You gonna put some tin over the plywood to keep it from smoldering or worse?First project in a little while. This is the base for a metal storage cart. I'll use 3/4" plywood inside the angle to save some money and it will have casters so I can move it around my garage space as needed.
notenuftoys
Active member
It's just to store some metal, won't have any heat on it. Here's the completed cart.You gonna put some tin over the plywood to keep it from smoldering or worse?
Attachments

kaymccampbell
Well-known member
I have a cart in the metal shop that has a plywood shelf. A big flying blob found it's way across the shop and lit the shelf on fire. I also had a wicked spray of grinder sparks and chunks fly 25 feet and light it again. I wrapped it in tin. No more flames or smoke.It's just to store some metal, won't have any heat on it. Here's the completed cart.
danski0224
Well-known member
Yup.I have a cart in the metal shop that has a plywood shelf. A big flying blob found it's way across the shop and lit the shelf on fire. I also had a wicked spray of grinder sparks and chunks fly 25 feet and light it again. I wrapped it in tin. No more flames or smoke.
Many burn permits on jobs I have been on call for a 30 foot radius to be clear of combustibles and/or covered with welding blankets.
Recently had a welding ember cause some smoldering and multiple weeks of delays.
That plain wood either needs to be flameproof or replaced with metal.