To avoid these ads, REGISTER NOW!

CM Block Grinder bearing replacement - 3 meathods

torqueman2002

Well-known member
Joined
Jun 3, 2009
Messages
6,138
Location
SE Michigan
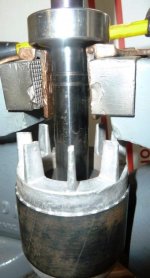
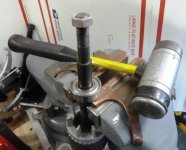
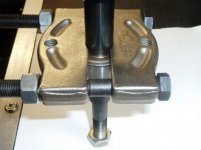
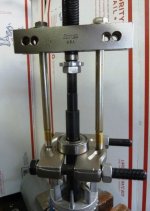
CM Block Grinder bearing replacement - 3 methods

This thread shows 3 ways to remove, and 1 way to install bearings on a grinder arbor/shaft.

Feel free to comment and add other ideas.

I chose to place this thread in the Vintage Tool Discussion section, because I am more active here than the other sections; but, the methods can be used on newer grinders.

While this may seem basic to some readers, the question is asked on the 'let's see your craftsman block grinders' thread from time to time. http://www.garagejournal.com/forum/showthread.php?t=157794

It is an active thread with close to 8,600 posts currently.

So, to make finding answers, resources, suppliers, etc .... quicker/easier, I started 'Craftsman Block motor Bench Grinders - What's the Fuss (with resource information)' thread. http://www.garagejournal.com/forum/showthread.php?t=249539

This thread will be/is placed in the above threads.

3 styles of bearings, you may encounter. (L to R; Open, Shielded, Sealed)
attachment.php


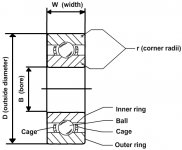
Cross-sectional views.
attachment.php


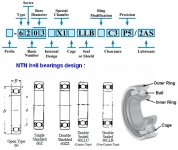
NTN brand designations.
attachment.php


NTN brand numbering guide.
attachment.php


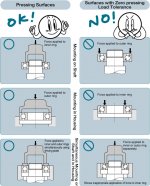
Pressing surfaces guide.

attachment.php


Bearing Cross Reference (NTN Website)
http://www.ntnamericas.com/en/


For additional information and resources, see: http://www.garagejournal.com/forum/showpost.php?p=5657009&postcount=73

Bearing Removal - begins on page 2.
 

Attachments

  • Bearings Open Shielded Sealed .jpg
    Bearings Open Shielded Sealed .jpg
    114.4 KB · Views: 529
  • Bearing Cross Section a.jpg
    Bearing Cross Section a.jpg
    62.3 KB · Views: 521
  • Cross Section Bearings Open Shielded Sealed.jpg
    Cross Section Bearings Open Shielded Sealed.jpg
    71 KB · Views: 522
  • NTN Ball Bearing Numbering Guide a.jpg
    NTN Ball Bearing Numbering Guide a.jpg
    81.3 KB · Views: 511
  • Pressing Guide.jpg
    Pressing Guide.jpg
    144.7 KB · Views: 524
Last edited:
To avoid these ads, REGISTER NOW!
OP
T

torqueman2002

Well-known member
Joined
Jun 3, 2009
Messages
6,138
Location
SE Michigan
Bearing Removal

Often, the bearings will remain on the shaft after the grinder is disassembled.

This can be for a number of reasons, some are listed below.

  • tighter interference fit to shaft than housing bore
  • bearing and shaft are seized due to rust
  • damage, debris, nicks, ... on the shaft

Before attempting bearing removal, inspect and correct for the last 2 above conditions. It is important the shaft surface be smooth, to allow the bearing bore to slide over the shaft during bearing removal.
On occasion I have used a fine file and/or emery cloth to 'polish' the arbor shaft surface.

Note: These methods apply to CM Block grinders with start-up relays. For grinders with start-up centrifugal switch, care must be taken to first disconnect and remove the
centrifugal switch before the arbor/shaft/bearing assembly is removed.

Note: The following Methods 1 - 3, are demonstrated on a CM 1/3-HP m-397.19580 Block grinder.


Method 1 - Soft faced hammer and vise. (my personal least favorite)

Important - To avoid damage to the rotor/shaft, use soft faced covers for the vise jaws. ie - copper, wood, plastic, ...

1) Install the rotor/bearing assembly in the vise, DO NOT tighten the vise jaws onto the arbor/shaft.

Note: To avoid damage to the arbor/shaft/threads, leave the shaft nut installed, with the shaft threads BELOW the top of the nut, not as pictured below.
attachment.php


2) Support the bearing/shaft assembly on the vise jaws, with the jaws as close to the bearing inner bore as possible. DO NOT tighten the jaws, the assembly should be free to move downward in the following steps.
attachment.php


3) Insure the 'lower' part of the arbor/shaft/bearing assembly is free of any obstructions.
attachment.php


4) Using the soft-faced hammer, hit the shaft nut, driving the arbor/shaft downward and away from the bearing.
attachment.php


Bearing Removal - Method 2, begins on the next page.
 

Attachments

  • Fi P1110389.JPG
    Fi P1110389.JPG
    136.8 KB · Views: 457
  • Fi P1110387.jpg
    Fi P1110387.jpg
    70.7 KB · Views: 455
  • Fi P1110386.jpg
    Fi P1110386.jpg
    52.5 KB · Views: 465
Last edited:
OP
T

torqueman2002

Well-known member
Joined
Jun 3, 2009
Messages
6,138
Location
SE Michigan
Bearing Removal, continued. Note: Before attempting bearing removal, insure the shaft surface is smooth, allowing the bearing bore to slide over the shaft during bearing removal.


Method 2
- Bearing Splitter and Puller with Moveable Jaws

Note: The pictures in Methods 1 - 3, are demonstrated on a CM 1/3-HP m-397.19580 Block grinder.

1) Install a bearing splitter as close to the arbor/shaft as possible, while allowing the shaft to move.
attachment.php


Either mounting method will work. The above ^^ method seems to support the bearing bore more.
attachment.php


2) Install the splitter/shaft/bearing assembly in the vise with soft jaw protectors and lightly tighten the vise to hold the assembly for the next steps.

Note: To avoid damage to the arbor/shaft/threads, leave the shaft nut installed, with the shaft threads BELOW the top of the nut.
attachment.php


3) Install the puller onto the splitter/shaft/bearing assembly.
attachment.php


4) Insure the arbor/shaft threads are protected with the shaft nut and if needed a washer.
attachment.php


attachment.php


5) Use the puller to draw the bearing 'up' the arbor/shaft, freeing the bearing from the arbor/shaft.
attachment.php


Bearing Removal - Method 3, begins on the next page.
 

Attachments

  • Fi P1110394.JPG
    Fi P1110394.JPG
    136 KB · Views: 432
  • Fi P1110378.jpg
    Fi P1110378.jpg
    52.2 KB · Views: 432
  • Fi P1110379.jpg
    Fi P1110379.jpg
    71 KB · Views: 448
  • Fi P1110375.JPG
    Fi P1110375.JPG
    130.5 KB · Views: 444
  • Fi P1110377.jpg
    Fi P1110377.jpg
    51.1 KB · Views: 443
  • Fi P1110390.JPG
    Fi P1110390.JPG
    120.3 KB · Views: 450
Last edited:
OP
T

torqueman2002

Well-known member
Joined
Jun 3, 2009
Messages
6,138
Location
SE Michigan
Bearing Removal, continued.Before attempting bearing removal, insure the shaft surface is smooth, allowing the bearing bore to slide over the shaft during bearing removal.

Method 3
- Bearing Splitter and Puller with Fixed Bar and Bolts.

1) Install a bearing splitter as close to the arbor/shaft as possible, while allowing the shaft to move.
attachment.php


Either mounting method will work. The above ^^ method seems to support the bearing bore more.
attachment.php


2) Install the splitter/shaft/bearing assembly in the vise with soft jaw protectors and lightly tighten the vise to hold the assembly for the next steps.

Note: To avoid damage to the arbor/shaft/threads, leave the shaft nut installed, with the shaft threads BELOW the top of the nut.
attachment.php


3) Install the puller onto the splitter/shaft/bearing assembly.
attachment.php


4) Insure the arbor/shaft threads are protected with the shaft nut and if needed a washer.
attachment.php


attachment.php


5) Use the puller to draw the bearing 'up' the arbor/shaft, freeing the bearing from the arbor/shaft.
attachment.php


Method 3.1 - Presses.


I've seen a number of bearing replacements that use correct sized sockets/pipes and a press - arbor/hydraulic.

Presses and pullers use even force that are gentle on the bearing assemblies.


The key is to find the correct socket/pipe diameter and length to fit on the race and over the shaft - in the case of Block bearings.


Bearing Install - "Fire & Ice", begins on the next page.
 

Attachments

  • Fi P1110394.JPG
    Fi P1110394.JPG
    136 KB · Views: 428
  • Fi P1110398.jpg
    Fi P1110398.jpg
    50.2 KB · Views: 424
  • Fi P1110397.jpg
    Fi P1110397.jpg
    79 KB · Views: 436
  • Fi P1110375.JPG
    Fi P1110375.JPG
    130.5 KB · Views: 428
  • Fi P1110377.jpg
    Fi P1110377.jpg
    51.1 KB · Views: 429
  • Fi P1110390.JPG
    Fi P1110390.JPG
    120.3 KB · Views: 426
Last edited:
OP
T

torqueman2002

Well-known member
Joined
Jun 3, 2009
Messages
6,138
Location
SE Michigan
Bearing Install - "Fire & Ice"

I have used vise jaws, an arbor press, and a brass punch to install bearings on grinder arbor/shafts.

But after 'discovering' this "Fire & Ice" method, it is the only way I install bearings.


Note: Before attempting bearing install, insure the shaft surface is smooth, allowing the bearing bore to slide over the shaft during bearing install.

1) Place the rotor/arbor/shaft in the freezer until the rotor reaches about 25F.

2) Warm the replacement bearings to about 135F. A coffee mug warmer is shown below.
attachment.php


attachment.php


3) Install and lightly secure the 'frozen' rotor in a vise with soft jaws.
attachment.php


attachment.php


4) Install warm bearing onto cold rotor/arbor/shaft. The bearing usually 'falls' right into place against the arbor/shaft shoulder.

5) Assure the bearing inner bore is fully seated against the arbor/shaft shoulder.

Note: If the bearing is not fully seated against the shaft shoulder, use a soft metal (brass) drift and hammer to lightly tap on the inner bore, until the bearing is 'home'.
attachment.php


attachment.php


The above original bearings that were removed were:
NDH 77503 | ID=17mm | OD=40mm | W=12mm
Replacement bearings NTN 6203ZZC3.
http://bearingfinder.ntnamericas.co...ow-radial-ball-bearings?itemids=130253+130486


Edit - June 05, 2016.

Bearing Install - "The Steam Bath method."

I stumbled upon another way to heat-expand a bearing for installation.

Wrap the bearing in a damp towel and pop it into the microwave for about 1:30 min/sec.


Thanks for looking.
:)
 

Attachments

  • Fi P1110426.jpg
    Fi P1110426.jpg
    57.3 KB · Views: 425
  • Fi P1110425.jpg
    Fi P1110425.jpg
    56.4 KB · Views: 432
  • Fi P1110427.jpg
    Fi P1110427.jpg
    54.9 KB · Views: 427
  • Fi P1110424.jpg
    Fi P1110424.jpg
    63.5 KB · Views: 425
  • Fi P1110429.JPG
    Fi P1110429.JPG
    75.9 KB · Views: 423
  • Fi P1110431.JPG
    Fi P1110431.JPG
    67.5 KB · Views: 429
Last edited:
To avoid these ads, REGISTER NOW!

ex_nihilo

Well-known member
Joined
Mar 28, 2018
Messages
101
Location
Texas
Very helpful thread. The fire and ice was awesome. Since I don't have a coffee warmer I just put them on a skillet on the stove-top at its lowest setting. It worked great!
 
To avoid these ads, REGISTER NOW!
Top Bottom