To avoid these ads, REGISTER NOW!

Craftsman Drill Press

OP
F

FrankLee

Well-known member
Joined
Sep 13, 2010
Messages
3,546
Location
seMI, 48317
Yes, there is some noticeable movement.
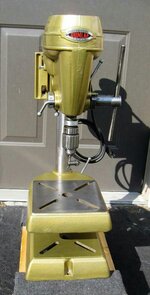
It looks like new sleeve bearings are in order. Or possibly the quill is loose in the head frame.


I have not had a chance to remove belts to try to isolate where the knocking noise is coming from, but this bothers me. The middle multi-speed pulley is touching the pulley support.

I noticed that the belts are out of alignment and the front belt is narrower (3/8"?) than the rear belt. The noise could be the seam of the narrow belt contacting the MSA.

That seems to be a common issue with the multi-speed attachment. See this post:
http://www.garagejournal.com/forum/showthread.php?p=4870269&post4870269
I don't believe that Craftsman had sold an MSA for a column that size. I think that one was modified to fit a 1-7/8" OD column.

It is a belt tension pulley that is not touching the belt. It looks like if I lowered the front belt to the bottom of the front spindle pulley it would engage.
Hmmm. It possibly was made to accommodate the customized MSA base and the shorter span to the spindle pulley.
 
Last edited:
To avoid these ads, REGISTER NOW!

ricshaw

Member
Joined
Sep 4, 2016
Messages
8
I don't believe that Craftsman had sold an MSA for a column that size. I think that one was modified to fit a 1-7/8" OD column.

Here is a better look:

drill_2096_zpsdu1loarn.jpg


drill_2098_zpsokeyhkc4.jpg


drill_2097_zps1sfozx6g.jpg


Pretty good job if a modified one.

I bought a green Accu-Link adjustable link belt from HF.

I want to flip the motor belt pulley over (if I can figure out how to get it off) and run it without the MSA to see if the knocking noise improves.
 

ricshaw

Member
Joined
Sep 4, 2016
Messages
8
I want to replace the electrical power cord and toggle switch to the motor.

drill_2100_zpsnoni0gt0.jpg


When I removed the motor, I found what you predicted, cracked wire insulation and exposed bare wire.

drill_2094a_zpsmaw5tade.jpg


I have a motor electrical question:
Can I skip connecting the new electrical cord wires to the red and white wires shown above (red arrow) and connect the cord black and white wires to the terminals shown below?

drill_2095a_zps89se24v6.jpg


Or do the wires connected to the terminal go someplace I do not know about? I would hate to fry the motor!
 
OP
F

FrankLee

Well-known member
Joined
Sep 13, 2010
Messages
3,546
Location
seMI, 48317
I don't believe that Craftsman had sold an MSA for a column that size. I think that one was modified to fit a 1-7/8" OD column.

Here is a better look:

Pretty good job if a modified one.

I agree... that looks original. More proof that I don't always know what I'm talking about. LoL! I checked just the 1949 catalog.

I want to flip the motor belt pulley over (if I can figure out how to get it off) and run it without the MSA to see if the knocking noise improves.

Try the technique in this post to remove the pulley. Sometimes the shafts are fubar and you have to mangle the pulley to remove it.
http://www.garagejournal.com/forum/showthread.php?p=4731213&post4731213

I want to replace the electrical power cord and toggle switch to the motor.


When I removed the motor, I found what you predicted, cracked wire insulation and exposed bare wire.


I have a motor electrical question:
Can I skip connecting the new electrical cord wires to the red and white wires shown above (red arrow) and connect the cord black and white wires to the terminals shown below?


Or do the wires connected to the terminal go someplace I do not know about? I would hate to fry the motor!

I'm not sure if you can bypass those wires. There is an internal centrifugal switch wired in there.
 
Last edited:
OP
F

FrankLee

Well-known member
Joined
Sep 13, 2010
Messages
3,546
Location
seMI, 48317
Dp#23

9/13/2016

I just got home with dp#23... a very nice bench model. It came with a nice Craftsman vise and mortising fence/hold-down. Oh, and a very nice MSA!

This one has me puzzled though. I thought it was a 1956 or ’57 model. It’s clearly a Craftsman 100, but the model number is 103.24520. That tells me it was made after 1957. There was no power tool catalog in 1958 when the 150’s were introduced. The motor is dated 2-58, so this one must be a very late Craftsman 100 made in early 1958.


9/15/2016

The vise cleaned-up nicely!


9/16/2016

The hold-down cleaned up nicely too!

 
Last edited:

taumac

Well-known member
Joined
Aug 30, 2011
Messages
8,104
Location
Brooksville, Fl
Re: The Classic Craftsman 100/150 Drill Press

First I have to say WOW, what a great thread. Very informative. I just recently got a 103.23141 King Seeley floor model. It works but I have to replace the cord since its dried and cracked but otherwise it's just dirty and paint faded since it lived outside on screen porch before I bought it. Going through it and either (PO or my doing) the return torsion spring lost tension. I tried redoing it but torsion spring needs to be replaced. Is there a place you recommend to get proper torsion spring? I checked ereplacement but couldn't find and local hardware had tension springs not torsion springs.
a8a9c8960fa8a07fd53c3e27e35ea7fe.jpg
 
OP
F

FrankLee

Well-known member
Joined
Sep 13, 2010
Messages
3,546
Location
seMI, 48317
Re: The Classic Craftsman 100/150 Drill Press

First I have to say WOW, what a great thread. Very informative. I just recently got a 103.23141 King Seeley floor model. It works but I have to replace the cord since its dried and cracked but otherwise it's just dirty and paint faded since it lived outside on screen porch before I bought it. Going through it and either (PO or my doing) the return torsion spring lost tension. I tried redoing it but torsion spring needs to be replaced. Is there a place you recommend to get proper torsion spring? I checked ereplacement but couldn't find and local hardware had tension springs not torsion springs.

Thanks. It's always nice to know that this information is helpful to others.

Yep, cords are almost always toast on these old motors. I normally get these replacements from HD:
http://www.homedepot.com/p/Husky-9-ft-14-3-Power-Tool-Replacement-Cord-AW62632/100661452

I never found a source for new replacement springs for these drill presses. Ebay is probably the best place to look. Here's a recent sale on ebay. I believe the torsion springs from the Craftsman 12-1/4" are the same as the 100's and early 150's. Springs from late 150's will not work. Springs from the 13-1/2" drill press may be a tad longer, but the pinion/handle assembly should work in the 100.

Where is your's broken? I had one drill press where the PO bent the end of the broken spring so it would work again. If you haven't take it apart yet, it's possible but not likely that a prong on the tension knob broke.
 
Last edited:

Outlawmws

Well-known member
Joined
Aug 9, 2011
Messages
39,094
Location
The Badlands
Frank, that one has a 150 table and paint job...

What other differentiating features does it have?

Taumac, if the spring broke near the end, I've repaired similar torsion springs by grinding the requisite notches or reforming the end...
 
OP
F

FrankLee

Well-known member
Joined
Sep 13, 2010
Messages
3,546
Location
seMI, 48317
Dp#23 Refurb

9/13/2016

Frank, that one has a 150 table and paint job...

What other differentiating features does it have?

I'm fairly certain that the table is original to this 100. The tilt table was discontinued as a standard feature in the 1956 model year. The tilt table was an option for a couple years after.

This dp has the pivoting motor mount. I was never sure when that was introduced. It also has a rapid-adjust feed stop and tapered lock handles.

Power Bronze paint was also introduced in 1956. I thought maybe it was repainted, but if it is, it was an excellent job. I'll have to pull the head frame trim and badge off and look for more evidence. I really think it's original.


9/17/2016

Dp#23 in pieces.


9/19/2016

The base, table, head frame and MSA are cleaned.


9/20/2016

Column, table lock, head frame lock, and spindle pulley cleaned. It's going back together.


I swapped-out the pivot motor mount with a stationary mount.


This drill press gave me the opportunity to use my home-made pin spanner for the first time to remove the chuck. It worked great! I've got the chuck soaking in ATF.


To remove the snap ring from the quill, I clamped a vise-grip on each end of the snap ring and used spreading pliers to open the ring enough to remove it.


The spindle pulley assembly, the quill/spindle assembly, and the pinion/spring/hub assembly are cleaned, reassembled and reinstalled into the head frame.


9/21/2016

Refurb is complete. This one is very nice!

 
Last edited:

taumac

Well-known member
Joined
Aug 30, 2011
Messages
8,104
Location
Brooksville, Fl
Re: The Classic Craftsman 100/150 Drill Press

Franklee and Outlaw.

Okay here's situation I'm in.
6230304b842f7e2e3b320da3ccb3df0c.jpg
faea75d6cd2a0be16cee4f9f5b234bf9.jpg

It snapped of 3/4 to 1" piece off the left and what's pictured is what's left. So it's easy to say this one is shot.
 
OP
F

FrankLee

Well-known member
Joined
Sep 13, 2010
Messages
3,546
Location
seMI, 48317
Dp#24 - Fubar!

Last Sunday, I bought dp#24 on the last day of an estate sale. It is a 13-1/2" drill press, but the model information plate is missing. I don't know the exact model number. I was hoping to refurbish it, but the PO had abused and modified this DP so much, most parts are fubar.


The original feed handle was replaced with a sawed-off tire iron. The teeth on the pinion gear are badly messed up. This prevents a smooth quill feed.


There was an obvious wobble to the chuck and after removing from the spindle, I found that it was installed with some kind of adapter sleeve and the taper may have been shortened. I need to check that taper and run-out yet. The thrust collar and collar nut were mangled.


The tapered pin was missing from the table. The PO drilled and tapped the taper hole from the top and bottom and added a third tapped hole and bolt on the side of the table/tilt. I haven't checked the table for squareness yet.


The smallest step of the spindle pulley was obliterated and the second step is wavy. The inner splines are still very good so the pulley does still work well.


There is a dent in column. The PO used a grinder on the column to allow the table to slide over the dent.


Several other parts were missing besides the table tapered pin; all lock handles, the feed-stop assembly (bracket, rod, nuts), quill lock assembly, the pinion shaft retaining screw, and the spindle washer.

The head frame had several extra holes for a switch and brackets. The trim is badly banged-up.

The head-frame lock cylinders were mushroomed on the inside of the head frame from over-tightening. I had to file the burrs off before they could be removed.

The motor works well, but it's a 3450-RPM motor... inappropriate for a DP.

Fortunately, there are enough good pieces to part-out and recoup my investment.
 
Last edited:

bubinga

Well-known member
Joined
Jul 26, 2014
Messages
12,744
Location
Bridgeport Ohio. (Across River From Wheeling WV)
Re: The Classic Craftsman 100/150 Drill Press

Tarmac, that broken spring *****, mine broke too but near the end, I was able to reshape the end of it.
At the mercy of e Bay I guess, unless a member has one. They couldn't use the standard clock spring type, might be easier to substitute.

Sent from my MotoG3 using Tapatalk
 

zeet

Well-known member
Joined
Jun 13, 2013
Messages
196
Location
Southern California
Last Sunday, I bought drill press #24 on the last day of an estate sale. I was hoping to refurbish it, but the PO had abused and modified this DP so much, most parts are fubar. Fortunately, there's enough to part-out and recoup my investment.

Wow, Franklee, that poor little machine sure accumulated an awful lot of abuse. Awhile ago I picked up a Delta 220 under similar circumstances and in similar condition. Though disappointed there wasn't enough left to refurbish, I ended up sending donor parts around the country.... Gratified it kinda "lives on".
 

RHJO51

Well-known member
Joined
Feb 27, 2015
Messages
242
Location
Red Hook, NY 12571
Hello Frank, I just picked up a early 50's model 80 Craftsman benchtop DP. It's a 103.23640. I have a really nice 60's 150 floor model with a vari-slo, that I restored with your help. What a wonderful machine. I wanted a benchtop model for my basement workshop so I found this one. Pretty much all there but needs a good degreasing and paint. Had a weird home made third pulley... A couple of questions for you.

I was disassembling the head and of course one of the screws holding the spindle pulley assembly broke off. I think they are the originals. How would you suggest I proceed to get the spindle pulley assembly out now? Good news is that bearings in the spindle pulley assembly appear to be very good so if I had to leave it in I could but rather get it out for cleaning and paint.

This one has the rotating table, appears to be some sort of frozen pin. How does this work? How do you rotate the table?

Thank you for this great thread, it's helped me a lot. - Jim
 
OP
F

FrankLee

Well-known member
Joined
Sep 13, 2010
Messages
3,546
Location
seMI, 48317
Hello Frank, I just picked up a early 50's model 80 Craftsman benchtop DP. It's a 103.23640. I have a really nice 60's 150 floor model with a vari-slo, that I restored with your help. What a wonderful machine. I wanted a benchtop model for my basement workshop so I found this one. Pretty much all there but needs a good degreasing and paint. Had a weird home made third pulley... A couple of questions for you.

I was disassembling the head and of course one of the screws holding the spindle pulley assembly broke off. I think they are the originals. How would you suggest I proceed to get the spindle pulley assembly out now? Good news is that bearings in the spindle pulley assembly appear to be very good so if I had to leave it in I could but rather get it out for cleaning and paint.

This one has the rotating table, appears to be some sort of frozen pin. How does this work? How do you rotate the table?

Thank you for this great thread, it's helped me a lot. - Jim

First, review this post:
http://www.garagejournal.com/forum/showthread.php?p=4771515&post4771515

If the screw backed out some, it may be enough for the bearing to pass. Try to tap out the spindle as described in a previous post.

If the screw is not out enough, there are two options to remove the spindle pulley...

1. Use the wood/dowel method above to break the screw inside the bearing cavity. You may have to hammer a little harder. I accidently found out that this works and didn't damage the pulley.

2. Remove the inner snap ring and remove the pulley and leave the lower bearing. It may be more difficult to reach the snap ring, but once the pulley is removed at least you'll be able to see the screw and know what you're dealing with . You can then remove the outer snap ring and remove the lower bearing from inside the head frame. Then you may be able to grab the screw with pliers and screw it back into the bearing cavity to remove.

I guess a third option is to drill out the screw.


That table tilt pin is tapered and will knock out by tapping from the bottom. Once the pin is out, loosen the tilt lock bolt underneath the table and the table should tilt.
 
Last edited:

bubinga

Well-known member
Joined
Jul 26, 2014
Messages
12,744
Location
Bridgeport Ohio. (Across River From Wheeling WV)
Re: The Classic Craftsman 100/150 Drill Press

Does this look like an 100, or an 80?
Thanks guys.
a4dbfb0c6d03e11c8884a3674cc984a2.jpgef376af6d74fef99ab571409305cfc42.jpg

Sent from my MotoG3 using Tapatalk
 

Attachments

  • ef376af6d74fef99ab571409305cfc42.jpg
    ef376af6d74fef99ab571409305cfc42.jpg
    123.5 KB · Views: 9
  • a4dbfb0c6d03e11c8884a3674cc984a2.jpg
    a4dbfb0c6d03e11c8884a3674cc984a2.jpg
    74.1 KB · Views: 8
OP
F

FrankLee

Well-known member
Joined
Sep 13, 2010
Messages
3,546
Location
seMI, 48317
Re: The Classic Craftsman 100/150 Drill Press

Does this look like an 100, or an 80?

Yes, but it's neither. There are three sizes in that classic style.

That Dunlap is a 12-1/4" DP with a 1-7/8" diameter column. It also has three porous bronze bearings and one thrust bearing.

In general, the 13-1/2" DP is an "80" with a 2-1/4" diameter column. I say "in general" because very early 13-1/2" drill presses were labeled as "100"s in the catalogs.

The "100" was advertised as a 15" drill press until 1955 when someone finally measured it and determined that it was actually 15-1/2". The pre-1955 and post-1955 model "100"s are the same size despite catalog specifications. The "150" is a 15-1/2" drill press. Both the "100" and "150" have a 2-3/4" column.

In the 1950 catalog, the Craftsman "80" 12-1/4" drill press was rebadged to Dunlap and the Craftsman "100" 13-1/2" drill press was demoted to the model "80".

The "80", "100", and "150" all have ball bearings.
 
Last edited:

RHJO51

Well-known member
Joined
Feb 27, 2015
Messages
242
Location
Red Hook, NY 12571
Hello Frank, thanks for your help, I was able to get the spindle pulley removed by taping it out. Some more question though. Any tricks for removing the feed handle knobs? What size was the stock motor pulley? Not sure mine is stock. Thank you - Jim
 
To avoid these ads, REGISTER NOW!
OP
F

FrankLee

Well-known member
Joined
Sep 13, 2010
Messages
3,546
Location
seMI, 48317
10/2/2016

Hello Frank, thanks for your help, I was able to get the spindle pulley removed by taping it out. Some more question though. Any tricks for removing the feed handle knobs? What size was the stock motor pulley? Not sure mine is stock. Thank you - Jim

No problem... glad to help.

To remove the feed handle knobs, install two 3/8" nuts (or 1/2" nuts for later models) on the hub end of the feed handle and tighten them together as jamb nuts. Then, hold one nut with a wrench or vise. You should be able to remove the knob by hand. You may need to purchase actual jamb nuts as they are thinner than standard nuts. Oops... that's for a three-handle hub.

On a feed handle rod with two knobs, you should be able to unscrew one knob by hand. For the other, use the jamb-nut technique with two 5/16" nuts.

I'm not sure of the spindle pulley dimensions on an "80", but here's my take on motor pulleys:
http://www.garagejournal.com/forum/showthread.php?p=4731213&post4731213

Regarding motor pulley size... a 2" pulley will provide a good overall speed. I had a small Dunlap DP with a four-step pulley for years and never changed the belt from the 2" step.
 
Last edited:
OP
F

FrankLee

Well-known member
Joined
Sep 13, 2010
Messages
3,546
Location
seMI, 48317
Re: The Classic Craftsman 100/150 Drill Press

.

This thread passed the 70000-views milestone today. Thanks for stopping in!


Ok, thanks Frank, I think I'm going to pass on it, he wants $135.00

It looks like the owner did a very nice job refurbishing it, but yeah, I would pass too.

Like most things, the guy restoring something rarely gets his money back, let alone a profit. On a project like that, what is time and effort worth? I will normally refurbish something to that degree only if I plan to keep it.
 
Last edited:

Toolinup

New member
Joined
May 1, 2016
Messages
2
Hello Frank - Thanks for all the information in this thread. I wondered if you ever found a bearing to replace the one in the idler drum of the Craftsman sander - page 5 of this string. I have the same machine and cant find a bearing anywhere. It would be an addition/contribution to the Vintage Woodworking Community if you knew a source/replacement part number that was still available. With appreciation... Toolin
 
OP
F

FrankLee

Well-known member
Joined
Sep 13, 2010
Messages
3,546
Location
seMI, 48317
Hello Frank - Thanks for all the information in this thread. I wondered if you ever found a bearing to replace the one in the idler drum of the Craftsman sander - page 5 of this string. I have the same machine and cant find a bearing anywhere. It would be an addition/contribution to the Vintage Woodworking Community if you knew a source/replacement part number that was still available. With appreciation... Toolin

No, I never did.
 
Last edited:

bubinga

Well-known member
Joined
Jul 26, 2014
Messages
12,744
Location
Bridgeport Ohio. (Across River From Wheeling WV)
Re: The Classic Craftsman 100/150 Drill Press

.

This thread passed the 70000-views milestone today. Thanks for stopping in!


It looks like the owner did a very nice job refurbishing it, but yeah, I would pass too.

Like most things, the guy restoring something rarely gets his money back, let alone a profit. On a project like that, what is time and effort worth? I will normally refurbish something to that degree only if I plan to keep it.
Yeah, he started at $175.00 if I remember. I offered $100 00, he said, Make another offer, I said $125.00
He refused $125,then I saw it for $135.00
I think it's gone now though.
Yes,
This posting has been deleted by its author.


Sent from my MotoG3 using Tapatalk
 
Last edited:

bubinga

Well-known member
Joined
Jul 26, 2014
Messages
12,744
Location
Bridgeport Ohio. (Across River From Wheeling WV)
Re: The Classic Craftsman 100/150 Drill Press

I did get a delta Rockwell sander, I was going to keep it, but I found a nice power matic.
Paid $100.00 for the delta, had about another $100.00 in it, and my time, fully restored it, paint, all bearings, but I did find the right buyer, and got $400.00 for it.
But that don't happen every day.

Sent from my MotoG3 using Tapatalk
 

RHJO51

Well-known member
Joined
Feb 27, 2015
Messages
242
Location
Red Hook, NY 12571
Hello Frank, thanks for the info on removing the feed handle knobs, they are free! And thanks for the pulley info - very helpful. Thanks again!
 
OP
F

FrankLee

Well-known member
Joined
Sep 13, 2010
Messages
3,546
Location
seMI, 48317
Mobile Machine Platforms

In an earlier life when I worked in IT, I would often see old computer equipment cabinets lined up on the dock waiting for the scrapper. I finally asked if I could have a few and eventually brought home four of these cabinets. My intent was to re-purpose the entire cabinet, but concluded that would be too much trouble. Instead, I removed the caster bases from each cabinet and use them as mobile machine platforms. I scrapped the rest of each cabinet and made few dollars. I was later able to get three more bases. I removed them at work and left the cabinets.


These caster bases are very heavy duty. They are 22" x 29.75", weigh about 35 pounds each, have a set of heavy duty double-wheeled casters and stabilizing feet. I cut and bolted a piece of 3/4" plywood on some and use them for my machines. They work great!


4/25/2020

Casters

I like casters. Between tool chests, cabinets, wire shelving, furniture dollies, machine platforms and stools, I counted about three dozens sets in my basement shop.

I featured these machine platforms above. They are, by far, are my favorites.
I have six of these platforms. My keeper machines have permanent homes on three of them. The other three are used during machine refurbs.

As great as these are, there are two problems with these platforms though. First, the casters are so good that depending on where they are in the basement, the platforms will wander on their own on the very slight slope of the basement floor. Second, setting the stabilizing feet requires getting on hands and knees to adjust them to the floor. Below is how I fixed that.


Caster with stabilizer

Stabilizers; original and modified with 10-24 x 3/8" button head socket screws

Transfer punched and drilled through the plywood platform with a 5/32" bit

Quick adjustment from top with 1/8"allen wrench


Hello Frank, thanks for the info on removing the feed handle knobs, they are free! And thanks for the pulley info - very helpful. Thanks again!

You're welcome. I'm always happy to help keep these classic machines running.
 
Last edited:

RHJO51

Well-known member
Joined
Feb 27, 2015
Messages
242
Location
Red Hook, NY 12571
Hey Guys, I've been looking for a 150 benchtop for a while now and they are pretty scare here in the Hudson Valley. I did come across one recently and picked it up for basically nothing. It's a 113.24501 .Unfortunately it's got some issues and must have hard a very hard life. The hub for the handle must have cracked and the owner installed a collar on the inside, then drilled and bolted each of the three handles. The lower sheave on the spindle pulley is very broken. I guess it's a parts machine, but l'm thinking of saving it - hate to toss one of these vintage machines. If anyone has a used handle hub, I could use it. The handles were drilled and not great but usable. I also need the spindle pulley. I thought I could cut of the remainder of the lower sheave or just not use it, but then I saw the grooves inside the pulley are worn to nothing - how'd that happen? Bearings are good and reusable. Surprisingly the spindle shaft is just fine. So not sure what to do, anyone have some spare parts? Or where to find them? Thanks - Jim
 

Attachments

  • 005.jpg
    005.jpg
    138.3 KB · Views: 64
  • 004.jpg
    004.jpg
    132.2 KB · Views: 75
  • 003.jpg
    003.jpg
    135.6 KB · Views: 84
  • 002.jpg
    002.jpg
    136.5 KB · Views: 67
  • 001.jpg
    001.jpg
    135.2 KB · Views: 68
OP
F

FrankLee

Well-known member
Joined
Sep 13, 2010
Messages
3,546
Location
seMI, 48317
Hey Guys, I've been looking for a 150 benchtop for a while now and they are pretty scare here in the Hudson Valley. I did come across one recently and picked it up for basically nothing. It's a 113.24501 .Unfortunately it's got some issues and must have hard a very hard life. The hub for the handle must have cracked and the owner installed a collar on the inside, then drilled and bolted each of the three handles. The lower sheave on the spindle pulley is very broken. I guess it's a parts machine, but l'm thinking of saving it - hate to toss one of these vintage machines. If anyone has a used handle hub, I could use it. The handles were drilled and not great but usable. I also need the spindle pulley. I thought I could cut of the remainder of the lower sheave or just not use it, but then I saw the grooves inside the pulley are worn to nothing - how'd that happen? Bearings are good and reusable. Surprisingly the spindle shaft is just fine. So not sure what to do, anyone have some spare parts? Or where to find them? Thanks - Jim

Wow... that's about as fubar as they come.

The splines are likely worn because of lack of lubrication, but could also be from the jolt of the motor starting. What motor was on it?

Before looking for replacement parts, check the spindle for run-out. If run-out is beyond acceptable, it may not be worth looking for those other parts.

You may be right about it being a parts machine. There are still plenty of good parts.

The base, column and table make a great grinder stand.

 
Last edited:

RHJO51

Well-known member
Joined
Feb 27, 2015
Messages
242
Location
Red Hook, NY 12571
Thanks Frank. Your idea on the grinder stand is ago done, I just happen to have a nice vintage craftsman bench grinder I was looking to find a stand for. Hmmm..... Thanks again
 

smalltown

Well-known member
Joined
Jul 9, 2015
Messages
985
Location
Western Maine
I've got a line on a Craftsman 150. The price seemed fair, and I am tempted, but I would need to take a road trip, and transport it in my car.
So I'm juggling pros and cons in my head.

A quick look at a model 100 specs, I am guessing the 150 would be similar.
~ 70 tall ~ 230lbs.

I was hoping to put down one side of the rear seat, and wrestle the 150 into the car trunk.
Since I've never had a drill press like this I wonder how much I could take it apart on site for transport? I have no idea how much help I would have.

There must be a clamp to loosen that allows the head to slide up and down the column ? If I tip the press on its side can I easily slide the head up and off the top of the column ? Maybe the same for the work table to reduce the weight. Maybe I could slide everything to the bottom?

Any thoughts, special tools I should bring with me ?

PS I have been looking at FrankLees links, but this 150 doesn't have the slow speed option.
 
Last edited:

Cruzan80

Well-known member
Joined
Jul 22, 2015
Messages
4,163
Location
Denver, CO
Every time I have moved a floor DP, I have found that taking off the head and table has helped immensely. Possibly a pipe for a cheater bar, and a small hammer to "shock" it loose? The base may or may not come loose. If it does, I put the clamp brace in my pocket (easiest thing to lose).vBring a box and some masking tape for the parts you are removing (labels).
 
OP
F

FrankLee

Well-known member
Joined
Sep 13, 2010
Messages
3,546
Location
seMI, 48317
I've got a line on a Craftsman 150. The price seemed fair, and I am tempted, but I would need to take a road trip, and transport it in my car.
So I'm juggling pros and cons in my head.

A quick look at a model 100 specs, I am guessing the 150 would be similar.
~ 70 tall ~ 230lbs.

I was hoping to put down one side of the rear seat, and wrestle the 150 into the car trunk.
Since I've never had a drill press like this I wonder how much I could take it apart on site for transport? I have no idea how much help I would have.

There must be a clamp to loosen that allows the head to slide up and down the column ? If I tip the press on its side can I easily slide the head up and off the top of the column ? Maybe the same for the work table to reduce the weight. Maybe I could slide everything to the bottom?

Any thoughts, special tools I should bring with me ?

PS I have been looking at FrankLees links, but this 150 doesn't have the slow speed option.

My preference is to take it apart into five manageable pieces; motor, head frame, table, column, base. It's usually an easy one-person job. Here's how I take them apart:
http://www.garagejournal.com/forum/showthread.php?p=5362688&post5362688

I take an adjustable wrench, pliers/channellocks, an assortment of allen wrenches, a wire cutter, a screw driver, and a box. A blanket is also handy... these DPs are frequently very dirty. Sometimes there is a rigged-up switch and if the wiring needs to be replaced, I just cut them.
Sometimes, if a floor stander, the column is stuck in the base. It's still manageable if the column and base must be moved together.

There's a floor stander and a bench model and stand in there:
 
Last edited:

smalltown

Well-known member
Joined
Jul 9, 2015
Messages
985
Location
Western Maine
Thanks Frank. Having never operated a drill press can I ask in this photo (top arrow) is this lever a lock for the up down movement of the head? I am assuming it a sort of clamping motion so counter clockwise to loosen, and hopefully move the head ?

The lower arrow is that the quill lock? So bring the quill up, and lock it with this handle?

Been searching around for instruction for the 150 Drill press without success. There was one GP poster that had two links that no longer work.

Whoops I forgot to upload the photo. Thanks for the link Frank !
 

Attachments

  • 14109734681_63d34a6a3a_d.jpg
    14109734681_63d34a6a3a_d.jpg
    75.7 KB · Views: 64
Last edited:
OP
F

FrankLee

Well-known member
Joined
Sep 13, 2010
Messages
3,546
Location
seMI, 48317
Classic Craftsman Drill Press Badges, Plates and Panels

Classic Craftsman Drill Press Badges, Plates and Panels

Styles

Most Craftsman 80, 100, and 150 drill press owners' manuals refer to the head frame trim as panels. There are two styles of head frame panels on the classic Craftsman drill presses.

The Craftsman 150 has a single piece panel with the crown logo.
 
Last edited:
OP
F

FrankLee

Well-known member
Joined
Sep 13, 2010
Messages
3,546
Location
seMI, 48317
Classic Craftsman Drill Press Badges, Plates and Panels - Part 2

10/24/2016

Thanks Frank. Having never operated a drill press can I ask in this photo (top arrow) is this lever a lock for the up down movement of the head? Yes
I am assuming it a sort of clamping motion so counter clockwise to loosen, and hopefully move the head ? Yes

The lower arrow is that the quill lock? Yes
So bring the quill up, and lock it with this handle? Yes, then remove the handle.

Thanks for the link Frank !

No problem!
 
Last edited:

smalltown

Well-known member
Joined
Jul 9, 2015
Messages
985
Location
Western Maine
Ok you got me with then remove the handle.
Can I interpret that as I can continue to unscrew the quill lock handle right out of the head?
 
To avoid these ads, REGISTER NOW!
Top Bottom