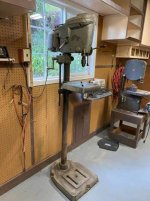
OK so here is the sneak peak! Got the Craftsman 150 w/ table raising mechanism, Early 12" Atlas bandsaw, box of tools and drill bits for... wait for it........ $210
$210
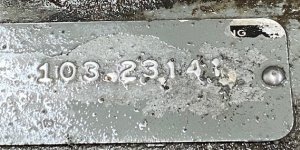
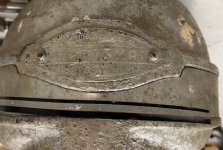
Of course there are issues my friend wanted the bandsaw so I got the drill press and tools for $110. It's pretty rough and it may become a parts machine I haven't tried to source parts but already I know it needs a motor, motor mount bracket, depth stop nuts, head stop lock and nut, one maroon knob. Then it is covered with a heavy grey tractor paint so lots of work. The table raiser looks to be in excellent shape inside and I think it will clean up well. I am not sure how the bevel gear on the main screw comes out though. I read where its pressed on and saw Franks wonderful pictures where he has it totally disassembled but I couldn't find any discussion on how to get them apart. Anyway it's hot and were are going to eat. More photos later.
$210Of course there are issues my friend wanted the bandsaw so I got the drill press and tools for $110. It's pretty rough and it may become a parts machine I haven't tried to source parts but already I know it needs a motor, motor mount bracket, depth stop nuts, head stop lock and nut, one maroon knob. Then it is covered with a heavy grey tractor paint so lots of work. The table raiser looks to be in excellent shape inside and I think it will clean up well. I am not sure how the bevel gear on the main screw comes out though. I read where its pressed on and saw Franks wonderful pictures where he has it totally disassembled but I couldn't find any discussion on how to get them apart. Anyway it's hot and were are going to eat. More photos later.