texasfiremedic
Well-known member
Wanting to build a homemade electrolysis tub at the house. What are the components you use. What is your best cleaning solutions that you have found? Also what the combination is best for rust, grease, grim .....

How well does this process work on grease and paint?
How well does this process work on grease and paint?
In my experience, it works best on rust. If the paint is flaking, it will pull it off but may leave some areas. Longest I ran anything was around 8hrs though.

I've heard rust and paint are usually what gets removed nicely to expose the raw steel when finished.
thanks for the tips on cleaning the grease off before the dunk. do you use a solvent tub or just a little simple green because I can use either?
any pictures to share for all us to enjoy your Electrolysis tanks in action????
please post on this thread.


I don't mean caked on grease but the stuff that takes cleaner or diesel and heavy scrub brush. Just mostly clean.
Did not think of a plastic 55 gallon drum. Cut the top out and your in business with 360 anodes. Great idea. That just skipped my mind. (The switch is on but the light just flickers)
I don't mean caked on grease but the stuff that takes cleaner or diesel and heavy scrub brush. Just mostly clean.
The old style battery chargers worked with this process. If you have an old battery, try that hooked up to a newer charger as well, if you have one of the new charger types.
Fretters: you have awesome pictures again.
I always think a photo is far more descriptive than words though, and is also a good backup against a shonky memory.now i'm on the search for some little metal baskets for the little stuff like sockets, nuts and bolts and so on.
also just learned to do a good grease and crud cleaning so the E process can find the steel.
great idea with the CPU and how would you hook one up?

If you really want to kick it up a notch get an old transformer DC stick welder. Just have to watch the duty cycle, but most of the old transformer machines have a few taps where they can go 100% usually around 80amps.
Another thing I will bring up is you need to watch and keep a mind on current density when doing this process.
are you talking current density on the CPU or the DC welder? how would you monitor that? if the part in the tub starts melting or if the lights in the neighborhood dim?
are you talking current density on the CPU or the DC welder? how would you monitor that? if the part in the tub starts melting or if the lights in the neighborhood dim?
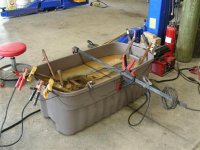
it's at the top of my project list of to do's also. here are a few pictures and i'll grab a parts list from my notes if someone else doesn't have them handy to post.
i'm planning on using the big plastic black storage container they sell at Costco with the yellow lid for the tank. I have plenty of rebar and wire for the electrodes and an old battery charger for the power. some spa chemicals and i'll get the name when I find my notes or I hear it works with baking soda or also without anything.
I hope others add posts with pictures too because nothing better than shiny steel other than steel cooking ready to become something shiny.
Is it me or does that look unsafe, haha, looks like it works well
Edit,I don't know how to get the pics to show