To avoid these ads, REGISTER NOW!

"Big Ziggy" 1HP Craftsman Block Grinder Build

JZiggy

Well-known member
Joined
Dec 1, 2014
Messages
990
Location
Atlanta
A wonderful GJer made all my dreams come true by selling me a totally complete 1HP flat-top block grinder. I wanted to share some details about the rebuild and upgrades so rather than clutter up the "let's see your block grinders" thread I'm making a new one.

As received:

IMG_3181_zpsw4nnvjeu.jpg


IMG_3202_zpssbh4mylc.jpg


This guy was gently used but badly stored.

So let's get started!
 
To avoid these ads, REGISTER NOW!
OP
J

JZiggy

Well-known member
Joined
Dec 1, 2014
Messages
990
Location
Atlanta
Citristrip got all the paint off nicely. Most of it just bubbled up and peeled off with minimal persuasion. I used a fine brass brush for the tough spots.

IMG_4456_zpsq9jifovv.jpg

IMG_4458_zpssdyqhm2t.jpg


I don't have much experience spray painting stuff that I really want to look good, so I got some help from a buddy with a lot of vintage car restoration experience and he walked me through it.

I used Rustoleum Graphite wheel paint for the frame and Rustoleum metallic silver for the band. Parts were primed first, and the topcoat was followed with Rustoleum crystal clear. Thanks to Bobioz1 for the color recommendations, they turned out great!

IMG_4521_zpsj2pwsctj.jpg
 
OP
J

JZiggy

Well-known member
Joined
Dec 1, 2014
Messages
990
Location
Atlanta
I feel that addressing the electrical contacts is an important part of bringing these grinders back to peak operation. I followed Torqueman's lead here (Dr. Block) as he outlines in his rebuild of "Go Blue."

1st step: disassemble start relay and clean all four contacts.

IMG_4516_zpsjl0xfizu.jpg


2nd step: Rebuild the rocker switch

IMG_4517_zps5dob65cl.jpg


The red switch part has two little spring loaded plungers. Take these and the springs out and clean, relube with silicone grease. Pull the contacts out of the bottom of the blakc housing, clean the terminals, apply a bit of silicone grease in the middle where the plungers ride on it.

Before:
IMG_4518_zpsdv90tzar.jpg


After:
IMG_4520_zpsj155blpm.jpg


The foam was all decroded so I made a little gasket out of some friction tape. Works okay.

3rd step: All spade terminals get a shot of Deoxit cleaner and a hit with a brass brush. Deoxit sure is interesting -- you can watch it bubble as it attacks deposits on the terminals.
 

drivesitfar

Well-known member
Joined
Oct 23, 2013
Messages
35,997
Location
Pacific Northwest
Ziggy: nice pictures and even better write up on the details. i bet all of us would love to see you CLUTTER up the block thread with these pictures and write ups. i know it's like one stop shopping for me sort of like Costco if Craigslist doesn't have it.

do as you will and just want to say you are doing a great job. not sure Jack Dodge still has the metal labels or the ability to make them if you want one but that might be might first choice on that big guy you just restored. or i think a couple other members were working on metal or vinyl labels so ask if you still are looking for options.

congrats and are you changing the bearings even though you say it hasn't been abused? i think Doc and maybe EX and others ALWAYS change their bearings when they buy a block to resell if they are spending the time to spiff it up.
 
OP
J

JZiggy

Well-known member
Joined
Dec 1, 2014
Messages
990
Location
Atlanta
Thanks guys!

Oh yeah, this guy got a pair of Nachi 6203 sealed bearings. Shoulda taken more pictures while I was doing that part.

- During that process, I applied some Loctite sleeve retainer to the bearing OD because the fit was a bit loose in the housings. This is a toughened epoxy so it helps stop vibration and increase load transfer to the housing.
- I also used my handy shim method to align the rotor. Install 0.010" brass shims on four sides, install stator, assemble housing halves, torque 3 main bolts, then reach in with pliers and pull out the shims.

Example of the shim method from a different block rebuild:
IMG_4142_zps15ngolpy.jpg


Jack Olsen gave me an Illustrator file and I've got it tweaked up and ready to print. Going to use the Crown logo even though it didn't come with that. I may use StickCutting.com as I made bumper stickers with them almost 10 years back and realized that the sticker on my truck is still in perfect condition... kind of amazing really!
 

drivesitfar

Well-known member
Joined
Oct 23, 2013
Messages
35,997
Location
Pacific Northwest
Ziggy: Jack's label had a cool little warning too. did he give you that file and care to post it because i can't remember exactly what it said? or post it when you get it on the grinder.

also make sure the sticker company is same owners and same materials because things change (a lot) in ten years. sort of like cooks in restaurants if you know what i mean.
 

bagged89s10

Well-known member
Joined
Mar 13, 2005
Messages
4,607
Location
CT
Awesome restore! I have the same 1HP grinder and probably in the same condition as you started with.
 

Model A Fan

Well-known member
Joined
Dec 1, 2011
Messages
1,210
Location
NW Washington
Looks great! I love these kinds of threads.

On a funny note, I used to have a cat named Ziggy Bigfoot as he had six toes on each paw.
 
OP
J

JZiggy

Well-known member
Joined
Dec 1, 2014
Messages
990
Location
Atlanta
Thanks for the kind words, everyone.

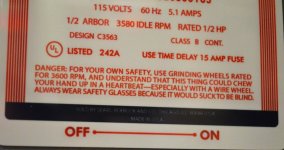
I was also inspired by Dr. Block to add a 15A time-delay fuse to the main circuit to protect the motor in an overload situation. But I wanted to take it a step further and add a 2nd fuse to protect the start circuit as well. My motivation here was when I forgot to reattach the return spring in the start relay of a 1/3hp grinder. After running for a short while the start coil began to smoke. Fortunately, it was not too far gone and it did not kill the grinder.

I wondered what amperage to use, so I started by measuring the resistance of the main vs. start coil. The start coil has about 7x the resistance, so I assumed its fuse should be about 1/7th the rating. The low side is 2A, and sure enough -- a 2A time delay fuse works! Even though the start cap kicks out MUCH more current than 2A, the time-delay fuse doesn't mind and will only blow is the start circuit is energized with greater than 2A for a few seconds.

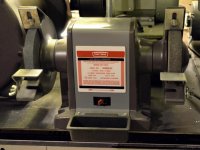
I also was not excited about putting a fuse holder on the back of the grinder so I mounted the fuses to the bottom metal cover. It's not super convenient, but I figure if I ever blow a fuse I'm going to want to pull it off and investigate anyway!

IMG_4524_zpsnwcsltbp.jpg


IMG_4525_zpseh8ggu0y.jpg


(15A on bottom, 2A on top)
 

Bobioz1

Well-known member
Joined
Jun 26, 2013
Messages
821
Location
Northern il. (For now)
Nice job on the 1 horse. I see you left your water tray knockout, knocked out. A rubber drum brake inspection plug fits in there nicely and doesn't look terrible either. Things fall in that open hole.........
 
OP
J

JZiggy

Well-known member
Joined
Dec 1, 2014
Messages
990
Location
Atlanta
Nice job on the 1 horse. I see you left your water tray knockout, knocked out. A rubber drum brake inspection plug fits in there nicely and doesn't look terrible either. Things fall in that open hole.........

Yes I actually bought a brand new steel band rather than de-rusting, de-painting, de-labelling the old one. It came with the hole knocked out. Great idea on the brake drum plug!!! Maybe I'll steal one from my wife's car :3gears:
 

drivesitfar

Well-known member
Joined
Oct 23, 2013
Messages
35,997
Location
Pacific Northwest
Ziggy: so when you added the 2nd fuse did you remove the lamp or didn't it have one to start with? sorry i didn't look at the first pictures before posting if it's obvious. also was it hard to do?

i found Jack Olsen's cool metal label with his insightful warning so here it is for all of us if this is like the one you are planning on using.

great job and just wondering if you are going to put wire wheels or stones on it? or keep it as it's pictured with the wire wheel and stone after the awesome paint job and restoration.
 

Attachments

  • 5f3f394a403998c766825dfe8205145e.jpg
    5f3f394a403998c766825dfe8205145e.jpg
    99.2 KB · Views: 245
  • eFhSzu.jpg
    eFhSzu.jpg
    70 KB · Views: 232
Last edited:
To avoid these ads, REGISTER NOW!
OP
J

JZiggy

Well-known member
Joined
Dec 1, 2014
Messages
990
Location
Atlanta
Ziggy: so when you added the 2nd fuse did you remove the lamp or didn't it have one to start with? sorry i didn't look at the first pictures before posting if it's obvious. also was it hard to do?

i found Jack Olsen's cool metal label with his insightful warning so here it is for all of us if this is like the one you are planning on using.

great job and just wondering if you are going to put wire wheels or stones on it? or keep it as it's pictured with the wire wheel and stone after the awesome paint job and restoration.

Hey Drives,

Nice catch. I just hadn't gotten the lamp installed yet. And no, adding jumper cables and the fuse block was not at all hard to do. :thumbup:

I may do a metal label like Jack as well.

For my needs I find that a fine-ish stone and a fine bristle steel wheel are perfectly suited.
 
OP
J

JZiggy

Well-known member
Joined
Dec 1, 2014
Messages
990
Location
Atlanta
Let's talk rubber for a minute. Grinder have a ton of vibration, and I've found having rubber in the right spots helps smooth everything out. Here's one trick I've done with my grinders:

IMG_4532_zpszdr1rcsr.jpg


IMG_4531_zps1gjlrjh2.jpg


This is "rubber edge trim" from McMaster, part # 8507K72. It helps the bottom cover stop resonating.
 
Last edited:
OP
J

JZiggy

Well-known member
Joined
Dec 1, 2014
Messages
990
Location
Atlanta
More thoughts on rubber:

I had asked a question on the main block grinder thread about whether the big boys with deluxe bases utilized bushing between the grinder and the base. Some seem to use them, others not. Mine had short #10-32 screws that would not have had room for the intermediate bushings. But when I installed it that way there was some resonant noise, so I got longer screws and put them through the bushings. This is great because the grinder is isolated in both up and down, and side-to-side directions.

IMG_4533_zpsvfoea8so.jpg


Also, I found that McMaster has pretty good replacements for the factory deluxe base feet. They fit and work fine. These also have integral washers under the screw which is kind of nice. These are McMaster part # 9540K879
They came in a pack of 10 so I have extra enough for another base... PM me if you'd like them.

IMG_4534_zps4ropstac.jpg
 

Shiftless

Well-known member
Joined
Mar 9, 2014
Messages
14,479
Location
East Bay SFO
Also...
It's amazing how much damping and isolation you can get from judiciously applied closed cell foam weatherstripping.

Those little rubber feet look like they would really do the job. You have upgraded that block to well above factory original. Good work!
 
Last edited:

McBrownie

Well-known member
Joined
Mar 27, 2014
Messages
1,827
Location
Cleveland, OH
Let's talk rubber for a minute. Grinder have a ton of vibration, and I've found having rubber in the right spots helps smooth everything out. Here's one trick I've done with my grinders:

Have you tried running it without wheels? If it doesn't vibrate without wheels, then something is out of balance. Stones can be dressed, but wire wheels can also be the culprit. I have used a lawnmower blade balancer to check wire wheels.

View media item 49142
 

torqueman2002

Well-known member
Joined
Jun 3, 2009
Messages
6,138
Location
SE Michigan
Ziggy - Again, nice job and write up. :D

I like the rubber edge trim. I have that and the intermediate bushings in my McMaster cart.

The part number links are very helpful.

BTW - what do you use for the embedded link? I use TinyURL, but that is not as streamline.
 
OP
J

JZiggy

Well-known member
Joined
Dec 1, 2014
Messages
990
Location
Atlanta
McB - this grinder doesn't have excess vibration. I meant grinders generally have vibration. Good idea on the wire wheel. Also, I feel like the snap rings don't let the flanges sit really flat against the arbor.

TM - good deal! For the links I use the link button just above the message text field. It is the earth and chain link icon.
 

McBrownie

Well-known member
Joined
Mar 27, 2014
Messages
1,827
Location
Cleveland, OH
McB - this grinder doesn't have excess vibration. I meant grinders generally have vibration. Good idea on the wire wheel. Also, I feel like the snap rings don't let the flanges sit really flat against the arbor.

Totally agree on the snap rings. GJ'r exmaxima helped me out with a Multitool attachment on my 3/4hp. I couldn't get it running true, so he machined a shaft collar to fit. Take a look at post #4 and 5 in this thread:

http://www.garagejournal.com/forum/showthread.php?t=274020
 
Last edited:
OP
J

JZiggy

Well-known member
Joined
Dec 1, 2014
Messages
990
Location
Atlanta
Totally agree on the snap rings. GJ'r exmaxima helped me out with a Multitool attachment on my 3/4hp. I couldn't get it running true, so he machined a shaft collar to fit. Take a look at post #4 and 5 in this thread:

http://www.garagejournal.com/forum/showthread.php?t=274020

McB - good idea on the shaft collar. I'm afraid that would space my grinding wheel out too far, so I'm going to try slightly overdrilling a fender washer to be a snug fit up against that shoulder. Honestly, it's something of a poor design having such a tiny shoulder to **** the flange washers up against.

EDIT - McB, I realize now that your shaft collar sits inside of the shoulder on the larger diameter shaft, which lets it create a new shoulder for the stone and washers to bear against. Very good idea! The size you mention is just a touch smaller than a 17mm shaft collar... maybe I'll try one of those.

In other news, I took the lamp apart, cleaned & lubed, and the nifty Leviton switch dressed up nicely with some plastic polish. I swapped gooseneck stalks with one from another grinder that wasn't all rusty. The aluminum lamp socket parts shined up with Nevr-Dull.

IMG_4535_zpsbboc2ibo.jpg
 
Last edited:
OP
J

JZiggy

Well-known member
Joined
Dec 1, 2014
Messages
990
Location
Atlanta
McBrownie shared a great idea about the shaft collar and I put it to good use today. The 5/8" arbor block grinders have 17mm shafts where the bearing sits and are slightly under 17mm with a shoulder where it transitions to 5/8" (so you're going from about 0.669" to 0.625"). This is a very small shoulder, only about 20 thousandths !!! Craftsman put thick snap rings there to help with this problem but honestly, they are not very flat and eventually they damage that little shoulder, so nothing will fit square against it.

The way to fix this is to install a shaft collar on the 17mm portion so that the face of the collar sits just forward of the original teeny shoulder. This gives you now a nice broad shoulder that is very square with respect to the shaft axis. I found that an off-the-shelf 17mm shaft collar fits perfectly here and there's even room to swing the hex wrench! The stone now sits very snugly up against this collar with no side-to-side wobble.

IMG_4552_zpscq9tbnmz.jpg


More improvements to come...
 

McBrownie

Well-known member
Joined
Mar 27, 2014
Messages
1,827
Location
Cleveland, OH
McBrownie shared a great idea about the shaft collar and I put it to good use today. The 5/8" arbor block grinders have 17mm shafts where the bearing sits and are slightly under 17mm with a shoulder where it transitions to 5/8" (so you're going from about 0.669" to 0.625"). This is a very small shoulder, only about 20 thousandths !!! Craftsman put thick snap rings there to help with this problem but honestly, they are not very flat and eventually they damage that little shoulder, so nothing will fit square against it.

The way to fix this is to install a shaft collar on the 17mm portion so that the face of the collar sits just forward of the original teeny shoulder. This gives you now a nice broad shoulder that is very square with respect to the shaft axis. I found that an off-the-shelf 17mm shaft collar fits perfectly here and there's even room to swing the hex wrench! The stone now sits very snugly up against this collar with no side-to-side wobble.

More improvements to come...

Doh! I never thought to just picking up a 17mm shaft collar instead of having a 5/8" one machined. I'll add a link to this over on my Multitool thread. Thanks for simplifying that step.
 
OP
J

JZiggy

Well-known member
Joined
Dec 1, 2014
Messages
990
Location
Atlanta
Jake - thanks for thinking of me! I did replace my start cap already. McMaster had it for a few bucks, I just matched the Farad rating. The new one was the same as the old except a bit shorter.
 
OP
J

JZiggy

Well-known member
Joined
Dec 1, 2014
Messages
990
Location
Atlanta
Opinions wanted!!

Big Ziggy is borrowing the tool rests from an antique Stanley bench grinder. These things are *heavy* cast iron and fit well. Should I ask him to please give them back or...?

IMG_4562_zpsqpooav9l.jpg

IMG_4561_zpszejxnfun.jpg

IMG_4563_zpslglxdsir.jpg
 

bagged89s10

Well-known member
Joined
Mar 13, 2005
Messages
4,607
Location
CT
Opinions wanted!!

Big Ziggy is borrowing the tool rests from an antique Stanley bench grinder. These things are *heavy* cast iron and fit well. Should I ask him to please give them back or...?

IMG_4562_zpsqpooav9l.jpg

IMG_4561_zpszejxnfun.jpg

IMG_4563_zpslglxdsir.jpg


Those fit and look pretty awesome!
 

torqueman2002

Well-known member
Joined
Jun 3, 2009
Messages
6,138
Location
SE Michigan
:beer:
Great solution, look like they were made for it.

I do get nervous when I see tool rests that 'encourage' grinding on the sides of stones that are not designed for that use.

For me, it is hard enough to resist side loading a stone with the CM OEM tool rests. I do think this style is OK for wire wheeling, just not grinding.

I'm going to put Stanley bench grinders on my radar search pattern. Maybe it's time Go Blue! had the correct tool rests.
Go-BlueDoneForInternetP1030982.jpg
 

drivesitfar

Well-known member
Joined
Oct 23, 2013
Messages
35,997
Location
Pacific Northwest
DOC & ALL: i have a neighbor that bought a new Jet 10 inch bench grinder last year and i already see grinding marks on the side of his new stones. i asked or maybe it was more of a warning and he says he's used the sides of stones since he was a kid and he's been a Boeing Machinist for 30 years and worked at a Boiler making company for maybe 10 years before that.

he's still alive, but i think he's more lucky than wise in this situation.

Ziggy: I agree those tool rests look very much at home on your Block. nicely done AGAIN
 
To avoid these ads, REGISTER NOW!
Top Bottom