To avoid these ads, REGISTER NOW!

1966 F100 EcoBoost Engine Swap (EcoBoosted)

Status
Not open for further replies.

nine4gmc

Well-known member
Joined
Mar 24, 2012
Messages
14,357
Location
Dallas
Re: 1966 F100 EcoBoost Engine Swap & 1966 427 Project

You are doing awesome! I didn't want to call bs on the dinky chrome cap because some people would be satisfied with it so I tried to put it nicely that it didn't look like it fit with all the professional work you are putting in to the rest of the truck. Thanks for pulling our legs, keep up the great work!

Sent from my SM-T230NU using Tapatalk
 
To avoid these ads, REGISTER NOW!

lorne

Well-known member
Joined
Mar 17, 2007
Messages
192
Location
Maynard, MA
WHEW! My knee's were knocking on this project. Just do not have the confidence to try, had no choice I guess. nobody else to do it for me.
Way and above anything I have tried before


I just called LuCkY '66 to wish me well . .lol

I think you're a little past the point where you can say you're not confident. I think you've proven on this project that you can do anything necessary.

Lorne
 

Oggy

Well-known member
Joined
Jan 2, 2011
Messages
1,295
Location
Central New York
Looks good, Thank you for keepin this thread updated. You make this look easy, but the detail in everything, and showing all the little things most people leave out keeps me hooked. I can't wait to see what's next!
 
OP
T

TimeWarpF100

Well-known member
Joined
Aug 21, 2010
Messages
6,784
Location
not here
Made the box for filler tube.

Used a piece of .074 Aluminum. Was all that I had handy.

Was thinking on using a nutsert for mounting.

Next up is to try and wire the '11-'14 Light sockets into a 1966 Taillight housing.

It will give me a double taillight, double brake light and a backup light to fit in the small housing. I will have one wire & socket left which I plan on using in the tool boxes at rear.

BEF939B5-D742-44C0-8403-39E69B6544B7_1.jpg

6E97E9CB-954C-4161-9A54-8CEF7406D164_2.jpg

270647C0-64DD-468B-9EEE-03BF913BFA4C.jpg

0D2AC7C3-9175-4464-93CC-6CCC8985280D_2.jpg

3EC1357D-54D1-4C9E-A56F-A6D6E117428C.jpg

F26204F0-FD6D-4BB3-A78A-E66232CCBA5B_1.jpg
 
OP
T

TimeWarpF100

Well-known member
Joined
Aug 21, 2010
Messages
6,784
Location
not here
By moving the box skin out 1/2-3/4" I could get the tires to clear If I roll the lip a bit.

I just would not be able to lower it to the point I was planning on.

The back tires need to be tucked up into wheel well at least a inch or so. Was hoping for at least 2". Only way to do that is get a different offset wheel.

I will look into the ones rmalkow2 mentioned a while back just for some more testing.

I did find out if the backup light bulb is removed from right side lighting none of the lights on right side work in the rear. If I remove the bulb from left side backup lights the left lights will still work. E L E C T R O N I C ' S 4 ya..

I dont mind the look of these wheels but simply wrong backspacing.

By the way the Gas Cap Door (twist on) was actually a Hub Cap . . It was laying on floor and sounded fun to hold it up to take a pic . .


7B9170A8-9C54-413E-9C17-9C46C02E99CC.jpg


Gas Cap door for HubCap . .

06062680-5228-4064-A752-B0508A9C8C93.jpg
 
Last edited:
OP
T

TimeWarpF100

Well-known member
Joined
Aug 21, 2010
Messages
6,784
Location
not here
There's a place over here that does wheel modifications, not sure if they could do anything or give you any suggestions.

http://www.weldcraftwheels.com/

I sent a message to James.

The outer spokes are pretty much even with outer lip of wheel.

Prob the only way is to change the steel inserts and mill off inside of wheel.

Not sure they would be strong enough then.

Will see what James says.

Edit Add: I looked at wheel a bit closer, changing offset not going to happen . .
 
Last edited:
OP
T

TimeWarpF100

Well-known member
Joined
Aug 21, 2010
Messages
6,784
Location
not here
Auction month in Arizona. One never knows what might pull up for a visit!

'70 Eldorado Originally from Oregon, very nice car. 81k Miles

The '61 Caddy is originally from Sterling Colorado

Thought some would enjoy seeing them.

763E3462-C553-4BFA-BC19-902BBD3D122A.jpg


DBEAE8F5-D363-42A0-989F-C3AD5CCE7A2A.jpg


BCB83BBE-A547-463C-A336-EA7BF5FD6B5E.jpg


596EA1BD-EC8E-4147-8FDA-2119D6A62206.jpg


95E2F26B-BF45-46F5-9E3D-0F8957E99A00.jpg


2B4596AA-E890-465A-9270-94907EB4A7E1.jpg


81220E54-9B9D-484E-B8CF-856FC094DB99.jpg


4F788C06-C7E2-47EB-A090-8871FC092615.jpg


5E2050D1-BA0C-4267-82AF-D8C048576269.jpg


8CAB203C-4720-49ED-82D7-E6A127999DD9.jpg


ADDABEAA-00E3-4BB9-86C4-48EB5DBB5C6B.jpg


5203C320-C893-4B1C-942E-85F315D4A534.jpg
 

Stuart in MN

Well-known member
Joined
Sep 8, 2005
Messages
23,186
Location
Minneapolis
Those Cadillacs are beautiful.

Next up is to try and wire the '11-'14 Light sockets into a 1966 Taillight housing.

It will give me a double taillight, double brake light and a backup light to fit in the small housing. I will have one wire & socket left which I plan on using in the tool boxes at rear.

You probably already know this, but Econoline taillight assemblies from (I believe) late 1960s and early 1970s have a backup light built in, and are the same shape as a '66 pickup taillight assembly so they should bolt in. It may be easier to use some of them to adapt to the new wiring.
 
OP
T

TimeWarpF100

Well-known member
Joined
Aug 21, 2010
Messages
6,784
Location
not here
Those Cadillacs are beautiful.


You probably already know this, but Econoline taillight assemblies from (I believe) late 1960s and early 1970s have a backup light built in, and are the same shape as a '66 pickup taillight assembly so they should bolt in. It may be easier to use some of them to adapt to the new wiring.

I picked up some new lenses for a '70 with backup provision. The buckets seem to mount differently.

'70 I had a while back. Forgot how nice that truck was.

1142.jpg
 

C_F

ALLIANCE MEMBER
Joined
Jan 21, 2005
Messages
9,675
Location
Utah...SNOW BLOWS!
That's a good looking Bumpside!

I have been following your thread for a while now & thought I may as well pop in & comment. :) Your Ecoboost F100 project is sure turning out nice. I wish I was closer, so I could pop in & lend a hand now and then!
Oh well, I guess I'll keep rootin' for you from afar.:rocker:
 

teul2

Member
Joined
Jun 17, 2015
Messages
21
Location
Carrollton, MS
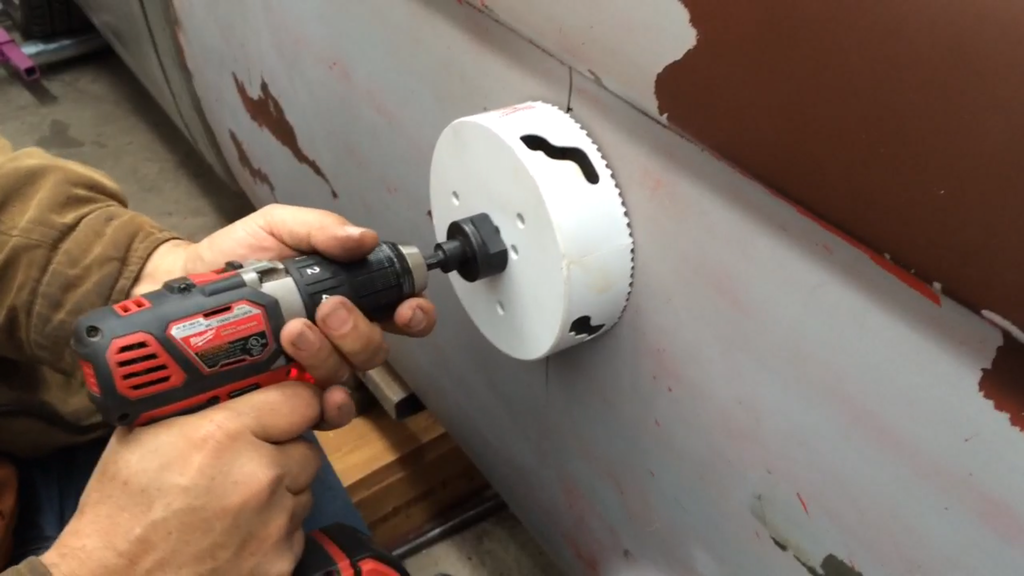
A few more pics on the fuel opening install.

A very large hole for sure.

I started out with a hole saw that was 1/2" smaller than what was needed.

257B22DC-896B-49E6-9E18-2C2AE53D65DE.png


Liking this thread even more. That Milwaukee Hole Dozer hole saw bit was made in my office in Greenwood, MS. Drill, assembled in another plant I am over (I'm an IT guy) in Jackson, MS. Thanks for supporting my brand. :bounce:
 
OP
T

TimeWarpF100

Well-known member
Joined
Aug 21, 2010
Messages
6,784
Location
not here
That's a good looking Bumpside!

I have been following your thread for a while now & thought I may as well pop in & comment. :) Your Ecoboost F100 project is sure turning out nice. I wish I was closer, so I could pop in & lend a hand now and then!
Oh well, I guess I'll keep rootin' for you from afar.:rocker:

I got a kick out of your Utah, Snow Blows!

A week or so I was helping my daughter drive back from Spokane to Phoenix. About 300 mi North of SLC we got caught in a blizzard where you could only see a few car lengths in front of you @ 45 mph. That lasted about 45 min to a hour before we made it through. Been a while since I seen it snow that hard . .

9671D4CC-49B9-474D-B836-EF28C7D60572.jpg


Liking this thread even more. That Milwaukee Hole Dozer hole saw bit was made in my office in Greenwood, MS. Drill, assembled in another plant I am over (I'm an IT guy) in Jackson, MS. Thanks for supporting my brand. :bounce:

If I need a hand tool and Milwaukee makes it that is always my first choice. Just never have an issue with them. Many many a Milwaukee tool used in this build!

Including today's job . . See next post.
 
OP
T

TimeWarpF100

Well-known member
Joined
Aug 21, 2010
Messages
6,784
Location
not here
One of the next hurdles in this Project is to get a tire & wheel that fits the timeline but clears the large brakes & clears the fenders. Nothing can be done to current wheels to make them work. I can gain a 1/2" or so by tweaking fender openings but dont really want to go that route as tires just stick out too far.

This evening came up with a brain"storm", of how to make a gauge for wheel clearance.
One can find them online for many many 100 $ or a cheapie china brand for 80.00.

I wanted to use something to really check clearance.

Looking at the brake rotor's and the inside of wheel decided to make my own tool.

Started off with this. A circle traced from a gallon paint can. Then using the MILWAUKEE nibbler just held the nibbler still and rotated the piece. Without trying too hare its very easy to hold it right on the line and very fast cutting. Its made to cut 14 ga or maybe 12 ga. 16 ga is like cutting butter. Here I forgot to take pic before I started.

9B610FAD-CA11-4868-9AAC-882ECDCC8567.jpg


BC609268-4C86-41E8-BB6E-55C407B21296.jpg


E6351887-43BB-4ED3-8817-106F5C3F9ABD.jpg


Not thinking ahead how I would do the next step much less than making a drawing. 1st step done.

144FA0EB-B978-4858-9FA4-32760E416051.jpg
 
OP
T

TimeWarpF100

Well-known member
Joined
Aug 21, 2010
Messages
6,784
Location
not here
86mm Hole saw (needed 87 mm) Closest I could find.

7901D56B-9771-460D-A9D5-2702BF7BA930.jpg


This is to fit the hub pretty much perfect both front and rear.

Cut most of the way through on my owned for 24 yr's 35.00 drill press. (who knows how old it was when I got it)

CAFF9815-FBCD-4C5F-A476-10BAA6D821C2.jpg


Finished off from other side.

1690D772-56E1-4FBB-8422-E5BE5EB39FB8.jpg


182E2E4D-7B7E-4DE9-87FB-AF126F2B9911.jpg


I then clamped it through the spokes of wheel while I traced out the holes with a marker.

DED0A8E3-DE61-4802-984E-E43F50CAD51C.jpg
 
To avoid these ads, REGISTER NOW!
OP
T

TimeWarpF100

Well-known member
Joined
Aug 21, 2010
Messages
6,784
Location
not here
I did not have a transfer punch large enough so thought how about a stock lug nut and use it to align it. Lol, Worked!

BF29EAED-7BB3-4D72-8691-262E980A3D2C.jpg


Not sure how this happened but it actually fit the hub!

11F33BA5-817A-4FEB-8290-76E237C21660.jpg


Held on with a few lug nuts I made this 5/16" rod to fit the shape of caliper and caliper mounting.

21C421BA-2B8E-4A24-A265-8299A6D89999.jpg


Made it for 1/8" clearance including cutting end off where it met spindle.

LuCkY '66 comes through once again!

B9A688CC-D920-45D3-BCFA-72C234AFAB2C.jpg


E89B9A0E-7C78-412C-8224-04C679ADDE53.jpg


EDA35438-B190-4CF3-84DC-2C903CE61535.jpg


F584C9E4-E1B1-4090-B80C-98BF05B41A5C.jpg


OOP"S, Fits the rear too! ToTaL LuCkY.

7742F144-DBD3-4CCB-A902-812B5194EA4D.jpg


Check fit to wheel

1DCC97A1-F233-4108-8DE7-FB8C0B326A37.jpg


Better quit while I am ahead!

6B920EA5-E2F2-48F8-ADAE-98C82116A684.jpg


I have been talking with a Well Know Wheel Company so will give this to them to see if it helps for measuring. Just by rotating the rotor I can tell how much clearance I have on a full rotation.

A couple other idea's now too. Will wait to see how this plays out before I spill more beans . .

ok, hint:

66%20cap.jpg
 
OP
T

TimeWarpF100

Well-known member
Joined
Aug 21, 2010
Messages
6,784
Location
not here
Not much to report but did find out the "11 taillight harness can be used with zero mods on the '66 box.

Started process of making housings from '66 buckets to work with the '70 style lenses and will now be 3 bulbs per side vs 1.

'66 here cut apart.

Note no prevision for backup.

 
OP
T

TimeWarpF100

Well-known member
Joined
Aug 21, 2010
Messages
6,784
Location
not here
ABBA8D9D-492E-4C70-B344-B49EF288C7C0.jpg


AE14093A-3BED-4809-9245-3C00CD06D3E6.jpg


12A048A6-77EE-4C06-BC91-D72CBA9F1DAF.jpg


of course Backup lights too.

E444D948-FBFE-4A79-A314-6AB94F6987D2.jpg


Next Idea was to make the tool boxes for in floor of box.

I had the start of a aluminum fuel tank had bright idea to cut it in half and use it . .

64D38E9E-F0A0-4028-9DD0-3816B97C2100.jpg


It cut in half just fine but the brain is lacking on how to go about building the box in floor of truck. I know the size just not how to go about doing that.

CD517C59-9FB5-4159-B5E2-40B18BF3CC6F.jpg


491D25E3-A2B6-4A6E-8B23-8D6C25AB57D8.jpg


Pile of aluminum from behind shop. I need a design program to help me do this.

Trying not to purchase materials for it. May end up building it out of mild steel vs the aluminum.

2463E8F8-7773-4EE7-9A95-740786BA0425.jpg
 
Last edited:

Redwolf947

Well-known member
Joined
Feb 13, 2015
Messages
613
Location
South East WI
I'd say cut that tank up and weld the boxes to fit the opening you have just put a lip at the top so you can lift them out to clean them? Your doing a great job TW.. Keep it up don't get too hung up on these boxes..
 
OP
T

TimeWarpF100

Well-known member
Joined
Aug 21, 2010
Messages
6,784
Location
not here
Beware galvanic corrosion where aluminum meets steel

I have decided against the aluminum tool box/storage


I'd say cut that tank up and weld the boxes to fit the opening you have just put a lip at the top so you can lift them out to clean them? Your doing a great job TW.. Keep it up don't get too hung up on these boxes..

I did kill a couple days trying to figure out how to go about it. Nothing really clicked. A biggie is I have a moving suspension component there. (bolt for upper spring shackle) I could put a notch in it . . .

It will also add a fair amount of weight, I searched all over town and could not find a suitable latch that would not look out of place.

I also have a issue with trying to keep water out yet make it somewhat flush so its more hidden.

I finally figured out how to go about making a proper lip to keep water out but would have to spend a lot of time cutting and fitting.

Pretty much leaning towards spending the time getting a bit more important things fitting. Like the tires and wheels.

How the truck sits now I simply could not drive the truck.

I looked into the steel 12 hole wheels but they too have the wrong offset and will not fit.

Custom offset wheel will work in back but not in front so that means cutting the front fenders apart . .I will need at least 1" per side.

One thing that may help on front is if I lower it enough the upper arm is near level now. Once it starts to pull in it just may help the tires to clear.

A bit beyond overwhelmed again.
 
OP
T

TimeWarpF100

Well-known member
Joined
Aug 21, 2010
Messages
6,784
Location
not here
Re: 1966 F100 EcoBoost Engine Swap & 1966 427 Project

Looks awesome! Glad to hear you are fighting through your health issues. I love this build and celebrate with you -as many do- as you post up progress pics and video.

What type of laser set up are you using for your truck bed?

Reading back through a few pages realized I did not answer your question.

The laser is CST/berger ILMXT Mini Laser Cross Level Self-Leveling

Model 58-ILMXT
Its made by Bosch Tool Corp.

www.CSTberger.com

I really like it at its price point.

I have made a few extra attachments for it. Use it quite often.
 
OP
T

TimeWarpF100

Well-known member
Joined
Aug 21, 2010
Messages
6,784
Location
not here
Have you talked to these guys yet? They should be able to make any size and offset you need in a steel wheel and then use the '66 hub caps.

http://detroitsteelwheel.com

I have not. I did follow the truck they built with the EcoBoost though.

I will give them a call as soon as I get a few more needed measurements.


I can push out the rear openings approx 1/2" without it looking too funny.

I need a bunch more. With a 1 1/4" more positive offset wheel on rear I think I can make it work.

Need the same on front but because of caliper's it will not allow that. I have less than 1/2" now from wheel to caliper. Kinda complicated . .

As I mentioned earlier if I lower the truck enough in front it may tuck the wheel in enough to work.
 
Last edited:

MScott

Well-known member
Joined
Jun 30, 2009
Messages
1,616
Location
Eastern Ontario
On one of the many TV shows (don't remember which one,) they had a problem with fender clearance and used a baseball bat which they rolled between the tire and the fender lip. It apparently gave them enough of a flare for clearance. This sounds rather redneck, and I have never tried it myself but it might be worth considering. Has anyone tried this?
 

paigej

Well-known member
Joined
Dec 5, 2012
Messages
253
Location
Arizona
Yes, it works. Gotta use a wood bat but like you said its a little redneck. There is a tool that bolts to the axle and has a roller on an arm that could also work. Best bet is to get wheels that fit :thumbup:
 
Last edited:

saceone

Well-known member
Joined
Dec 31, 2011
Messages
388
Location
Montreal Canada
I'm 29 but I remember back in the day (lol) we used to roll our fenders by jacking up the car, sticking a baseball bat between the fender and the tire, heated the fender with a heat gun (mom's hair dryer) and rolled them suckers!


that was on a brand new golf back then, I was 17... life was easy...now just looking at the 911 is expensive..

great build, keep it up!
 

C_F

ALLIANCE MEMBER
Joined
Jan 21, 2005
Messages
9,675
Location
Utah...SNOW BLOWS!
I got a kick out of your Utah, Snow Blows!

A week or so I was helping my daughter drive back from Spokane to Phoenix. About 300 mi North of SLC we got caught in a blizzard where you could only see a few car lengths in front of you @ 45 mph. That lasted about 45 min to a hour before we made it through. Been a while since I seen it snow that hard . .

I hear ya, I've already been caught in two storms like that this year...one was on my commute to work! That was a long commute.:mad:

Nice work on the taillight mod!:thumbup:
 
OP
T

TimeWarpF100

Well-known member
Joined
Aug 21, 2010
Messages
6,784
Location
not here
On one of the many TV shows (don't remember which one,) they had a problem with fender clearance and used a baseball bat which they rolled between the tire and the fender lip. It apparently gave them enough of a flare for clearance. This sounds rather redneck, and I have never tried it myself but it might be worth considering. Has anyone tried this?

I saw Foose do that before.

Problem is I need more than just a fender lip adjustment.

I really had not gotten to the point I had to think about it seriously how I was going to go about fixing the tire clearance issue. I knew at some point I would have to deal with it and it appears the time is now . . If box is on I cannot move or drive the truck until its handled.

So much to do in so little time .
 
OP
T

TimeWarpF100

Well-known member
Joined
Aug 21, 2010
Messages
6,784
Location
not here
A fellow Garage Journal member was in town for the auctions and stopped by for a visit yesterday. It does not appear he has posted in this thread before but thanks to him for dropping by to check out the EcoProject!

Last few days have been quite the zoo around here but hoping this weekend can make a bit more progress.

Gotta finally get to the wheel tire clearance issue. I have been putting it off for quite some time now. Lets just hope it does not get so involved that I have to start changing suspension pieces.

Rear not a issue with a 1" to 1 1/2" more positive wheel offset but the fronts are already less than 1/2" from touching the caliper.

Only possible is to drop the front a country mile to **** the tire in on top then mod the bottom control arm mounting.

Time to get serious about the wheel/tire clearance while wrapping up the box project.

Then its time to get after the wiring issue's (where and how it will all fit)

I have lowered the rear suspension approx 3" now so really need some tire clearance there. Drop the front another 3", maybe cut the front fenders apart if push comes to shove . . That will not work on the rears.

I do have the fender lip roll tool's for my air hammer but have been unable to find them.

Probably been 25yrs since I used them.
 
Last edited:

gsloan

Well-known member
Joined
Nov 6, 2012
Messages
67
Location
Campbell, CA. Valley of hearts delight
You probably already know the front track width on the stock 65-72 F-100 is wider by
3-4 inches than the rear. Are you having tire clearance problems in the front? If not I still think narrowing the rear end is still the easier way to go. It may even be possible to use the short axle on the long side leaving you only one axle to shorten. I always want you to know how much I enjoy all that you share here. The problem solving is what makes me keep coming back.
 

white6589

Well-known member
Joined
Feb 27, 2011
Messages
351
Location
Maryland
Problem is I need more than just a fender lip adjustment.

Hi Randy,

Love the progress you've made lately.

I was thinking about the use of a lip roller on your f110 even before it was suggested recently. Was wondering if using the lip roller without the wheel housings installed would enable the roller be used to persuade the fender to bump out a bit as the lips are being rolled in. Since you're looking for such a small amount I thought this may work out to get clearance you're looking for. If it works?

Just a thought.
 
Status
Not open for further replies.
To avoid these ads, REGISTER NOW!
Top Bottom