To avoid these ads, REGISTER NOW!

30x40 Attached Hot Rod Shop

OP
M

mlyonsdc

Well-known member
Joined
Nov 23, 2018
Messages
238
Location
USA
Well I am waiting on a new headliner and at a stand still with the cage. Ray was finishing up some welds underneath and it got to hot and burnt the headliner. In order to get a new headliner in there we have to raise the body one more time so I can't finish the door bars till that's done. I am also going to start sanding and painting at least the top of the cage before I lower the body.

In the meantime I decided to jump back on putting the motor back together. I've had the short block done for awhile but needed to finish the top end assembly and figure out the accessory drive and custom crank trigger. I also need to do some more fab work to the headers for the new turbo which I probably won't do till it is back in the car.

Like the rest of this project very little is a bolt on or plug-n-play and the motor is no exception. When I was racing this car back in 2009-10 it was the fastest GN Buick V6 with production Stage 1 heads and planned to run pretty much the same motor program. It dawned on me that the only thing remaining in this build from the previous build is the block lol!

Now for some good Buick Engine ****!

I run a Buick Motorsport (BMS) Stage 2 on-center block. The factory "109" block that the GN came with simply wont live at the power level I am making with this motor which was over 1400hp in 2009 and I am planning on 1600 with the new set up.

A little background on all the different Buick blocks which can be confusing. Buick had a very successful race program through the 80's and well into 90s. The Grand National itself was made as a testament to the success of the Buick V6 in the NASCAR Busch Grand National series which it dominated for a long time. In addition they ran successfully in Indy Cart, ASA and Indy Lights programs among other programs.

As result Buick made a ton of high performance parts, 4 bolt main high nickel content blocks with 14 head bolts, forged crankshafts and host of other cool stuff. They also made a symmetrical port Stage 2 cylinder head which is really bad *** and almost all the really fast Buick guys run, except me of course lol!

The Buick V6 originally was an odd fire motor where two rods shared a common crank pin and the Odd cyl fired at 90 degrees and the evens at 150 degrees. Needless to say this wasnt the smoothest motor so Buick made it an even fire by splitting the common rod journal on the crank and firing even and odd cylinders evenly at every 120 degrees. When they split the rod journal it added an 1/8" of material between the rods so Buick off set the rod to the crank pin instead of designing a new block. Most all production Buick V6s are off center motors including the one in the Grand National. The original Stage 1 and 2 blocks made by BMS were also off-center but they eventually went to on-center. The on-center blocks are a stronger block with less side load and wear on pistons and bearings but the odd bank of cylinders is now an 1/8" off from a production block. While factory heads will bolt right up the factory intake will not since it is now an 1/8" off. Everything else will still work with some tweaking and spacing and it is no longer just a simple bolt in for a stockish Turbo Buick. Most on-center blocks are also dry sump with no wet sump pick up provisions so they require an external oil pump or one of the "Duttwieler" pumps that uses a factory front cover and pump housing.

The early off-center Stage blocks are highly desirable to the Turbo Buick guys since they also have wet sump provisions and can easily be dropped in a Grand National with all the stock parts bolting back on the motor including the intake and accessories. The original motor in my Ttype was a girdled 109 block with stroker crank. I ended up with an offcenter S2 block that I built for the car.

Here is a pick of a Girdled 109 block which I had in my Ttype originally.
0402202239.jpg
I sold this motor and built a 3.8 012 off-center Stage 2 block for the Ttype which when installed looked identical to the motor that was in the car. While the Ttype is a legit 800hp motor it was within the capable limits of the 109 block pictured above but S2 can handle significantly more power. The biggest difference is the steel four bolt mains and 14 head bolts as opposed to 8 for the factory 109 block. Here are pics of my Ttype S2 short block notice were the wet sump pick up is compared to the 109 above.

0329201931a.jpg0815210752_HDR.jpg

Like I mentioned the on-center blocks were stronger and BMS made a bunch of them the early ones were like the off centers and actually had wet sump provisions a place for an oil dip stick, then they started cross bolting the front and main rear caps and were totally a dry sump block with no dip stick provisions.

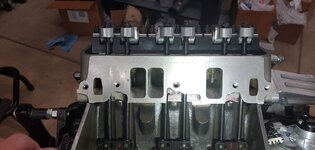
Here is a pic of a S2 oncenter with x-bolted front and rear main caps. This is actually the short block I ran in 2009. It also had roller cam bearings in it which is what the oil line in the valley was for.
0117221648.jpg0117221652_HDR.jpg0305221418b.jpg

Now the short block I am going to run has 6 bolt center caps. The crank is a new 3.625 billet Crower, rods are 6.300 Crower billet, the pistons are 4.025" Race Tech with about 10.5:1 CR at about 278ci. And yes I will run 40 psi of boost with that CR lol!
1224221611_HDR.jpg1224221612_HDR.jpg1218222304.jpg
 
To avoid these ads, REGISTER NOW!
OP
M

mlyonsdc

Well-known member
Joined
Nov 23, 2018
Messages
238
Location
USA
Big power= lots of air. A Buick V6 is a very small box to stuff it all in, gotta get it in there somehow lol!

To run mid 170's I was at 38psi. I did go to 42psi and really didnt pick up any probably due to back pressure issues that turbo is known to have. The new Bullseye NLX I have should have a lot less back pressure at that boost level.
 
OP
M

mlyonsdc

Well-known member
Joined
Nov 23, 2018
Messages
238
Location
USA
Cool stuff - Thanks for sharing the history for those of us not in the know.

What fuel and engine management are you running?
Thanks, the next post will be on cylinder heads and the top half of the motor.

In 2009 I was running an Accel Gen 7 and C16.

The new set up will certainly be on some variation of corn cut with race gas for the track and pump E85 on the street. It will be a flex fuel car too.

The electronics and wiring package for this new build is going to be extensive. I will cover it in depth when its installed. For a sneak peak it is a Holley Dominator, Davis Profiler/VPS and Racepak Smartwire.
 

Paul_VR6

Well-known member
Joined
Dec 27, 2012
Messages
301
Location
Oxford, Pa USA
Super cool project and neat to learn about the Buick v6. From what I have seen some strange things happen if you do certain ethanol blends with race fuel. I have been very happy using e98 and ignite red but even some canned fuels with lead like C85 don't hold up as well as you think with big power.
 
OP
M

mlyonsdc

Well-known member
Joined
Nov 23, 2018
Messages
238
Location
USA
So I covered the bottom end and now for the top end. One of the things that makes my engine combo unique or at least different than the other high HP Buick V6's are the cylinder heads. I am running a Stage 1 production style wedge head that is essentially the same head configuration that came on a production. Almost all the high HP (over 1200) combo's are running the Buick Motorsport Stage 2 heads which were never used on any production motor but used extensively almost exclusively in Buick racing, and for good reason it is a bad *** head! Not only that but they are plentiful and relatively cheap compared to running an aftermarket production style head.

Below are pics of a Stage 2 motor and heads that I picked up as a back up and was actually a Childress Racing motor. As you can see S2 heads are radically different than a production style head.
0703220850.jpg0925221352.jpg0925221352_HDR.jpg0925221353.jpg0925221407_HDR.jpg

The factory head is a "8445" casting and they only came with 8 head bolts so they are not very useful on a block that has 14 head bolts. Buick did make a 14 bolt cast iron Stage 1 head but they were experimental and only a few sets were produced. I have only seen one pair of them ever. Buick did make a Stage 1 8 bolt iron head which I actually had on a motor back in the 90s. Below are a set of 8445 heads that had extensive amount of work done to them including moving the valves for larger springs and overized intake and exhaust valves and used a custom set of shaft mount T&D's. They were on the 109 motor I had in my Ttype.
1124192021.jpg

The first aftermarket head for the Buick V6 was from M&A castings and was almost a direct copy the BMS Stage 1X head with 14 head bolts. These heads flowed well for the times but had a lot of porosity problems with the castings. Champion Racing released a new aluminum head in the late 90s for the Buick V6 with 14 head bolts and custom T&D's which I have a set of on my Ttype.
0818211948_HDR.jpg

The Champion heads worked well but developed cracking problems on higher horsepower cars. I went through at least 3 sets of them between 2005-2010 and the last set I had on the car in 2009 was literally held together with GM Seal tabs lol. Tom at Champion continued to improve the head as we pushed the limits and eventually came out with a more durable casting which he made with a custom raised runner for me in 2010. Unfortunately I never ran the car with this head, I did however flow them against my current head and a set of Stage 2 heads for comparison.
1113212034a_HDR.jpg
1113212034_HDR.jpg
Unfortunately Tom at Champion passed away a few years ago, he was an wizard with cylinder heads too and a real loss to the hot rod community. Champion Racing Heads was recently purchased by another Buick owner who is currently trying to breath new life into the business.

Finally for the heads I am running are from TA Performance who released their own casting around 2008. They are a much beefier casting and to date the only TurboBuick to make over 1200hp with a set of Stage 1 prod heads and not crack them is my buddy Tommy who ran TA heads when he went 7.80's@176. I think I posted the video of that run earlier in this thread. The TA heads I have flow about 20 CFM more than the raised runner Champion above, have a much better pushrod geometry and literally wiegh at least 5# more than the Champion head. If I crack these heads I will be going to the Stage 2 head. The TA's flow 290 on intake, the Champions 270 and the Stage 2 335 all on the same bench same day. I seem to have pictures of everything except my cylinder heads lol!
 
OP
M

mlyonsdc

Well-known member
Joined
Nov 23, 2018
Messages
238
Location
USA
Why hadn’t you decided to just run the stage 2 heads before now?
I started with M&A heads and it just progressed from there, we got faster and faster and then it was well how fast can we go? Then we put the motor on an engine dyno and tested different cam profiles, then we designed a variable stall controller and played with different TQ designs, then we came up with a wide LSA cam design that allowed us to make power above 7k rpm with the same small port heads. This was all way back in 2006-7 no one else was doing stuff like this. Plus at the time I was not only the fastest stage 1 head car I was faster than most of the Stage 2 head cars out there except for two , Dave Fiscus and Tony Gomes. Both of whom had top shelf cars and motors Stage 2 heads with large frame billet wheel PTE8891 turbos on T6 Flange. I was still running a mid frame 4788 on a T4 flange!

Dave Fiscus was the top dog in the class and I wasn't far behind him running 8 teens with smaller heads, smaller turbo, smaller everything lol! I soon sold the car after that to build a 25.3 car to compete in 275 radial racing. It died in chassis shop hell, I moved on to doing Ironman triathlons and Dave soldiered on and continued to dominate TSO. He has now moved on to dominating Ultra Street in a Buick powered Mustang and built the baddest x275 Buick GN/Gbody ever, in case you missed it on Youtube lol!

Here is Dave at Edgewater testing the same day I was there running 8 teens. I believe this was the first time he got his car in the 7s. Good guy and good friend I couldnt be happier to see his success today.

I joined this site in 2018, built a garage and dove right back down this rabbit hole! After getting the car back in 2021 I decided I wanted to finish what I was doing back then and set a new record for Stage 1 heads which I believe is currently 7.72@178 @ 3200#. If the TA Stage 1 heads fail I will not buy a new set or fix them and finally go Stage 2 but honestly I think they are going to hold up and do well. I feel I should be able to get in the 7.50s and over 1600hp. My goal is no longer class drag racing I want to do drag-n-drive and avg in the 7s with a Buick V6.

Here are the TA heads I have on the motor now notice how much more material they have than the Champion. The TA head also outflowed the raised runner Champion head by more than 20 cfm and do no require a spacer to raise the runner. I am also able to run a 3/8" pushrod which also has way better geometry than the Champion.
0111231923-jpg.1805977

0111231924.jpg
If and when I put Stage 2 heads on the car here is the one I will use.
0111231925.jpg
 

Attachments

  • 0111231923.jpg
    0111231923.jpg
    412.5 KB · Views: 400
OP
M

mlyonsdc

Well-known member
Joined
Nov 23, 2018
Messages
238
Location
USA
Super cool project and neat to learn about the Buick v6. From what I have seen some strange things happen if you do certain ethanol blends with race fuel. I have been very happy using e98 and ignite red but even some canned fuels with lead like C85 don't hold up as well as you think with big power.
I was going to try the Renegade race E85, my buddy Tommy had a lot of success running it and swears by it.

Thanks for the comments and likes. if anyone has questions I am happy to answer, no super secret race program here lol! I also welcome feedback on the project. I went into detail on the motor build since not a lot of people are familiar with them and how I ended up where I am with it was also a story in itself. I can have a lot more technical stuff I can share this project progresses and gets closer to running.

FYI Headliner showed up today!!
 

82355

Well-known member
Joined
Jul 13, 2013
Messages
689
Location
Bradish Nebraska
The first time I saw an even fire Buick crankshaft, I couldn't believe it held up to stock power levels, let alone being hopped up. Always blows my mind how much power those silly looking offset crankshafts can handle. Keep posting the Buick stuff!

Martin
 
OP
M

mlyonsdc

Well-known member
Joined
Nov 23, 2018
Messages
238
Location
USA
There was a time when I would have laughed at a small tire car with a chute. Would have accused the guy of posing..lol
Lol, I remember those days too. I actually drove my car a lot with the chute and my license plate which said 8secGN which always got attention. I remember being a local car cruise in 2007-8 with Ray and his Dad who got into an argument with another older gentleman about my car being as fast as it was and I drove it there. I even got a fist full of timeslips out of the console and he still refused to believe it lol!. Chute strings give it away, nice and clean poser, It is common place today though.
 
OP
M

mlyonsdc

Well-known member
Joined
Nov 23, 2018
Messages
238
Location
USA
The first time I saw an even fire Buick crankshaft, I couldn't believe it held up to stock power levels, let alone being hopped up. Always blows my mind how much power those silly looking offset crankshafts can handle. Keep posting the Buick stuff!

Martin
I still can't get over how tiny they are either! I was actually planning to post more info on the cranks. They are starting to become an issue as we keep pushing the limits. Fiscus has broken a few and the Godfather Kenny Duttwieler is saying 1800 is the limit for the even fire crank. That is probably about were Dave is with his car in Ultra Street right now. I am only shooting for 1600 for that reason and I have a $4k Crower Billet crank. My turbo and fuel system are supposed to be good to 1800.

I believe Dave's X275 car is going to be an odd fire crank which has a common crank pin for two rods but firing order in 90/150. I know of a few other high end odd fire builds going together right now and all are running on methanol and should be eclipsing 2000hp. The most power made that I am aware of was by Duttwieler he made 2300hp with an Odd Fire motor on an engine dyno, motor was put in a car but never made a pass.
 

Old Man Roger

Well-known member
Joined
Apr 6, 2017
Messages
17,654
Location
Palm Coast Florida
Lol, I remember those days too. I actually drove my car a lot with the chute and my license plate which said 8secGN which always got attention. I remember being a local car cruise in 2007-8 with Ray and his Dad who got into an argument with another older gentleman about my car being as fast as it was and I drove it there. I even got a fist full of timeslips out of the console and he still refused to believe it lol!. Chute strings give it away, nice and clean poser, It is common place today though.
I saw a chute on a clapped out 2000 trans am just the other day.lol PBIR, formerly known as Moroso Motor Sports Park, closed recently, so there will be less posers as time goes by.

Lots of great deals on race cars around here, now that the track closed.
 

Paul_VR6

Well-known member
Joined
Dec 27, 2012
Messages
301
Location
Oxford, Pa USA
Interesting that they do both with and without lead, that would be pretty cool to back to back. Never been able to do a real comparison with one brand.
 

82355

Well-known member
Joined
Jul 13, 2013
Messages
689
Location
Bradish Nebraska
I believe Dave's X275 car is going to be an odd fire crank which has a common crank pin for two rods but firing order in 90/150. I know of a few other high end odd fire builds going together right now and all are running on methanol and should be eclipsing 2000hp. The most power made that I am aware of was by Duttwieler he made 2300hp with an Odd Fire motor on an engine dyno, motor was put in a car but never made a pass.

Does the odd fire cause issues at those power levels? Are they streetable? How is the sound?

Martin
 
OP
M

mlyonsdc

Well-known member
Joined
Nov 23, 2018
Messages
238
Location
USA
Does the odd fire cause issues at those power levels? Are they streetable? How is the sound?

Martin
Odd fire is MUCH stronger at those power levels and why guys end up switching. I don't see why it wouldn't be streetable the original production Buick V6 in the 60s was an oddfire and in no way was it considered to be performance motor lol!

They do have a distinct sound at idle.

Dave is really pushing new territory with the Buick V6. The fastest Buick V6 in a GN is probably still Duttwiellers car after he sold it. It went 6.75@205 at the 2010 Buick Nats. I am not 100% sure it was an odd fire motor but pretty certain it was.

The fastest Buick V6 ever is still Duttwieller in his pro-stock Cutlass at 6.60's. But then there is the all time legend Buddy Ingersoll who did **** with a Buick V6 in ProStock in the 80s we are still trying to figure out today. This video is definitely worth watching!

I am sure the Duttwieller GN was light but lets say it was 2700# which would be heavy for a car like that. At 2700# he was making 1800hp. Dave is running 4.40s@154 at over 3000# in his Ultra Street Mustang right now and making close to the same power maybe more? His new x275 car is 2450#! In all fairness aerodynamics plays a big role in quarter mile racing with a Regal body and some of those guys may be making more than calculated HP numbers to push the Regal nose through the air at 200mph in the quarter mile.

Also on that list is Len Freeman who when 6s at 2008 Nationals. And the only guy I am 100% certain has an odd fire motor is Gene Fleury out on the west coast who has run a bunch of low 7s at close to 200mph and still has his car but I don't think races it much these days. And that rounds out all the top dog Buick V6 GNs I am aware of.

Not a lot of guys pushing the envelope these days other than the small tire guys like Fiscus. There are a few builds going on now. My buddy Tommy who bought my first 25.3 GN project and now has a 2008 Z06 corvette with a 6.0 cert he is going to put a Buick V6 in. He is collecting parts now and just ordered a new Bryant billet odd fire crank which will be here in September. I will be somewhat involved in that build and have more first hand knowledge once he gets started with it.

All of Dave's stuff will be 1/8 mile but to be competitive he will need well over 2000hp even at 2450#. The current x275 record is 4.16@183 and with all things its a freakin Cummins Diesel lol!

We should see some new and exciting stuff out of the Buick world soon.

Enough of this race car **** and now back to my street car junk lol!
 

82355

Well-known member
Joined
Jul 13, 2013
Messages
689
Location
Bradish Nebraska
Odd fire is MUCH stronger at those power levels and why guys end up switching. I don't see why it wouldn't be streetable the original production Buick V6 in the 60s was an oddfire and in no way was it considered to be performance motor lol!

I am sure the crank is stronger without the offset journals. I was thinking more along the lines of harmonics with the timing of the cylinders firing.

Mart
 
To avoid these ads, REGISTER NOW!
OP
M

mlyonsdc

Well-known member
Joined
Nov 23, 2018
Messages
238
Location
USA
Well it has been a long last two weekends so I am going to skip over some of the motor build I did previously. Ray and I worked on this Fri-Sun last weekend and this weekend and easily have 150 man hours in it between the two of us. But the cage is DONE and has passed NHRA inspection for a 25.3 cert for 6.50 ETs and slower and up to 3600#!!
0127231452.jpg

I am actually exhausted but can't even begin to tell you how proud I am of the sticker. If you have been following along we had no idea how to tig weld, bend tubing or any of it before we tackled this project and really learned how to do most of this by watching youtube!

Once I got the new headliner installed and top of the cage painted I dropped the body back down for the last time, or so I thought...

We got the primary diagonal door bars bent and in and I started laying out the secondary bars and the gussets need for the 6.50 cert.
0121231656_HDR.jpg0121231655_HDR.jpg

Once I started on the secondary we quickly realized we didn't account for how to weld the outside of the bar. We put a lot of thought into how go about building this and still being able weld it but didn't consider this part. It looks nice having the bars all tucked nice and tight to the body but you still have to TIG weld them 360 degrees which is literally a nightmare.
image20081.jpgWell you have to be really creative and we got lucky with this one as we were able to raise the body to get the out side of the weld in hole that the factory runs the door wiring harness through. Ray some how got two hands and a tig torch in there and was able to weld the outside of the bars.
0127231229_HDR.jpg

Once we passed that we dropped the body down for again the time and finished the rest.
0127231726_HDR.jpg0129231433_HDR.jpg0129231619_HDR.jpg0129231618.jpg
 
OP
M

mlyonsdc

Well-known member
Joined
Nov 23, 2018
Messages
238
Location
USA
While the main part of the cage is done there is still a TON of work that needs to be done. Starting with the rear I started laying out some of the rear bars. I cut out the rear spare tire well and re-purposed the original A-pillar bars that I scarped earlier. The angle and bend was a perfect fit. I had to cut even more holes in the truck floor lol!
image20303.jpg
We managed to get them in and fit this weekend too
0129231619.jpg
The rear needs an x-brace and I am considering a few different ways of doing it. I need it to be above the rear as close to where the anti-roll bar attaches which is on the front x-member
image20318.jpg
image20322.jpg
I was going to cut the original chute mount out and redo it with gussets and extra bracing but then thought about and the damn thing was raced with it like this for at least 5 years and has seen MANY 170+ mph stops at 3450#. The bar is .150 wall 1.75" tubing so I left it and attached the new rear clip bars to it and will be adding a couple of gussets to the chute mount. After all we are planning to go faster this time lol!!image20325.jpg
 
OP
M

mlyonsdc

Well-known member
Joined
Nov 23, 2018
Messages
238
Location
USA
I remember putting a 6PT cage in my 81 malibu back in the day, can't even imagine doing one like yours..lol Even that little cage stiffened up that malibu quite a bit.
The fact that we did this like we did just goes to show how little we knew when we started lol!! Seriously we were watching youtube videos in April/May learning how to turn on the TIG welder and figuring out how to put the tubing bender together lol! If it weren't for Justin at TFS and Jodi at Weldingtips I don't think we would have gotten this far this fast.
 
OP
M

mlyonsdc

Well-known member
Joined
Nov 23, 2018
Messages
238
Location
USA
We finished up the last pieces of the cage this past weekend by welding in a x-brace and the rear clip bars. I only have two gussets I need to put on the parachute stub that are already made and a couple of small spots to weld. That is it no more bars to bend fab or weld at this point. The last few things to tackle will be the pedal mounts, window net and tabs for seat belts, fire system and parachute cable etc.
0205231304_HDR.jpg

I had a hard time deciding if I wanted to put a mini-tub in along with another crossmember in the rear but decided against it. The frame rail notch on the car is not really deep and can be cut another inch or so back to the inner rail which is all that is required for most classes. This would need to be done in order to any more clearance and make putting a mini tub in worth it. If I cut the frame rail any deeper I would also be required to run another inner frame rail since my current frame is actually a boxed steel frame rail it is accepted as a part of the 25.3 spec without the additional 2b inner frame rail.
InkedRear Frame.jpg

That extra rail would also create a lot of extra cutting. So we decided to stop here. I accomplished what I wanted and that was getting a 6.50 cert and keeping as much of the original car as possible. This car still has the most of the original floor and trunk pans, stock wheel tubs, all steel and glass body and will have most of the factory interior including back seat. I am hoping the current motor will run down into the 7.50 range so it didn't make sense to me to do a 7.50 cert cage that really couldn't be upgraded down the road to a faster cert without almost completely cutting it our and starting over. Right now if I decide on a faster combo or something stupid like twin 98s on methanol on a BBB with billet heads the rest of the car can be updated pretty easily.

The motor is also complete, I had a few more posts to make on some of the custom stuff we built for it like the 12-1 crank trigger and custom MSD cam sensor, went to a belt drive pump and used a Buick S2 front cover for a dry sump motor. We also made custom stands for the Coils. I will get into more details on the build later, next step is making a turbo mount and redoing the passenger side header, crossover and downpipe to fit the new NLX88 I am planning to run.
0205230916_HDR.jpg
0205230916a_HDR.jpg
The turbo is a mid-frame NLX88 from Bullseye and it is a pretty bad *** piece. It is 88mm compressor billet comp wheel they are are known for making big power in addition to looking cool.

This one is rated at 1850hp, I am hoping to get 1600 out of this combo.
0511221941a_HDR.jpg

Bullseye makes all parts for this turbo including a billet center section that is dual ball bearing and a custom compressor cover with a tunable compressor cover that allows you to adjust the inlet
0511221942_HDR.jpg
The turbine side is where most of the big changes are happening. My old combo had a journal bearing billet wheel Precision 4788 with a T4 flange with a .96AR housing with a 92x82mm Garrett turbine wheel. The NLX88 has a 96x88mm turbine wheel with a 1.00 AR housing a 3" V band inlet.

0511221942a_HDR.jpg
I considered going straight to a T6 housing and turbine flange and at the power level I am planning it wouldn't be a bad choice especially if I decide to go bigger as just about every turbo bigger than this will be on a T6. After talking to Bullseye they told me to save my money and I should be able to get the power out of this combo with their turbo that I am looking for.

This thread should start getting into the cool stuff and I can't wait to start pulling out all of the stuff I have been collecting for this build. Wait till I start posting about the electronics package that will be on this car!!

Right now Ray and I are little burnt out working on it and going to take a small vacation to Orlando to watch the start of Sick Week. While we did not get the car done in time for the race the race promoter did switch us to Sick Summer in June in the mid-west which we are certain to make barring any major set backs. So for now our first planned outting with the car should be in May at the Buick Nationals in Bowking Green KY.
 
OP
M

mlyonsdc

Well-known member
Joined
Nov 23, 2018
Messages
238
Location
USA
It has been one year today that we pulled the car apart and started this project. It is still not done but we keep plugging away at it and today actually put the body panels back on and the car looks like a car again.

Once we got back from Orlando and watching the start of Sick Week I put the motor and trans in the car to start fabbing the cold side. We also had to figure out the pedals and steering and start gettin. Since I am only 5'7" and I moved the seat back I was worried about the pedals. We were able to simply make spacers for the factory pedal bracket and bracket pedal bracket that worked out perfectly. We also cut and fit the steering shaft and u-joints.
0226232007_HDR.jpg

We then started on the header. We made a bracket to mount the turbo and cut the old flange and cross over pipe merge to make a new one.
0219231513.jpg
Header pic.jpg
So far it turned out pretty nice. I still have to build a downpipe and wastegate discharge. I am going to get them coated too and looking at a product from Zycoat that is supposed to work well and hold up on turbo headers. It is expensive though.
0318231608_HDR.jpg
0318231608a_HDR.jpg

We also had to come up with a window net. I bought a kit with buckles from ART that just wasn't going to work. After doing some more research I came up with one from Tim McAmis that is probably the nicest well thought out window net kit out there and has a quick release spring that makes releasing it really fast and easy which would make it safer if you have to make a quick exit.
0318231609_HDR.jpg
We then decided to put the body panels back on. We need the front clip back on the car to do the cold side pipes and also to make the front clip bars which I am still considering how or if I am going to run them. It is cool to see it look like a car again.
0325231439b.jpg0325231439.jpg

I have the dash mostly fit but still have some work to do there too.
dash.jpg

It is starting to come together and I feel it is coming out really nice. I am starting to get really excited about this thing running again some day soon. We are going to finish up patching the floor and trunk pans tomorrow then seam sealer, cage paint and then some final assembly. I still have a few tabs to mount such as the fire bottle cable and a couple for the dash.
 

Old Man Roger

Well-known member
Joined
Apr 6, 2017
Messages
17,654
Location
Palm Coast Florida
Forgive my ignorance, Ive been out of drag racing for years, and I know you did this cage right, but it looks so strange that the cage takes up half the window?
Is it going to be like a nascar cage with a HANS device and giant pads? Or does the seat keep you far enough away from the cage?

Just looks like your head and shoulders would be beat after any kind of wreck. Could just be an optical illusion too.
 
OP
M

mlyonsdc

Well-known member
Joined
Nov 23, 2018
Messages
238
Location
USA
Forgive my ignorance, Ive been out of drag racing for years, and I know you did this cage right, but it looks so strange that the cage takes up half the window?
Is it going to be like a nascar cage with a HANS device and giant pads? Or does the seat keep you far enough away from the cage?

Just looks like your head and shoulders would be beat after any kind of wreck. Could just be an optical illusion too.
A funny car cage is required on anything faster than 8.50 in the quarter mile and yes I will be wearing a HANS device on the track.

There is plenty of room inside the cage, it is not the safest thing on the street without all the safety equipment on but no roll cage is. I am eventurally going to upgrade the seat with a containment device for that reason.
 
OP
M

mlyonsdc

Well-known member
Joined
Nov 23, 2018
Messages
238
Location
USA
Its been awhile since my last post and life and work have happened and the car ended up on the back burner.

Thanks for the nice comments Mike, I am glad you like the fab pics and in this post I get to show you all the mistakes we made, lol! We had few set backs kind of took the wind out of our sails so to speak but nothing that can't be fixed.

Shortly after getting the car back together a series of f'ups started popping up. The first one was the rearend housing. In the previous pics I have a set of centerline wheels on the car that fit perfectly with a 275/60 drag radial but this is the rim tire I plan to use on the street not the track and it ends up they have a deeper BS than the Welds magnums I have for the car. Needless to say Welds with beadlocks and a pro-radial tire absolutely wont fit the car. I started looking at it and finally measured it and sure enough they built the rear housing at the stock length and it was supposed to be 5/8" shorter on each side to fit these wheels. Maybe I should have measured this BEFORE I had it powder coated!
0313232000.jpg
1020221526_HDR.jpg
Trick Chassis was willing to fix it but I was going to have to ship there and back and there was no way around having to repowder coating it which was going to cost more than the first time since he will have to strip it. I decided to have a local shop narrow the rearend which just saved time and aggravation. Once I got the housing back I test fit everything the wheels fit PERFECTLY

66010.jpeg

I only test fit the housing and axles since I knew I was sending the housing back out to have it re-powder coated. This time I also decided to have the UCA and LCA coated too and I also had the ARB done in satin black since all it had was crappy flat black spray paint on it. I also decided to remove the ugly brake line mounting tabs and stud I used and planned to run the brake lines on the frame instead. After getting the housing back I started assembling everything for what should be the final assembly just to find more issues. While the axles fit before and after I narrowed the rearend the passenger side one did not fit as the splines were now bottoming out. Upon further investigation I also found the axles were to long and almost touching inside the spool which would have been the case even prior to narrowing the housing. In addition once I tried to install the rear calipers and rotors I found the bearing offset was wrong so off to Moser and they are fixing everything. I figured out the rear was the wrong length in March and I should finally have my axles back by Thursday this week. I will be able to wrap up the rear suspension, brakes and wheels tires and get it back on four wheels. That was set back #1
68023.jpeg
0627231943a_HDR.jpg
Set back #2
The headers. We spent a ton of time redoing the passenger side header and crossover for the new turbo. We made a support bracket with a Maven mount not once not twice but three times and finally got it all to fit and look really good, or so we thought! We forgot to check the clearance for the water pump out let which with the Meziere pump is a -16an fitting out of the side that is in a slightly different location than the stock water pump.

0411231705_HDR.jpg

0411231704a_HDR.jpg

Fortunately I think it is going to be an easy fix where we just weld a new exhaust flange on top of the old flange and then make a new 4th support bracket. The new flange will move the turbo up about 1/2" and should provide enough clearance for the water pump. At least we didn't fab a downpipe yet that would have been even more of a mess. I am waiting on a new radiator from Champion which is a dual pass core that is made for a LS motor swap in a G-body. My original radiator worked really well but was large single core race radiator and I was worried about cooling on long drives and freeways which we will be doing with DnD events. I should have it by the end of the week and once it is here I plan to plumb the entire cooling system and make sure EVERYthing fits this time!

Third set back!
This is the one that really was a punch in the gut and was just sloppy work on our part. We got in a hurry trying to get the cage close enough to finished when the chassis inspector was on his way and ended up welding the upper secondary door diagonal on the drivers side welded in to high and it is in the way of the door handle. I should have known and stopped and fixed it earlier as the x-brace looked like **** too and it was our first attempt at an x-brace. Anyway the bar is a difficult one to weld and also has two gussets welded to it but and I've decided we are going to cut it out and make it right. I can move the door handle to make it work but I will also look at it everything I go to get in the car and it will drive me nuts.

0428231403_HDR.jpg

This is how it was supposed to fit
0625230738.jpg

The last issue isn't really a set back as much just a change of plans. It is how we ran the inner frame rails and rear floor pans. I dont like how they are going to turn out and decided to section them raise them up and weld them to the cage itself. This is actually preferred for safety reason on a car with a separate body and frame and what I originally intended to do. This will also give us more clearance underneath and we may be able to build a 4" over the axle exhaust system which would be really cool to do but not sure about getting it over the axle as I have a lot going on back there.

Floor.jpeg
If I were doing this project again from the start I would have cut the entire floor pan out from the back of the drivers seat to the rear tailight panel in the trunk and replaced it with sheet metal and carbon fiber wheel tubs. It would have taken at least 150# off the car and made this whole process WAY easier than it was. But no I needed to keep the back seat and wanted to retain as much of the factory car as possible lol!

My next post will show some progress and some stuff finally coming to completion.
 
OP
M

mlyonsdc

Well-known member
Joined
Nov 23, 2018
Messages
238
Location
USA
We are making progress and the closer it gets the most excited and motivated we are at getting it done. At this point I am hoping to having running in August sometime.

I made a trans cooler shroud with a fan and repurposed stuff I had to do it instead of spending $300 on a new one. The trans cooler on the car was a nice plate cooler and I had a 12" fan from another project laying around for years. I bought a cheap HF sheetmetal brake and some 20g steel to make the shroud. I used some vibration dampers to mount it to the trunk floor underneath the gas tank.
0509231717a_HDR.jpg
65918.jpeg
I got the gas tank powder coated made brackets for it and mounted the battery and ICT billet battery tray. I got the trunk seam sealed and painted and started plumbing the fuel system.
0625230737_HDR.jpg

I did manage to finish one thing on the car to completion! The brake system which should be simple but I some how made more complicated than it needed to be and literally purchased everything to do the job twice. I originally had a Wilwood MC with prop valve but ended up going with the TRZ mount and Strange MC. I also got the Line lock mount from Jegs and decieded to run -3AN SS tube nuts and bulkheads on the whole system instead of the standard flare tube nuts. I also removed the brake lines from the axle and mounted it to the CO mount. And of course I got to buy new tools for this. This has to be the best tubing flare tool ever and I got both 37 and 45 degree dies and made the whole job go super smooth.

0626231409_HDR.jpg

0625231940a_HDR.jpg

0625231953_HDR.jpg
0625231945_HDR.jpg

0629232324.jpg

0629232325_HDR.jpg

We moved the car down to Ray's shop and started on the hot and cold side plumbing along with fixing the header and turbo mount. I should have another update next weekend with some really cool pics as the engine compartment is really starting to come together.
 
OP
M

mlyonsdc

Well-known member
Joined
Nov 23, 2018
Messages
238
Location
USA
Cant wait for the wheelie videos..lol
Ray finished welding up the hot side and downpipe last night. I am hoping to finish the plumbing and start wiring it in a couple of weeks. Possibly have it running in August and making some A to B passes in the fall.

No wheelies this time though lol!
VPS-900.jpg
 

LXCam

ALLIANCE MEMBER
Joined
Apr 23, 2013
Messages
19,149
Location
AZ
Ahh man. Never noticed this thread before and made the mistake of popping my head in and saw one nice ride. Now I’m gonna have to read the whole darn thing.
 
OP
M

mlyonsdc

Well-known member
Joined
Nov 23, 2018
Messages
238
Location
USA
We started with fixing the header and turbo location so we can finish the hot and cold side along with putting the motor together. In sticking with the theme of this build we kept all the parts in the stock location, turbo, crossover and down-pipe with really isn't easy when the tubes are larger than factory stuff. I had the headers custom made for the car back in 2008 and at the time we thought they were really nice until we actually started to learn how to do this stuff and found out they really aren't that nice. We made them work but at some point if I keep this combo I think we will build a new set. Same with the IC, the largest pipes we can get under the factory core support is 3" and even still I have killed a couple sets and had to re-weld new elbows on once due to smashing them on wheelies. We made a 3" extension off the IC to a 4" inlet pipe with a clam shell clamps on everything.

To fix the turbo location we just extended the mounting flange and instead of cutting the old one off we left it as it would have been a PIA to take off and butted up against the WG tube gusset. It turned out nice but took some finagling and tweaking to get the turbo to sit level.
image000000.jpg
0629232040a_HDR.jpg
0629232042_HDR.jpg
We got the WG discharge mounted and the lower radiator hose fit nice once we got the turbo in a better location. I am going to heat wrap the WG discharge pipe. There is more clearance than it looks in the pic.
0709230954_HDR.jpg

I ended up upgrading the radiator. I had a nice aluminum single core race radiatior in the car that did work well but I was concerned about the volume of water it held and driving long distances on freeways with it. I ended up getting a really nice dual pass 3 core from Champion with twin 12" Spal fans and it came with -16AN orb fittings for inlet and outlet which was nice since I had to weld them on the radiator I had. It is a LS G-body swap radiator so both the inlet and outlets are one the passenger side which is not a big deal. It dropped right in and really HQ and reasonably priced as is everything I've gotten from Champion.
0709230955a_HDR.jpg
Once we started fitting the downpipe we discovered we also had to re-do the cross over pipe in order to fit a 4" down-pipe between the firewall and motor and still keep it in the engine compartment. Seems most guys build a dump out the fender or a bull horn which IMO looks horrible. We got the downpipe under the car and past the firewall. For now I put a "muffler" on it with a turn done that was on the car before but plan to eventually build a full over the axle exhaust. We are raising the rear floor pans to actually make room to do this with 4" oval tubing.

0709230954b_HDR.jpg

Finished welding the hot side and Ray did a nice job as usual he did all the fab on the downpipe and it turned out really nice. He did figure out you can't TIG weld with the garage door open as the breeze blows the Argon off which when doing SS is a PIA with a #19 Furick cup and back purging.
0715231755_HDR.jpg
0715231915_HDR.jpg
The cold side was a little easier. I was using the IC that was on the car to begin with and the discharge pipe just needed shortened. It is really tight under the core support and 3" pipes are the largest we can run. We used a 4" inlet pipe from the IC outlet to the TB.
0715231701_HDR.jpg0715231903_HDR.jpg

We have two welds to finish up on the IC tomorrow and the pipes are off to get coated. I may leave the inlet pipe polished.
 
To avoid these ads, REGISTER NOW!
Top Bottom