OP

You are using an out of date browser. It may not display this or other websites correctly.
You should upgrade or use an alternative browser.
You should upgrade or use an alternative browser.
40x50 garage-shop
- Thread starter toomanyrocks
- Start date


OP
toomanyrocks
Well-known member
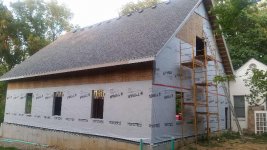
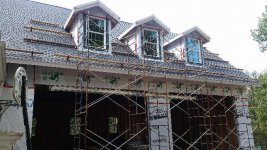
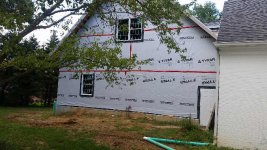
Window week: The windows were easy except there was a lot of work putting scaffolding up and down to get them in. The windows are by Jeld Wen. Aluminum outside wood inside. The glass comes out nicely so all I had to lift was an empty frame. (be sure to keep the frame square though.)


And you can just see the entry door at the bottom left.
And you can just see the entry door at the bottom left.
Attachments


Last edited:
OP
toomanyrocks
Well-known member
Last bit to close things up: Doors. I didn't get any in process pictures, but these doors are huge. but the process is the same as for residential doors. Put up the track then stack one panel at a time bolting it together as you go. I didn't drop any, although it did get pretty dicey putting that last panel up, since that is 11 feet in the air.
I have worked with garage doors and openers since I was a kid, installing the openers to pay my way though college. These doors have jackshaft openers, which are commercial openers that mount to the wall and turn the torsion bar above the door. You still need to hang and balance the door properly wind wind the springs. That job on these commercial doors is not for the faint of heart, as the door when assembled weighs probably 1000 pounds, which means those springs are pretty tightly wound, and you have to do that by hand. Too bad they didn't have a drill powered winder like the residential doors do.
Anyway, I had no problem, but I have experience. If you are less experienced, it can be done, just slowly and carefully.


Again for perspective of the sizes.

I have worked with garage doors and openers since I was a kid, installing the openers to pay my way though college. These doors have jackshaft openers, which are commercial openers that mount to the wall and turn the torsion bar above the door. You still need to hang and balance the door properly wind wind the springs. That job on these commercial doors is not for the faint of heart, as the door when assembled weighs probably 1000 pounds, which means those springs are pretty tightly wound, and you have to do that by hand. Too bad they didn't have a drill powered winder like the residential doors do.
Anyway, I had no problem, but I have experience. If you are less experienced, it can be done, just slowly and carefully.
Again for perspective of the sizes.
Attachments


OP
toomanyrocks
Well-known member


OP
toomanyrocks
Well-known member
I'll continue this tomorrow.....

KillNThrill24
Well-known member
Nice build! Looks like a great project to keep busy on. And the amount of space is awesome. Great read.
Sent from my Note 9 using The Garage Journal mobile app
Sent from my Note 9 using The Garage Journal mobile app
jblnut
ALLIANCE MEMBER
What a wonderful shop !!
You as a one man crew are getting some amazing work done !!
You as a one man crew are getting some amazing work done !!
OP
toomanyrocks
Well-known member
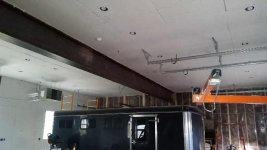
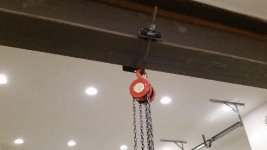
to tarmy, I've been looking into an electric hoist, I currently have a couple of CM chain hoists. Problem is that the beam is so big there are no commercial trolley's that fit, generally the top out at 6 to 8 inches. I like the CM trolley because it is on a v shape hex bar so it adjusts to any size beam..I made these since the stock ones also didn't go this big. Obviously the weight rating of the trolley is reduced due to this mod.
Attachments

OP
toomanyrocks
Well-known member
Well finally got things buttoned up, it is the end of October Year1, the garage project is now 10 months since beginning planning 6 months since groundbreaking. The order of construction in my head indicates I need to put in a stairwell before I can frame in the bath and storage areas. Code here says more than 12 steps and you have to have a landing...I guess so that if you fall from the top you have something to bounce off of before going down the rest of the way....
The clearances were pretty tight, as I wanted at least 4 ft clear at the top of the steps and enough room for a separate doors to the shop area, outside, and the door to the old garage. Lots of calculating to get the runs on the steps to fit. The stairs are slightly less than 4 ft wide to fit between the trusses. You can see the end of the beam abuts the stairwell and is affixed o a post there, it does not span to the outside wall.
I wanted a full 8 ft clearance above the stairs for carrying stuff, and had to remove a couple of cross members and flooring to get it. (non-structural.)
Over 14 feet from the top landing to the floor, pretty scary with no rails. (And I know about fast trips to the concrete floors.) The free side of the stairs will be supported by the framing of the closed stairwell from above to leave free space for storage in the utility room below.
Attachments

OP
toomanyrocks
Well-known member

OP
toomanyrocks
Well-known member
Southern Ohio starts to get cold by the end of October, so time to address the heat issue. My little Kerosene heater is not making a dent in the chill, especially with no insulation yet and the eaves wide open. It is like a chimney in there all the heat goes up.
I had been thinking about the gas situation since working on the kitchen. I was able to tap into the abandoned gas line from the old kitchen and run it to the new kitchen., but after doing the flow and distance calculations, the piping in the house was nowhere big enough to allow me to connect to a gas line on the near side of the house and run it in a trench with the other utilities to the garage.
Alternatives were: 1) switch the entire system over to a high pressure system( which would entail putting high pressure regulators on every appliance in the house.), or 2) run a new line directly from the meter.
I chose option 2, but, obviously the meter was 300 feet away on the opposite end of the house and there were lots of buried drain lines in the yard. Gas lines have to be buried 2 feet down, and since it all is PEX nowadays, tracer wires have to be run. Now one interesting thing I found, no one inspects anything on the user side of the meter. I spoke with Plumbing, electric, gas company, and apparently the gas co stopped doing it. (Although they insisted that they had to come out to physically make the connections to the risers from the underground pipe I was laying.) It all made no sense, but what the heck, I wouldn't have to by the chamfering tools to be able to trim the pipe to fit the connectors.
Back to home Depot to rent the big trencher again, but this time after an hour or so it stopped making progress. I fought with that damned think for hours making no progress, until I realized that the chai was set too tight and it won't cut like that. I was really pissed that they would rent a piece of equipment set up incorrectly. After I got it working and finished, I took it back the next day, and they insisted I pay for an extra day. I went round and around with the manager who was not sympathetic and did not have good customer skills. Put it on a credit card and told him that HD could fight with them when I declined the charge. (Having dealt with credit card companies, I knew HD would never follow up and I would have the charge removed.)
Since I was digging, I decided to also replace the old gas lines to the pool heater, which is why there are 2 pieces of pipe. I went ahead and pressurized the lines once the gas co came and hooked them up, since they didn't even do a leak test, they said that was my responsibility.
I bought the pipe, risers and fittings from an on-line supplier for less than a quarter of what they wanted locally, but the first shipment, had damaged the big gas line in transit, looked like the coil was dropped or hit, not punctured, but dinged enough I wasn't going to bury it. They gladly shipped a replacement coil and told me to trash the damaged one.(I actually sold it on craigslist and recouped part of the cost.)
Attachments


OP
toomanyrocks
Well-known member
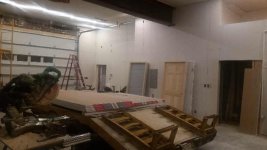
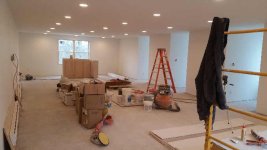
Time to start framing the interior, some plumbing and electric work.
I wanted the electric box to be in the shop area for easy access, rather than in the utility room, so a little more conduit to wrap around to the box.


I also had to get some insulation in the ceiling, as I was freezing in there. I used 12 inch thick r38 unfaced bats and held it up with housewrap, which is supposedly permeable for the vapor. I wanted it covered so that I would have something sturdy to hold it up so it wouldn't weigh down the drywall. (an issue when you are 14 feet up in the air trying to screw up drywall.) I talked to the inspector ahead of time and he ok'd this.

I wanted the electric box to be in the shop area for easy access, rather than in the utility room, so a little more conduit to wrap around to the box.
I also had to get some insulation in the ceiling, as I was freezing in there. I used 12 inch thick r38 unfaced bats and held it up with housewrap, which is supposedly permeable for the vapor. I wanted it covered so that I would have something sturdy to hold it up so it wouldn't weigh down the drywall. (an issue when you are 14 feet up in the air trying to screw up drywall.) I talked to the inspector ahead of time and he ok'd this.
Attachments


OP
toomanyrocks
Well-known member
A couple points. I learned my lesson in Michigan about open stairwells to an unheated attic...it causes you to have a freezing draft all the time and your heat just goes up. Up there I didn't want a door to enclose the stairs, as I wouldn't be able to carry anything big up, so ended up with plastic sheeting to cover the stairwell, which worked pretty well. Here the permanent solution is a closed stairwell. All the framing will close in the stairs, with doors at the bottom.
The downside is that the stairwell itself is unheated and is freezing cold in the winter even if I keep a space heater upstairs to keep my sored paint and supplies at 45degrees. I have electric outlets in the stairwell and could mount a portable heater on the wall, but so far, I have not bothered. If I open the bottom door of the stairs, enough warm air is drawn up that it at least is not too terrible a shock when I go up.
Below is my fancy plumbing. Ends up I had 3 vent lines that come together for the bath. I put a box at the top with an Oatey Sure Vent so that I would not have to perforate the roof with a vent pipe. Codes around here allow these instead of open vent pipes, and I use them exclusively, since I have had multiple leaks around roof vents as the rubber gaskets deteriorate in about 10 years.

The vent lines, drain and water lines all come up through the floor and then go into the wall since there is a 12 inch foundation wall that I did not put conduit into when it was poured, figured that the sink cabinet would cover it all and one less stress on the pipes where the slab and wall meet.
The downside is that the stairwell itself is unheated and is freezing cold in the winter even if I keep a space heater upstairs to keep my sored paint and supplies at 45degrees. I have electric outlets in the stairwell and could mount a portable heater on the wall, but so far, I have not bothered. If I open the bottom door of the stairs, enough warm air is drawn up that it at least is not too terrible a shock when I go up.
Below is my fancy plumbing. Ends up I had 3 vent lines that come together for the bath. I put a box at the top with an Oatey Sure Vent so that I would not have to perforate the roof with a vent pipe. Codes around here allow these instead of open vent pipes, and I use them exclusively, since I have had multiple leaks around roof vents as the rubber gaskets deteriorate in about 10 years.
The vent lines, drain and water lines all come up through the floor and then go into the wall since there is a 12 inch foundation wall that I did not put conduit into when it was poured, figured that the sink cabinet would cover it all and one less stress on the pipes where the slab and wall meet.
Attachments

OP
toomanyrocks
Well-known member
I got sidetracked by a little week-end project. My daughter wanted a privacy fence on her property and to close in the rest with split rail, so they could let the dog run out, so my son-in-law and I made a day of it. She has a really big yard and her neighbors complained about losing the view, but they were also the ones who called the police when her grass got too long....what comes around...


Attachments


OP
toomanyrocks
Well-known member
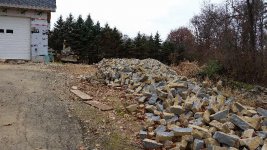
Got my rocks off...
took delivery of 60 tons of rock for the façade. Won't get to this until the following summer, but the piles were pretty daunting. I think there were like 20 truck loads. You can't even see half the piles in this pic as they are over the top of the hill.

took delivery of 60 tons of rock for the façade. Won't get to this until the following summer, but the piles were pretty daunting. I think there were like 20 truck loads. You can't even see half the piles in this pic as they are over the top of the hill.
Attachments
Last edited:
OP
toomanyrocks
Well-known member
more insulation....LOTS more insulation.
Got the heaters installed. Finally the space is nice to work in. The heaters are high efficiency, thus all the venting, pipes and drain lines. Closed combustion, so I don't need to worry about the hazard of wood dust or fumes in the air. The downside is that they cost 4 times as much as standard shop heaters. Turns out the second one rarely kicks on because the garage is so tight. But, if I turn them down when I am not in there and flip the both on on a cold day, I can warm everything up 20 degrees in about 30 minutes.
You can se I put up a couple sheets of drywall before installing the heaters, so I wouldn't have to do all that cutting later.
I have low temp thermostats on them so I can set them down to 40 or 45 when I am not going to be there for a while, just enough to keep the pipes from freezing so I don't have to drain all the plumbing in the winter. A note as to that, I did put drain spigots on all the plumbing lines so that I could blow them out and winterize if needed.
Attachments

Deezler
Well-known member
Call the police for unmowed grass? Get real.
But dude. You are an animal. This is such a daunting amount of work to take on solo. Very impressed.
But dude. You are an animal. This is such a daunting amount of work to take on solo. Very impressed.
OP
toomanyrocks
Well-known member
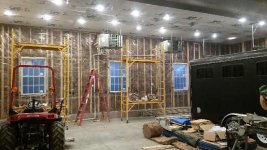
A couple of days and all the insulation is up upstairs. Again, the r30 held up with ventilated housewrap.
Did you notice my lighting? the same cans are downstairs...I think there were about 100 altogether....Unfortunately that means almost every piece of drywall will have at least one if not two holes precisely cut before lifting 14 feet in the air.
Actually I have gotten pretty good with cutouts in drywall, measure twice...I think I only had a dozen or so of the holes that were off enough that they had to be fixed later. I don't use a zip tool, as that would have meant that I would have had to have the drywall held up to cut, and it was hard enough to get them lined up with the holes already in them.
One other word to the wise, be sure if you use cans, you get the IC rated ones so you can pack insulation around them. Air gets sucked up the openings like crazy otherwise.
Attachments


OP
toomanyrocks
Well-known member
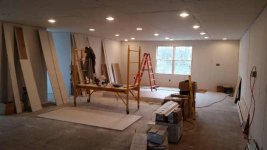
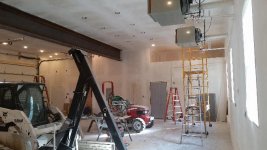
When the drywall starts going up, you really start feeling good, that is until you realize all those seems have to be taped and mudded.
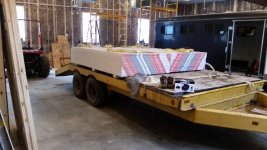
Since this is a garage, I used all 5/8 inch fire rated drywall. Even the "lighter weight" stuff is still about 55 pounds per sheet. Lots of heave ho to get them on the lift and crank them up. I have had this lift for many years, but it was only good for 10 feet, luckily I have a nephew who mentioned that he had the extension piece for it to get it up to 14 feet. Sweet, much easier than mounting the lift on the trailer and dragging it around the garage, which was my original plan.
There are 100 sheets of drywall on the trailer. I think I used 300.
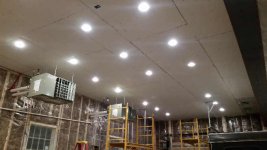
A note about the lights, I have the lights wired to 3 different circuits. Even though LED bulbs don't use much electricity, since the cans can hold 65 watt bulbs, 30 of them would potentially max out a 20 amp circuit.
I didn't want fluorescent tube lights because they tent to catch dust and always seem to spit the dust just when applying the final coat of varnish to a project below. (Also cold start problems in winter.)


Since this is a garage, I used all 5/8 inch fire rated drywall. Even the "lighter weight" stuff is still about 55 pounds per sheet. Lots of heave ho to get them on the lift and crank them up. I have had this lift for many years, but it was only good for 10 feet, luckily I have a nephew who mentioned that he had the extension piece for it to get it up to 14 feet. Sweet, much easier than mounting the lift on the trailer and dragging it around the garage, which was my original plan.
There are 100 sheets of drywall on the trailer. I think I used 300.
A note about the lights, I have the lights wired to 3 different circuits. Even though LED bulbs don't use much electricity, since the cans can hold 65 watt bulbs, 30 of them would potentially max out a 20 amp circuit.
I didn't want fluorescent tube lights because they tent to catch dust and always seem to spit the dust just when applying the final coat of varnish to a project below. (Also cold start problems in winter.)
Attachments
Last edited:
OP
toomanyrocks
Well-known member
More drywall. I elected to use 8 foot sheets, rather than springing for 14 footers, since I was manhandling this all alone and didn't think I could easily manage, pluse the cost difference for the custom size didn't make sense v.s one more seam. I already had bracing at 8 ft in the framing anyway.


I drywalled the space above the bathroom and put down 3/4 t&g plywood so this space could be used for storage. It is not so convenient, but a good place for scaffolding parts I rarely use. Notice all wood members are covered in drywall and seams taped to meet fire code, made for some unusual shapes under the stairs.

I drywalled the space above the bathroom and put down 3/4 t&g plywood so this space could be used for storage. It is not so convenient, but a good place for scaffolding parts I rarely use. Notice all wood members are covered in drywall and seams taped to meet fire code, made for some unusual shapes under the stairs.
Attachments

OP
toomanyrocks
Well-known member


OP
toomanyrocks
Well-known member


OP
toomanyrocks
Well-known member
Taping and mudding, taping and mudding...taping and mudding...
I like to use nylon mesh tape and setting type mud. I never had much luck with paper tape, I could never get it to stick properly. I suppose if I did this all the time I would try a tape banjo (I think that is what they are called). I also prefer the setting type mud that you mix as you use it since it cures hard and doesn't have the tendency to expand as it absorbs moisture form the environment later. It can be very wet in a garage.


You may not be able to see, but in the pic below I have covered the exposed polystyrene insulation on the foundation with strandboard and then drywalled over that to protect it from damage and fire risk.

I like to use nylon mesh tape and setting type mud. I never had much luck with paper tape, I could never get it to stick properly. I suppose if I did this all the time I would try a tape banjo (I think that is what they are called). I also prefer the setting type mud that you mix as you use it since it cures hard and doesn't have the tendency to expand as it absorbs moisture form the environment later. It can be very wet in a garage.
You may not be able to see, but in the pic below I have covered the exposed polystyrene insulation on the foundation with strandboard and then drywalled over that to protect it from damage and fire risk.
Attachments


OP
toomanyrocks
Well-known member
You can see my power conduit where I set the box on the inside wall to be able to get at it from the shop. There is also a junction box there in the wall for the alarm system wires and CAT5 cable for the wifi access point in the garage.

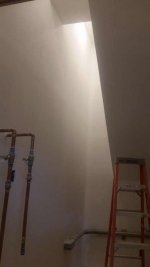
Here's a shot of the drywall in the stairwell.

Here's the utility room, showing the underside of the stairs and the odd shaped space next to the stair out to the wall formed by the framing of the bathroom. I was going to close this in, but I didn't want an inaccessible space. It was pretty tight getting all that drywall up to the top and finishing it.
Also water heater connections, I am going to have only a small 6 gallon electric heater, enough for one shower, but it uses only 125 volts, so it fit into my load calculations. I pre-wired for 240 volt access if I ever go for a bigger heater, and made the water valves high enough for a 40 gal tank without re-plumbing.

Here's a shot of the drywall in the stairwell.
Here's the utility room, showing the underside of the stairs and the odd shaped space next to the stair out to the wall formed by the framing of the bathroom. I was going to close this in, but I didn't want an inaccessible space. It was pretty tight getting all that drywall up to the top and finishing it.
Also water heater connections, I am going to have only a small 6 gallon electric heater, enough for one shower, but it uses only 125 volts, so it fit into my load calculations. I pre-wired for 240 volt access if I ever go for a bigger heater, and made the water valves high enough for a 40 gal tank without re-plumbing.
Attachments


OP
toomanyrocks
Well-known member
Started a new project. Daughter decided to update her bathroom for the new baby. She had an old plastic tub surround and janky plumbing. She wanted a thermostatically controlled faucet in the tub so baby couldn't burn himself.

She wanted subway tiles, so I cut and she placed....lots of cutting...

I built this little vanity, it has a built in step at the bottom that pulls out so when baby gets bigger, he should be able to wash his hands himself. I found a broken piece of granite counter top for a few bucks and a sink basin at the surplus warehouse. Just a matter of cutting the hole for the sink. She used white wood grained porcelain tiles on the floor. We re-used the old toilet, but had to repair the mounts, as they had corroded and cracked.

She wanted subway tiles, so I cut and she placed....lots of cutting...
I built this little vanity, it has a built in step at the bottom that pulls out so when baby gets bigger, he should be able to wash his hands himself. I found a broken piece of granite counter top for a few bucks and a sink basin at the surplus warehouse. Just a matter of cutting the hole for the sink. She used white wood grained porcelain tiles on the floor. We re-used the old toilet, but had to repair the mounts, as they had corroded and cracked.
OP
toomanyrocks
Well-known member
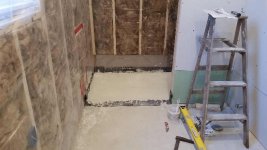
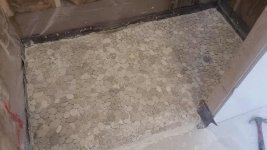
Now my bathroom. As I stated, I wanted a toilet and shower, so got to work on that. The floor of the shower is level to the floor of the bathroom, no step. So laid 40 mil PVC and poured the cement base. Tiled with these flat pebble sheets. The PVC is a ***** to work with especially the way I bought it. It was folded up and those creases never came out. I will always buy off a roll in the future.


Then started the floor tiles. I went with the wood grained porcelain. I did notice they are not as resistant to impact as the commercial tiles I later used in the stairwell, but they look nice and are a breeze to clean.

Then started the floor tiles. I went with the wood grained porcelain. I did notice they are not as resistant to impact as the commercial tiles I later used in the stairwell, but they look nice and are a breeze to clean.
Attachments

OP
toomanyrocks
Well-known member
Finished up the upstairs drywall, all painted, pretty....You can see my drywall sander on the floor. This think is great, and hooks to the wetvac to keep the dust to a minimum. It was a pain to use overhead especially on those 14 foot ceilings, but I'm sure I could never have finished all that drywall without it what with my rotator cuffs...residua of that unfortunate episode with the basement floor.

Attachments
OP
toomanyrocks
Well-known member
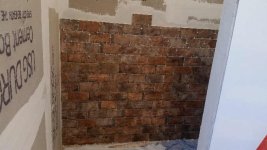
Started on tiling the bathroom. the shower and south wall are tiled all the way up. I decided to just cement board the entire wall rather than drywall the non shower area, didn't want to deal with the transition.
The tiles are those porcelain tiles that have the glaze printed to look like bricks. Gives the man-bath a nice rustic feel and the glaze is real easy to clean. The bath ceiling is lowered to 9 feet, so it wouldn't be so hard to heat and so I could use the space above for storage. All water resistant drywall in the ceiling. I have a vent to the outside, but I am still getting condensation on the windows, Not sure if this is due to the cement still curing a year later, moisture form the hot water heater, or just because the room is so tight that it traps moisture. I have not come up with a good answer yet.


The tiles are those porcelain tiles that have the glaze printed to look like bricks. Gives the man-bath a nice rustic feel and the glaze is real easy to clean. The bath ceiling is lowered to 9 feet, so it wouldn't be so hard to heat and so I could use the space above for storage. All water resistant drywall in the ceiling. I have a vent to the outside, but I am still getting condensation on the windows, Not sure if this is due to the cement still curing a year later, moisture form the hot water heater, or just because the room is so tight that it traps moisture. I have not come up with a good answer yet.
Attachments


OP
toomanyrocks
Well-known member


OP
toomanyrocks
Well-known member
More plumbing, got the water heater in.

Set the toilet and hung the Dreamline glass shower door. This is a really heavy door, there are 2x6 backers behind the wall to hold it. The only problem is that there is minimal adjustment, and after all the tile was applied I probably was about 1/8 inch too narrow. I was able to remove the spacers behind the hinges and trim down the bracket that holds the stationary glass, but It still catches when closing. The other brands have a lot more leeway built in. Interestingly when the sun warms up that wall of the building, it moves just enough that the door really catches.

Got the shop sink in. The plumbing ended up a little high in the wall due to how the drain pipe goes into the cement, so the sink is mounted on a 2x4 base. This actually worked better, as it is anchored to the floor and keeps the sink from moving. The under sink trap is too low for the inspector, and he made me shorten it up, I had just enough clearance with it slipped all the way up the tailpiece. Later I was able to use a garbage disposal tailpiece in order to hook up the condensate drains from the heaters.

Set the toilet and hung the Dreamline glass shower door. This is a really heavy door, there are 2x6 backers behind the wall to hold it. The only problem is that there is minimal adjustment, and after all the tile was applied I probably was about 1/8 inch too narrow. I was able to remove the spacers behind the hinges and trim down the bracket that holds the stationary glass, but It still catches when closing. The other brands have a lot more leeway built in. Interestingly when the sun warms up that wall of the building, it moves just enough that the door really catches.
Got the shop sink in. The plumbing ended up a little high in the wall due to how the drain pipe goes into the cement, so the sink is mounted on a 2x4 base. This actually worked better, as it is anchored to the floor and keeps the sink from moving. The under sink trap is too low for the inspector, and he made me shorten it up, I had just enough clearance with it slipped all the way up the tailpiece. Later I was able to use a garbage disposal tailpiece in order to hook up the condensate drains from the heaters.
OP
toomanyrocks
Well-known member
Got my chain hoist put up. there is a note earlier about this but the CM trolley is the only one I found that would go over this 12 inch beam, but I did have to fabricate a bigger bar that it hangs from to accommodate the beam width. CM has other size bars, but not this big. It is the adjusters that go on the bar ends that work so nice to set it to the correct width.

Attachments
OP
toomanyrocks
Well-known member
A little work on the truck. I think I am replacing the blown out, corroded brake lines...at least the ones that I did not replace last year...I have had to do this on every chevy truck I have owned in the past 30 years...next truck will be a Ford with stainless lines.

Attachments

OP
toomanyrocks
Well-known member
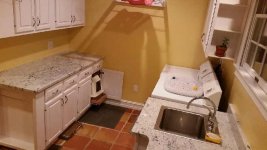
just came across this pic, it is of the remodeled laundry area. The previous one was only as deep as the dryer and the washer and dryer were against the wall which was about 3 feet closer. Absolutely no room to turn around or sort clothes. Lots of cabinets and a drying rack I made is attached to the back wall.

Attachments
OP
toomanyrocks
Well-known member
Another little side project. Daughter wanted to put in laminate in her dining area, they contracted the final install, but we had to shim up the floor and level it. Baby got a kick out of the tools. The headphones were due to the air compressor and nailer we were using. He actually keeps them on.

Attachments

OP
toomanyrocks
Well-known member
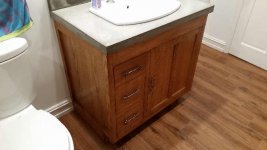
Started on the vanity for the bathroom.

I got all interested in cement countertops a couple years ago but never tried one, not bad for first attempt. (It is ungodly heavy.) I sealed it with lacquer, not sure how it will hold up over time.

Like I said, he loves the tools:

I got all interested in cement countertops a couple years ago but never tried one, not bad for first attempt. (It is ungodly heavy.) I sealed it with lacquer, not sure how it will hold up over time.
Like I said, he loves the tools:
Attachments


OP
toomanyrocks
Well-known member

OP
toomanyrocks
Well-known member
Still winter, can't do anything outside, so continuing inside. I decided to do the upstairs floor in pre-finished oak. I needed something hard since there would be heavy stuff on it and they guaranteed the finish would stand up. (Also I didn't feel like finishing that much hardwood.)
We had debated about bamboo, since it is really hard, and hard to work with, but I like the look of the oak. These were a deal at Lumber Liquidators and since I needed 1000 sq ft, I wanted something in the 2 to 3 dollar range. Couldn't beat these.
The floor required something other than the underlayment to get it up to the engineering spec. I laid the boards lengthwise so they would span the trusses and have the most strength.
Went down surprisingly fast and since I was doing 50 foot runs, little cutting and little waste.

You can see the dormers here. Not much useful space, but lots of light.


We had debated about bamboo, since it is really hard, and hard to work with, but I like the look of the oak. These were a deal at Lumber Liquidators and since I needed 1000 sq ft, I wanted something in the 2 to 3 dollar range. Couldn't beat these.
The floor required something other than the underlayment to get it up to the engineering spec. I laid the boards lengthwise so they would span the trusses and have the most strength.
Went down surprisingly fast and since I was doing 50 foot runs, little cutting and little waste.
You can see the dormers here. Not much useful space, but lots of light.
Attachments


OP
toomanyrocks
Well-known member
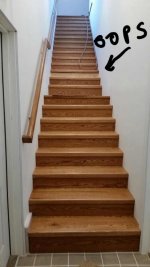
Still cold out, Time to address the stairwell. The stairs are an odd size, non standard due to the length and height, so premade treads and risers were out. Back to the hardwood supplier. I figured out exactly what I needed and got to work.

some stain

stairs from the top. I Couldn't find a banister long enough for the stairwell, so made that also. Nice to have something to finally be able to hold onto when going down.

some stain
stairs from the top. I Couldn't find a banister long enough for the stairwell, so made that also. Nice to have something to finally be able to hold onto when going down.
Attachments


OP
toomanyrocks
Well-known member
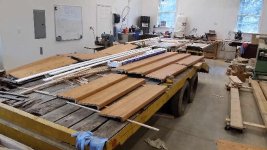
Measure once... cut twice......

Of course I had bought the exact amount of wood that I needed to make these, but cut one riser wrong... back to the lumber supplier. Luckily the hardwood dealer is only a couple miles from me, and he knows me by name. When you buy truckloads they tend to give you a really good price.
Of course I had bought the exact amount of wood that I needed to make these, but cut one riser wrong...
back to the lumber supplier. Luckily the hardwood dealer is only a couple miles from me, and he knows me by name. When you buy truckloads they tend to give you a really good price.