To avoid these ads, REGISTER NOW!

40x50 garage-shop

OP
T

toomanyrocks

Well-known member
Joined
Jan 20, 2019
Messages
190
Location
Ohio
got some racks. I picked up this little electric heater that is hanging from the ceiling, and so far it easily maintains the temps at 45 even in the winter. Pre wired a 220v outlet on that wall that I originally had baseboard heaters attached to (don't tell the inspector), but I was nervous about not having a fan to disburse the heat to the front of the building. Anyway, The wiring should handle a split system if I ever really wanted to add air/heat.

racks.jpg
 

Attachments

  • racks.jpg
    racks.jpg
    35.6 KB · Views: 23
To avoid these ads, REGISTER NOW!
OP
T

toomanyrocks

Well-known member
Joined
Jan 20, 2019
Messages
190
Location
Ohio
Spring 2018, finally can get outside and start the real work. I have been staring at those piles of rock for a year now and am anxious to start;0.

rocks.jpg


rocks2.jpg


rocks3.jpg
 

Attachments

  • rocks.jpg
    rocks.jpg
    27.7 KB · Views: 20
  • rocks2.jpg
    rocks2.jpg
    48.9 KB · Views: 19
  • rocks3.jpg
    rocks3.jpg
    53.6 KB · Views: 21
OP
T

toomanyrocks

Well-known member
Joined
Jan 20, 2019
Messages
190
Location
Ohio
first wall is done!

rocks4.jpg


here's the process once I got too high to reach. Those rocks are heavy! So out comes the bobcat and jib. I can load up a pallet load of rocks and a pan of mortar and not have to do too much heavy lifting.

rocks5.jpg
 

Attachments

  • rocks4.jpg
    rocks4.jpg
    38.4 KB · Views: 21
  • rocks5.jpg
    rocks5.jpg
    56 KB · Views: 20
Last edited:
OP
T

toomanyrocks

Well-known member
Joined
Jan 20, 2019
Messages
190
Location
Ohio
I won't bore you with a whole slew of progress pictures, but I could do about 2 or 3 rows a day, so the project took all summer and into the fall.

FYI the scaffolding is wired to the building so it was pretty stable even 5 layers up. The view down, though, was unpleasant.

rocks6.jpg


Here's the north side all done, eaves all closed trimmed, and painted. Time to move the scaffolds.

rocks7.jpg
 

Attachments

  • rocks6.jpg
    rocks6.jpg
    117.9 KB · Views: 18
  • rocks7.jpg
    rocks7.jpg
    103.9 KB · Views: 19
OP
T

toomanyrocks

Well-known member
Joined
Jan 20, 2019
Messages
190
Location
Ohio
Here's working on the back and the finished back side.

rocks8.jpg


rocks9.jpg
 

Attachments

  • rocks9.jpg
    rocks9.jpg
    150.5 KB · Views: 18
  • rocks8.jpg
    rocks8.jpg
    145.9 KB · Views: 17
OP
T

toomanyrocks

Well-known member
Joined
Jan 20, 2019
Messages
190
Location
Ohio
The last ROCK.

rocks10.jpg


rocks11.jpg


rocks12.jpg
 

Attachments

  • rocks10.jpg
    rocks10.jpg
    120.2 KB · Views: 15
  • rocks11.jpg
    rocks11.jpg
    90.7 KB · Views: 17
  • rocks12.jpg
    rocks12.jpg
    79.3 KB · Views: 15
OP
T

toomanyrocks

Well-known member
Joined
Jan 20, 2019
Messages
190
Location
Ohio
FINAL PRODUCT: Total time was 4 1/2 months to put up all that rock. I was worried I wouldn't have enough as the piles were getting pretty small by the end, but I had about 4 or 5 tons left over. built a little retaining wall and sold the rest on craigslist.


rocks13.jpg
 

Attachments

  • ROCKS13.jpg
    ROCKS13.jpg
    119.7 KB · Views: 15
OP
T

toomanyrocks

Well-known member
Joined
Jan 20, 2019
Messages
190
Location
Ohio
Got some grading and planted grass prior to winter. Next spring: driveway.

grade1.jpg


grade2.jpg
 

Attachments

  • grade1.jpg
    grade1.jpg
    68.8 KB · Views: 15
  • grade2.jpg
    grade2.jpg
    71.1 KB · Views: 15
OP
T

toomanyrocks

Well-known member
Joined
Jan 20, 2019
Messages
190
Location
Ohio
Finally got to move the compressor to the new garage. I originally had thought it could be in the front between the doors, but turns out not enough room there what with all the hardware for the doors. I had pre-plumbed hard pipe from that spot between the doors to the ceiling for a reel and to this corner for another reel and access to a lift later. So I put the compressor in this corner out of the way. Worked out fine.

One boo boo, when I got it all hooked up, the hard pipe apparently was leaking at some fitting somewhere, not much, but just enough to lose pressure overnight. But since the walls were now all finished, I can't get at the leak. My only hope is that with time it will rust just enough to seal itself. In the mean time, a shut off valve to the hard pipe.

You can see the new color of the beam :)

air.jpg
 

Attachments

  • air.jpg
    air.jpg
    48.9 KB · Views: 19
OP
T

toomanyrocks

Well-known member
Joined
Jan 20, 2019
Messages
190
Location
Ohio
It is spring 2018...time to start on the final phase. Replacing the driveway. The driveway was original to the house and getting on 30 years old, it was cracking up in spots and the heavy equipment over the past 4 years took it out the rest of the way. Tis last project was always part of the plan as the final step.

First the old drive and parking pad had to come out and the area in front of the new garage had to be filled and leveled. No more driving over a stack of 2x4's to get into the garage.

drive.jpg


The original plan was to rip out as much of the bad asphalt as possible and use all that to form the base of a new drive that will go around to the side, smaller garage door of the new garage. Here is a pic out the second story window on that side of the new garage. the new drive has been excavated and partially filled with the rubble as a base. There were spots where the drive was still solid, I elected to pave over the top. Where there were soft spots, I excavated down a couple feet and filled with rubble for a better base and compacted gravel over the top.

drive2.jpg
 

Attachments

  • drive.jpg
    drive.jpg
    61 KB · Views: 19
  • drive2.jpg
    drive2.jpg
    30.5 KB · Views: 18
OP
T

toomanyrocks

Well-known member
Joined
Jan 20, 2019
Messages
190
Location
Ohio
I've done a couple driveways and sidewalks in the past, so figured I could do this, prob didn't need my nice concrete contractor. And because I estimated 150 yards of concrete, the concrete plant was more than happy to give me contractor pricing.

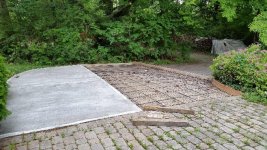
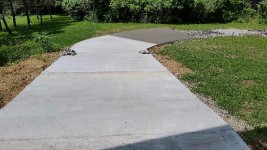
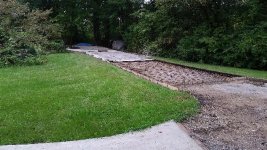
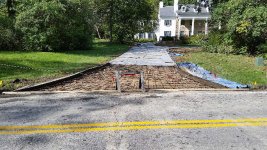
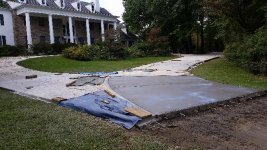
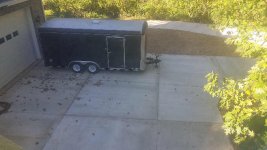
I spec'd out the drive to trace the old one so it would be 12 feet wide and in the areas where I always over ran it with the truck and trailers, I widened it to 14 to 15 feet. I wanted to never have to deal with this again and I hate cracked concrete. I frequently have semis delivering stuff, so I had to have it so that it could handle those loads, as well as my own equipment.

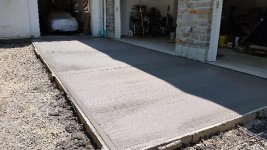
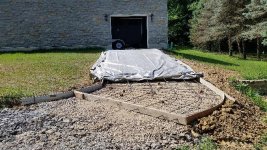
So 5000 psi mix with fiber (the fiber, well , just because it was only 7 bucks and should add strength) and 1/2 in re-bar at 12 inch spacing. The drive has a number of hills so I couldn't have the mix too thin, or it all would run downhill before I could get it screeded. I decided on 6 in thick as the goal. What the heck, if I don't have to pay the labor, may as well spent on materials. Besides made it easy to use 2x6 lumber to do the framing.

I could only do one truckload at a time, which was the only downside. Between the weather being too hot or rain or difficulty getting a helper, this project would take all summer.

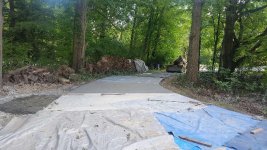
It worked out that I could tear out old asphalt, grade, set up forms and set rebar in about 3 days for each section. I could get about 20 to 24 linear feet of drive done in one truck load.

By the time I coordinated with my helpers, I was down to one pour a week...at that pace it would take more than the summer. Later we were able to get 2 a week, and once 3.

My help included my daughter, who always engendered pity from the truck drivers, every one of them jumped down and grabbed a shovel when she was helping.

My other help, believe it or not was my financial advisor. He has intermittently helped me on various projects over the years, and he seems to enjoy the change from the button-down white collar job he normally does. He would come over on his lunch hour and pull the screed board with the best of them. Bless his soul

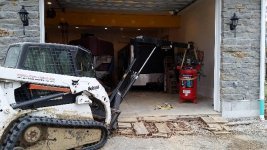
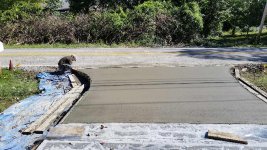
Here was our first pour. It really turned out horribly. I had never worked with fiber before and it made the cement the consistency of oatmeal. It didn't help that it was 90 degrees and we were in the sun. It was disheartening to put in all that work and have it look so bad...

Problem was it wouldn't float, it just stuck to everything. Part of the problem was that I had ordered it so thick to keep it from running downhill the other problem was that because it was a 5000 pound mix it had a lot more cement in it that I was used to, so it stiffened up really fast. Even with retarder in it, you only got about 15 minutes to work with it before it became unworkable. We definitely needed a new plan of attack.

drive3.jpg
.
 

Attachments

  • drive3.jpg
    drive3.jpg
    59.8 KB · Views: 23
OP
T

toomanyrocks

Well-known member
Joined
Jan 20, 2019
Messages
190
Location
Ohio
Continuing the saga of the cement....Well the second load went a little better, thank God, Otherwise I would have had to listen to wife's I told you so's probably until I died. Well, the driver at the second pour took pity on my daughter and me and gave a lot of helpful hints on how to workthe stuff.The best hint was to spray the surface with some water to keep the float from sticking to the cement and fibers, so the second pour looks considerably better.

( still have that horrible first pour, I should have planned that better and done the first in a more inconspicuous place rather than by the front door of the house.)

Here's a picture of the second pour. I has the nice brushed surface I wanted.

drive4.jpg
 

Attachments

  • drive4.jpg
    drive4.jpg
    29 KB · Views: 19

1953mercury

Well-known member
Joined
Nov 25, 2012
Messages
701
Location
Steamboat Springs CO
The stone work looks great. I've done enough of it to know what you accomplished. ***** about the air leak. Wondering if there isn't some kind of sealer similar to fix a flat that couldn't be used to remedy that. Looking forward to updates. Cheers, Mike
 

JHenke

Well-known member
Joined
Apr 4, 2017
Messages
47
Longtime lurker, seldom post, but I have to say this is one of Garage Journal's best threads.
 
OP
T

toomanyrocks

Well-known member
Joined
Jan 20, 2019
Messages
190
Location
Ohio
Next it was time to address the apron in front of the new garage. Originally I had thought to pour it all at one time, but that would have been about 1 1/2 loads and now I knew we were not up for that much cement.

I still had not gotten down the timing of when to cut the joints. Usually by the time I was able to lay a board across as a straight edge,it was either too hard and took a lot of messing with or it was still too soft and the board left impressions. I also had problems getting my edges level they always seemed to be angled a little bit so when the next pour abutted it, the was a lump or depression. It makes an annoying ride to drive up the drive and feel every joint.


drive5.jpg
 

Attachments

  • drive5.jpg
    drive5.jpg
    45.8 KB · Views: 18
OP
T

toomanyrocks

Well-known member
Joined
Jan 20, 2019
Messages
190
Location
Ohio
The next issue was the little hills, how to keep the wet cement from sliding down hill, but still have it loose enough to work with. I'm sure the hottest summer on record didn't help and I am convinced that the cement yard didn't pay much attention how much water they added. Seemed no matter how I ordered it, each truckload was completely different consistency. I finally figured out to order it a little dryer than I wanted and have the driver add water on site until it was the consistency I wanted.

These little hiss were a bear, parts of it hardened before I could float them and the surface looks like hell. I try and not look to closely.

drive6.jpg
 

Attachments

  • drive6.jpg
    drive6.jpg
    56.3 KB · Views: 17
OP
T

toomanyrocks

Well-known member
Joined
Jan 20, 2019
Messages
190
Location
Ohio
This part was the worst: not only 90 degrees out, but the steepest part of the drive, and no access for the cement truck. Much steeper than it appears in the photos. So I had to have the driver dump into the bobcat bucket and then dump one bucket at a time into the form. There was no way to evenly distribute the cement in the form other than to shovel and pull it. It finally did get evened out, and looks good, but I have a feeling that there are voids in the cement.

I don't have a picture of it in process, I wanted to get it covered and out of the sun as soon as possible.

drive7.jpg

drive8.jpg
 

Attachments

  • drive7.jpg
    drive7.jpg
    76.5 KB · Views: 18
  • drive8.jpg
    drive8.jpg
    49.6 KB · Views: 17
OP
T

toomanyrocks

Well-known member
Joined
Jan 20, 2019
Messages
190
Location
Ohio
a few More pics of progress. Because the slabs are so tick, I merely cut the surface with the hand tool and the next day went back with a diamond blade and cut a full 3 inches into the slab for control joints. I later filled all the joints with elastomeric joint filler.

drive9.jpg


drive10.jpg


drive11.jpg
 

Attachments

  • drive11.jpg
    drive11.jpg
    47.3 KB · Views: 16
  • drive10.jpg
    drive10.jpg
    56.8 KB · Views: 19
  • drive9.jpg
    drive9.jpg
    25.4 KB · Views: 18
OP
T

toomanyrocks

Well-known member
Joined
Jan 20, 2019
Messages
190
Location
Ohio
Here's a fun pic. The redimix company does make early deliveries, so I tried one, and it really worked out well, not 90 degrees, much easier to work the cement in the dark rather than the sun. Unfortunately tis was the only one we did early, being a small customer, I never was high enough priority to land that prime spot, plus my daughter couldn't get to my house that early.


drive12.jpg
 

Attachments

  • drive12.jpg
    drive12.jpg
    20.7 KB · Views: 19
OP
T

toomanyrocks

Well-known member
Joined
Jan 20, 2019
Messages
190
Location
Ohio
more progress pics

drive13.jpg


drive14.jpg


drive15.jpg
 

Attachments

  • drive13.jpg
    drive13.jpg
    49.3 KB · Views: 20
  • drive14.jpg
    drive14.jpg
    48 KB · Views: 21
  • drive15.jpg
    drive15.jpg
    59.4 KB · Views: 22
To avoid these ads, REGISTER NOW!
OP
T

toomanyrocks

Well-known member
Joined
Jan 20, 2019
Messages
190
Location
Ohio
More progress

drive16.jpg


drive17.jpg


the last pour. My daughter signing the cement. It sure seemed to go a lot faster in the pictures than in real life...

drive18.jpg
 

Attachments

  • drive18.jpg
    drive18.jpg
    62.9 KB · Views: 37
  • drive17.jpg
    drive17.jpg
    72 KB · Views: 35
  • drive16.jpg
    drive16.jpg
    52.6 KB · Views: 38
OP
T

toomanyrocks

Well-known member
Joined
Jan 20, 2019
Messages
190
Location
Ohio
Finally, time to retire the old backhoe. I have had this thing for probably 30 years, but with the bobcat pretty much able to do anything this cold do, and without all the oil dripping everywhere....Craigslist it is...Sold in 4 hours. (maybe I should have asked more for it.)

I have seen the backhoe attachments for the bobcat listed for less than I got for the Case, maybe....


hoe.jpg
 

Attachments

  • hoe.jpg
    hoe.jpg
    87.1 KB · Views: 29
OP
T

toomanyrocks

Well-known member
Joined
Jan 20, 2019
Messages
190
Location
Ohio
pics of the completed drive from the second story. sorry about the blurr, it was taken through the screen.

drive20.jpg


drive21.jpg


drive22.jpg


drive23.jpg


drive24.jpg
 

Attachments

  • drive20.jpg
    drive20.jpg
    53.2 KB · Views: 31
  • drive21.jpg
    drive21.jpg
    49.7 KB · Views: 29
  • drive22.jpg
    drive22.jpg
    30.6 KB · Views: 28
  • drive23.jpg
    drive23.jpg
    26.5 KB · Views: 28
  • drive24.jpg
    drive24.jpg
    31.8 KB · Views: 30

tarmy

Well-known member
Joined
May 28, 2014
Messages
4,670
Location
Nor Cal
Got my chain hoist put up. there is a note earlier about this but the CM trolley is the only one I found that would go over this 12 inch beam, but I did have to fabricate a bigger bar that it hangs from to accommodate the beam width. CM has other size bars, but not this big. It is the adjusters that go on the bar ends that work so nice to set it to the correct width.

cm.jpg

I would seriously consider either welding a smaller beam to the bottom or side of that main beam that could handle a good trolley and electric hoist...you have done soooo much work...you need it.

The photos below show the beam I used...and it is actually bolted to steel plates I designed in and installed during framing....

D895DC60-CE30-4E12-BC1A-515D81A4B127.jpg

24F1E12D-BFDB-4DAD-8944-B2A87173B8F1.jpg

9AAA05C3-650C-4D73-9260-30948E33BDED.jpg
 
OP
T

toomanyrocks

Well-known member
Joined
Jan 20, 2019
Messages
190
Location
Ohio
going through my camera, found a couple pics. The stats on the driveway: 230 yds concrete 3.5 tons steel 4 1/2 months. Thanks to the daughter, couldn't have done this. I am pretty sure she helped only to ensure that I didn't try to do this myself and end up with a heart attack.

worker1.jpeg


worker.jpeg
 

Attachments

  • worker1.jpeg
    worker1.jpeg
    133.6 KB · Views: 24
  • worker.jpeg
    worker.jpeg
    138 KB · Views: 26
Last edited:
OP
T

toomanyrocks

Well-known member
Joined
Jan 20, 2019
Messages
190
Location
Ohio
From the planning stage, I wanted a 4 post lift in the new shop. Originally I thought about one of those 4 posters that have wheels to move them about, but a couple of problems with that plan. The code says the floor has to slant to the door, which bothered me how a 4 poster would be level depending upon where you placed it. Second, I had a 1 ton truck with duals, and those lifts were only rated for 6000 pounds. Not only would the truck be too wide, but the limit of the weight was a problem since the truck was right at 6000. I don't like not having a wide safety margin.

Next issue I thought about was that I also have small cars that I work on. I couldn't determine from any of the on-line literature if the 4 posters had a movable ramp to accommodate different wheel widths. (Of course I didn't bother to call to find out, but most of the websites for these things I found lacking anyway.)

Being a lurker on Craigslist, I saw an ad one day for a commercial lift at a local Midas shop that was remodeling. (of course I was too late when I actually decided to call, but the guy promised me he was going to have others as more shops were being remodeled and he took my number...never got a call) Kept looking for him again on Craigslist, never saw another ad, but one popped up from an old Car-x shop. This time I called right away, and went to look. For $1100 he had an old (later I found out from the serial number that it was actually 30 years old.) 12,000 pound lift that looked rough and rather dirty and oily, but worked. Measured it, determined the big truck would fit between the pillars and saw how to adjust the track for smaller wheel-width.

Shook hands and it was mine....just had to disassemble it and take it home.

Having been looking at these things for a while, I had a pretty good idea how they are put together, and knew they were not light weight. Here it is in teh shop we got it from.


lift2.jpeg


lift7c.jpg
 

Attachments

  • lift2.jpg
    lift2.jpg
    87.3 KB · Views: 20
  • lift7c.jpg
    lift7c.jpg
    77.7 KB · Views: 17
Last edited:
OP
T

toomanyrocks

Well-known member
Joined
Jan 20, 2019
Messages
190
Location
Ohio
so that weekend My son-in-law and I loaded up the bobcat and headed out. We planned on spending most of the day on this project, but as it turned out these lifts really have only 4 parts (ramps and crossmembers) and the posts.

I didn't know hoe heavy those big ramps were, but knew the bobcat could lift at least 1000 pounds. Sorry I don't have any pics of the disassembly, but it was pretty straightforward, remove the cables and lift off the ramps, threading the cables out as you go.

Here's a pic of part of it loaded on the trailer. I think the ramp with the hydraulic cylinder was just at 1000 pounds, but the bobcat had no problem with it.


lift.jpg


Notice the new truck? F450 (Finally done with chevy. Although I was happy with the duramax, everything else on the truck rusted away after 10 years and I was getting nervous pulling the big trailers.) The new Ford has the aluminum body and they told me stainless brake lines (I have not checked to be sure.) Since the difference in price with the F350 was not much, why not go for bigger? Ohio doesn't tax vehicles, so the tags are relatively cheap, no real difference 1 ton vs 1 1/2 ton.

ford1.jpeg


truck3.jpeg
 

Attachments

  • lift.jpg
    lift.jpg
    108.2 KB · Views: 27
  • truck3.jpg
    truck3.jpg
    66.2 KB · Views: 27
  • ford1.jpg
    ford1.jpg
    29 KB · Views: 25
Last edited:
OP
T

toomanyrocks

Well-known member
Joined
Jan 20, 2019
Messages
190
Location
Ohio
Luckily, not too busy a day at the car-x since we took up most of the parking lot.


lift7b.jpg


Got it all home and stacked in the garage for the next 6 months while the driveway took up all my time.


lift4.jpg


I had the backhoe to unload the trailer at home, since there wasn't room on the trailer to get the lift and bring back the bobcat in the same trip.
 

Attachments

  • lift4.jpg
    lift4.jpg
    92.1 KB · Views: 22
  • lift7b.jpg
    lift7b.jpg
    102 KB · Views: 22
OP
T

toomanyrocks

Well-known member
Joined
Jan 20, 2019
Messages
190
Location
Ohio
Fast forward to October, Finally got the chance to work on the lift. It is always hard to figure where these large pieces of equipment should go in the shop, for access as well as where will it not be in the way when not being used, since it is permanently mounted.

Originally the floor plan called for the lift in one of the front bays, but with it bolted down, and with this being a lot bigger and wider than the non-commercial lifts, If I put it in the front, it would take up more than 1 bay and I would loose a lot of storage space. I had planned on storing the garden tractor and mowers by the small garage door on the rear side of the garage, and I spent a lot of time measuring and driving the big truck onto a mock up ramp to make sure the roof would clear. The other problem was that I had not accounted for needing clear space to the ceiling in this area, meaning that the heating unit for this side of the shop hung right where it would get hit if lift was raised up all the way.

First project was moving the heater back 2 feet to clear the lift area. This entailed re-hanging it and shortening up all the pipes and re-doing the hard gas line. A couple days and that was done.

Time to move the lift to clean it up. I was finally able to see what I had, and happily, the cables appeared relatively new, no significant wear, and the hydraulic cylinder looked as though it had been replaced at some point, as it still had a shipping label on it. So far so good. At least the expensive bits were ok. The pulleys on the cross members, though, were a different story, these turned on brass bushings and were completely worn out. they worked, but wobbled so badly as to be out of spec and dangerous. I was able to find a parts supplier on-line, but since this lift is made by Dover Elevator, you'd better believe there is a tight control on parts suppliers and prices....$560 bucks later, I had a new set of pulleys. At least the pulleys in the ramp were still good.

I knew the hydraulic pump had a leaking reservoir, judging by the amount of oil on the floor under it at the Car-x shop, and the dent in the side corresponded to where someone had hit it and knocked off a mount. A little gentle persuasion and a little fabrication, and I had a new mount bracket and no leak. I didn't see until later that there was also a small leak in the release valve, but that part was pretty easy to find on ebay.

So. a lot of elbow-grease and some paint....


lift5.jpg


lift7a.jpg
 

Attachments

  • lift5.jpg
    lift5.jpg
    112.8 KB · Views: 22
  • lift7a.jpg
    lift7a.jpg
    95.8 KB · Views: 22
OP
T

toomanyrocks

Well-known member
Joined
Jan 20, 2019
Messages
190
Location
Ohio
Now came the nerve-wracking part. Aligning and setting up the uprights. This is the critical part, since I would only have one chance to drill my nice pristine concrete. There is interestingly, a fair amount of play when the lift is rising, but the uprights have to be aligned properly for the locks to engage, I think there was only about 1/8 inch that you could be off and still have the locks work properly.

The other issue was my slanted floor, you can see the laser in this picture. The post near the door was shimmed almost an inch and a half. Lots of measuring, but I had taken lots of measurements and photos of the Car-x installation, so I knew what the distances were. I was able to download an installation manual off the internet but since it was a newer mode, I didn't fully trust the measurements they gave, so I went with the car-x numbers.

This lift gets bolted down with 3/4 inch cement anchors in min 6 inch concrete, I had that but we had cut an expansion joint in the floor when poured, and since this was not where the lift was to go, didn't think about exact placement. Specs called for min distance from any joint, so the entire installation had to be shifted an inch to the left. Turns out, that was ok, since this was the stationary ramp and I still had full clearance of the door opening, although I have to remember to always fold in the mirrors!

Here is the front installation.


lift6.jpg


and after paint.


lift7.jpg
 

Attachments

  • lift6u.jpg
    lift6u.jpg
    32.9 KB · Views: 27
  • lift7.jpg
    lift7.jpg
    42.9 KB · Views: 25
Last edited:
OP
T

toomanyrocks

Well-known member
Joined
Jan 20, 2019
Messages
190
Location
Ohio
I had to think about this next part a bit, since the ramps have to be inserted into the cross members and the cables threaded with little clearance and without knocking off all my pretty paint. I ended up hanging them from a chain hoist, balanced in the middle so I could get out of the bobcat and lower is manually while massaging into place and threading the cables.


lift8.jpg


lift9.jpg
 

Attachments

  • lift8ub.jpg
    lift8ub.jpg
    29.8 KB · Views: 23
  • lift9u.jpg
    lift9u.jpg
    32.5 KB · Views: 21
OP
T

toomanyrocks

Well-known member
Joined
Jan 20, 2019
Messages
190
Location
Ohio
The second ramp was a lot easier since it just sits on top with no cables or pulleys to clear, just the bracket that it slides along to adjust the width.


lift10.jpg


Too bad the lift didn't come with the pneumatic/hydraulic rolling jacks, but these were worth the investment, rated 6000 pounds each, should have no problem lifting anything that fits on the lift.

Lift10a.jpg
 

Attachments

  • lift10au.jpg
    lift10au.jpg
    36.8 KB · Views: 31
  • lift10.jpg
    lift10.jpg
    32.2 KB · Views: 32
OP
T

toomanyrocks

Well-known member
Joined
Jan 20, 2019
Messages
190
Location
Ohio
Lift in and working, all oil leaks chased down and repaired, thinking about the first job for the lift: daughter's truck with a bad starter...at least I think.

Hauled the trailer over to her house and winched the truck up and brought it home. I had previously thought about that steep hill outside the side door of the garage, and it was apparent the dead truck was not going to find its way up there on its own. I did manage to back it to the bottom of the hill on the trailer only taking a little paint off the new truck when I wasn't watching how sharply the trailer had to turn to get around the last curve. (Drat, I kept telling myself not to jackknife the thing while backing, since to get the truck on the trailer I had to pull it all the way on.) Normally I put any trucks on this trailer pointing forward, so that the front of the truck doesn't stick so far out over the front of the trailer, but this time I loaded it backward so that I could unload it facing forward to the lift. The bed of a truck hangs out a lot further than the nose. At least it was just a little scratch...but no matching touch up paint at the car parts store yet, only at the dealer, and I'm not paying their price. Aluminum, so no rust worries.

I welded up a bracket to mount a 120 volt winch to the floor, (from harbor freight, the same one I used to lift trusses,) and it worked fine to haul the truck up the hill.


winchb.jpg


Had to hang a pulley off a motorcycle lift to get clearance for the cable over the hill. Didn't want to take off any of my paint. The little winch didn't really even groan.

wincha.jpg
 

Attachments

  • winchb.jpg
    winchb.jpg
    27 KB · Views: 32
  • wincha.jpg
    wincha.jpg
    29.4 KB · Views: 34
Last edited:
OP
T

toomanyrocks

Well-known member
Joined
Jan 20, 2019
Messages
190
Location
Ohio
I would seriously consider either welding a smaller beam to the bottom or side of that main beam that could handle a good trolley and electric hoist...you have done soooo much work...you need it.

The photos below show the beam I used...and it is actually bolted to steel plates I designed in and installed during framing....

D895DC60-CE30-4E12-BC1A-515D81A4B127.jpg

24F1E12D-BFDB-4DAD-8944-B2A87173B8F1.jpg

9AAA05C3-650C-4D73-9260-30948E33BDED.jpg

I'm still looking for an electric hoist, most I find are either too expensive or 3 phase. I have thought about how to modify the type of trolley you have by putting in a longer cross bolt, but then I got these CM trollies. I could still hang an electric hoist like yours from my trollies. CM does make heavier...just wouldn't know what I would ever do to need it.
 

LaCorski

Well-known member
Joined
Oct 11, 2013
Messages
62
Location
Central Washington
A couple of quick pic of the inside. I finally got some things in there out of the weather.


inside.jpg


inside2.jpg

Great build so far, like the can-light setup as well. Luv the S2000! 2004? I had the very same car, wish I still had it, sure was fun and got a ton of looks. Still to this day not too many people know what they are.
 
To avoid these ads, REGISTER NOW!
Top Bottom