
You are using an out of date browser. It may not display this or other websites correctly.
You should upgrade or use an alternative browser.
You should upgrade or use an alternative browser.
44 Bikes Frame Shop
- Thread starter fortyfour
- Start date


fergus
Well-known member
Nice work!
MUST. FIX. MY. LATHE.
MUST. FIX. MY. LATHE.
Stand for the Di-Acro arrived this afternoon.

Assembled some parts to see where everything sits in space to figure out what kind of footprint I'll need to make everything work:

Going to live with the stand in place for a few days, drill holes and then it's time to lift large heavy object into place... I'll also move shift some stuff around for full access to this new bender so it has 180° of usable rotation (which is a lot more than what I will ever need).

Assembled some parts to see where everything sits in space to figure out what kind of footprint I'll need to make everything work:
Going to live with the stand in place for a few days, drill holes and then it's time to lift large heavy object into place... I'll also move shift some stuff around for full access to this new bender so it has 180° of usable rotation (which is a lot more than what I will ever need).
csp
Well-known member
What a great find that Di-Acro is! That tool has been on my "want" list since using one in junior high metal shop class in 1981.
Rented a hammer drill this afternoon and installed the studs for the base of the Di-Acro #4 Bender. I was noodling how to lift this sucker by myself, just as a fun challenge. I woke up early this past Tuesday morning and the solution hit me: Build a trussed bridge from the door to the bender stand once it was bolted to the floor. So roll the bender back out the door, get it onto the ramp and then slide it up to the stand:

Took a bit of time to get everything into place but sliding the bender up the ramp took all of 10 seconds.
And installed. Time to mix up a matching green paint for the base (which is currently brown - I'll remove the clamps of course and mask things off) and clean up the rest of the parts along with making a few dies:
This morning's job before heading out for a ride was to shift the vise stand a bit to the right to allow for a bit more elbow room around the ratchet mechanism of the bender and after working for 6 years, I want more room to the left of the vise too. Naturally 1 of the 4 holes was WAY off. I have to drill out the base holes a bit more as they are exactly 1/2" (studs are 1/2")..


Nice room now in all directions and I have 180° of bending space for the bender. If I need more, I can loosen the clamp downs and rotate it a bit:

Then it was back to the Depot to return the Hammer Drill and pick up fresh bolts for the Diacro which some were a bit "dunnered" up. (That's PA Dutch Slang for "messed up" or "banged up").

Now to clean everything up and get rid of spot rust and tarnish with a thorough cleaning and regreasing / oil where needed. It's in really good shape but there's about 40 years of **** on it in spots and some parts don't move too smoothly (quick lock clamp). I'm also going to match the paint of the base and paint the bottom and some parts that Diacro green color.

Then off for a ride since it was finally 65° and sunny...

Overall... a good weekend with lot's of sound progress. I'm riding high right now.
Nice room now in all directions and I have 180° of bending space for the bender. If I need more, I can loosen the clamp downs and rotate it a bit:
Then it was back to the Depot to return the Hammer Drill and pick up fresh bolts for the Diacro which some were a bit "dunnered" up. (That's PA Dutch Slang for "messed up" or "banged up").
Now to clean everything up and get rid of spot rust and tarnish with a thorough cleaning and regreasing / oil where needed. It's in really good shape but there's about 40 years of **** on it in spots and some parts don't move too smoothly (quick lock clamp). I'm also going to match the paint of the base and paint the bottom and some parts that Diacro green color.
Then off for a ride since it was finally 65° and sunny...
Overall... a good weekend with lot's of sound progress. I'm riding high right now.
Zeke
Well-known member
Lookin' good Kris. Love to see the Di-Acro in action.
Material just showed up from McMaster Carr for my ratchet mechanism (need to make the cheater bar). I'll be sure to put together a short video of the ratchet mechanism in action. Getting closer to finally putting this one back into service.
Ask and you shall receive. Di-Acro No. 4 Ratchet Mechanism in Action:
video here.
Also cleaned up the quick lock:

Material arrive for the ratchet bar:

It needed this Yeti Speed Grip BTW...

Getting closer to putting this back into action. 3 dies to acquire and/or make and then it's go time:

video here.
Also cleaned up the quick lock:
Material arrive for the ratchet bar:
It needed this Yeti Speed Grip BTW...
Getting closer to putting this back into action. 3 dies to acquire and/or make and then it's go time:
Zeke
Well-known member
Wow, the ratchet arm really saves on the effort. After seeing the girl do it and then you, I can think of something regarding the 2 bolts you must tighten and loosen for each bend. And it isn't using a ratcheting wrench. Hint: big *** wing nuts (or in this case, wing bolts).
Wow, the ratchet arm really saves on the effort. After seeing the girl do it and then you, I can think of something regarding the 2 bolts you must tighten and loosen for each bend. And it isn't using a ratcheting wrench. Hint: big *** wing nuts (or in this case, wing bolts).
Good thoughts. Thanks for sharing.
So for what I need this bender for (chain stays and seat stays) they are made in pairs and I often do batches of parts to optimize the set up time. I'll do 4 pairs to cover the next 4 builds. So the actually set up you see in the video isn't lost and the time it takes is nominal.
Also, the amount of force exerted on that roller is exponential. Point of tangency needs to be maintained through the bend sequence. If that changes mid-way through the bend with thin walled tubing, it will wrinkle/fold or create a bulge. So the bolts need to be good and tight and a ratchet is the only way to get them tight enough. That's extra set up time I'm willing to take in order to get things "just so".
cash68
Keeper Of Rotor Hill
Love this build, glad to find another ID guy here. ")
Next on the short list: Organize and find a home for all my pieces parts I take to trade shows. Right now most of this was hanging out in the wood shop and getting in the way.

So decided to make a pair of simple brackets so this can be organized right next to the door so it's up and out of the way but close by the door so i don't have to haul it too far when loading out:

Took the end of the day Friday to make the above parts and since it was going to rain Saturday, spent some of the morning TIG welding these up:

Welding in the stainless nuts:

Completed brackets and end stops:

Installed and organized finally. Moved the fire extinguisher to a different spot in the shop as I'll be moving where I do all my brazing with the torch later this spring so that will be closer at hand just in case:

Shop help was on hand of course to inspect...

So decided to make a pair of simple brackets so this can be organized right next to the door so it's up and out of the way but close by the door so i don't have to haul it too far when loading out:
Took the end of the day Friday to make the above parts and since it was going to rain Saturday, spent some of the morning TIG welding these up:
Welding in the stainless nuts:
Completed brackets and end stops:
Installed and organized finally. Moved the fire extinguisher to a different spot in the shop as I'll be moving where I do all my brazing with the torch later this spring so that will be closer at hand just in case:
Shop help was on hand of course to inspect...
Last edited:
JustinS
Well-known member
Kristofer, that ratcheting mechanism is really slick!
What's the max tube size it can bend?
What's the max tube size it can bend?
Kristofer, that ratcheting mechanism is really slick!
What's the max tube size it can bend?
The number 4 goes up to 1.25" OD tubing. I only will be using it for .625", .75" and .875" steel/titanium seat stay and chain stay bends for my own purposes. However I have a very specific custom bender I built for both 1.25 and 1.375" OD seat tubes (.035" wall thickness over a 14.5"R die).
Here's the specs of all the machines for reference sake.
Hostyle
Well-known member
Every time you post an update, it makes me want to learn to weld. Awesome as always!


Since I'll be making a bunch of these dies for my new Di-Acro bender, figured I should put some time into dedicated tooling to hold the blanks:

.75" OD X 4.5"CLR die finished up this past weekend:
Little bit of finishing work and I need to make a new clamping block as the .75" clamping block that came with the bender had been modified to take a tapered .75" part. 1018 steel on the way. Making tools is a never ending part of the process. Of which I enjoy immensely!
polexican23
Banned
you and Sakurama together could take over the world, and Zmotors to maintain it. Always impressive Kristof
zmotorsports
ALLIANCE MEMBER
Kristofer, great job on the dies and tooling. I love seeing your work.
Mike
Mike
Thanks fellas. Very much appreciated.
Here's one of life's simple pleasures... Stamping critical dimensions on tooling:

And had to build a new fork for a client to replace the original one. We crossed lines of communication and I did not realize his generator hub used the new 110 Boost spacing vs 100mm. This will also enable all his wheel sets to be compatible with all his bikes in his stable. Some weld samples:


It's going on this bike:

Here's one of life's simple pleasures... Stamping critical dimensions on tooling:
And had to build a new fork for a client to replace the original one. We crossed lines of communication and I did not realize his generator hub used the new 110 Boost spacing vs 100mm. This will also enable all his wheel sets to be compatible with all his bikes in his stable. Some weld samples:
It's going on this bike:
zmotorsports
ALLIANCE MEMBER
Very impressive and high quality work as usual Kristofer.
Mike
Mike
cderalow
Well-known member
sigh. every time i look at this thread it makes me want to order a bike from you.
Terranova
Well-known member
One of life's simple pleasures is appreciating your welds.
You give me hope.
You give me hope.
BoilermakerFan
Well-known member
you and Sakurama together could take over the world, and Zmotors to maintain it. Always impressive Kristof
AMEN! I was thinking the same thing!
One of life's simple pleasures is appreciating your welds.
You give me hope.
AMEN! I was thinking the same thing!
It's all just time behind the torch! The more you weld, the better you get. Practice truly makes perfect.
One thing early on that I did do was I separated the tasks since there's so much going on with TIG. So at first, all I did was use the torch and foot pedal getting used to what happens when you add or subtract amperage (heat control), understanding my pace with relation to that heat and concentrating on the relationship of torch and tungsten to the work piece. I'd just lay long welds with no filler and fill up a sheet of metal like that. I also practiced fusion welding parts together like this too. That teaches you not only heat control, but also how to move and push metal around.
Once I got comfortable, I then added filler into the scenario. Since I had a good understanding and relationship with the torch, heat, angle of the torch and relationship to the material, and using my eyes in combination with my foot working the pedal for amperage, I was now ready to layer in filler and subsequently learn more about heat control, pace and how you can feed the puddle with filler. Separating those elements really worked for me for some reason? It enabled me to take the tasks in bite sized pieces. Maybe this will help others as well.
Some recent heat:


Some recent work completed and delivered.
Bike to California:
Local bike to NH:
Frame set down to CT:
Last edited:
BoilermakerFan
Well-known member
It's all just time behind the torch! The more you weld, the better you get. Practice truly makes perfect.
One thing early on that I did do was I separated the tasks since there's so much going on with TIG. So at first, all I did was use the torch and foot pedal getting used to what happens when you add or subtract amperage (heat control), understanding my pace with relation to that heat and concentrating on the relationship of torch and tungsten to the work piece. I'd just lay long welds with no filler and fill up a sheet of metal like that. I also practiced fusion welding parts together like this too. That teaches you not only heat control, but also how to move and push metal around.
Once I got comfortable, I then added filler into the scenario. Since I had a good understanding and relationship with the torch, heat, angle of the torch and relationship to the material, and using my eyes in combination with my foot working the pedal for amperage, I was now ready to layer in filler and subsequently learn more about heat control, pace and how you can feed the puddle with filler. Separating those elements really worked for me for some reason? It enabled me to take the tasks in bite sized pieces. Maybe this will help others as well.
Wow, this is great! Thank you. I'm an adjunct instructor at a local university and I have access to a lab full of toys. They have Lincoln 225 or 240A TIG welders so I am planning to buy myself a torch so that I get used to my torch. They also just received a tensile testing machine so I can actually test my welds. I'm really stoked since I'm building custom motorcycles, but I can't do the really cool stuff until I know my welds are good, strong, and safe. I'll definitely be putting your advise to use. I'm not even going to buy a welder for the house until I'm consistently getting strong welds. I don't need to stack dimes before I get my own, but I want my frames safe.
Oh, I love your purge air adapters on the BB. Great idea!
Are you on IG? I follow a lot of the custom bicycle frame builders on IG.
Local bike to NH: [url=https://flic.kr/p/UXPCyJ said:[/url]
stupid question time
what is the purpose of the cable that runs up to the seat??
BoilermakerFan
Well-known member
stupid question time
what is the purpose of the cable that runs up to the seat??
It allows you to lower the seat post on decents, then you can raise the seat back up on flats or climbs. On really steep or technical decents you move back over the rear wheel so having your seat drop out of the way helps.
Wow, this is great! Thank you. I'm an adjunct instructor at a local university and I have access to a lab full of toys. They have Lincoln 225 or 240A TIG welders so I am planning to buy myself a torch so that I get used to my torch. They also just received a tensile testing machine so I can actually test my welds. I'm really stoked since I'm building custom motorcycles, but I can't do the really cool stuff until I know my welds are good, strong, and safe. I'll definitely be putting your advise to use. I'm not even going to buy a welder for the house until I'm consistently getting strong welds. I don't need to stack dimes before I get my own, but I want my frames safe.
Oh, I love your purge air adapters on the BB. Great idea!
Are you on IG? I follow a lot of the custom bicycle frame builders on IG.
Sure thing, I am on Instagram: @44Bikes
Good to hear the above tips may help.
If I can make a recommendation on torch/s:
Personally I really like CK Worldwide: http://www.ckworldwide.com
The offer both air and gas cooled torches in a variety of head angles and amperage ratings and their customer service is really, really good. I had to trouble shoot a problem and the CEO of the company called me back.. I own their CK130:

Regardless of the torch size and thickness of material you're tackling, be sure to get a gas lens along with your alumina cup. I personally use a No. 10 alumina cup with matching gas lens for 99% of my welding in steel and have a No. 8 stub with matching gas lens for really tight/acute spots. Both offer good coverage but the No. 10 stays a bit cooler and offers more coverage. 1/16" 2% lanthanated tungsten and I have 3/32 of the same for thicker materials on hand. Most of my work is thin walled materials so 1/16 tungsten is what I use primarily. Gas lens provides good arc stability and less arc wandering on material during start up and lends to a more even distribution of gas.
Make sure you get a superflex hose (depending on manufacturer they call it differently). It's really light and when you weld for long periods, the torch assembly doesn't start to pull on you so you're fighting torch angle. I'll also loop it over my arm or lay a section in my lap to unweight the torch gas lines.
The best advice I can give anyone who is practicing TIG is this: CLEAN. CLEAN. CLEAN.
TIG welds need cleanliness. Both your weld materials, your set up and where you are physically welding. Mechanically remove any mill finish or dirt from inside and outside the material (if tubes). Ideally give the part a warm soap and water wash, dry with lint free cloth but post clean up, an acetone or denatured alcohol wipe down with a lint free cloth is good practice to remove any remaining dirt/oils. Once clean, do not touch the weld site with bare hands. Any oils from your hands can introduce contaminants.
Once ready to weld...
- Clip a new tip off your filler and punch the pedal to get your pre-flow running but do not strike an arc.
- Allow the argon to "wash" that weld site clean as one final finally step. Once argon has finished flowing, strike your arc and start your weld. When you finish, DO NOT remove the torch. Allow your post flow set up to run through it's pre-determined setting. This allows the weld to cool and is protected by the argon.
- Always clip a fresh tip off your filler metal. (I mention it twice because it's a step you never should skip.) You will introduce contaminants if you do not. I repeat this on both ends of my filler just to be sure I've done it. It's a routine!
- Colors you're looking for are in the silver, gold, blue and purple range. Dull grey or flat colors? You're either moving way too slow, using way too much heat, your argon flow needs to be adjusted at the torch, weld area is not clean or some combination of those.
- You're looking for smooth transitions and fillets, good bead spacing, colors in the above range, no undercutting, no lumps, gaps or beads that are unevenly spaced. If there's something that does not look right, it's ok to go back over. Long term you want to avoid this, but steel is incredibly forgiving. You want smooth transitions, no undercutting and good bead spacing as I said, so marching back 4-5 beads won't harm anything so long as your heat management is respectable and under control.
There's just a few small steps you can take to produce really good, strong welds. It's nice to test your welds, but for those who don't have that access, if you follow the above, all typically goes smoothly. But take good notes too so if there is a problem, you can go back to those initial steps to understand what went wrong and how you can adjust your process to make thing run smoother. Problems are typically in prep and set up.
Purging: Any stainless alloys and titanium alloys must be purged. Oxygen is a contaminant and will create a weak weld. Other steel alloys depending on what it is you are doing do not necessarily need this. For my own steel work, I purge because there are critical dimensions that I must ream parts to so it is essential that certain areas inside the bike frame are oxidation free. It does make a noted difference when welding if you are purging. It's small improvements on weld integrity but initially, you want to work on all of the above rather than use more gas.
Like I mentioned earlier, cleanliness is really, really important. So get into good habits and practice now as it will make for better work practice which is intuitive later down the road.
Any questions you or anyone have, feel free to ask. No secrets here when it comes to TIG welding!
BoilermakerFan
Well-known member
Sure thing, I am on Instagram: @44Bikes
Good to hear the above tips may help.
If I can make a recommendation on torch/s:
Personally I really like CK Worldwide: http://www.ckworldwide.com
The offer both air and gas cooled torches in a variety of head angles and amperage ratings and their customer service is really, really good. I had to trouble shoot a problem and the CEO of the company called me back.. I own their CK130:
Regardless of the torch size and thickness of material you're tackling, be sure to get a gas lens along with your alumina cup. I personally use a No. 10 alumina cup with matching gas lens for 99% of my welding in steel and have a No. 8 stub with matching gas lens for really tight/acute spots. Both offer good coverage but the No. 10 stays a bit cooler and offers more coverage. 1/16" 2% lanthanated tungsten and I have 3/32 of the same for thicker materials on hand. Most of my work is thin walled materials so 1/16 tungsten is what I use primarily. Gas lens provides good arc stability and less arc wandering on material during start up and lends to a more even distribution of gas.
Make sure you get a superflex hose (depending on manufacturer they call it differently). It's really light and when you weld for long periods, the torch assembly doesn't start to pull on you so you're fighting torch angle. I'll also loop it over my arm or lay a section in my lap to unweight the torch gas lines.
The best advice I can give anyone who is practicing TIG is this: CLEAN. CLEAN. CLEAN.
TIG welds need cleanliness. Both your weld materials, your set up and where you are physically welding. Mechanically remove any mill finish or dirt from inside and outside the material (if tubes). Ideally give the part a warm soap and water wash, dry with lint free cloth but post clean up, an acetone or denatured alcohol wipe down with a lint free cloth is good practice to remove any remaining dirt/oils. Once clean, do not touch the weld site with bare hands. Any oils from your hands can introduce contaminants.
Once ready to weld...
- Clip a new tip off your filler and punch the pedal to get your pre-flow running but do not strike an arc.
- Allow the argon to "wash" that weld site clean as one final finally step. Once argon has finished flowing, strike your arc and start your weld. When you finish, DO NOT remove the torch. Allow your post flow set up to run through it's pre-determined setting. This allows the weld to cool and is protected by the argon.
- Always clip a fresh tip off your filler metal. (I mention it twice because it's a step you never should skip.) You will introduce contaminants if you do not. I repeat this on both ends of my filler just to be sure I've done it. It's a routine!
- Colors you're looking for are in the silver, gold, blue and purple range. Dull grey or flat colors? You're either moving way too slow, using way too much heat, your argon flow needs to be adjusted at the torch, weld area is not clean or some combination of those.
- You're looking for smooth transitions and fillets, good bead spacing, colors in the above range, no undercutting, no lumps, gaps or beads that are unevenly spaced. If there's something that does not look right, it's ok to go back over. Long term you want to avoid this, but steel is incredibly forgiving. You want smooth transitions, no undercutting and good bead spacing as I said, so marching back 4-5 beads won't harm anything so long as your heat management is respectable and under control.
There's just a few small steps you can take to produce really good, strong welds. It's nice to test your welds, but for those who don't have that access, if you follow the above, all typically goes smoothly. But take good notes too so if there is a problem, you can go back to those initial steps to understand what went wrong and how you can adjust your process to make thing run smoother. Problems are typically in prep and set up.
Purging: Any stainless alloys and titanium alloys must be purged. Oxygen is a contaminant and will create a weak weld. Other steel alloys depending on what it is you are doing do not necessarily need this. For my own steel work, I purge because there are critical dimensions that I must ream parts to so it is essential that certain areas inside the bike frame are oxidation free. It does make a noted difference when welding if you are purging. It's small improvements on weld integrity but initially, you want to work on all of the above rather than use more gas.
Like I mentioned earlier, cleanliness is really, really important. So get into good habits and practice now as it will make for better work practice which is intuitive later down the road.
Any questions you or anyone have, feel free to ask. No secrets here when it comes to TIG welding!
Cool, gave you a follow from my personal account. Scurvy Tick customs will follow you later when I log in to that account...
I'm looking at the Weldcraft A-150 and CK torch for my first torch. The superflex hose was already on the list. I'm planning to get a couple Furick cups. Mike has been a great help to me too. Eventually I'll add a smaller torch for finer sheet metal work.
Since TIG is so different from MIG, I wasn't planning to even do any MIG. I'll just spend the time to learn TIG.
I'll be screen shooting that post for my files too. Thanks again!
BoilermakerFan
Well-known member
Anything new going on Kristofer?
jinjaninja
Well-known member
- Joined
- Nov 1, 2011
- Messages
- 149
Just to add a tiny bit of information to Kris's post above.
Regarding the need for purging.
With stainless and it it's a must. With some chromemolly sets it's also a must. The deciding factor as far as I have been able to determine is the amount of chromium on the mixture and that includes your filler. For example, 4130chrome Molly doesn't have enough chromium to react meaningfully.
Purging for other reasons is handy, especially internal finish to improve paint/anti rust adhesion etc.
Other curiosity I wanted to mention came up ina conversation with Kris on instagram.... When comparing welder settings always be sure to compare apples and apples
I was chatting to Kris about amps, and to me he was using massive numbers.
I did some chatting with a sparky mate, and we recon it's due to America using a 110v setup and aussies using a 240v or higher setup. So remember kiddies, not all amps are equal and always do your own test welds to determine your preferred settings for peno
Question Kris, I've seen it mentioned a few times that ti bikes / ti welds on general like a fusion weld followed by a second filler weld... Why is that?
Sent from my HTC 2PS6200 using Tapatalk
Knyte Tyne
Well-known member
Excellent Break down and write up guys... You help make TIG seem far less scary...
<SNIP>
As per the above, the biggest impetuous for my own purging in my steel bikes is actually what happens POST weld. I have to chase the threads in the bottom bracket, then face the shell and face/chase the inside of the seat tube and head tube all with tools that are really expensive. Any oxidation on the backs of those welds really shortens these tools lifespan. It also makes those tough jobs even tougher as they're all done by hand. So the biggest reason for me from the outset was from a process approach where maintaining tolerances were super critical. Then there are all the small benefits with regards to weld integrity with chromoly/4130 aircraft tubing. Small gains, but critical in a product that really see's a lot of abuse and cycles over time.
But to the welder just starting out with 4130 or steel? It's completely not necessary. You really need to focus your efforts on cleanliness. I can't stress this enough. Both sides of the work piece and/or inside/outside of the work. No dirt, mill finishes, oil, not even a finger print. All of that can lead to contamination. Your work space also should be clean where you're welding too. So if you don't have a routine, get into one and make sure things are tidy. From there it's all heat input, pace, and experience with the torch, tungsten, filler and pedal. And practice.
Practice would be 2nd most important factor. This is a weld from yesterday:

Anyone reading this can do this weld. And I'm not joking. It just takes practice and a level of familiarity with the process where it becomes intuitive and that intuition, that one where you don't think and you're just reacting and acting? That's practice. Just know that the learning curve can be steep at times but being persistent, dedicated and putting focused time into that skill will make you better. I still learn new things every time I weld. I actually picked up the torch yesterday after welding up another Ti prototype and already I could feel and see I'd learned more just from welding a different material.
Just to be clear: The NH service provider refused to drop in a 2nd service and bring 3 phase over. So I'm stuck with 110v at the shop and things are on phase converters while my welder (Miller Dynasty 200 DX) recognizes both single and three phase. Everyone I know who runs three phase into their shop here in the US, depending on material thickness have similar high amperage settings. An Amp is an Amp. Reference paragraph 2 titled under constant current in this article.
However, what made me change my settings was penetration and how the weld was wetting out. Instead of relying on the percentage of power at the peak of the arc (which is why my amps were low originally, with a high peak percentage), I flipped it: So now I have higher amperage settings with a lower percentage of power at it's peak. Example using this weld junction which is unique on a bicycle frame:
The bottom bracket is somewhere in the .06" range while the tube thicknesses are .031 (seat tube / ST) and .035 (down tube / DT). I'll start at the crotch of the ST/DT junction which is acute and at .03" and pull that weld down to the bottom bracket which is considerably thicker at .06". So I need range with the pedal. I'll ramp up with the pedal about a 1/3 of the way down, and watch how the puddle grows and add/subtract power with the pedal to keep that puddle consistent in size but I'm also really keeping a close watch to the left and right so I'm not undercutting that thin tubing so I'm pushing more or less filler in there as I'm working the pedal. The reason though I need that range is where all 3 points of the tubes intersect. That's really thin right there but abruptly changes to a really thick tube, so I need to back off power as I carry more heat and then basically floor it when I get to that bottom bracket shell (and not keyhole the down tube...). That just takes practice! But my settings for that junction are:
115 Amps
30% Peak
9% Background
1.3 PPS (pulses per second)
15-20 SCFH at torch
10-15 seconds post flow
5-10 SCFH for purge
.035" Filler Weldmold 880 (basically 312)
1/16 2% Lanthanated Tungsten
No. 10 Alumina Nozzle with Matching 1/16 gas lens.
No secrets there really. It's all in the technique.
I had that same darn question... I actually can't find a definitive answer where this practice actually originates. I honestly wonder regarding it's origin as I have read about single and double pass weld techniques. Most answers I have gotten state it has to do with the root of the weld and getting proper penetration between the two parent metals that a single pass cannot achieve. To give you an idea though... it took me about 1.5-2 hours to weld up the above steel bike yesterday. It was a SOLID 5-6 hours welding the below Ti bike this past Saturday...
Right on! It's not at all scary. It's quite fun and challenging in a good way. You'll have plenty of sweaty nervous practice welds FYI. I did. But like I state above, what really helped me get my head around the process was separating some of the actions to break things down a bit so I could focus on a few things at a time instead of everything at once, which made if feel REALLY overwhelming. So it was this series of weeks where I would focus time and practice on parts of the process. Take notes and dial things in. This really helped me gain confidence in all the aspects. Some just "get it" right away. Honestly, it took me some time to get comfortable with the torch and foot pedal, then move on to filler with heat management etc. Again: I can't stress how important practice is. I'll do practice welds and practice joints with regularity.
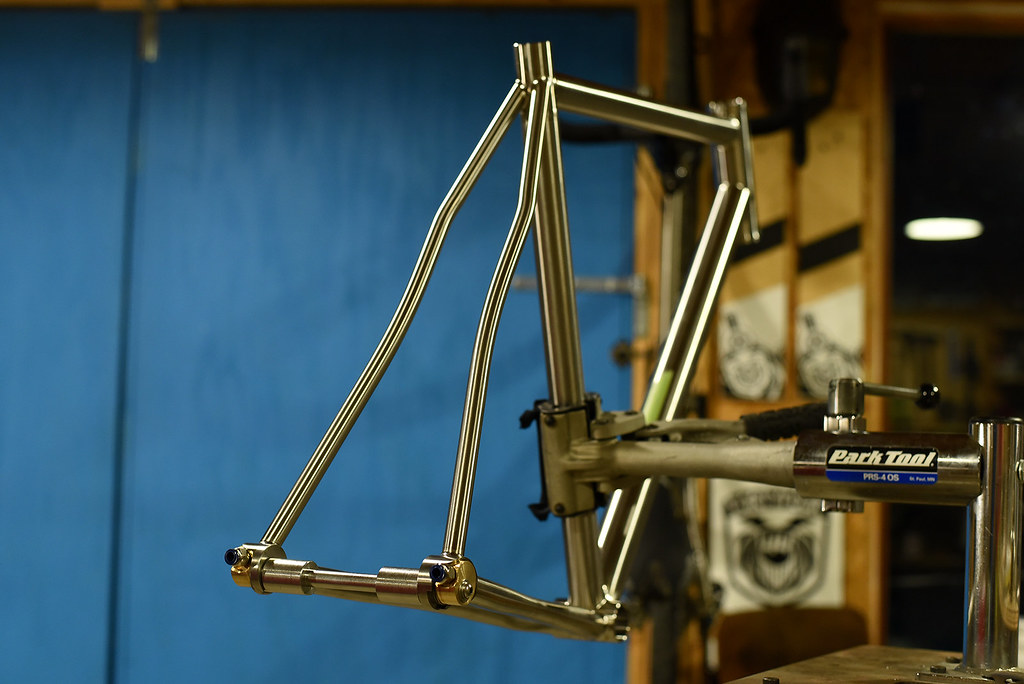
And for those who want to know what's new: TITANIUM!
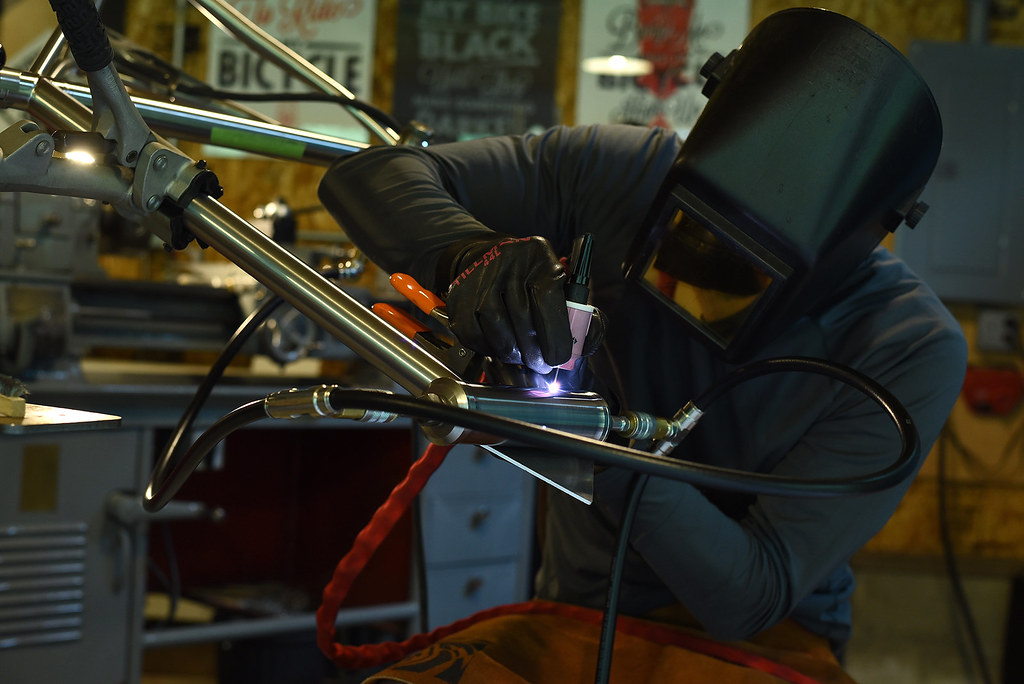
Fusion:

Filler: (note the slight bit of discoloration outside of the weld zone - this is acceptable and cleans up with a stainless brush)


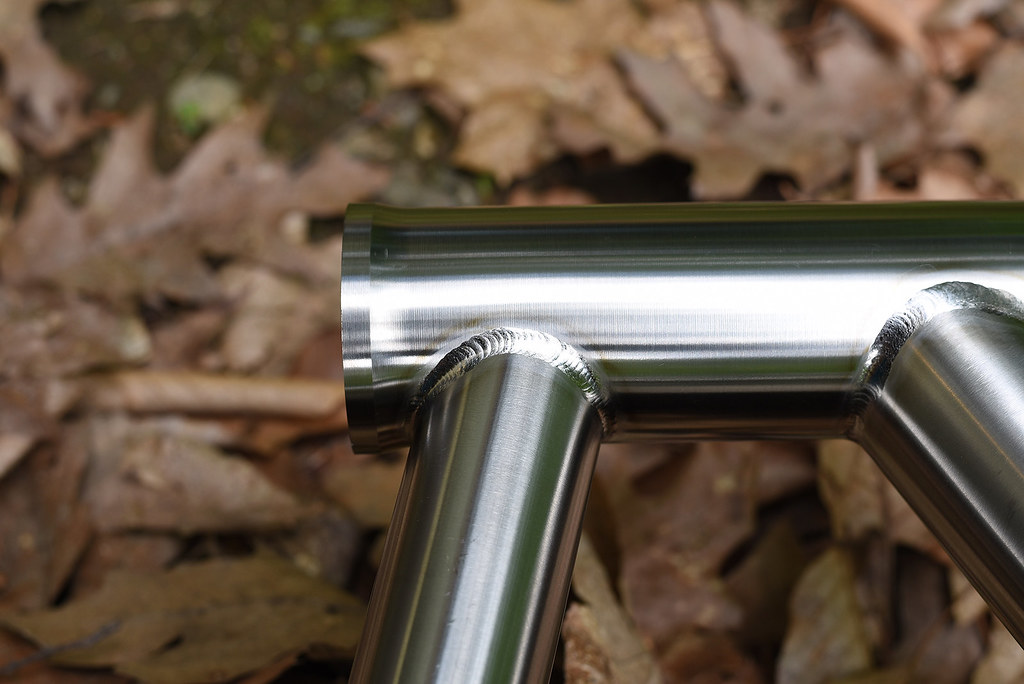

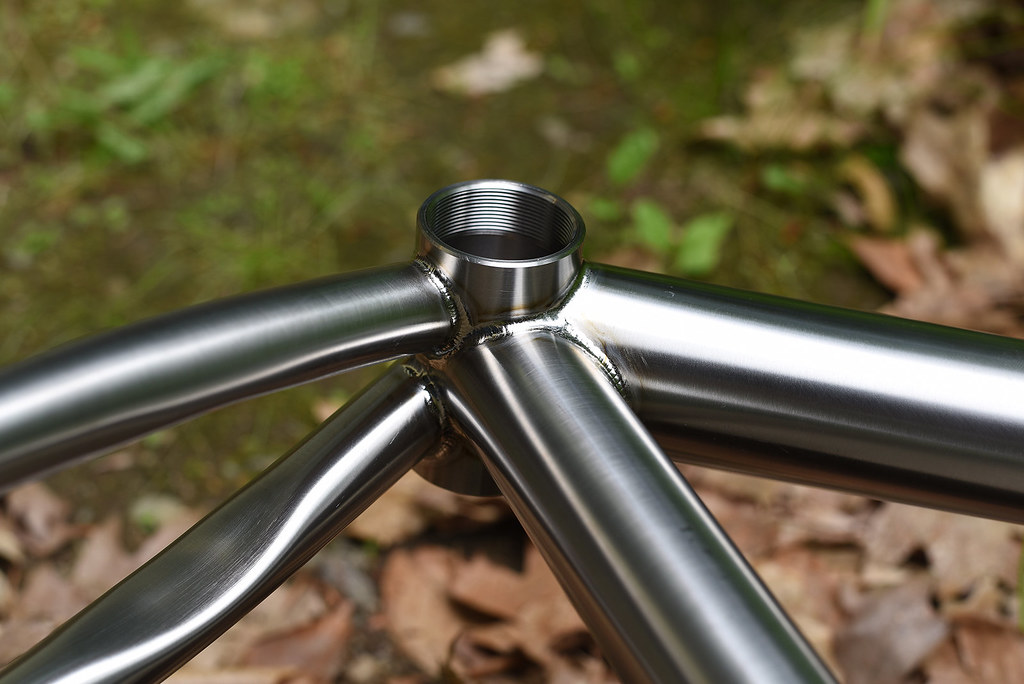
This was a tight spot to weld!


Florescent Marauder 1x11 for a repeat client from England:


More tools... Converting my frame jig to use the same parts as my chain stay sub-assembly jig:


Back from Paint: Huntsman headed to Connecticut
In the shop now: Dedicated Single Speed


Regarding the need for purging...
As per the above, the biggest impetuous for my own purging in my steel bikes is actually what happens POST weld. I have to chase the threads in the bottom bracket, then face the shell and face/chase the inside of the seat tube and head tube all with tools that are really expensive. Any oxidation on the backs of those welds really shortens these tools lifespan. It also makes those tough jobs even tougher as they're all done by hand. So the biggest reason for me from the outset was from a process approach where maintaining tolerances were super critical. Then there are all the small benefits with regards to weld integrity with chromoly/4130 aircraft tubing. Small gains, but critical in a product that really see's a lot of abuse and cycles over time.
But to the welder just starting out with 4130 or steel? It's completely not necessary. You really need to focus your efforts on cleanliness. I can't stress this enough. Both sides of the work piece and/or inside/outside of the work. No dirt, mill finishes, oil, not even a finger print. All of that can lead to contamination. Your work space also should be clean where you're welding too. So if you don't have a routine, get into one and make sure things are tidy. From there it's all heat input, pace, and experience with the torch, tungsten, filler and pedal. And practice.
Practice would be 2nd most important factor. This is a weld from yesterday:
Anyone reading this can do this weld. And I'm not joking. It just takes practice and a level of familiarity with the process where it becomes intuitive and that intuition, that one where you don't think and you're just reacting and acting? That's practice. Just know that the learning curve can be steep at times but being persistent, dedicated and putting focused time into that skill will make you better. I still learn new things every time I weld. I actually picked up the torch yesterday after welding up another Ti prototype and already I could feel and see I'd learned more just from welding a different material.
I did some chatting with a sparky mate, and we recon it's due to America using a 110v setup and aussies using a 240v or higher setup.
Just to be clear: The NH service provider refused to drop in a 2nd service and bring 3 phase over. So I'm stuck with 110v at the shop and things are on phase converters while my welder (Miller Dynasty 200 DX) recognizes both single and three phase. Everyone I know who runs three phase into their shop here in the US, depending on material thickness have similar high amperage settings. An Amp is an Amp. Reference paragraph 2 titled under constant current in this article.
However, what made me change my settings was penetration and how the weld was wetting out. Instead of relying on the percentage of power at the peak of the arc (which is why my amps were low originally, with a high peak percentage), I flipped it: So now I have higher amperage settings with a lower percentage of power at it's peak. Example using this weld junction which is unique on a bicycle frame:
The bottom bracket is somewhere in the .06" range while the tube thicknesses are .031 (seat tube / ST) and .035 (down tube / DT). I'll start at the crotch of the ST/DT junction which is acute and at .03" and pull that weld down to the bottom bracket which is considerably thicker at .06". So I need range with the pedal. I'll ramp up with the pedal about a 1/3 of the way down, and watch how the puddle grows and add/subtract power with the pedal to keep that puddle consistent in size but I'm also really keeping a close watch to the left and right so I'm not undercutting that thin tubing so I'm pushing more or less filler in there as I'm working the pedal. The reason though I need that range is where all 3 points of the tubes intersect. That's really thin right there but abruptly changes to a really thick tube, so I need to back off power as I carry more heat and then basically floor it when I get to that bottom bracket shell (and not keyhole the down tube...). That just takes practice! But my settings for that junction are:
115 Amps
30% Peak
9% Background
1.3 PPS (pulses per second)
15-20 SCFH at torch
10-15 seconds post flow
5-10 SCFH for purge
.035" Filler Weldmold 880 (basically 312)
1/16 2% Lanthanated Tungsten
No. 10 Alumina Nozzle with Matching 1/16 gas lens.
No secrets there really. It's all in the technique.
Question Kris, I've seen it mentioned a few times that ti bikes / ti welds on general like a fusion weld followed by a second filler weld... Why is that?
I had that same darn question... I actually can't find a definitive answer where this practice actually originates. I honestly wonder regarding it's origin as I have read about single and double pass weld techniques. Most answers I have gotten state it has to do with the root of the weld and getting proper penetration between the two parent metals that a single pass cannot achieve. To give you an idea though... it took me about 1.5-2 hours to weld up the above steel bike yesterday. It was a SOLID 5-6 hours welding the below Ti bike this past Saturday...
Excellent Break down and write up guys... You help make TIG seem far less scary...
Right on! It's not at all scary. It's quite fun and challenging in a good way. You'll have plenty of sweaty nervous practice welds FYI. I did. But like I state above, what really helped me get my head around the process was separating some of the actions to break things down a bit so I could focus on a few things at a time instead of everything at once, which made if feel REALLY overwhelming. So it was this series of weeks where I would focus time and practice on parts of the process. Take notes and dial things in. This really helped me gain confidence in all the aspects. Some just "get it" right away. Honestly, it took me some time to get comfortable with the torch and foot pedal, then move on to filler with heat management etc. Again: I can't stress how important practice is. I'll do practice welds and practice joints with regularity.
And for those who want to know what's new: TITANIUM!
Fusion:
Filler: (note the slight bit of discoloration outside of the weld zone - this is acceptable and cleans up with a stainless brush)
This was a tight spot to weld!
Florescent Marauder 1x11 for a repeat client from England:
More tools... Converting my frame jig to use the same parts as my chain stay sub-assembly jig:
Back from Paint: Huntsman headed to Connecticut
In the shop now: Dedicated Single Speed
cderalow
Well-known member
you posted the going rate for a TI frame yet?
with you getting into that now, I may look to get a huntsman... need a decent all weather bike.
with you getting into that now, I may look to get a huntsman... need a decent all weather bike.