To avoid these ads, REGISTER NOW!

5x10 Shed Build

drbooshkit

Active member
Joined
Apr 21, 2025
Messages
33
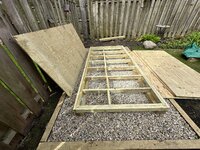
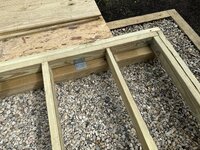
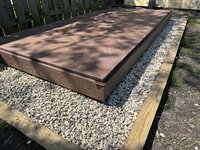
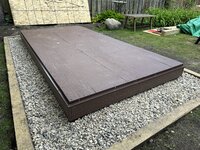
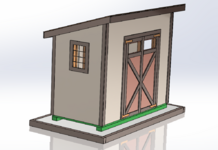
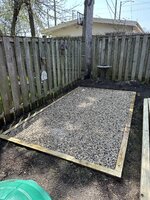
I found some very helpful information in this forum as I am researching for upcoming shed build. Figured I would share my plans and progress here in case it helps others -- or in case you all can offer me your experience! I haven't done a shed or garage per se, but what I am attempting feels simple and I'm competent with all the tools and trades to make this happen. Attaching image of the design I made in CAD. The biggest decisions so far were: 1) gravel base vs concrete (going gravel so it can be moved if needed later)... and 2) floor joists as 2x4 or 2x6... currently leaning towards 2x4 since the span is short (12" or 16" OC?). Span is 58". I am planning on 2x4 rafters as well 16" OC. The skids are 4x6 PT, as are the gravel perimeter.
Any feedback or sanity checks are welcome.
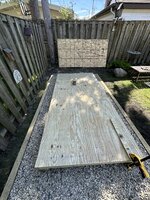
Question I have: would you use PT 2x4 for the sill plate? or regular OK? Plan to use LP SmartSide for speed of build. Floor is 3/4 PT plywood.
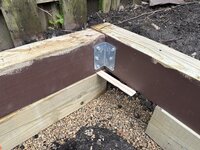
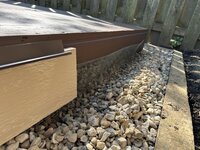
 

Attachments

  • framing.png
    framing.png
    731 KB · Views: 182
  • shed iso.png
    shed iso.png
    220.4 KB · Views: 154
To avoid these ads, REGISTER NOW!

mike93lx

ALLIANCE MEMBER
Joined
Dec 9, 2013
Messages
37,555
Location
Richmond, VA
The bottom wall plate doesn't need to be PT as it will be protected from tbe weather.

At that size 2x4 will be fine everywhere and 16oc is well more than plenty.

On the floor blocking, I would just place it where you will have an unsupported seam.

5x10 is an odd size, but since lumber can be bought in 10 and 12' lengths, planning we'll should minimize waste. Sheet good usage won't be super efficient
 
OP
D

drbooshkit

Active member
Joined
Apr 21, 2025
Messages
33
mike-- thank you for the input on this one, that's a big help.
5x10 is indeed strange! I am replacing an old 4x6 shed and maximizing the footprint I can build in the constrained space.
Absolutely on the sheet usage, it's not ideal. For floor and roof deck, I can buy 3 sheets and "waste" a lot (i.e. sit around for 3 years before I have another useful project) or nest 2 sheets with length offcuts... still on the fence on that one.
You make me think again though about the 5' sides, that might be some slim pieces of the 48" T1-11 (or LP SmartSide) -- i will mock that up. Anyone know if there's a spec minimum width you'd rip a 48" siding panel to?
 

mike93lx

ALLIANCE MEMBER
Joined
Dec 9, 2013
Messages
37,555
Location
Richmond, VA
mike-- thank you for the input on this one, that's a big help.
5x10 is indeed strange! I am replacing an old 4x6 shed and maximizing the footprint I can build in the constrained space.
Absolutely on the sheet usage, it's not ideal. For floor and roof deck, I can buy 3 sheets and "waste" a lot (i.e. sit around for 3 years before I have another useful project) or nest 2 sheets with length offcuts... still on the fence on that one.
You make me think again though about the 5' sides, that might be some slim pieces of the 48" T1-11 (or LP SmartSide) -- i will mock that up. Anyone know if there's a spec minimum width you'd rip a 48" siding panel to?
If you do the 5', I'd probably use a 3' and a 2' with framing spaced accordingly. Your 1' wide offcuts will give you your soffit material
 

mschoo92

Well-known member
Joined
Oct 2, 2023
Messages
72
Location
Sussex County, NJ
Nice shed design! What do you use for your CAD?

If you haven’t done the gravel base yet it may be worthwhile to plan adding some hardware cloth or chicken wire around the perimeter of the shed and buried into the gravel in an “L” - that’s supposed to help keep anything out from living underneath.

I haven’t built a shed but recently built a gravel foundation and moved an existing 10x12 to it, I added trim boards underneath to block any critters but am thinking of adding the wire as added protection! Had a couple groundhogs living under it in its previous location and their dirt mound created a constant wet spot on the flooring.
 

Bigblue&Goldie

Well-known member
Joined
Mar 12, 2009
Messages
10,679
Location
AZ
I built a little 5x12' shed recently. You can check it out here:


I'm not against small sheds (obviously), but keep in mind you will be loosing 7" on length and width of floor space to your wall framing. With that in mind, I'd double check what you're storing to make sure your dimensions work. Everyone thought I was nuts for building so small, but the fact of the matter is my shed is packed pretty darn full all the way up whereas most people have a tall shed with a bunch of misc **** on the floor and a ton of empty air space above it.
 

JeepYJ

Well-known member
Joined
Dec 25, 2015
Messages
8,984
Use 2x3 lumber for wall framing if you want a little more interior space. You could probably go down to 2x2 lumber for such a small shed.
 
OP
D

drbooshkit

Active member
Joined
Apr 21, 2025
Messages
33
Wife and I have laid the perimeter 4x6 and excavated down for 3.5” - 4” of gravel (3/4” chip). Delivery tomorrow of gravel. Probably overkill, but used Simpson inside corner brackets and 5 1/2” screws on each side. Before laying in the gravel trench, I did paint the bottoms and sides with Woodluxe. The wood is still a bit wet but I figured I can leave the top face of the timbers open for the season to let water get out there. I really wanted to seal the sides and bottom before they got covered forever. I am hoping that having the gravel on the bottom instead of bare ground will also prolong life.
Finally, way overkill, but pinned the sides down with 48” x 1/2” rebar , two places on each side. She is never going anywhere lol !
Three weeeks until shed construction. My best bud from Texas is coming up for two days. It’ll be a fun sprint. Just ordered all the lumber for delivery $1900. A few hundred more expensive for the local family lumber yard and that’s fine with me.
Also finalized the design for the door. Got some lovely bronze hinges finished in espresso brown.
Still in search of a good door handle …
 

Attachments

  • IMG_4162.jpeg
    IMG_4162.jpeg
    1.8 MB · Views: 110
  • IMG_4153.jpeg
    IMG_4153.jpeg
    1.6 MB · Views: 99
  • IMG_4140.jpeg
    IMG_4140.jpeg
    896 KB · Views: 91
  • IMG_4137.jpeg
    IMG_4137.jpeg
    1.1 MB · Views: 90
  • IMG_4133.jpeg
    IMG_4133.jpeg
    1.9 MB · Views: 92

mike93lx

ALLIANCE MEMBER
Joined
Dec 9, 2013
Messages
37,555
Location
Richmond, VA
Exterior. It will be the LP Smartside T1-11 with 8” OC, which isn’t shown.
I just sided my 16x16 with those smartside panels and have another 8x8 with it. They're very consistent and they last a long time.

Are you using them as sheathing or on top of sheathing?
 
OP
D

drbooshkit

Active member
Joined
Apr 21, 2025
Messages
33
I just sided my 16x16 with those smartside panels and have another 8x8 with it. They're very consistent and they last a long time.

Are you using them as sheathing or on top of sheathing?
Was planning to use it as single sheathing + siding. Mostly for time and cost.
 
OP
D

drbooshkit

Active member
Joined
Apr 21, 2025
Messages
33
I built a little 5x12' shed recently. You can check it out here:


I'm not against small sheds (obviously), but keep in mind you will be loosing 7" on length and width of floor space to your wall framing. With that in mind, I'd double check what you're storing to make sure your dimensions work. Everyone thought I was nuts for building so small, but the fact of the matter is my shed is packed pretty darn full all the way up whereas most people have a tall shed with a bunch of misc **** on the floor and a ton of empty air space above it.
Thank you for sharing your build. Looks tidy!
 
OP
D

drbooshkit

Active member
Joined
Apr 21, 2025
Messages
33
Nice shed design! What do you use for your CAD?

If you haven’t done the gravel base yet it may be worthwhile to plan adding some hardware cloth or chicken wire around the perimeter of the shed and buried into the gravel in an “L” - that’s supposed to help keep anything out from living underneath.

I haven’t built a shed but recently built a gravel foundation and moved an existing 10x12 to it, I added trim boards underneath to block any critters but am thinking of adding the wire as added protection! Had a couple groundhogs living under it in its previous location and their dirt mound created a constant wet spot on the flooring.
Great idea to make a flange on the wire and bury that a bit. Will do that.
I use SolidWorks for CAD, I get access through work. Great tool.
 

mike93lx

ALLIANCE MEMBER
Joined
Dec 9, 2013
Messages
37,555
Location
Richmond, VA
Was planning to use it as single sheathing + siding. Mostly for time and cost.
It'll work fine.

I had a 10x10 at my last house that was a cheap kit, but used smartside for sheathing. I never painted it and it was holding up fine after 6ish years of new England winters

This is my current build https://www.garagejournal.com/forum/threads/pool-shed-build.540649/page-5

And the 8x8 (this thread is a bit of a shitshow)
 
Last edited:
To avoid these ads, REGISTER NOW!

DGersic

Well-known member
Joined
Mar 12, 2017
Messages
6,310
Location
DeKalb, IL
If you haven’t done the gravel base yet it may be worthwhile to plan adding some hardware cloth or chicken wire around the perimeter of the shed and buried into the gravel in an “L” - that’s supposed to help keep anything out from living underneath.

Yes, do this. I didn’t when I built my shed, and it was fine for several years, but then something tried to move in to the space under the shed. I had to dig a perimeter trench and install hardware cloth to evict it. Would have been easier to do before putting the shed up.
 

mschoo92

Well-known member
Joined
Oct 2, 2023
Messages
72
Location
Sussex County, NJ
Great idea to make a flange on the wire and bury that a bit. Will do that.
I use SolidWorks for CAD, I get access through work. Great tool.

Nice, thought it looked familiar! I use SolidWorks too, have a license through work and I also have a “maker” license for around $50/yr that is nice to have on my home laptop for tinkering/printing projects.
 
Last edited:
OP
D

drbooshkit

Active member
Joined
Apr 21, 2025
Messages
33
Lumber arrived yesterday. I am solo getting ahead by constructing the platform and floor. I used PT 2x4, 16” OC, with a blocking for the seam. Used my new Milwaukee 30 degree nailer on this with galvanized 3 1/4 (3 per connection). ((Made myself practice toenailing after this). Then for good measure, applied some Simpson 90 degree brackets. I only had #9 SDS screws instead of the 1/4” SDS , but I think they will be okay :) seriously though it will be reassuring to have that extra hardware if this needs to be moved from the skids.
I have one more piece of plywood left to screw down and cut. Then going to sand and paint the edges with a handsome brown trim wood luxe.
My buddy is coming over this weekend. Two days to build the shed! I don’t think making the floor was cheating , just giving us a fighting chance.
 

Attachments

  • IMG_4382.jpeg
    IMG_4382.jpeg
    1.5 MB · Views: 90
  • IMG_4379.jpeg
    IMG_4379.jpeg
    1.5 MB · Views: 70
  • IMG_4383.jpeg
    IMG_4383.jpeg
    1.5 MB · Views: 72
  • IMG_4385.jpeg
    IMG_4385.jpeg
    1.5 MB · Views: 80
OP
D

drbooshkit

Active member
Joined
Apr 21, 2025
Messages
33
Lumber arrived yesterday. I am solo getting ahead by constructing the platform and floor. I used PT 2x4, 16” OC, with a blocking for the seam. Used my new Milwaukee 30 degree nailer on this with galvanized 3 1/4 (3 per connection). ((Made myself practice toenailing after this). Then for good measure, applied some Simpson 90 degree brackets. I only had #9 SDS screws instead of the 1/4” SDS , but I think they will be okay :) seriously though it will be reassuring to have that extra hardware if this needs to be moved from the skids.
I have one more piece of plywood left to screw down and cut. Then going to sand and paint the edges with a handsome brown trim wood luxe.
My buddy is coming over this weekend. Two days to build the shed! I don’t think making the floor was cheating , just giving us a fighting chance.
Anddd for those sharp of you to spot it, yes I did a double rim joist. lol. I ordered 10x of the 10-foot sticks, so I had enough to “just double it” since I was I was on edge about 2x4 vs 2x6. This thing isn’t going anywhere.
 

JohnX14

Well-known member
Joined
Jun 2, 2014
Messages
559
Location
Boston 'burbs
Looks good so far, and for that size the 2x4's are fine. My only "question" is what will make themselves at home under the shed. My next door neighbor has a shed up on blocks, and fortunately it's only rabbits under there. The construction looks fine.
 
OP
D

drbooshkit

Active member
Joined
Apr 21, 2025
Messages
33
I'm sure you will be fine but I would have used 2x6s for the floor.
Definitely could do 2x6 for peace of mind. However I can say now the 2x4 are just fine. It’s the small 58” overall width (effective span is 47” after taking the 4x6 into account).
 
OP
D

drbooshkit

Active member
Joined
Apr 21, 2025
Messages
33
While waiting to begin framing, I found a few things to do. 1) painted the floor and outside edges (good family fun!). 2) found some wire mesh laying around and trimmed to size with flanges ready to install (thanks @mschoo92 !) 3) the lumber delivery ended up breaking the 1x6x16’ LP trim boards during the drop, so they gave me three new ones. So why not add a skirt trim around the entire platform? Wasn’t planning on it but now I have ample material (and full length for the fascia’s too).
With the Z flashing I still have 1/4” below the deck, so i could do that install now and then have a ledger board for the siding install. Any objections to nailing down the “skirt” trim and Z flashing now?

Also in other news, ordered the sandstone coin g-floor. Going to be a sharp finishing touch. But the brown is fun for now.
 

Attachments

  • IMG_4407.jpeg
    IMG_4407.jpeg
    872.5 KB · Views: 70
  • IMG_4403.jpeg
    IMG_4403.jpeg
    1.3 MB · Views: 73
OP
D

drbooshkit

Active member
Joined
Apr 21, 2025
Messages
33
The siding needs to be raised off rhe Z flashing a bit, so make sure you have some spacers on hand to ensure that.
I have a box of popsicle sticks I could use to raise off siding — what do you think?
Also, I saw one picture where the siding was shimmed out at bottom to kick it out a bit. Thoughts ? Picture update attached. Wife helped me pin the skirt trim. Nice ! And very glad to install that wire mesh during the process. Left the **** sides attached only with screws so can be removed if necessary.
 

Attachments

  • IMG_4410.jpeg
    IMG_4410.jpeg
    1.4 MB · Views: 76

mike93lx

ALLIANCE MEMBER
Joined
Dec 9, 2013
Messages
37,555
Location
Richmond, VA
I believe lp calls for 3/16 spacing... Confirm that

I used a couple composite shims, but they don't like to stay in place and can get frustrating
 
OP
D

drbooshkit

Active member
Joined
Apr 21, 2025
Messages
33
Thanks for shim tips.
Here’s the floor… just waiting for the next fun.
 

Attachments

  • IMG_4413.jpeg
    IMG_4413.jpeg
    1.5 MB · Views: 75
To avoid these ads, REGISTER NOW!
Top Bottom