To avoid these ads, REGISTER NOW!

5x10 Shed Build

OP
D

drbooshkit

Active member
Joined
Apr 21, 2025
Messages
33
I believe lp calls for 3/16 spacing... Confirm that

I used a couple composite shims, but they don't like to stay in place and can get frustrating
3/8” spacing. Here is from LP, their corporate blog:

Closing the Gap: Installers can provide flashing but mistakenly rest the siding on top of the flashing, which can prevent moisture from escaping. Remember to provide a 3/8-inch gap between the flashing and the bottom edge of the siding. Here’s a quick tip: If you are installing LP SmartSide 38 series lap siding, you can use a scrap piece of the siding to create the proper gap (38 series lap siding is approximately 3/8-inch thick).”
Thanks for the quick tip LP! Good thing I had left a half inch gap at the top of the sheet for margin in the plan!
 
To avoid these ads, REGISTER NOW!
OP
D

drbooshkit

Active member
Joined
Apr 21, 2025
Messages
33
You didn't fill the screw holes??

Kids today...

:)
i'll touch up the trim screws at the very end. the floor decking, it's 3/4" plywood. i think i overdrove them but not concerned.
please, by all means, any tips along the way from anyone is welcome. even if I don't see it, this thread will help the next builder.
 

mike93lx

ALLIANCE MEMBER
Joined
Dec 9, 2013
Messages
37,479
Location
Richmond, VA
i'll touch up the trim screws at the very end. the floor decking, it's 3/4" plywood. i think i overdrove them but not concerned.
please, by all means, any tips along the way from anyone is welcome. even if I don't see it, this thread will help the next builder.
Looking good. I'm sure it will be a well built, stout little shed
 

drivesitfar

Well-known member
Joined
Oct 23, 2013
Messages
36,007
Location
Pacific Northwest
I need to build a bigger version of something similar to this so when I get to it I’ll check your build and see what I can learn. Good luck with the doors and finishing it.
 
OP
D

drbooshkit

Active member
Joined
Apr 21, 2025
Messages
33
Been raining almost 3 days here. Multiple inches. Besides the fact there's no door on the Shed, it's been bone dry. So thankful for the weather during last weekend's build days.

This has given me time to re-think the door design. . Here's where I am at. picture below.

Green = 2x4 laid on the flat side. Orange is the siding panel (Saved from cutting the door carefully during sheathing). Brown is LP 1x4 (5/8" x 3.5" actual) trim. In the center I have an astragal trim mounted on the right side that will seal it and be just the right width. hanging with 4x strap hinges.
In case you can't tell, I am not a carpenter ;) But I am going to try to half-lap join the corners of the green structural 2x4s in the corners, then glue and screw the intermediate horizontals and angles.
transom flush mount window in the space up top.
I will use 1/8" gaps between frame and door paneling, and additional 1/8" from panel door structure on three sides. on teh bottom side, there's a few inches of board that will hang below the structure.
Then, perhaps weather seal the receiving door vertical? any weather seal / strip suggestions?
Cheers,
Brian

1747866413976.png
 

mike93lx

ALLIANCE MEMBER
Joined
Dec 9, 2013
Messages
37,479
Location
Richmond, VA
Looks good. The half laps will be good practice. Make them tight so when the wood dries, the my open a bit less.

I'd use tite bond 3 or polyurethane construction adhesive
 

drivesitfar

Well-known member
Joined
Oct 23, 2013
Messages
36,007
Location
Pacific Northwest
If you’re cutting and gluing the boards outside make sure it’s in the cool part of the day otherwise lumber heats up in the afternoon sun and the sizing can change. Good luck!!
 
OP
D

drbooshkit

Active member
Joined
Apr 21, 2025
Messages
33
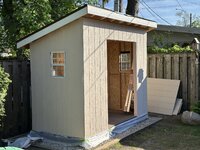
Update: Doors and trim are up! Great success.

There was a good chance to parallelize a couple tasks last weekend. First, I laid out all the trim and gave them a first coat of paint. I used Benjamin Moore AURA exterior paint, in Fresh Brew color, which matches our house trim. Definitely use 1/2" or more nap on the roller, as the LP siding has aggressive texture. I had used 1x6 LP for the fascia and skirt trim, and the others are 1x2 and 1x4. My wife and I pre-assembled the four sets of window trim. While that dried, I could get to real "woodworking" on the doors :)
1748789857814.png

Moving to the door structure, assembly and mounting... As you saw above, based on my width measurement (59 1/2" total framed opening), I had to use a thinner-than-ideal vertical stile in the middle part of the door. This was because I had already ordered two 24" transom windows. I had ordered those awhile ago, maybe too quickly, since I hadn't fully fleshed out all the dimensions and gap requirements for the door. But since I had the windows in hand already, I really wanted to make them work. I should have widened the door frame opening in the design, but even as we raised the front wall, I wasn't thinking ahead to the exact details -- for example that the windows need 24 1/4" rough opening (there's a half inch off the available door structure width already).
For the 1.5" wide piece, you're thinking that's just a 2x2"... but good luck finding a straight and true 2x2 at the store. I had to pause for an extra hardware store run to get a couple ideal 2x6, from which I ripped the "2x2".
All that being said, I was worried that 1.5" wouldn't be strong enough, and I wanted to increase strength of that joint with a half lap joint. However, not being a woodworker, I compromised and used glue + screw for the remaining cross and angle joints. Here's the layout of the wood, before joining:
1748791067999.png
The crosses and angles were scribed and cut to length after the primary structure was assembled, squared, glued, clamped, screwed.
Oh wait, first we need to cut some half laps. I tried to use the stop feature on my miter saw, but found that I operate the saw with inconsistent force on the arm, resulting in different depths. So, I switched to simple Japanese pull saw and vice clamp down in the basement shop. It took about an hour to cut the 16 half laps. Sure, could have also cut the crosses and angles like this, but you have to keep reminding yourself, "it's a shed" and make the right tradeoffs so you get the project done in that one week(end) timeframe.
I don't have to tell anyone how to square these up, but it's worth mentioning to find a really nice flat surface to do this on. And lift it up off that best ground with some equal blocks, like offcuts:
1748791216786.png

All together, these doors are quite sturdy. Heavy, in a good way (Except my worst shed injury to date is now dropping the edge of the assembled door on my toe -- the one day i wasn't wearing my steel toe project boots). Here's the structure as finished and mounted:

1748791447382.png


Lets back up though... we have to finish the doors and mount them. After a few beers and talking it through with my friend Justin, who happened to be in town last weekend, we agreed to build and mount the doors in-place. There was some discussion, because I had seen a variety of approaches on YT. Ultimately, I liked what this builder came up with. You can't see in this image, but behind the door structure are six 2x4 blocks that are temporarily screwed down 1.5" back (door width) inside the frame. Three blocks each top and bottom meant that dimension was already perfect:
1748791516026.png
I got a variety of spacers and we put the door structure in place in the frame with the as designed gaps. fit almost perfectly, maybe 1/16" off in the center bottom. no big deal, that's why there's extra margin built in to the dimensions of the door structure. In general, I kept the door structure 1/4" offset from the frame [top and sides] and 3/4" on bottom. 1/2" in center between doors. With spacers in place, the door structure was basically holding itself in place. Then, one side at a time, we held up the door panel and scribed where it would mount to the structure. While the door panels are the exact cut outs from the walls themselves, we still had to pull out the circular saw. We decided to do a 3/16" space between wall and door panels, which was a bit wider that the kerf left with the initial cut. We also cut off the leading and trailing shiplap edges, but did this AFTER the panels were assembled to the door, in order to cut it flush. Then, take down the structure and assemble. We had some fun and shot 113x2" from the nail gun :) [note, dial in the nail depth precisely flush with the siding and it just barely doesn't poke through the door.]
With structure + panel built, we put THAT back in to the frame, with the same block + spacers approach. Then, we cut the trim to length, starting with the frame and hinge side verticals. Next, the cross trims. with those in place, we mounted the 11" T hinges. Since I was only using two hinges (aesthetics mostly), I got some really solid hinges. Of course we had to use our own 2" screws vs the included 1", in order to penetrate down to the structure. Finished with a drop bar latch. It really turned out to work and look fantastic at this point! Again, due to limited space I used a single trim down the center as an astragal. It attaches to the right door, which gets the handle.

Comment: Any recommendations on door holders? Like maybe a magnetic catch to grab and hold the door wide open?

Comment, also: I think it would be a big benefit if others share their approach to building and hanging doors. This might could have been simpler or faster than I made it. But I knew this approach would make it look great even if everything we had done up to now had bad square and plumb.

Looking

1748792487469.png

1748792787681.png

I also added 1x2 trim ("frieze block"??) between soffit and wall, which added a really huge level of polish that I didn't initially have in the design.

NEXT up: shingles, gutter (we had rain and turns out with drip edge, water lands directly on the rear timbers. duh).
 
Last edited:

DGersic

Well-known member
Joined
Mar 12, 2017
Messages
6,292
Location
DeKalb, IL
Comment: Any recommendations on door holders? Like maybe a magnetic catch to grab and hold the door wide open?

I got these from Amazon after seeing a similar hook on another shed.

IMG_5390.png

My doors are the cutout T1-11 siding, framed (outside) with 2X lumber, and hung on three hinges. I left the centre lap on the siding.

Inside, the left door got two barrel bolts to keep it closed at top and bottom. Outside, a puck lock keeps the right door closed.
 
To avoid these ads, REGISTER NOW!

drivesitfar

Well-known member
Joined
Oct 23, 2013
Messages
36,007
Location
Pacific Northwest
I’m guessing framing doors use and length of service depends on where in the world you live but I do like the framing because it has an even better chance of lasting longer.
 
OP
D

drbooshkit

Active member
Joined
Apr 21, 2025
Messages
33
I've found sheet goods for doors will support itself just fine without any frame work on the inside.
Do you have some pictures of this design? This sounds like a much FASTER way if you wanted to go that route.
I had some 1/2" plywood leftovers that I almost added inside to the door "sandwich" but that seemed overkill. It certainly would have looking back.
We know sheet goods are great for the shear (in plane of door) loading, which is for the door what you're trying to prevent for the most part. I noticed the LP SmartSide (T1-11) was terrible for holding screws, just chewed up with little hold. So I would feel better if there was plywood sandwiched together, and maybe even use bolts instead of screws.
Perhaps you could make a sandwich of paneling, such as T1-11; 1/2 OSB; maybe another T1-11? Especially if you had leftover sheets.
Weight of my doors (frame + panel) = 31 lb [excluding screws, trim]
Weight of T1-11 + 1/2" OSB of same size = 29 lb.
 
OP
D

drbooshkit

Active member
Joined
Apr 21, 2025
Messages
33
Big update, my dad visited for a couple days and helped out HUGE with the shingles and gutter. I'll share more when I have some time to write, but gotta go back to work. Monday's, right? J-O-B. to afford things like sheds, tools, copper gutter piece... ;)
 

Attachments

  • IMG_4584.png
    IMG_4584.png
    6.4 MB · Views: 50

Jazz1

Well-known member
Joined
Jan 3, 2016
Messages
4,184
Location
Thunder Bay On.
Great looking shed OP built
When i think of maximizing footprint for a shed these come to mind…one in my area got slide and a fire pole from the playhouse which becomes more storage when the kids move on…
 

Attachments

  • IMG_0276.jpeg
    IMG_0276.jpeg
    20.5 KB · Views: 41
OP
D

drbooshkit

Active member
Joined
Apr 21, 2025
Messages
33
Update: Roof shingles and gutter successfully installed.
Shingles were the same make and color as our house from a few years back, OC Duration in Black Sable. This was really enjoyable to lay down on top of the ice & water shield that had been keeping her dry for a couple weeks.
I hand-nailed with 1 1/4" galvanized roofing nails, while my dad made the cuts. I also made the stagger easy with this template board in anticipation:
1749075957655.png

A couple tips for the fine details of the roofing:
0. since the visible rake edge of our roof is on the right (image below), i started on that side with factory edges and worked left. this was great, no problem, even though you usually watch folks do it left to right.
1. Make starter row by cutting horizontally and taking the single sheet side (non architectural tabs side).
1b. use that leftover architectural strip as your final course at the peak of the roof.
1c. final course, keep the half shingle width intact and just reduce the reveal. no one will notice this.
2. I messed up nailing the last course, and didn't get close enough to the edge to cover the nail row with the cap flashing / drip edge. had to Henry's seal those nails. no one will see it but you guys in this picture.
3. I used 1.5" Drip Edge for the sides and eave, but due to angle that was not sufficient to cover the roof decking -to-fascia gap. had to go to the store to grab 2.5" drip edge (more like 2", but it worked out ok). I think there's a better way to flash that cap but oh well, it's good.
4. used roofing screws, 1" with gasket, to screw in top flashing.
5. i used my chalk line after nailing the first course, to make a mark 2 courses up. it wasn't necessary and I found by the top I was off about 1/4" across 13 courses.
roofing was fun, but it was my own shed in 50 degree temps! : )

looks nice with the house shingles:
1749075714237.png

Gutters were easy to install.
Tip: mark on the underside of your fascia where your rafters are, since your fascia fasteners will be covered by the gutter as you fine toon the hanger placement. definitely want to run the 1.5" hanger screws through both the fascia and rafter. especially in my case where there is no added sub-fascia board.
I didn't originally plan on a gutter, but the rain was falling right from the drip edge on to the rear foundation perimeter timber. dumb. so we used it as a change to bling out the shed. haha. our local gutter supply store sold and delivered a copper by-the-foot, with a couple end caps, very next day. It's a beautiful accent to the warm color tones. The vision is the rain chain to barrel, hopefully can find the right barrel soon.

1749075479594.png

We just had 1-2" of rain in the last 24 hours, with moderate winds. Shed is bone dry, so is the fascia board on the eave side. It's very pleasing to see it come together. i took some video while it was raining. very good angle from the rain.
1749076882429.png
final tip: although hardly shows in image above, the drip edge was bent out about 1/2" and the gutter flange slide behind the drip edge. 1/2" of slope across 11 1/2' of length. beauty.

Next Up: finishing touches (door sweep, holders, barrel bolts), paint final and touch up coats. caulking.
THEN: going to see if we can rejuvenate the ~400 ft^2 lawn / turf in front of the shed, after all this construction abuse it's 50% dead. might try and push getting sod in and cross fingers for a cool june.
 
OP
D

drbooshkit

Active member
Joined
Apr 21, 2025
Messages
33
Some finishing touches today after a few days of rain.
Door sweep for the bottoms:
1749152011835.png

Barrel bolts, top and bottom. on the left door:
1749152189548.png

Coin floor in sandstone [you can see in image above]

Door holders, ended up getting a magnetic set. works pretty good so far
1749152225800.png

I finished painting today:
First, did the burnt terra cotta color on the door
then, all the trim and fascia... even the skirt.
then final final touches on the walls (which already had 3 coats) where i left a smudge or missed my cut.

"final" phase will be caulking. yay ---- not my favorite.
1749152287677.png

Finally, found a rain barrel that matched the door color for the most part. I am sure the "palm stripe" pattern will grow on me. what's cool is you can put a plant in the top shelf too.
1749152315771-png.2343887


next next: re-boot the turf in front of the shed, trees, edging, final landscaping.
 

Attachments

  • 1749152315771.png
    1749152315771.png
    4.3 MB · Views: 85

mschoo92

Well-known member
Joined
Oct 2, 2023
Messages
66
Location
Sussex County, NJ
Some finishing touches today after a few days of rain.
Door sweep for the bottoms:
1749152011835.png

Barrel bolts, top and bottom. on the left door:
1749152189548.png

Coin floor in sandstone [you can see in image above]

Door holders, ended up getting a magnetic set. works pretty good so far
1749152225800.png

I finished painting today:
First, did the burnt terra cotta color on the door
then, all the trim and fascia... even the skirt.
then final final touches on the walls (which already had 3 coats) where i left a smudge or missed my cut.

"final" phase will be caulking. yay ---- not my favorite.
1749152287677.png

Finally, found a rain barrel that matched the door color for the most part. I am sure the "palm stripe" pattern will grow on me. what's cool is you can put a plant in the top shelf too.
1749152315771-png.2343887


next next: re-boot the turf in front of the shed, trees, edging, final landscaping.
That looks great!
 

drivesitfar

Well-known member
Joined
Oct 23, 2013
Messages
36,007
Location
Pacific Northwest
Nice work. Just curious how much your copper gutter that is just shy of 12 feet costs? How much was a metal one?

I’m not sure what part of the country you live in but you might want to put a hard surface path to your shed instead of grass if it rains and snows much.

Barrel with chain bringing water into it looks great, is the plan to use the rain water to water plants and other things or just drain it off with a hose to another area?
 
OP
D

drbooshkit

Active member
Joined
Apr 21, 2025
Messages
33
Nice work. Just curious how much your copper gutter that is just shy of 12 feet costs? How much was a metal one?

I’m not sure what part of the country you live in but you might want to put a hard surface path to your shed instead of grass if it rains and snows much.

Barrel with chain bringing water into it looks great, is the plan to use the rain water to water plants and other things or just drain it off with a hose to another area?
Cu gutter $12/foot. Aluminum is $3 or $4 per foot. So it was gratuitous to be sure. But I had the budget and it got me to the free delivery threshold.
First time with a rain barrel, it does look nice, and I hope it is useful for watering the garden. Lots of flowers that are not irrigated.
Thanks for the idea of a path. We are north of Chicago area, so not as rainy probably as you but definitely need to be thinking about winter access.
 

drivesitfar

Well-known member
Joined
Oct 23, 2013
Messages
36,007
Location
Pacific Northwest
You seem pretty handy so pouring a concrete sidewalk 5-6 inches thick would be the best option but your call there. I’ve poured maybe a couple thousand bags of concrete around our house (my version of a gym) in wheelbarrows and 80 pound bags. I use trex (or 1x6 pvc) decking to form my sidewalks and flat surfaces because more than not my bride usually wants some sort of curve.

As far as your rain barrel they are a great idea but do some reading on how to keep yours from becoming a mosquito pond. Maybe planting lemon grass in the little planter area with a fake dragonfly?

Your shed looks awesome. Is it big enough for your stuff?
 
To avoid these ads, REGISTER NOW!
Top Bottom