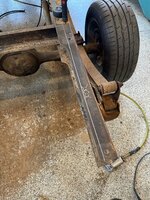
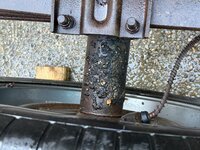
I needed to cut out a cross member at the rear, it will be reinstalled at the back behind the tank. I cut the rivets and punched the out with an air hammer. The tank is a touch wider than the rails. I needed to remove 3/8” to both sides top and bottom. Even though I have a plasma cutter, I chose to use a cut off wheel to keep this as nice of a cut as I could.

You are using an out of date browser. It may not display this or other websites correctly.
You should upgrade or use an alternative browser.
You should upgrade or use an alternative browser.
66 F100 Rustomod
- Thread starter Ohmthis
- Start date

After I verified it will fit like I want, I started the install of the in tank fuel pump. I chose to use a FI Tech universal pump. It uses standard pumps and has -6 AN male fittings.
I measured and marked where I wanted it. I placed it on a flat spot where the float for the fuel sender would not be in the way. I drilled the 2 1/8 hole with a hole saw. Then made marked the hold down holes and drilled those. While installing the hold down fitting, 2 of the 6 hold down screws (Stainless steel) galled and I had to trash them (Dammit!!!). I got some new screws and let’s try again. This time I used just a touch of anti seize and majic!
I measured and marked where I wanted it. I placed it on a flat spot where the float for the fuel sender would not be in the way. I drilled the 2 1/8 hole with a hole saw. Then made marked the hold down holes and drilled those. While installing the hold down fitting, 2 of the 6 hold down screws (Stainless steel) galled and I had to trash them (Dammit!!!). I got some new screws and let’s try again. This time I used just a touch of anti seize and majic!
Attachments

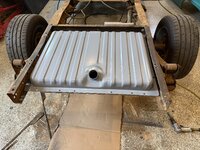
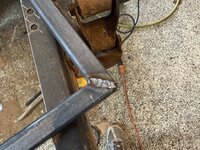
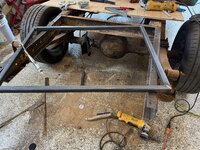
The tank has support from the frame rails, but not between them. I used 1” square tube to make a frame. Some people put the frame below the tank. They don’t want to show any of the tank from behind. I want as much room on top of the tank for fuel lines. Here’s the frame, weld picture, and the set up in place. I will bolt the tank to the frame and frame to frame rails. Thanks for looking!
Attachments


rdoty
ALLIANCE MEMBER
Hey, that looks like actual progress! Thanks for updating.
Amazing what you can do with an engine hoist and a bit of creativity, isn't it. I've been finding a lot of uses for an engine hoist since my brute force just doesn't brute like it used to...
Where are you going to mount the filler? It looks like the inlet in the tank is right in the middle of the bed.
HaHaHa……He said progress! Thank you!Hey, that looks like actual progress! Thanks for updating.
Amazing what you can do with an engine hoist and a bit of creativity, isn't it. I've been finding a lot of uses for an engine hoist since my brute force just doesn't brute like it used to...
Where are you going to mount the filler? It looks like the inlet in the tank is right in the middle of the bed.
I’m so used to working By myself that I come up with some pretty good ideas. Brute may work sometimes, but this needed to be delicate too. I don’t have much room and if I tried lifting it straight up, I’d have to push the truck out and then pull it back in……..Way too much brute forcing!
Well, I’m hopeful that I can get it to fit the license plate opening. It turns up and turns (maybe a 30* bend) back. I am putting the bed back on and then I’ll have a better idea. Thanks for the response.
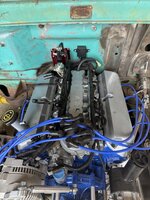
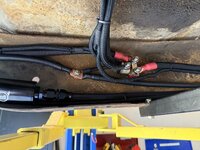
Dang! It’s been awhile since I’ve “played” on the old truck! Father’s Day is here and I can do anything I want to…..A day in the shop, ok! I spent a lot of time cleaning up the wiring and wrapping it with braided coverings. It was tedious, but I think it worked out really well. Unfortunately, I only got half of the day, so I’ll have to plan the next part out. Here are some pictures. The cable for the mass air meter will be secured to the tube with a tab I haven’t come up with yet. Thanks for looking.
Attachments
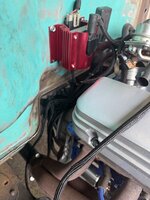

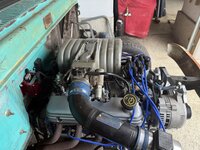
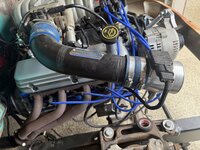
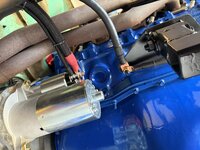
Back to the wiring. This time running the big cables for the battery, starter, grounds, and other miscellaneous wires in the area. I wrapped the cables in the same braided covering. I used red heat shrink on the ends of the positive cables and black for the negative. Should make for easy identification. I mounted a power block to have a place for all of the positive (1x #10, 2x #8, 1x #4, and 2x 1/0) to meet. I also used a perfectly placed factory hole to ground the frame and bond all of my grounds. The frame will be used to conduct the grounds for the fuel pump, fuel sender, fan/fan relay, and front/rear lights. Here are pictures. I’m hoping I can get this thing started up in the next 6 months. Thanks for looking!
Attachments


stinkity stoink
Well-known member
Nice jO’Brien’s on the wiring …looks very clean !! I really like the braiding. Is that a split loom or a sleeve ?
rdoty
ALLIANCE MEMBER
That wiring is really clean! Have you considered doing a wiring thread? How did you crimp the connectors on the cables?
Thank you! I really want the wiring to blend in and leave the mechanicals to look at. I will probably do a thread when I do the full wiring on the truck. The EFI harness was done and recorded via my YouTube channel. I’ve got to get another SD card. I will be building a fuse/relay box and I want to record it. I just need to clone myself (without feelings, I won’t feel guilty making him go to work for me) so I can have more time.
rdoty
ALLIANCE MEMBER
I looked into cloning myself. Turns out that cloning me (specifically) is a felony in 37 states...Thank you! I really want the wiring to blend in and leave the mechanicals to look at. I will probably do a thread when I do the full wiring on the truck. The EFI harness was done and recorded via my YouTube channel. I’ve got to get another SD card. I will be building a fuse/relay box and I want to record it. I just need to clone myself (without feelings, I won’t feel guilty making him go to work for me) so I can have more time.
Cloning me would be worthless, to get things done. Unless a younger version of me.I looked into cloning myself. Turns out that cloning me (specifically) is a felony in 37 states...
")
Also if a younger version of me, the beer would get drank. Now in my late 40's I enjoy a cold one here in there. My younger self wanted to enjoy all the cold beers.I thought the same thing. Then, I wouldn’t know what I do now and I may be worse than worthless. Hmmmmm……….
I have been working on my 65. I just ordered and received today DJM's new radius arms and rear tucked bumper brackets from soulless innovations. I have on order some custom shop truck door decals.
Attachments
rdoty
ALLIANCE MEMBER
If I told you I would have to kill you!Felony because you are secretly a CIA operative with top secret intell????
I think it actually has something to do with my personality. Apparently one of me is enough and any more would be a "bad thing"...
What are the purpose of needing (maybe just wanting) the aftermarket radius arms? I really like your truck!Also if a younger version of me, the beer would get drank. Now in my late 40's I enjoy a cold one here in there. My younger self wanted to enjoy all the cold beers.
I have been working on my 65. I just ordered and received today DJM's new radius arms and rear tucked bumper brackets from soulless innovations. I have on order some custom shop truck door decals.
Mine are worn out and that is the last of the old suspension left on the front once I swap them. Piece of mind.What are the purpose of needing (maybe just wanting) the aftermarket radius arms? I really like your truck!
Shop truck logo, Hunter was my best bud and he passed away a little over 2 years ago.
Both of my Dogs always hung in the garage no matter what, hanging or wrenching. I miss them.
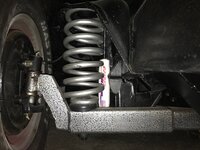
Dream beams installed about 7 years ago. In gray primer is right after I bought it in 2014 I think.
Sorry not trying to take over your thread just sharing.
Both of my Dogs always hung in the garage no matter what, hanging or wrenching. I miss them.
Dream beams installed about 7 years ago. In gray primer is right after I bought it in 2014 I think.
Sorry not trying to take over your thread just sharing.
Attachments

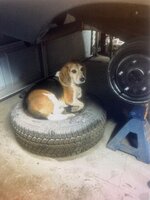


Hunter looked right at home. I love the shop logo, that’s an amazing way to honor your buddy. No worries, I truly love seeing everyone’s projects.Shop truck logo, Hunter was my best bud and he passed away a little over 2 years ago.
Both of my Dogs always hung in the garage no matter what, hanging or wrenching. I miss them.
Dream beams installed about 7 years ago. In gray primer is right after I bought it in 2014 I think.
Sorry not trying to take over your thread just sharing.
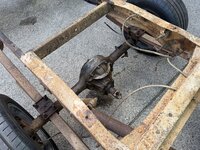
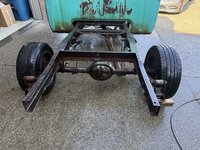
I finally got some time to “play” on the old truck. I’m pushing forward to get it started. Before mounting the fuel lines/filters I wanted to clean and possibly paint the frame. I got the bed off and pressure washed the frame. I was surprised how little rust is actually on the frame. All the years of dirt and oily grime must have protected it somewhat. Here is a before.
Attachments


MP&C
Well-known member
The tank in original location behind the seat is 18 gallon, hope you got the 20 gallon variety Mustang tank for extra range. My original and the normal 12mpg means I better be pulling into a gas station not long after 200 miles.
After the T5 gets installed with the 410, I'm hoping to extend that range per tank to a more comfortable 300 miles.
After the T5 gets installed with the 410, I'm hoping to extend that range per tank to a more comfortable 300 miles.
My tank is a 22 gallon, I still have my cab tank in really good condition. Since I’m not using a stocking seat and will make my own mounts, I’m hoping for more legroom. I’m not that tall, but do have longer legs. Thanks for the input Robert.The tank in original location behind the seat is 18 gallon, hope you got the 20 gallon variety Mustang tank for extra range. My original and the normal 12mpg means I better be pulling into a gas station not long after 200 miles.
After the T5 gets installed with the 410, I'm hoping to extend that range per tank to a more comfortable 300 miles.
Here is the frame after some superclean and the pressure washer. This is still wet in the pictures, but it looks surprisingly clean when dry. There is some crusty stuff that I will assume is road tar/paving. It wouldn’t come off with pressure. I’ll have to wire wheel it I think. Thanks for looking. Maybe I can get something done before Christmas 
Attachments

I'm not tall either but I'm a big guy. Mine has a fuel cell in the back and I still need to adjust the seat a little farther back. I think the metal was just a better quality than what is used today. Your truck looks solid.My tank is a 22 gallon, I still have my cab tank in really good condition. Since I’m not using a stocking seat and will make my own mounts, I’m hoping for more legroom. I’m not that tall, but do have longer legs. Thanks for the input Robert.
It definitely has some rust, but overall it is solid. Thanks for the comment.I'm not tall either but I'm a big guy. Mine has a fuel cell in the back and I still need to adjust the seat a little farther back. I think the metal was just a better quality than what is used today. Your truck looks solid.
Yah but rust compared to stuff made these days. Planned obsolence.It definitely has some rust, but overall it is solid. Thanks for the comment.
larry4406
Well-known member
Very nice job!Here is the frame after some superclean and the pressure washer. This is still wet in the pictures, but it looks surprisingly clean when dry. There is some crusty stuff that I will assume is road tar/paving. It wouldn’t come off with pressure. I’ll have to wire wheel it I think. Thanks for looking. Maybe I can get something done before Christmas
What is this "superclean" you mentioned? Some sort of degreaser/cleaner?

I’m back at it again! I’m jokingly saying it’s my quarterly report! I pulled the truck out and got after the rear frame with a heavy wire wheel on my grinder.
I am running a rear gas tank and with it mounted, there will be no way to reach a wrench in for the bumper nuts. So to alleviate that, I’m welding nuts in for the bumper. I also welded a bolt through for a ground for the fuel pump and rear taillights.
I used a bolt to hold the nuts tight for welding. Also…….I didn’t know which holes were indeed specific for the bumper, google didn’t help. I welded an extra in for shits and giggles.
Lastly, I needed to secure the tank frame to the rear frame. I marked the frame from the bottom and drilled holes for nuts and bolts to take care of that.
Now I’m ready for paint……..I just need some warmer weather!
Attachments


Happy New Years to everyone!
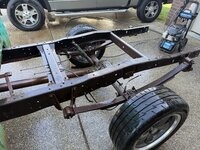
I really wanted to spray the frame to match the front section I did earlier. It turned out great and I liked the sheen. Unfortunately it’s a lot of work to build a big booth and no one but me will see it under the bed.
I rolled the truck in, cleaned the chassis with wax and grease cleaner and mixed the paint with hardener. I used a roller and foam brush. Hindsight being 20/20, I should have used the foam rollers I bought instead of the 1/4” nap on the roller handle. It left a texture that I’m ok with, but wish wasn’t there.
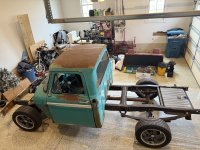
I also set my seat in. I am wanting to get the wiring done inside. I need to see where the seat will be so I don’t set the computer or terminal strip where it’s not serviceable.
I really wanted to spray the frame to match the front section I did earlier. It turned out great and I liked the sheen. Unfortunately it’s a lot of work to build a big booth and no one but me will see it under the bed.
I rolled the truck in, cleaned the chassis with wax and grease cleaner and mixed the paint with hardener. I used a roller and foam brush. Hindsight being 20/20, I should have used the foam rollers I bought instead of the 1/4” nap on the roller handle. It left a texture that I’m ok with, but wish wasn’t there.
I also set my seat in. I am wanting to get the wiring done inside. I need to see where the seat will be so I don’t set the computer or terminal strip where it’s not serviceable.
Attachments


rdoty
ALLIANCE MEMBER
Looking good! I also like the bit of texture on the frame rails. Not a place you need to skim coat and block sand!
MP&C
Well-known member
Happy New Year! I resemble that quarterly report.
Nice fit up on the new tank!
Nice fit up on the new tank!
larry4406
Well-known member
Nice!
Tank filler tube thru the floor of the bed?
Tank filler tube thru the floor of the bed?