To avoid these ads, REGISTER NOW!

7 x 18 utility trailer.

koditten

Well-known member
Joined
Apr 10, 2008
Messages
5,528
Location
Midland, Michigan
As promised, I wanted to start a thread on building one of my bigger trailers.

This one will have 2 fold down ramps. One in the back and one on the side. The customer needs to haul 2 full sized quads and a personal recreational vehicle.

Here are some pics to get started. I won't be doing this in one sit down, so bear with me on getting all the pics posted.

KO
 

Attachments

  • DSCN0946.JPG
    DSCN0946.JPG
    142 KB · Views: 446
  • DSCN0947.JPG
    DSCN0947.JPG
    137.7 KB · Views: 417
  • DSCN0949.JPG
    DSCN0949.JPG
    141.7 KB · Views: 396
  • DSCN0952.JPG
    DSCN0952.JPG
    142 KB · Views: 448
  • DSCN0950.JPG
    DSCN0950.JPG
    145.7 KB · Views: 437
  • DSCN0953.JPG
    DSCN0953.JPG
    142.6 KB · Views: 472
  • DSCN0951.jpg
    DSCN0951.jpg
    134.4 KB · Views: 605
To avoid these ads, REGISTER NOW!
OP
K

koditten

Well-known member
Joined
Apr 10, 2008
Messages
5,528
Location
Midland, Michigan
Because I'm a one man show, I needed a way to hold the tape measure. When you span 20 or so feet the tape foot wants to slip off the steel. Makes it a pain trying to measure your diagonals.

I solved that issue by tack welding a couple of nails to the corners. The Tape measure foot grabs the nail nicely making it easy to get the trailer squared. As I said in my previous build, you only need to be within an 1/4".
 

Attachments

  • DSCN0958.JPG
    DSCN0958.JPG
    143.9 KB · Views: 335
  • DSCN0957.JPG
    DSCN0957.JPG
    144 KB · Views: 416
OP
K

koditten

Well-known member
Joined
Apr 10, 2008
Messages
5,528
Location
Midland, Michigan
Looks like we got a problem here. For some reason I gave the my metal supplier the wrong dimensions for the cross members. I had to shorten all 10 cross members by 4". No big deal, 10 minutes with the port-o-band solved that issue.
 

Attachments

  • DSCN0959.JPG
    DSCN0959.JPG
    143.1 KB · Views: 249
OP
K

koditten

Well-known member
Joined
Apr 10, 2008
Messages
5,528
Location
Midland, Michigan
Here is a pic of all 10 cross members. I spaced them at 24" on center (roughly). Because this trailer is a utility trailer, only 5/4" lumber will be used for the deck. You can see the 5/4" spacers below the cross members.

I should have mentioned that the trailer is upside down at this point.

I like to alternate welding between ends and sides to prevent the trailer from pulling out of square. If you start on one side and work your way down, you will likely end up with a frame that is slightly diamond shaped.
 

Attachments

  • DSCN0962.JPG
    DSCN0962.JPG
    145.3 KB · Views: 284
OP
K

koditten

Well-known member
Joined
Apr 10, 2008
Messages
5,528
Location
Midland, Michigan
Here Ihave hoisted the frame onto my welding table. Because the table is only 4 x 5", I like to tack weld some "legs" to the frame ends that overhang the farthest from the trailer. Even tho the fram is made out of 2 x 4 1/8" wall tube, it will still flex quite a bit. This is the time when I finish welding the cross members. Because the trailer is upside down, I can only weld 3/4 of the cross members. If you don't have the legs,you run the risk of the trailer staying in the flexed possition. My theory is the welding "stress relieves" the steel, and that is the way it stays.

I have only 1" weldson the cross members while it was on the floor. I just don't care to be bent over or kneeling doing all that welding when it is a lot easier while on the bench.

If anyone noticed, I used 2" x 2" angle as well as tube. I've found that the combination makes the trailer stiff while keeping it a bit lighter. This trailer would have been fine if it was 16' or less to just use angle.
 

Attachments

  • DSCN0963.JPG
    DSCN0963.JPG
    145.5 KB · Views: 298
OP
K

koditten

Well-known member
Joined
Apr 10, 2008
Messages
5,528
Location
Midland, Michigan
Here is the welding of the ball coupler. Because this is a light duty, tandem axle, I was fine to use base model 50* ball coupler. If one was to plan on hauling cars or tractors it would benifit to move to a heavier duty coupler.
 

Attachments

  • DSCN0964.JPG
    DSCN0964.JPG
    144.4 KB · Views: 339
OP
K

koditten

Well-known member
Joined
Apr 10, 2008
Messages
5,528
Location
Midland, Michigan
For some reason, I never took pics of positioning the tongue. To make it easy on me I make the tongue just long enough that it does not fall to the floor. I just slowly pull it forward until I am just before the point of balance. You end up with enough tongue that enables a costomer to attach a truck box to the front, which work great for storing the random stuff you need to safely tow.

Anyways, because I never know what width the customer wants, I just order 9' pieces and cut off the rest of the tails. Simple trig will tell how long you need to make the tongue angles to match the width of your trailer. Once you have that number it is just a matter of making all measurements equal. I wish I would have taken a pic of this. Having a hard time describing it. Measure from the far corners (were the nails hopefully still are) to tongue tip and check to see if you are close. Once again 1/4" is perfectly fine number.

To note, I use my port -o-band to cut off the tongue angle tails after the tongue is welded to the frame. Attaching the tongue is very important. Make sure you trust your welds completely.
 
OP
K

koditten

Well-known member
Joined
Apr 10, 2008
Messages
5,528
Location
Midland, Michigan
Here I am shortening the axles. Because I never know what width trailer a customer wants, I usually have to shorten or lengthen the axle. I just several of one size andmake them the width I need.

I back of the trailer as a temporary bench. We already know the trailer is square so I use the frame as guide to ensure the axle is welded together strait. I just eyeball down the cross member and back frame membere to to make sure the axle is strait.

In one of the pics you can see a slight bow to the axle. I like a bit of camber to my axles. This helps the trailer pull strait when going down the road. This measure is not really crutial. Anywhere from 1/2" to <2" is fine.

I cut the axle in half and slide the sleeve over the joint. You can see my piece of scrap metal holding up the axle in the position I wanted. Once you have it peervectly strait and have your camber where you want it, just tack weld multiple points on both sides of the sleeve. After 4 or 5 tacks on both sides you can finish welding the sleeve. I usually only end up welding 2/3 of both sides of the sleeve. I do the bottom after I turn the trailer over, which now becomes the top.

This is a tandem trailer, so I had to do 2 axles. One of the axles is a breaked axle, so be carefull and support the hub end after you cut it in half. The hub end is heavier than the axle tube so the hub may want to swing down. This happens with shorter axles. I didn't have that problem on this axle, but it is worth mentioning. Dropping half an axle from 35" makes a scary and sometimes expensive noise. I usualy cut my axles in half on the floor with the band saw to keep the axle from falling off the trailer frame. Once on the frame and the sleeve pushed on they are pretty safe.
 

Attachments

  • DSCN0965.jpg
    DSCN0965.jpg
    117.1 KB · Views: 343
  • DSCN0970.JPG
    DSCN0970.JPG
    141.9 KB · Views: 391
  • DSCN0969.JPG
    DSCN0969.JPG
    144.2 KB · Views: 370
  • DSCN0967.jpg
    DSCN0967.jpg
    99.8 KB · Views: 417
OP
K

koditten

Well-known member
Joined
Apr 10, 2008
Messages
5,528
Location
Midland, Michigan
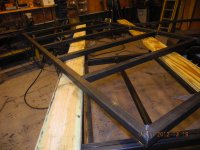
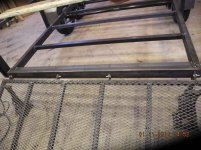
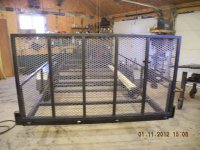
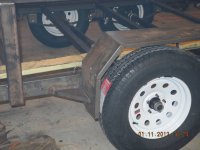
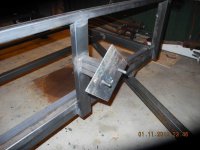
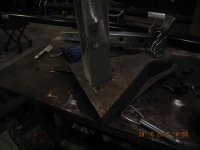
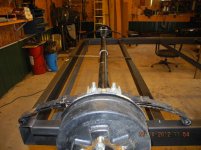
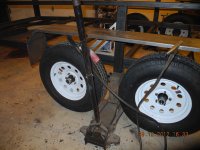
Time to position the axles.

The front spring hanger on this trailer is 90" from the front. You can weld this front hanger in position now. The other 4 hangers will follow the front hanger position. Regardless what you have heard, there is not a calculation for positioning axles on a frame. This trailer will have a heavy front gate off one side, so I had to take that into account. In general, I like to have the front axle about 1/2 to1' back from center. This way I can put tires on the front axle only and move it around the shop with ease. The trailer is only slightly tongue heavy at this time.

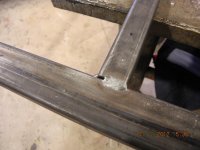
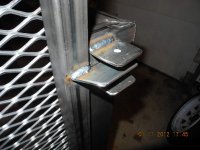
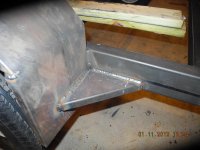
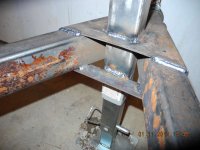
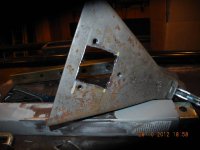
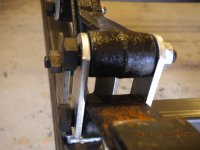
If you notice the spring bolts, you can see they are shoulder bolts. This is to prevent the bolts from being over tightened. I don't like using these, but they do serve a purpose. Years ago I over tightened a bolt on the shackle end. The bolts were so tight, the spring could not flex. It actually ripped the hanger off the bottom of the trailer frame. I was left with a 2" x 4" hole in the frame that had to be repaired.

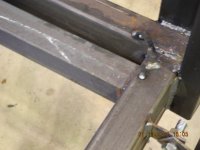
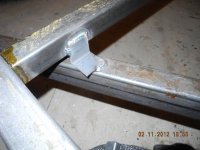
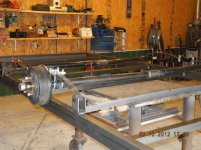
These equalizers are a pain at times to get assembled. The extra weight of the braked axle makes the equalizer pivot. I solve this by replacing the shoulder bolt with one of my standard trailer bolt. I can now tighten up the pivot point so the equalizer can not move. Finish assembling your bolts and links. Adjust the rear axle and equalizer hanger so the links are hanging straght down. Do this on both sides and measure the position of both side hangers. as long as you are withing a 1/4" you are good to go. Weld all the hangers in place. I don't weld all 4 sides of the hangers, just the front and back. I have found if you have 4" of welds on both sides, you can warp the frame upwards. The welds cool and shrinks the metal, especially if you have 3 hangers.

Tighten up the rest of the bolts and don't forget to loosen the pivolt bolt on the equalizer. 1-2 turns on the nut is fine.

You will notice on one of the pics that there is a gap between bolt head and hanger. Because of these shoulder bolts, this is as tight as you can get them. To me it looks like I forgot to tighten the bolts.

KO
 

Attachments

  • DSCN0973.JPG
    DSCN0973.JPG
    139.1 KB · Views: 244
  • DSCN0972.JPG
    DSCN0972.JPG
    143.5 KB · Views: 269
  • DSCN0974.jpg
    DSCN0974.jpg
    113.8 KB · Views: 336
OP
K

koditten

Well-known member
Joined
Apr 10, 2008
Messages
5,528
Location
Midland, Michigan
Not much to show here. I used my chain falls to lift the trailer off the table. I just lift the back end, roll out the table and lower the upside down frame the the ground.

Now I attach the chain falls to one side of the trailer and start to raise one side of the frame up. Once it is verticle, I push the top over and lower. The trailer is now upside right. You might have to "walk" the frame to one side of your bay or the other so you have room to lower. I have no trouble doing this by byself. The trailer weight is resting on the hub faces so its easy to handle as long as you hoisted it from somewhere near the center.

Once on the ground I jack up the axle and attach wheels to the front axle. Now I can position it to start welding. I usually attach the tongue jack at this time. This way I can level the trailer.

I weld all the cross members and frame pieces that were previously on the bottom at this time. I like to weld my tie downs on as well. You can see what I use for tie downs in my other build. There are many things that carry over from the other build thread that will be used on this build, so please view that thread for details.

One note that I should mention. I said this trailer has a combination of 2 x 2 angle and tube for cross mebers. On the tube cross members ilike to leave 1/4" on the bottom unwelded. This gives any condensation that builds up a place to drain. I have had trailers in the past build up so much water in the tubes that they will freeze and round out the tube. Don't ask me how the water gets in there, but it does.

KO
 

Attachments

  • DSCN0975.JPG
    DSCN0975.JPG
    146.3 KB · Views: 250
OP
K

koditten

Well-known member
Joined
Apr 10, 2008
Messages
5,528
Location
Midland, Michigan
The next phase is to attach my corner uprights. Please view my other build thread for the details on this.

I wasn't happy about about the gap I had here. My uprights must have not been quite plumb. I solve this by using my 8' bar clamp. I clamp on the opposite side and pulled the gap closed. Just be careful, the uprights are only solidly tacked in place and it is easy to make the whole thing come a part like a house of cards.

KO
 

Attachments

  • DSCN0976.JPG
    DSCN0976.JPG
    145.2 KB · Views: 292
OP
K

koditten

Well-known member
Joined
Apr 10, 2008
Messages
5,528
Location
Midland, Michigan
Got the top rail tacked in place. I can now finish weld the top rail and the corner uprights.

The second pic was taken to try and show you the sag in the 18' top rail. I'll show how I addressed that in future posts.

You can see that the shop was getting kind of smokey from all the welding I was doing. I took a break and had a beer with the doors open. Since I usually build the trailers in one session, I treat myself after 3 or 4 hours. If anyone is bored, they can check the time and date stamps and get an idea how long this takes me. It actually took me longer because of stopping to snap some pics.

KO
 

Attachments

  • DSCN0978.JPG
    DSCN0978.JPG
    144 KB · Views: 237
  • DSCN0977.JPG
    DSCN0977.JPG
    142.8 KB · Views: 220
OP
K

koditten

Well-known member
Joined
Apr 10, 2008
Messages
5,528
Location
Midland, Michigan
Cheap *** gloves. You would think I could get more than 6-7 trailers out of a pair of gloves. Dammit! They were just getting perfectly broke in.

KO
 

Attachments

  • DSCN0979.jpg
    DSCN0979.jpg
    103 KB · Views: 202
OP
K

koditten

Well-known member
Joined
Apr 10, 2008
Messages
5,528
Location
Midland, Michigan
I'm getting ready to build and mount the fenders. Because I just eyeball the position of the fenders, I need both tires mounted.

The clamp in the picture keeps the axle from pivoting down. It keeps the tires on that axle from contacting the floor. I can still move the trailer around the shop on one axle this way. Its a little heavier, but I can still do it by hand.

KO
 

Attachments

  • DSCN0980.JPG
    DSCN0980.JPG
    144.2 KB · Views: 347
OP
K

koditten

Well-known member
Joined
Apr 10, 2008
Messages
5,528
Location
Midland, Michigan
Time to build my fenders. I use 14 gauge sheet steel bent into 10" wide channel. The lip is 1". My fenders may not look as good as store bought fenders, but they are a whole lot stronger. I can stand on my fenders after they are properly mounted with no fear of bending them. My way is alot cheaper as well. I pay around 50 bucks for the pair. 1 store bought fender can be 70+.

Anyways, I notch the fenders at 10" and 8". This gives me the length I need to cover the tire properly. Do the same for the other end. I have my angle gauge set to find this angle preset. I am only trying to get close on the angle. The only thing I care about the verticle section is perfectly plumb. You can see the bends in the notches. This allows me to bend the channel a bit easier. I put the channel on the floor and bend it by hand. I have clamped to the steel table, but I was in a bit of a hurry.

KO
 

Attachments

  • DSCN0982.JPG
    DSCN0982.JPG
    142.1 KB · Views: 229
  • DSCN0981.JPG
    DSCN0981.JPG
    145.5 KB · Views: 211
  • DSCN0984.JPG
    DSCN0984.JPG
    142.6 KB · Views: 305
OP
K

koditten

Well-known member
Joined
Apr 10, 2008
Messages
5,528
Location
Midland, Michigan
As I said, I just eyeball the position of the fenders over the tires. I need to make the gap between the front of the front tire to be equal to the gap between the rear of the rear tire. A person could measure if they want, but the naked eye works just fine.

I have a jacks on both ends of the fenders. I just raise or lower the jacks to make the front and rear of the fenders match. 4" of height between the bottom of the fender and the top of the tire is plenty. If one wants it higher that is fine too. I usually stick my fist under the fender and that is the height I make the fenders.

Please remember that i still have the rear axle clamped up. I the front axle and tire to take all my measurements from.

Once you get the fender were you want it, make sure it not tipped. You can now weld it to the frame.

KO
 

Attachments

  • DSCN0985.JPG
    DSCN0985.JPG
    143.8 KB · Views: 266
  • DSCN0986.JPG
    DSCN0986.JPG
    140.4 KB · Views: 166
  • DSCN0987.JPG
    DSCN0987.JPG
    140.6 KB · Views: 155
OP
K

koditten

Well-known member
Joined
Apr 10, 2008
Messages
5,528
Location
Midland, Michigan
I've marked were my upright will live. I use my plasma cutter to notch out the fender. A cut off wheel on the grinder actually better because the cuts will be good and strait.

In the second pic you can see were the upright is positioned on a floor jack. I mentioned earlier that the the top rail has a sag. Using the jack I can go to the end of the trailer and look down the full length. I just jack the upright up until the sag is gone. Weld the uprights in place. weld the fender to the upright and you now have fenders that will support a pretty heafty person. They have no trouble supporting my 215 lbs.

I usually weld my fender notches as this time as well.

KO
 

Attachments

  • DSCN0989.JPG
    DSCN0989.JPG
    141.7 KB · Views: 216
  • DSCN0988.JPG
    DSCN0988.JPG
    143.9 KB · Views: 181
To avoid these ads, REGISTER NOW!
OP
K

koditten

Well-known member
Joined
Apr 10, 2008
Messages
5,528
Location
Midland, Michigan
You can just see the sag in the top rail in this pic. The jack took care of this.

KO
 

Attachments

  • DSCN0992.JPG
    DSCN0992.JPG
    140.3 KB · Views: 218
OP
K

koditten

Well-known member
Joined
Apr 10, 2008
Messages
5,528
Location
Midland, Michigan
My battery finally gave out on the camera. I was forced to use the cell phone. Pretty crappy, but you can get the idea on what the finnished product will look like.

I wont be posting any more pics until this weekend. The pics are the way the trailer presently sits. Hopefully I can get to building the ramp gates and other details on Thursday and Friday.

Lets see, to do list:

Finnish welding in tiedowns.
Make foot rest, front and back of fenders.
Build gates
Wire trailer
Wash trailer
paint trailer
Deck trailer.
Brace for tongue jack.
I'm sure I for got somethings.

Questions are welcome.

Later

KO
 

Attachments

  • IMG00167-20121029-1715.jpg
    IMG00167-20121029-1715.jpg
    130.6 KB · Views: 240
  • IMG00168-20121029-1718.jpg
    IMG00168-20121029-1718.jpg
    123.9 KB · Views: 188

Man of Many Vices

Well-known member
Joined
Aug 23, 2012
Messages
366
I learned more about trailer building in the 30 minutes I spent on this thread than I have learned in the past 10 years. You do great work. My car hauler was stolen from my front yard last week, so I am looking for another to buy as soon as my financial batteries recharge.

I use mine mostly for hauling green waste to the compost facility; although I occasionally throw my Kubota backhoe. I put up 2 ft. stake sides on an otherwise flat deck. I wish I could come up with fenders that don't stay bend when I bump them with my front end loader.

Would you recommend a "store bought" trailer or find an independent local guy here in So Cal to create one from scratch, as you have done?

Dan
Indio, CA
 
OP
K

koditten

Well-known member
Joined
Apr 10, 2008
Messages
5,528
Location
Midland, Michigan
Tough question. If you contracted out what you wanted, you would get exactly what you asked for.

If you bought off the lot you would have to do the mods that you required. The trailer would be cheaper off the lot, but then you would have to pay a fab guy to give you what you want.

I'll always lean towards the indy guys (like myself), when it comes to custom work. I tell every one of my customers the trailer will be more expensive because I try to buy as much materials local as possible. If I can keep someone in a job around my local, I feel better. Most of my customers seem to agree. The fact that the guy that built the trailer is local, repairs can be made with ease because you already know what kind of work he is capable of helps too. This is the only justification I can give you for spending more money. You and your wallet are the only ones that can make the decision.

Hope this help

KO
 
OP
K

koditten

Well-known member
Joined
Apr 10, 2008
Messages
5,528
Location
Midland, Michigan
The 2 x2 angle and tubes are 1/8". This is strong enough to haul cars if needed. The only reports of my trailers bending this size iron is when a customer hauled landscape stone and the yard man dropped a full scoop of stone into the bed. He would not have bent the cross members if the stone was slid out of the bucket with a bit of care.

I make many of this style trailer using 14 gauge. This one will haul sugar beets to the feed lot on occasion and those can get heavy. I overbuilt it on purpose.

KO

KO
 
OP
K

koditten

Well-known member
Joined
Apr 10, 2008
Messages
5,528
Location
Midland, Michigan
Time to start on the gates. This tailer has 2. As you can see I measure diagonally. I'm only doing this to be close. As soon as I have it into a "rough" rectangle I put it on the bench. My "bench is the back of the trailer. Makes a nice work hight. I've only solidly tack welded it at this point.

Because the gate frame wasn't quite true, I use a long bar clamp to bring it into shape. I would rather do this on the "table", thats why I only get it roughly square on the floor.

This trailer gate will have to hold the weight of a compact tractor. I don't know what they weigh, so I used 1/8" wall 1 1/2" x 1 1/2" tube. better to be safe than sorry. As much as I enjoy building the trailers, I don't want to ever work on them again.

I try to leave a bit of the joints unwelded, again, a place for the water to drain out.

The last pic is just showing the mesh. I ordered it a bit long. Its easy to cut down to size with the plasma cutter. I did this for years using thin wheels on the grinder. I do love using the Pcuter.

The side gate is going to be used to load quads. I used 14 gauge tube for that. The side gate is close to the same dimensions, but at least 30 lbs. lighter.

KO
 

Attachments

  • DSCN0993.JPG
    DSCN0993.JPG
    144.5 KB · Views: 100
  • DSCN0994.JPG
    DSCN0994.JPG
    142.1 KB · Views: 120
  • DSCN0995.JPG
    DSCN0995.JPG
    144.8 KB · Views: 119
  • DSCN0996.jpg
    DSCN0996.jpg
    124.2 KB · Views: 110
OP
K

koditten

Well-known member
Joined
Apr 10, 2008
Messages
5,528
Location
Midland, Michigan
When the ex. steel is installed, care must be taken to ensure that the orientation is proper. In the pic showing my hand, I'm feeling to check to make sure the higher friction direction is facing up the ex steel. If the mesh is backwards, lawnmowers may have trouble gaining traction.

The second pic shows another use for plyers. Just pinching down the metal so I can get a good tack.

The third pic is of the hinges I make. Kinda crude, but they are plenty strong. I just evenly space them out olong the width of the trailer gate. No tape measure involved.

KO
 

Attachments

  • DSCN0999.jpg
    DSCN0999.jpg
    140.2 KB · Views: 171
  • DSCN1000.JPG
    DSCN1000.JPG
    146 KB · Views: 185
  • DSCN1001.jpg
    DSCN1001.jpg
    84.5 KB · Views: 220
  • DSCN1002.JPG
    DSCN1002.JPG
    145.3 KB · Views: 219
OP
K

koditten

Well-known member
Joined
Apr 10, 2008
Messages
5,528
Location
Midland, Michigan
The fist pic could have been included in the previous post. The pic shows them tacked, but you can weld them solid.

The second pic is how I align the gate to the trailer frame. In the 2nd pic you can see the gap between the trailer and the gate. I just eyeball it. If the gap is the same on both sides you are fine to start welding the hinges. Note I did the same on adjusting the gate left and right.

KO
 

Attachments

  • DSCN1003.jpg
    DSCN1003.jpg
    118.8 KB · Views: 206
  • DSCN1004.jpg
    DSCN1004.jpg
    127.1 KB · Views: 200
OP
K

koditten

Well-known member
Joined
Apr 10, 2008
Messages
5,528
Location
Midland, Michigan
Pretty crappy pic of the gate in the raised position. You can see the use of a c-clamp to keep the gate closed. I'll be showing latches in a bit.

KO
 

Attachments

  • DSCN1005.JPG
    DSCN1005.JPG
    146 KB · Views: 169
OP
K

koditten

Well-known member
Joined
Apr 10, 2008
Messages
5,528
Location
Midland, Michigan
Here is the latches. I just use some 1 1/2" band iron. I will be drilling holes for the pins a bit later. I used 3/8" pins because thats what I had on hand. Use what you like.

KO
 

Attachments

  • DSCN1022.JPG
    DSCN1022.JPG
    145.2 KB · Views: 122
  • DSCN1021.JPG
    DSCN1021.JPG
    145.6 KB · Views: 139
OP
K

koditten

Well-known member
Joined
Apr 10, 2008
Messages
5,528
Location
Midland, Michigan
I just wanted to quicklly show the welding dot. Use this to mark the location of the cross member. I will be able to quickly mark the lumber when it is time to screw down the deck boards.

The last pics are going to be my "steps". These triangular pieces will be welded in front and rear of the fenders. It give a person a place to step if they want to climb into the bed with out lowering the ramps.

If anyone guessed, the metal is left over from the channel that became the fenders. I usually order the channel a couple feet longer than I need. I find countless uses for this thinner iron.

KO
 

Attachments

  • DSCN1009.JPG
    DSCN1009.JPG
    143.2 KB · Views: 164
  • DSCN1010.JPG
    DSCN1010.JPG
    144.2 KB · Views: 142
  • DSCN1011.jpg
    DSCN1011.jpg
    104.7 KB · Views: 141
  • DSCN1013.JPG
    DSCN1013.JPG
    143.2 KB · Views: 155
  • DSCN1012.JPG
    DSCN1012.JPG
    144.5 KB · Views: 152
OP
K

koditten

Well-known member
Joined
Apr 10, 2008
Messages
5,528
Location
Midland, Michigan
Here is some pics of the "steps" installed as well as in use. I figured it was time to toss back a beer as well.

Hard to believe this is only me second beer building this trailer, isn't it?;)

KO
 

Attachments

  • DSCN1019.jpg
    DSCN1019.jpg
    125.3 KB · Views: 383
  • DSCN1018.jpg
    DSCN1018.jpg
    118.9 KB · Views: 410
  • DSCN1016.JPG
    DSCN1016.JPG
    143.9 KB · Views: 254
  • DSCN1014.JPG
    DSCN1014.JPG
    144.5 KB · Views: 271
OP
K

koditten

Well-known member
Joined
Apr 10, 2008
Messages
5,528
Location
Midland, Michigan
This first pic is of a brace I add to the tongue jack. If you notice, my weld looks like ****. I don't care who you are, weldiong thru paint is never gonna turn out. This is just a scrap piece of angle steel welded to the tongue angles.

The last pics are of the spare tire bracket. I just used a scrap piece of 3/16" plate steel. Drill a couple of holes and weld the back of the bolts so they can't spin. Attach to a 5" long piece of 2 x 3" tube. Nothing fancy here.

KO
 

Attachments

  • DSCN1020.JPG
    DSCN1020.JPG
    142.3 KB · Views: 272
  • DSCN1023.JPG
    DSCN1023.JPG
    142.3 KB · Views: 223
  • DSCN1025.JPG
    DSCN1025.JPG
    144.9 KB · Views: 233
OP
K

koditten

Well-known member
Joined
Apr 10, 2008
Messages
5,528
Location
Midland, Michigan
Here is the safety chains welded to the tongue. I don't know what thickness they are, but they are pretty stout. It's cheaper to buy the hooks and chain seperate, so that what I do.

The next is some extra bracing I made for the tongue/frame. Because this trailer will have 5/4" lumber, the tongues do not contact the cross members. I bridged this gap with some scrap pieces of angle. This was the leftover cross member steel I had to cut down. I try not to waste anything.

KO
 

Attachments

  • DSCN1027.JPG
    DSCN1027.JPG
    142.1 KB · Views: 194
  • DSCN1028.JPG
    DSCN1028.JPG
    142.5 KB · Views: 202
  • DSCN1030.JPG
    DSCN1030.JPG
    144.4 KB · Views: 216
  • DSCN1029.JPG
    DSCN1029.JPG
    144 KB · Views: 202
To avoid these ads, REGISTER NOW!
Top Bottom