
You are using an out of date browser. It may not display this or other websites correctly.
You should upgrade or use an alternative browser.
You should upgrade or use an alternative browser.
A dream come true
- Thread starter robolop
- Start date
Boosted1
Well-known member
Wow! Very nicely done.
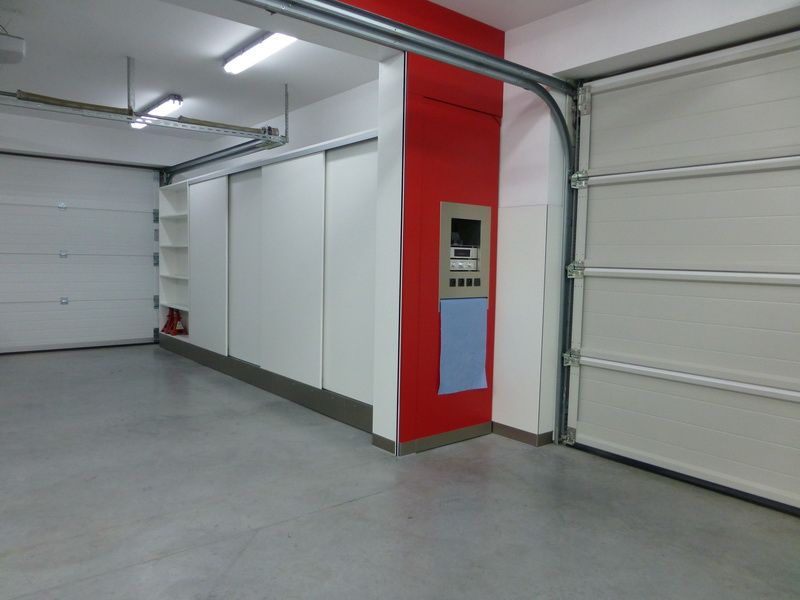
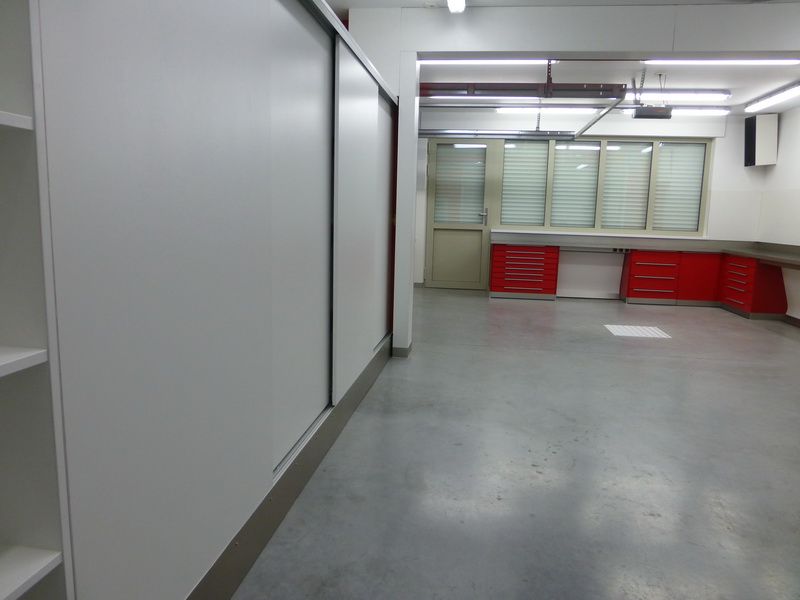
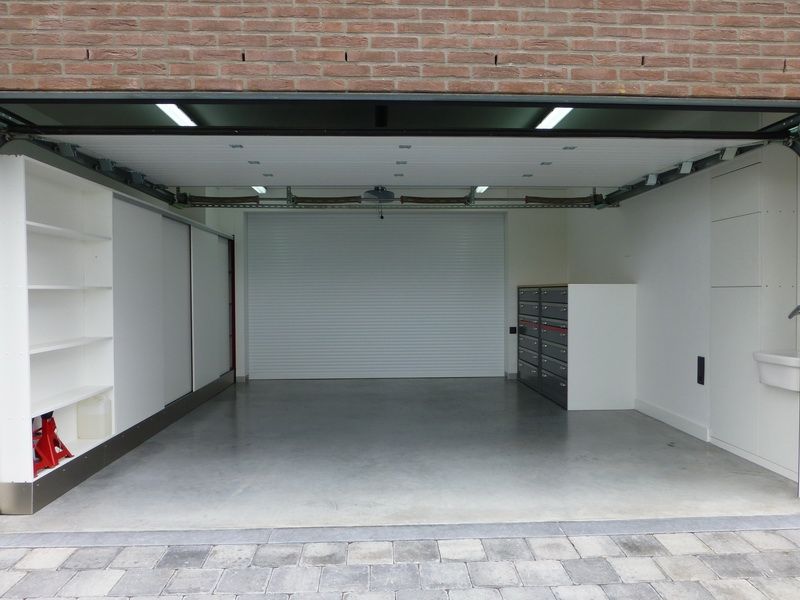
Some pictures of the rolling cupboard.
Some of my stock of aluminium and wood.
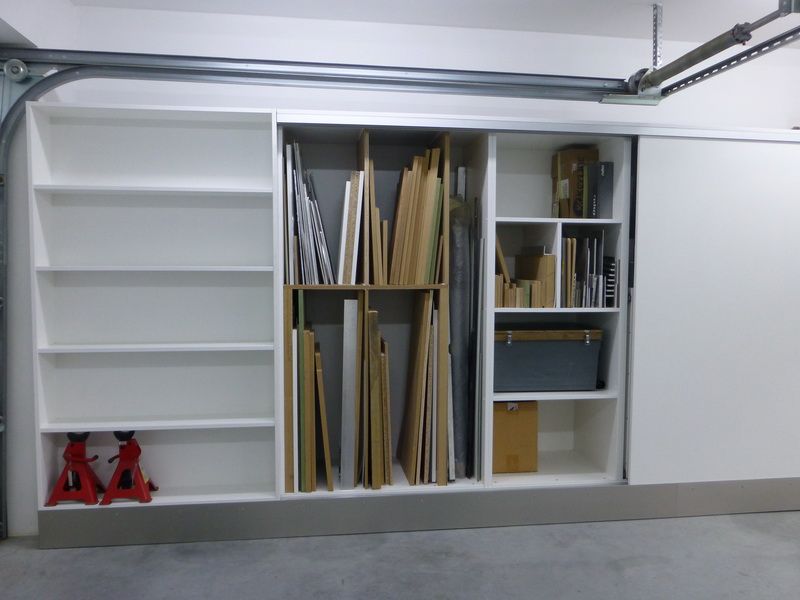
When the closet is filled with all my materials, I wanted at least 10% of space left in my cupboards and drawers.
I accomplished this goal.
In my old workshop I had a corner that was always filled with fine thin strips of wood or aluminum.
Every time I had to pick something out of there, the rest fell over, and it was always a messy corner.
This I certainly did not want to have anymore and I ended up making this.
Everything remains at its place, and I have a good overview now.

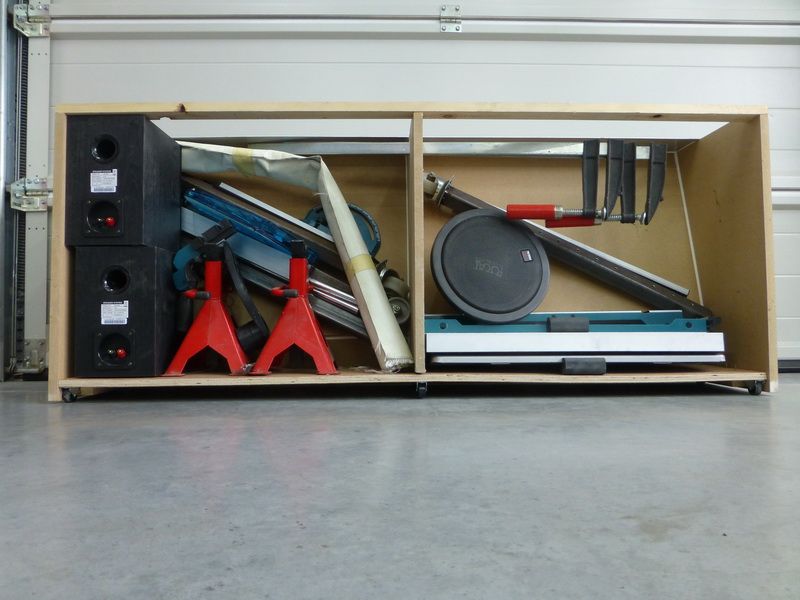
Between the pedestals there was still plenty of room left…

The area in between is on small wheels.
I can shift the whole thing to the front, to place somethings behind it. And shift it all nicely under it, in place.
Here you can see the things I don’t need immediately.
When my eletrician asked me where I wanted the sockets, he looked weird when I said I only needed 1 per workingtable.
You can never ever have enough sockets he said.
Still, I wanted them mounted in another way than the normal ones on the wall.
I let someone fold me a stainless steel bar, and I nicely mounted everything in there.
You can see I also didn’t use the little cover around the sockets. Looks more clean to me, and…I saved me some euro’s, haha, lol
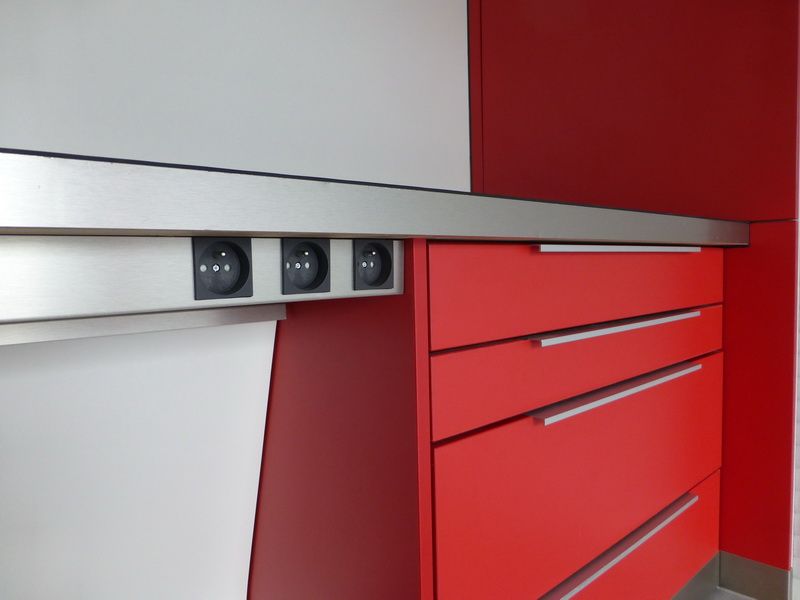
They are nearby, and there’s never an annoying cable on my table.
I counted all my sockets in- and outside my garage, and I can totally say…I must be nuts.
One of the nicest things in my working place, IMO, is still my sectional door.
Once the floor heatings is off, i’ll open it, and I get the nice scenery for free.
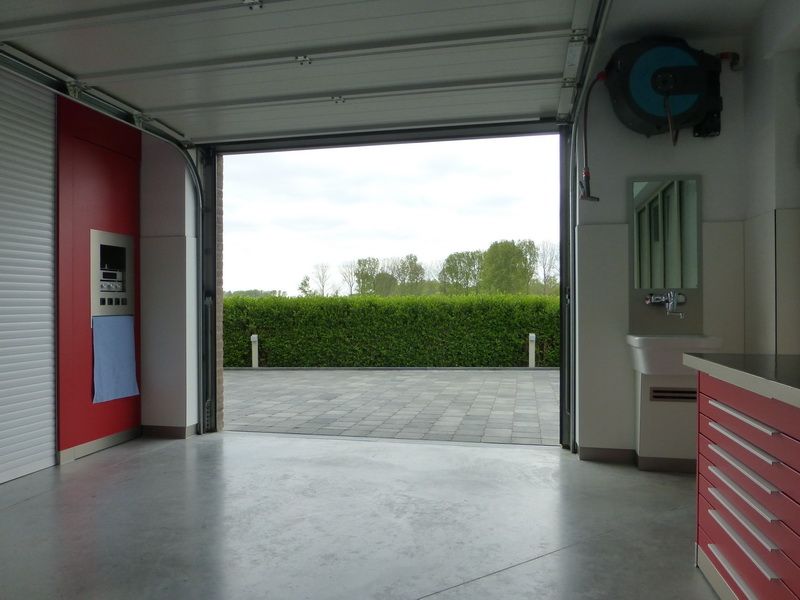
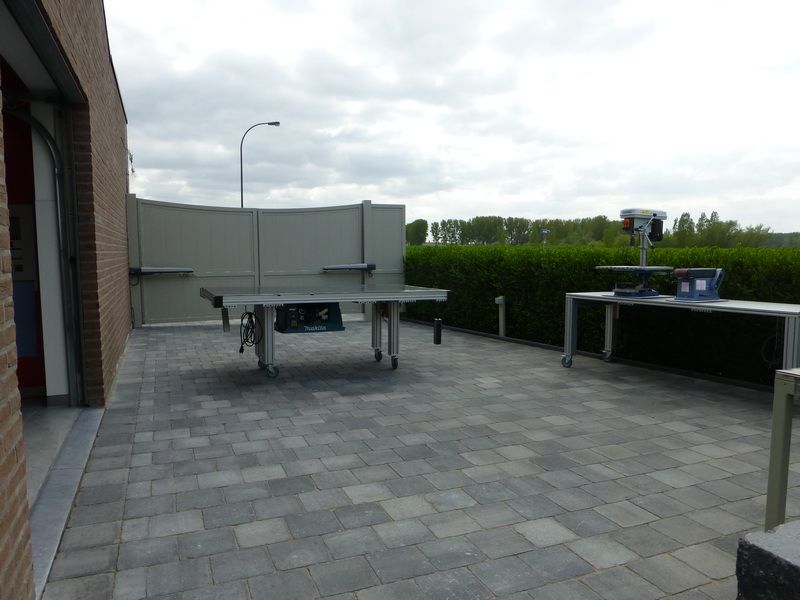
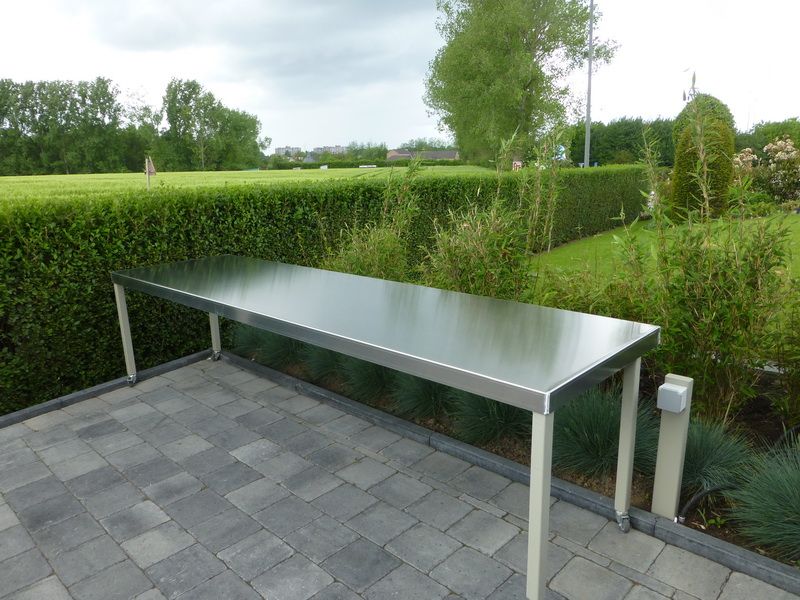
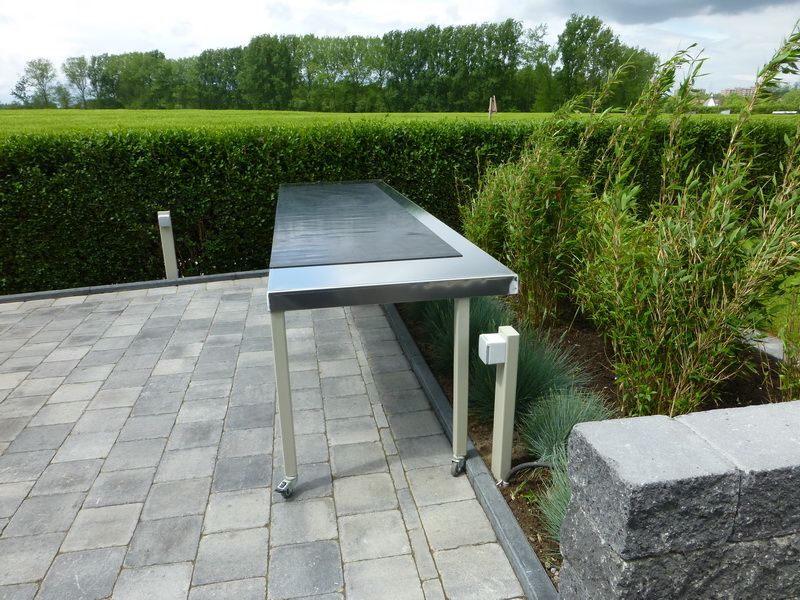
I’m also very happy with the nice working terrace, which has several compressed air-points.

This table will stay outside, I just need to cover it with an aluminium plate.
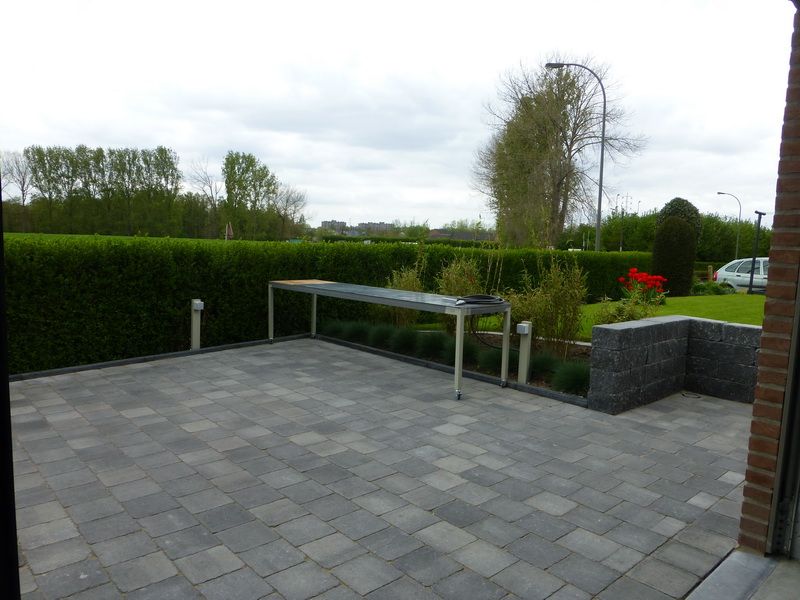
I can get everything outside in a second, and I can work outdoors.
I added rubber mats of 4mm on every table.
If I want to use my saw or mill, I just roll the rubber to one side, simple
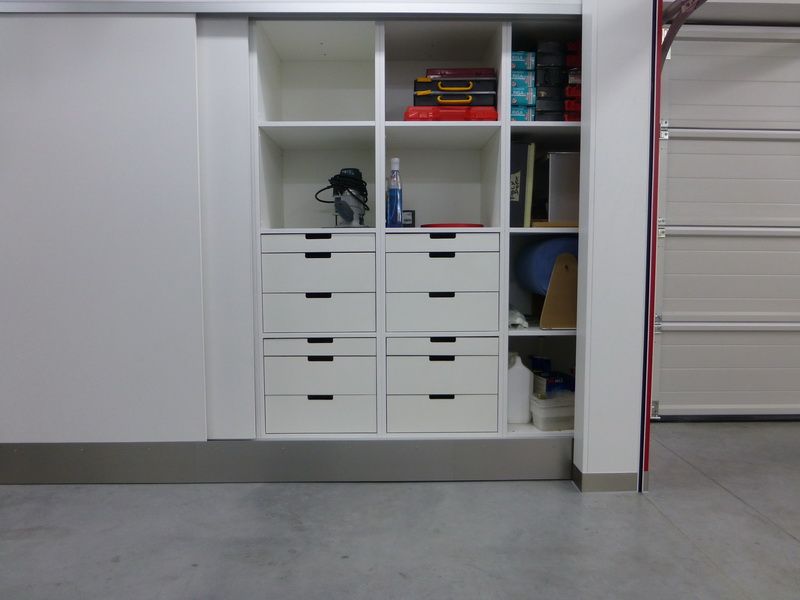
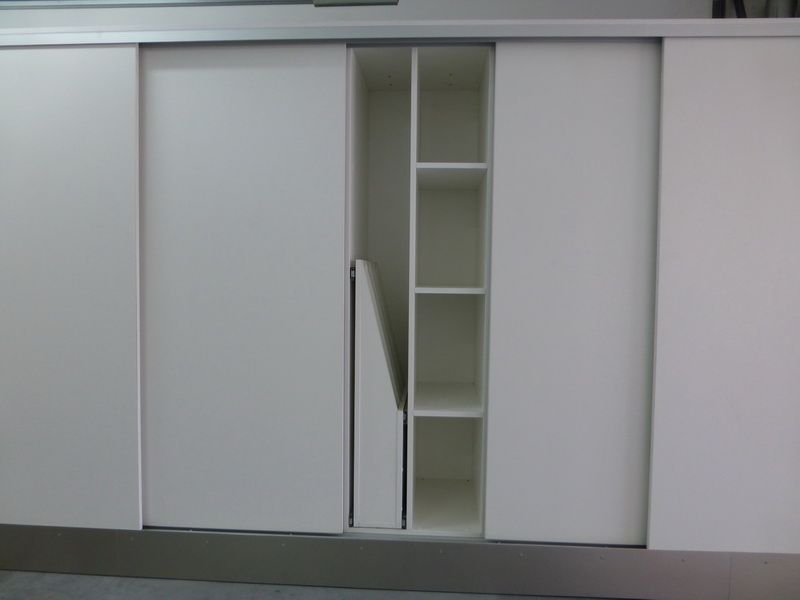
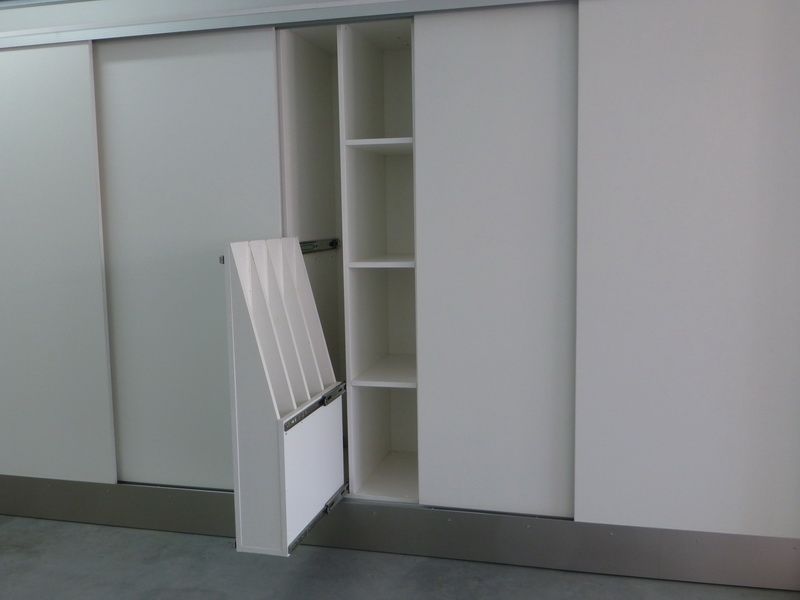
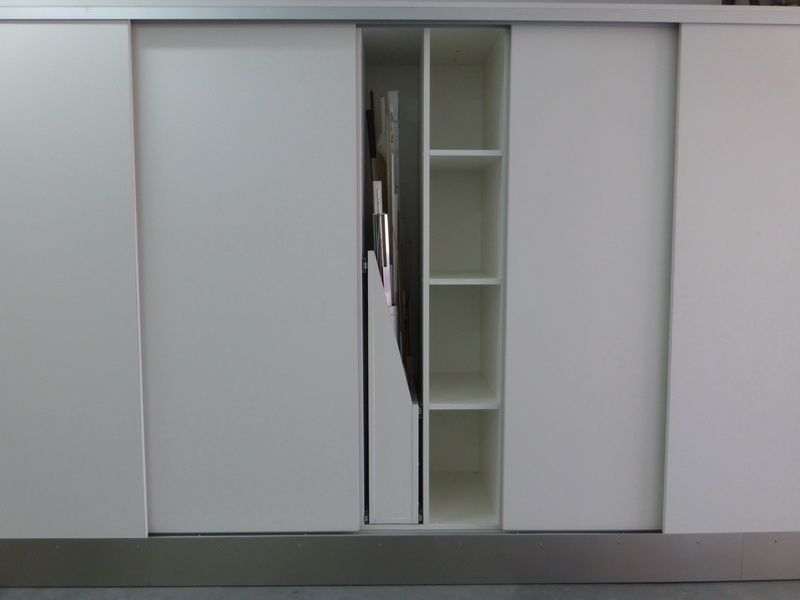
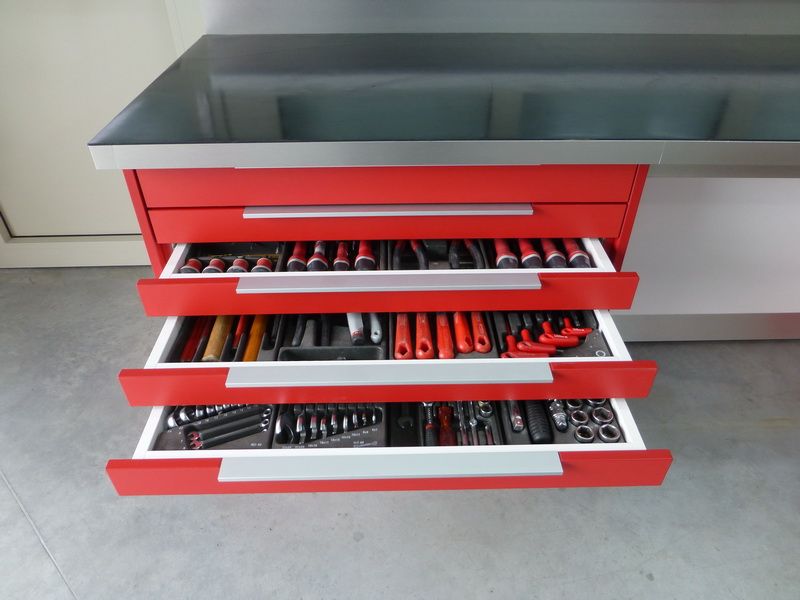
Regarding the division of my drawers, I needed a closet which contained all my keys and screwdrivers, in a central point.
So I lose a minimum amount of time to take something.
You can also see I first measured the plastic units from Facom. So it all fits perfectly, and there no space around it.
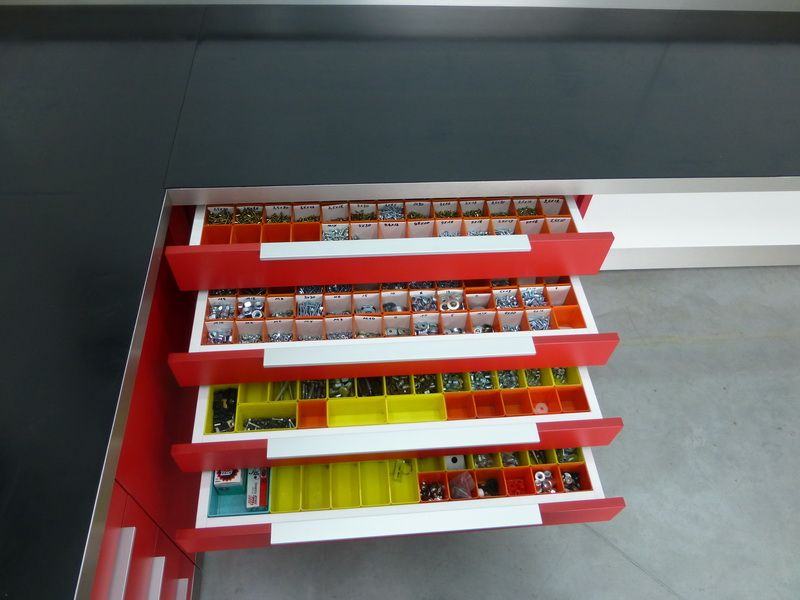
I did the same with the plastic little trays for screws and nuts.
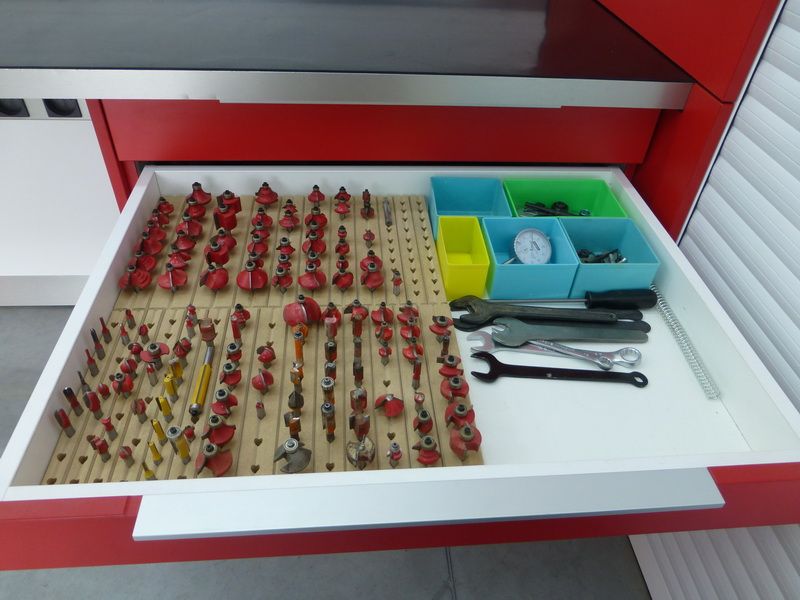
As for the routers (milling), I made myself something nice so I had a nice overview.
Soon much more with a little movie
Some of my stock of aluminium and wood.
When the closet is filled with all my materials, I wanted at least 10% of space left in my cupboards and drawers.
I accomplished this goal.
In my old workshop I had a corner that was always filled with fine thin strips of wood or aluminum.
Every time I had to pick something out of there, the rest fell over, and it was always a messy corner.
This I certainly did not want to have anymore and I ended up making this.
Everything remains at its place, and I have a good overview now.
Between the pedestals there was still plenty of room left…
The area in between is on small wheels.
I can shift the whole thing to the front, to place somethings behind it. And shift it all nicely under it, in place.
Here you can see the things I don’t need immediately.
When my eletrician asked me where I wanted the sockets, he looked weird when I said I only needed 1 per workingtable.
You can never ever have enough sockets he said.
Still, I wanted them mounted in another way than the normal ones on the wall.
I let someone fold me a stainless steel bar, and I nicely mounted everything in there.
You can see I also didn’t use the little cover around the sockets. Looks more clean to me, and…I saved me some euro’s, haha, lol
They are nearby, and there’s never an annoying cable on my table.
I counted all my sockets in- and outside my garage, and I can totally say…I must be nuts.
One of the nicest things in my working place, IMO, is still my sectional door.
Once the floor heatings is off, i’ll open it, and I get the nice scenery for free.
I’m also very happy with the nice working terrace, which has several compressed air-points.
This table will stay outside, I just need to cover it with an aluminium plate.
I can get everything outside in a second, and I can work outdoors.
I added rubber mats of 4mm on every table.
If I want to use my saw or mill, I just roll the rubber to one side, simple
Regarding the division of my drawers, I needed a closet which contained all my keys and screwdrivers, in a central point.
So I lose a minimum amount of time to take something.
You can also see I first measured the plastic units from Facom. So it all fits perfectly, and there no space around it.
I did the same with the plastic little trays for screws and nuts.
As for the routers (milling), I made myself something nice so I had a nice overview.
Soon much more with a little movie
1/2 Cup
Member Emeritus
An absolutely stunning outcome and beautifully executed..WOW
I PLAY FOR KEEPS
Well-known member
Your shop makes my OCD happy! Amazing job 
Tyberius
Well-known member
is that just a wood router bit used on alu?
Sure looks like it. They should be able to cut alum and plastic just fine though. Man I gotta get on making a router table for myself.
Good god... I love this shop.
LegacyIndustrial
ALLIANCE MEMBER
Motivational.
NastyGT500
Member
That is incredible! Nice work. Awesome setup!
dhubbard422
Well-known member
Beautifully done. An amazing space.
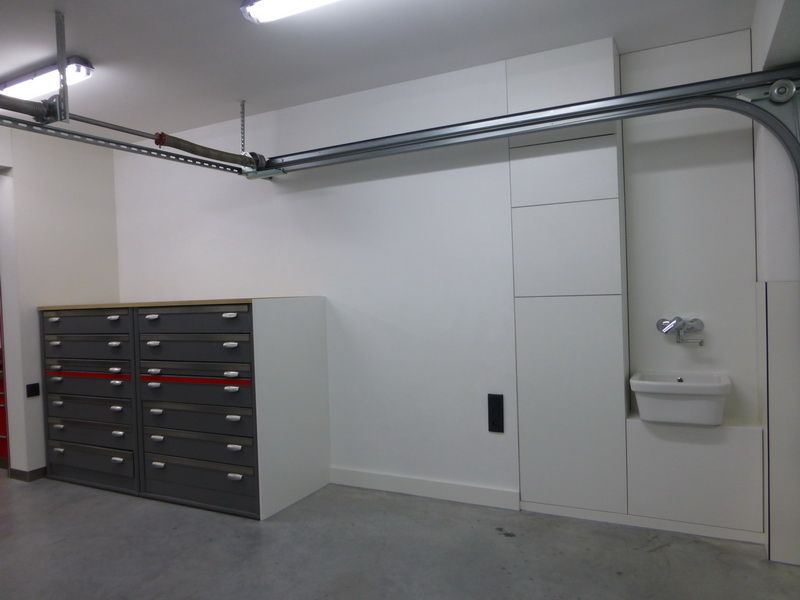
The right part is now also completely finished
I also moved the gray cabinets that were in my old workplace
It's the intention that they get out of there at some time. I'm already making some plans for my garden shed, and they'll move over there when it's finished.

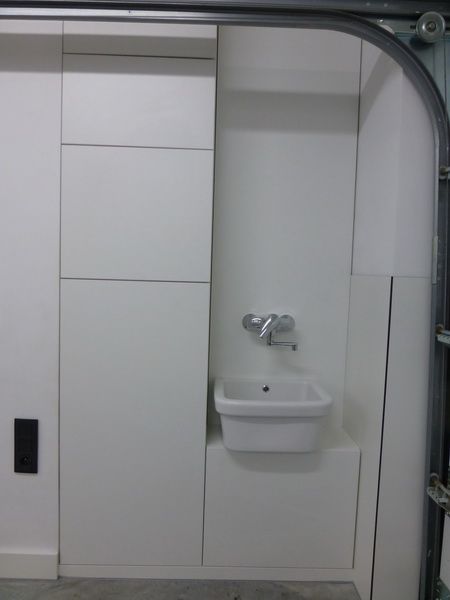
A second basin, next to the cabinets wich contain my polishing materials for the bmw, and EVERYONG MUST KEEP AWAY FROM THOSE .
 ***61514;
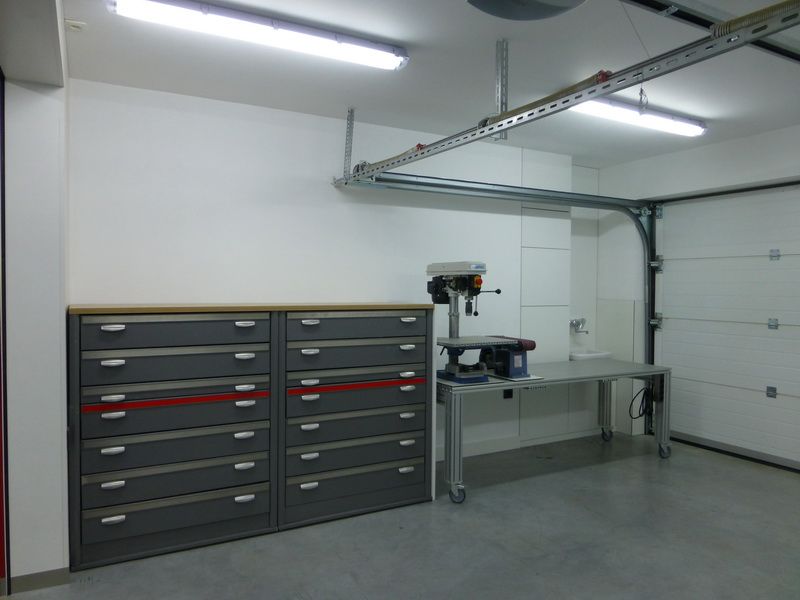
The long aluminum worktable. I also made it so that it fits nicely between when I do not need it.
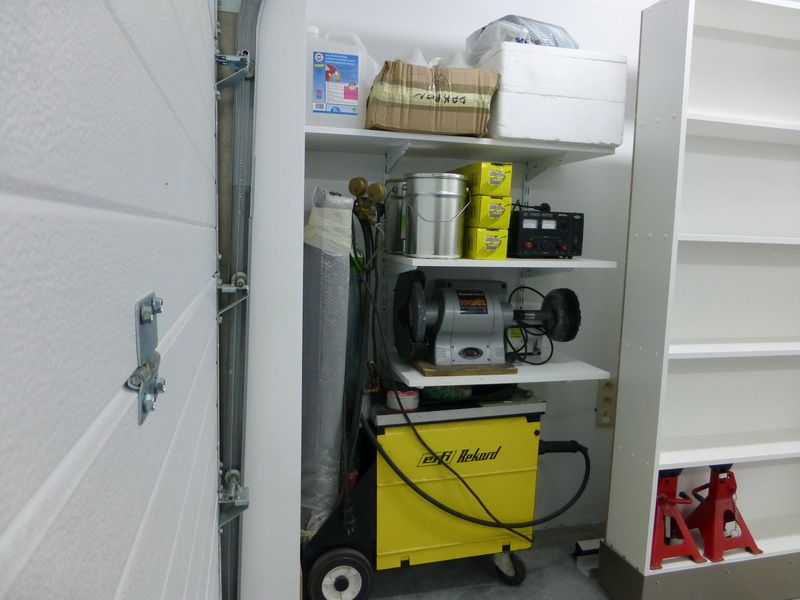
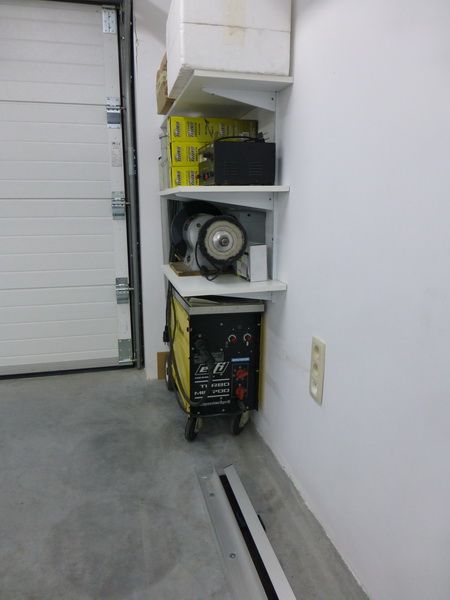
Here you can see how I gave my welding set a place behind the sliding closet.
And against the wall, I screwed another rack to storage some other stuff.
I had a stainless steel plate of 2mm to bent and welded, for the workbench outside.
So it's protected for rain and snow.
I also moved the gray cabinets that were in my old workplace
It's the intention that they get out of there at some time. I'm already making some plans for my garden shed, and they'll move over there when it's finished.
A second basin, next to the cabinets wich contain my polishing materials for the bmw, and EVERYONG MUST KEEP AWAY FROM THOSE .
The long aluminum worktable. I also made it so that it fits nicely between when I do not need it.
Here you can see how I gave my welding set a place behind the sliding closet.
And against the wall, I screwed another rack to storage some other stuff.
I had a stainless steel plate of 2mm to bent and welded, for the workbench outside.
So it's protected for rain and snow.
theflystyle
Member
- Joined
- Sep 4, 2013
- Messages
- 11
Truly one of my favorite builds
jb3
Well-known member
this place is incredible. I don't think i've ever seen such a meticulously clean and organized workplace. Reminds me of an aerospace lab
Crazy Backyard Builder
Well-known member
Nice space, you build some impressive stuff !
Last edited:
bikingpro5
Well-known member
Knew i recognized that BMW and username, can't wait to see what you can create in this space.
Gentle_Ben
Well-known member
Very impressive!
Victorymike18
Well-known member
Wow, what an amazing space you have built! Very well thought out and implemented designs.
I'm not exactly sure I understand the purpose of the big sliding cabinet, what was the intended purpose that having it movable fulfills?
And I apologize if you mentioned already but what do you do for a living? I assume a workspace like this is for a business or at least an income generating hobby?
I'm not exactly sure I understand the purpose of the big sliding cabinet, what was the intended purpose that having it movable fulfills?
And I apologize if you mentioned already but what do you do for a living? I assume a workspace like this is for a business or at least an income generating hobby?
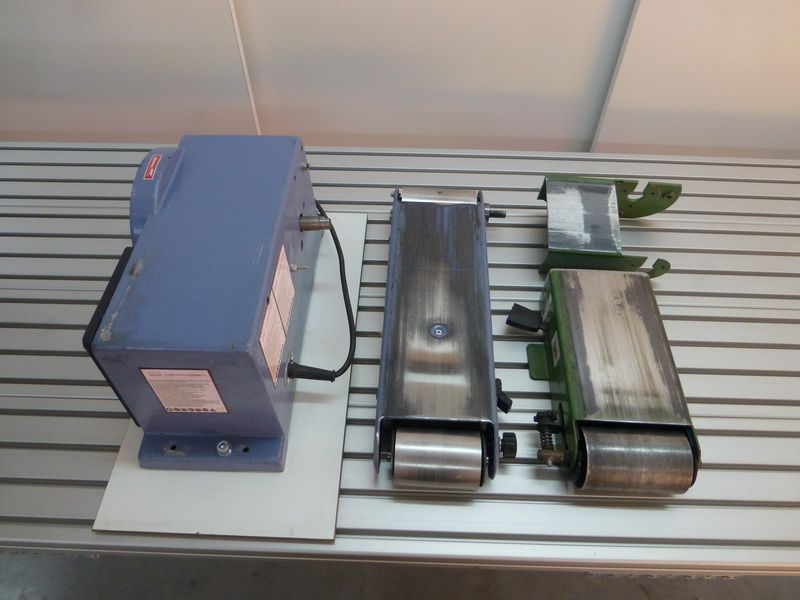
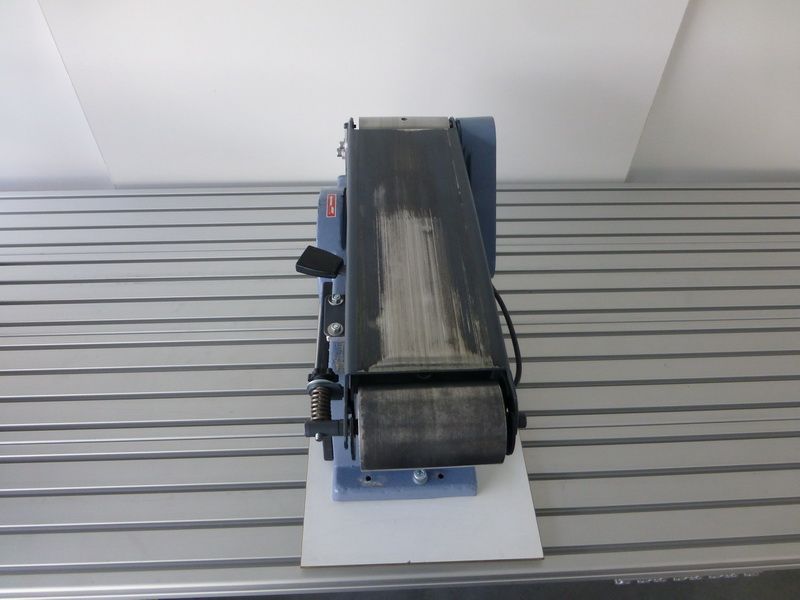
A couple of months ago I purchased myself a new belt and disc-sander. It looked almost identical to the model that proved it's service for over 9 years.
When I unpacked the new machine, I immediately saw that it was big dud.
I worked with it for over 2 months, but I bought more drive belts then the machine was worth.
Enough was enough.
I found the cause pretty quickly. The suspension of the engine was running skew;, and the front part of the roller was not beared.
I had the old one laying around, so I put the disc in all of this.
On the right you can see the old piece, with the roll that was beared.

Then I stretched everything nice and straight, and welded the 2 parts to each other.
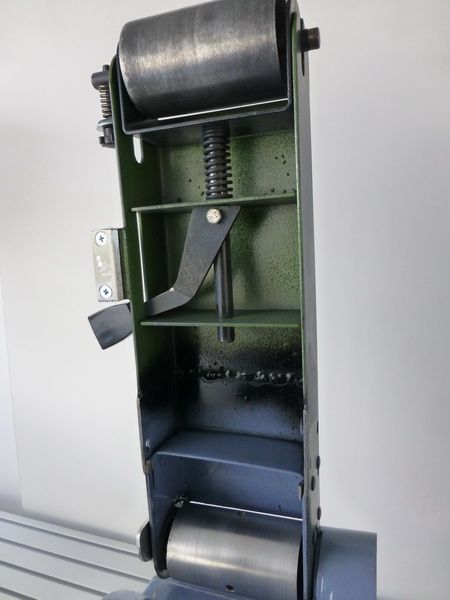
The top side made pretty tight.
Did some more improvements on the side, so it was all runing straight.

Everything goes perfectly now, and I don't need to replace any drive belts.
When I unpacked the new machine, I immediately saw that it was big dud.
I worked with it for over 2 months, but I bought more drive belts then the machine was worth.
Enough was enough.
I found the cause pretty quickly. The suspension of the engine was running skew;, and the front part of the roller was not beared.
I had the old one laying around, so I put the disc in all of this.
On the right you can see the old piece, with the roll that was beared.
Then I stretched everything nice and straight, and welded the 2 parts to each other.
The top side made pretty tight.
Did some more improvements on the side, so it was all runing straight.
Everything goes perfectly now, and I don't need to replace any drive belts.
volvo
Well-known member
...
>>>In the meantime I’ve got a new friend, which keeps me company every day!>>>
.
I must have missed something? Other than your out of this world build.
>>>In the meantime I’ve got a new friend, which keeps me company every day!>>>
.
I must have missed something? Other than your out of this world build.
buzz08
New member
hello
what site did you buy your modular rails
thank you
what site did you buy your modular rails
thank you
Tyberius
Well-known member
I've got a question. The rolling shelf: Is it simply used to move the shelved items closer to the work, or is their some other purpose to having the shelf on wheels?
I thought it was just to move the supplies (or whatever is stored on there) closer to the active work area, but maybe I'm missing something.
I thought it was just to move the supplies (or whatever is stored on there) closer to the active work area, but maybe I'm missing something.
sunsation288
Well-known member
I like that kind of stuff !!!, thanks for posting !
Showboy
Well-known member
BHR4CE1
Well-known member
I love the sliding doors over the storage cabinets. I did the same thing in my garage years ago, and yours is the first one I have seen that did that too. Bravo!
The right part is now also completely finished
I also moved the gray cabinets that were in my old workplace
It's the intention that they get out of there at some time. I'm already making some plans for my garden shed, and they'll move over there when it's finished.
A second basin, next to the cabinets wich contain my polishing materials for the bmw, and EVERYONG MUST KEEP AWAY FROM THOSE .
***61514;
The long aluminum worktable. I also made it so that it fits nicely between when I do not need it.
Here you can see how I gave my welding set a place behind the sliding closet.
And against the wall, I screwed another rack to storage some other stuff.
I had a stainless steel plate of 2mm to bent and welded, for the workbench outside.
So it's protected for rain and snow.
I also moved the gray cabinets that were in my old workplace
It's the intention that they get out of there at some time. I'm already making some plans for my garden shed, and they'll move over there when it's finished.
A second basin, next to the cabinets wich contain my polishing materials for the bmw, and EVERYONG MUST KEEP AWAY FROM THOSE .
The long aluminum worktable. I also made it so that it fits nicely between when I do not need it.
Here you can see how I gave my welding set a place behind the sliding closet.
And against the wall, I screwed another rack to storage some other stuff.
I had a stainless steel plate of 2mm to bent and welded, for the workbench outside.
So it's protected for rain and snow.
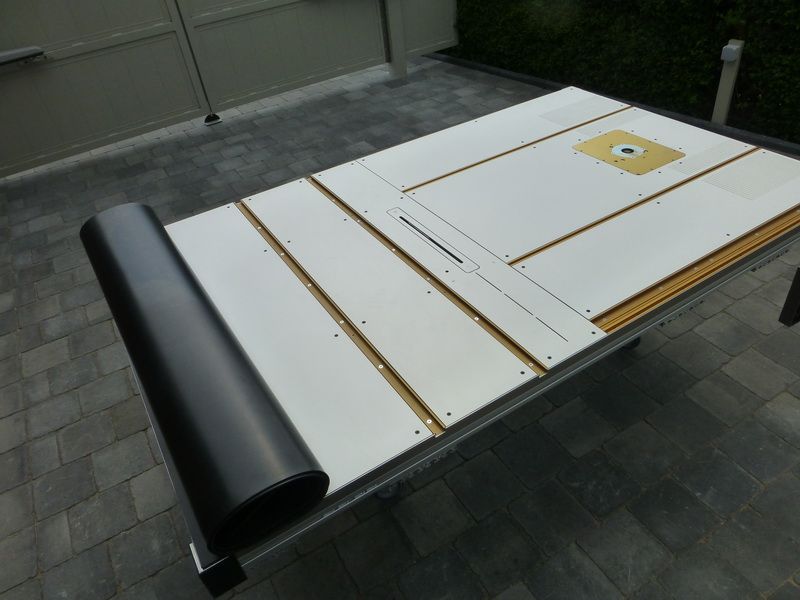
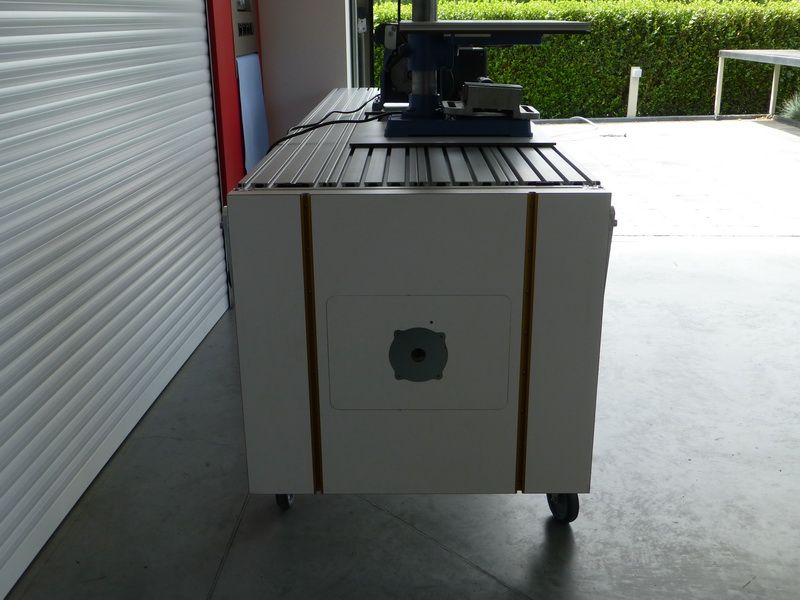
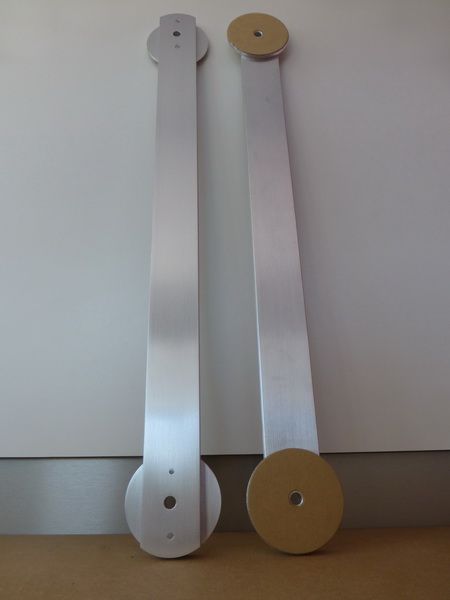
In terms of organization of the workshop, this is (I think) the last thing I had to put in order.
I made two solid aluminum brackets.
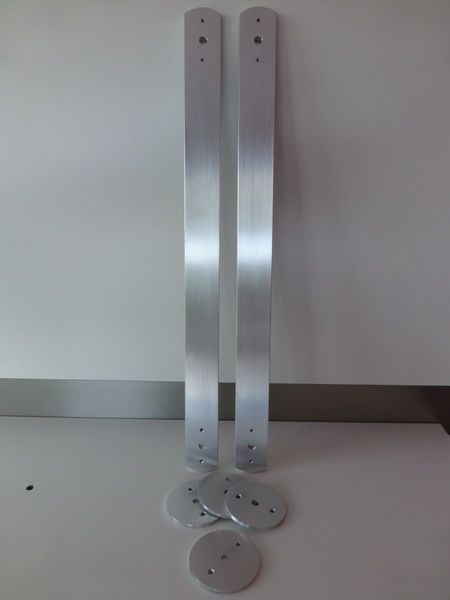
These were made to hold the router table in place, once it's folded open.
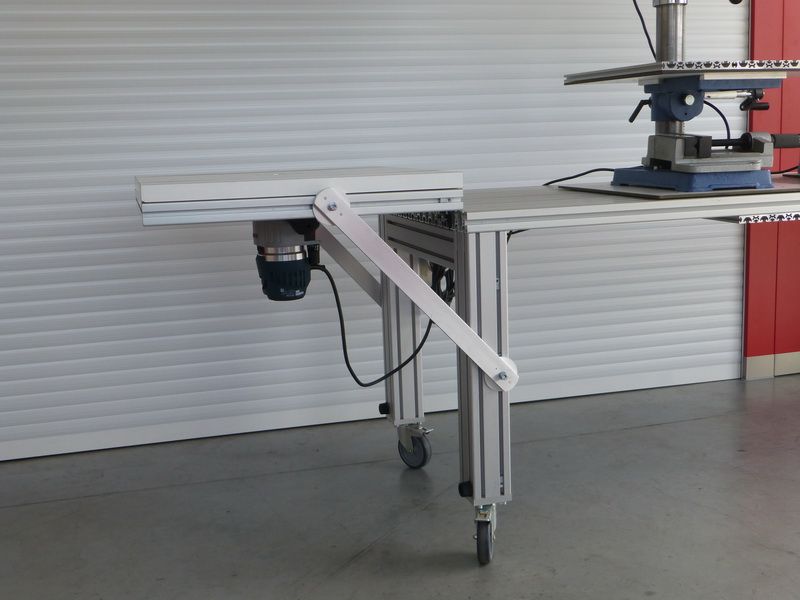
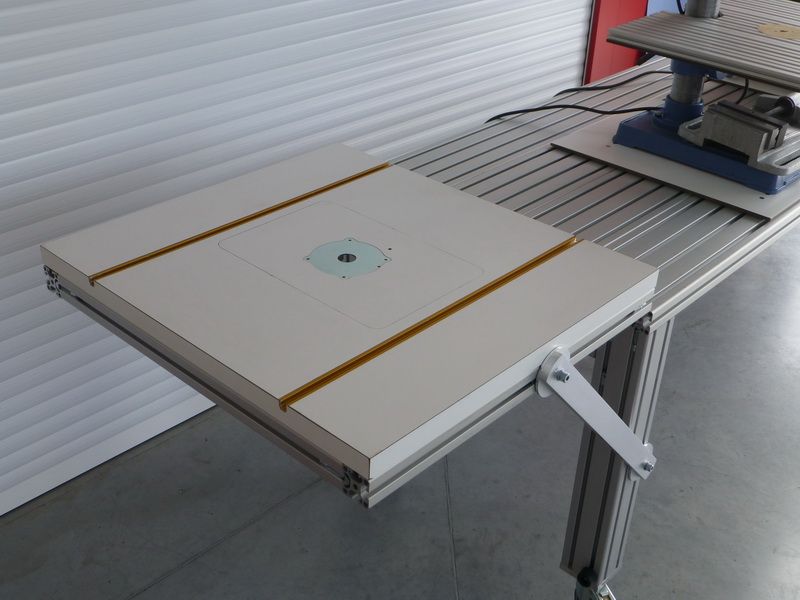
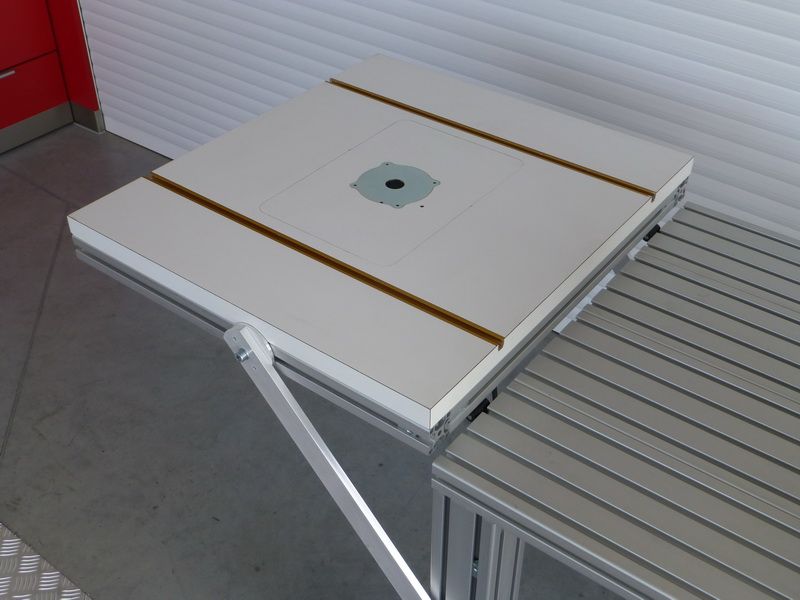
If I do not need this, it justs hangs next to the table, and this doesn't takes any space somewhere else.
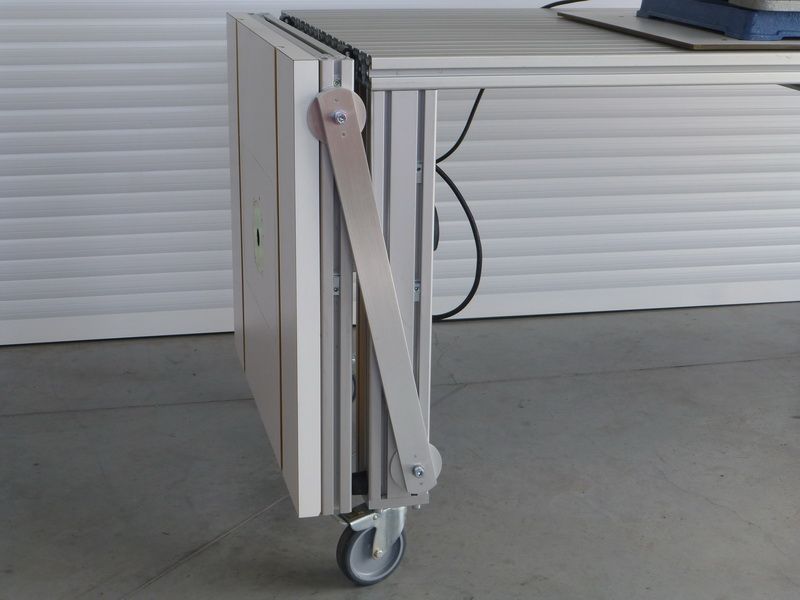
The roundells I milled, I provided with a layer of paper which they use to make seals from.
The advantage is that it doesn't scratch, but the best thing is that once it is established, it doesn't come loose from it's own.
This for the safety of the router-table once it is lifted.
I made two solid aluminum brackets.
These were made to hold the router table in place, once it's folded open.
If I do not need this, it justs hangs next to the table, and this doesn't takes any space somewhere else.
The roundells I milled, I provided with a layer of paper which they use to make seals from.
The advantage is that it doesn't scratch, but the best thing is that once it is established, it doesn't come loose from it's own.
This for the safety of the router-table once it is lifted.
Your shop makes my OCD happy! Amazing job
+1! Absolutely love it!
80WTI_55_CHEV
Well-known member
robolop,
your workmanship is second to none, i wish i had quarter of your talent and workmanship please keep us up to date with future builds as your quality of work will hopefully rub off on me. Thankyou Lee
your workmanship is second to none, i wish i had quarter of your talent and workmanship please keep us up to date with future builds as your quality of work will hopefully rub off on me. Thankyou Lee