To avoid these ads, REGISTER NOW!

Between 705 & 1200 SQ/FT A Seattle Small Lot Build

Workspaces between 705 and 1200 squarefeet.

R. Deschain

Well-known member
Joined
Jan 7, 2016
Messages
393
Location
Seattle, Wa
It looks like we are a go for a new garage! I am meeting our builder this weekend and passing him a check (two checks actually, one is for the City of Seattle permit office...) and I will have a real garage and wood-shop by spring. My too tiny, falling down, little carriage house will go away and I will have a new, modern, heated work area! Room for my big lathe, cabinet saws, wood storage, my joiners workbench, room to assemble projects/furniture, a real dust collection system for the first time ever, and all my planes/saws/chisels/hand tools on one side. On the other side of the shop will be a mini-machine/fabrication shop with a two post lift, lathe, end mill, welder, work table, and various other metal bit and bobs...

I cannot tell you how stoked I am! Seriously, I am all giddy about it. I plan to make cool stuff, build some furniture, descend into super-nerdiness, will go over my jeep with a microscope, and will be voiding the shiznit out of warranties! My wife is already planning on dinner in the shop one night a week - I do love her!

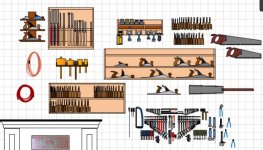
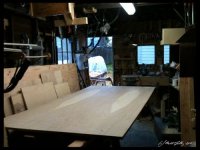
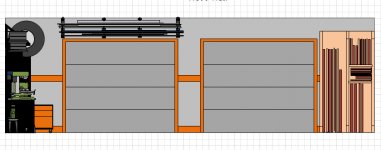
Here are pictures of my existing "garage," the prelim drawings that have been submitted for the new one, and a layout of the shop floor.
 

Attachments

  • Garage_1.jpg
    Garage_1.jpg
    153.9 KB · Views: 798
  • shop.jpg
    shop.jpg
    29.1 KB · Views: 769
  • Garage floor 2 copy.jpg
    Garage floor 2 copy.jpg
    91.4 KB · Views: 800
  • Garage Floor 1 copy.jpg
    Garage Floor 1 copy.jpg
    105.8 KB · Views: 885
  • Garage floor 3.jpg
    Garage floor 3.jpg
    145.1 KB · Views: 1,094
To avoid these ads, REGISTER NOW!

Off-Street Parking

Well-known member
Joined
Aug 1, 2015
Messages
351
Location
Midwest
Looks like your new garage layout is missing a space for material storage... How high will the ceiling be, and will the roof trusses be designed for a usable storage attic?

...Also, does your dog know how much yard he/she is going to be losing soon? :lol:
 

Bib Overalls

Well-known member
Joined
Dec 4, 2006
Messages
3,318
Location
Jonesboro, Arkansas
SHIZNIT: More "urbanized" form of the ****. Basically means really, really good. Other versions include:hella cool,tight, the best.

Damn Tony! Your new ride is the shiznit! Lemme borrow it to drive by Mya's.


The Garage Journal is so educational!

Looks like you have alley access to your back yard. Certainly solves a lot of problems when you are building detached garage on a smaller lot. Going to be nice.
 

hunterguy86

Well-known member
Joined
Jan 22, 2012
Messages
168
Location
Central Texas
Subscribed. Your shop size is pretty much the exact size I'm going to be building as well. Looking forward to seeing how you organize.

What software did you use for that layout?


Sent from my iPhone using Tapatalk
 
OP
R

R. Deschain

Well-known member
Joined
Jan 7, 2016
Messages
393
Location
Seattle, Wa
Subscribed. Your shop size is pretty much the exact size I'm going to be building as well. Looking forward to seeing how you organize.

What software did you use for that layout?


Sent from my iPhone using Tapatalk

I wanted the 24'X30, but I had to sacrifice a foot to the Gods of Zoning. I used AutoCAD for the layout I sent to the City and for organization I used/am using VISIO
 
OP
R

R. Deschain

Well-known member
Joined
Jan 7, 2016
Messages
393
Location
Seattle, Wa
Looks like your new garage layout is missing a space for material storage... How high will the ceiling be, and will the roof trusses be designed for a usable storage attic?

...Also, does your dog know how much yard he/she is going to be losing soon? :lol:

The north half of the Garage attic will have storage trusses and an extra wide pull down staircase for Christmas lights and **** that I am not allowed to throw away. The ceiling height on that side will be 9'. The southern half, above the lift, is designed with scissor trusses. It gives me 12'-1.3" after the 5/8 drywall is applied at the ridge. I will have lots of cabinet storage and space above the garage doors for steel and lumber, long lumber storage above the workbench and the lathe, and sheet good storage in the NE corner. See the drawings below, some of the storage is illustrated.

The dogs hate me over this already. They are not allowed in the back yard right now as the demo has started and stand at the gate and whine.
 

Attachments

  • North Wall copy.jpg
    North Wall copy.jpg
    135.7 KB · Views: 475
  • West Wall copy.jpg
    West Wall copy.jpg
    89.7 KB · Views: 412
  • South Wall copy.jpg
    South Wall copy.jpg
    55.1 KB · Views: 456

jfish

Well-known member
Joined
Apr 26, 2012
Messages
342
Location
Tacoma WA
I'll be watching as well as I'm beginning an attitude adjustment on my 24 x 36.

Puget Sound shiznit!
 

RSwannabe

Well-known member
Joined
Dec 17, 2009
Messages
403
Congratulations! I look forward to following your progress. What neighborhood are you in?

I built my new shop in Ballard last year and would have killed for 23'x30' and alley access. Mine is only 20'x20' with access up the side of the house. I can't help but dream about what I'd be able to do with the 72% extra interior volume you will have. ;-). If interested, my build thread is here (http://www.garagejournal.com/forum/showthread.php?t=251805).

Good luck and keep us appraised of progress.
 
OP
R

R. Deschain

Well-known member
Joined
Jan 7, 2016
Messages
393
Location
Seattle, Wa
Congratulations! I look forward to following your progress. What neighborhood are you in?

I built my new shop in Ballard last year and would have killed for 23'x30' and alley access. Mine is only 20'x20' with access up the side of the house. I can't help but dream about what I'd be able to do with the 72% extra interior volume you will have. ;-). If interested, my build thread is here (http://www.garagejournal.com/forum/showthread.php?t=251805).

Good luck and keep us appraised of progress.

That is a very **** Garage build. The detail fab and paint work on your cars is fantastic!

We have a paved alley and is one of the many reasons we decided specifically on our place. I have maxed out my available build able space for a 4840sq ft lot, and if I need more someday I will have to go up, but zoning in my area will have to change. I am limited to 15' max ridge height.
 

RSwannabe

Well-known member
Joined
Dec 17, 2009
Messages
403
Thanks. My garage has been a fun and rewarding project and its great to have the nice work space at home (not to mention a much more useable back yard).

I maxed out my 35% allowed lot coverage as well. I have a slightly bigger 5,100 SF lot, but my house footprint limited by garage to a maximum 400 SF.
 
OP
R

R. Deschain

Well-known member
Joined
Jan 7, 2016
Messages
393
Location
Seattle, Wa
Demo has begun and first thing to is clean out the old space, get rid of the junk and move the good stuff into storage for the duration. 1st step was to give away my two scary table saws on Craigslist. Replacing them with a new 3HP SawStop. I have "made due" for years and rebuilt the kitcken, made furniture, and added trim and built-ins with saws that I had to retrue every time I swapped blades, had wonkey fences, were under powered, and made me fear for the safety of my fingers every time I flipped their switches. I have paid my table saw dues and deserve greatness. Greatness I shall have with the addition of the SawStop.


uploadfromtaptalk1452367195087.jpg

Sent from my SAMSUNG-SM-G900A using Tapatalk
 

54stude

Well-known member
Joined
Jul 12, 2007
Messages
95
Location
Twin Cities MN
The only thing I notice on your layout drawing, is that I would make sure you have room to walk around the southern most post on the car hoist carrying a tire. Perhaps putting a shallow cabinet, overhead shelf, hose hooks, or something else next to that post instead of a bench would be a good idea? Just a little info from a person with one or two immovable car lifts. Shoot for a minimum of 24" to walk though
 
OP
R

R. Deschain

Well-known member
Joined
Jan 7, 2016
Messages
393
Location
Seattle, Wa
Thank you 54stube. I have the same advise from the machinist at my J-O-B. He recommends a tool board with shelf or cabinet above head-smacking height.

I will build my fab bench in place, so I have the room and flexibility to follow what seems to be sound advice.

Sent from my SAMSUNG-SM-G900A using Tapatalk
 

bczygan

Well-known member
Joined
Nov 4, 2009
Messages
22,002
Location
DETROIT! Arsenal of Scrappers
Demo has begun and first thing to is clean out the old space, get rid of the junk and move the good stuff into storage for the duration. 1st step was to give away my two scary table saws on Craigslist. Replacing them with a new 3HP SawStop. I have "made due" for years and rebuilt the kitcken, made furniture, and added trim and built-ins with saws that I had to retrue every time I swapped blades, had wonkey fences, were under powered, and made me fear for the safety of my fingers every time I flipped their switches. I have paid my table saw dues and deserve greatness. Greatness I shall have with the addition of the SawStop.


uploadfromtaptalk1452367195087.jpg

Sent from my SAMSUNG-SM-G900A using Tapatalk

I like how you have planned everything including the layout inside, of all your tools.

The saws I have recently gotten are just like the two you are parting with, so wish me luck.

Bill
 
To avoid these ads, REGISTER NOW!
OP
R

R. Deschain

Well-known member
Joined
Jan 7, 2016
Messages
393
Location
Seattle, Wa
Wow, I enjoyed looking at your sketch up of the garage and your planning of the locations of your tools. Very impressive. Richard D.

Thank you, Sir.

I have a little OCD issue with organization. I have spent countless hours modeling tools, equipment, our cars, all the furniture in the house, my bikes, even our dogs... I did a sketch of my tool board (metric is red banded), the molding and bench planes a couple of years ago and it just ballooned from there.

I modeled all the furniture in the house because I got tired of moving it three times just to put it back in the first position waiting for my wife to make up her mind. I then taught her to use Visio and it has saved me countless hours and arguments.
 

Attachments

  • House and puppies copy.jpg
    House and puppies copy.jpg
    114.2 KB · Views: 280
  • jeep copy.jpg
    jeep copy.jpg
    103.4 KB · Views: 264
  • Bikes copy.jpg
    Bikes copy.jpg
    102.9 KB · Views: 245
  • tools 2 copy.jpg
    tools 2 copy.jpg
    51.4 KB · Views: 247
  • tools 3 copy.jpg
    tools 3 copy.jpg
    44.8 KB · Views: 251
  • tools copy.jpg
    tools copy.jpg
    68.4 KB · Views: 277
OP
R

R. Deschain

Well-known member
Joined
Jan 7, 2016
Messages
393
Location
Seattle, Wa
Spent a couple of nights this week and all weekend cleaning out the shed getting ready for demolition day. We lived in France for a couple of years and the garage/shed was used to store all my tools and as a free storeroom for our entire extened family.

After everyone cleared their **** out, I had 4 trailer loads of tools, lumber, supplies, and 1/2 finished/someday projects that went to storage. Some stuff was given away on Craigslist, had 2 full garbage cans, 1 over-full recycling can, and a few things are up for sale (anyone need a 12X16 variable speed Ricon midi lathe?). There is a little bit left to haul away, but I am ~96% ready for the deconstruction.

As a bonus, I need to change the oil and do some work on the jeep's hard top, so I pulled it into the shed to work in the dry. This is the first time in 6+ years that a vehicle has been in that shed.

This is what I started with, after the clean out, and with the jeep inserted and ready for some hot wrenchin' action:

uploadfromtaptalk1453089099145.jpg
uploadfromtaptalk1453089113515.jpguploadfromtaptalk1453089126701.jpg
 
OP
R

R. Deschain

Well-known member
Joined
Jan 7, 2016
Messages
393
Location
Seattle, Wa
If you want to hear God laugh, tell him what your plans are…

I haven't posted an update in a bit: We hit a snag on the garage build just as I was starting the tear-down. Super frustrating, but there was some stuff going on inside our house - in the walls - that took precedence and they had to be address immediately. Thankfully, we were in a place financially to take care of it, but my dream shop was pushed a couple of months.

Making lemonade out of lemons: We took the opportunity to do some long wanted remodeling since the place was already torn apart - 1/2 the walls were down to studs and the center stairs plus one floor beam had to be ripped out for the structural repair work to be done. We are now insulating the exterior walls, re-plumbing the whole house, re-wiring to remove the old knob&tube still left in the attic, remaking the Stairs of Doom into something that people won’t fall down, tearing out the 30% efficient 1942 oil heater and adding a heat-pump, a bathroom in the basement, adding attic access, making a dining room, putting in arched doorways, bringing in more light, and adding lots of period-appropriate detail.

All of the demolition work is now done and the rebuild has started. Electrical is moving along, the City inspector signed off on the new HVAC (there is a permit inspection for the basement still to come), and all of the rough work on the main floor is complete. The once scary attic is now clean and waiting for a reinforced floor and new spray foam insulation. Some of the trim in the dining room and kitchen is done, specifically the cove/crown on the cabinets. All the doors are now hung, and the wainscoting in the new dining room is 90% up.

With all that almost done, I am back in garage mode and have dumpsters coming on the 15th for the demo waste. My windows are on order and I am handing my builder a very fat check in the morning. I have also been buying some purdy new tools: PM3520b, 36"/3hp SawStop, Rotery lift, 9X20 metal lathe, 8" joiner, Bosch miter saw, and such...
 
Last edited:
OP
R

R. Deschain

Well-known member
Joined
Jan 7, 2016
Messages
393
Location
Seattle, Wa
The old garage came crashing down at about 9:00am this past Saturday. All it took was a little push with the forklift at the peak of the roof (I rented an extension boom forklift and a jack-hammer to assist with the garage and old slab destruction) I didn’t take out any fences or cars, but one of our recycling cans took a beating. Within 3 hours it was all loaded into a debris dumpster that I had dropped Friday morning. BTW if anyone in Seattle of south King County needs a dumpster, I have a GREAT resource for you!

The forklift was a little manky to start and keep running. After a couple of calls, the rental company brought me a free 18000lb rated track-hoe with a bucket thumb and a pusher blade!!! That translated into an adult sized Tonka toy for my yard. While the garage demo was a breeze, the slab was something else altogether. It was super tough, full of quarter-sized aggregate, and 6 inches thick. The footing was +16” deep. I was impressed - I thought it was just some concrete poured over dirt like our basement slab. Nope, this stuff was WAY overbuilt for the tiny carriage house. I could had parked a tank on this thing and it would have been just fine.

After 8 hours with the fork lift, 3 with a chain saw, and five hours on the track hoe the garage, the whole slab, footings, three tree stumps, and four posts that were set in concrete were loaded and ready for transport. All our water lines, fences, and overhead electrical lines were still intact so it was a successful second and final day of garage demo. My back yard is now a flat spot of dirt and is waiting for a new garage slab.
 

Attachments

  • Matt Talley_Garage Build_2016 (4).jpg
    Matt Talley_Garage Build_2016 (4).jpg
    133.7 KB · Views: 443
  • Matt Talley_Garage Build_2016 (8).jpg
    Matt Talley_Garage Build_2016 (8).jpg
    138.5 KB · Views: 372
  • Matt Talley_Garage Build_2016 (10).jpg
    Matt Talley_Garage Build_2016 (10).jpg
    149.4 KB · Views: 382
  • Matt Talley_Garage Build_2016 (15).jpg
    Matt Talley_Garage Build_2016 (15).jpg
    100.7 KB · Views: 382
  • Matt Talley_Garage Build_2016 (22).jpg
    Matt Talley_Garage Build_2016 (22).jpg
    140.2 KB · Views: 401
  • Matt Talley_Garage Build_2016 (1).jpg
    Matt Talley_Garage Build_2016 (1).jpg
    118.5 KB · Views: 363
  • Matt Talley_Garage Build_2016 (3).jpg
    Matt Talley_Garage Build_2016 (3).jpg
    134.1 KB · Views: 359

CamarosRus

Well-known member
Joined
May 14, 2009
Messages
1,547
Location
Renton, WA (Seattle)
Who is your racer neighbor ??? What kind of race cars does he haul in that stacker trailer.

I am on the crew of Hancock & Lane (Jeff Lane) NHRA Comp Elim and (Cody Lane) Super Stock.
 
OP
R

R. Deschain

Well-known member
Joined
Jan 7, 2016
Messages
393
Location
Seattle, Wa
I have two neighbors that race. The one behind has a couple of sweet cars: Super Comp & Pro Modified and the guy a few doors down has two door slammers (his wife drives one). The brother of the guy behind owns the track in Medford, OR. The guy down the street knows about the new lift going in the garage and has mentioned that it will be wasted on the likes of me... :) Great guys and good neighbors.

I am more of a 4WD/AWD guy (CJ7 and a WRX are my daily drivers), but I love to cart and keep a helmet at my desk at work in case someone is headed out to SyCart in Renton.
 
Last edited:

smschriefer

Well-known member
Joined
May 28, 2009
Messages
841
Location
Yorktown, VA
I like that you represented your sphere of influence in your CAD design. It makes life much easier when you finally achieve this realization.

Can't wait to see the garage get built.
 
OP
R

R. Deschain

Well-known member
Joined
Jan 7, 2016
Messages
393
Location
Seattle, Wa
I like that you represented your sphere of influence in your CAD design. It makes life much easier when you finally achieve this realization.

Can't wait to see the garage get built.

Me either! I am vibrating with anticipation.

The Sphere of Influence was done specifically so that I/the Mrs. wouldn't plan to put a couch in front of a door or make it so a saw was placed in an unusable position. I also have a 4X8 block I move around the shop plan to make sure I have clearance for a full sheet of finish ply.
 
OP
R

R. Deschain

Well-known member
Joined
Jan 7, 2016
Messages
393
Location
Seattle, Wa
More pics of the CJ..

Sure... I am always down to share Jeep p0rn. Couple of Specs: Original in-line 6 rebuilt. Fuel injection and ECU added, T5 5-speed ******, Ford 9" rear end, big ol' Branco brakes, Skyjacker lift and suspension, 9,000lb winch, sway bar disconnect, all three tops, full Rhino lined interior and fender wells, and 2.4 million candles of KC lighting.

These were shot today at your request in the parking lot at work. I have my custom built 4X6 trailer (225 tires, etc.) latched on because I am picking up two doors and 4 windows after work. My Speedo when it rolled 200K is also pictured and I threw in the WRX just 'cause I can.
 

Attachments

  • Matt Talley_1986_CJ&_Jeep_2.jpg
    Matt Talley_1986_CJ&_Jeep_2.jpg
    80.5 KB · Views: 167
  • Matt Talley_1986_CJ&_Jeep_3.jpg
    Matt Talley_1986_CJ&_Jeep_3.jpg
    125.4 KB · Views: 165
  • Matt Talley_1986_CJ&_Jeep_4.jpg
    Matt Talley_1986_CJ&_Jeep_4.jpg
    144.2 KB · Views: 186
  • Matt Talley_1986_CJ&_Jeep_1.jpg
    Matt Talley_1986_CJ&_Jeep_1.jpg
    132 KB · Views: 174
  • Matt Talley_2008_WRX.jpg
    Matt Talley_2008_WRX.jpg
    65.4 KB · Views: 175
OP
R

R. Deschain

Well-known member
Joined
Jan 7, 2016
Messages
393
Location
Seattle, Wa
The builder had a Honey Bucket (portable enclosed toilet), a roll of welded wire, form boards, steel stakes, and rebar delivered at 7:00 this morning. That tells me there is serious work planned for the next couple of weeks.
 
OP
R

R. Deschain

Well-known member
Joined
Jan 7, 2016
Messages
393
Location
Seattle, Wa
Forms are up, utility trench dug, lift footing dig complete... oh wait... I took a look at the prep after work last night just to make double sure before they laid in the visqueen, rebar, and welded wire and while both footing holes are centered fine on the north/south axis of the building and the southernmost hole looks good as far as its placement, the northern one seemed to be too far north and they are not centered on the corresponding garage door opening.

The outside dimension of the lift (Rotory Revolution RPT10) – flange edge to flange edge - is 137” (11’-5”). The lift installer recommends a minimum of an additional 12” of footing on the outside edge of the lift post flange, giving an overall of outside footing edge to outside footing edge of at least 13’-5”. This would mean that the minimum inside measurement of inside footing edge to inside footing edge would need to be around 5’-6” and again centered on the east/west centerline of the door. The lift posts should not be centered on the footing, but to one side creating cantilevered structure to support lots o' weight.

After making some measurements, running a string, getting out my laser level, and being way too **** retentive, it looks as though the northernmost hole is about 12” too far north and the post would have sat in the very middle of the pad. I drew up the offset, added notes & lines to a picture, included the notes & measurements, and made a pdf doc with the lift spec included. I sent the document to my builder last night and his response early this morning was not quite as detailed but both concise and perfectly reasonable: "If you want to dig it another foot that is fine we will use it to fill in
the electrical ditch after inspection"


Sometimes I am too detailed for my own good... I SHOULD have just said the footing is off, I will do some digging instead of going full enginerd on the guy..
 

Attachments

  • Ground work pic.jpg
    Ground work pic.jpg
    82.4 KB · Views: 235
  • Lift Pad locations.jpg
    Lift Pad locations.jpg
    111 KB · Views: 241
  • Garage 5-4-16.jpg
    Garage 5-4-16.jpg
    148.9 KB · Views: 270
Last edited:
OP
R

R. Deschain

Well-known member
Joined
Jan 7, 2016
Messages
393
Location
Seattle, Wa
My slab gets poured next Tuesday. All clear from the City for electric trench and slab forms. There were a few issues that I saw last week that needed to be adjusted: There was a rebar oops in the car lift footings that was a serious new-guy error, but instead of calling my contractor to *****, if just fixed it. Sometimes you are only as good as your worst employee... I picked some rebar and a couple boxes of chairs, looped ties, and put a 12"OC grid down of 1/2' rebar 3" from the dirt in the footing hole on Friday evening after work.

I also lifted the existing rebar over the footing holes up with chairs so that it would all be the same level as the welded wire. Hanging it from the wire would force the wire down to the top of the visqueen, negating the use of the material in a large area. I took the extra chairs I had and added them to the welded wire field. I understand that it gets stomped down when they pour and walk the pour, but the trick for me is to limit the amount that stays down. It was $90.00 worth of material and a couple hours of my time and we can work it out as we move forward with the build. The minor details in the grand scheme. My two new lathes also came in!! The PM3520b with extension and a Jet 9X20 metal lathe. The pics below were taken as I off-loaded them into temp storage until the garage is in the dry.
 

Attachments

  • Matt Talley_Garage Slab work_2016_2016_01.jpg
    Matt Talley_Garage Slab work_2016_2016_01.jpg
    126.3 KB · Views: 243
  • Matt Talley_Garage Slab work_2016_2016_06.jpg
    Matt Talley_Garage Slab work_2016_2016_06.jpg
    115 KB · Views: 248
  • Matt Talley_Garage Slab work_2016_2016_03.jpg
    Matt Talley_Garage Slab work_2016_2016_03.jpg
    126.8 KB · Views: 252
  • Matt Talley_Garage Slab work_2016_2016_02.jpg
    Matt Talley_Garage Slab work_2016_2016_02.jpg
    114.4 KB · Views: 240
  • Matt Talley_Garage Slab work_2016_2016_07.jpg
    Matt Talley_Garage Slab work_2016_2016_07.jpg
    103.7 KB · Views: 250
  • Matt Talley_Garage Slab work_2016_2016_05.jpg
    Matt Talley_Garage Slab work_2016_2016_05.jpg
    97.8 KB · Views: 249
  • Matt Talley_Garage Slab work_2016_2016_04.jpg
    Matt Talley_Garage Slab work_2016_2016_04.jpg
    110.9 KB · Views: 285
To avoid these ads, REGISTER NOW!
Top Bottom