To avoid these ads, REGISTER NOW!

Accidental bathroom remodel

OP
M

mattblast

Well-known member
Joined
Jan 30, 2013
Messages
784
Location
Bridgewater, NJ
Loaded up the truck and took it to the dumpster at work.

6fabf4da335e38ea0b8540679598d90a.jpg

I saved some pieces to harvest tile from. The scrap will be tossed with my household trash (I get a 96 gallon can and weekly pickup)

My work dumpster gets emptied every Monday morning so as long as I can fit my stuff no one minds.

Here it is when I arrived.

80a2280389f6eba38c8c56b5fdaaf220.jpg

And after dumping a truckload of debris.

9a2def10e5405718f2159e25e7fde465.jpg
 

Attachments

  • 6fabf4da335e38ea0b8540679598d90a.jpg
    6fabf4da335e38ea0b8540679598d90a.jpg
    355.6 KB · Views: 0
  • 80a2280389f6eba38c8c56b5fdaaf220.jpg
    80a2280389f6eba38c8c56b5fdaaf220.jpg
    349.4 KB · Views: 0
  • 9a2def10e5405718f2159e25e7fde465.jpg
    9a2def10e5405718f2159e25e7fde465.jpg
    367 KB · Views: 0
To avoid these ads, REGISTER NOW!

CGT80

Well-known member
Joined
Aug 29, 2014
Messages
863
Location
IE, SoCal, USA
It already looks better with so much of the pink out of there.


Angle stops and supply lines caused water leaks in many of the commercial suites that I have worked on. It is very important to ensure they are in good shape. Of course toilet seals are easy to repair and the big deal is from showers (occasionally installed in commercial buildings).


Looks like a great project that was much needed.
 

James-W

Well-known member
Joined
Feb 3, 2013
Messages
12,432
Location
Southeastern Wisconsin
It already looks better with so much of the pink out of there.

Looks like a great project that was much needed.
I agree, now he can rebuild it and make it exactly the way he wants it to be. There are times when you can "fix the problem" and then there are times when you need to just gut the room and start over.

That is what we did with my oldest daughter's downstairs bathroom. She has two bathrooms, one upstairs and one downstairs so it wasn't a big deal when we gutted the downstairs bathroom. With everything out of the bathroom we were able to make it the way she wanted it to be. It turned out great and she loves it.
 
OP
M

mattblast

Well-known member
Joined
Jan 30, 2013
Messages
784
Location
Bridgewater, NJ
105455d907769b0c7f00f5bb8353ef0d.jpg

I’m thinking of keeping old pan. It’s not original to he house and it works fine. It’s a bit dirty from demo but that will clean up. Hard part will be removing old caulk from front edge that sealed against shower doors.

2edd578d12d1f0701599bb9e9cd1950d.jpg

It will save a lot of time and frustration reusing it.

6a0c8777eaf3750cfb4116f2448232a8.jpg

I’m going to remove the closet framing and make it open shelves. Funny that they put a header in since it’s not load bearing.

And the original design had a lowered shower ceiling. Any reason to keep this?

af9e6443fa9f3946ed1b7b811624f833.jpg

It does give space for recessed light but I don’t need to keep that. Only other plus is that the lower ceiling keeps heat in the shower better and makes it easier for steam to escape to the higher ceiling (and the exhaust fan)

The hall bath had same thing but I decided to keep it lower in the remodel.

2b9afd33b40dfa3c6dfd041cd5ab8ff6.jpg
 

Attachments

  • 6a0c8777eaf3750cfb4116f2448232a8.jpg
    6a0c8777eaf3750cfb4116f2448232a8.jpg
    45.8 KB · Views: 0
  • af9e6443fa9f3946ed1b7b811624f833.jpg
    af9e6443fa9f3946ed1b7b811624f833.jpg
    361.4 KB · Views: 0
  • 2b9afd33b40dfa3c6dfd041cd5ab8ff6.jpg
    2b9afd33b40dfa3c6dfd041cd5ab8ff6.jpg
    275.3 KB · Views: 0
  • 105455d907769b0c7f00f5bb8353ef0d.jpg
    105455d907769b0c7f00f5bb8353ef0d.jpg
    342.8 KB · Views: 0
  • 2edd578d12d1f0701599bb9e9cd1950d.jpg
    2edd578d12d1f0701599bb9e9cd1950d.jpg
    399.9 KB · Views: 0

chaosracing

Well-known member
Joined
Nov 14, 2015
Messages
585
Location
Kutztown, Pa
No reason to keep the lower ceiling. Header over a closet door even though non load bearing shows whoever built the house did it properly. It was what they did back in the day before builders got cheap.
If it was my house, I would ditch the shower pan and start over with new stuff.
 

jd_1138

Well-known member
Joined
May 8, 2013
Messages
17,045
Location
NE Ohio
I remember we had the pink tile growing up in the thr 50s. We were big time!

I think the sales brochures of the era would've described it as "salmon" in color. I guess I'm a bore. I'd pick off white for a bathroom, maybe black and white subway tile.

A friend gave up on tiling his bathroom and asked me to finish it. I did so, but I felt the tiling design choice was bizarre -- cream in color with 2 inner black squares. I felt like saying "um, 1981 called and they want their tile back".

But I said nothing and just finished the job. :beer: It's now a rental, and he bought a different house.
 
Last edited:
OP
M

mattblast

Well-known member
Joined
Jan 30, 2013
Messages
784
Location
Bridgewater, NJ
Took the drop ceiling and closet out.

a4f9dd6d247bc87e936db711c5d85888.jpg

778f8247912c427391517adbe4f3a309.jpg

I’ll have to secure the side wall of the shower to the joists as it is now loose without closet there.
 

Attachments

  • a4f9dd6d247bc87e936db711c5d85888.jpg
    a4f9dd6d247bc87e936db711c5d85888.jpg
    308.8 KB · Views: 0
  • 778f8247912c427391517adbe4f3a309.jpg
    778f8247912c427391517adbe4f3a309.jpg
    345.7 KB · Views: 0
Last edited:

Falcon67

Well-known member
Joined
Jun 11, 2009
Messages
18,371
Location
Merkel, TX
X2 on removing the lower ceiling - but I'd put back a insulation contact compatible can with a dimmable LED, just because. We have a huge master shower - 36 w x 72+ with a skylight and I'd much prefer a couple of LED cans vs that skylight. It's just not that much light. The sky light is fun in winter - warm shower, dry almost all off then a ice cold condensate drip hits you in the back...
 
OP
M

mattblast

Well-known member
Joined
Jan 30, 2013
Messages
784
Location
Bridgewater, NJ
If it was my house, I would ditch the shower pan and start over with new stuff.


I was debating if it should stay or go and your post pushed me in the right direction.

The drain was filled with oakum and lead. Usually you can chisel out an inch then pry the rest of the lead out but because of a lip at the edge of the drain it had to be chisled bit by bit.

e7f8f7691cb58e10fa3d0bc91781de80.jpg

Got a lot of lead.
ec5caf4ebb9fa0d2d6a057a372a7b3cf.jpg

And the results
93a788ed147f13fa852264e1e7658735.jpg
 

Attachments

  • e7f8f7691cb58e10fa3d0bc91781de80.jpg
    e7f8f7691cb58e10fa3d0bc91781de80.jpg
    357.6 KB · Views: 0
  • ec5caf4ebb9fa0d2d6a057a372a7b3cf.jpg
    ec5caf4ebb9fa0d2d6a057a372a7b3cf.jpg
    310.4 KB · Views: 0
  • 93a788ed147f13fa852264e1e7658735.jpg
    93a788ed147f13fa852264e1e7658735.jpg
    283.9 KB · Views: 0

C_F

ALLIANCE MEMBER
Joined
Jan 21, 2005
Messages
9,675
Location
Utah...SNOW BLOWS!
Melt that lead down & make bullets! :thumbup: Also, it's really lucky you caught the problem when you did, before of the water caused an arc at the light & started a fire.

Looking forward to your continued updates. :beer:
 

Marctrees

Well-known member
Joined
Mar 5, 2015
Messages
6,265
Location
TX/LA border - Toledo Bend
Matt - So now you have that romex tail hanging w the old shower light.

Rather than delete that entire switch leg.. consider re purposing it to a new location where it will reach for a new light.

If you want to re use the tail for a new shower light.. I'm not sure what current Code is on that.


Marc
 
Last edited:

johnnyradiant

Well-known member
Joined
Mar 27, 2017
Messages
833
Location
Vancouver, BC
Schluter walls or cement board painted with Red Guard?

Good call on the base. Take your time seating the new one and then make sure you give it a nice cardboard skin so you don't chip your new base putting everything back together.

One of our recent bath remodels had the clients do their shower walls in solid surface. Can't remember if it was Corian or another line, as that part was between the clinet and the countertop people. Because they were working with one piece per wall extra time was spent making sure everything was plumb and square. I'm glad my wife just wants tile 'cause our 110 yr old house doesn't know what plum and square is and getting things around our new shower was trying enough to get it close enough.
 

chaosracing

Well-known member
Joined
Nov 14, 2015
Messages
585
Location
Kutztown, Pa
Schluter walls or cement board painted with Red Guard?

Good call on the base. Take your time seating the new one and then make sure you give it a nice cardboard skin so you don't chip your new base putting everything back together.

One of our recent bath remodels had the clients do their shower walls in solid surface. Can't remember if it was Corian or another line, as that part was between the clinet and the countertop people. Because they were working with one piece per wall extra time was spent making sure everything was plumb and square. I'm glad my wife just wants tile 'cause our 110 yr old house doesn't know what plum and square is and getting things around our new shower was trying enough to get it close enough.

My dad just did that with his shower stall. They custom cut the pieces to fit the walls, even if out of level and plumb. His guy came out with a laser measuring system and got it that way. Very nice and clean install. Makes it very easy to keep clean.
 
OP
M

mattblast

Well-known member
Joined
Jan 30, 2013
Messages
784
Location
Bridgewater, NJ
After leaving the tile covered drywall outside for the week (in the rain) the tile was easy to pop off.

Here is the harvesting process.

828be4c9c30344c5e72d3c1c2ac0c1a1.jpg
Scraper with a few taps of a hammer then pry up. Tile either came off cleanly or snapped in half. I saved about 80%

Here’s what I recovered.

318b2309131334973f8f5faa9f87a2eb.jpg

Then I took another trip to my work dumpster to dump the final load of debris (any new debris will go out with normal trash)

Last task of the day was to tear off the old fiberglass and replace it with rock wool. I hate this step. It’s itchy to work with but I wanted to get it all done in a sitting so I can shower and be done with it.

The hard part was filling in the corners which originally had no insulation. On one I just pushed the rock wool in with a putty knife and it took about 30 mins to fill it up bit by bit. The other was a double 2x4 cavity so I drilled some holes and filled them up with larger pieces the used the putty knife to push it to the bottom. Went much faster.

0e6fce1f7cb4b1dda2d5997a1490500c.jpg
This is the wet wall between the two upstairs bathrooms.

b7cf24adc157d73aa209c2090f21f03c.jpg
Had to pull out an extra 2x4 which was used to support shower door.

ad4e5a9350a7152a7f216355502f36d7.jpg

Tomorrow I’ll shave high studs and fur out low ones and level the ceiling if all goes according to plan. Plus secure shower wall to ceiling joists.
 

Attachments

  • 828be4c9c30344c5e72d3c1c2ac0c1a1.jpg
    828be4c9c30344c5e72d3c1c2ac0c1a1.jpg
    392.7 KB · Views: 0
  • 318b2309131334973f8f5faa9f87a2eb.jpg
    318b2309131334973f8f5faa9f87a2eb.jpg
    420.4 KB · Views: 0
  • 0e6fce1f7cb4b1dda2d5997a1490500c.jpg
    0e6fce1f7cb4b1dda2d5997a1490500c.jpg
    326 KB · Views: 0
  • b7cf24adc157d73aa209c2090f21f03c.jpg
    b7cf24adc157d73aa209c2090f21f03c.jpg
    320 KB · Views: 0
  • ad4e5a9350a7152a7f216355502f36d7.jpg
    ad4e5a9350a7152a7f216355502f36d7.jpg
    372 KB · Views: 0
OP
M

mattblast

Well-known member
Joined
Jan 30, 2013
Messages
784
Location
Bridgewater, NJ
Made a bunch of drywall shims from some 0.050” thick chipboard cut into 1-1/2” strips. No one in NJ/PA seems to stock these so I made them myself.

6543a882d5bed526187344be5eaa53ce.jpg

High spots were power-planed and low spots were shimmed. Makes for a much flatter drywall install.

dea02fbe5575190ab3d55a6d95718ddd.jpg

One stud was bowed out 1/8”!

43540104d18c009392ce9df461384c74.jpg

All joists and studs are now aligned except for the inside of the closet which was heavily bowed on outside and needs 1/4” of shims on the inside. I’ll probably just sister on a 2x to give a new nailing surface (or perhaps I’ll just replace the 2 bad studs).

While doing the electrical work I noticed that the bathroom light circuit is now a dedicated 15a circuit. I may end up cutting that line and tying the lighting into the dedicated outlet circuit (and run 12g to the lights)
 

Attachments

  • 43540104d18c009392ce9df461384c74.jpg
    43540104d18c009392ce9df461384c74.jpg
    277.6 KB · Views: 0
  • dea02fbe5575190ab3d55a6d95718ddd.jpg
    dea02fbe5575190ab3d55a6d95718ddd.jpg
    282.3 KB · Views: 0
  • 6543a882d5bed526187344be5eaa53ce.jpg
    6543a882d5bed526187344be5eaa53ce.jpg
    347.7 KB · Views: 0
To avoid these ads, REGISTER NOW!
OP
M

mattblast

Well-known member
Joined
Jan 30, 2013
Messages
784
Location
Bridgewater, NJ
And the medicine cabinet framing. It designed so that I need a 2” spacer from the wall to the vanity to be centered.

f4ef069ffc1c00c5a9b9b33fa187d69a.jpg

That’s all for tonight.
 

Attachments

  • f4ef069ffc1c00c5a9b9b33fa187d69a.jpg
    f4ef069ffc1c00c5a9b9b33fa187d69a.jpg
    335.9 KB · Views: 0
OP
M

mattblast

Well-known member
Joined
Jan 30, 2013
Messages
784
Location
Bridgewater, NJ
Got the rough wiring done and a few odds and ends such as fire stopping and foam insulation around the window.

bb8518e20dc61d4f42bc038381c34cec.jpg

Exhaust fan enclosure. Last bathroom I used a style that doesn’t require access to framing (remodel) and it has a wide lip at the bottom edge that makes it harder to drywall to. This new construction style is better. And no sharp edge to get cut on.

e01f0807b12c43301cf57eafbb4239b7.jpg
Fire stopping of 2” hole with a wooden plug and fire stop caulking.

f5bd29c1e3645b65dd37c1f2c06a0bd5.jpg
Window insulated with low expanding foam.

1fad0b869e05b5a54ec4b64960110c0b.jpg
Temp light wiring. All rough wiring is done and I left wire long until I decide on switch position. (3 gang)

Have to install two studs in back of shower and vapor barrier then I’m ready to drywall.
 

Attachments

  • 1fad0b869e05b5a54ec4b64960110c0b.jpg
    1fad0b869e05b5a54ec4b64960110c0b.jpg
    334.8 KB · Views: 0
  • f5bd29c1e3645b65dd37c1f2c06a0bd5.jpg
    f5bd29c1e3645b65dd37c1f2c06a0bd5.jpg
    59.7 KB · Views: 0
  • bb8518e20dc61d4f42bc038381c34cec.jpg
    bb8518e20dc61d4f42bc038381c34cec.jpg
    301.8 KB · Views: 0
  • e01f0807b12c43301cf57eafbb4239b7.jpg
    e01f0807b12c43301cf57eafbb4239b7.jpg
    299.8 KB · Views: 0
OP
M

mattblast

Well-known member
Joined
Jan 30, 2013
Messages
784
Location
Bridgewater, NJ
Things didn’t go as quickly as I planned. The two walls of the shower were out of plumb by 1/2”-3/4” and that would have made tiling difficult. Plus the glass shower door wouldn’t look very good with a big gap on top.

So I took down the wall between the shower and closet and started to reframe it.

b1cf1e753f920758b6ebe6f15da324d9.jpg

7c8944e849f7b65c2e45f79cc4de0018.jpg

And the exterior wall was shimmed with tapered strips of 2x4 and now it’s within 1/16” of plumb.

4a4cc42e2af8bce1e829971808e567e0.jpg

Plan is to complete framing and put drywall ceiling in place tomorrow.
 

Attachments

  • 4a4cc42e2af8bce1e829971808e567e0.jpg
    4a4cc42e2af8bce1e829971808e567e0.jpg
    268.6 KB · Views: 0
  • 7c8944e849f7b65c2e45f79cc4de0018.jpg
    7c8944e849f7b65c2e45f79cc4de0018.jpg
    285.8 KB · Views: 0
  • b1cf1e753f920758b6ebe6f15da324d9.jpg
    b1cf1e753f920758b6ebe6f15da324d9.jpg
    284.4 KB · Views: 0

spoonsports86

Well-known member
Joined
Feb 11, 2014
Messages
274
Location
raleigh nc
Forgot to show the “best” part. The hide away toilet paper holder!925f823aebdcb97c09ad6feb6fd9ba74.jpg

Plus a hide away toothbrush/soap/cup holder

ec5bcad03f4c1baa6dcabf4298d0d114.jpg

a11f70c3d1285631b5344cd0e0617163.jpg

(I recently sold the two from the hall bath on eBay for about $50).

those are awesome... you selling them?

also bath remodel is coming out great
 

Attachments

  • a11f70c3d1285631b5344cd0e0617163.jpg
    a11f70c3d1285631b5344cd0e0617163.jpg
    56.9 KB · Views: 0
  • ec5bcad03f4c1baa6dcabf4298d0d114.jpg
    ec5bcad03f4c1baa6dcabf4298d0d114.jpg
    44 KB · Views: 0
  • 925f823aebdcb97c09ad6feb6fd9ba74.jpg
    925f823aebdcb97c09ad6feb6fd9ba74.jpg
    32 KB · Views: 0
OP
M

mattblast

Well-known member
Joined
Jan 30, 2013
Messages
784
Location
Bridgewater, NJ
Finally got some time tonight to work on the bathroom. Got the new framing up and it’s perfectly plumb.

938f5cfc75ffb78ee04fc718670a6392.jpg

My toenailing with a pneumatic nailer needs to be improved. It’s good enough for this wall but half the toenails ended up at the wrong angle or they stick out a bit and need to be hammered in. I just can’t seem to get the hang of it.

17c410b38de1e44ea46b6b554a14f7de.jpg

And to the question in the previous post - these will eventually end up for sale on eBay.

Hoping to pick up 2 sheets of drywall for the ceiling and the shower valve tomorrow so I can get an early start Saturday.
 

Attachments

  • 17c410b38de1e44ea46b6b554a14f7de.jpg
    17c410b38de1e44ea46b6b554a14f7de.jpg
    271 KB · Views: 0
  • 938f5cfc75ffb78ee04fc718670a6392.jpg
    938f5cfc75ffb78ee04fc718670a6392.jpg
    292.2 KB · Views: 0
OP
M

mattblast

Well-known member
Joined
Jan 30, 2013
Messages
784
Location
Bridgewater, NJ
Yesterday was very productive. A buddy from work came by and helped me get a load of supplies from Home Depot, then we brought everything upstairs. Drywall, cement board, compound, and a few odds and ends.

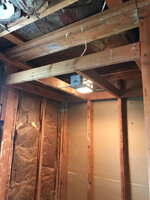
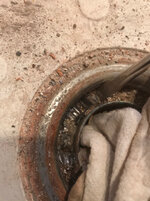
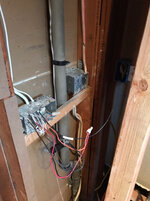
First step was to fix the leaking T at the cold water supply. Then I squared up the cut of the sink drain line and soldered on a trap adapter.

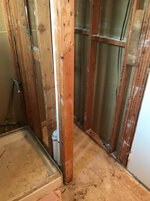
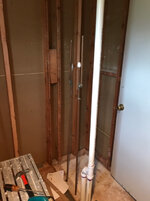
I added the backer boards where the drywall meets the cement board and installed a 6 mil vapor barrier.

a30e3f106ca688bfc868baaa63430319.jpg

The first sheet of drywall for the ceiling was exactly a 4x8 area and needed a square hole for the exhaust fan. That was the hardest sheet to put up because of the weight and the rest went in easily.

042a6a8f8b518855cf5086cb3d3ea024.jpg

I skipped lunch and had to stop with 1 sheet to go at dinner time.

04206639dc1768050bd1c60a99e7ce8c.jpg

I’ll get that last sheet up this morning (there is one other small sheet needed in the wall of the closet but that will wait until the shower valve is installed).

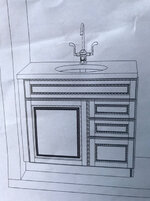
After the valve and closet drywall is up, then I am mostly at a standstill until the shower pan arrives. I can’t install any cement board in the shower or on the floor without it. That gives my wife and I time to pick a vanity and tile and get them in order. The last vanity took about 4 weeks to come in. I need a 22”x36” unit and prefer a custom one rather than stock.

The house is a mess with tools everywhere. So a big part of today will be getting everything down to the garage and putting it away.

aef619ec1c84656926906ec7e8d7e727.jpg

Most of these tools are no longer needed, or won’t be needed until much later.
 

Attachments

  • 042a6a8f8b518855cf5086cb3d3ea024.jpg
    042a6a8f8b518855cf5086cb3d3ea024.jpg
    232 KB · Views: 0
  • a30e3f106ca688bfc868baaa63430319.jpg
    a30e3f106ca688bfc868baaa63430319.jpg
    273.8 KB · Views: 0
  • 04206639dc1768050bd1c60a99e7ce8c.jpg
    04206639dc1768050bd1c60a99e7ce8c.jpg
    280.7 KB · Views: 0
  • aef619ec1c84656926906ec7e8d7e727.jpg
    aef619ec1c84656926906ec7e8d7e727.jpg
    426.2 KB · Views: 0
OP
M

mattblast

Well-known member
Joined
Jan 30, 2013
Messages
784
Location
Bridgewater, NJ
Got the shower valve plumbed. The body of the valve was removed during soldering to prevent any heat damage.

90663d4f136dd9be2502738ec1620693.jpg

The crazy thing is that the valve is identical to the one used for a bath but you need to cap the spout hole. The only indication you need to do this is buried in the pictograph instructions with a small note that the cap is not included.
 

Attachments

  • 90663d4f136dd9be2502738ec1620693.jpg
    90663d4f136dd9be2502738ec1620693.jpg
    309.6 KB · Views: 0

Marctrees

Well-known member
Joined
Mar 5, 2015
Messages
6,265
Location
TX/LA border - Toledo Bend
mattblast -

Very knowledgeable skillful work, and documentation.

Definitely above average.

Realizing the need for the shimming, stuff like that.

Sloppy non caring workman would not even think of those important details.

You learned somewhere.

Great job !!

What do you do for work ?

Marc
 
OP
M

mattblast

Well-known member
Joined
Jan 30, 2013
Messages
784
Location
Bridgewater, NJ
Just paid for the vanity. It’s going to be about 4 weeks before it arrives.

3e73cdd093991f326d991503aa1bdd50.jpg

Full overlay. Soft close full extension drawers. Cherry Kraftmaid brand. Plywood construction.

40a1f65f8f4a15ed4ff53e73c472f323.jpg

Ended up running about $900. So far I’m just under $2000 and that includes the not yet installed cement board.

I wasn’t going to order it today but as my wife and I sat down with the designer we learned it was the final day or 20% discount.
 

Attachments

  • 40a1f65f8f4a15ed4ff53e73c472f323.jpg
    40a1f65f8f4a15ed4ff53e73c472f323.jpg
    333.4 KB · Views: 0
  • 3e73cdd093991f326d991503aa1bdd50.jpg
    3e73cdd093991f326d991503aa1bdd50.jpg
    315.7 KB · Views: 0

Marctrees

Well-known member
Joined
Mar 5, 2015
Messages
6,265
Location
TX/LA border - Toledo Bend
Kraftmaid is verry nice..

But I am still shocked about $900 for a 3' vanity relatively basic, no matter how nicely made.

$900 NO **** ?????

I'm assuming that is just the cab, no top or sink.

Marc
 
OP
M

mattblast

Well-known member
Joined
Jan 30, 2013
Messages
784
Location
Bridgewater, NJ
Great job !!

What do you do for work ?

Marc


Thank you. This is bathroom remodel #6 - all were complete gut jobs over the last 15 years. 3 in the last house and now 3 in this house.

Technically I’m head of purchasing but I also do IT and technical support / training for CAD/CAM software and hardware. It’s a small company and I wear a lot of hats. Over the years I’ve collected a full assortment of tools and skills and it helps that I find it fun to tear into a project.
 
OP
M

mattblast

Well-known member
Joined
Jan 30, 2013
Messages
784
Location
Bridgewater, NJ
I'm assuming that is just the cab, no top or sink.


Just the cabinet. I could build it for a lot less and that includes the cost to buy an old shaper and a set of rail & stile knifes and premium hardware. It would have been about $400 in maple with a more basic door style but this is the master bath so we splurged!

It does bother me that it costs so much. The plywood upgrade alone was $150 in the cabinet. I’m saving thousands in labor so in the end it’s not a big deal. I figure it will end up around $4000 total but would be closer to $12,000 had I hired a “pro”.
 

Marctrees

Well-known member
Joined
Mar 5, 2015
Messages
6,265
Location
TX/LA border - Toledo Bend
"Technically I’m head of purchasing but I also do IT and technical support / training for CAD/CAM software and hardware. It’s a small company and I wear a lot of hats. Over the years I’ve collected a full assortment of tools and skills and it helps that I find it fun to tear into a project."

Now, THAT is funny..

Often, seems usually, one in your postion would not even know what a Lug Wrench is.

VERY knowledgeable GJ'r, VERY multitalented.

Marc
 

LXCam

ALLIANCE MEMBER
Joined
Apr 23, 2013
Messages
19,105
Location
AZ
Matt, looking great bud. And good thing you plumbed up the shower wall. I just finished my project from hell and like you had a substantial waiting time on the shower base. When I ordered my frameless enclosure I elected to use their base to save me some time and effort since everything had to be perfectly square and true or the frameless glass kit wouldn't work. Well what was supposed to be 2 weeks turned into almost six. Hopefully you don't go thru the same BS.

My biggest PITA was getting the framing dead nuts on since the shower butted to a exterior wall that had a 3/4" bow in it AND the adjoining wall wasn't square to it. So I elected the straight cut both 2x6 and 4x12 for my backing and sister the old studs. This forced me to thicken the exterior wall an inch so I didn't have a jog in it and the other wall I was able to clean up the squareness. Looking at my floor tile you'd never have a clue I did it.

In the end it was worth alllll the effort. Keep up the great work.

IMG_5996.jpg

IMG_6319.jpg

IMG_6573.jpg

IMG_6649.jpg
 
Last edited:

Marctrees

Well-known member
Joined
Mar 5, 2015
Messages
6,265
Location
TX/LA border - Toledo Bend
matt -

You may legitimately have bigger fish to fry than to chase after saving a few hundred..

But wouldn't a local custom kitch cab shop be like 50% ?

Or, I may be living in the past.

Seriously, I dunno..

Just sounds crazy high.

Marc
 

LXCam

ALLIANCE MEMBER
Joined
Apr 23, 2013
Messages
19,105
Location
AZ
VERY nice LX.

Did you do the shower tile ?

Marc


Ya I did it and thanks. Was the first time cutting glass though, that was a learning curve. Those sheets only came like this.

IMG_6444.jpg

So I had to cut all the half and quarter pieces.

IMG_6449.jpg


The other hint I'd offer up matt is backing for towel racks and such. In my case the wife couldn't make up her mind what size and where. I just didn't have time for that nonsense so I covered myself for any option. ;).

IMG_6337.jpg

I'd also suggest bedding the pan in mortar if you hadn't considered it. It makes all the difference in the world stopping any kind of movement

IMG_6389.jpg

IMG_6392.jpg
 
Last edited:

Marctrees

Well-known member
Joined
Mar 5, 2015
Messages
6,265
Location
TX/LA border - Toledo Bend
Yup, the meat backing is a minor yet major good thinking.

WAYYY better than toggle bolts or plastic anchors.

I've done alot of custom Fab work, but never laid tile.

O YAAA, now I remember...

When I was a Young Pup and working as Maintenance Electrician just out of School, Dunwwody in MN...

Living in the Iron Range of MN..

Working at a Taconite steel ore processing plant..

Dang 450' x 90' REAL live Sand beach..

Re doing a 3 season cabin..


Putting those varied size old school rectangle slate pieces in a front hall..

Decided to make the grout line wider than standard..

What a silly Goose idea..

Understand ?

The different rectangle sizes are made to fit together ONLY with a particular grout width...

Figured out a total mistake shortly after I started...

Was young and foolish.

Now, just Old and Foolish.

But I have learned...

Some anyway.

Marc


Marc
 
Last edited:

LXCam

ALLIANCE MEMBER
Joined
Apr 23, 2013
Messages
19,105
Location
AZ
Yup, the meat backing is a minor yet major good thinking.

WAYYY better than toggle bolts or plastic anchors.

Marc

Marc you have no idea. The wall buts up to another bathroom so it's loaded to the hilt with plumbing. I always cussed mounting anything on it because ya were never certain what you might hit. Some AC plywood ended that bs.

Looks like a blueprint for a Nukelar reactor !!!

Marc

Haha, ya that template was for the shower drain and crapper. It also tripled as my square gauge for the walls when framing.
 
To avoid these ads, REGISTER NOW!
Top Bottom