OP
86turbodsl
Well-known member
Looks like bulletin 16, which does cover my machine, but is not really an instruction manual. The army manual at vintagemachinery does have some in it, but it's not exact.

")
Haha! Yeah I'm sure my lathe wouldn't even grunt as it yanked my whole body into it and threw me across the room or worse.
I don't take my hands off the controls unless the spindle is stopped. With exception of the tool post being out of the way and a file at slow speed.
Sent from my LG-TP450 using The Garage Journal mobile app
Anybody know what the lever does? Doesn't appear to do anything. I am also ecstatic to report my tailstock is no longer frozen. It spins a full 360 degrees.
Pb blaster is working!
Sent from my LG-TP450 using Tapatalk
A suggestion for you. Buy a 7/8” triangular, and also a 5/8” round carbide insert paint scraper.
Wooo. Subscribed! I really love American lathes, especially the pacemaker. I'd put them up against the best, even Monarchs. I saw a 20" short bed on gov deals for for $600. It hurt me, but I certainly don't have the means for a 9klbs lathe right now. I do have to ask how it's a 50hp shop with only a 20hp phase converter though.
As others said, should be the quill lock. Use it with a tailstock center.
-Mild disagree. The best way to get rust off the ways, that I've found, is a simple razor blade. Use whatever handle or holder you want, and toss it when the edge chips or feels dull. I cleaned up a lathe slightly bigger than that with about half a dozen blades all told.
After the blade scrapes off the heavy stuff, Scotchbrite cut into small squares and lubed with WD-40 works great to scuff off the rest of the rust and bring back a little shine.
Yeah, we're always told never to use abrasives on ways, but in this case, the rust has itself already done more damage than something like Scotchbrite could do even if you had a steam-powered elbow.
And don't be afraid to use sandpaper on noncritical surfaces to bring back a little shine.
When I rebuilt mine, I used a little of everything. Vinegar for rust removal, sandblasting, Scotchbrite wheels, electrolysis, needle scalers for paint removal, wet-dry sandpaper, razor blades, Naval Jelly, you name it.
(If you wanna root through that thread, I also had to repair several levers, replace or repair both cross slide and compound handles, repair a couple of gears and make two more from scratch, replace the tailstock handwheel, replace the entire compound, etc, etc.)
Doc.
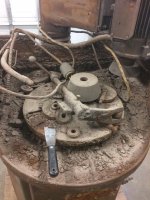
As far as the chuck, I wonder if it had the threads bolted on with those 3 holes somehow. I would think that the bolts would have to go down through the ring as close as they are to the center hole. Weird.
I bought a brand new 3 jaw for mine that is a plain back so I need to decide whether to remove the backing plate from the old one or make a new one or buy one. I have not found a new one for any less than what I paid for the lathe, so rather not do that.
I'll go check it out, but i'm really hesitant to use abrasives on the ways. For obvious reasons. I don't know you ever get them back out again. Then it's basically running down the clock until full grind time.
OccupantRJ - nice transformation!
I'll go check it out, but i'm really hesitant to use abrasives on the ways. For obvious reasons. I don't know you ever get them back out again. Then it's basically running down the clock until full grind time.
Actually this lathe does not have removable ways. That was only on the later modelsI doubt I'd worry too much about scotchbright or a brass wire wheel or something on ways that large. The one huge advantage you have is that your ways are removable unlike every other lathe ever. So grinding is now trivial. If I found significant wear, I would try to find a longbed lathe being scrapped, and steal the end of the ways. Those will likely be like new.
The one huge advantage you have is that your ways are removable unlike every other lathe ever. So grinding is now trivial. If I found significant wear, I would try to find a longbed lathe being scrapped, and steal the end of the ways. Those will likely be like new.
I'll go check it out, but i'm really hesitant to use abrasives on the ways.
-Unfortunately, it doesn't work like that.
"Replaceable" ways still have to be re-ground back to spec when new ones are installed. All the replaceable version gets you is the ability to go back to factory dimensions after a regrind, rather than being undersized.
-Besides the fact that rust is, itself, an abrasive, and the rust pits can and do hold more gunk and grit than can possibly be "embedded" in the cast iron itself, the general rule of thumb is that a grit used between two surfaces will embed in the softer of the two.
To make a cast iron lap, for example, you use a hardened steel bearing as a roller to embed the grit into the iron. Copper laps are commonly used to precisely and finely finish things like small master cylinder bores and the like- the softer copper holds the abrasive, rather than the iron bore.
When using sandpaper or Scotchbrite on cast iron, the paper backing or plastic mesh is of course considerably softer than the iron, making it very difficult to embed any.
Doc.
Made from a cast-iron mixture containing 40% steel scrap and other ingredients, which produced a semi-steel of approximately 40,000 pounds tensile strength, the bed had detachable V-ways, of solid tool-steel, hardened to approximately 60 Rockwell C, and ground to gauge tolerances for interchangeability with replacement units.
Tell me about this pony start set up?
I may have a deal on a 30hp converter and my shop has 200 amp service.
I`ve a 10 hp now but it`s not enough to power up Chomper.
Are you sure? So you'd still have to remove the whole headstock and grind it in? That seems like a waste of money to even swap them then. Who cares if the carriage is dropped by 20 thousands?
Edit: I had be thinking that due to the literature I'd read, which seems to support my case.
http://www.lathes.co.uk/pacemaker/
My understanding was the early ones did not have replaceable ways at all. And the later ones, it was optional. I know mine definitely does not have the replaceable ones.
Are you sure? So you'd still have to remove the whole headstock and grind it in?
Who cares if the carriage is dropped by 20 thousands?
Edit: I had be thinking that due to the literature I'd read, which seems to support my case.

It's a WEG 20hp motor connected by belt to a clutch driven by a 2hp single phase motor. I used the clutch so i could automate it and keep friction low. You can just connect a single phase motor to a 3 phase motor. You start the small pony and then throw the contactor for the 3 phase in when its up to speed. It drops starting load current a ton.
I've heard of this method quite a bit. Do you have the big motor on a magnetic starter? The only issue I've heard about is in the event of a short power outage the big motor could burn up when it comes back online if not turned off. Or does the little motor run full time? Also you still need capacitors for the full 3 phase power to fix the power factor, right?
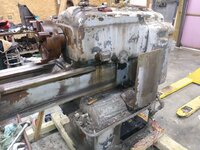
Pulled the switch gear off the backside and now i can see the original motor was a 7.5hp westinghouse. That's gone and in it's place is a higher rpm 10hp motor.
I also found 3 layers of paint on it.
)I think this was probably on a navy ship at some point, it looks like a navy grey.
-Ditto. Mine had some unknown-HP motor, that according to the old photos, was at least half again bigger than the one that's in it. When I got it, it'd been replaced by a modern 10HP Emerson.
The old motor, like yours, was very likely an 1140RPM unit. The replacement 1725 of course turns everything half again faster.
I don't mind the higher speeds, so I'm probably going to make a new plate that reflects the actual spindle speed. I'll be using a giant VFD to power it, so assuming I need to get back down to the original super-slow speeds, I can just dial the VFD back by 30-40%.
-Pretty much all machines of this vintage have changed hands and/or been repainted multiple times. Mine had at least three colors on it, but I was lucky enough to find what I was reasonably sure was the factory dark grey under one of the data plates. Turned out the alkyd enamel I was already using was very nearly the exact same color.
(Not that anyone anywhere cares about a "correct restoration" on these things.
-Quite possible. The US Government back in the day used mostly Monarchs, but also had a significant number of LeBlonds, Lodge & Shipleys, DSGs and others.
If it actually saw use on a ship, though, you should run across an anchor stamp, or other Navy emblem. Possibly a riveted brass tag that literally says "Property of the US Navy" or something like that.
While mine was made during WW2 (1943) I have no idea the wartime history of it. I did find evidence it once had a "war production board" tag, so I plan on making a reproduction tag and affixing it in the correct spot.
Doc.


Everything on mine is automated by my plc. Order of operation is lock clutch, spin up single phase motor, check rpm, at 1800, disengage clutch and spin down single phase, engage 3ph. As the big motor is already spinning near unity, there's a slight current inrush as the power is applied because you have to build the magnetic flux in the motor. But is nowhere near the 7X nameplate rating that is typical of a 3ph motor start.
I currently do not have phase capacitors. I would like to add some though, and do some phase voltage monitoring too. It's a work in progress. I have nearly everything to wire the whole shop for 3ph right now, but haven't done it yet.
Pulled the switch gear off the backside and now i can see the original motor was a 7.5hp westinghouse. That's gone and in it's place is a higher rpm 10hp motor. I need to put a tach on it and make sure they changed the pulley. Being it's a 5 sheave, it's unlikely they changed it. I may be on the hunt for a 6 pole 7.5 hp motor. I also got the feed/threading lever unstuck. All that remains at this point is the carriage to work on.
I couldn't get the cross slide gib to move.
Sent from my LG-TP450 using Tapatalk
B Blaster:: PB Blaster: WD40...I know kroil is better than pb, but it's difficult to find in this area...