To avoid these ads, REGISTER NOW!

American Scale Red Seal 62 Vise Restoration

designer485

Well-known member
Joined
Jan 12, 2010
Messages
547
Location
Orange County, CA
Preview (added after completion) - Before and After:

0Red%20Seal%2062%20%28Before%20and%20After%2014%29.jpg

About this project:
A few months ago, my Dad and Brother were at an estate sale and sent me a photo of this vise attached to a workbench. "Last day, want it for $100...American Scale Red Seal 62". Yep, absolutely. I'm ready for another vise project.

The Plan:
Once again, I will give this one the same spa treatment I have given my past restorations (Desmond Stephan 41P, Desmond Stephan 33S, Wilton Bullet 9300). Disassemble, clean, polish, paint and replace worn / damaged / missing parts. When I picked this vise up, I was shocked how big it was for a 3.5" vise. It absolutely dwarfs my 3in Wilton Bullet. It weighs close to 50lbs and opens to 7in.

American Scale Catalog Page (Extra Heavy Machinists' Vise w/ Swivel Base):
American%20Scale%20and%20Vise%201956_0000-X2.jpg

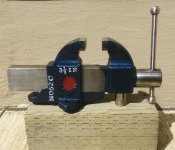
Here is what we are working with...dirty, rusty, but complete and in great shape all things considered. It does have some handmade brass jaws instead of the factory steel jaws, but I will be replacing those, so not a problem. The only real issue is the bend swivel lock handle, but again, not a concern as it will be replaced.

20250603_Tools-D75_4707.jpg

20250603_Tools-D75_4709.jpg

20250603_Tools-D75_4710.jpg

20250603_Tools-D75_4711.jpg+

20250603_Tools-D75_4715.jpg

20250603_Tools-D75_4718.jpg

20250603_Tools-D75_4716.jpg

20250603_Tools-D75_4719.jpg

20250603_Tools-D75_4720.jpg

20250603_Tools-D75_4721.jpg

20250603_Tools-D75_4725.jpg

Jaw opens safely to 7in even though the catalog page says 6in.

20250603_Tools-D75_4726.jpg

20250603_Tools-D75_4727.jpg

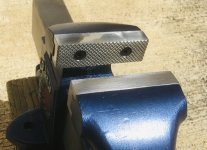
The jaw screws are quite mangled, they will take some work to remove.

20250603_Tools-D75_4728.jpg

20250603_Tools-D75_4729.jpg

Quite a beefy handle for a 3.5" vise.

20250603_Tools-D75_4730.jpg

20250603_Tools-D75_4747.jpg

A few different past paint colors showing through.

20250603_Tools-D75_4736.jpg

20250603_Tools-D75_4737.jpg

20250603_Tools-D75_4738.jpg

Check out the size difference between the Red Seal 62 and the Wilton 9300.

20250603_Tools-D75_4748.jpg

20250603_Tools-D75_4749.jpg

20250603_Tools-D75_4750.jpg

20250603_Tools-D75_4751.jpg

20250603_Tools-D75_4752.jpg

20250603_Tools-D75_4753.jpg

Now, lets take it apart.

20250607_Tools-D75_4754.jpg

20250607_Tools-D75_4757.jpg

The swivel has a replaceable steel insert where it bolts to the main casting.

20250607_Tools-D75_4758.jpg

This vise uses a shaft collar on the main screw to lock it in place.

20250607_Tools-D75_4763.jpg

20250607_Tools-D75_4775.jpg

The main nut uses a bent pin to hold it in place.

20250607_Tools-D75_4765.jpg

The pin can be knocked out from the bottom.

20250607_Tools-D75_4770.jpg

20250607_Tools-D75_4772.jpg

The shaft collar looks to be made from bent flat bar stock wrapped around the screw instead of being machined from round stock.

20250607_Tools-D75_4777.jpg

Now to remove the jaws. All of the screws were mangled and need extraction.

20250607_Tools-D75_4778.jpg

20250607_Tools-D75_4782.jpg

20250607_Tools-D75_4784.jpg

I used a Dremel cut of wheel to create a slot for a large flat blade.

20250607_Tools-D75_4785.jpg

First casualty of the project...bent flat blade tip.

20250607_Tools-D75_4786.jpg

20250607_Tools-D75_4787.jpg

Here are all the parts laid out ready for refurbishment. Time to tackle all of the grease, saw dust, rust and faded paint.

20250607_Tools-D75_4788.jpg

20250607_Tools-D75_4790.jpg
 
Last edited:
To avoid these ads, REGISTER NOW!
OP
D

designer485

Well-known member
Joined
Jan 12, 2010
Messages
547
Location
Orange County, CA
Update, making progress:

I needed to cut the handle off of the swivel lock so that i can replace it and refurbish the bottom threaded portion. It was covered in coats of old paint.

20250713_Tools-D75_6193.jpg

After a quick de-grease and wire wheel session, we are left with the rest of the parts looking like this.

20250713_Tools-D75_6194.jpg

20250713_Tools-D75_6195.jpg

20250713_Tools-D75_6196.jpg

Lots of de-greaser used. This thing is caked in grease and grime.

20250803_Tools-D75_8455.jpg

20250803_Tools-D75_8458.jpg

20250803_Tools-D75_8459.jpg

20250803_Tools-D75_8461.jpg

Stamped "3" on the bottom of the slide. I haven't been able to track down if that indicates a date, a batch number, or just matching a slide to a base.

20250803_Tools-D75_8462.jpg

20250803_Tools-D75_8467.jpg

20250803_Tools-D75_8468.jpg

20250803_Tools-D75_8473.jpg


20250803_Tools-D75_8476.jpg

20250803_Tools-D75_8477.jpg

20260117_Tools-D75_2957.jpg

20260117_Tools-D75_2958.jpg

After a ton of wire wheel work, the casting is almost fully stripped.

20260117_Tools-D75_2959.jpg

20260117_Tools-D75_2960.jpg

20260117_Tools-D75_2961.jpg

I try to knock down all of the sharp edges on the casting with a combination of file and Dremel work.

20260117_Tools-D75_2962.jpg

20260117_Tools-D75_2963.jpg

Not sure why it took me this long to look at the bottom of the main casting, but it is no the best. The casting was rough and the machining did not take it down all the way. It swivels smooth, so it's not a really a problem, but it does not look the best. The positive is that it wont be seen and doesn't affect function.

20260117_Tools-D75_2964.jpg

20260117_Tools-D75_2965.jpg

20260117_Tools-D75_2967.jpg

The top of the swivel lock was quite chewed up. A few minutes with a file and Dremel flap disk made it look a ton better.

20260117_Tools-D75_2968.jpg

20260117_Tools-D75_2969.jpg

I found and ordered a new handle for the swivel lock. It is shorter than the current, but it will still lock down tight after testing.

20260117_Tools-D75_2970.jpg

20260117_Tools-D75_2971.jpg

20260117_Tools-D75_2972.jpg

The new jaws also arrived. Kendrick at https://www.antiquevises.com/ did a great job once again. He turned these around super quick and I am thrilled at the quality. Smooth Heat treated A2.

I sent over a CAD drawing of what I wanted based on the brass jaws that were on the vise. I made these a bit thicker overall.

20260117_Tools-D75_2974.jpg

20260117_Tools-D75_2975.jpg

And they fit perfectly. They are just sitting on the vise right now without bolts snugging them up to each surface.

20260117_Tools-D75_2976.jpg

20260117_Tools-D75_2978.jpg

20260117_Tools-D75_2979.jpg

20260117_Tools-D75_2980.jpg

You can see the size update here:

20260117_Tools-D75_2981.jpg

I really don't like the bent pin holding in the main nut. I tapped the 5/16" hole with a 3/16-18 tap and inserted a socket head cap screw instead. I like this much better.

20260124_Tools-D75_2995.jpg

20260124_Tools-D75_2996.jpg

20260124_Tools-D75_2998.jpg

There was a minor chip on the sliding jaw. I filled it with JB Weld steel stick and filed it smooth.

20260124_Tools-D75_3000.jpg

20260124_Tools-D75_3001.jpg

20260124_Tools-D75_3003.jpg

20260124_Tools-D75_3004.jpg

20260124_Tools-D75_3005.jpg

20260124_Tools-D75_3008.jpg

I decided to paint the inner ring of the swivel base. It would be seen, but it will keep it from rusting. I may also hit the inside of the swivel channel with some cold blue to keep the rust at bay.

20260124_Tools-D75_3009.jpg

20260124_Tools-D75_3010.jpg


Next up - time for paint.
 
Last edited:
OP
D

designer485

Well-known member
Joined
Jan 12, 2010
Messages
547
Location
Orange County, CA
Update: I took advantage of the warm weather this weekend and painted the vise. I used the same RustOleum Professional primer and paint that I previously used on some Rigid pipe wrenches (and really liked the result). It goes on thick and seems to be pretty tough once dried / cured for a week or so.

I started by taping up all the surfaces that need to be bare metal.

20260131_Tools-D75_3012.jpg

20260131_Tools-D75_3013.jpg+

20260131_Tools-D75_3014.jpg

20260131_Tools-D75_3015.jpg

20260131_Tools-D75_3016.jpg

20260131_Tools-D75_3017.jpg

First, a few coats of primer.

20260131_Tools-D75_3018.jpg

20260131_Tools-D75_3019.jpg

20260131_Tools-D75_3021.jpg

20260131_Tools-D75_3022.jpg

20260131_Tools-D75_3023.jpg

20260131_Tools-D75_3024.jpg

Given that this is a "Red Seal" model, I felt like the color had to be red for this one. I contemplated going with a gun blued finish like on my previous Desmond Stephan, but it just felt right to paint it red.

20260131_Tools-D75_3025.jpg

20260131_Tools-D75_3026.jpg

20260131_Tools-D75_3027.jpg

20260131_Tools-D75_3045.jpg

20260131_Tools-D75_3046.jpg

Now to let it cure for the next week or so while I finish up a few last details on some of the other parts. Almost there. I know some like to hide or smooth out the castings, but I like seeing the texture and age / use of these vintage vises. I think it gives them character and keeps some of the history while making it feel "new".
 
To avoid these ads, REGISTER NOW!
OP
D

designer485

Well-known member
Joined
Jan 12, 2010
Messages
547
Location
Orange County, CA
Time for assembly. Here are all the refurbished parts laid out ready to be put back together.

20260215_Tools-D75_3085.jpg

Jaws mounted.

20260215_Tools-D75_3089.jpg

20260215_Tools-D75_3091.jpg

Contact surfaces greased.

20260215_Tools-D75_3092.jpg

I started with mounting the swivel base to the main casting and tightening the swivel lock.

20260215_Tools-D75_3094.jpg

20260215_Tools-D75_3095.jpg

Main nut installed.

20260215_Tools-D75_3096.jpg

I had planned to use a socket head cap screw to secure the nut...I realized after sliding in the dynamic jaw that it hit the head of the screw because the hole was not drilled center originally.

20260215_Tools-D75_3097.jpg

I switched to a button head bolt and that solved the problem. I like the bolt a lot better than the original pin.

20260215_Tools-D75_3098.jpg

I got excited to get this thing finished and didn't take any other assembly photos. I did add a 1/16" thrust washer behind the handle against the main casting. It removed the slop / play and makes opening / closing very smooth.

Complete:

20260226_Tools-D75_3109.jpg

20260226_Tools-D75_3112.jpg

20260226_Tools-D75_3113.jpg

20260226_Tools-D75_3114.jpg

20260226_Tools-D75_3118.jpg

20260226_Tools-D75_3119.jpg

20260226_Tools-D75_3122.jpg

20260226_Tools-D75_3124.jpg

20260226_Tools-D75_3125.jpg

20260226_Tools-D75_3127.jpg

20260226_Tools-D75_3134.jpg

20260226_Tools-D75_3135.jpg

20260226_Tools-D75_3137.jpg

20260226_Tools-D75_3140.jpg

20260226_Tools-D75_3142.jpg

Here are a few before and after shots:

0Red%20Seal%2062%20%28Before%20and%20After%2001%29.jpg

0Red%20Seal%2062%20%28Before%20and%20After%2002%29.jpg

0Red%20Seal%2062%20%28Before%20and%20After%2003%29.jpg

0Red%20Seal%2062%20%28Before%20and%20After%2004%29.jpg

0Red%20Seal%2062%20%28Before%20and%20After%2008%29.jpg

0Red%20Seal%2062%20%28Before%20and%20After%2010%29.jpg

0Red%20Seal%2062%20%28Before%20and%20After%2012%29.jpg

0Red%20Seal%2062%20%28Before%20and%20After%2013%29.jpg

0Red%20Seal%2062%20%28Before%20and%20After%2014%29.jpg
 

Shiftless

Well-known member
Joined
Mar 9, 2014
Messages
14,541
Location
East Bay SFO
Very nice work!
You did a more thorough job on your Red Seal than I did.
I figured since it was a “Red Seal” that I would paint just the red seal part red.
You are absolutely right that size for size, the American Scale vises are among the most heavy duty.
 

Attachments

  • 925D959C-FC03-4EA4-8EFA-8DF8DD866320.jpeg
    925D959C-FC03-4EA4-8EFA-8DF8DD866320.jpeg
    349.7 KB · Views: 4
  • 2EE86AEF-54F7-4059-ABF8-66CB56290B71.jpeg
    2EE86AEF-54F7-4059-ABF8-66CB56290B71.jpeg
    432.5 KB · Views: 4
  • 667D4E8B-35AA-432D-82DE-4D12ED3F022D.jpeg
    667D4E8B-35AA-432D-82DE-4D12ED3F022D.jpeg
    804.7 KB · Views: 4
  • 1C345AB2-6911-455E-9858-FE94005A7CA5.jpeg
    1C345AB2-6911-455E-9858-FE94005A7CA5.jpeg
    668 KB · Views: 4
  • 6B13D0C9-C6FC-4C44-9CB2-006089E1BB4C.jpeg
    6B13D0C9-C6FC-4C44-9CB2-006089E1BB4C.jpeg
    1 MB · Views: 4
  • 9DC0B5A4-E9B5-4CDE-A282-F8AF7B9F4158.jpeg
    9DC0B5A4-E9B5-4CDE-A282-F8AF7B9F4158.jpeg
    490.4 KB · Views: 4
  • DD54318E-0801-42E4-881F-FBECED239597.jpeg
    DD54318E-0801-42E4-881F-FBECED239597.jpeg
    715.3 KB · Views: 5
To avoid these ads, REGISTER NOW!
Top Bottom