ZRX61
Well-known member
Well there's an orphaned one less than two miles away. I mentioned someone may come by & pick it up ")

This looks like a door to the inside so I meant keeping the cold AC from escaping.
 although I'm not sure why anyone would care about that, not like it's youtube.
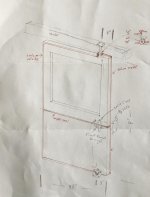
New Dutch door being installed. Build it out of old reclaimed wood that came out of a burnt down flour mill in Oregon.
Wrapped in 1.5” steel angle as to “control” expansion of wood. It pivots 8” from the side and has flanged bearings inset with 1” pivot pins.
Ordered a double pane Evergreen glass that will be inserted within the upper portion.

FartyMarty, on the pivoting Dutch door the best method I have found to seal around the pin is like you said with a doughnut type or “S” seal. As the pivot makes things much more dynamic, I will have molding on the outside of the door where it will seal from the handle side “up to the pin”. From there the molding and seal will be installed on the inside as seen in my original drawing attached.
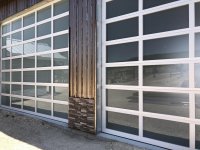
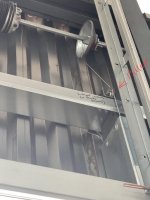
About 95% complete on the vertical garage door installation. Had to totally reengineer the shaft,spring and opener location as it was originally to be installed at the top of the rails in the middle of the second story view.

ZRX61, I will take a ride on the Harley in the morning and pick up the orphan edgehog as it is less than a mile away from the house. We’ll give it a new home and send you pics of our family of hedgehogs and the new addition!
Chance Our Fox Red Lab is now back to a family of three hedgehogs!
Thanks ZRX!
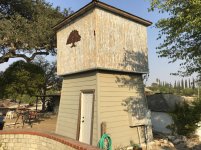
Talking of water towers, there's a really cool looking one just North of the 46 at Whitley Gardens. Looks like a big egg with a hat
But then, that photo was from 2012, so maybe they've updated it?
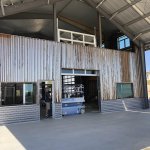
With retirement coming in a few years we decided the time was now to build our dream
4200 sq ft home/shop. The plan originally was to purchase a piece of property now and build after retirement but got the itch and decided to pull the trigger and build a Barndominium on 8.5 acres we purchased in Paso Robles, California.
Working overseas for the past 20 years on a month on month off schedule makes the choice to be an owner builder an easy one. In addition, help from family and friends will make the project move forward more easily.
I wanted to document the build in some way and when running across some GJ member builds during research on the web, I thought what better of a way than to join and post right here!
We started with the grading a couple months back, installed the septic system, well and fencing at the entry to the property. Started with a few pics up to now with more to be uploaded soon.
Looking forward to uploading pics and videos as often as I can as to interact with other members and reduce the headaches that others have already experienced.
Updated video as of August 16, 2020 below:
Nice project I'm an hour south of you in Santa Maria and would love to find a piece of property and build something like this as well. Dream setup
TT you better get out on the pismo Dunes while you still can as rumors are flying once again of closing em down.
The purpose of this Barndo build is to be able to build some big HP toys once I retire.
We hang out at Dumont with our 700hp Tatum Black Widow as often as we can but occasionally at Pismo.
Dumont video:
Not a rumor, they apparently passed the ban last week. Three years left before they close it all down to vehicles.TT you better get out on the pismo Dunes while you still can as rumors are flying once again of closing em down.