To avoid these ads, REGISTER NOW!

Above 1200 Sq/FT Barn Workshop build

Wokspaces above 1200 squarefeet.
OP
U

ururk

Well-known member
Joined
Jan 9, 2010
Messages
739
Location
Southeast MI
Saturday, Mar 19: Spent the day outside, though it was somewhat cold, and I was working with water which didn't help. I had a few tasks today - cut the opening, finish putting in tapcons, trim the 3/4" plywood extensions, double up the side boards around the frame, grind the concrete down a 1/4". I got all of that done:

25635555340_e5c92106e6_z.jpg


25910235386_f1058fc4fb_z.jpg


Test fitting the side boards:

25910212866_c798efdbb6_z.jpg


Coat 1 of 2. I treated all the edges and both side up to 16" or so:

25841184561_c328eb0e6e_z.jpg


25307415223_bef276dafb_z.jpg


Boards removed for preservative treatment, test fit of door:

25841164011_b90b2b6213_z.jpg


Sunday I'll flash the bottom area and install the door in the opening.
 
To avoid these ads, REGISTER NOW!
OP
U

ururk

Well-known member
Joined
Jan 9, 2010
Messages
739
Location
Southeast MI
Sunday, Mar 20: Never, never again will I install a door myself. Then again, I said that the last three times I replaced a hollow-core door inside the house.

I installed the side boards and flashed with a grace product. Since I'm using a 'sill pan' I didn't caulk the entire bottom - just the perimeter. I may have gone overboard on the size of the bead:

25824705722_17cfa5a203_z.jpg


Getting the door frame properly set was a nightmare. I followed the instructions, but the strike side wasn't sealing at the top/bottom. I over did it on the top and the bottom of the door wasn't sealing. After backing out my screws on that side (except the bottom) I was able to move the frame in 1/8" and the door sealed. It was a moment of sheer panic.

25316762233_9eab34489d_z.jpg


25919587136_56dca582fe_z.jpg


Next up: Frame the garage door opening. The door should be installed sometime the week of the 4th. I decided to have the company install it. I'm very sure I could have done the install myself, but I have both safety concerns - charging the coil, lifting the door slat roll - and frankly I just want it done. I have so much more work yet to do, rather than learn a skill I'll never use I think this one time I'll have someone do the install for me.

Oh, and I still have a bit more to do on the side door (foam around the frame, paint the door, inner trim, flash the box, put trim around the inside of the box (Boral), and so forth) - but at this point it is mostly done.
 
Last edited:

BuickFarmer

Well-known member
Joined
Apr 5, 2006
Messages
1,415
Location
Athens, Georgia
Nice looking door, good job on the install! Actually I like installing doors and windows IF I framed out for it and know the dimensions are good and it is all square and plumb. What is the or what is in the wood preservative you used? I usually coat the bottom 24" of studs and bottom plates with Boracare for powder post beetles, termites and mold. I use Timbor test the way up.
Lookin good, loving your build, thank for the update
 
OP
U

ururk

Well-known member
Joined
Jan 9, 2010
Messages
739
Location
Southeast MI
Nice looking door, good job on the install! Actually I like installing doors and windows IF I framed out for it and know the dimensions are good and it is all square and plumb. What is the or what is in the wood preservative you used? I usually coat the bottom 24" of studs and bottom plates with Boracare for powder post beetles, termites and mold. I use Timbor test the way up.
Lookin good, loving your build, thank for the update
Thanks!

I used Woodlife CopperCoat Green Wood Preservative.
 
OP
U

ururk

Well-known member
Joined
Jan 9, 2010
Messages
739
Location
Southeast MI
How did you go about grinding the recess in the concrete? Looks nice
I used a 4" double row diamond grinding wheel/cup. It took several hours, and when everything was said and done - was it worth it? Yeah, but I'd much have rather had the recess pre-formed. I used plastic sheeting to keep dust from getting inside he barn, but dust found its way in along one side.
 

rpenterics

Well-known member
Joined
Jun 7, 2012
Messages
362
Location
SE Michigan
I used a 4" double row diamond grinding wheel/cup. It took several hours, and when everything was said and done - was it worth it? Yeah, but I'd much have rather had the recess pre-formed. I used plastic sheeting to keep dust from getting inside he barn, but dust found its way in along one side.

wow, sounds fun, probably in my future as well - need to replace a door in my barn that was never waterproofed or installed correctly
 
OP
U

ururk

Well-known member
Joined
Jan 9, 2010
Messages
739
Location
Southeast MI
I only had a respirator, safety goggles, and hearing protection. Wear some kind of suit if you don't have the dust under control - I used a bit of water but didn't have it running continuously. It took 4 or 5 washings to get my hair feeling close to normal.
 
OP
U

ururk

Well-known member
Joined
Jan 9, 2010
Messages
739
Location
Southeast MI
Sunday, Mar 27: Since the side door install is mostly done, I've moved onto getting the rolling door opening framed out. Due to miscommunication, I wasn't able to pick up a 4x10 sheet of OSB on Friday, so will have to do that this week. Instead I spent some time sanding the posts where the door rails will be mounted to. They have a bit of black mold/weathering from being in the sun/rain for a month, and they need a bit of TLC. After sanding I sprayed the wood with hydrodgen peroxide - I'm not too sure if I should have treated them before sanding, but hopefully this works. I only did one side - if the mold reappears then I'll do the other side differently (or with bleach).

As I was working I noticed a little puddle of clean water next to the corner of the barn. Well, due to timing and weather I never hooked up my perimeter drain to a discharge pipe. The water pressure was sufficient enough to push water from below the dirt up (site is on a slight hillside). Anyhow I dug out the pipe end and have started digging the trench to put the discharge pipe in. After 30 minutes the water was down to a reasonable level - prior to digging the water was a few inches above the pipe:

26074586595_101869a247_z.jpg


Since I've never done this before, I was slightly worried it wouldn't work. I did a lot of research on the drain assembly, and am happy to report it is working!
 
OP
U

ururk

Well-known member
Joined
Jan 9, 2010
Messages
739
Location
Southeast MI
Saturday, Apr 2: Cold day. Picked up a few sheets of OSB and some lumber for the rolling door opening. I added some additional 2x's to frame out the opening:

25925029000_f0a4e07044_z.jpg


Then built up a sheet to go in front of the 2x's:

26131598211_7fd4d93f6a_z.jpg


Installed:

25925040230_19b5295c6a_z.jpg


This isn't a header per-se - it isn't weight bearing - just needed so the rolling door hood has something to **** against. The rolling door is self-supporting.

I don't have a door install date - once I have it set I'll remove the rest of the OSB closer to the date, until then I'm leaving it alone so that water infiltration is kept to a minimum.
 

Bib Overalls

Well-known member
Joined
Dec 4, 2006
Messages
3,318
Location
Jonesboro, Arkansas
Cutting the concrete to recess the door threshold is something most builders around here would never think of. Concrete guys would never do it without being told what was expected and getting the layout right would be a *****. In short. too difficult to do.

Certainly not the usual and customary way. The threshold in my shop sits on top of the concrete and I trip on it occasionally. Water comes in under it when the wind and the rain conspire to make it happen. If I have to replace my walk door somewhere down the line I am going to get a diamond cup and start grinding.

In other words, a great idea well executed!
 
OP
U

ururk

Well-known member
Joined
Jan 9, 2010
Messages
739
Location
Southeast MI
Recessing the threshold is a very nice detail well executed. If I ever replace my shop walk door I am going to grind some concrete myself.
Thanks! This was a suggestion I got from the internet (I think I got it from here: http://www.greenbuildingadvisor.com...estions/30939/basement-window-and-door-detail). The alternative was a sill pan on top of concrete, but I figured water would creep under the pan.

I would have liked to have ground it further, but the internet (knower of all things) seemed to indicate it didn't have to be very deep to keep water out. I'll find out once I trim the opening and the door is exposed to the elements.

It's funny you mention the builder thing - I tried to explain the concept to my concrete guy but he thought it was silly. I don't do concrete, so wasn't too sure how exactly (if at all) one could even do this while the concrete was wet. It is a good thing I didn't have him do it - I hadn't thought through the door install anyhow, and would have had him incorrectly placed the recess.
 
OP
U

ururk

Well-known member
Joined
Jan 9, 2010
Messages
739
Location
Southeast MI
No real updates this weekend. A Tigers game on Friday prevented the rolling door installer from installing the door yesterday (Saturday). My door knob and deadbolt arrived, but the keycode stamped on the house door key was incorrect - so I had to order a rekey kit and will be rekeying the new door handle set to match. Finally, It has been a nasty weekend - wet, snowy, cold. It's supposed to approach 70 by next weekend (when the door will be installed), so expect some updates each day this week.
 
OP
U

ururk

Well-known member
Joined
Jan 9, 2010
Messages
739
Location
Southeast MI
Monday, Apr 11: Defeat! I have to locate the house drain outlet. I know the general area it is in, but the soil is a bit mucky. I spent about an hour with a soil probe, but haven't located it. The outlet got covered during the original excavation. I need to bury the perimeter drain exit from the barn, and want to co-locate the two pipes in the same area (as well as extend the house drain). I've dug some exploratory ditches, but haven't found it yet.

Any suggestions? I've never used a soil probe before, but I think I have a decent idea of how it works. The target is a 3-4" PVC pipe.
 
OP
U

ururk

Well-known member
Joined
Jan 9, 2010
Messages
739
Location
Southeast MI
Tuesday, Apr 12: I cut out the opening for the door. In the background you can see the mess I made digging up the ground in a vain attempt at locating the house drain pipe:

25793587534_cc787ddcd3_z.jpg


I have some more work to do on the opening - sand the beams above, and once the door is installed install OSB then peel+stick to flash.
 
OP
U

ururk

Well-known member
Joined
Jan 9, 2010
Messages
739
Location
Southeast MI
Wednesday, Apr 13: 50/50 success failure. I rekeyed the deadbolt, but the mfg did not key the door handle cylinder correctly - the keys that came with the lockset did not work in the door handle (sigh, my bad - I didn't test the door handle lock). My house keys didn't work (they shouldn't have). I printed a bump key, but that didn't work either so I'm contacting the distributor. Because of my timeline, I will need to find a way to get the cylinder out.
 
OP
U

ururk

Well-known member
Joined
Jan 9, 2010
Messages
739
Location
Southeast MI
Friday, Apr 15: Sanded the area above the door, cleaned up the mess, and swept the floor. All ready for the door install tomorrow!
 
OP
U

ururk

Well-known member
Joined
Jan 9, 2010
Messages
739
Location
Southeast MI
Saturday, Apr 16: Installers arrived on time, and had it installed in 4 hours. After watching the entire process I realize I could have done everything they did, but it would have taken me three weeks and a lot of hesitation.

First side channel installed:

26468436156_d6de552a35_z.jpg


Curtain:

26402070772_481742b1b3_z.jpg


Done!

26221540360_5b25c3ac2e_z.jpg


26494389005_d82c05ef15_z.jpg


After the installers finished, I located the drain after probing, digging, probing, digging:

25889499444_6c590a0485_z.jpg


And saw this little guy walking in a puddle (about 1.5" in diameter):

26221556730_c39f7b09fa_z.jpg
 
OP
U

ururk

Well-known member
Joined
Jan 9, 2010
Messages
739
Location
Southeast MI
Sunday, Apr 17: No photos - spent the day tidying up the housewrap around the door, and digging ditches. The goal is to have both the house and barn drains meet up and share the same exit area. There is a ton of digging yet to do, but a pick axe and small shovel will hopefully make the work less horrible.

On other fronts, I've been in the process of ordering Ice+Water shield, used XPS foam, and screws for the insulation. It may take me a while to get everything so updates may slow down a bit.
 

matt_i

Well-known member
Joined
Mar 14, 2008
Messages
10,719
Location
SE Michigan
Looks like you are getting it enclosed! I am having issues with birds wanting to nest in my building, with the window and door openings...

If you don't have one, a drain spade, around 6" across, with a short D-handle, will make faster work of digging virgin soil than a round point shovel.
 
To avoid these ads, REGISTER NOW!
OP
U

ururk

Well-known member
Joined
Jan 9, 2010
Messages
739
Location
Southeast MI
Looks like you are getting it enclosed! I am having issues with birds wanting to nest in my building, with the window and door openings...

If you don't have one, a drain spade, around 6" across, with a short D-handle, will make faster work of digging virgin soil than a round point shovel.

Sorry to hear about the birds. I was very lucky not to get nesting birds, as I had a large opening for several weeks. It's all closed in now. When I went to visit a timber frame barn Mike did for a Michigan customer, the customer had to leave the door open all the time because barn swallows had taken up residence - and I swear a bird flew in/out of that barn every 30 seconds.

As for the shovel - will check it out. I have a short handled mini-shovel, and I alternated its use with a full size shovel, but the drain spade sounds like a better choice.
 
OP
U

ururk

Well-known member
Joined
Jan 9, 2010
Messages
739
Location
Southeast MI
any updates?
None at the moment. I didn't document a few small things I've done:

  • Located/extended the house drain, buried it
  • Searched for a metal roofer
  • Got window estimates

I'm getting close to ordering windows, though. I called all over my area to get ballpark window quotes (vinyl, fiberglass). It seems they range anywhere from $200 on up for the same window unit, depending on quality. Lowes offers a bulk purchase discount (depends on # of windows) and had a sale going on (over now). Menard's Crestline/JeldWen were more expensive (only $100 more total) for similarly spec'd windows compared to Lowes Pella.

The holdup has really been a few things - I was out of town for three weeks, and have not been able to find any used XPS foam in the quantity I need. At this point I'm likely going to have to order new material, but will have to downgrade my original plans for the wall assembly - instead of R-30 do R-20, which should be good enough. Menards has had Foamular 150 on sale in the past for $25/sheet (2" 4x8), but right now it is $29. Not too sure if I can wait any longer.

I'm waiting for one quote from a local builder for the insulation - if their price is reasonable I'll have them do the work, otherwise I'll start posting again next weekend as I will move ahead with my original plans.
 
OP
U

ururk

Well-known member
Joined
Jan 9, 2010
Messages
739
Location
Southeast MI
Just a quick update and one question.

I haven't heard back from the builder, so will wait till next week and then move on with my original plan, so to speak. I'm also ready to order the windows, but the sales rep at the lumberyard is off this week so I won't be able to until she gets back.

Tomorrow I'll be sending out bid requests to the three lumberyards in my area - my hope is that with the qty of materials I'm ordering they can give me a % off (one lumberyard said I could open an account, which would give me a discount).

Question: How do I find a place to make custom flashing for me? I've searched the net, but all of the places that come up are located hours away. I'm in the Plymouth/Ann Arbor area, and there have to be a lot of places that can make up what I need.
 

hpw

Well-known member
Joined
Oct 7, 2007
Messages
989
J

Question: How do I find a place to make custom flashing for me? I've searched the net, but all of the places that come up are located hours away. I'm in the Plymouth/Ann Arbor area, and there have to be a lot of places that can make up what I need.

Ask the lumberyard for any recomendations and a quick google search turned this up

https://www.google.com/?ion=1&espv=2#q=Ann+Arbor+michigan+sheet+metal+fabrication

and if they can't help maybe they know someone that does
 
OP
U

ururk

Well-known member
Joined
Jan 9, 2010
Messages
739
Location
Southeast MI
Ask the lumberyard for any recomendations and a quick google search turned this up

https://www.google.com/?ion=1&espv=2#q=Ann+Arbor+michigan+sheet+metal+fabrication

and if they can't help maybe they know someone that does
I went down both of those routes before - I even tried calling a few gutter places. Every place I looked at appeared to be industrial, or didn't know anyone. Honestly, I didn't call a lot of places - just the four major lumberyards in the area besides the gutter shop and a few metal shops.

However, today by chance I ran into someone I sort of know who has his own handyman service, and he suggest I go to the place where he gets his trim - and that I should ask to use their metal brake - they let him use it. I'm going to call tomorrow to see if they'll let me, and what kind of trim stock they carry.
 
OP
U

ururk

Well-known member
Joined
Jan 9, 2010
Messages
739
Location
Southeast MI
Saturday, Jul 9/Sunday Jul 10: Last week I picked up a used Honda Element - 2003 - with hitch. It has interior cargo space necessary for hauling medium-sized item, and it can pull my trailer and whatever I will be hauling with it - my needs are fairly small, and a beater truck would have been overkill.

Now on to the project... because I'm insulating on the outside, I need to install any windows on the inside or outside - typically called innies or outies. Some people advocate for installing them in the middle. Anyhow, to support the windows I need to build plywood window bucks - basically a frame made of 3/4" plywood. These need to be installed before I start putting the peel and stick on the walls.

So, Saturday I picked up two sheets of 3/4" plywood to make the window bucks - see this for more details: http://www.greenbuildingadvisor.com/articles/dept/musings/installing-windows-foam-sheathed-wall

Sunday, I went and cut most of the strips - no pictures. I'll finish up tomorrow and post some pics. Still have to get glue and screws to assemble them.
 
OP
U

ururk

Well-known member
Joined
Jan 9, 2010
Messages
739
Location
Southeast MI
Monday, July 11: Small update, some pictures.

Probably more pictures than warranted for the task :D 
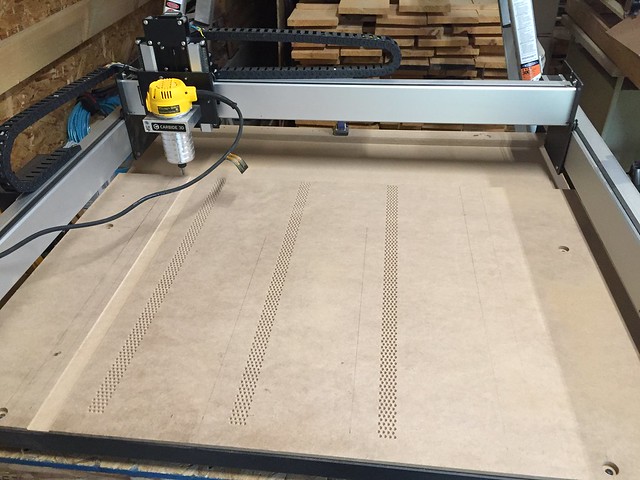
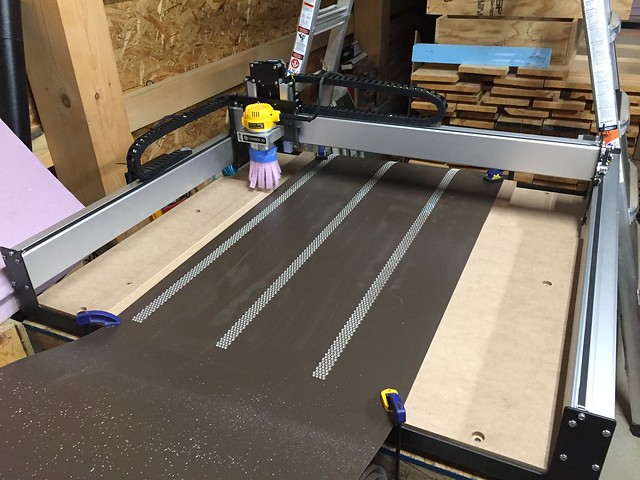
Each of the pieces cut here will form the sides of a window box - seven in total. Next step is to glue and screw them together, waiting for an amazon delivery.

28148941892_330c3727f2_z.jpg


27637572304_fcaae7ebb1_z.jpg


28148954492_7d3f53b3f1_z.jpg


28148952382_cd638041e6_z.jpg
 
OP
U

ururk

Well-known member
Joined
Jan 9, 2010
Messages
739
Location
Southeast MI
Wednesday, July 13: I started to get some pieces of 2x6 ready for the window openings. These pieces will frame the sides of the plywood boxes I'm making. Because I bought rough sawn lumber, it wasn't quite square. My boss has a workshop in his basement, and let me use his jointer. I squared up just one side - relative to the back - so that when it is butted up against the plywood box it won't cause the plywood to warp or get out of shape.

The attached rendering might help explain what I'm trying to do. The dark grey "beams" are the 2x6 pieces - I will cut through them partially to install the window box. The smaller pieces (that I jointed) **** up against the plywood box, and I needed the sides to be perpendicular to the part that touched the OSB sheathing (represented by the funky texture). Screws will go into 2x6's from multiple directions: from outside the sheathing, from the plywood into the edges of the 2x6's, and finally when the foam is installed, from an 8" flange around the plywood box, through the foam and into the 2x6.

My goal is to get all of the 3x2 boxes installed before any of my other materials arrive. The windows are going to take 3 weeks (salesman said 7-10 days, though), foam two, and the peel and stick and any additional lumber I can get anytime I'm ready (which I'm not).

I'm trying to figure out how to fabricate some perforated aluminum flashing (8" wide) so I can bend it into a U-channel. Let's just say perforated metal is $$$$ and the two local metal suppliers only carry expanded metal, which really won't work for my application.
 

Attachments

  • window_box.jpg
    window_box.jpg
    139.8 KB · Views: 61
OP
U

ururk

Well-known member
Joined
Jan 9, 2010
Messages
739
Location
Southeast MI
Saturday, July 16: Got some things done today. Placed my order for the windows - they should arrive within 10-15 days. Stopped at the place where I will be buying flashing from, and took a look at their flashing brake.

Fixed up a little cart that I got from UofM's property disposition ($15!):

28353054345_7f993b74ea_z.jpg


And finished the window boxes. Two stainless steel screws per box, plus Titebond III.

28353062065_ff384790c8_z.jpg


28249659952_59c19854ee_z.jpg


Before stacking them I made sure they were square - if not I added OSB braces. I only had to do this with the larger boxes and one 3x2.

3x2:

27736958864_1525b1732e_z.jpg


4x4:

27736961034_dee535713b_z.jpg


The larger window boxes will get a 2x10 (ripped to 8") installed below it on the outside for additional support for the window, and all of the window boxes will get an 8"flange made out of the same plywood all around. I don't have that plywood yet - that will be delivered with the remainder of the building materials "soon". On the inside, the window boxes will be screwed into the horizontal girts all around.
 
Last edited:
OP
U

ururk

Well-known member
Joined
Jan 9, 2010
Messages
739
Location
Southeast MI
I'm not entirely sure I follow the window boxes but good to see you're making progress again
Hopefully in two weeks I'll start cutting into the walls. Foam, windows have been ordered. Windows should arrive this week or early next. Foam will take a week or so. I'm setting up a new tool this week (if it arrives) to help me make the perforated flashing. It was something I was going to get eventually... but decided I could save $500 by making it myself. More details later this week :D.

For further details on the windows:

http://www.greenbuildingadvisor.com/articles/dept/musings/installing-windows-foam-sheathed-wall
 
OP
U

ururk

Well-known member
Joined
Jan 9, 2010
Messages
739
Location
Southeast MI
Tuesday, July 26: I'm building a tabletop for a new tool. I had intended to purchase one of these in a few years, but I need to make some things for this project, and it will save me $700, so...

28479618322_65acdb6458_z.jpg


It isn't quite a torsion box, but using LSL's, I was able to get a fairly flat surface as opposed to 2x4 stock. They are a bit more expensive than 2x4's - they cost me $28 total - but I have a ton of OSB left over and I needed something that would be stiff and dimensionally true.
 
OP
U

ururk

Well-known member
Joined
Jan 9, 2010
Messages
739
Location
Southeast MI
Sunday, July 31: Picked up the windows! One trip, five 3x2 awnings and two 4x4 casements.

28369859303_1c7a0b6e22_z.jpg


28369871743_9968591735_z.jpg


Yes... those are Marvin windows. I wanted fiberglass - not premium vinyl or builders grade vinyl. I know this isn't a house, but everyone I talked with has regretted their vinyl window replacement, some told me to go aluminum clad ($$$$ if extruded aluminum cladding). I could get the awnings in a cheap builders grade vinyl, but the casements not so much, and I didn't want to cheap out. So and so on. I decided I didn't want to mess with replacing these 10 years form now.

It took so long to order these because I got quotes from everywhere - all the local building supply companies, big box stores (Menards, Lowes). I really wanted something that had insulated frames (Lowes Pella have foam filled insulated frames), but the cost for the Marvin's was the same as Lowes and the reviews were better. The best prices was, oddly enough, from a lumberyard. I'm always am surprised by their prices, even though they are located in a high priced college town.
 
OP
U

ururk

Well-known member
Joined
Jan 9, 2010
Messages
739
Location
Southeast MI
Sunday, August 7: Prep for the insulation delivery. Moved one stack of wood to one side and added the remainder of my pink foam.

28367664894_29bb8da52e_z.jpg
 
OP
U

ururk

Well-known member
Joined
Jan 9, 2010
Messages
739
Location
Southeast MI
Tuesday, August 9: Insulation arrives! This is the part of the project that I realize I'm in over my head :D, literally and figuratively.

Hopefully I calculated the totals correctly, and can return the extra sheets I ordered (I ordered the exact amount needed with just blue foam, so theoretically I should have 13 extra sheets). It took me a bit of time to order this because I was unable to buy used so had to delay a few months. In that time I found one company in OH that sells Foamular at very low prices, but a local company (Masonpro) worked with their Dow rep and was able to match their prices. They were great to work with, and even sent two guys out to help unload. Probably not their normal delivery practice :D

28701001590_5cf84fe91f_z.jpg


28701003210_aff80f93df_z.jpg
 
Last edited:
OP
U

ururk

Well-known member
Joined
Jan 9, 2010
Messages
739
Location
Southeast MI
Saturday, August 13: Ok, so... I tend to overdo things, overthink things, and generally speaking this adds time to any of my projects. One of the details on this projects is ventilated flashing that goes below the foam.

When doing external insulation with a ventilated space behind the siding (ie, a rainscreen assembly) some builders use what is called "ventilated j channel". If you google it - there should be plenty of images that show what it looks like. I couldn't find it locally, and ordering was costly. There is a plastic product - cor-a-vent, but I have mixed feelings about it based on reviews.

Anyhow - I was going to order sheets of perforated aluminum - couldn't locate the material locally. The total cost was going to be quite high for the number of sheets I needed (120 linear ft @ 8" wide). Plus, I may need some additional material later on in the project.

So... I ended up buying a tool (Shapeoko) to help me make my own flashing with perforations. Made some progress:

Spoilboard:

28367726494_59d4b834d4_z.jpg


Job in process:

28369930123_0ef9a01258_z.jpg
 
OP
U

ururk

Well-known member
Joined
Jan 9, 2010
Messages
739
Location
Southeast MI
Sunday, August 14: Slow and steady progress on the perforated flashing stock. I probably won't bore anyone with individual days making this, but I thought I'd show some pictures of the setup.

4 clamps hold the flashing stock down. When finished it will be cut at 10' and slit into 8" strips, and bent into U-shaped channels.

I'm using a Dewalt DWP611 trim router, 1/4" 60 degree included angle v-groove chamfer bit (solid carbide).

Almost halfway done, and the bit is still cutting well:

28910598621_89e9ce398a_z.jpg


This is the setup:

28954500976_7c5ca01103_z.jpg


Each job takes 45 minutes, but can more or less be left unattended.
 
OP
U

ururk

Well-known member
Joined
Jan 9, 2010
Messages
739
Location
Southeast MI
Quick update:

1) Reserved an aerial lift rental. Try as I may, I think this will be the safest way for me to proceed. I've done a bit of "testing" with my ladders, and I don't think I can safely apply the foam in a reasonable amount of time. Additionally, the quotes I got for a standing seam roof were quite high, so provided I move swiftly (but safely) I can get it all done in a month. We'll see about that.

2) Almost done perforating the flashing. Three more 45 minute jobs. Then on Saturday I'll be bending the flashing into shape.

So... by next weekend there should be plenty of updates!
 

smschriefer

Well-known member
Joined
May 28, 2009
Messages
841
Location
Yorktown, VA
Things look like they are still progressing well. I agree with not using a ladder - biased as I don't like being on ladders.

I hope the temps and weather in general work with you!
 
To avoid these ads, REGISTER NOW!
Top Bottom