To avoid these ads, REGISTER NOW!

BEFORE & AFTER....A Tool Polisher's Haven

don long

Well-known member
Joined
Mar 31, 2012
Messages
8,841
Location
southern california
Thanks for that complement 2oolhound
I enjoy seeing things change from patina (rust) to shinny new looking.
I Like your saw, It looks great. welcome to the polisher's thread. Hope to see much more of your great work.

Don
 
Last edited:
To avoid these ads, REGISTER NOW!
OP
J

JMLangford

Well-known member
Joined
Jun 25, 2014
Messages
1,122
Location
Upstate SC
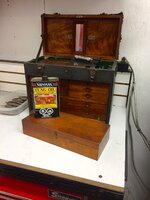
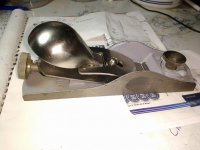
This item here I got for a dollar at the flea market cause the guy didn't know if it worked......
I'm an amateur luthier wanna-be......I've done a few bridge repairs, fixed broken necks, general maintenance, etc. mostly on my guitars and on inexpensive instruments....(don't want to "practice" on a 1939 Martin :eyecrazy:)
I'm always looking and thinking of ways to make luthier repair tools out of everyday things instead of buying from expensive places like Stewart MacDonald (http://www.stewmac.com/)
So, when I saw this heating/solder "iron"? the ole light bulb went on. :thumbup: The first thing I thought of was a Fretboard Iron.....When I got home I plugged it in and it started heating up....
Fretboard Iron 100.jpg Fretboard Iron 101.jpg

It had this 3 position switch that read low, med, high SPEED :lol_hitti
Fretboard Iron 102.jpg

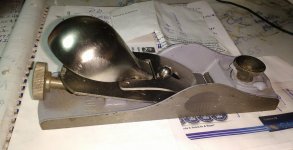
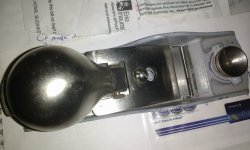
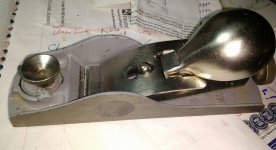
I removed the bottom plate and placed it against one of my guitars for spacing....(14 frets to the body - 25.4" scale - std. Martin dreadnought)....placed an old blade in my table saw.....then softened the edges as to not scratch the fretboard....
Fretboard Iron 103.jpg Fretboard Iron 104.jpg Fretboard Iron 105.jpg Fretboard Iron 106.jpg


.
 
Last edited:
OP
J

JMLangford

Well-known member
Joined
Jun 25, 2014
Messages
1,122
Location
Upstate SC
Started taking every thing apart....
Fretboard Iron 107.jpg

Sanded the handle and wire brush the other pieces....
Fretboard Iron 109.jpg

Put some tung oil on the handle and then reassembled the body....
Fretboard Iron 110.jpg Fretboard Iron 111.jpg

Then I started in on re-wiring the "Speed" switch....
Fretboard Iron 112.jpg Fretboard Iron 113.jpg

Made myself a wiring diagram so I'd remember how this thing went back together :beer:....
Fretboard Iron 114.jpg


.
 
Last edited:
OP
J

JMLangford

Well-known member
Joined
Jun 25, 2014
Messages
1,122
Location
Upstate SC
Put a new chord on the switch.....wired brushed the strain relief spring....
and now its time for the glamour pics....
Fretboard Iron 115.jpg Fretboard Iron 116.jpg Fretboard Iron 117.jpg Fretboard Iron 118.jpg Fretboard Iron 119.jpg

All back together and this thing gets HOT !!!!.....hadn't had a chance to use it on a fretboard removal yet but I've got it if I need it....:rocker:


.
 
Last edited:

drivesitfar

Well-known member
Joined
Oct 23, 2013
Messages
35,999
Location
Pacific Northwest
JM: i've never heard of that tool, but looks like it's working much better and you might even have a use for it.

great tip making a drawing of the electrical when taking a switch apart. i might tend to just take a picture on my cell phone when taking things apart and so far that's worked ok for me.

ALL: keep those cool shiny and interesting tools coming cause as Bears said it's the start of a great thread.

MERRY CHRISTMAS!!
 
OP
J

JMLangford

Well-known member
Joined
Jun 25, 2014
Messages
1,122
Location
Upstate SC
JM: i've never heard of that tool, but looks like it's working much better and you might even have a use for it.

great tip making a drawing of the electrical when taking a switch apart. i might tend to just take a picture on my cell phone when taking things apart and so far that's worked ok for me.

ALL: keep those cool shiny and interesting tools coming cause as Bears said it's the start of a great thread.

MERRY CHRISTMAS!!

Thanks Drives,
I'm an old fart and I keep forgetting I have a camera on my hip....Yes, it would have been a whole lot easier to snap a pic or two.....:beer:


.
 

drivesitfar

Well-known member
Joined
Oct 23, 2013
Messages
35,999
Location
Pacific Northwest
JM: yep i still have to remember that i don't have to load film in the old Poloroid camera and have that awful film smell just to take a picture. :D
 

don long

Well-known member
Joined
Mar 31, 2012
Messages
8,841
Location
southern california
38462978164_276abbb726_c.jpg


That is a work of art :thumbup: :thumbup:

Thanks Bears Fan
It was fun to get it to that stage I'm making a handle for it and i need to find the pump (I don't remember what I've done with it) I took it off for painting.
 

don long

Well-known member
Joined
Mar 31, 2012
Messages
8,841
Location
southern california
Mike I like your work. You have found some neat stuff to work on.

This thread really has my intrest. I love showing my tools but I like seeing what others are doing more.

I found the before and after pictures of the fire tools I posted earlier

2017-06-03 15.45.52 by don long, on Flickr

4 by don long, on Flickr

2017-06-03 15.45.44 by don long, on Flickr

2017-06-03 16.47.01 by don long, on Flickr

2017-06-03 13.27.56 by don long, on Flickr

2017-06-03 16.08.04 by don long, on Flickr

2017-06-03 13.28.24 by don long, on Flickr

2017-06-03 16.08.16 by don long, on Flickr

2017-06-03 13.28.33 by don long, on Flickr

2017-06-03 16.08.30 by don long, on Flickr

2017-06-03 13.28.03 by don long, on Flickr

2017-06-03 16.07.52 by don long, on Flickr
 
OP
J

JMLangford

Well-known member
Joined
Jun 25, 2014
Messages
1,122
Location
Upstate SC
Mike I like your work. You have found some neat stuff to work on.

This thread really has my intrest. I love showing my tools but I like seeing what others are doing more.

I found the before and after pictures of the fire tools I posted earlier...

Thanks Don....that means a lot to me coming from you...:bowdown:

Yeah boy!!! That my kinda tool polishin' on those fire tools!!!.....:thumbup:


.
 
Last edited:

drivesitfar

Well-known member
Joined
Oct 23, 2013
Messages
35,999
Location
Pacific Northwest
ALL: MERRY CHRISTMAS all your TOOL POLISHERS and i'm thinking this might be one of my favorite threads next year. i also might end up doing a little more polishing than just putting BLO (boiled linseed oil) on most of my tools.

CHEERS and keep posting those before and after pictures cause that is really where it shows how good some of you are at this.
 

WoodsTruck

Well-known member
Joined
Jan 12, 2013
Messages
1,019
I've got a pair of pliers I cleaned up and modified the end on.

What should I use to protect this finish so it doesn't rust out again?
 

Attachments

  • Tool 1.jpg
    Tool 1.jpg
    114.7 KB · Views: 255
  • Tool 2.jpg
    Tool 2.jpg
    62.6 KB · Views: 258

drivesitfar

Well-known member
Joined
Oct 23, 2013
Messages
35,999
Location
Pacific Northwest
Wood: depends a lot on where you live and how much you use them. i put BLO on my vises and some tools, but if it's not baked on or put on when it's pretty warm out to dry it completely it might not be the right type of finish/feel you are looking for.

I'm like you and looking for better options so wanted to chime in and see what others do. good question. BTW what's the custom feature used for?
 

WoodsTruck

Well-known member
Joined
Jan 12, 2013
Messages
1,019
I narrowed up the tips and installed the facing notches. I use these on my sled to remove the push darts that hold panels on. The darts have a recess on either side to get a tool under the lip, but a couple of them are down in a well themselves.

With that in mind, the environment will be rather damp for these while in storage. If nothing else, I have a bottle of gun blue that I may use.

Other suggestions?

pic from ebay as I neglected to get a "before" shot when they were factory shaped and rusty.
 

Attachments

  • s-l1600.jpg
    s-l1600.jpg
    148.5 KB · Views: 198

don long

Well-known member
Joined
Mar 31, 2012
Messages
8,841
Location
southern california
I narrowed up the tips and installed the facing notches. I use these on my sled to remove the push darts that hold panels on. The darts have a recess on either side to get a tool under the lip, but a couple of them are down in a well themselves.

With that in mind, the environment will be rather damp for these while in storage. If nothing else, I have a bottle of gun blue that I may use.

Other suggestions?

pic from ebay as I neglected to get a "before" shot when they were factory shaped and rusty.

Don't worry Woody


We are all guilty of doing that
 
To avoid these ads, REGISTER NOW!
OP
J

JMLangford

Well-known member
Joined
Jun 25, 2014
Messages
1,122
Location
Upstate SC
I've got a pair of pliers I cleaned up and modified the end on.

What should I use to protect this finish so it doesn't rust out again?

I narrowed up the tips and installed the facing notches. I use these on my sled to remove the push darts that hold panels on. The darts have a recess on either side to get a tool under the lip, but a couple of them are down in a well themselves.

With that in mind, the environment will be rather damp for these while in storage. If nothing else, I have a bottle of gun blue that I may use.

Other suggestions?

pic from ebay as I neglected to get a "before" shot when they were factory shaped and rusty.

Almost everything metal I clean up I coat with a thin coat of gun oil.....in your situation where you'll be using them in a damp environment, I would cover it a bit heavy and rub it in with my hands real good for a few minutes and leave it as is and let it work into the metal.....
Bluing alone won't necessary keep it for rusting.... you'll still need to oil it.

I've never tried BLO before, (like Drives suggested) so I don't know it's characteristics, but I have use wiping varnish that dries to a hard coat......I've used it on items like the polished shanks of carving chisels and it works fine.....think, like how they coat brass items from tarnishing....

The varnish I refer to is sold as "tung oil" but it's probably a mixture of some varnishes, mineral spirits, maybe some BLO (?) etc......but it dries to a hard protective finish.....I don't think a TRUE tung oil ever dries......

This is what I use:
250deafc-0ef5-48b0-802d-b089533761a2_1.d52b600f7207456382892f5baf9bd959.jpeg


Lowes or Home Depot sells it....


.
 
OP
J

JMLangford

Well-known member
Joined
Jun 25, 2014
Messages
1,122
Location
Upstate SC
JML,
That is a cool find and a creative Franken tool you made there. It came out great.

Shawn

Thanks Shawn.....Yeah, when I first saw it I immediately thought of using as a fretboard iron, but I wondered how it was originally used with it's wide, flat heating surface :dunno:


.
 

drivesitfar

Well-known member
Joined
Oct 23, 2013
Messages
35,999
Location
Pacific Northwest
Wood: if your new pliers is a tool that most likely will sit in an unheated area in a toolbox that might also be damp or wet you might try CORROSION X or FLUID FILM or one of those industrial rust preventives.

good luck and let us know how your new tool works and which protective coating you chose and how it worked to keep rust off.

ALL: MERRY CHRISTMAS!!
 

lis2323

Well-known member
Joined
Dec 25, 2016
Messages
3,234
Drives: Fluid Film is a staple in my shop[emoji106]

JML: We're on the same page for protective wood finish...

abb48df434993d0726fa3a31947393ed.jpg

"slipp'n her the tung" ALWAYS works for me. [emoji3]
 

Attachments

  • abb48df434993d0726fa3a31947393ed.jpg
    abb48df434993d0726fa3a31947393ed.jpg
    548.2 KB · Views: 14

drivesitfar

Well-known member
Joined
Oct 23, 2013
Messages
35,999
Location
Pacific Northwest
LIS: glad you like FLUID FILM and i'll have to buy a case soon unless i get rid of some of this steel i've got laying around. i was going to buy a few cases of 30w oil, but i do like to garden and respect the cat's territory.

nicely done on the TUNG OIL!!

ALL: just bumping up the thread to see if there are any more existing or wanna be TOOL POLISHERS and more pictures. please post them up with the process if you have time to or just check out what's already been posted and give praise and credit to those that have these skills.

cheers
 
OP
J

JMLangford

Well-known member
Joined
Jun 25, 2014
Messages
1,122
Location
Upstate SC
Here's the BEFORE pics of a nice little vintage VW jack.....(I hear these things are getting rare as hen's teeth :dunno:)
VW1.jpg VW2.jpg VW3.jpg VW4.jpg

And here's the AFTER pics.....funny thing is, I cleaned this jack all as one piece, cause I was afraid if I removed it from it's shaft....it would fly apart EVERYWHERE and I'd never get it together again :lol_hitti
VW5.jpg VW6.jpg VW7.jpg


.
 
Last edited:

littleponderosa

Well-known member
Joined
Sep 27, 2014
Messages
864
Location
MONTANA
I'm definitely in the wanna-be class. Damn you guys do outstanding work.

I've got an old kerosene burner from my Fathers. Used for melting lead for sinkers. Ate a lotta lead fumes from that, I'd sure like to make it a little more respectable looking.
Please keep showing us examples of your work.
Any and all hints will attempt to be retained.
Bill
 

bubinga

Well-known member
Joined
Jul 26, 2014
Messages
12,744
Location
Bridgeport Ohio. (Across River From Wheeling WV)
Here are by before pics. of A "Minty" craftsman low angle block I got off "the bay"
for $20.00 shipped! (one of those 'had to have it deals"):pimpflash
Not a dang thing wrong with it, as it sits, but I'm polishing it for the "halibut"
After Pics when I'm done.
 

Attachments

  • c4.jpg
    c4.jpg
    86.1 KB · Views: 198
  • c3.jpg
    c3.jpg
    101.7 KB · Views: 212
  • c2.jpg
    c2.jpg
    93.5 KB · Views: 225
  • c5.jpg
    c5.jpg
    123.8 KB · Views: 195
  • c6.jpg
    c6.jpg
    107.2 KB · Views: 189
  • c7.jpg
    c7.jpg
    100.8 KB · Views: 194

drivesitfar

Well-known member
Joined
Oct 23, 2013
Messages
35,999
Location
Pacific Northwest
JM: I think i remember either that jack or one similar i used to use on my dad's 63 VW bug and it was more like a toy, but it worked a lot better than having a few friends lift up the car to change a flat tire.

are you using those 3m pads to spiff it up and what did you use for the shine or protection?

WELL DONE!!

Bub: nice work!!
 

Swingpress

Well-known member
Joined
Mar 16, 2017
Messages
537
Admittedly, I am easily amused. Maybe that's why I love messing with the buffing wheel and sander. Here is an Atha hammer I messed around with this afternoon.
I didnt think to snap a photo of the face, but it looked about like the rest. Not as good as most here, but I'm happy.
Before:
0ae6573487c5b2d9b15c3a6f5f2438f3.jpg
0e1365ace1385bc83450396d97b92f91.jpg

After: (still need to cut a handle)
d48fc7774c7af0057ee1036c51211545.jpg
a7ba750288e2f2faa84ae250768a9f8f.jpg
 

Attachments

  • d48fc7774c7af0057ee1036c51211545.jpg
    d48fc7774c7af0057ee1036c51211545.jpg
    330.4 KB · Views: 11
  • 0ae6573487c5b2d9b15c3a6f5f2438f3.jpg
    0ae6573487c5b2d9b15c3a6f5f2438f3.jpg
    48 KB · Views: 9
  • 0e1365ace1385bc83450396d97b92f91.jpg
    0e1365ace1385bc83450396d97b92f91.jpg
    48.1 KB · Views: 7
  • a7ba750288e2f2faa84ae250768a9f8f.jpg
    a7ba750288e2f2faa84ae250768a9f8f.jpg
    307.3 KB · Views: 12
OP
J

JMLangford

Well-known member
Joined
Jun 25, 2014
Messages
1,122
Location
Upstate SC

Thanks Bubinga....I love that little low angle plane and you did good for $20 bucks! :beer:

JM: I think i remember either that jack or one similar i used to use on my dad's 63 VW bug and it was more like a toy, but it worked a lot better than having a few friends lift up the car to change a flat tire.

are you using those 3m pads to spiff it up and what did you use for the shine or protection?

WELL DONE!!

Bub: nice work!!

I'm curious how you will coat the VW jack to keep it from rusting again.

Yes, I used the 3M pads :thumbup: and for the protection I lathered it up in gun oil....
I put liberal amounts of oil on and them I have a worn-out tooth brush (bristles are nice-n-soft) that I just scrub and work the oil in good all over and the leave it....In fact I got this jack in Sept.(27th) this year and cleaned it and hung it on the wall for display, I had forgot to take some after pics....I just snapped the after pic yesterday to post them up here, so after 3 months it hadn't changed....
My shop is insulated but only heated or cooled when I'm out there but most items I clean up and wipe down with oil stay pretty much rust free....


.
 
OP
J

JMLangford

Well-known member
Joined
Jun 25, 2014
Messages
1,122
Location
Upstate SC
Admittedly, I am easily amused. Maybe that's why I love messing with the buffing wheel and sander. Here is an Atha hammer I messed around with this afternoon.
I didnt think to snap a photo of the face, but it looked about like the rest. Not as good as most here, but I'm happy.
Before:
0ae6573487c5b2d9b15c3a6f5f2438f3.jpg
0e1365ace1385bc83450396d97b92f91.jpg

After: (still need to cut a handle)
d48fc7774c7af0057ee1036c51211545.jpg
a7ba750288e2f2faa84ae250768a9f8f.jpg

Good job Swing! :rocker:

.
 

Attachments

  • d48fc7774c7af0057ee1036c51211545.jpg
    d48fc7774c7af0057ee1036c51211545.jpg
    48.8 KB · Views: 5
  • 0e1365ace1385bc83450396d97b92f91.jpg
    0e1365ace1385bc83450396d97b92f91.jpg
    48.1 KB · Views: 6
  • 0ae6573487c5b2d9b15c3a6f5f2438f3.jpg
    0ae6573487c5b2d9b15c3a6f5f2438f3.jpg
    48 KB · Views: 8
  • a7ba750288e2f2faa84ae250768a9f8f.jpg
    a7ba750288e2f2faa84ae250768a9f8f.jpg
    40.8 KB · Views: 10
OP
J

JMLangford

Well-known member
Joined
Jun 25, 2014
Messages
1,122
Location
Upstate SC
Nice work dkroth....and fast too!!

Now, tape off the handle and the shiney parts and paint it bright purple or lime green or some other unconventional, obnoxious color...:beer:


.
 
To avoid these ads, REGISTER NOW!
Top Bottom