To avoid these ads, REGISTER NOW!

Blacksmithing Projects Journal

To avoid these ads, REGISTER NOW!
OP
D

DoghouseForge

Well-known member
Joined
May 11, 2013
Messages
374
Location
Lakeland, Fl
Awesome work and great info. I spent a couple of hours reading your whole thread. I have been making knives for a couple of years now and am going to start learning blacksmithing now. If you have any questions about knives I may be able to help or at least point you in the right direction.

Sam

Sam ,

Thanks for the compliments!

Im working on a batch of blades and they should be done this weekend. Ive documented the new steps to the process and when I post the finished pics Ill list the heat treating tolerances at the different satges. If you think Im missing an opportunity or if there is something to do better please feel free to jump into the discussion.

I know that any help with getting the fit of the thumb guard on my hunting stlye knives would be appreciated by anyone who has experience. I dont have a mill...so how do you get the seems flush? I currently use the drill press to kock out the rough center and then a dremel grinder to even it up.
Mine look like **** quite frankly and thats why i stick to full tang knives. So i guess what im asking is how do you match up the blade, thumb guard, and handle with no gaps around the tang at its insertion into the guard and keep eveyone in tension?

Thanks again

JP


Heres what going into the oven tonight!
There was even some differential quenching going down! Yup, the diapers are off and the "pull ups" are on!
9 " traditional Chef, 8" rocker chop, a deep belly paring knife, and a slick little fillet knife.
 

Guster

Well-known member
Joined
Mar 11, 2012
Messages
1,543
Location
Auckland, New Zealand
...if there is something to do better please feel free to jump into the discussion.

Not intended as critique though rather to contribute to the knowldege sharing aspect - have you considered other sources for good knife steel? Sure you going to run out of files sooner or later. :dunno: I had a "junkyard steel classification" list somewhere that is very handy for just this sort of thing.

As an example automotive suspension leaf springs is a good high carbon steel. Smaller vehicles tend to have thinner material if the others are too thick. Some farm equipment like ploughshares can be good too. I often see an old scarifier and tiller/cultivator sitting rusting away thinking there must be something good in those work surfaces. I have a friend who scored a lifetime supply in old bandsaw blade material from a closing lumberyard which he turns into filleting knives. He also got some round saw blades >1m dia that he kept for making knives for himself.

I've heard about cold chisels, pry bars and other sources of forged high tensile steels being used though care should be taken as some are laminates or forged with high speed steel work sufaces that shatter or break off during forging.

What else?
 
Last edited:
OP
D

DoghouseForge

Well-known member
Joined
May 11, 2013
Messages
374
Location
Lakeland, Fl
I have that junkyard list on my computer, and ill include it this weekend when I update the knife work.

Plow disk are 1095 I believe, leaf springs from old pre 90, s car and trucks are good but the newer stuff is not the same quality so the older the better, saw blades are ok if they are not "tiped" the circular saw blades thst have hardend teeth are a high nickel alloy thats good for flexing but bad for blades.

Theres a bunch on there so ill make sure to include it.

My rasp piles will outlive the knife business. There were over 100 last time I counted and I add 2 or 3 a week. So thats a big reason ive invested the time into understanding it. W2 is good blade steel and being water cooled it doesnt get much more straight forward when learning the quenching tolerances.

I have a 3' x1/8"x1" stick of A2 that I got to make horseshoing knives with and learn the air hardening approach.

Theres something to starting with a known material that is already annealed and truly flat.
I spend alot of time leveling my blanks after the forging and the forging method looses another 2-3 hrs to normalizing.

Anyway, ill get more into that this weekend.

Thanks guster, you always add great ingo and give me food for thought.

Jp
 

aggierailroad

Well-known member
Joined
Jan 8, 2012
Messages
581
Location
Houston, TX
JP have you ever looked at Iron-Iron phase diagrams and phase curves to get a deeper understanding of the heat treating process?

Something like this:

FeC.gif


I've had the "pleasure" of looking at them all week while working on welding procedures for our plant... to post weld heat treat or not to post weld heat treat - that IS the question :) Sorry, I'm an iron nerd..

btw, the shelf with the rose is the best thing you've made yet. that is some sharp stuff.
 
Last edited:
OP
D

DoghouseForge

Well-known member
Joined
May 11, 2013
Messages
374
Location
Lakeland, Fl
JP have you ever looked at Iron-Iron phase diagrams and phase curves to get a deeper understanding of the heat treating process?

Something like this:

I've had the "pleasure" of looking at them all week while working on welding procedures for our plant... to post weld heat treat or not to post weld heat treat - that IS the question :) Sorry, I'm an iron nerd..

btw, the shelf with the rose is the best thing you've made yet. that is some sharp stuff.

Thats funny you posted that. My Mentor and I have been discussing that same stuff all week. Its very cool stuff! and even cooler when you can see or feel the steel change after the different stages. Just adding a few steps has changed everything. I added normalization to my process after forging, and understand non-magnetic before quenching now. Tempering has been dialed in correctly and the entire process is flowing along.

This afternoon I was goofing around while waiting for the epoxy to set up and I brought a rasp to 1450 (non magnetic) and quenched...repeated i think 5 times and on the last quench it ruptured hairline cracks like an egg shell. I just wanted to see what level of tolerance the W-2 blend I have will stand. Its some ********* stuff to literally get so hard it shatters internally.

Im working on differential hardening for the thin bladed knives in order to have maximun flexability with a hardend cuting edge. When I post the pics Il try to get one of the lines that form distingusihing the layers your diagram is talking about.

thanks!
JP


The "Aggiemethod" was used again today. :lol::thumbup:


First afternoon off in a while. Not a bad turnout. They are curing overnight in the clamp party on my work table. Then tomorrow I will finish the handles and blades. They are only ground up to 220 so far and the handles need the whole range of grits before tomorrow night so I can seal them in time to be dry for saturdays market. I turned the rocker chop knife into a cake knife/serving knife and yes!!! thats a burl!!! handle....Im jones'n to polish that thing! the others are bloodwood, zebra wood, and canary wood.


The pins and new handle process have made the assembly almost fool proof
 
Last edited:
OP
D

DoghouseForge

Well-known member
Joined
May 11, 2013
Messages
374
Location
Lakeland, Fl
Knives, Knives, some more Knives, and a couple special order jobs...


So to start here are a couple special orders that have come from the market.

One customer wanted a set of quirky numbers made from horseshoes like my signs lettering. She wanted to use them to mark the rows in her garden so after they were completed i welded them to rebar spikes.

Not something I would have made for myself but...To each there own! :dunno::lol:


The second order took a little more concentration and honestly gave me some trouble...
The request was for two towel bars to go on the end of an old, primitive style, wooden bar. She wanted it to be forged and twisted with a brushed finish. I had to make them twice because this was the first time I have had to make hardware with a specific hieght and width requirement. Doing the math to figure out how much strech was going to occur form the twist and from forging the bends was a little harder than i expected.

The bars needed to be 14" across and around 4 inches in height. I figured on 14" of stock for the distance and 4" of stock for each side. That was 22" of 1/2x1/2" square bar stock. I then subtracted 1.5" from each side for the gain forging the mounting tabs was going to draw out of the stock and another 2" for random gains due to the stretching when its twisted, So my total length of steel was 17". when I finished the first set they were 4" tall and 15" wide! Dag!!!

So i re-made them with only an inch of random gain from the twisting and got it right on the 14" mark. In the future, the stretch from twisting should only be added if the twist are loosly done or covering alot of width. All four of the twist on each bar were tight and almost stationary so the stretch was minimal.

Oh well... live and learn and store it for next time.

Here's her bar brackets. I wasnt really happy with them but the customer was completly happy and ordered some more pieces.


In the second photo you can see that the bar in back is higher and narrower than the bar in front. The front bar is perfect so to fix the rear you simply heat the corners with the torch and knock them down. As the corners come down the sides will push outward and the width increases so it only took a few taps to get them evened up.


Im going to work on the next knife update for a while and will hopefully have it posted soon.

Thanks

JP
 
Last edited:

Jarhead0408

Well-known member
Joined
Apr 1, 2012
Messages
5,733
Location
Who knows?
Dude, got to say man, your work kicks **** man! My wife is hassling me to get prices from you. I'll have to shoot you a pm in the future.

My hat is off to you man. You have a much forgotten talent with your hands and mind.
 
OP
D

DoghouseForge

Well-known member
Joined
May 11, 2013
Messages
374
Location
Lakeland, Fl
Knives continued...

Ok, heres the latest batch of knives and the latest info from the heat treating front. Please note that I am learning this stuff as I go and sharing it with you in real time. My mistakes are learning tools and the info im presenting is as best i know of to date. As I improve I will update you and hopefully this journey will reach a point where success is achieved by following the system which has been developed.


I tried to photograph the different stages of the heat treating process to give some reference to all the info Ive been posting and alot of the photos will correspond with the chart "aggie" posted earlier as well.


So the first step is still the same. Get it hot and hit it hard! :lol:

Forging:

I dont worry so much any more about trying to forge the shape of the knife into the rasp but instead focus on forging the taper. Each rasp starts at 1/4" thickness and gets drawn down to 1/8" thickness. Next I try to envision the blade that im going to cut from the finished blank. With that picture in your head you can hammer out the blank leaving it thicker down the top line and working it to a very fine edge along what will be the bottom.

Heres a photo of the blank with what would be the imaginary blade from my head drawn on it. By forging the taper before hand the grinding time is reduced a tremendous amount and my belt usage is lower so I spend less money per knife.


The band saw is going to do a much better job at making the shape than my hammer is and its also also way! faster than trying to move that incredibly hard W-2 steel around

That being said, if i quench the forged steel at this point it will harden. Even if not done at a high temp it still will be made tougher to some degree by cooling it. The temperature difference that simply coming from the forge to what the amibiant room temperature is will harden it to a degree.

In order for the bandsaw to cut through the tool steel at faster than a couple inches a minute I need to turn the forged blank into the softest state possible. This improves the speed at which it cuts but also reduces stress on the blade. My band saw has a 108" blade so they are not cheap and replacements must be ordered. While the blade I have is built for cutting hardend tool steels the longer it last the better.


Annealing and Normalizing:

To achieve the softest stage of metal is to Anneal it. That involves bringing the steel up to what its specific critical temperature is and holding it there for a set period of time. We are usually talking an hour or more of holding temp and then a very!!!! slow controlled cooling of the steel. Temps usually cant decrease more than 50deg per half hour. So without a kiln and temperature controller true annealing isnt an option.

side note:
When you buy tool steel it usually comes completly annealed from the foundry. This is why stock removal knife builders dont need to do all the heat treating before hand. When its removed from the package its the softest it will ever be. So the heat treating usually comes after the grinding has finished.


So to work with what i have, I can do a lesser form of annealing called "Normalization". This involves bringing the steel up to "non magnetic" or 1450deg and then cooling as slowy as your set up alows. With my forge I can get the inner liner very very hot and it will stay hot for along time after the gas is shut off. I can further increase the temp holding ability by blocking off the side ports with 1/4 plate. After an hour my blanks will still have a light cherry golw when the forge has remained closed up.

The steel is alowed to cool untill its room temperature. With my forge set up that can take up to 4 hours. Now that seems like a long time but the hardness is decreased enough that the bandsaw can rip through the blanks and more importantly the cut out blank is easier to grind during the stock removal portion of the blade build.

Here is a picture of the blanks soaking in the forge heat during the "normalization process"


So after normalizing, the shape is cut, and you can spend as much time as you desire grinding the perfect blade for your knife. When you have reached the thickness and contour that is ideal for your finished knife design you need to stop before putting your finished cutting edge in place. I take a moment to drill out my pin holes and get any fine tuning of "level" or straightness fixed if needed.


Hardening:
The next step is to harden the steel back up to the level it was before you normalized it. This step is quenching or hardening...
Its important that you heat the steel enough to affectivly harden it throughout the blade but not heat it to the point that your start to break down the strucuture permanently. The chart that "aggierailroad" posted shows the different names for this breakdown and the temps that certain steels reach those breakdowns.

Unless you have a pretty rad thermometer or a kiln its not really possible to know how or when you will reach the ideal temp for hardening or to know that you didnt reach a temp higher than needed and instead cause your steel to become brittle. Luckily, the ideal temp for hardening is 1450def far. This is also the temperature at which steel becomes "non Magnetic". So by using a magnet you can put your knife in the fire, heat it, check its magnetism, and repeat untill it no longer attracts the magnet. Once non magnetic is reached the quenching can occur.

Since the rasp steel is a "W" steel i can use water or brine to quench, and once non-magnetic is reached i immediatly cool the blade in the water.

When the cooling occurs it shocks the molecules in the steel and causes them to bunch up real tight. This makes the steel more dense and in turn harder.

Here are some pictures:

heating to non-magnetic 1450 deg.


After the shock cooling:


Notice the coloring in the above pictures. Since I was trying to photograph this instead of paying attention I let one of the knives get to hot. I quenched it and it became brittle and got micro cracks in the surface along the thickest section of the blade where it was alowed to get the hottest. The coloring shows the damaged steel compared to the normally quenched steel. The chart aggi listed has the correct names for when these damaging changes take place but for general purposes its bad when they do.

That knife was ruined and along with it about 3 hours or labor. Instead of tossing it I ground it down untill I had removed all the steel with visible hairline stress cracks and reshaped it into a serving knife. It would never be safe to use as a chopping knife but it will be fine for cutting cake or carving the turkey at thanksgiving. Ill keep it and it can be a nice addition to my cutlery at home.
 
Last edited:
OP
D

DoghouseForge

Well-known member
Joined
May 11, 2013
Messages
374
Location
Lakeland, Fl
Tempering:

step one - wait until your wife has gone to bed and steal the oven for the night!


Ok here are the charts from the previous post reguarding the tolerances for W-2 steel and tempering.


So tempering has been discussed in some previous post so Im not going to be very in depth on the "whys". Instead I would like to use the charts to show how I achieved what i did.

From many discussions with my mentor, researching online, and talking with a fellow "junksteel" Knife maker on instagram i determined that the best Rockwell Hardness for my kitchen type knives is around 60HR. This appers to be the best balance for keeping a sharpend edge and being able to resharpen when needed. If the hardness is to high on the rockwell scale then you can probably put an edge on the knife with your belt sander but you wont be able to achieve it any other way. On the same note if its to soft it wont hold its edge and will need constant maintainence.

So by using the chart to achieve 60 RC my temperature needs to stay at 580deg. How long to soak the steel at temp depends on the type of steel but I have a set time of 1.5hours. I have read that the time is no less than 30 min per 1/4" of thickness but all of my contacts use a set 1.5 hour system so untill i understand it better im sticking with that.

A fun fact Ive learned is that my oven at home is only accurate when set up to 430deg. after that it doesnt regulate the temperature correctly and it gets up to 550plus. This was discoverd by accident when I tried to temper a batch at 450 and the color chart showed it had gotten to the high five hundereds. I turned it down to 430 for the second batch and they came out golden straw colored just like they were supposed to. Then I tempered the cleaever and set it to 450 again and reached the 550plus mark. guess im lucky the fault is working in my favor but let it be a warning that the home oven may not be as correct as you think.

Here are the blades after tempering, I temper them TWICE!! and let them cool complety in between. Thats why I do it late at night so no body disturbs them while they are cooling. Then the next night I repeat the procedure.


the color chart and my blades match up so my rockwell of 60HR should be fairly close.


Finishing up:So from here is the fitting of the handle scales and pins and the applying the epoxy. Then the artistic work starts and you can do the sanding/sculpting in the handle work and finish the blades cutting edge and polish.

Fitted scales pinned loosly to alow them to slide to one side or the other while applying epoxy.


Heres the shape of the serving knife that i created from the tosty chef style from earlier


ready for glue


Aggiemethod insures a flawless bond


Final sanding and apply the sealant to the handles. I wanted to make the serving knife look fancy since its basicly as decoration. It got a burl handle to dress it up. :thumbup:


And your done:


The fillet knife and the deep belly paring knife were cut out of an old cross cut saw. Ive been trying to source more material choices and these seem to be in everyones garage stuck aginst the back wall behind the motorized and electrical tools. The fillet knife has what is my first attempt at differential tempering/hardening and its actually very flexible still but the baldes edge felt really good when I was sanding it. Time will tell but Ill post on that technique after i try it a few more rounds.


So you probably noticed the other knife in the pictures. This was my first attemp at replication of a "KA-BAR" style hunting knife. Ill do a more detailed post soon but Im working on the second one and its going much smoother than this one did. The fit of the thumb guard was tricky as well as some other stuff.

the one pictured has a stacked leather disc handle that turned out way better than my blade did. :lol: 
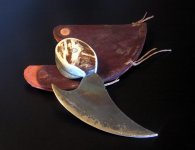
Im fixing some blade issues in the second attempt so dont laugh to hard at this one. The sheath was made by Boondock studios here in lakeland florida. He does great work and helped me with the disc cutouts. If i can get my act together this has the potential to become a really cool knife and belt sheath to add to the booth.


ok, as promised earlier this week here is the list of typical steel types from junkyard materials so now nobody has an excuse not to make stuff.


Allright, have a great week and thanks for reading along. I hope someone other than aggie and mysef cares about the technical info. :lol: Its alot of reading and Im aware of the time it takes to actually read through instead of just photo hoping so thanks again to you guys using this stuff to make your own work better.


JP


Jarhead, thanks alot! for sure shoot me a message!
 
Last edited:

aggierailroad

Well-known member
Joined
Jan 8, 2012
Messages
581
Location
Houston, TX
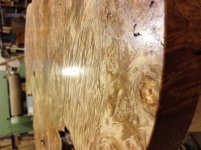
To keep you humble, here's some real burl :)

Just waiting for you to send me $1,600 and I'll mail it your way!

As always, good read. Keep it up!
 

Attachments

  • image.jpg
    image.jpg
    137 KB · Views: 98
OP
D

DoghouseForge

Well-known member
Joined
May 11, 2013
Messages
374
Location
Lakeland, Fl
Been chugging away here at the Doghouse this month. Just wanted to post an update of some of the things that have been produced.

Unfortunatly/fortunatly, my real job has been crazy busy. Honestly, its always crazy busy, but there are a few weeks that really leave no time for playing. Ive been putting in late nights at the shop in order to keep up with the market booths inventory. So around 8pm when my kiddo goes to sleep its off to the Doghouse for a few hours to hack away at the never ending....


Some highlights from the last couple weeks are a new round of serving boards, a cool display/mantel shelf, and another attempt at flora forging with some maple leaves.


Here are the boards. These are the biggest sellers at the market. Luckily, they are way easier to make than the butcher block cutting boards. Its been fun to play with grains and tones with in the wood. The guys at woodcraft laugh at me because I spend a long time looking at the woods overall picture instead of quick, straight, and true glances straight to the checkout.
Walnut is the most important to analyze in my opinion since it can vary from light to dark so quickly on the same board. These changes in tone can add really cool dynamics to the finished piece but some for thought and planning are needed. If you get the tones wrong it will look chaotic and unpleaseing.

Anyway, I know...this is a blacksmithing thread, but these came out really sweet.


The left side is maple ambrosia, walnut and padauk. The center is walnut, padauk, and a sliver of red oak. The right is red oak, padauk, yellow heart, and purple heart. Just in case anyone dosent realize it, there is no stain used, just the natural coloring in the wood. The finish is "Watco Buthcher block oil and sealer" so everything is food grade...even the titebondIII.


I found some crazy vibrant padauk this last trip to the store and man was it fun to play with. It made a great handle for the lastest "Cheese Cleaver" and I think im going to sell the Ambrosia board with the knife as a set.


The walnut was a blast to play with. It contrasted the padauk so well.
The radious was provided by a discarded 6" sanding pad. ;)


People eat these colorful boards up as fast as I can make them...


Heres the flip side of the Ambrosia and the walnut boards


Another fun project was incorporating some salvaged steel I scored walking the closed rail road tracks across from the shop. I was hunting for thrown spikes to use for an up coming knife project, and found these two beauties half buried near some pulled track sections. Im not sure what they were for but the shape was amazing. All I did was get them hot and block brush the rust off, then I welded some 1/8"x1/2" flat bar to the top with holes punched for some screws; oiled the steel and baked it in the forge untill it got nice and black.

The walnut I used for the top was a special piece I have had for a while. Its a perfect pattern, unbroken and colored beautifully. I couldnt bring myself to cut it into strips for serving boards and Im glad I held onto it because it was perfect for this.

I like it plain and simple as a shelf, but my wife suggested I dress it up a little for the market booth. She likes to remind me(alot :)) that she was a visual merchandiser before she became a mother... so I take her advise. She's usually right about what makes things sell...I want to keep everything, so i'd rather nothing sold, but I also want the engine for my jeep....


Ive got one last project to post thats actaully blacksmith realted so Ill get going on that and have it up in a few minutes.

JP
 
Last edited:

machine_punk

Well-known member
Joined
May 14, 2011
Messages
2,540
Location
Napa Valley, California
I like that last shelf...heavy iron and solid wood are one of my favorite combinations...always have been.

Do you just sell locally, or do you have an Etsy account or something?

Do you have a steady source of those files you use for knives, or is that just something you occasionally have from your own farrier business?

Kev
 
OP
D

DoghouseForge

Well-known member
Joined
May 11, 2013
Messages
374
Location
Lakeland, Fl
If you want to see what Padauk does to your shop when cut or sanded just look at everything not on the work station... :lol:


The last project for this update is Forged Maple leaves.

The inspiration came when a few of these big guys blew down while I was shoeing a horse. I like how big they get compared to the other trees in Florida. Plus the fact that they actually color up, slightly before falling off. :thumbup:

So I wanted to make a center piece that could be used from fall into the holidays. Hoping that I can find a buyer at the market in the next few weeks.

Heres the process:

Cut out some 20 guage steel sheet and traced the leaf onto them with a sharpy.


Bandsaw....


Belt sander to clean everything up...


Next I drew out the viens...these things have alot!:willy_nil


Since there are a combination of straight and curved lines I needed two different fullers. One was crisp with no radious and the other was duller with a slight curve. This let me flow around the pattern when needed, but also cut crisp main lines. The process was the same as other leaves have been, using a block of wood as the backing so that the metal has someplace to go when struck.


Using the scroll tongs makes the curving and counturing of the leaves easy.
I should note that I was very! carefull not to overheat the steel. I wanted to keep a nice blue/purple tint to the metal. This will make great colors when its brass brushed, but if it gets to hot and turns grey the coloring wont have any depth. It will just be a solid brass color...


The market makes a great place to do the finish work of projects. I can start and stop with no issues and the time spent talking with folks keeps me from rushing the process.

Here you can see why it was important to keep the blues and purples. Mixed with the brass and stainless steel brushwork it truned out out really slick.


So the rest of the work went into finishing the other two leaves and tweaking the different down turns in order to get the leaf to sit evenly with a flat section in the center. The stems were not working with me so I removed them. I spent a couple different sessions trying to incorporate them, but sometimes what you want and what's possible just dont mix.

With then leaves evend up I could add the glass cups and arrange the leaves around the stilted glass candle holder. I used the leavesto make a "hook and lock" system with the curved outer edges to lock them together. It took some tweaking but it's well worth not having to weld them. Plus this way the buyer can use them in different settings if they wish.

So here's the finshed product. Its unfortunatly not as colorfull on film as it is to the eye, but you can get a general feel for it.


The candle choices for the season are Christmas based, but it could easily have orange and yellow fall colored candles for earlier in the year.


Well, Thats what I got for the time being. Lots of Irons in the fire so as they finish up I put together another update.

Thanks for looking and as always let me know if you have any question!

Thanks

JP
 
Last edited:
OP
D

DoghouseForge

Well-known member
Joined
May 11, 2013
Messages
374
Location
Lakeland, Fl
I like that last shelf...heavy iron and solid wood are one of my favorite combinations...always have been.

Do you just sell locally, or do you have an Etsy account or something?

Do you have a steady source of those files you use for knives, or is that just something you occasionally have from your own farrier business?

Kev

Thanks Kev,

I do most of my stuff through the market and referals from clients. Alot of my Farrier service clients end up buying the more artsy pieces. I have a few that are really into the metal work and the primitive pieces so that helps. The esty store is mostly made to order stuff, but my wife is the one that helps me with its maintainence.

My etsy store link : https://www.etsy.com/shop/DogHouseForge?ref=si_shop


I literally have a 55gal peeper drum full of rasp from over the years. On top of that I have 40 or so that I have saved since I started making the knives. Since i get 2-3 added to the pile each week its doubtfull that Ill find a shortage any time soon. ;)

I appreciate the comments and I love your thread!

Thanks,

JP
 

MP&C

Well-known member
Joined
Oct 21, 2009
Messages
4,396
Location
Leonardtown, MD
The cutting board colors are just amazing! Nice work on the leaves as well. BTW, I checked out your etsy site and noticed some $1 items. Didn't know if you had a black Friday sale going on or just some typo's to fix :lol_hitti
 
OP
D

DoghouseForge

Well-known member
Joined
May 11, 2013
Messages
374
Location
Lakeland, Fl
The cutting board colors are just amazing! Nice work on the leaves as well. BTW, I checked out your etsy site and noticed some $1 items. Didn't know if you had a black Friday sale going on or just some typo's to fix :lol_hitti


The Etsy store re is mostly custom order stuff. Truthfully most of whats pictured is long gone. I just leave them up so I can remake them if people want them. Its easier to price to order than to lump everything into a generic cost pool.

Thanks for the concern lol

And thanks brad!

JP
 
To avoid these ads, REGISTER NOW!
OP
D

DoghouseForge

Well-known member
Joined
May 11, 2013
Messages
374
Location
Lakeland, Fl
WOW! great thread, excellent craftsmanship...

I own a small propane forge but have not made anything that nice. this is great inspiration...


Thanks man,

Get that forge going and post up some projects! the rose is a good one, they sell the blanks already cut on ebay. all you have to do is the fun part.

http://www.ebay.com/itm/BLACKSMITHI...ultDomain_0&hash=item3f2ceeaf2a#ht_367wt_1362


Xicaque,

the etsy store, referals, and the market place. The links to the store are in the page before and the markets pictured somewhere recently,

thanks

JP
 
OP
D

DoghouseForge

Well-known member
Joined
May 11, 2013
Messages
374
Location
Lakeland, Fl
Decided to have some fun this week, despite the fact that there really isnt any time for fun. :lol:

Im gonna have to get in gear tomorrow. Still need to finish up a few knives and a butcher block that got ordered as christmas gifts so I can get them sent out by thier delivery/completion estimates. Not that these orders arnt fun side projects, but sometimes my brain needs to figure out a solution to unfinished thoughts or ideas to clear out the dust.

It was kinda getting a little draggy in the shop so I needed to change up the pace. Its been a while since I just plain turned something into something else. I find a great deal of therapy in projects like this. How to hit the metal, what temp, how hard, and what to do about the finish work... working on these issues in real time keeps my head spinning and tends to cler out the clutter of overthinking. Plus i like when you start with an object/shape and its toatly different at the end of the process.

Rail Road Spike Knives are not my idea...These things have been made 10,000 different ways by 10,000 different blacksmiths and knife makers. I personally had never tried it before so it seemed straight forward enough to just dive in.

Since i had another round of serving boards to manage and some glue up waiting periods i knocked out a few spike blades.

Started with some Rail Road Spikes I scored while walking the closed sections of track behind the shop. These three were rusted a little but had good clean edges and no deep pitting. To clean them up I got them hot and used the block and wire brushes to knock the scale off.


Next i used my big shop vise and put some different twist into the upper half of the spikes. I didnt really think this out to much, kinda just twisted til i was happy, but i did make sure to mark the starting points on each one before twisting.

Here the rough twist. If you didnt see the post on twisting metal jump back a few pages to see the details of how this happens.


Now the therapy...:lol:


GET IT HOT AND WAIL ON IT!


The steel wasnt as tough as I thought it would be. I was under the impression that this was going to be very dense high carbon 1080 1070 type stuff. If it was it sure didnt feel like it.
I drew out the different blades i wanted with a soap stone. Usually I would go to the band saw but ther wasnt alot of material to remove so I let Mr. Baldor have a little extra steel for lunch.

He likes aged metal, must be like stinky cheese to a ginder...


here the roughed out blanks. The one on the left has the cutting eged ground into the blade and some cleaning has been done to the twist work.


And....an hour or so later i had the blades rough ground with the twist nicely evened up.


You will probably notice between this photo and the next that the **** ends of the handles will be different. In my haste I didnt think about which side of the spike i was flattening and i made the blade edge on the worng side of the handle for two of the knives... this sucked because I had to use the torch to heat the **** end and twist them around accordingly. One of them didnt have enough material left to do the full twist needed so that knife got an "intentional" rear facing head. :lol: live, learn, and adapt.


Next step is to fine tune the handle work and to finish grind the blades.
I took them up to 600grit and then used my buffer/cloth wheels with a few different rouges to put the shine to them. :thumbup:


So You could leave them here and they would be cool, but...Ive been having alot of fun lately with the tempering color scale...I know, your tired off hearing about color to heat comparisons...this time however its going to be used to give a RAD! effect on the blades before I finish them.

Like i said before, 10,000 different spike knives so you kinda got to find cool ways to make stuff like this your own.

Off to the house for a little soak in the oven.


After 2 hours at 500deg.


Youve all seen the knives turn this cool blue gold contrast but it is very thin and while it last the normal handling stresses it smears and distorts when its wiped hard or washed. To stabalize eveything they all got 2 coats of minwax Polycrylic Ultra Clear Coat sealer.


So here are the finished railroad spike knives

or...what i have dubbed them...

Martha Stewarts prison shanks....


this ones definitly a while collar prison weapon!


These will make some cool gifts this holiday and I can cross Railroad spike knife off the list of projects to try.

Have a good sunday, Ill try to post up the currnet knife builds photos once they are finished. No new info so just pictures this go round...

Thanks,

JP
 
Last edited:
OP
D

DoghouseForge

Well-known member
Joined
May 11, 2013
Messages
374
Location
Lakeland, Fl
ok part two for the evening...


Here are the finished serving boards from this week, seems like alot of guys are doing or thinking about doing stufff like this since there have been serveral post or threads started/updated about it.

hopefully this gives you all some ideas:

If a blacksmith can do it anyone can!

Heres the info:

Maple/Ambrosia with walnut boarders. Red heart wood and purple hearwood accents.

The center is rounded with a 6"sanding pad as the template and has walnut and ambrosia striping with a yellowheart and purple heart accent in the center.

I learned this week how to use a piece of oak clamped to the saws table top to make a "zero clearance" tolerance with my table saw blade. Its safe if done correctly but get help if your not totally sound with the process. Last thing you want is that blade bucking the boards back up and into your face.

Im hoping to do alot of this fine accent work in the future.


The flip sides


All have been sanded with a 3x21belt sander at 40 grit to plane it down and remove any glue/unevenness. (I will say that with the "aggiemethod and the magical cauls" this first rough sanding is really more about the glue removal since there really isnt any buck to the pieces anymore) :thumbup:

Edge work is just done with the DA sander on low, with an 80grit disc. Then everything gets 80-120-220grit and the endgrain edges get 400 grit as the final grade.

Watco butcher block oil and sealer with easy 600grit in between coats... 2 coats per side...

Hope you guys trying these board project out can use some of that info. If you havent go read Aggierailraods blog...its basiclly a very detailed posting like these but he really explains why the wood acts the way it does and explains the steps needed to prevent and correct it. Its honestly made stuff like these boards easy and fun to do since im not sanding all my problems away before i even get started...

heres the link: http://howtoforengineers.blogspot.com/


Allright,

have a good night,

have a good week and be safe,

JP
 
Last edited:

aggierailroad

Well-known member
Joined
Jan 8, 2012
Messages
581
Location
Houston, TX
haha, thanks for the shameless plug!

I've got something up my sleeve you'll want to try when you get your hands on those planks and timbers you were talking about..

Full writeup coming soon!

I am really digging on the maple/ambrosia. It reminds me of olivewood. Have you considered routing a bullnose dado about a 1/2" in around the perimeter to catch liquids as they are cut? One of my thick cutting boards at home has it, and it helps keep stuff from sloshing around on your way to the sink. I suspect your boards are more suited for fine wines and cheeses, as they look so damn good.
 
OP
D

DoghouseForge

Well-known member
Joined
May 11, 2013
Messages
374
Location
Lakeland, Fl
I am really digging on the maple/ambrosia. It reminds me of olivewood. Have you considered routing a bullnose dado about a 1/2" in around the perimeter to catch liquids as they are cut? One of my thick cutting boards at home has it, and it helps keep stuff from sloshing around on your way to the sink. I suspect your boards are more suited for fine wines and cheeses, as they look so damn good.


Best part about that Ambrosia is its $4.45/boardft. So a 1x6x6ish board is around $14.50...considering 1 boardft of walnut is the same price as a full board of the other...lets just say I bought a "few" feet.

Ive been strugling to keep up with the repalcements and the day job so I took this "easy way out" and have been exploiting the Ambrosias cool color and patterns in order to make less cuts in each board...

The "juice Groove" as its called is something I do when people order it.

I cant believe you didnt threaten to cut me off from my woodcraft education if I didnt send you those rail road spike knives. With a name like Mr. Road I expected no less. :lol:

Thanks Thomas! I appreciate it!

Alright, going to the park with my lil one and then after bed time im heading back to the shop. Ive still got a knife to forge, one to handle, and one to finish grinding...then theres the issue of the butcher block that hasnt even been started yet...:willy_nil:willy_nil:willy_nil Im so screwed

JP
 

aggierailroad

Well-known member
Joined
Jan 8, 2012
Messages
581
Location
Houston, TX
I figured I'd get laughed out of the forum for being so cliche! But heck yes I want one.

Did you temper them or did I miss it?

And, they are "soft" to prevent chipping when hitting them with a spike maul or sledge..

That's why they are everywhere, not special enough to pick up. If they get loose, they make these pine "stakes" that you break off in the original tie holes, then drive the same spike back in the same hole. It's a cheap way to tighten a loose, old tie.
 
OP
D

DoghouseForge

Well-known member
Joined
May 11, 2013
Messages
374
Location
Lakeland, Fl
Did you temper them or did I miss it. .


The last bake to get the coloring was the same as tempering, I just didnt do a proper hardening. The steel felt so soft that I just decided to go for fancy and novel. No sense polishing a turd... lol they're sharp but I imagine the edge isnt very tough.

I had you in mind , that's why I asked about your name the other day. Ill put one in the box with the leaf.

JP
 
OP
D

DoghouseForge

Well-known member
Joined
May 11, 2013
Messages
374
Location
Lakeland, Fl
Well...I shived myself...lol...

Im stuck at home at least untill tomorrow so im bored...

I was going to post this later when i finished the other knives im working on but since its finished ill put this one up now.

only have one arm for typing so gonna be mostly pics today. if you want to know how stuff is done look back through the thread and its all there...

first! the injury!
Hoof knife for trimmig the soles of horses feet...slipped trimming the frog and BURIED! it in my forearm...1.5" of blade to be exact...Apparently i cut into the muscle that extends your arm and fingers so they arnt working very well at the moment... should be fine...just hurts...


i never go to the doctor...i stopped and got guaze and some steristrips...my wife laughed at me as i tried to close the gapping hole...Dr. laughed when she was told the story...so my wife and hot lady dr. both laughing at my idiocy..:sad:


So i have a few christmas orders ive been working on and heres one of them.

Guy wanted a big, heavy, utility knife with a burnt oak handle...

id say i nailed it..:thumbup:


the stuff Aggies dreams are made of...


maybe someone can explain why the stripes in the oak burn faster than the rest??? works cool for me because it tiger stripes it, but id like to know why...


heres a 6" chef knife that i should finish sunday if i get the all clear...
ill get into the explaination in another post but this ones differentialy hardened.

This is the straightest ive achieved to date... basiclly the cutting edge is hardened while the spine remains softer. alowing for more flex to be achieved in different parts of the knife while the edge stays hardend and retains the cutting edge...


if you look closly the blade still shows the density line change after the final grindwork... i find this stuff to be very cool...


repeat photo but it shows the handle..Bocote wood is Rad!


Allright, back to being house bound...

Ill get the other projects up once im back in action.

JP

"Shop of Solitude"
 
Last edited:

MP&C

Well-known member
Joined
Oct 21, 2009
Messages
4,396
Location
Leonardtown, MD
Yeah, yeah, those all look nice and everything, but we need to see the one dripping with blood. :willy_nil

Nice work as usual, at least we know for sure your knives are sharp! :lol_hitti


BTW, nail guns are my vice.....


nailhand.jpg


nailhand2.jpg
 
Last edited:
OP
D

DoghouseForge

Well-known member
Joined
May 11, 2013
Messages
374
Location
Lakeland, Fl
Yeah, yeah, those all look nice and everything, but we need to see the one dripping with blood. :willy_nil

Nice work as usual, at least we know for sure your knives are sharp! :lol_hitti


Nail gun....
QUOTE]

Ha! I dont have any ****** shots...my wife took that one when I had my eyes closed in the ER...

your xrays look pretty clean for a sheet metal man...that arthritis in the distal thumb joint has me worried though... ;)
 

RivennHewn

Well-known member
Joined
Jun 4, 2011
Messages
10,356
Location
PNW
Been enjoying this thread. It's giving me the itch to set the forge up again.

Here's some pics of a few I've made, and a few Pakistani blades from back when I was just working on handles.

I love the more primitive aesthetic as opposed to the super finished knives you'd be afraid to take outside and use.

Keep up the postings
 

Attachments

  • il_570xN.134058460.jpg
    il_570xN.134058460.jpg
    57.4 KB · Views: 40
  • il_fullxfull.135343057.jpg
    il_fullxfull.135343057.jpg
    74.3 KB · Views: 43
  • indian1.jpg
    indian1.jpg
    93.8 KB · Views: 41
  • IMG_7099.jpg
    IMG_7099.jpg
    150.4 KB · Views: 43

aggierailroad

Well-known member
Joined
Jan 8, 2012
Messages
581
Location
Houston, TX
Ew. Enough said.

JP, I've got a French made pocket knife that has a pretty long history. The neatest part of the knife is that each craftsman grinds his mark in the back of the blade right next to the hilt. They are all unique and you can identify the maker if you knew them all.

Here's a link kind of showing this. http://www.original-laguiole.com/cat/57

Might be something you could incorporate?
 

Kevin54

MEMBER EMERITUS
Joined
Jan 12, 2005
Messages
29,341
Location
Urbana, Ohio
Doghouse....I just want to say that both the wood projects and the metal projects look fantastic. I love the looks of the cutting boards.

RivvenHewn.....beautiful work also. I'm really liking the looks of the knife in the first pic. Very nice!!!!!!!
 

aggierailroad

Well-known member
Joined
Jan 8, 2012
Messages
581
Location
Houston, TX
JP, you've just about got this clamping thing figured out!


A sampling of today's work.. Walnut, pecan and mahogany Pachmayr style shooting box.

With any luck, I'll return to you a nice chunk of that burl I showed you earlier for you to make into a nice knife handle. Would be nice if you'd put that skill to use and make me a fine set of chisels or something.... hint... hint...
 
Last edited:
OP
D

DoghouseForge

Well-known member
Joined
May 11, 2013
Messages
374
Location
Lakeland, Fl
Been enjoying this thread. It's giving me the itch to set the forge up again.

Here's some pics of a few I've made, and a few Pakistani blades from back when I was just working on handles.

I love the more primitive aesthetic as opposed to the super finished knives you'd be afraid to take outside and use.

Keep up the postings

Thanks Man! I'll be in touch about the Anza site. I like your primitive style with the copper rivits! I usually push a longer rivit through and grind it flush but im gonna have to put your idea on the to do list. !

Doghouse....I just want to say that both the wood projects and the metal projects look fantastic. I love the looks of the cutting boards.

RivvenHewn.....beautiful work also. I'm really liking the looks of the knife in the first pic. Very nice!!!!!!!

Thanks Kevin, always appreciated! Let me know if you have any cool ideas. I know your holding a few of them in there. :thumbup:

JP, you've just about got this clamping thing figured out!


A sampling of today's work.. Walnut, pecan and mahogany Pachmayr style shooting box.

With any luck, I'll return to you a nice chunk of that burl I showed you earlier for you to make into a nice knife handle. Would be nice if you'd put that skill to use and make me a fine set of chisels or something.... hint... hint...

and... Mr. Road...dont you have your own thread to post pictures in now? :lol_hitti

Im only kidding...always cool to see your work.

Im close to starting my research into the makers mark etching. Its not real difficult. Stamp your mark when its hot and then do your normal work. once its been heat treated you can etch the blade with some form of acid (ferric chloride is the most common). Then you do your finish grinding and polishing. The etching grinds away from the blade but stays in the recess of your mark making it clear to read. I just need to figure out the specifics.

Im affraid Ive been taking the easy road with my clamp work on these serving boards. Only having to worry about one direction of force and the top/bottom cauls has spoiled me.

Had to get serious today and finish the grunt work on a Etsy Christmas order. This girl must really like her man, 18''x20''x2" butcher block. The biggest ive made yet. I got it glued and clamped this afternoon so I will hopefully be able to finish the sanding and get some searler on it tomorrow. Its suppose to ship out on monday...I'll make the deadline, but it will be close. She ordered him a 8" chef/utility knife as well... I think im gonna have to make myself something this nice one day. :lol:

Ambrosia, Walnut, Bloodwood, Purpleheart, Red oak, and poplar. This is before glue so the seems are not compressed but you get the idea. Its gonna shine up real nice! Plus its freaking huge!


Got everything preped before i laid down the glue..
I looked over and thought about an operating room in the vet clinic I do theraputic farrier work for.

"Scalple and a #10 clamp nurse" ... lol


Under, over, around, and through... this thing was so big I had to cut new top and bottom caul templates to fit it, but it went together real nice so Im hopefull for the removal tomorrow showing good news.


Oh... I cracked that other knife blade pictured in the last post...sadness :sad: Just a smallvhairline about an inch down the cutting edge but I cant sell it like that.. Im gonna try to salvage a blade from the wreckage, but it still *****. My dumb *** tried to fix a little woble with the hammer after i had done the hardening...Dooh! what was I thinking..I know better...

Tomorrow shall tell the tale...we will see how much my arm lets me do and how big a price Im gonna pay for using it so much today.

This is the last order for the year and my buddy's design build launches 12/22 so the shop will finally be able to get cleaned back up. Seemed futile to keep cleaning it. I tried, failed, and then succumbed to the fact that saw dust is saw dust and untill the saws and sanders stop there just isnt enough time to keep up with it, family time, and work my real job

JP
 
Last edited:
OP
D

DoghouseForge

Well-known member
Joined
May 11, 2013
Messages
374
Location
Lakeland, Fl
Allright,

Throughout the thread many of you guys have offered to help with the knife works if I was to get stuck...

Well...Im stuck...

During the Quenching process I am getting these tiny! under 1/3" cracks/splits through my sharpend cutting edge. The blades are straight, I have my temp correct, and im doing everything Im supposed to, but as soon as I pull it out of the water there they are. One or maybe 2 splits per blade.

I end up having to grind out the crack and resharpen/shape the blades and then harden again. So i have mananged to slavage most of them but this shouldnt be happening at all.

Am I sharpening them to far before I quench?

The thought here was that its easier to remove the stock after normaliztion so the more I get done before I harden it the better. Ive been taking the cutting edge all the way up to 320grit before hardening. This is basicly the finished cutting edge...I do a little more with 400 and 600 grit but the cutting edge is established around 220-320 so its razor thin at this point.


Can the slightest curve in the blade cause constriction when hardend and therefore over tensionthe cutting edge? Basicly tearing it by the rapid change?


I have noticed that this doesnt happen with the blades that have a thicker cutting edge/blade at the time of the quench so this is why I have focused on these two questions.


Any help?

Thanks

JP
 

aggierailroad

Well-known member
Joined
Jan 8, 2012
Messages
581
Location
Houston, TX
Dude, you opened a can of worms.... To answer these questions, we need more info, particularly about the steel type, quench material, temperatures, and on and on.

Here's a link to get you started down the road. Give us some more info and we'll narrow it down.

Quench Cracking
 
To avoid these ads, REGISTER NOW!
Top Bottom