To avoid these ads, REGISTER NOW!

Blacksmithing Projects Journal

To avoid these ads, REGISTER NOW!

Southernbuild

Well-known member
Joined
Aug 25, 2012
Messages
402
Location
North MS
Update, the anvil rescue mission was a success. Good thing I went ahead and got it, because to the roof had a nail hole that was letting water drip directly onto the anvil :( I was actually able to just carry it through the junk, I knew it was heavy, but was shocked / excited when it weighed in at 150 lbs :rocker:

It's not in the best of shape, and looks really old, but I got 75+% bounce back with the hammer test. Makers mark was too weathered for me to read it, but all in all, I'm pretty excited :D
 

Attachments

  • IMAG2086.jpg
    IMAG2086.jpg
    144.6 KB · Views: 72
OP
D

DoghouseForge

Well-known member
Joined
May 11, 2013
Messages
374
Location
Lakeland, Fl
Update, the anvil rescue mission was a success.
It's not in the best of shape, and looks really old, but I got 75+% bounce back with the hammer test. Makers mark was too weathered for me to read it, but all in all, I'm pretty excited :D


That my friend looks like an OLD! peter wright ...

:thumbup:

Im sure the A-Team theme song gave you power enough to lift that thing...BA Baracus was with you in spirt.

If you want to...

Get your self a heavy wire brush and a 4.5" grinder and give it a good once over. Then switch to a finer wire and hit it again. On the horn and the face, once you have it clean of the major rust use a plam sander or DA sander and start with 40grit and work up to 220. You can use a flap disc on the bigger grinder to smooth chips and pits that wont sand away. This will keep them from chipping more since the slightly rolled edge is much more durable than a sharp on. On the horn pay attention not to make ridges as you want as nice a contour as you can get.

It looks to have some established pitting so you cant really fix that, but you'll want what is still in good shape polished so your steel doesnt bite when you forge it. You can work the upper edges with the flap disc as well but dont get carried away. I would find a section that isnt rolled way off yet and focus on making that crisp...An anvil with a clean edge all the way down is nice but you really only need one 90deg section on each side to get your work done.

Look for a set of 3 numbers on one side. Could be on the foot or across the center but they should be there. Thats the Stone weight marklings and it will varify the engish make.

A cool thing about that is it apperars solid wrought since there's no line seperating the face plate from the body...again a sign that this is an old probably pre 1900 anvil.

The last thing is to paint it so it doesnt rust up on you again...The face is easy to clean with a wire brush but the sides are annoying with the pits and stuff...
I like to run up to the edge on the sides and under the horn past the turning line...

believe it or not this one looked alot like yours...Just took a couple hours and some thoughtfull work smoothing and ploishing...


If you cant tell Im super pumped for you! :lol:

Congrats!

Looks like your gonna need to build a base...;)

JP
 
OP
D

DoghouseForge

Well-known member
Joined
May 11, 2013
Messages
374
Location
Lakeland, Fl
You luck DOG! ;)

I know, I know. It's great.

Quote from the wife tonight: "Are you sure we're supposed to use this? This is way too nice for a cutting board."

:thumbup:

Thomas don't worry, guys who provide friendship, whitty conversation, FSJ Cherokee advice, and a powerful "Air Supply" connection get slightly off balanced, too nice to use cutting boards.

BUT!!!

guys that provide technical support, parts listings(with links) , and photo documented build instructions for heat treat ovens have been known to get slightly warped, too nice to use knives,

:lol:

Jp
 

toms73novass

Well-known member
Joined
Nov 10, 2005
Messages
483
Location
grand island, ny
I just need to reciprocate with all the great posts you have done. Oh, by the way I am going to post a updated detail on my electronic controls when I redo the box that holds it to the side of the oven. I need to put in a fan to draw in cooler air to cool that area and also create a slight heat "baffle" to isolate the electronics from the heat radiated from the oven. In fact the heat baffle might be enough, but the fan is extra insurance.
 
OP
D

DoghouseForge

Well-known member
Joined
May 11, 2013
Messages
374
Location
Lakeland, Fl
Can you make a Doghouse out of a Ball Peen hammer?


Got a mixed update tonight.

Since the last post there has been an explosion of knife orders. This one makes the previous seem easy, but Im up for the challange. Ive learned a little, so far, so there's a nice long while before these need to be shipped.

Its a mixed bag of large Chefs, Santokus, various pettys and paring knifes, and a couple slicers. There was some extra blank left from this forging session so an 11" slicer was cut as well. (for myself of course)


Another issue that needed to be addressed was that all of these knives have been heading out without any mark or brand. I looked into a few punch makers and they wanted between $70-$150 for one with my logo on it... at 1/4" to boot!

HA! so the other day the question was asked..., "can you make a doghouse out of a ball peen hammer...?''

the answer:....

Yes, yes you can. !

Draw what you want the makers mark to look like with a sharpy and start removing material untill you have just the center left. Then use a dremel with the cone shaped grinding stone to hollow it out.

I wanted it to match the wood working brand and it turned out better than hoped.


This one is ground to the final thickness. Lesson learned is to punch closer to the spine, but thats an easy fix. This worked and should look cool after its handled and polished.


Another cool bit of news is that Doghouse Forge products and services is getting a web site. No amature hour web site for this stuff so I had the knives, woodwork, and process professionally photographed. This was a wierd feeling. When you're so used to being the captain, steping back and letting someone else take charge is hard.


my phone camera taking a pic of what they were taking a pic of. lol


I dont have the photos back yet, but Ill leak a few to the GJ when I do.


Some of the handle materials on deck are in this photo. Should be some stunners, plus a few suprises in the mail that will take this up another level.


The last thing for the night was a lesson learned in humiliity. Its easy to make something, but to make 6 of somethinig identical, by hand, is freaking hard!

My buddy needed some forged hammer finished brackets for an outdoor kitchen he was contracted on. The granite bar top had a hint of play to it, and this guys is as big a perfectionist as myself so he added these brackets for some extra security.

started with some 3/16 x 2 flat bar
forged the hammer finish on all of them...holy **** was that alot of tapping!


next was to build a little jig for a forged template that fits the deminsions he asked for. 6"under the bar and 8"down the supporting wall.


Forged two identical pieces of 3/8"x7/8" flat bar and welded them together down the underside. This gave the form needed to bend the previously forged straps evenly...

Clamp the lower end and heat the section above the clamp. Then bend and add more clamps...repeat this every 1.5-2" untill you have it turned the entire length.


Ill post some pics once I get them of the installed product.


So kinda scattered currently, Lots going on... the only other news worthy info is that all the parts for the heat treat oven build , modeled after Toms73nova's, have been ordered! cant wait to put this thing together and take the heat treatment to the next level!

Progress posted as it happens!

Thanks
JP

and thanks Gallye!
 

metal1313

Well-known member
Joined
Apr 28, 2009
Messages
3,416
Location
clinton NJ
i know you do most of your work with hammer and flame, but have you considered something like a hossfeld bender? with the various dies and shoes you could make items like those brackets easily, and repeatedly.

im on the hunt for more dies for mine to make it more useful to me, but they are few and far between in my area
 
OP
D

DoghouseForge

Well-known member
Joined
May 11, 2013
Messages
374
Location
Lakeland, Fl
i know you do most of your work with hammer and flame, but have you considered something like a hossfeld bender? with the various dies and shoes you could make items like those brackets easily, and repeatedly.

im on the hunt for more dies for mine to make it more useful to me, but they are few and far between in my area

Wow!

Just checked out some links and videos of those benders... Im not sure if I do enough uniform fab work to justify something like that in the shop at this point, but I can see how it would be a necessity if repeated units were the norm. Im entertaining the idea of doing custom gate work. A lot of the farms I service have stupid expensive gates and artistic details built into them. Its down the road but definitly smething I'd like to get my business into.

JP
 
OP
D

DoghouseForge

Well-known member
Joined
May 11, 2013
Messages
374
Location
Lakeland, Fl
I just wanted to take a minute and say goodbye to my longtime partner, Sophie.

I lost her last night. Its was peacefull and she was ready. She started this life with me over 14 years ago, and ended it by my side in the home she so gratiously protected.

I cant begin to tell you the adventures we've had. Ranch Life, College, and the PCT to name a few. She allowed my wife to marry me, worked by my side everyday untill the end, and cared for my daughter like the pup she is.

Im blessed to have been able to spend a great day with her even though we both knew it was the last. It couldnt have been more perfect, for one of the worlds most amazing partnerships.

"Jon, in life you only get one great dog and one great horse, dont waste them" Rod Taylor

Looks like im out.

JP


Take a minute today and tell your partners how important they are. Give them a hug or a pat, and breath deep that feeling of understanding that only the two of you share.

Bye Soph,


OP
D

DoghouseForge

Well-known member
Joined
May 11, 2013
Messages
374
Location
Lakeland, Fl
Thanks Guys,

Been a quiet week so far to say the least... just weird not to hear the nails clicking on the wood floor and to look over at my passenger seat being empty...

Wifes trying to help...been sending me pics of Aussie's and Aussie Mixed puppies all day today.. :) Its exciting to think about starting the adventures all over again, but I just had planned on doing it before Sophie passed. She could teach anything, honestly I never spent a minute of training on the other dog(wifes)...sophie put her in place and explained the rules of life.

Guess i shouldt have waited until she was 14+ ... :headscrat

JP
 

nine4gmc

Well-known member
Joined
Mar 24, 2012
Messages
14,357
Location
Dallas
My condolences, I had a tear come to my eye reading the news and had to pick my lil dog up for some lovin...
 

Farmerjonathan

Well-known member
Joined
Nov 23, 2013
Messages
349
Location
Northwestern Indiana
Serviced the horses feet at the "Fancy Chicken Coup Farm" , you should see the rest of the place..over the top to say the least!


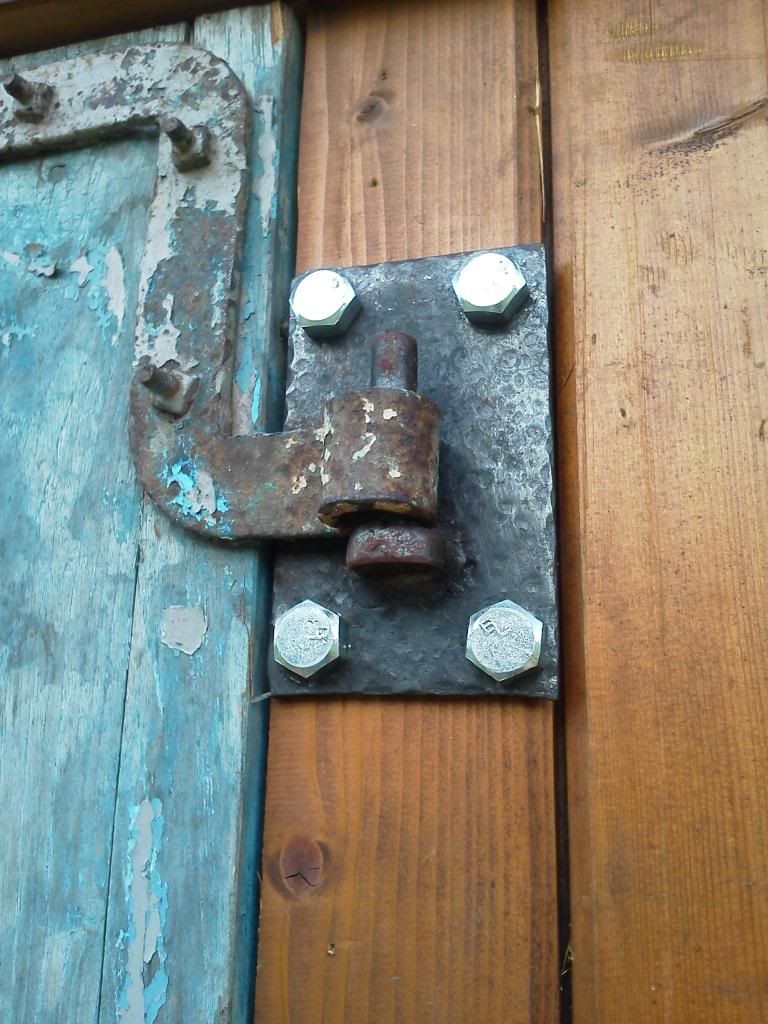
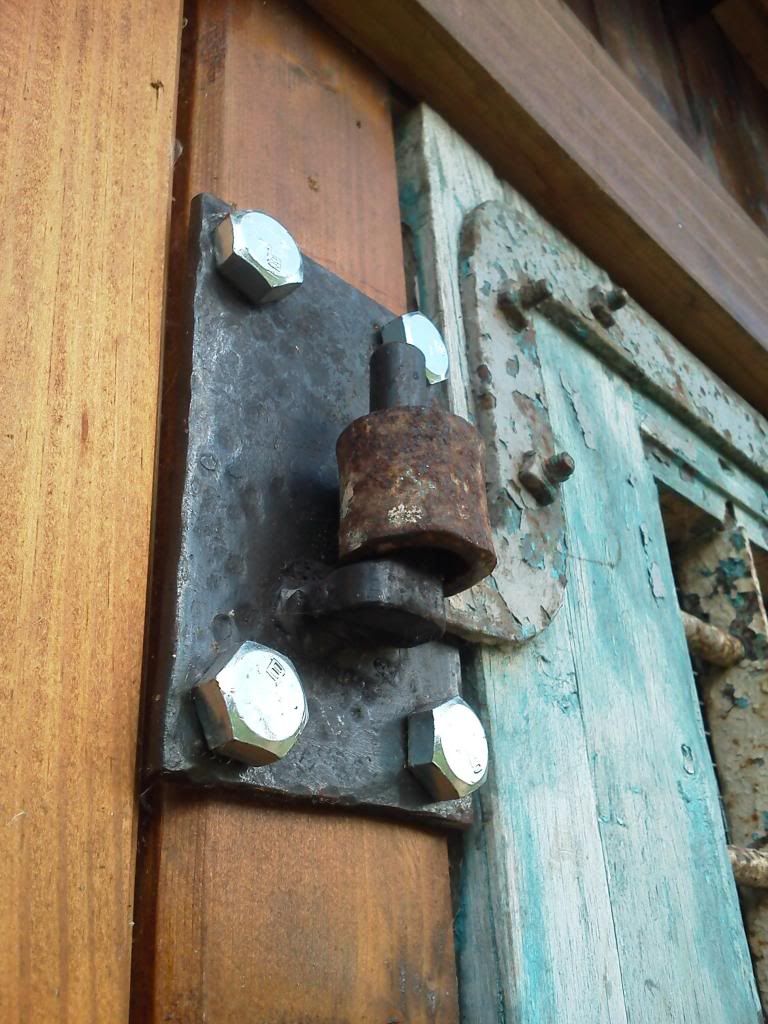
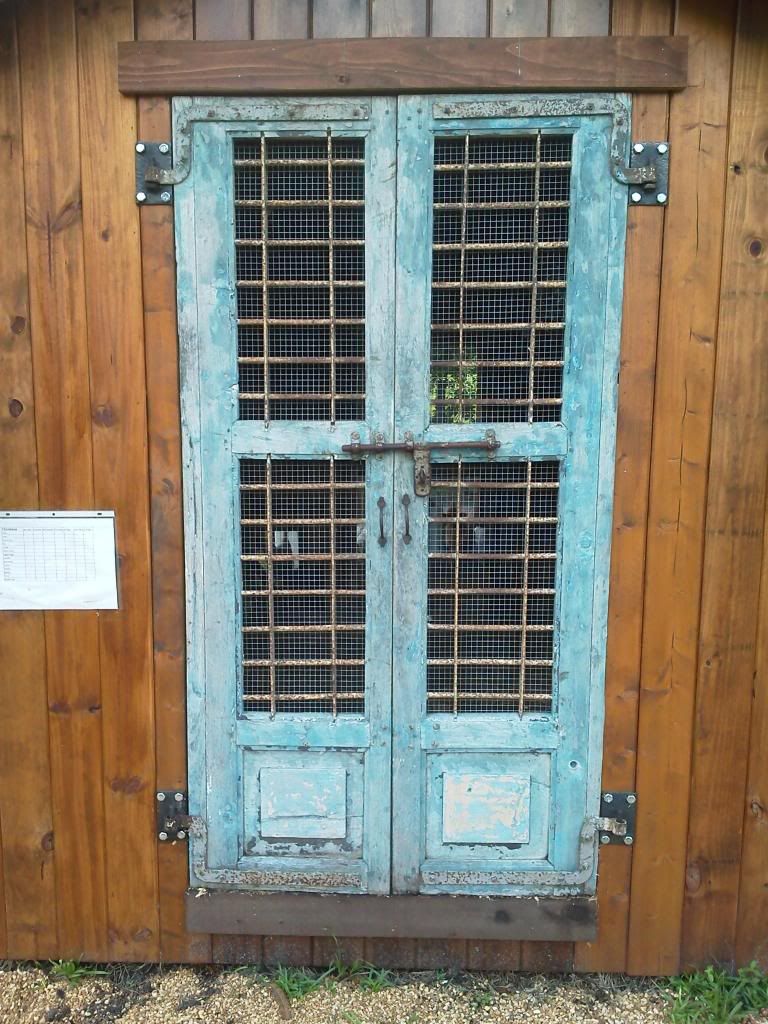
Just wanted to update the pintel photos now that they have had a couple months in the elements to rough them up a bit:

The faux wrought Iron looks pretty good next to the worn out rustic stuff... another 6 months and they are going to really look great!


Must be a 4-H project for one of her kids. The sheet on the left is time specific for each chicken and the eggs collected as well as water and feed records! Intense...

The owners of this place just finished building a huge new house and ask me to make a bunch of pieces for the inside decor. Hopefully, I can accomodate the requested items because I could really use the extra loot. The Belt Sander and sheet metal brake I need are not exactly "important" items as far as the wife is concerned. ;)

Thanks

JP

Great job on the hinge plate (haven't gotten past page 6 yet). Only thing that sticks out to me, maybe cut those hex heads into square heads and dip in some acid to patina them. Great jobs on everything. How many horses you shoe on a weekly average?
 
To avoid these ads, REGISTER NOW!
OP
D

DoghouseForge

Well-known member
Joined
May 11, 2013
Messages
374
Location
Lakeland, Fl
Great job on the hinge plate (haven't gotten past page 6 yet). Only thing that sticks out to me, maybe cut those hex heads into square heads and dip in some acid to patina them. Great jobs on everything. How many horses you shoe on a weekly average?

Thank you,

thats a good idea on the square heads! I dropped those brackets off with black gate bolts but the contractor used those zinc plated ones. The owner wasn't real happy with him but they look ok at this point. Im going there this week so ill get a updated pic.

I work with between 60 and 80 head a week. It just depends on how many shod horses and how many trims. I can only shoe about 8 all around in a day, especially when I have to make a lot of shoes. On the other side of that, last week I had a day with 19 trims and one shod. So I try to mix and match the stops to keep things balanced. To many trims and you're probably gonna hurt badly the next day, but some barns are full day stops by themselves so you just gotta put your head down and do some work.

thanks for reading through it!
 

Farmerjonathan

Well-known member
Joined
Nov 23, 2013
Messages
349
Location
Northwestern Indiana
My hat is off to you, started shoeing horses after graduating from OK horseshoeing school in Stillwater, OK in 1977. About 10 years ago quit shoeing and trimming outside horses. We have 9 currently on our farm. Stocks have saved my back and kept me able to do my own. Bad back is an understatement for me. Keep healthy and man I am enjoying your work/demos!
 
OP
D

DoghouseForge

Well-known member
Joined
May 11, 2013
Messages
374
Location
Lakeland, Fl
So...Im sick...

I never get sick, NEVER!

This is how my head feels...


My wife has banished me into the guest bedroom with the vaporizer, cold meds, and an "economy" pack of throat soothing candy.

I should really be working on the Doghouse Forge website but I wanted to do this instead.

So tonights post is a mixed bag...Since my last update the photoshoot pictures arrived, I built a heat treat oven, and finished a few orders.


As mentioned a few post back I needed high resolution photography for the web site. Through a mutual friend I meet and worked with a local photographer and am very pleased.

He really did a nice job. My only complaint is that his photos are so clean they show every mistake Ive made. :headscrat


Some of my favorites are a series he did on the patina these carbon steel knives develope. I've tried to capture it before but just didnt have the ability. I have a good enough camera, but lack the rest of the puzzle.


Ill leave the majority of his work as a suprise for when the website launches but there's just one more series I wanna show. The cleaver was a knife that I never could photograph correctly. It always looked different then it did in real life when I took the pics, but he nailed it...


Unfortunatly, I cant afford to have every knife I build professionaly photographed so Ive been working on it at home. The website has a Blog section thats going to highlight the individual orders as they are finished. Not so much a "step by step" or "hey I scewed your thing up, but this is how i saved my ****" like the GJ here, but a way to let the customer feel like they have been apart of their knifes process... I cant have camera phone pics on the website so I guess time will tell if I can up my game.


The last batch of knives was a cool one. A brother and Sister each ordered knives but reqested the handle material be some 100+year old barn wood from their families dairy in Illinios. Seemed simple enough, LOL!

This wood was a nightmare to work with...Knots, Checks, the wrong grain presentaion, and density differences to name a few. I had 12 pieces and it took 7 to get the 4 keepers that eventually went on the knives. All the checks and knots had to be stabilized with super glue before you could shape them so when one broke or cracked it meant a decent amount of lost time.

The wood itself was kinda boring so it needed the knots and checked areas to give the curves of the handle more life...


My honest hope for the finish was low, thought that it would look like a polished 2x4, but I couldnt have been more wrong. Instead of the usual sealing technique I sanded each coat from 600 to 2500 grit. By the final coat I used a wet 3000 grit trizac pad only and it worked out great..Deep and glossy, yet food safe at the same time.


So here are the "Leuty Woods"

7.75'' Cutaway Chef , Barn wood, and Brass


7" Santoku , Barn wood, and brass


Also had an order for a pair of knives.
7.75" Cutaway Chef and Pairing Knives. Standard builds and happy customers!

7.75" Chef / blackwood burl and copper


So to finish off this section I have some really cool news. Doghnouse Forge has a "stabalizer" now. :thumbup: Means I dont have to pay retail for my fancy Burl and spalted handle materials anymore. Lucky for me the guy I use is a fan of the knives so he offered me a trade for one. I got probably $300 worth of scales in retail cost, and he's getting a cleaver like the one listed above... SWEET! Hes interested in trading an entire sets worth of knives vs materials so this could prove to be a very good thing!

heres a sampling of what I got, everything pictured has another matched set to go along with it so there's enough material here to dress up the knives for a while.


OP
D

DoghouseForge

Well-known member
Joined
May 11, 2013
Messages
374
Location
Lakeland, Fl
Allright second section for tonight is a brief look at the heat treat oven.

"Toms73Novass" posted a great build about a month ago of how to do this yourself instead of ponying up the $1300 it cost to buy one.

Im gonna basiclly just do a little show and tell since the how to was already handled.

Heres the link to his build (he also posted a RAD! forced air forge build this weekend)- http://www.garagejournal.com/forum/showthread.php?t=237184


The behind the scenes work at play here is pretty large. Toms been kind enough to message me the parts list, and answer my uneducated questions. So I owe him a BIG thanks!

9am - friday morning:


TC23 light duty fire brick - 3"x4.5"x9" - 2 cases 10 per case
Empire High Duty Refractory brick 3"x4.5"x9" - 9 total
KO WOOL M-Board - 1" thick 2'x3' - 1 full board
KO WOOL blanket - 2" thick 3sq.ft

Total cost - $201


12pm - arrived at shop and began lego construction on the Egyptian Tomb:


Interior deminsions - 24"x7.5"x9"


1pm - used the "Big *** Fan behind you" and respirator method to controll the dust on the router table when grooving the bricks.


2pm - relaized that the empire high duty brick was way overkill and to heavy for an unsupported housing structure, then realized there wasnt enough TC23 light duty to cover both the walls and floor...

215Pm - decided that driving 1.5 hours for 3 bricks was silly and began over engineering


330pm - finished building the base 1.5"tube legs, mitered 2.5"angle, 1/4x1" cross braces, and 16guage floor


345pm r- re-assembled tomb


4pm - broke end caps and the main cover out of 16guage


5pm - had brilliant idea to use snap down clasp to secure the unit instead of welding it...Now if i need to work on the enterior is a 30 second process to remove the shell...


6pm - broke the housing and lid for the electrical box


Went home....

1030am - Had conversation with "Toms73Novass" , rambled at him... he politly listened to the rambling and then suggested this setup.
instead of one long wire each side will have a wire that connects to the dead post in the center. This makes its two loops so if one fails you only need to repair that side.

(washers are to big...these are just what i had and were used for mock up)


1130am - built door and insulated it with 2"KO Wool blanket..Door depth ws 1.25 " so there is a large cushion of blanket that helps to ensure seemless door fit. Added hinge, latch, and clasp


Painted with 1200 deg grill paint...stood back and said "hell yah"


I have everything i need to run it except the Kanathal Wire which i ordered today...Once thats here I will hook everything up, and make a little controll box tab towards the front for the digital controller.

I had to buy stuff from the referactory supply in box or full unit form so I have extra stuff. You could also save money by not buying the high duty, million pound bricks...

With the electrical and element, sheet metal, and the insulation im running right at $300...

Thanks Again Tom!

More updates when it actuall gets things hot. :shocking:

Have a great week !

JP
 
Last edited:

machine_punk

Well-known member
Joined
May 14, 2011
Messages
2,540
Location
Napa Valley, California
WOW! Lotsa cool stuff going on over there...

I know the feeling of getting pics together for a web site. I've been slowly working on that for myself.

I like the doghouse maker's mark made from a hammer. I've been thinking about having a maker's mark stamp made for me...now I might need to think about trying to make one. Perhaps out of oil hardening drill rod.

Very cool furnace you've got there. Did I miss how you are going to heat it? Or is it just an 'insulated box,' to slow down cooling?

Kev
 

toms73novass

Well-known member
Joined
Nov 10, 2005
Messages
483
Location
grand island, ny
Great Job! That is really going to keep the heat in with all of that great combination of insulators.

A little trick when you put the coil wires in if there is a spot where they don't seem tight enough to stay, you and make little "rings" (sort of like a keychain ring) of kanthal wire a bit larger than your milled slot and push them in to retain the coil.
 

vagabondmidget

Active member
Joined
Jul 28, 2012
Messages
40
Location
ATL
Some of my favorites are a series he did on the patina these carbon steel knives develope. I've tried to capture it before but just didnt have the ability. I have a good enough camera, but lack the rest of the puzzle.

what you're missing is light, photography is not only the capture of an image it's by large the capture of light.

use the same color of light and lots of it. you can even use halogen shop lights just position them till you like how it looks then try a pic and adjust as needed. (if using halogen turn off florescent shop lights, if using window light turn off all others) you can have a mediocre camera and still pull off decent pics this way.

I'm far from pro but that's what I've learned. :beer:
 

805gregg

Well-known member
Joined
Nov 12, 2011
Messages
272
Location
Ojai, Ca
I think it's great that you make knives that can still be used as rasps, double duty good thinking
 
OP
D

DoghouseForge

Well-known member
Joined
May 11, 2013
Messages
374
Location
Lakeland, Fl
Thanks everyone!

Kev, it will be an electric element 240 v. The link to toms73novass's build has much more detailed info than my post.

Rivennhewn I appreciate it man, Love your work! you have the kind of eye my shop mate has for turning the discarded into beauty.

Vagabond, Thanks for the tips. I agree and think building some light boxes might be worth while.

805Gregg thanks!

ryhno your off to a pretty good start , everything you try adds to the education...


Toms77novass, Thanks...I was actually about to message you with the "how do you keep it in the grove question"...lol ..appreciate it. Should have the wire Friday so maybe this weekend I can get it all wired up...Keep the help line open for me. :eek:

JP
 
OP
D

DoghouseForge

Well-known member
Joined
May 11, 2013
Messages
374
Location
Lakeland, Fl
OK! feeling 100% again! only took 10 days:sad:

Quick little update as I'm running full tilt with the farrier business trying to catch up from last week. On top of that one of my Farrier buddies broke his Tib/Fib and is out for 3 months...We Farriers can really ***** about one another until someone gets hurt..Then its all hands on deck as we take turns covering their clients until they are better...Kind of an unofficial union I guess.

So the Kanathal Wire came in last Friday, and it will be going to my friends shop to use the lathe for the wind up at some point this weekend. While there I'm going to take advantage of the louver die, and put some heat vents in the lid of the power box. Updates on the build once it gets it fired up.

There is a stack of knives pretty close to the handling phase so I'm hopeful that I can get them going during the horse show this weekend.

So the last really cool thing to announce is the web site is officially live!

I need to thank Aggie as he played a big roll in the layout and design as well as correcting my horrible grammar and spelling... :lol::thumbup: However, my new Chrome web browser spell checks everything so look out world!

So go check it out and let me know what you think! Feed back is appreciated.

www.doghouseforge.com


Beeen a fun journey getting to this point and its just the beginning! Big plans for the future! Aggie's already busy with a collaborated project and I've got a few other GJ members that are gonna be getting called out over the next few months. Like it or not...:lol:

Thanks Guys and have a great rest of the week!

JP
 
OP
D

DoghouseForge

Well-known member
Joined
May 11, 2013
Messages
374
Location
Lakeland, Fl
Site looks very professional. Nice Job.

Web site looks good! Those fancy pictures really show off the detail and quality of workmanship! :bowdown:

The site looks great and your "About" page is very fell written. Well done!

Quite eloquent for a blacksmith :rocker:


Thanks guys!

Hot Chop, Aggie deserves half credit for the "well written" applause...he decided to redo it one afternoon, forgiveness over permission. :lol: if he ever gets off his office chair and finishes something he'll have a space in the store as well.

Maybe ill take orders for the "mega jinga" sets... you'd love to crank some more of those out, right? I bet we could get you a whole $20 for each one!!! :thumbup:

Jp
 
OP
D

DoghouseForge

Well-known member
Joined
May 11, 2013
Messages
374
Location
Lakeland, Fl
"Time flies when your building an empire"...54panelford

I apologize for the lack of updates...Sometimes I have to put my head down and just work...

A little back story... as I posted before I was sick..for almost a week... then my very good friend and fellow farrier broke his leg (dirt bike related, nothing equine). So between making up my own missed days, and working a few 18 hours days to get my friends client list done...I ended up working 25 days straight.

Full disclosure- I actually worked 18 days straight...followed by a 500 mile, two day road trip, from Lakeland to Miami to Napels and back to Lakeland... not so bad you say, HA! slap 2 hours of Children s community theater in each destination city, and make the journey with a 7 month pregnant woman and a 21 month old... that's right...:eyecrazy:

So even though I had a couple days between 18 - 19 I still consider that working...

I've been cranking out as much as I can from the shop either at night, horse-shows, or anytime someone cancels an appointment... This past week I have been there every day because my truck decided to blow its ECM and in turn, every other computer module... You don't want to know the cost of the repair so luckily for me I had enough equity not to fix it, trade my truck in broken, and come out just the happy side of zero...So tomorrow I'm going to buy a new truck...:dunno::sad:

As for projects the basic routine has been to fill the orders on time as best i can. I have a bunch of stuff to show you guys so Ill update it over the next couple weeks... Everything from the usual knives and boards, to a Kitchen Island Counter top, some sculptural work, A forge welded 3 rasp thick mega Cleaver build, and preparing for the first guest artist on www.doghouseforge.com


I think for tonight I'll just throw out some eye candy and drop a few sneak peaks into the futre posting topics. but first...

There has been a dangerous and rare outbreak of "Aggnificus-totallis-suckacus"

This is a Equine related disease that appears on the soles of horses feet. From onset to death its usualy only a matter of days but I was lucky enough to catch the fungal pattern in its prime...Here is a picture so if you have horses watch out!


:lol:


My wife got me an awesome shop apron (tired of me ruining jeans)
If you have never heard of these guys the company is "Knife and Flag" and i cant say enough good things about this product... Its comfortable, the quality is exceptional, and its made in the USA... its still a relatively small company but when they explode remember you saw them first on the Garage journal..

http://www.knifeflag.com/


I will do a detailed post on these guys later but for any of you interested, there are a couple Grade A Railroad Spike knives for sale in the Doghouse forge store... They were forged and finished a couple weeks ago


On the woodworking front I have upgraded and cant say enough thanks to Aggie for talking me into these blades...They are kinda like my Miller multi-matic...I cant really weld but it makes it look like i can...these blades to the same thing to wood!


Found a wholesale Hardwood Distributer 3 miles from mny shop...Ive been driving 3 hours round trip to buy wood from people that buy wood from this guys who literally has a shop around the corner... more on him and this amazing place soon...


Okay, its late and I need to call it a night, but here are the Knives and sneak peaks I promised...

Doghouse Forge "Cutaway Chef" with a natural Buckeye burl, Bloodwood, and brass handle...The spacers has a custom matched Bloodwood color epoxy blend and while this was the first time trying it I was very pleased...

Using a mortar and pastel I ground Bloodwood saw dust into a fine powder and them mixed it with the epoxy resin...That was allowed to soak overnight, and when I came back the powder had dissolved. When the resin was mixed with the hardener it maintained the Bloodwood color...


This was a first for me...Keeping this thing straight was a chore but by following the formula it managed not to destroy itself..

11"Slicer (279MM ...all the cool culinary knife builders use metric):lol:
Red and black stabilized Buckeye burl...Hidden tang, with brass bolster and pommel.


Ill post on these projects soon... Epic on all accounts

The Mega Cleaver!
Hand forged from 3! forged welded rasp into one single piece of butchering amazingness

I have the forge welding and billet fab process documented in detail so I can show you all the steps.


And here we have the largest stack of glued and cut wood I have every made...Whatever will I do with it...


Ill post up soon and thanks for reading!
have a great rest of your week...


I don't know why the pics are so small but ill look into it...
 

54FordPanel

Well-known member
Joined
Aug 7, 2009
Messages
5,711
Location
Fort 54, Littleton, Co
....I think for tonight I'll just throw out some eye candy...my wife got me an awesome shop apron (tired of me ruining jeans)


...

Oww! Thanks for the eye candy! Wooo! David Lee Roth wears something like that, doesn't he? Open in the back, right?

Did the Mrs tell you she wanted to come home and see you're wearing your apron....just the apron?

I expect Cabelas and Carhart will be calling with modeling offers....you'll have to turn them down. Too much on your plate.

Farrior, Blacksmith, Jeep restorer, childrens theatre critc, male model....a true renaissance man.

Fabio can't do all that.

:thumbup:

Knives look fantastic, truly.
 
Last edited:
To avoid these ads, REGISTER NOW!
Top Bottom