
You are using an out of date browser. It may not display this or other websites correctly.
You should upgrade or use an alternative browser.
You should upgrade or use an alternative browser.
Above 1200 Sq/FT Blue Bomber's Garages
- Thread starter BlueBomber
- Start date
Wokspaces above 1200 squarefeet.
OP
BlueBomber
Well-known member
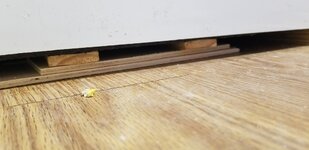
I don't think it's bees. The fuzz is definitely insulation fluff. I still haven't figured out what's been causing it.Carpenter bees?
Sent from my SM-G965U using Tapatalk
Lots of stuff going on around the property, some of it garage related. I've not done well with photo documenting, so my garage thread has gone cold as I soldier through. I'll try to get some updates together for anyone who might be interested.
Sent from my SM-G950U using Tapatalk
Last edited:
gearhead1960
ALLIANCE MEMBER
BB,
Always interested on what you have going on.....look forward to some updates!
Always interested on what you have going on.....look forward to some updates!
Bob Heine
ALLIANCE MEMBER
BB, I know I'm not the only one who is interested. No pressure, just happy to see a fresh post from you,I'll try to get some updates together for anyone who might be interested.
OP
BlueBomber
Well-known member
Well, I'm sitting outside of an estate sale waiting for it to open, holding number 72, so I have some time to kill.
Since late August, I've been very busy--too busy to keep my thread updated. Also, I've been figuring some projects out as I go, making mistakes and back tracks along the way. That's not exactly conducive a desire to take pictures and make daily updates.
So let me go back to late August. I did get the carpet and seatbelts reinstalled in the T-Bird and SWMBO took it out for her first drive behind the wheel. That cemented it--the T-Bird was --hers--. When we bought it and I told her it was for her, she said "yeah, right." But once she turned the key, heard the burble from the exhaust and motored down the road in it, she fell in love. It was good to witness.
Once the Bird was out of the way. I moved the Impala over and began work on installing shoulder belts for the front and lap belts everywhere else. Like the T-Bird project, I started out taking pictures but stopped about halfway through.
The two door hardtop design makes shoulder belts a bit harder to install. I didn't want to put the shoulder belt up in the roofline, as that breaks the aesthetic openness of the hardtop. Going straight over the back down to the floorboard doesn't work either for a number of safety and mechanical reasons. I pulled the interior rear trim panel and examined the sheetmetal structure of the section behind the door, and it seems as robust, or more so, than the floorboards that would serve as anchor points for the other ends of the belts.
So, for the shoulder belt, I modified a bracket from the kit I bought and welded it into the quarter interior. The bottom belt reel was mounted via several bolts lower down and is hidden behind other rear seat structure.
Be assured, I used grade 8 hardware, large fender washers behind sheetmetal floorboards, and even after that, I'm under no illusions that my 60-year old car is now as safe as a modern car. However, it is way more survivable now than it was when I bought it, with NO seatbelts at all.
I only got the driver's side done, and found that the belt doesn't move freely. I can see why, though, and when I take the back seat back out to do the passenger side, I'll tweak the design.


Sent from my SM-G950U using Tapatalk
Since late August, I've been very busy--too busy to keep my thread updated. Also, I've been figuring some projects out as I go, making mistakes and back tracks along the way. That's not exactly conducive a desire to take pictures and make daily updates.
So let me go back to late August. I did get the carpet and seatbelts reinstalled in the T-Bird and SWMBO took it out for her first drive behind the wheel. That cemented it--the T-Bird was --hers--. When we bought it and I told her it was for her, she said "yeah, right." But once she turned the key, heard the burble from the exhaust and motored down the road in it, she fell in love. It was good to witness.
Once the Bird was out of the way. I moved the Impala over and began work on installing shoulder belts for the front and lap belts everywhere else. Like the T-Bird project, I started out taking pictures but stopped about halfway through.
The two door hardtop design makes shoulder belts a bit harder to install. I didn't want to put the shoulder belt up in the roofline, as that breaks the aesthetic openness of the hardtop. Going straight over the back down to the floorboard doesn't work either for a number of safety and mechanical reasons. I pulled the interior rear trim panel and examined the sheetmetal structure of the section behind the door, and it seems as robust, or more so, than the floorboards that would serve as anchor points for the other ends of the belts.
So, for the shoulder belt, I modified a bracket from the kit I bought and welded it into the quarter interior. The bottom belt reel was mounted via several bolts lower down and is hidden behind other rear seat structure.
Be assured, I used grade 8 hardware, large fender washers behind sheetmetal floorboards, and even after that, I'm under no illusions that my 60-year old car is now as safe as a modern car. However, it is way more survivable now than it was when I bought it, with NO seatbelts at all.
I only got the driver's side done, and found that the belt doesn't move freely. I can see why, though, and when I take the back seat back out to do the passenger side, I'll tweak the design.
Sent from my SM-G950U using Tapatalk
Attachments
-
 f2f535013aebd6a478f18311145d6c68.jpg123.7 KB · Views: 0
 -
 dc75df73d5bb824ebb07ea66d21b7f6e.jpg411.5 KB · Views: 0
 -
 5c01b3cfd33c86f5f9ddc6365cdea1a4.jpg366.8 KB · Views: 0
 -
 ffd23e088e1ebc9180f0a9fd1e4149da.jpg417.8 KB · Views: 0
 -
 db5aeff98054df8635f55fd2a8b52658.jpg432.5 KB · Views: 0
 -
 b4f3ee5fd0e0f49d4f792ee24f28398d.jpg363 KB · Views: 0
 -
 58c134952cb1ef37bca7a283335c4215.jpg374.7 KB · Views: 1
Last edited:
OP
BlueBomber
Well-known member
SWMBO and I decided to take advantage of the fall weather by taking a day trip up into New Hampshire. We started out with a "Cars & Coffee" event that turned out to be oriented at more modern...and more expensive..cars. We hung out for a bit, but departed for more sights up north. The farmer stands, garden estates and the Castle In The Clouds were two highlights of a great day out!


Attachments
-
 8cf964e2d822e080583ad4e95206222a.jpg356.1 KB · Views: 0
 -
 62ec390801e04dfc987a3d9c9a0fcda1.jpg531.1 KB · Views: 0
 -
 d13f5d099a6fa9be3396fa31c89816b3.jpg467.8 KB · Views: 0
 -
 8a08020eaff92d4260278c4111b109b9.jpg638.7 KB · Views: 0
 -
 13f5bdc22cabcc357b55e37474380a79.jpg492.6 KB · Views: 0
 -
 6129b7c4d4fbf38a92d9ec40b0c92a91.jpg491.9 KB · Views: 0
 -
 049826dcbb5a2045b48f77cbc3a49a85.jpg586.4 KB · Views: 0
Last edited:
1953mercury
Well-known member
On a trip through the north east several years back, my wife and I went through " The castle in the clouds ", beautiful place, and interesting history. Mike
OP
BlueBomber
Well-known member
Right around this same time last fall, my Dad passed away at the family farm down in Culpeper, Virginia. His passing was anticipated and I was able to be there with my Mom and brother when he made his transition.
My Dad was a good man, who taught me to be handy, thrifty, honorable and punny. I put together the slide show for the reception after the funeral, and it renewed my appreciation for my Dad's life, the lives that he touched and the memories of our time together. Because after all, that's the only real legacy anyone leaves behind.


Sent from my SM-G950U using Tapatalk
My Dad was a good man, who taught me to be handy, thrifty, honorable and punny. I put together the slide show for the reception after the funeral, and it renewed my appreciation for my Dad's life, the lives that he touched and the memories of our time together. Because after all, that's the only real legacy anyone leaves behind.
Sent from my SM-G950U using Tapatalk
Attachments


Last edited:
gearhead1960
ALLIANCE MEMBER
Sorry for your loss....
OP
BlueBomber
Well-known member
Sorry for your loss....
Thanks, gearhead1960. I find I think about him more often now than when he was alive. Maybe that's just the nature of losing people. Which reminds me, I need to call my Mom this week.
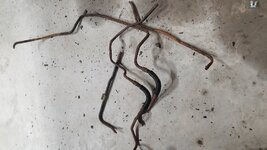
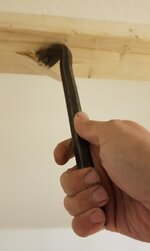
Resuming the catalog of partially cataloged garage projects, the fuel lines in my Silverado started leaking back in late October. Thank goodness for the lift--changing those on my back would have been a nightmare, even on the garage floor. As I removed the old lines, they crumpled and cracked, disintegrating like new potato chips. The replacement lines were from LinesToGo.com. They seemed to have been bent in the right places to fit my truck, but I had problems getting the modern o-ring fittings to hold pressure.
I tried new O-rings, old O-rings but no joy, so after a half-dozen attempts and more than a little cursing, I cut the offending fittings off and double clamped them on with old fashioned hose clamps and fuel injection-rated rubber line. It's been tight and dry for the last four months.
I only managed to grab the following two pics of the old lines--they were bad!


Attachments

OP
BlueBomber
Well-known member
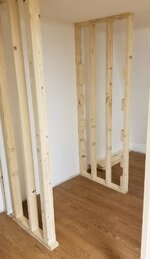
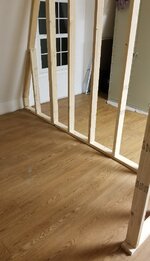
Next up was adding a bathroom to the second floor rec room above the old garage. I finally found a plumber willing to take the job and whose quote I could stomach. I pulled the framing permit and left the plumbing work to him.
Here's what we started with, a bare corner just inside the door.

I laid out the walls and cut out the flooring in the right places.

In trying to work fast and by myself, I missed that the top plate was out of plumb by a half inch--do'oh!

A cats paw and some more muttered curses helped fix the problem. Well, the curses didn't actually fix anything, but they made me feel better.

Here's the framing done, except for the header in the doorway.


Here's what we started with, a bare corner just inside the door.
I laid out the walls and cut out the flooring in the right places.
In trying to work fast and by myself, I missed that the top plate was out of plumb by a half inch--do'oh!
A cats paw and some more muttered curses helped fix the problem. Well, the curses didn't actually fix anything, but they made me feel better.
Here's the framing done, except for the header in the doorway.
Attachments
-
 9df2dec0234bde591273d4a104aa2e28.jpg318.2 KB · Views: 0
 -
 2716588c27c86ade08debc6d9128ec7d.jpg354.1 KB · Views: 0
 -
 24ee630799860997de212e972bc7418f.jpg292.4 KB · Views: 0
 -
 c639bbd4d26e43f505e9a5fe9549c631.jpg253.7 KB · Views: 0
 -
 51ccf756c73ca8b7900fe413a16550fe.jpg382.7 KB · Views: 0
 -
 953aa06b15f077f95c106ce057a0d1c9.jpg338.8 KB · Views: 0
 -
 7b5e0b5e6d4fa7267bf18698d64fbf83.jpg373.8 KB · Views: 0
Last edited:
captain14
Well-known member
BlueBomber. Lost my dad eight years ago in March. Lots questions I should have asked but..
I’m interested in the new bathroom project when you have time. The fuel lines were a rusty mess. What shape are the brake lines in?
Looks like a good weekend for the road trip. Score anything at the estate sale?
I vaguely remember my father installing seat belts in his 59 And 63 Fords. I think the 63 had factory front belts installed and he did the rear lap belts.
OP
BlueBomber
Well-known member
Next came the saga of the sewer line. See, when I renovated the garage back in 2014 and put in a new slab on the ground floor, I had the workers stub in a 4" PVC pipe into the floor and through the foundation. I extended that stub to the other side of the driveway before I had it paved (back in Post #51). The plumbers dug down two feet and couldn't find it, so I rented the Kubota again on Halloween after work and opened up the trench in an evening. Here's the "before" picture...I forgot to grab an immediate "after"...but don't worry, the trench is still open as I type this.

Turns out the pipe I stubbed in 6 years ago was too deep. It couldn't gravity feed into the existing septic system. My plumber consulted with "someone" in the building department and determined we could put a pump tank in the ground beside the driveway to macerate the sewage and lift it up the extra 18" needed to allow it to gravity feed from there. So, over a weekend, I excavated a hole six feet into the ground and bought a basin and a big Liberty sewage pump. I also extended the trench by hand to the side of the house and ran electrical conduit out to carry power for the pump.


Getting a hole through the side of the sill was a bit of a challenge. I had picked up a giant 7/8" diameter auger bit more than a foot long at an estate sale, and the sill beam on my 100-yr old farm house needed every bit of it to break through. From there, it got even more fun. Sometime in the house's past, someone had poured concrete inside the stone foundation walls in an attempt to dry out the basement (it didn't work). However, that left the walls over two feet thick in paces, which meant the first floor joist in from the sill plate was also above the foundation (and running parallel to the wall), thus blocking access from the inside to the hole I had just drilled on the outside!
I ended up digging out the longest spade bit I had (14") and an extension (another 14") and just barely had enough length to drill through the floor joist...from the outside! Then, with the drill bit still in the hole, I taped a fish line to the drill bit, pulled it back through to the outside, taped the electrical wire to the fish line and then pulled the wire back through to basement. Whew!


Turns out the pipe I stubbed in 6 years ago was too deep. It couldn't gravity feed into the existing septic system. My plumber consulted with "someone" in the building department and determined we could put a pump tank in the ground beside the driveway to macerate the sewage and lift it up the extra 18" needed to allow it to gravity feed from there. So, over a weekend, I excavated a hole six feet into the ground and bought a basin and a big Liberty sewage pump. I also extended the trench by hand to the side of the house and ran electrical conduit out to carry power for the pump.
Getting a hole through the side of the sill was a bit of a challenge. I had picked up a giant 7/8" diameter auger bit more than a foot long at an estate sale, and the sill beam on my 100-yr old farm house needed every bit of it to break through. From there, it got even more fun. Sometime in the house's past, someone had poured concrete inside the stone foundation walls in an attempt to dry out the basement (it didn't work). However, that left the walls over two feet thick in paces, which meant the first floor joist in from the sill plate was also above the foundation (and running parallel to the wall), thus blocking access from the inside to the hole I had just drilled on the outside!
I ended up digging out the longest spade bit I had (14") and an extension (another 14") and just barely had enough length to drill through the floor joist...from the outside! Then, with the drill bit still in the hole, I taped a fish line to the drill bit, pulled it back through to the outside, taped the electrical wire to the fish line and then pulled the wire back through to basement. Whew!
Attachments


Last edited:
555
Well-known member
So sorry for the loss of your Father.
Our current "old" house was built in 1863. I can relate to the incomprehensible joy of remodeling an old house.
Our current "old" house was built in 1863. I can relate to the incomprehensible joy of remodeling an old house.
OP
BlueBomber
Well-known member
All seemed well. The plumbers laid in the pipes inside the building and down the trench from the basin to the main line coming out of the house, and then called for an inspection. However, this time a different "someone" came out and said "No way can you have a pump tank in the yard! It has to be inside a building!" Grumble--growl. So, I had to rip out all the plumbing and conduit from the trench and my son and I hand dug it another 18" deep over the 50-ft length of the trench.

We lucked out and avoided any big rocks until we got up close to the foundation. Yeah, there were lots of big potatoes from when they excavated the basement. The first big boy required some creative jerry-rigging. I wish I had taken some pictures--we parked my pickup truck nearby in the driveway, ran a tow strap from the tow hitch to a come-along, connected a logging chain to the come-along and ran that over several 6x6 scraps at the edge of the hole and then down and around the boulder. It was a little sketchy, and I had my son run the winch while I was down in the hole near...but never under!... the rock. After a few incremental lifts and some shoring to allow repositioning of the strap/winch/chain, we eventually got it up and out of the hole!

Here was the trench just before the new year, with the pipe partially laid in.


We lucked out and avoided any big rocks until we got up close to the foundation. Yeah, there were lots of big potatoes from when they excavated the basement. The first big boy required some creative jerry-rigging. I wish I had taken some pictures--we parked my pickup truck nearby in the driveway, ran a tow strap from the tow hitch to a come-along, connected a logging chain to the come-along and ran that over several 6x6 scraps at the edge of the hole and then down and around the boulder. It was a little sketchy, and I had my son run the winch while I was down in the hole near...but never under!... the rock. After a few incremental lifts and some shoring to allow repositioning of the strap/winch/chain, we eventually got it up and out of the hole!
Here was the trench just before the new year, with the pipe partially laid in.
Attachments
-
 752a95a566bccaface24210f94f0d1d9.jpg480.3 KB · Views: 0
 -
 78839a193b0ced649a5666b036416e91.jpg404 KB · Views: 0
 -
 eddce4317c6dbfdfa06f06508494a710.jpg313.3 KB · Views: 0
 -
 c828c7baa6a56b47eac78937f611d5e9.jpg349.2 KB · Views: 0
 -
 76bee7c1ab834a1ed7f4c506578d3261.jpg389.1 KB · Views: 0
 -
 b9c21ae279630c559a15c1ad2cb1e843.jpg357.6 KB · Views: 0
Last edited:
gearhead1960
ALLIANCE MEMBER
Thanks, gearhead1960. I find I think about him more often now than when he was alive. Maybe that's just the nature of losing people. Which reminds me, I need to call my Mom this week.
BB, my dad has been gone since 1992 and I still think of him all the time and I called my mom this morning...93 and still going strong....

OP
BlueBomber
Well-known member
We're just about caught up to the present. The crew came out after New Year's Day, drilled the foundation and plumbed in the basin. You can see it below, still showing the mud from the outside trench. Tomorrow, the team will meet the inspector and hopefully (!) sign off on the installation so that I can rent the backhoe uh-gain and finally fill in the Grand Canyon outside my back door.


Attachments


OP
BlueBomber
Well-known member
On a trip through the north east several years back, my wife and I went through " The castle in the clouds ", beautiful place, and interesting history. Mike
Yes! To think, the original owner, Tom Plant, owned 6,300 acres, including two miles of shoreline on Lake Winnipesaukee and a six-car garage, among other amenities. It is an impressive place still!
BlueBomber. Lost my dad eight years ago in March. Lots questions I should have asked but..
I’m interested in the new bathroom project when you have time. The fuel lines were a rusty mess. What shape are the brake lines in?
Looks like a good weekend for the road trip. Score anything at the estate sale?
I vaguely remember my father installing seat belts in his 59 And 63 Fords. I think the 63 had factory front belts installed and he did the rear lap belts.
The bathroom will have a large shower, a toilet and a vanity. I've wired it since the pictures were taken (and that's another tale involving town inspectors and contractors for another post). It will have built in storage along one wall and an on-demand electric hot water heater.
On the truck, the brake lines had been replaced with stainless before I bought it, so they are in good shape.
I did well at the sale. Here's a link to my finds on the 2020 Garage Sale thread.
So sorry for the loss of your Father.
Our current "old" house was built in 1863. I can relate to the incomprehensible joy of remodeling an old house.
Yeah, well if it were easy, it'd be boring. Sometimes, I could stand to be a little more bored.
BB, my dad has been gone since 1992 and I still think of him all the time and I called my mom this morning...93 and still going strong....
I think my Mom will also live into her '90s, too. I was stopping in over the last three years whenever my business trips took me down to Northern Va.
I'm sure I'll continue to do so to keep up with the "sonny-do" list.
OP
BlueBomber
Well-known member
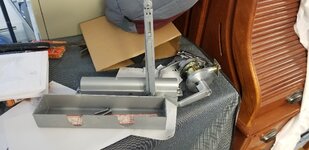
Just in case you thought it was all home improvement projects, I had several other distractions, too.
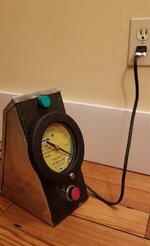
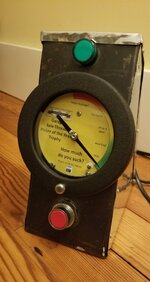
I built a trophy for the 2019 Garage Sale Thread Picker of the Year (PoTY). PrivateLugnutz ended up winning it by popular vote.


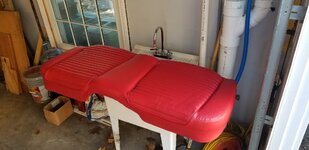
My wife and I also tackled reupholstering the seat in her '57 Thunderbird. Neither one of us had ever done more than stretch-over seatcovers, and this was a little intimidating. We got the bench stripped down, and then it sat in our living room for a month before I finally got up the time and courage to put it back together just today. I also stripped down the seat back and prepped it to go back together later this week.


Never a dull moment around here!
I built a trophy for the 2019 Garage Sale Thread Picker of the Year (PoTY). PrivateLugnutz ended up winning it by popular vote.
My wife and I also tackled reupholstering the seat in her '57 Thunderbird. Neither one of us had ever done more than stretch-over seatcovers, and this was a little intimidating. We got the bench stripped down, and then it sat in our living room for a month before I finally got up the time and courage to put it back together just today. I also stripped down the seat back and prepped it to go back together later this week.
Never a dull moment around here!
Attachments
-
 b1812e21fe4e917d92afabda0d81f7ae.gif1.5 MB · Views: 0
 -
 4a28a19a6a4839faad1121cb43cb8456.jpg253 KB · Views: 0
 -
 18f3d9d0e224a4f460a2e38b218f4d64.jpg312.6 KB · Views: 0
 -
 17ae98604ecad1c581d9b66a428dd8ee.jpg342.5 KB · Views: 0
 -
 7f3a39c1212052f3f4517408c770f93a.jpg299.9 KB · Views: 0
 -
 b840c932c648c7c98d08cdf63eebd454.jpg320.6 KB · Views: 0
 -
 f0ea17cf9934258a4730118580af6ed0.jpg364.2 KB · Views: 0
 -
 0740810de01249cbc32a959be9366724.jpg438.5 KB · Views: 0
 -
 c0a8511a67aa899103522dfb55389eb7.jpg417.3 KB · Views: 0
Last edited:
gearhead1960
ALLIANCE MEMBER
I think my Mom will also live into her '90s, too. I was stopping in over the last three years whenever my business trips took me down to Northern Va.
I'm sure I'll continue to do so to keep up with the "sonny-do" list.
Let me know the next time you're in NOVA and have a few minutes to meet for lunch or a beer at one of Virginia's fine breweries. I'm in Manassas (work in Gainesville), so somewhere in the middle from Culpeper would be easy....
captain14
Well-known member
I think my Mom will also live into her '90s, too. I was stopping in over the last three years whenever my business trips took me down to Northern Va.
I'm sure I'll continue to do so to keep up with the "sonny-do" list.
My mother will be 91 next month and had the second knee replaced in September. My brother and I split time at her house for almost 3 months.
My job description at work includes 5% of duties that are not specifically stated in the other 95% of the categories but the three months time spent at her house included raking and mulching leaves, replaced sink faucet, handrail at the side door, cook and drive her to followup appointments. I’m sure there are others I forgot.
Oh yea include exterminator. I heard noises in the wall and caught several mice that moved in when it turn cold .
OP
BlueBomber
Well-known member
Plumbing and electrical inspections passed! With snow forecasted for today. I rented a backhoe from the local hardware store Friday afternoon and went to work filling in the trench.
It wasn't easy work. The temps have been below freezing for the last several days and the dirt piles were all encased in about a three inch thick veneer of frozen hard dirt, kinda like Magic Shell over ice cream. At first, I couldn't break through and was concerned I'd have to wait until Spring. However, once I did crack the armor, I was able to nibble the edges and make progress. The first pic is an in-progress shot and the second is from today, just as the snow began to fall. The trench is reburied, but it will be well into spring before all the dirt clods thaw and settle and we can return the landscaping to normal.
While I had the backhoe, I buried a new electrical line from the house out to the garden, plucked a forsythia bush out of SWMBO's garden, and moved some rock piles that where in the way. More somberly, we also dug a final resting place for our family dog, Delaware before the ground froze hard. He's not dead yet, but he's been showing his age lately and we're concerned he won't make it to the spring thaw.
The backhoe was returned at 2pm, and I ran down to Home Depot to pick up some drywall for the garage bathroom walls. I'll hit that first thing tomorrow.

Sent from my SM-G950U using Tapatalk
It wasn't easy work. The temps have been below freezing for the last several days and the dirt piles were all encased in about a three inch thick veneer of frozen hard dirt, kinda like Magic Shell over ice cream. At first, I couldn't break through and was concerned I'd have to wait until Spring. However, once I did crack the armor, I was able to nibble the edges and make progress. The first pic is an in-progress shot and the second is from today, just as the snow began to fall. The trench is reburied, but it will be well into spring before all the dirt clods thaw and settle and we can return the landscaping to normal.
While I had the backhoe, I buried a new electrical line from the house out to the garden, plucked a forsythia bush out of SWMBO's garden, and moved some rock piles that where in the way. More somberly, we also dug a final resting place for our family dog, Delaware before the ground froze hard. He's not dead yet, but he's been showing his age lately and we're concerned he won't make it to the spring thaw.
The backhoe was returned at 2pm, and I ran down to Home Depot to pick up some drywall for the garage bathroom walls. I'll hit that first thing tomorrow.
Sent from my SM-G950U using Tapatalk
Attachments


OP
BlueBomber
Well-known member
More progress over the weekend and tonight.
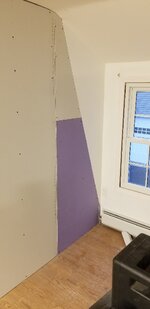
I picked up ten sheets of drywall, split between the purple anti-mold stuff for the inside of the bathroom and regular for the outside.

Here's an "almost" before shot I took after I got two sheets up...

But before I began the wall board, I had to modify the vanity junction box bracket to clear the vent pipe. The vanity light needed to be centered over the sink, which put it in the middle of the stud cavity. It will be pretty heavy, so I wanted to use a special junction box with a bracket that anchored to either stud in the wall cavity. The problem was that the plumbers routed the vertical vent pipe up through the same cavity. They did bend the pipe around the spot that I wanted the box (centered over the drain) but the pipe itself blocked the bracket. No problem...I have a cordless cutoff saw and a welder. In about 30 minutes, I had the shape I needed.


Here was the first sheet I mounted. It was the easiest one I did all day.

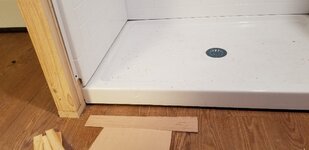
As usual, I got into the groove of hanging rock and minimized pictures. When I worked my way around to the shower stall, I had to deal with two problems: the step down from the shower panels and the raw edge of the drywall in a very high moisture area. I handled the first by putting up some 1/8 paneling scraps to level the two surfaces (pictures below). I handled the second by adding plastic J-channel to the drywall edges that border the shower panel. Sorry, no pics of the J-channel, but it should work pretty nicely to seal up the board.


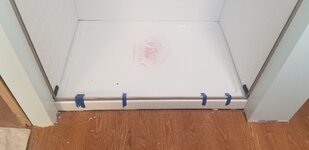
Another task I undertook was to properly brace the shower basin. The floor here was rather out of level, so the plumbers shimmed it with these wedges to bring it flat. Problem was, they didn't support the middle of the basin! Since everything was already screwed and glued, I couldn't take it out to put in floor leveler, so I did the next best thing I could, which was to shove thin scraps under to brace as much of the floor as I could.


Toward the outer edge, I stacked 1/8" plywood scraps and wedges to support the outer edge of the basin. It felt much firmer with this setup.

Another challenge I had was how to cover the electric water heater. It was lag screwed to the studs, but with pipes and electric cables coming to it from below, I couldn't just pop it off the wall, rock the studs, and then remount it. After some consideration, I decided to build a false wall to enclose the heater completely. The space below with the heater will be accessed via a door panel, and the space above will be filled with shelving to minimize the wasted volume.


At this point, I realized I had never called for my rough in framing inspection. Ooops. I stopped sheetrocking and called the Building Department. They were cool with it, especially since I left the framing exposed from the outside. They said they could come out mid-week to sign off on the framing. So, since I had Monday off, so I spent the day putting up corner beading and mudding the interior walls. No pics here, but hopefully understandable due to mud-covered hands.
The inspectors made it out today (Wednesday), so I snuck out tonight to put up some more drywall.
Here's a legit before pic:

Tonight's problem solving task: the exhaust pipe from the first floor gas-fired heater had a union at floor level the impenged into the plane of the wall board by nearly a half inch! At first, I thought I would have to try carving out the gypsum with my utility knife, but then I remembered the cutoff saw!

I stripped the paper first and used the 4" cutoff blade to carve a perfect curve into the gypsum. It worked like a charm!

As of 10:15PM, all of the outside was done, except for a small triangular section over by the window. I also still have the water heater false wall to cover, and then all of the mudding to do. Then sanding. And then probably a few more cycles of those last two until everything is smooth.

Sent from my SM-G950U using Tapatalk
I picked up ten sheets of drywall, split between the purple anti-mold stuff for the inside of the bathroom and regular for the outside.
Here's an "almost" before shot I took after I got two sheets up...
But before I began the wall board, I had to modify the vanity junction box bracket to clear the vent pipe. The vanity light needed to be centered over the sink, which put it in the middle of the stud cavity. It will be pretty heavy, so I wanted to use a special junction box with a bracket that anchored to either stud in the wall cavity. The problem was that the plumbers routed the vertical vent pipe up through the same cavity. They did bend the pipe around the spot that I wanted the box (centered over the drain) but the pipe itself blocked the bracket. No problem...I have a cordless cutoff saw and a welder. In about 30 minutes, I had the shape I needed.
Here was the first sheet I mounted. It was the easiest one I did all day.
As usual, I got into the groove of hanging rock and minimized pictures. When I worked my way around to the shower stall, I had to deal with two problems: the step down from the shower panels and the raw edge of the drywall in a very high moisture area. I handled the first by putting up some 1/8 paneling scraps to level the two surfaces (pictures below). I handled the second by adding plastic J-channel to the drywall edges that border the shower panel. Sorry, no pics of the J-channel, but it should work pretty nicely to seal up the board.
Another task I undertook was to properly brace the shower basin. The floor here was rather out of level, so the plumbers shimmed it with these wedges to bring it flat. Problem was, they didn't support the middle of the basin! Since everything was already screwed and glued, I couldn't take it out to put in floor leveler, so I did the next best thing I could, which was to shove thin scraps under to brace as much of the floor as I could.
Toward the outer edge, I stacked 1/8" plywood scraps and wedges to support the outer edge of the basin. It felt much firmer with this setup.
Another challenge I had was how to cover the electric water heater. It was lag screwed to the studs, but with pipes and electric cables coming to it from below, I couldn't just pop it off the wall, rock the studs, and then remount it. After some consideration, I decided to build a false wall to enclose the heater completely. The space below with the heater will be accessed via a door panel, and the space above will be filled with shelving to minimize the wasted volume.
At this point, I realized I had never called for my rough in framing inspection. Ooops. I stopped sheetrocking and called the Building Department. They were cool with it, especially since I left the framing exposed from the outside. They said they could come out mid-week to sign off on the framing. So, since I had Monday off, so I spent the day putting up corner beading and mudding the interior walls. No pics here, but hopefully understandable due to mud-covered hands.
The inspectors made it out today (Wednesday), so I snuck out tonight to put up some more drywall.
Here's a legit before pic:
Tonight's problem solving task: the exhaust pipe from the first floor gas-fired heater had a union at floor level the impenged into the plane of the wall board by nearly a half inch! At first, I thought I would have to try carving out the gypsum with my utility knife, but then I remembered the cutoff saw!
I stripped the paper first and used the 4" cutoff blade to carve a perfect curve into the gypsum. It worked like a charm!
As of 10:15PM, all of the outside was done, except for a small triangular section over by the window. I also still have the water heater false wall to cover, and then all of the mudding to do. Then sanding. And then probably a few more cycles of those last two until everything is smooth.
Sent from my SM-G950U using Tapatalk
Attachments
-
 0ed5dc6e86c3c535dd80bd3a180fd215.jpg287.1 KB · Views: 0
 -
 78177012beae4ab13fa94f29626d04c1.jpg305.3 KB · Views: 0
 -
 5ec0e46cd17255fd409f9cba3358c381.jpg302.4 KB · Views: 0
 -
 9f32b50a137672863843fddb7f0a4109.jpg282.9 KB · Views: 0
 -
 03cf1ec0f105e39b1c06981b199b16b5.jpg336.6 KB · Views: 0
 -
 6853fa75867151e3d0bd7f22d0821b88.jpg286.9 KB · Views: 0
 -
 4060f7470be70a44d72bc3be680a5a50.jpg288.7 KB · Views: 0
 -
 df74b6762cb8a5e97b97cd118c81eaf2.jpg275.4 KB · Views: 0
 -
 d8c7e3f89890745a1a79aa3e28a499a6.jpg235.3 KB · Views: 0
 -
 1d9d8dc4c56fbee12e6094c0bb5cfd68.jpg293.2 KB · Views: 0
 -
 4e6aeb6d7a31c0b211375e5f1a87df92.jpg327.6 KB · Views: 0
 -
 49844727e6bd414e97981a177ac121fd.jpg307.4 KB · Views: 0
 -
 52f2543a76127bf4cb3841d5c8d19bb2.jpg317 KB · Views: 0
 -
 08146c4d981c113b6bbeadfca3c453c6.jpg280.1 KB · Views: 0
 -
 d9f5bb4abc62f8f5603558702886ec4e.jpg359.2 KB · Views: 0
 -
 b59a6dcea7200eb62f2765aa0605cca1.jpg280.1 KB · Views: 0
 -
 759013e71bccf1b1f19d6817ed072c3b.jpg224 KB · Views: 0
 -
 49e78f0657dc6595e55aa1f1a9080b3f.jpg252.7 KB · Views: 0
Last edited:
Arclitgold
Well-known member
- Joined
- Dec 20, 2017
- Messages
- 317
Looking awesome!
Sent from my iPhone using Tapatalk
Sent from my iPhone using Tapatalk
Lotusnut
Well-known member
Consider getting a can of spray foam insulation to spray under the shower pan. If you can find a piece of tubing to extend the nozzle you can get the foam farther under the pan. It will also hold your wood shims in place. I am in the process of replacing a shower stall that was installed with foam and it had stood up very well when I removed it.
Last edited:
OP
BlueBomber
Well-known member
That's a good idea! The non- or min-expanding kind, I would imagine, to keep it from lifting the pan....Consider getting a can of spray foam insulation to spray under the shower pan. If you can find a piece of tubing to extend the nozzle you can get the foam farther under the pan. It will also hold your wood shims in place. I am in the process of replacing a shower stall that was installed with foam and it had stood up very well when I removed it.
Sent from my SM-G950U using Tapatalk
Lotusnut
Well-known member
That's a good idea! The non- or min-expanding kind, I would imagine, to keep it from lifting the pan....
Sent from my SM-G950U using Tapatalk
I would just put some weight in the pan and use the expanding foam it will just move out rather than up.
OP
BlueBomber
Well-known member


OP
BlueBomber
Well-known member
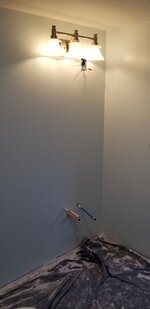
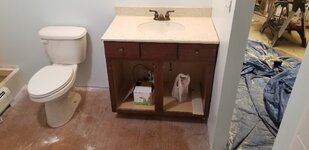
No posting has not meant no work! I've got all the mudding done, sanded, and primed.. The interior of the bathroom is painted, so this weekend SWMBO and i picked out the mosaic tile for the insert on the shower.
The shower insert instructions called for a specific adhesive to glue in the mosaic tile (DAP 3.0). It was pricey (30% more than regular caulk) but bonds extremely well to the shower panels. I applied it generously from the caulk gun and then spread it evenly with a slooted spreader. The mosaic set in the adhesive instantly with no sagging over the drying time. I had two sizes of spacers in my "previous tile job leftovers" pile but of course, neither were the right size to get even spacing at the top and bottom of the tile slot in the panel. I ended up hand-trimming a dozen or so spacers to the size I needed. It worked well!


I also got the vanity lights installed. The hanger that I made earlier in this thread supported the light just fine. The bulbs that came with the yard sale buy are too yellow compared to the overhead LED light, so I picked up some "whiter" LED bulbs at the store today. The outlet below the lights are for a heated, lighted mirror, on order. It ended up a lot higher than I would have liked, but it will still work. It'll receive a recessed outlet later today.

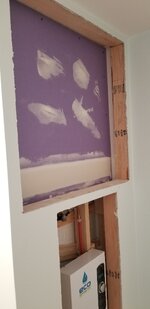
I forgot to mud this inside section of drywall that will be the backing for the shelving I will add later, so it got some mud yesterday.

Here are a few wider shots with the vanity and toilet placed. It's starting to look like an actual bathroom!


Sent from my SM-G950U using Tapatalk
The shower insert instructions called for a specific adhesive to glue in the mosaic tile (DAP 3.0). It was pricey (30% more than regular caulk) but bonds extremely well to the shower panels. I applied it generously from the caulk gun and then spread it evenly with a slooted spreader. The mosaic set in the adhesive instantly with no sagging over the drying time. I had two sizes of spacers in my "previous tile job leftovers" pile but of course, neither were the right size to get even spacing at the top and bottom of the tile slot in the panel. I ended up hand-trimming a dozen or so spacers to the size I needed. It worked well!
I also got the vanity lights installed. The hanger that I made earlier in this thread supported the light just fine. The bulbs that came with the yard sale buy are too yellow compared to the overhead LED light, so I picked up some "whiter" LED bulbs at the store today. The outlet below the lights are for a heated, lighted mirror, on order. It ended up a lot higher than I would have liked, but it will still work. It'll receive a recessed outlet later today.
I forgot to mud this inside section of drywall that will be the backing for the shelving I will add later, so it got some mud yesterday.
Here are a few wider shots with the vanity and toilet placed. It's starting to look like an actual bathroom!
Sent from my SM-G950U using Tapatalk
Attachments
-
 2e6b29ab19d3c1bc26d921ca19c8f003.jpg39.6 KB · Views: 0
 -
 2cdac7e6c81390eadb9697aa6662c7d6.jpg235.3 KB · Views: 0
 -
 45e86b78afce92d5aec9b6fcbad61d54.jpg251.8 KB · Views: 0
 -
 e71516969ba499823764ab398b83c24c.jpg262.7 KB · Views: 0
 -
 b58d5376e191e291679816445a6942e5.jpg454.8 KB · Views: 0
 -
 94a51ec601797e70a24089217a1a4aa7.jpg242.8 KB · Views: 0
 -
 d9a54f1463f4601badbde8b7f03244e9.jpg322.1 KB · Views: 0
Last edited:
OP
BlueBomber
Well-known member
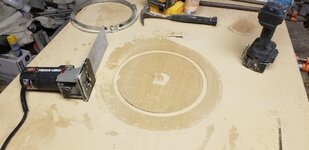
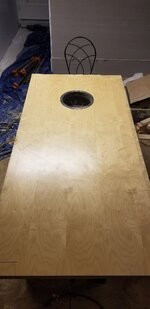
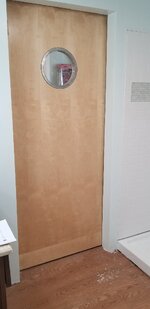
I also worked on the sliding barn door for the bathroom. I picked up a commercial solid core door off of Marketplace for $50. It is a monstrously heavy door, and at 41" x 79", too wide and too short. However, the price was right, and since I plan to paint it, a little surgery will allow me to resize it and fix its flaws.


I removed all of the heavy duty attachments, including the hinges, latch and automatic door closer. These should come close to covering my acquisition cost on Ebay.

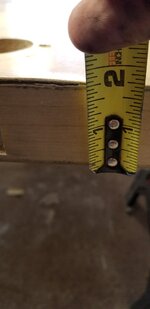
The first task was to cut the door down to the 36" width I needed. The door has a particle board interior with birch veneer and edges, the first step was to remove the edge off of the door knob side. I then cut another 5-1/2" down the length of the door to remove the door knob hole. In both cases, an 8-foot scrap of wallboard edge served as my straight edge. Although not pictured, I later glued the edge back to the side of the door and held it in place with panel clamps until it was solid. I also brushed sawdust into the gaps and glue to help with the blending and sanding later. Later today, once the hardware kit arrives, I'll cut an extension for the door bottom and glue it on, too.

On the door hinge side, a 1/4" slice removed the hinge mortises, leaving only the screw holes that wood putty should fill in nicely.

In keeping with the general nautical theme of the room, I bought a porthole off of Ebay to install on the door. However, the door was thicker than the porthole frame could span, so I determined I would have to inset the rim. This would have the added bonus of having nothing sticking out on the wall side of the door to scrape or bump. I located the exact spot for the center of the opening (18" from the top and either side) but I knew I would not be happy with trying to hand route the round opening. I wandered out to my scrap pile behind the other garage and cut a 12"x3" strip of sheetmetal from an old air conditioner enclosure (knew I'd saved it for a good reason") ) and fashioned a jig that attached to the router. After that, a perfect circle was child's play on both sides, and the inside line of the groove made a perfect guide for the jigsaw to cut out the center. Alas, the depth of the router was a little long, and the porthole rattles a bit in the hole, but I figure I will caulk it into place anyway, so it will do nicely.
) and fashioned a jig that attached to the router. After that, a perfect circle was child's play on both sides, and the inside line of the groove made a perfect guide for the jigsaw to cut out the center. Alas, the depth of the router was a little long, and the porthole rattles a bit in the hole, but I figure I will caulk it into place anyway, so it will do nicely.


The bottom of the door (which will be the top in my installation) was delaminated in several places. I squirted some glue in under the chips and clamped them down with two boards, one on each side. They closed up nicely, again--good enough to finish for painting.

While I was typing the above two entries, the UPS and Amazon delivery trucks brought the barn door rolling hardware and the recessed outlet. Thus, I guess its time to get off the computer and back to work. I'll try to add another update tonight before the work week resumes tomorrow.
I removed all of the heavy duty attachments, including the hinges, latch and automatic door closer. These should come close to covering my acquisition cost on Ebay.
The first task was to cut the door down to the 36" width I needed. The door has a particle board interior with birch veneer and edges, the first step was to remove the edge off of the door knob side. I then cut another 5-1/2" down the length of the door to remove the door knob hole. In both cases, an 8-foot scrap of wallboard edge served as my straight edge. Although not pictured, I later glued the edge back to the side of the door and held it in place with panel clamps until it was solid. I also brushed sawdust into the gaps and glue to help with the blending and sanding later. Later today, once the hardware kit arrives, I'll cut an extension for the door bottom and glue it on, too.
On the door hinge side, a 1/4" slice removed the hinge mortises, leaving only the screw holes that wood putty should fill in nicely.
In keeping with the general nautical theme of the room, I bought a porthole off of Ebay to install on the door. However, the door was thicker than the porthole frame could span, so I determined I would have to inset the rim. This would have the added bonus of having nothing sticking out on the wall side of the door to scrape or bump. I located the exact spot for the center of the opening (18" from the top and either side) but I knew I would not be happy with trying to hand route the round opening. I wandered out to my scrap pile behind the other garage and cut a 12"x3" strip of sheetmetal from an old air conditioner enclosure (knew I'd saved it for a good reason
) and fashioned a jig that attached to the router. After that, a perfect circle was child's play on both sides, and the inside line of the groove made a perfect guide for the jigsaw to cut out the center. Alas, the depth of the router was a little long, and the porthole rattles a bit in the hole, but I figure I will caulk it into place anyway, so it will do nicely.The bottom of the door (which will be the top in my installation) was delaminated in several places. I squirted some glue in under the chips and clamped them down with two boards, one on each side. They closed up nicely, again--good enough to finish for painting.
While I was typing the above two entries, the UPS and Amazon delivery trucks brought the barn door rolling hardware and the recessed outlet. Thus, I guess its time to get off the computer and back to work. I'll try to add another update tonight before the work week resumes tomorrow.
Attachments
-
 18a83ffb0da762075baad28284ec78d2.jpg317.3 KB · Views: 0
 -
 34ff344ae0286cd5e288edc6f6336829.jpg278.9 KB · Views: 0
 -
 3cfb0c013d2402fde67f7c3379aaa6db.jpg381.8 KB · Views: 0
 -
 fa479902f4ea6b330bab720f463958f1.jpg328.9 KB · Views: 0
 -
 cc36b3c073bed7029215db6f8e8e42dd.jpg341.8 KB · Views: 0
 -
 fd4987ab94540e054a993d7b1f58fd79.jpg86.3 KB · Views: 0
 -
 33eddc52ad0f3fb7939f9074fa076eb9.jpg316.5 KB · Views: 0
 -
 92e514becb47b694c2d189da3e0340ae.jpg329.9 KB · Views: 0
 -
 0af227f63dddf44b65b38002c82d321a.jpg64.5 KB · Views: 0
 -
 81e8c54db1e024003c01a249a0ca9f03.jpg288.5 KB · Views: 0
Last edited:
OP
BlueBomber
Well-known member
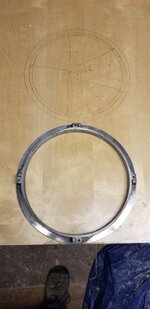
Three weeks brought some more progress on the bathroom project.
I cut the extension for the bottom of the door and used the table saw to cut the dado for the floor mounted guide post that keeps the sliding door from flipping into or away from the wall. I then made some biscuit cuts in both pieces and glued/clamped them together to finally get the 2nd-hand door to the dimensions I need.


Next, I grouted the stone & glass mosaic tiles with a grey-tinted premixed grout and a rubber spreader. I pretreated the mosaic with a grout release, and it seemed to work well. I wasn't sure my little container would be enough for my 6-in x 10-ft strip of mosaic but I had some leftover at the end.


Sent from my SM-G950U using Tapatalk
I cut the extension for the bottom of the door and used the table saw to cut the dado for the floor mounted guide post that keeps the sliding door from flipping into or away from the wall. I then made some biscuit cuts in both pieces and glued/clamped them together to finally get the 2nd-hand door to the dimensions I need.
Next, I grouted the stone & glass mosaic tiles with a grey-tinted premixed grout and a rubber spreader. I pretreated the mosaic with a grout release, and it seemed to work well. I wasn't sure my little container would be enough for my 6-in x 10-ft strip of mosaic but I had some leftover at the end.
Sent from my SM-G950U using Tapatalk
Attachments


Last edited:
OP
BlueBomber
Well-known member
The plumbers finally hooked up the water and drains, so I tried out the hot water heater when I got home....nothing! I did some troubleshooting analysis and got worried when I found a warning that said not to turn on the heater unless water was connected. The risk was burning out heating elements--d'oh, I had done just that when I first wired everything up! However, after further inspection and reading, I found the problem:

Yep, the plumbers hooked up the lines backwards! Turns out these electric heaters don't heat when you run the water through them in reverse (imagine that).
The plumber fumbles continued, unfortunately. After coming out to fix the connections and prep for final inspection, I got a text saying the heater (which I had picked out) was too small and not producing enough heat at the shower head three feet away. Another end of workday inspection revealed they hadn't flipped on both breakers that feed the heater (2 40-amp 240V circuits). After doing so, it heated just fine. So, they scheduled and the work passed the final plumbing inspection. I was just about to send a "thanks for everything" text until, on a hunch, I checked the attic to find this:

The vent pipe was not appropriately through the roof. Both inspector and plumbers had missed that! After sending the same picture to the plumbers with a a "this doesn't look right..." note, they quickly came back out and and, finally, finished the job.
Sent from my SM-G950U using Tapatalk
Yep, the plumbers hooked up the lines backwards! Turns out these electric heaters don't heat when you run the water through them in reverse (imagine that).
The plumber fumbles continued, unfortunately. After coming out to fix the connections and prep for final inspection, I got a text saying the heater (which I had picked out) was too small and not producing enough heat at the shower head three feet away. Another end of workday inspection revealed they hadn't flipped on both breakers that feed the heater (2 40-amp 240V circuits). After doing so, it heated just fine. So, they scheduled and the work passed the final plumbing inspection. I was just about to send a "thanks for everything" text until, on a hunch, I checked the attic to find this:
The vent pipe was not appropriately through the roof. Both inspector and plumbers had missed that! After sending the same picture to the plumbers with a a "this doesn't look right..." note, they quickly came back out and and, finally, finished the job.
Sent from my SM-G950U using Tapatalk
Attachments


Last edited:
OP
BlueBomber
Well-known member
During the plumber follies, the electrical team got their work done just fine. They ran a new conductor from the house main panel to the garage, and then a new line through the wall to the garage panel, and that satisfied the town inspector.
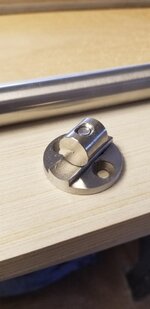
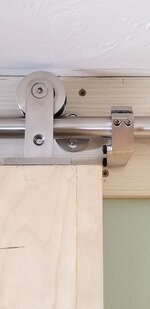
While all of the inspections were going on, I made more progress on the sliding door. First, I knew that with such a heavy door, I would need a strong mounting surface for the bar. I found a long enough piece of 3/4" plywood left over from the Murphy bed project and trimmed it to match the decidedly not-plumb ceiling at the top of the wall (there was a >1-in difference between "level" over the 6-ft span!).

Next, I mounted the bar to the board. The mounting system was pretty slick, with internal threaded cylinders that allowed the brackets to capture the bar with no visible fasteners on the front face. These brackets then mated with other brackets that separately mounted to the backing board with big, strong screws. In all, a pretty clean system.


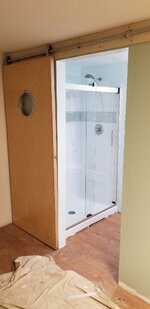
The top rollers were also cleanly mounted via machine screws into large threaded inserts that were screwed and glued into the top of the door. Here are a few shots of the rollers and the hung door.


For such a heavy door (>150 lbs, I'm sure), it rolls easily with a single finger push. I still have to mount the handles, door pulls and latch, and I may add some additional trim to the outside to break up the large flat surface and to hide my door joinery flaws. Then, the whole door will get a coat of white paint to match the other two doors on that end of the room.
While all of the inspections were going on, I made more progress on the sliding door. First, I knew that with such a heavy door, I would need a strong mounting surface for the bar. I found a long enough piece of 3/4" plywood left over from the Murphy bed project and trimmed it to match the decidedly not-plumb ceiling at the top of the wall (there was a >1-in difference between "level" over the 6-ft span!).
Next, I mounted the bar to the board. The mounting system was pretty slick, with internal threaded cylinders that allowed the brackets to capture the bar with no visible fasteners on the front face. These brackets then mated with other brackets that separately mounted to the backing board with big, strong screws. In all, a pretty clean system.
The top rollers were also cleanly mounted via machine screws into large threaded inserts that were screwed and glued into the top of the door. Here are a few shots of the rollers and the hung door.
For such a heavy door (>150 lbs, I'm sure), it rolls easily with a single finger push. I still have to mount the handles, door pulls and latch, and I may add some additional trim to the outside to break up the large flat surface and to hide my door joinery flaws. Then, the whole door will get a coat of white paint to match the other two doors on that end of the room.
Attachments
-
 76d2cc8c6fd8274734e6e215c1ccb640.jpg265.4 KB · Views: 0
 -
 28ca6da620a75e5fbc23d9f964b4286d.jpg306.3 KB · Views: 0
 -
 7a2dc359c617e10d82b895bddd3900ab.jpg314.3 KB · Views: 0
 -
 786540a56b133d72298c70063491717b.jpg269.9 KB · Views: 0
 -
 8ebefaa64731aefab0197d9a000aea6d.jpg285.9 KB · Views: 0
 -
 526412254596ddab95db404c42dde797.jpg280.5 KB · Views: 0
 -
 9ddb839ea072852334a43e1e12bcbaf2.jpg154.6 KB · Views: 0
 -
 2182276651e13b266fb05ab152715292.jpg311.4 KB · Views: 0
Last edited:
OP
BlueBomber
Well-known member
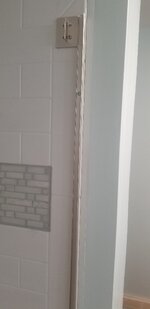
Next up were the shower sliding doors. The Kolher kit featured a bottom rail that glued to the edge of the shower pan, which went in easily enough. The two side rails, however, revealed a shortcoming with how I had mounted the shower panels.

The vertical door rails were supposed to attach via screws, and the kit came with fasteners for either tile/backer board or wood studs. Unfortunately, I did not provide a wooden support behind this section of the thin shower panel, so I had to improvise. Since the side rails would only support the vertical weight of the doors, and not any horizontal force trying to pull them out of the wall, I found these expanding plastic anchors that did the trick. This picture is from the backside, through the heater access panel.

The upper rail attached to the top of the vertical with some additional screws and anchors, and then the doors hung via rollers on both sides of the rail.


Sent from my SM-G950U using Tapatalk
The vertical door rails were supposed to attach via screws, and the kit came with fasteners for either tile/backer board or wood studs. Unfortunately, I did not provide a wooden support behind this section of the thin shower panel, so I had to improvise. Since the side rails would only support the vertical weight of the doors, and not any horizontal force trying to pull them out of the wall, I found these expanding plastic anchors that did the trick. This picture is from the backside, through the heater access panel.
The upper rail attached to the top of the vertical with some additional screws and anchors, and then the doors hung via rollers on both sides of the rail.
Sent from my SM-G950U using Tapatalk
Attachments
-
 7fb321daf85f0bd4574a97875e46bbec.jpg258.3 KB · Views: 0
 -
 07aabe1d972f42a15ad8132f2776483e.jpg246.2 KB · Views: 0
 -
 4a5b65b2ede6d5f16232c4374b57d729.jpg273.7 KB · Views: 0
 -
 8f5ad1e516942761892bd4933f96ae20.jpg227.5 KB · Views: 0
 -
 8a06e01207dcdcb6ed318d6543f63e65.jpg284.9 KB · Views: 0
 -
 ac52f29fdb82b026f7b0dfefeb09683c.jpg210.9 KB · Views: 0
 -
 4ba4e5f4e4fea577cec9d3ac50f0899a.jpg231 KB · Views: 0
Last edited:
OP
BlueBomber
Well-known member
Here's present day. The bathroom is fully functional, which puts it in that dangerous "90% done" stage where the last 10% can take as long to finish as it did to do the work in front of it. Hopefully, I can get to the door finished next weekend and knock out the shelving before the summer gets here. I also need to get SWMBO's T-bird seat finished and reinstalled before the spring weather arrives. There's a lot to do, but I seem to like it that way!


Sent from my SM-G950U using Tapatalk
Sent from my SM-G950U using Tapatalk
Attachments


C_F
ALLIANCE MEMBER
Looks great! I really like that type of shower door set.
With your hanging wood door, I assume you are going to have a roller or something at the bottom, so it doesn't slide along the base board?
I really like that type of shower door set. With your hanging wood door, I assume you are going to have a roller or something at the bottom, so it doesn't slide along the base board?
OP
BlueBomber
Well-known member
Looks great! [emoji106] I really like that type of shower door set.
With your hanging wood door, I assume you are going to have a roller or something at the bottom, so it doesn't slide along the base board?
Thanks, C_F! Yes, there's a roller that screws to the floor to capture the bottom of the door. Back in post #512, if you look closely you can see me holding it in the slot I cut on the door bottom.
Last edited:
C_F
ALLIANCE MEMBER
Thanks, C_F! Yes, there's a roller that screws tot he floor to capture the bottom of the door. Back in post #512, if you look closely you can see me holding it in the slot I cut on the door bottom.
Oh sorry, I missed that somehow.
 Looks like it will work great!
OP
BlueBomber
Well-known member
This weekend, I made a commitment to SWMBO to get her Thunderbird seat finished and reinstalled. With spring weather fast approaching, she was getting antsy to get her car back on the road.
First thing I did was make some room by putting back up a shelf that came down to allow access for the electrical work on the upstairs bathroom. Easy peasy.


Next was finishing the upholstery work on the seat back. I left it with the central parts hog ringed in and needing to fasten the top, bottom and sides. I started with the top, and used a wooden scrap and clamps the help compress the new foam so that I would have enough material to staple and hog ring. It worked, and I plowed forward with the rest of the work. I never imagined I would have to trim so much foam away from a kit specifically designed for my car, but I sure did. At one point, I test fit the seat back to the bottom and realized I needed to open it back up and cut off some more foam so that the seat would fold all the way open!


All proceeded reasonably well with no damage to my new upholstery...until I got to the last step of putting the backing on. With the new vinyl obscuring the old holes in the seat frame, I elected to drill new ones. Unfortunately, while driving the screws into the new holes, the screws occasionally bound up, making the driver slip a few times, poking a few extra holes into the brand new backing. This was annoying, but the curse words flew when the bit slipped and tore a 3/4 rip into the brand new vinyl upholstery, right at the top of the driver's side seat! Grrr! I ordered a vinyl repair kit from Amazon--hopefully it will minimize the problem.
Once the seat was done, I replaced the air distribution plenum under the dash while I still had room to get easily up under the dash. The original was pressboard, and had deteriorated and torn. The replacement from NPG was plastic, and will live forever, but I was not impressed by the flimsy metal brackets that were attached. I drilled out the rivets on both pieces and reattached the old brackets to the new plenum and then put it into place, followed by the seat.


To celebrate, SWMBO and I took the Bird out for a gas tank top off and lunch for us. This was the car's first drive on the new white wall radials, and she rode very nicely. There's still a lot to do to the car, but I'm hands off for a while so that SWMBO can enjoy her. Happy wife, happy life!


Sent from my SM-G950U using Tapatalk
First thing I did was make some room by putting back up a shelf that came down to allow access for the electrical work on the upstairs bathroom. Easy peasy.
Next was finishing the upholstery work on the seat back. I left it with the central parts hog ringed in and needing to fasten the top, bottom and sides. I started with the top, and used a wooden scrap and clamps the help compress the new foam so that I would have enough material to staple and hog ring. It worked, and I plowed forward with the rest of the work. I never imagined I would have to trim so much foam away from a kit specifically designed for my car, but I sure did. At one point, I test fit the seat back to the bottom and realized I needed to open it back up and cut off some more foam so that the seat would fold all the way open!
All proceeded reasonably well with no damage to my new upholstery...until I got to the last step of putting the backing on. With the new vinyl obscuring the old holes in the seat frame, I elected to drill new ones. Unfortunately, while driving the screws into the new holes, the screws occasionally bound up, making the driver slip a few times, poking a few extra holes into the brand new backing. This was annoying, but the curse words flew when the bit slipped and tore a 3/4 rip into the brand new vinyl upholstery, right at the top of the driver's side seat! Grrr! I ordered a vinyl repair kit from Amazon--hopefully it will minimize the problem.
Once the seat was done, I replaced the air distribution plenum under the dash while I still had room to get easily up under the dash. The original was pressboard, and had deteriorated and torn. The replacement from NPG was plastic, and will live forever, but I was not impressed by the flimsy metal brackets that were attached. I drilled out the rivets on both pieces and reattached the old brackets to the new plenum and then put it into place, followed by the seat.
To celebrate, SWMBO and I took the Bird out for a gas tank top off and lunch for us. This was the car's first drive on the new white wall radials, and she rode very nicely. There's still a lot to do to the car, but I'm hands off for a while so that SWMBO can enjoy her. Happy wife, happy life!
Sent from my SM-G950U using Tapatalk
Attachments
-
 476b5ec678de2bd32b8b34f4f62480eb.jpg341.4 KB · Views: 0
 -
 9008f5404a4184d90e89f2d83263e314.jpg454.1 KB · Views: 0
 -
 23abfab177882d22f40089872630c425.jpg412.3 KB · Views: 0
 -
 c0421fda697edc40e0c69fd7b0aa6f83.jpg450.1 KB · Views: 0
 -
 363cbeb4ed0062d3b66dd07f8f234451.jpg427.4 KB · Views: 0
 -
 c3a556c1e5c09ab81e40897dd2a13175.jpg427.1 KB · Views: 0
 -
 e7345ccf693caf680a6c10769af595ff.jpg314 KB · Views: 0
 -
 652264aa9749524035f0b2195b04ec46.jpg293.6 KB · Views: 0
 -
 61c8514f56e0eea0646afc28315eef62.jpg273.4 KB · Views: 0
Last edited: