To avoid these ads, REGISTER NOW!

building a 60" x 24" workbench

Atlsud

Member
Joined
Dec 8, 2015
Messages
5
I'm planning a 60"x24" workbench and wanted to ask some experts on construction.

It will be built with 2x4 and particle board tops. I was initially thinking of using the simpson tie kit but I was given a nice pocket hole jig. Would the screws in the pocket holes be strong enough?

Thanks in advance!
 
To avoid these ads, REGISTER NOW!

73RR

Blank Email
Joined
Dec 13, 2016
Messages
300
Location
Central Ory-Gun
You'll be better off with a metal frame.......and if you want a really stout work surface, shop around for a short piece of glu-lam beam.
 
OP
A

Atlsud

Member
Joined
Dec 8, 2015
Messages
5
It will be freestanding on 3" casters. General purpose with a heavy vise on one corner. Will also use for miter saw and work surface when wrenching on the car.
 

zippy99

Active member
Joined
May 3, 2013
Messages
43
Location
Elmer, NJ
I'm planning a 60"x24" workbench and wanted to ask some experts on construction.

It will be built with 2x4 and particle board tops. I was initially thinking of using the simpson tie kit but I was given a nice pocket hole jig. Would the screws in the pocket holes be strong enough?

Thanks in advance!

Pocket screws in softwood are not going to stand up. I have a mobile bench that I build using the simpson brackets for the same types of uses you mention and it works great. Added bonus it went together really fast. You should be able to build the whole thing in an hour or so.
 

matt_i

Well-known member
Joined
Mar 14, 2008
Messages
10,725
Location
SE Michigan
You'll be better off with a metal frame.......and if you want a really stout work surface, shop around for a short piece of glu-lam beam.

The welded tube frame would be my advice as it won't need any "X" bracing via metal strapping or other.
 

James-W

Well-known member
Joined
Feb 3, 2013
Messages
12,432
Location
Southeastern Wisconsin
I've built some 2x4 workbenches and went through several designs using screws, lag bolts, lots of bracing, etc. This is the sturdiest design for a small, wood workbench that I've come across. I've built several this way now and have been very happy. Take a look.
I agree, that is a very strong design. The only thing I would do is to have a brace from the center bottom of the legs (on the brace going between the the end legs) to the center of the bench on the bottom side.
 

Cyberbear

Well-known member
Joined
Nov 23, 2013
Messages
1,524
Location
California
A lot depends on the weight the bench will be subjected to. Personally, I'd opt for the corner legs to be 4 x 4 with a let in notch for vertical strength and only rely on glue and bolts to hold it all together. The top can be anything solid in nature and then covered with replaceable real Masonite. The bottom shelf can be plywood of suitable thickness and acts to support the legs. The casters should be the lockable type to keep the bench from rolling all over the shop when positioned. Under drawers can be added for small tool and supply storage. Adding a four outlet box is a real convenience as well in order to always have available electrical power wherever you are working for portable power tools and lights, etc. These benches are fun to build and will last forever w/o extreme abuse. My personal bench size is 48" x 72" for portability and being stable under heavy loads.
 

R_einan

Well-known member
Joined
Aug 29, 2016
Messages
461
Location
Eastern WA
I've built a couple of work benches, all using a design my father in law showed me. The one I built in my last shop was a free standing unit. It's hell for stout, and I've had a ton of weight on the design. Using 2x4 for legs, place a horizontal board running the length of the bench at the flush with the tops of the legs. Then place a 2x accross the top of each leg extending out over the horizontal support, tying both sides together. Then a 2x2 filler between the top ties. Then attach the top around the perimeter and across the center supports. You can add a lower shelf at whatever height you wish using 2x2s. For a rolling bench I would upgrade the corner legs to 4x4s.
 

MushCreek

Well-known member
Joined
Jan 14, 2015
Messages
9,763
Location
Upstate South Carolina
This is how I build them. Very strong and rigid. The key is using GLUE and screws. The legs are made out of plywood with a 2X2 in the corner, again, glued and screwed. I make the plywood pieces 8" at the top tapered down to 4" at the bottom.

 
To avoid these ads, REGISTER NOW!

bczygan

Well-known member
Joined
Nov 4, 2009
Messages
22,002
Location
DETROIT! Arsenal of Scrappers
I've built some 2x4 workbenches and went through several designs using screws, lag bolts, lots of bracing, etc. This is the sturdiest design for a small, wood workbench that I've come across. I've built several this way now and have been very happy. Take a look.

That is very far from the sturdiest design.

The lateral strength is all in the joints:
workbench.jpg


The design of a bench depends on it's use.

Some need mass and some need light rigidity.

The OP sounds like he needs a medium duty bench that has a top with enough strength to work on and a frame rigid enough in all 3 axis, yet also light, so it can be moved.

2x4's and sheet goods are his preferred materials and they will work well.

Frame it up as desired with the 2x4's using whatever joinery is desired, but make sure to frame in a bottom shelf at the base. This will make the bottom of the legs rigid and give him something to mount the casters to.

Being only 24" deep, and on casters, this will be tippy front to back, so it needs ballast. The low bottom base will give him a place to put tools and toolboxes to provide some ballast.

The top can be anything he wants.

But the secret to lateral strength will be what mushcreek proposed. Sheath the 2 sides and back completely with plywood, glued and screwed. I wouldn't do any fancy sloped legs like he shows, just full cladding, tying the framing all together.

Bill
 
Last edited:

Furley

New member
Joined
Dec 22, 2016
Messages
1
I'm planning a 60"x24" workbench and wanted to ask some experts on construction.

It will be built with 2x4 and particle board tops. I was initially thinking of using the simpson tie kit but I was given a nice pocket hole jig. Would the screws in the pocket holes be strong enough?

Thanks in advance!

I built this one with a few mods. First, I lowered the bottom shelf to give me more space for tools. Second, I put it on lockable wheels to make it mobile, yet sturdy when locked. Third, I made 3 equal width drawers. If I did it again, I would put the drawers on slides. It has been great for both woodworking and mechanical projects.

http://www.familyhandyman.com/workshop/workbench/simple-workbench-plans/view-all
 

rick carpenter

Well-known member
Joined
Jan 20, 2011
Messages
3,773
Location
Huntsville, East Texas
Arlsud,

Bczygan has some good advice building off what MushCreek posted re the cladding. But I think you can come up with a close second that's more accessible if you made a lower shelf then clad four ~12" plywood strips horizontally under the top and the shelf. You could cover the strips with pegboard mounted to some 1x stand-offs. I think the pocket screws would pull through after a while so I suggest you be sure to use fender washers with any screws/lags/bolts directly into the wood.

I used a 1-3/4" industrial particlewood door for my bench "sub-top" with 1/2" mdf as a sacrificial topper.

Bdbecker, that bench is a beauty!
 

Catadj78

Well-known member
Joined
Aug 11, 2014
Messages
1,009
Location
Alabama
af1899d9483c74ce0b0ea80e9e990f9b.jpg

9a3bd50f771e3b9c80a0e983122d007e.jpg

Don't know nor care if it's right or wrong but it works for me


Sent from my iPad using Tapatalk
 

Attachments

  • 9a3bd50f771e3b9c80a0e983122d007e.jpg
    9a3bd50f771e3b9c80a0e983122d007e.jpg
    531.7 KB · Views: 1
  • af1899d9483c74ce0b0ea80e9e990f9b.jpg
    af1899d9483c74ce0b0ea80e9e990f9b.jpg
    517.2 KB · Views: 4

matt_i

Well-known member
Joined
Mar 14, 2008
Messages
10,725
Location
SE Michigan
Some people use oak flooring as a bench top. It works really well and the cost isn't terrible.

I did this with some 3/4" solid maple flooring. I ripped the tongue off to make sort of an "edge band" with the groove facing down. Its nailed to a solid door and then a steel tube frame underneath. Have to get a pic, its approaching 20yo now!
 

bczygan

Well-known member
Joined
Nov 4, 2009
Messages
22,002
Location
DETROIT! Arsenal of Scrappers
Some attention needs to be given to the casters.

Since the bench will be narrow front to back, they should be mounted as close to the corners as possible. The top should also not overhang the box too much either.

And the casters should be carefully chosen. They need to be a big enough diameter to roll easily on the surface it will be used on. Larger diameter will roll over rougher surfaces. But it needs to be balanced with a width and grippiness that will keep the bench stable.

As mentioned above, at least 2 of them should be lockable.

Bill
 

driftpin

Well-known member
Joined
Dec 22, 2016
Messages
11,218
Location
Miami-Dade/Broward Co. Florida
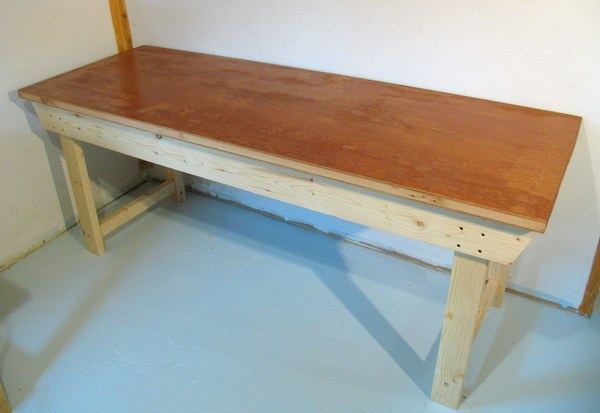
I chose to use commercial products instead of making my own, but I just used a frame from Sears, and made my own tabletop. I got one of the formed sheetmetal Craftsman frames. It's 2' x 8' and I topped it w/a 4' x 8' x 3/4" CDX plywood sheet ripped to make two 2' x 8' pieces, which I them glued & screwed together to make the countertop. I went to a sheet metal shop and bought a 3/16" steel sheet and 3/4" strips to case the edges of my wood tabletop. I made the dimensions of the steel sheet to overhang the wood tabletop by the thickness of the edge steel banding. I wanted a surface that I could put mechanical components onto and wail-away on them without having to worry about denting a thinner surface, as-in some lighter gauge of steel sheet. I countersunk the holes in the 3/16" sheet steel so I could use flat-top machine screws for a flush finish. Since the top surface does tend to oxidize, I keep it waxed. I've thought about getting a cap of stainless steel to just sit on-top, but it's not high on my priority list. Underneath I have Craftsman drawer roller cabinets, or shelved cabinets, all on casters, the three fit perfectly. The workbench is against a masonry wall, so a few fasteners into that, and it's as rigid as you could want.

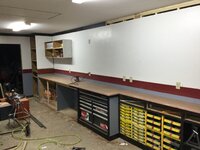
Above the countertop I have Whirlpool Corp. brand Gladiator wall panels for adjustability of hanging an assortment of frequently-used tools. I also have my cordless chargers mounted to the wall panels to get them off the benchtop, I made some plywood brackets to mount them using the stamped-steel brackets Gladiator includes with their wall-hanging cabinets, but which I didn't use for cabinet-hanging, as I tapconed my 30" x 30" x 12" wall cabinets in-place.

I made sure I used 4" electrical boxes so I could wire-in two duplex outlets at each box. The 4" boxes are 3' o.c. I also have a 20 amp 220 volt box for my Powermatic 64 table saw I bought from a Coast Guardsman in Key West, the best $125 investment I ever made.

I installed a Harbor Freight Tools (HFT) 50' air hose retracting reel above the workbench. When I'm done with work, I simply blow-out the overhead doors all the floor debris of a small nature, the big stuff and metal shavings I generally sweep-up to prevent trauma from it lying in the driveway, or getting embedded in someone's shoe sole, and then defacing the interior of the house's red oak floors we recently re-finished.

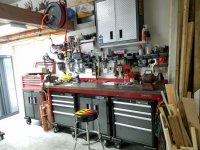
All the Gladiator and Craftsman stuff I waited until it went on-sale, I saved up to 80% (!) off the retail cost by waiting for close-outs and sales. The roller Craftsman cabinets under the workbench were $325-400+ retail, I paid $84 apiece. When the salesman told me the price, I asked him, "how-many do you have at that price?" I bought them all, limited to 'stock on-hand.' The workbench frame was $208 retail, I paid $80. All was new-in-box, not returns. I don't have the time to spend making all the cabinets and drawers I would need, so this worked out well for me.

I like reading about how others approach the construction, in my case, it was easier to just get permission from "The War Dept." to get new stuff, and then to buy it. The Gladiator cabinets are welded, though they do have knock-down ones too, I found the welded Pro line to be more-sturdy.
 

Always_Thinkin

Well-known member
Joined
Aug 14, 2012
Messages
300
Location
Illinois
I built this one with a few mods. First, I lowered the bottom shelf to give me more space for tools. Second, I put it on lockable wheels to make it mobile, yet sturdy when locked. Third, I made 3 equal width drawers. If I did it again, I would put the drawers on slides. It has been great for both woodworking and mechanical projects.

http://www.familyhandyman.com/workshop/workbench/simple-workbench-plans/view-all

Do you happen to have any pictures of your workbench? Curious to see what it looks like. I have always thought this was a good design, one of my favorites.
 

Know Wosad

Banned
Joined
May 15, 2016
Messages
811

Attachments

  • PC221018.jpg
    PC221018.jpg
    100.7 KB · Views: 65
Last edited:

Mr. Soup

Member
Joined
Nov 19, 2016
Messages
21
Location
Troy, Missouri
My son and I built this one for him from a box of leftover hardwood flooring and some scrap stuff laying around. You don't have to get fancy just use what you got.
 

Attachments

  • 20161127_103741.jpg
    20161127_103741.jpg
    146 KB · Views: 63

johnehr

Well-known member
Joined
Nov 24, 2013
Messages
103
Location
Oak Grove, Minnesota
I used a simple 2x4 design idea that I saw at one point on GJ... works great, adaptable to desired size, easy build...ffbeee28c73b8a72b453ade4e9d3fa6b.jpga14e2e399d9070e79a22e8330535e5b0.jpg4bc794c8fa7b92ee9b009241ca7647d8.jpg6350e67a7ffc19c73243513bf8fd356b.jpg
 

Attachments

  • 6350e67a7ffc19c73243513bf8fd356b.jpg
    6350e67a7ffc19c73243513bf8fd356b.jpg
    855.6 KB · Views: 5
  • 4bc794c8fa7b92ee9b009241ca7647d8.jpg
    4bc794c8fa7b92ee9b009241ca7647d8.jpg
    925.3 KB · Views: 4
  • a14e2e399d9070e79a22e8330535e5b0.jpg
    a14e2e399d9070e79a22e8330535e5b0.jpg
    954.3 KB · Views: 4
  • ffbeee28c73b8a72b453ade4e9d3fa6b.jpg
    ffbeee28c73b8a72b453ade4e9d3fa6b.jpg
    883.1 KB · Views: 4
To avoid these ads, REGISTER NOW!
Top Bottom