
You are using an out of date browser. It may not display this or other websites correctly.
You should upgrade or use an alternative browser.
You should upgrade or use an alternative browser.
Building Another Garage.
- Thread starter zappman
- Start date
Brilliant use of OCD, and I mean that in the most respectful way possible. Nice garage!
Wow, your the second member here to diagnose me with having Obsessive, Compulsive, Disorder. Good thing I am so thick skinned or you guys would be giving me a complex. (ha)
Perhaps a bit **** Retentive, which can be a bit frustrating when mixed with bad short term memory. Everything has it's place, I just can't remember where that place is usually.

Thanks for the post, and the compliment (I think)
As for the diagnosis, it's probably nothing more than a retirement induced case of N.B.T. (nothing but time)
great work. I really love the project print out you made. definitely something I need to start doing.
Thanks r0yal.
"The project print out" can save you much grief in the long run. Aside from giving you an accurate materials and cut list, it can help you foresee possible problems and avoid them. If the numbers don't add up right on paper, they surely won't in the construction.
Above all, it gives you a great reference guide to go by. As illustrated in the picture below, how per-calculating effects the end result.
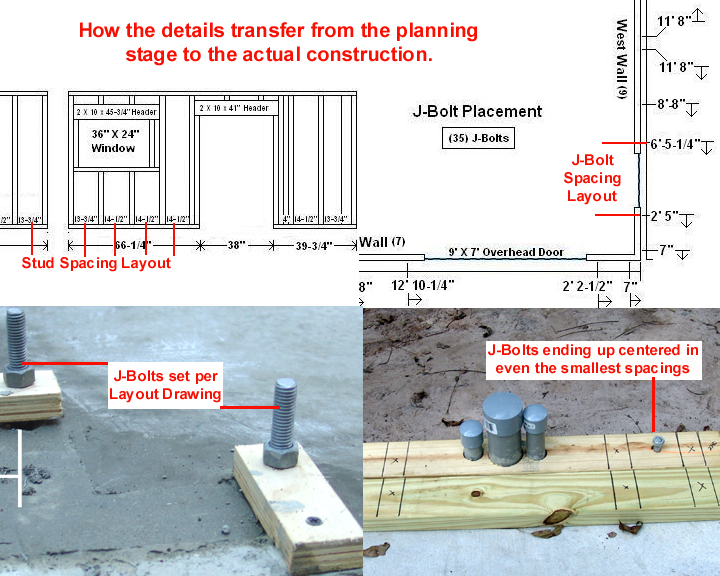
Personally, I'd rather do the math over a quiet cup of coffee in the evening, than on the fly with all of the possible distractions.
Thanks for posting.
JCQuick
Well-known member
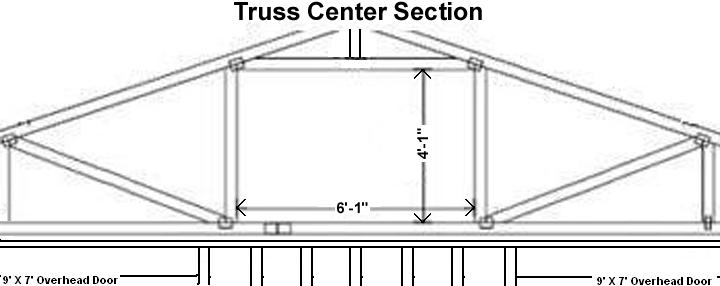
is that loft in the center of the 2 doors I had the same thought on the building I'm planning. anymore details
is that loft in the center of the 2 doors I had the same thought on the building I'm planning. anymore details
Yes JCQuick, The Trusses are at a 4/12 pitch I wanted to maintain at least a 4' height, so I managed to get a 6'-1" width. So the 4' X 8' decking is a sheet and a half wide on the floor and one sheet tall on the sides. The Loft is 24' deep so it actually has quite a bit of room up there.
Any other details you'd like to know about, I'll tell you what I can about it.
Hotz
Well-known member
build inspiring  ... Congratulations...
... Congratulations...is that loft in the center of the 2 doors I had the same thought on the building I'm planning. anymore details
Here go JCQuick, I went back through my pictures, and here are a couple more relating to the loft area.
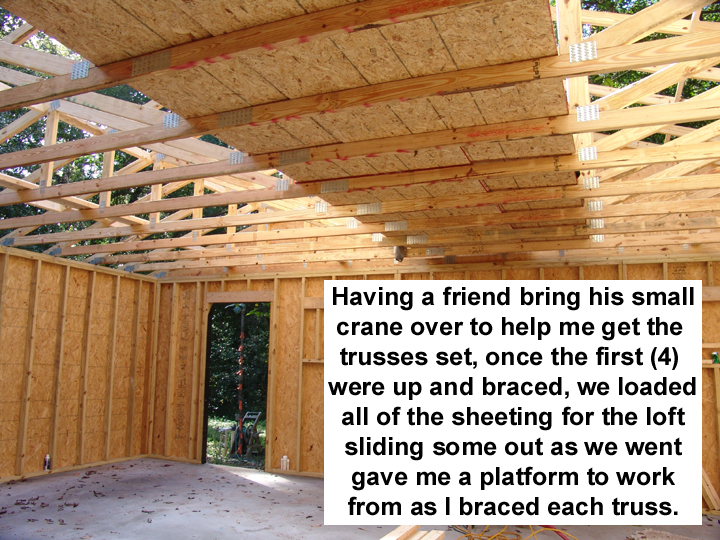
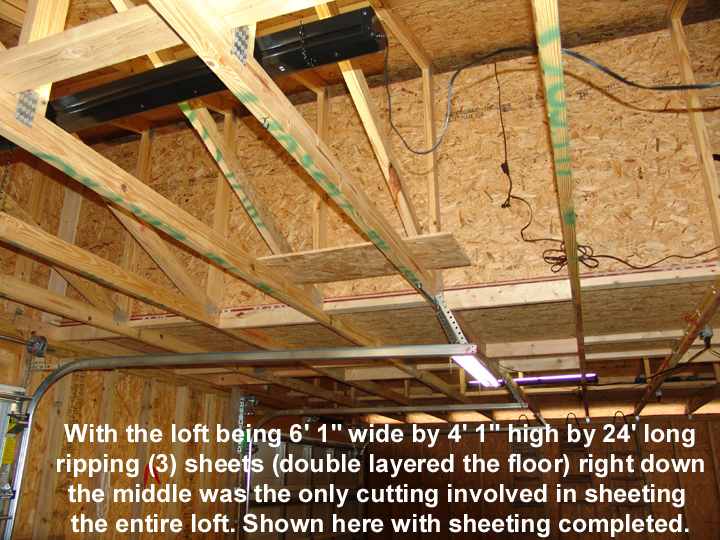
With the cost of 7/16" OSB being so low, I was able to double layer the floor giving a 7/8" OSB floor up there for less than sheeting it in a single layer of 1/2" plywood.
kesslerbmw
Well-known member
Beautiful job, I love the design for the loft area, but still using prefabbed trusses.
Beautiful job, I love the design for the loft area, but still using prefabbed trusses.
Thanks kesslerbmw. The standard truss webbing can be customized to some extent and still comply with codes. My local truss company accommodated my request, and the total difference from the original quote was under $300. Another $120 in sheeting and the loft added another 576 cubic feet to keep a lot of seldom used tools and such up out of the way. That's 73¢ per cubic foot of storage space.
this thread is a good manual for me! Because I want to build a new garage according to your construction.
That's great SBogaCH. I am glad to hear that the thread is useful to you. It makes all the image uploading and posting worth while to know that it may be helping someone else with their own future build.
polexican23
Banned
Amazing use of detail and planning. I have some free time on my hands and will put to use MSpaint. Your drawings in paint are meticulous and believe it is something I can utilize if I am ever going to get a garage built at my home. The fiance is planning the wedding so if I ever want to get it built it would be on the left over funds. (not much from what I have seen). If you feel comfortable what is your material costs on the framing side?
Btw beautiful space.
Btw beautiful space.
Amazing use of detail and planning. I have some free time on my hands and will put to use MSpaint. Your drawings in paint are meticulous and believe it is something I can utilize if I am ever going to get a garage built at my home. The fiance is planning the wedding so if I ever want to get it built it would be on the left over funds. (not much from what I have seen). If you feel comfortable what is your material costs on the framing side?
Btw beautiful space.
Thanks polexican23.
As for my material costs on the framing side, (bare in mind all of the walls are framed in "pressure treated" lumber)
Walls took: (120)2X4X8 PT. (20)2X4X12 PT plus the 2X12X10's for the Lintels.
Truss Blocking, Gable Overhangs etc.took: (60)2X4X8 #2 and (12)2X4X12 #2
With all the Screws, Nails, Bolts, Plates, Washers, and Strong tie HS24 Hurricane Straps and the 6-1/2% sales tax came to $1,269.55
The Trusses cost (delivered) was $1,271.50
So altogether $2,541.05 went into the framing stage.
Well, its been awhile since I posted any updates. We've been getting a lot of rainy days. Between them though to level out the approach, I had another 18 yards of fill dirt brought in and dropped in front of the build. From there I slowly moved and leveled it by hand, with a shovel, a wheelbarrow, and a hard rake.
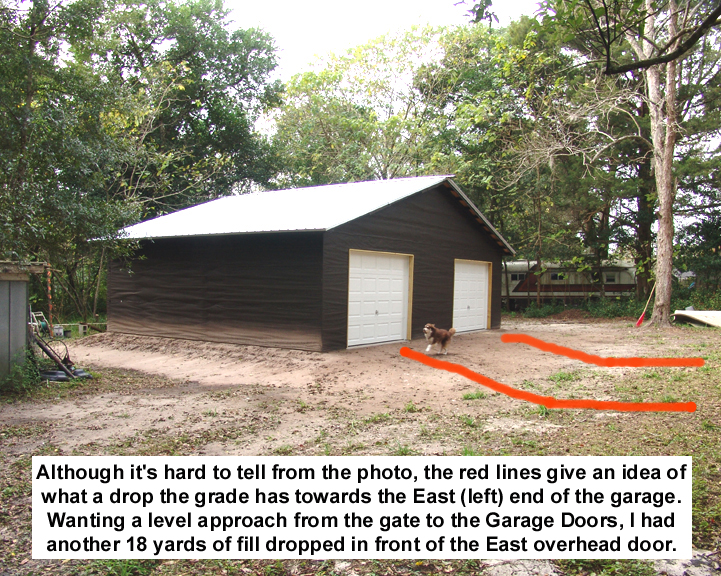
(above) before
(below) during
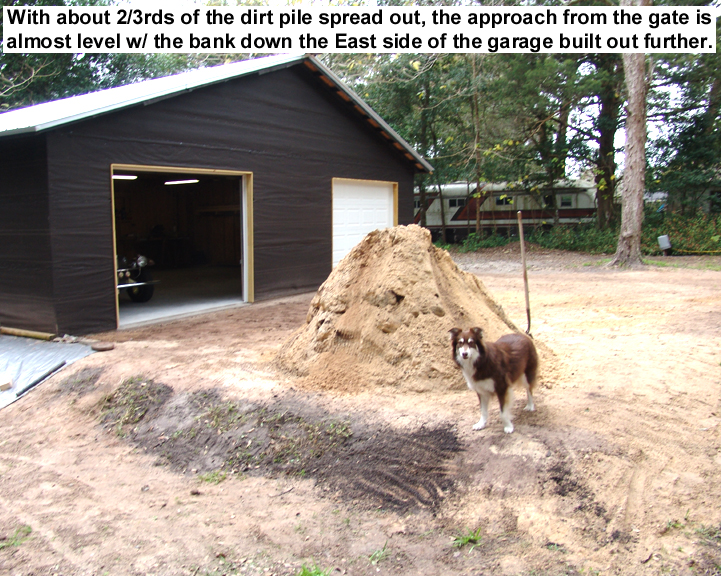
Above you can see how I've got the bank down the side of the garage tarped off to keep the water rushing off the roof from washing the bank back out. The tarp will be replaced with a layer of rubber retention pond liner a friend is giving me to permanently install over the bank.
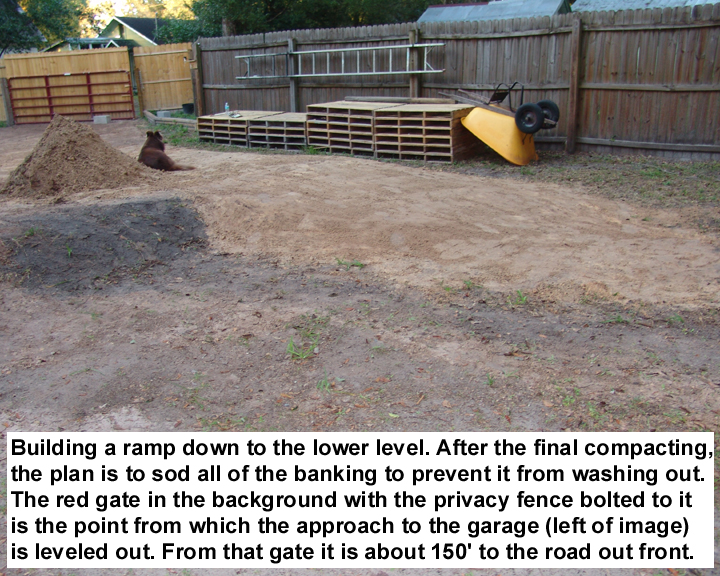
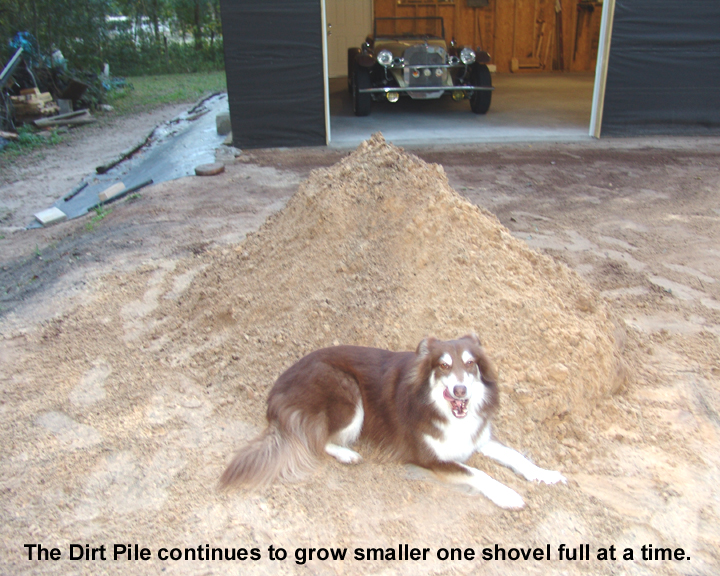
And finally after much, much, shoveling, the pile is gone, and it's all ready for a final compacting. Yeah!
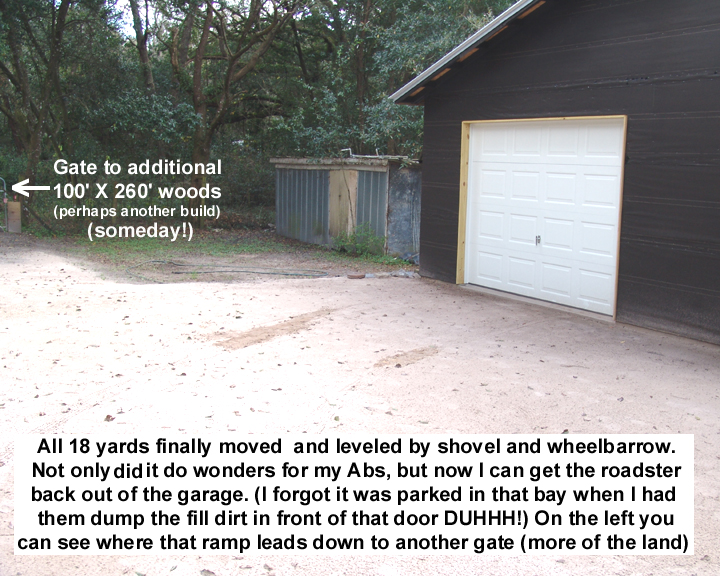
Until the next update:
(above) before
(below) during
Above you can see how I've got the bank down the side of the garage tarped off to keep the water rushing off the roof from washing the bank back out. The tarp will be replaced with a layer of rubber retention pond liner a friend is giving me to permanently install over the bank.
And finally after much, much, shoveling, the pile is gone, and it's all ready for a final compacting. Yeah!
Until the next update:
getthewheelsinline
New member
- Joined
- Apr 30, 2013
- Messages
- 3
Great thread! Nice attention to detail. As the saying goes 'plan your work then work your plan!'
Thanks for taking the time to post!
Callum
Thanks for taking the time to post!
Callum
Kevin54
MEMBER EMERITUS
All I can say is WOW!!!!!
OCD, Attention to Detail, or whatever you want to call it, WOW!!!! And the notebook with everything in detail just takes this build over the top. WOW!!!!
OCD, Attention to Detail, or whatever you want to call it, WOW!!!! And the notebook with everything in detail just takes this build over the top. WOW!!!!
Stuart in MN
Well-known member
I am using pressure treated in all the framing for the walls. And Yes, Subterranean Termites are the issue. They are relentless here. They will come out of the ground at the edge of a slab and make little tube tunnels (that they travel inside of but are very hard to see) right up the slab bypassing the bottom plate (being PT) and destroy half the untreated studs by the time you realize they are there.
It's a great looking building, and you've done a great job of documenting it. One question, since I'm not familiar with termite issues: are there any concerns about them getting into the OSB sheathing, or don't they like it?
Thanks getthewheelsinline, I had a Wood Shop teacher in Jr. High that used that saying a lot. I guess it must have sunk in to some extent.
No OHSCrifle, it's not to shady, and for most of the banking (like around the approach) I will just lay sod. It's just the 26' down the East end of the building that will get the rubber cover over the bank.
With that side of the building's 18' X 26' metal roof surface on a 4/12 pitch, I'm afraid the water coming off of it during some of the torrential down pours we get around here would still wash the dirt out right through the sod.
There are way to many leaves falling year round onto that area for rain gutter too. I'd spend the rest of my days cleaning them out constantly.
Thanks for the kind words theroyz71.
Thank you Kevin54. The build pales in comparison to some of the more elaborate "Monster" builds on here, but for what it is, and for what I have invested, I am pretty pleased with the results thus far.
Good question Stuart in MN. Though I've never asked any of them what they thought of the OSB (ha-ha) it seems to be mainly the soft "white wood" that they will tunnel several inches over treated wood to get to. I have had them build their little tunnel right up the side of a PT bottom plate to infest a "white wood" stud. Hence my going with PT wall studs and top plates as well, from that point on. They won't tunnel 8' of PT to get to untreated wood. (at least I've never heard of them doing it)
As for the OSB, between the hardness of the compressed composite, and the resins used to hold them together, in my experience they tend to leave it alone. Though I also sprayed the bottom foot or so with a long lasting residual subterranean termite concentrate before I applied the felt wrap. (Just as an added deterrent)
Thank you all for your comments, it's great to have others show an interest in the project, and this thread has provided a lot of encouragement from my very first post.
There is still a ways to go on the build. Right now I am still on the fence between going with a stucco exterior or a "Hardy Board" siding which was the original plan. Any thoughts on that?
I know stucco is very common is FL and if done properly will give you great service life. Personally, I'm a fan of stucco on block, and cautious of stucco on lath over wood framing. My reluctance is due to wood buildings expanding and contracting fairly significantly, while a cement product on another cement product is more consistent with respect to movement. This is not to say stucco cannot be used on wood framing. If you do use stucco be sure to include control joints to break it into reasonable size "panels" so the movement effect is minimized. Place it on lath over two layers of felt (or Tyvek, etc) and provide perforated bottom screeds that are above grade... so the water that eventually gets into the stucco (it will) will have a drainage path.
Note: With pressure treated lumber, if it is not KDAT (kiln dried after treatment) the wood is likely to experience considerable shrinkage as it dries. Time in the FL sun may remedy that issue.
Check out the early pages of "the concrete underground" in the build gallery, where fiber cement panels were used on a garage in Maine. It's not your typical HardiePlank siding job.
Thanks for the input OHSCrifle.
In reading up on the application of stucco over wood framed construction, I have noted the use of expansion joints. The average recommendation in my climate seems to be between 4'X 4' and 4' X 8' sections to allow for the "wood buildings expanding and contracting"
As for the PT lumber, it was ACQ treated, and kilned. Though no indication in which order was provided.
I have experienced some warping of studs in past additions I have used PT lumber in framing up. Although it did require a bit of re-work at the drywall stage, I still feel it's benefits in terms of ODO's (organic deteriorating organisms) outweighed the extra effort.
Thank you for bringing both very valid topics into question, as for their discussion could be useful to anyone reading this thread and making personal decisions based on it's contents.
Great build, as a fellow OCD-type I am really impressed with how organized and methodical your planning and build process (and process is the right word) has been. I wish my builder was as contentious with keeping a clean build site and that they had the same attention to detail as you do. Really looking forward to seeing the finished product!
Notice I did not say OCD sufferer, my OCD doesn't bother me at all! Our builder and my wife may have a different view however as I drive them a little nuts sometimes.
Notice I did not say OCD sufferer, my OCD doesn't bother me at all! Our builder and my wife may have a different view however as I drive them a little nuts sometimes.
Thanks for commenting with the kind words on my build jsherid1. I am sure I have driven some, more than just a little nuts sometimes
Having run construction crews in the past, I used to catch a lot of flack over my demands of how the site was left at the end of the work day. Yet, it always seemed to give the customer a secure feeling that they were dealing with a high level of professionalism. That alone to me, was always worth the effort.
As for attention to detail, unfortunately it has become difficult to compete in today's market without maintaining a pace that doesn't eat up the job's profits in man hours.
While there are true "Hacks" that shouldn't be in the trades in the first place, I believe that if it wasn't for the obstacles like absorbent impact and permitting fees, intolerable Workman's Comp. policy cost, coupled with all of the similar fees forced upon those in the production of materials, that today's Craftsmen could afford the time involved in exacting every step of their trade.
There are just way to many people extorting from the exchange between the Contractor and the Customer these days. It's a shame, but "Attention to Detail, hasn't become a "Lost Art", in as much as an "Unsupported Art".
Unfortunately, while the Craftsman suffers the frustration aspect of that, it is as always, the Consumer, who ends up taking the ultimate hit for a corrupt regulatory system.
I am glad that retirement has finally gotten me out of that rat race. Because although I truly love to work with my hands building structures that will hopefully be standing long after I am gone, it has become (and will most likely continue to be) increasingly difficult to make a living at it.
My hat is off to those true Craftsmen out there trying to feed their families by doing so.
On a lighter (and off topic) note:
I noticed your listed '69 Cherokee 32. Sweetness! One of only forty produced in it's four year production run.
Living on the Gulf Coast myself, I've had a couple of sailboats over the years, and I miss them all.
Limited to those utilizing a swing keel due to the shallow channel here, I will hopefully find myself owning another, one of these days.
Well, having gotten the building dried in and sealed up in December, I was able to take some time away from
the project to take care of some of life's other demands that had been piling up around here. So after around 5
months of setting closed up, I finally rolled the temporary electrical line back out to it, and started picking up
where I left off.
Because I will be doing a lot of wood working in this shop, I wanted a smooth sealed floor because trying to
keep fine sawdust swept up off from my existing garage's porous concrete floor has always been a pain.
So, knowing how things have a tendency to work out, I figured if I didn't do something about the bare concrete
now, I'd end up moving in benches and tools and then the floor would never end up getting done.
I opted to go with a concrete stain, and clear gloss solvent based sealer. I decided on a two toned (tan/brown)
spattered finish. The picture below shows the floor treatment I did, using a standard $20 pump up insecticide
type sprayer.
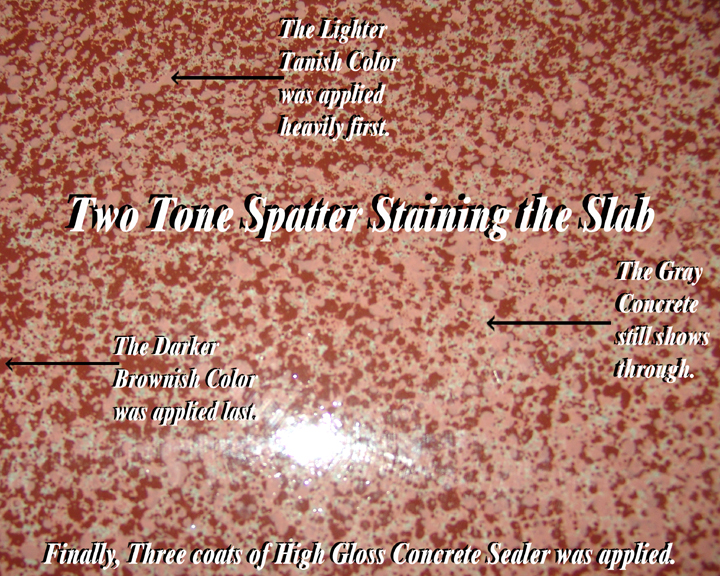
Needless to say, that with the three coats of clear gloss solvent based sealer (8 gallons total over 768 sq. ft.) I
got that smooth sealed (easy to sweep) surface I was after.
With the floor finished, I decided I wanted to get the ceiling up while there was still nothing in my way. Aside
from the elevator to the loft, I wanted simple access up and down from it. So, my next move was installing a pull
down staircase.
I mounted it between the trusses at the outside edge of the loft, so that at the top of the stairs you'd be
entering the loft from the side wall, and not taking up any of the loft's floor space with the staircase.
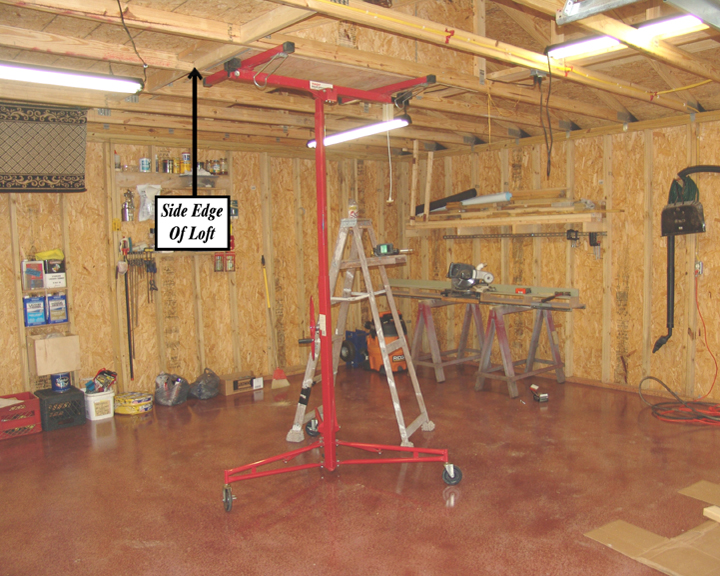
I had thought about buying one of these drywall jacks for several years. I finally did on my last project (an
addition on the house) I have to say that it is nice to have around when you need it. It certainly made installing
this pull down stair case a piece of cake to install.
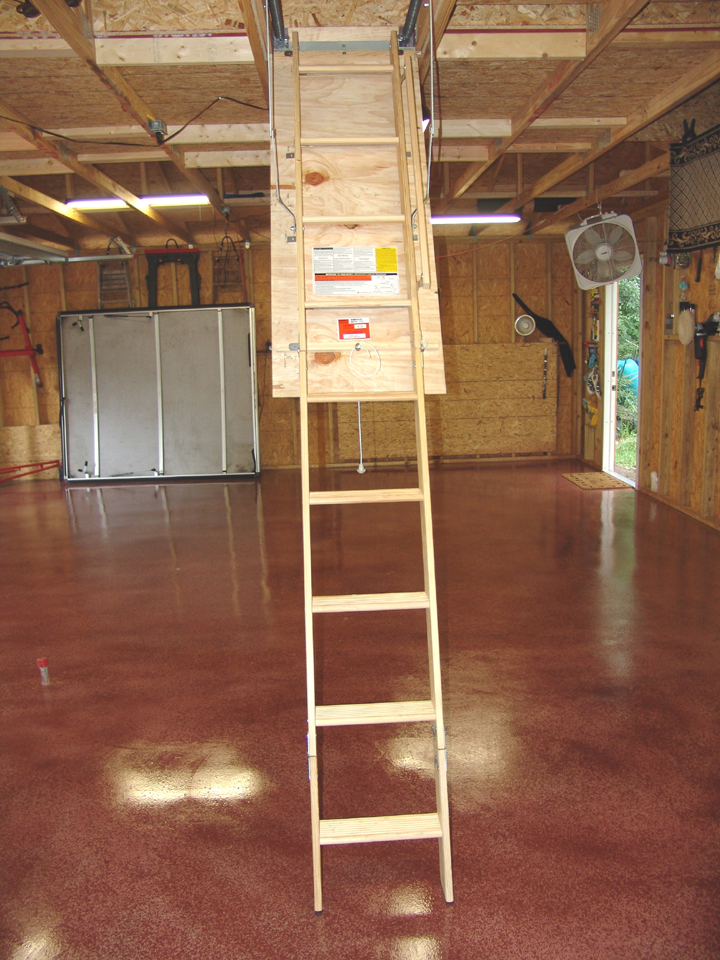
With the legs cut off to size it's ready to climb.
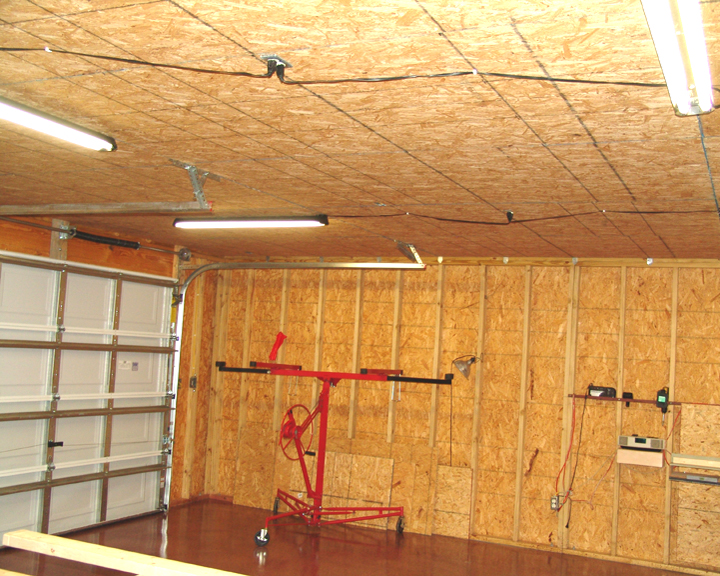
Having only ran a few of the over head electric lines (enough to run the temporary lighting) before putting up the
ceiling, I had to make sure that all of the overhead wiring was completed first.
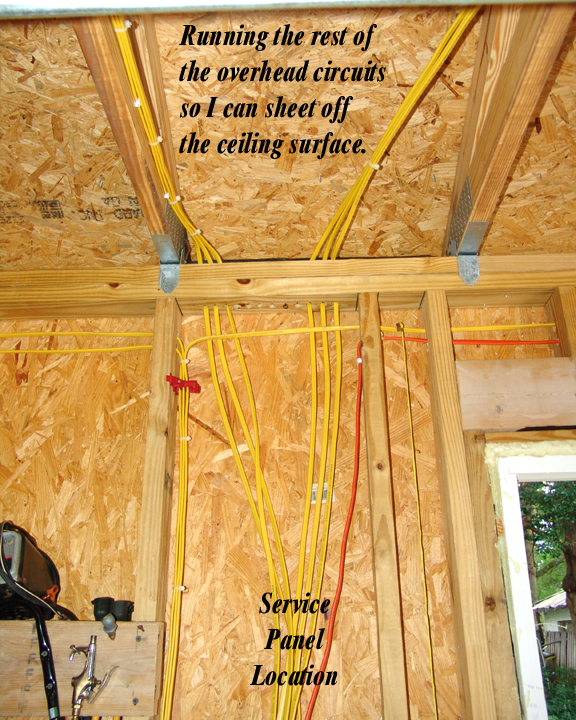
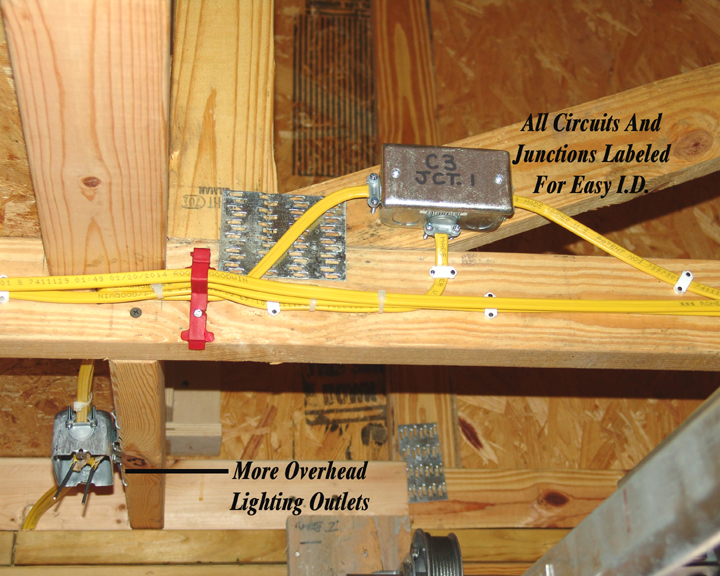
And now with all of the overhead rough in wiring complete the real fun begins.
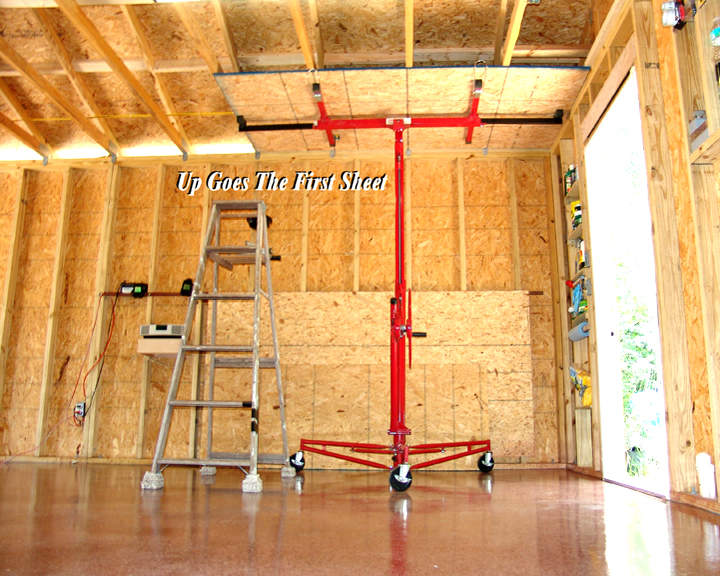
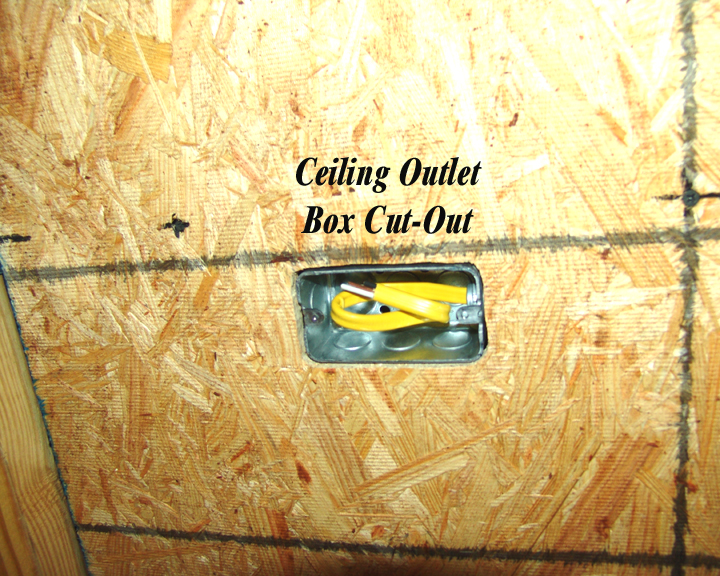
The drywall jack is really earning it's keep because each sheet goes up, gets any outlet boxes marked, then
comes back down to be cut out, then goes back up to be screwed to the trusses.
Slowly sheet by sheet making my way across the ceiling. As I get to it, each light or overhead door track
support has to come down and then be re-installed after that sheet goes up.
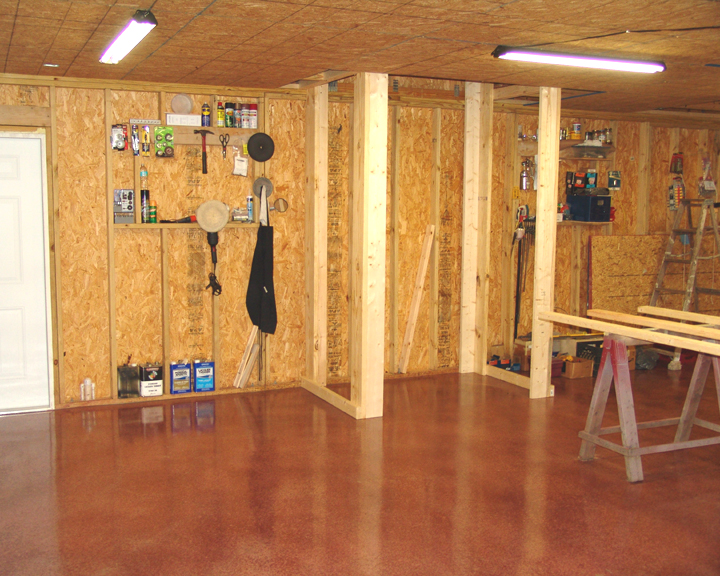
Finally, 24 sheets, 480 screws, and a lot of handling, the ceiling is in. The only opening in it now is at the elevator shaft (pictured here against the back wall). But, the Ceiling and Floor are now complete.
Well thats all for this update. I hope it won't be long till the next one, now that I am back on the project again.
the project to take care of some of life's other demands that had been piling up around here. So after around 5
months of setting closed up, I finally rolled the temporary electrical line back out to it, and started picking up
where I left off.
Because I will be doing a lot of wood working in this shop, I wanted a smooth sealed floor because trying to
keep fine sawdust swept up off from my existing garage's porous concrete floor has always been a pain.
So, knowing how things have a tendency to work out, I figured if I didn't do something about the bare concrete
now, I'd end up moving in benches and tools and then the floor would never end up getting done.
I opted to go with a concrete stain, and clear gloss solvent based sealer. I decided on a two toned (tan/brown)
spattered finish. The picture below shows the floor treatment I did, using a standard $20 pump up insecticide
type sprayer.
Needless to say, that with the three coats of clear gloss solvent based sealer (8 gallons total over 768 sq. ft.) I
got that smooth sealed (easy to sweep) surface I was after.
With the floor finished, I decided I wanted to get the ceiling up while there was still nothing in my way. Aside
from the elevator to the loft, I wanted simple access up and down from it. So, my next move was installing a pull
down staircase.
I mounted it between the trusses at the outside edge of the loft, so that at the top of the stairs you'd be
entering the loft from the side wall, and not taking up any of the loft's floor space with the staircase.
I had thought about buying one of these drywall jacks for several years. I finally did on my last project (an
addition on the house) I have to say that it is nice to have around when you need it. It certainly made installing
this pull down stair case a piece of cake to install.
With the legs cut off to size it's ready to climb.
Having only ran a few of the over head electric lines (enough to run the temporary lighting) before putting up the
ceiling, I had to make sure that all of the overhead wiring was completed first.
And now with all of the overhead rough in wiring complete the real fun begins.
The drywall jack is really earning it's keep because each sheet goes up, gets any outlet boxes marked, then
comes back down to be cut out, then goes back up to be screwed to the trusses.
Slowly sheet by sheet making my way across the ceiling. As I get to it, each light or overhead door track
support has to come down and then be re-installed after that sheet goes up.
Finally, 24 sheets, 480 screws, and a lot of handling, the ceiling is in. The only opening in it now is at the elevator shaft (pictured here against the back wall). But, the Ceiling and Floor are now complete.
Well thats all for this update. I hope it won't be long till the next one, now that I am back on the project again.

jbmatth
Well-known member
I must say I am impressed with your planning. I thought I was the only one OCD enough to go through the drawings like you did. But you went way beyond my planning even and I'm inspired by your electrical runs and labeling. I'll keep this one on my list to watch, keep up the great work.
evildky
Well-known member
subscribed
dittle fart around
Well-known member
I was under the impression that you couldn't bury junction boxes behind drywall.
Zeke
Well-known member
That will be essentially an attic where j-boxes are allowed.
1949 caddyman
Well-known member
Nice build. I have termites here also in Arizona. I do a monthly walk around the foundation & look for their tubes. I reapply chemical as needed. It helps to have good visability to the foundation to see the tubes.
Thanks txusa03! Out of all of those I'd rank "determination" to be the main ingredient. As for the energy, if your totally into and enjoying what your doing, seems like the energy is just there.
Well, jbmatth I'm just of the mindset that good planning saves you time (once you start building) saves you from a lot of headaches, and saves you money by preventing waste. I am glad I was able to inspire you. That's what it's all about here I think, is inspiring, and encouraging one another.
Good-on-ya! evildky
This is America dittle fart around, we can do whatever we want here. You know, "Land of the Free" and all that.
Spot On Zeke! And even though outside of the "Loft" area, there are also access doors in the "Loft" that allow access to all of the wiring runs. So nothing is actually buried.
I agree 1949 caddyman "good visibility to the foundation" is definitely key to keeping subterranean termites out of the building.
Thank you everyone for your comments. Until the next time...............
Well, jbmatth I'm just of the mindset that good planning saves you time (once you start building) saves you from a lot of headaches, and saves you money by preventing waste. I am glad I was able to inspire you. That's what it's all about here I think, is inspiring, and encouraging one another.
Good-on-ya! evildky
I was under the impression that you couldn't bury junction boxes behind drywall.
This is America dittle fart around, we can do whatever we want here. You know, "Land of the Free" and all that.
Spot On Zeke! And even though outside of the "Loft" area, there are also access doors in the "Loft" that allow access to all of the wiring runs. So nothing is actually buried.
I agree 1949 caddyman "good visibility to the foundation" is definitely key to keeping subterranean termites out of the building.
Thank you everyone for your comments. Until the next time...............
Modern Jess
Well-known member
I'm really digging all the planning and outright neatness that's gone into this build. Though I'm anything but neat, I can still admire it from a distance.
Keep up the good work!
Keep up the good work!
Thanks Modern Jess. Being retired now, has given me all the time in the world to work on the project. Luckily, I don't have any deadlines for it's completion, so I am able to just take my sweet time with the details.
The planning pages have spawned a book of drawings and detail info that has been being created in the process, documenting every stage of the build. It should make for a great owner's manual for whomever ends up with it someday after I am gone.
The planning pages have spawned a book of drawings and detail info that has been being created in the process, documenting every stage of the build. It should make for a great owner's manual for whomever ends up with it someday after I am gone.
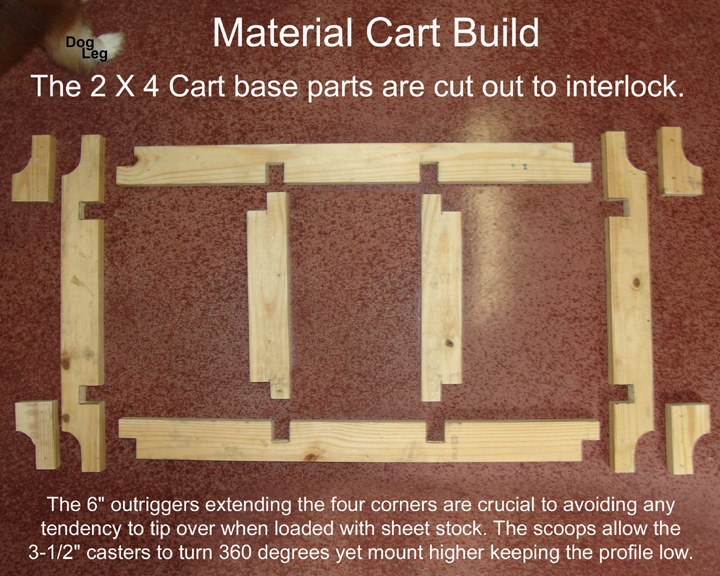
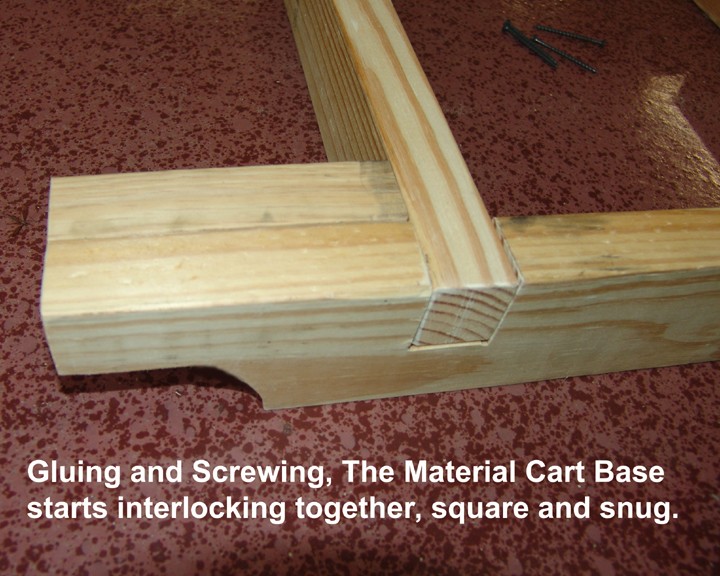
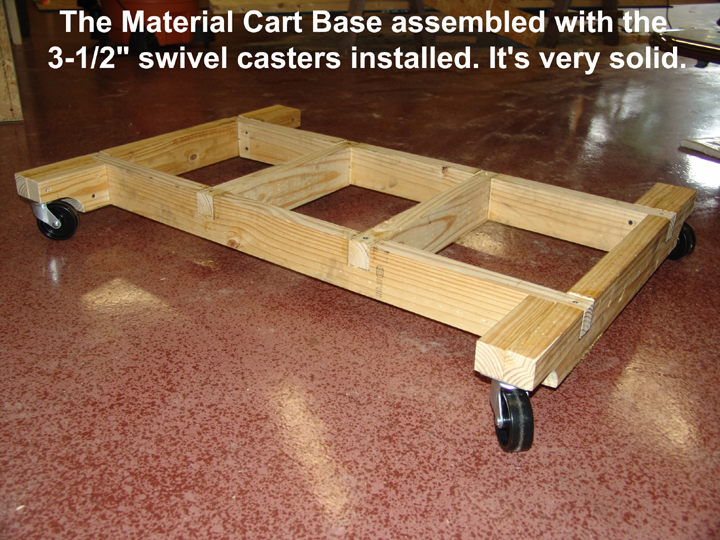
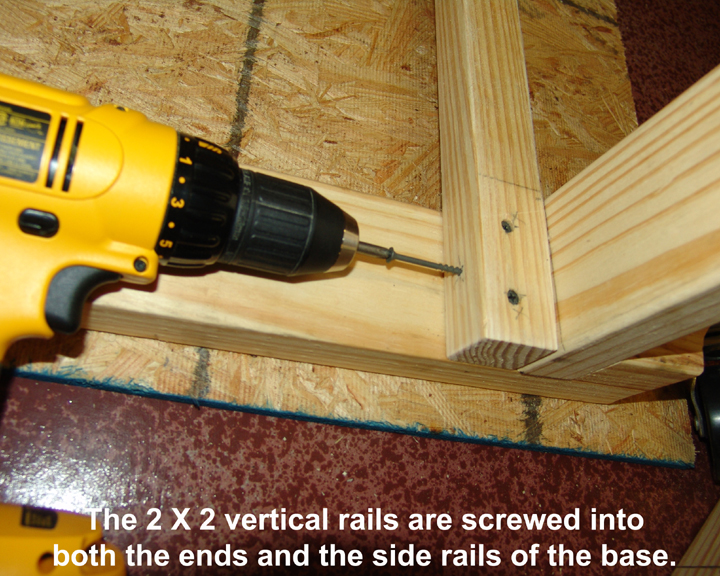
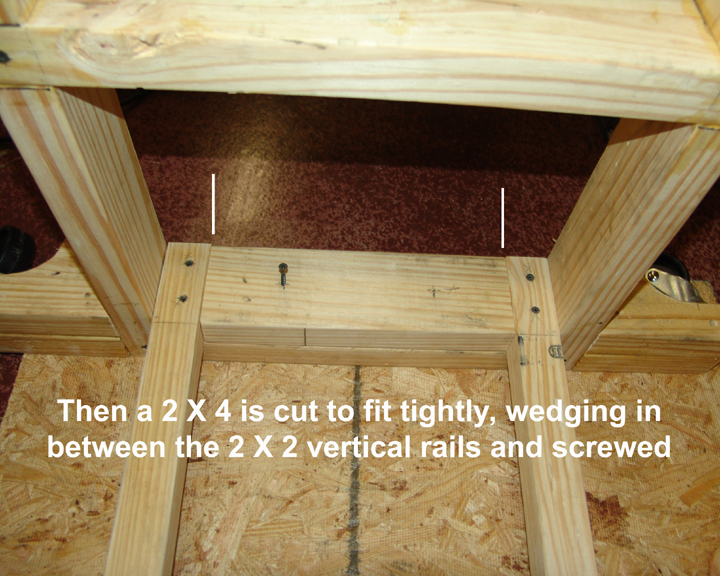
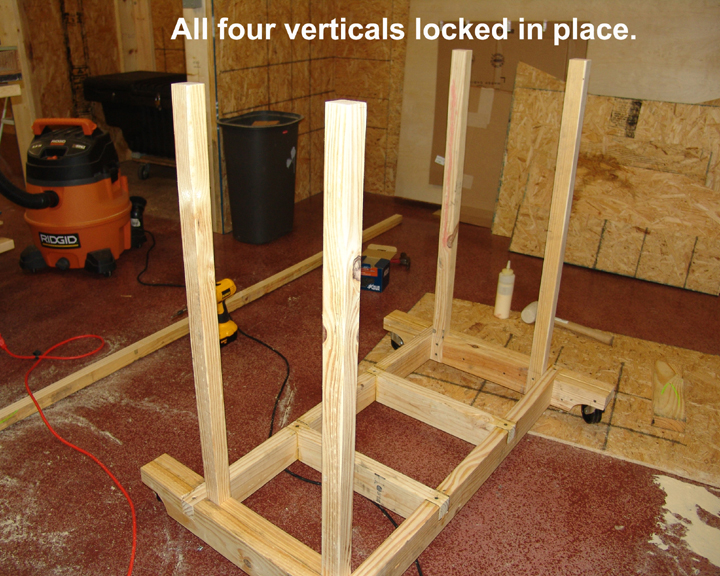
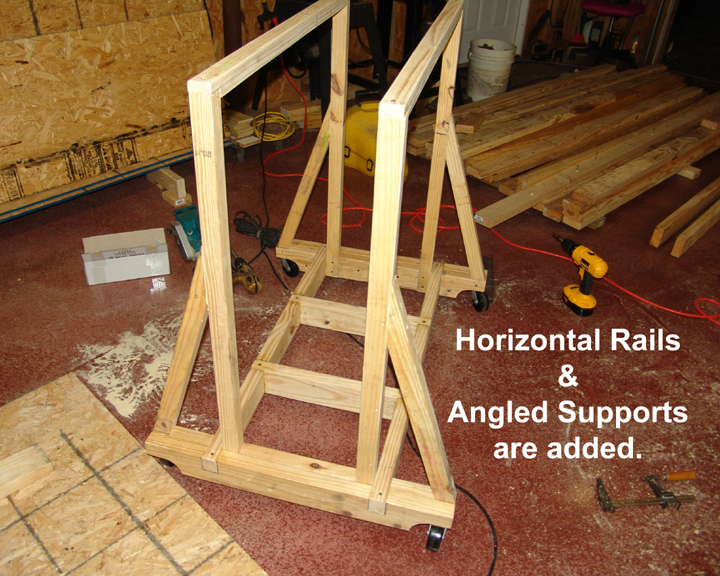
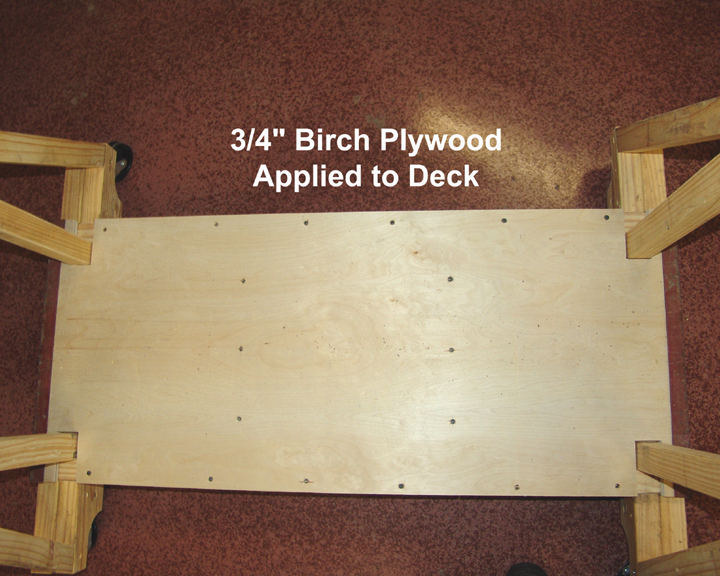
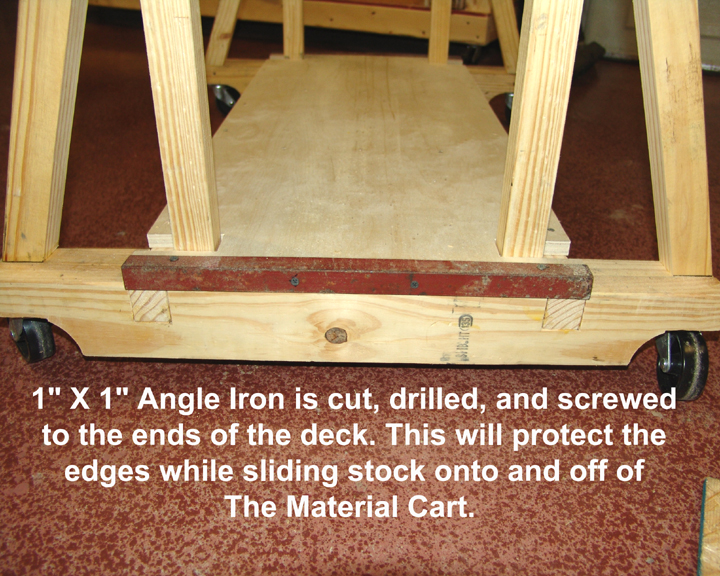
. Before moving on to sheeting the walls, and knowing I was going to have to keep moving things off from them as I go, I decided to take a little detour and build myself a material cart. This thing turned out to prove itself so handy, that I thought I'd share my design with you all in case any of you could benefit from building one.
Being one to believe I can make most anything out of wood, the amount of materials was very minimal. The greatest expense was actually the casters.
My goal was simple, Keep it low to the ground, stable when loaded with full sheets, and strong enough to handle moving several hundred pounds around the shop. All was achieved on the first attempt, and is holding up extremely well and without issue.
Here is what I came up with.
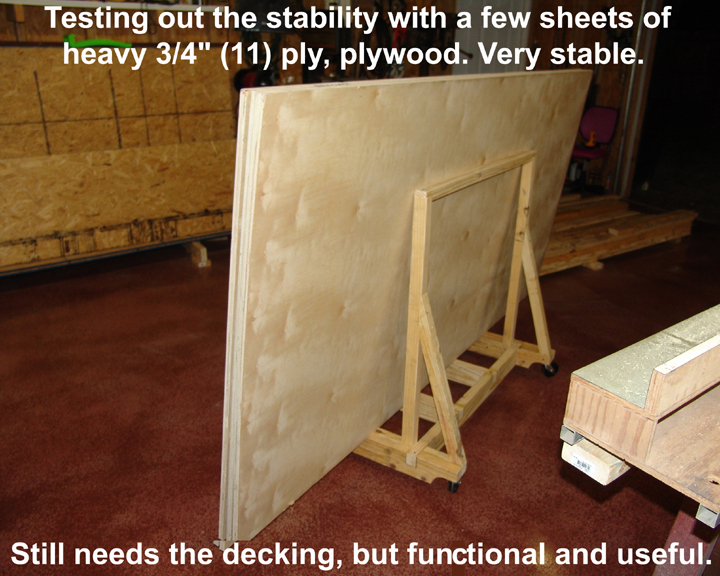

Well, hopefully this will give someone some inspiration. It has been well worth the couple of hours I invested building it, and has proven to be very handy to have around the shop.
Now time for me to quit Lolly Gagging and get back to work on the shop itself.
Being one to believe I can make most anything out of wood, the amount of materials was very minimal. The greatest expense was actually the casters.
My goal was simple, Keep it low to the ground, stable when loaded with full sheets, and strong enough to handle moving several hundred pounds around the shop. All was achieved on the first attempt, and is holding up extremely well and without issue.
Here is what I came up with.
Well, hopefully this will give someone some inspiration. It has been well worth the couple of hours I invested building it, and has proven to be very handy to have around the shop.
Now time for me to quit Lolly Gagging and get back to work on the shop itself.
jbmatth
Well-known member
I love how you take the time to build something so useful and put so much energy into it to make sure it will function to such a high degree. I applaud you!
thetastelingers
Well-known member
Wow. Your measuring, layout and position of hole skills are next to none.
My holes always are 1/2 inch off in one or two ways. Your rounded corners to fit the box. Applause sir!
My holes always are 1/2 inch off in one or two ways. Your rounded corners to fit the box. Applause sir!
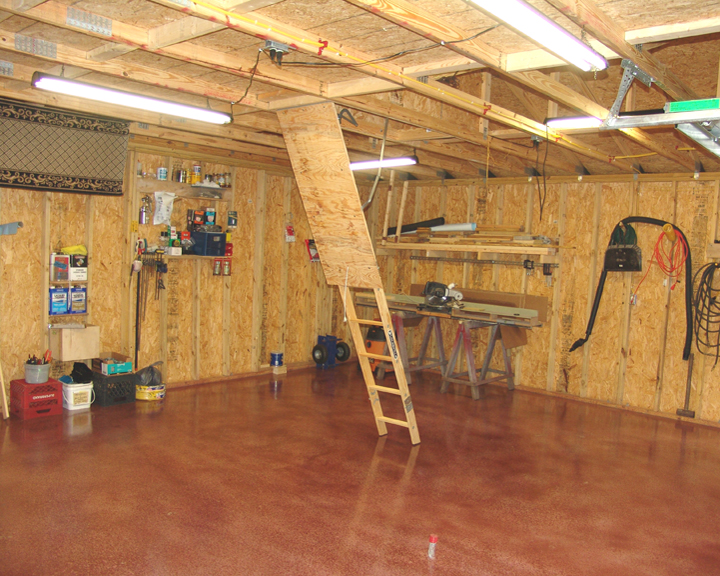
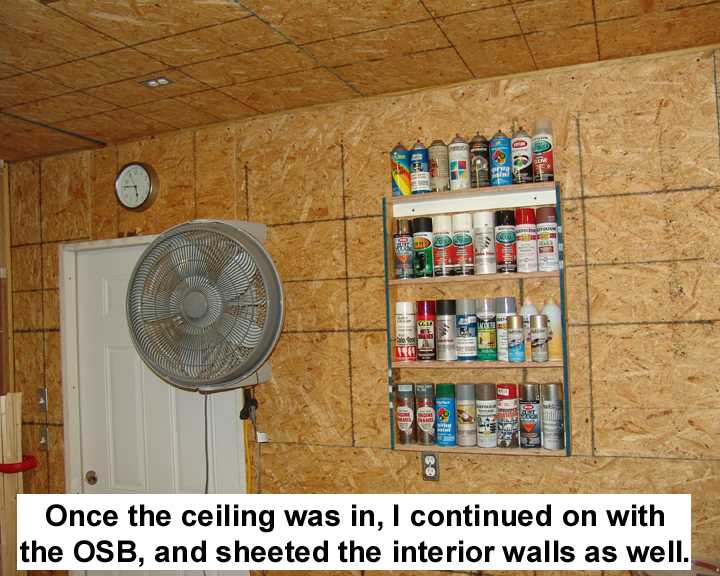
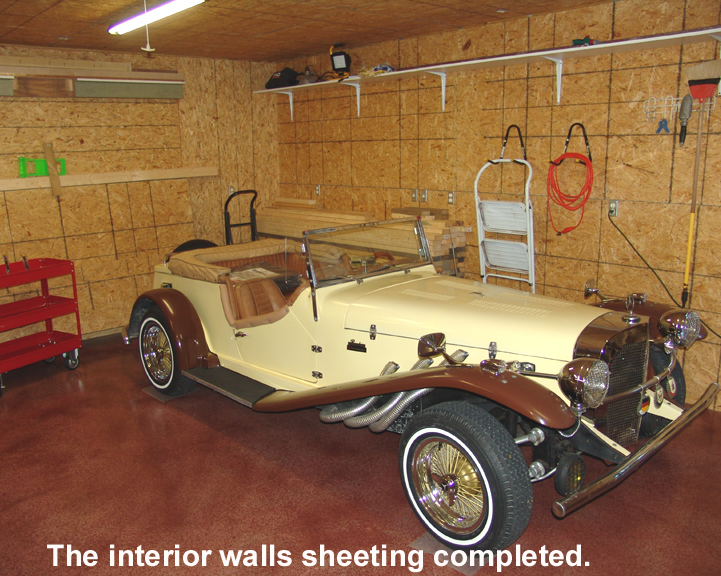
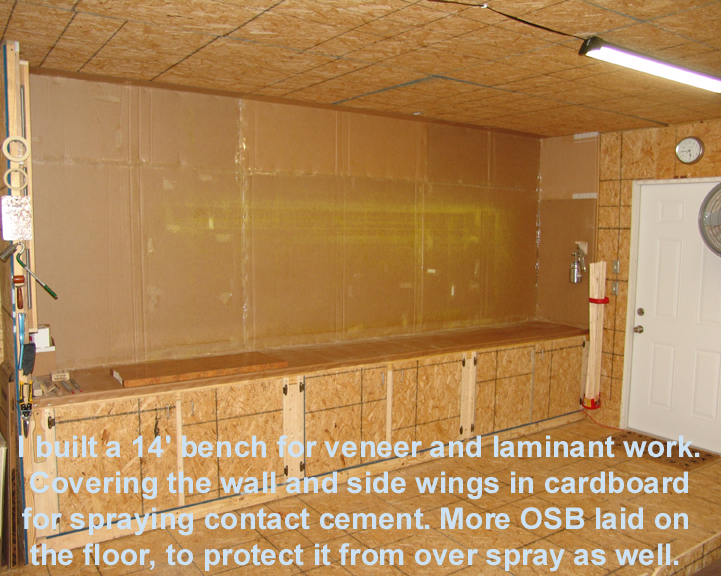
Just thought I'd post a few pictures of the interior. I've gotten the sheeting done on the walls, and been building some of the benches shown in the layout plans drawing at the very beginning of this thread.
I hope everyone's projects are going well.
Until the next update:
I hope everyone's projects are going well.
Until the next update: