To avoid these ads, REGISTER NOW!

Can ya handle another welding table?

just1more

Well-known member
Joined
Jan 30, 2011
Messages
178
I FINALLY got time to start my welding table this weekend. First project with my Miller 211... Still have more to do, but at least it is usable.

Was going to build completely from scratch, when a contractor told me about his industrial pallet shelving he wanted to sell, $50/ unit. Had to weld the upright legs to the base, but worked great!

IMAG0343-2.jpg


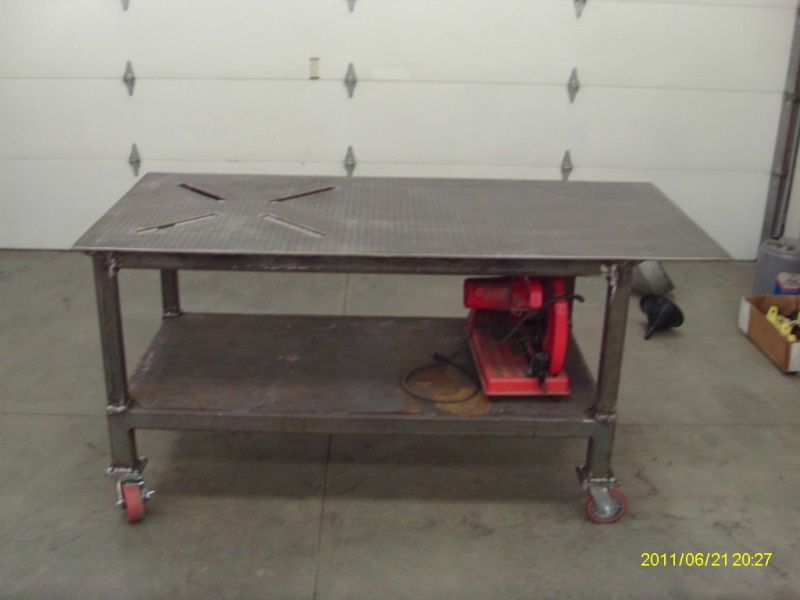
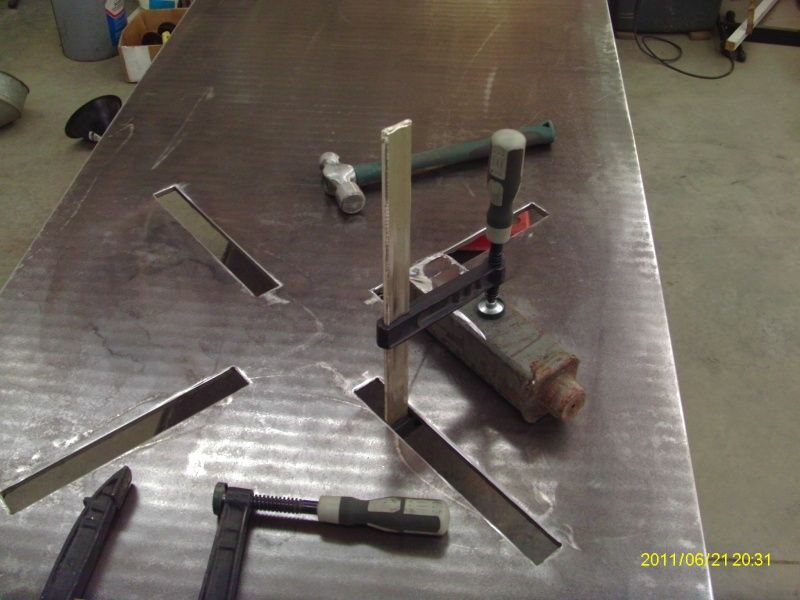
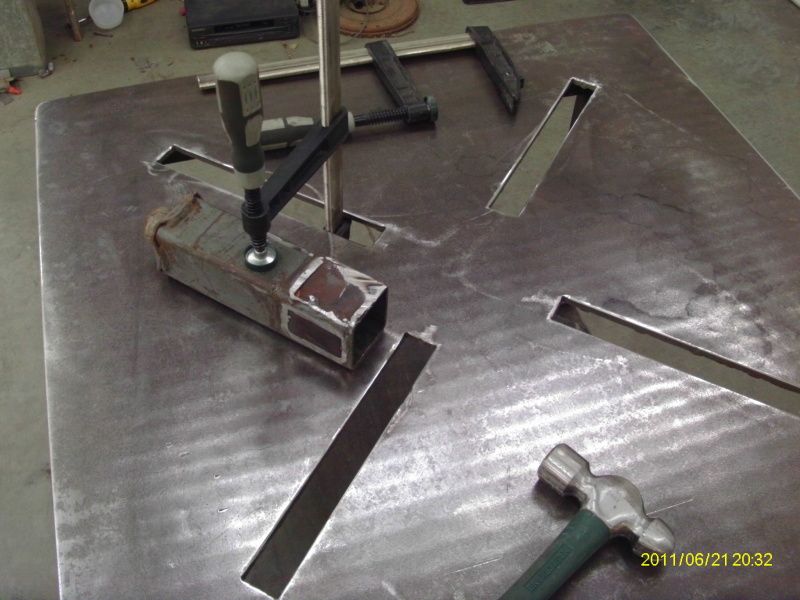
A friend gave me a sheet of 3/8 diamond plate... my son cut it to size , 72" long x 33" deep. Also had him plasma cut the "X" in the left half of the top for clamps. Bought a set of 5"x2" casters (rated 1,000 lb each)from ebay

IMAG0344-1.jpg


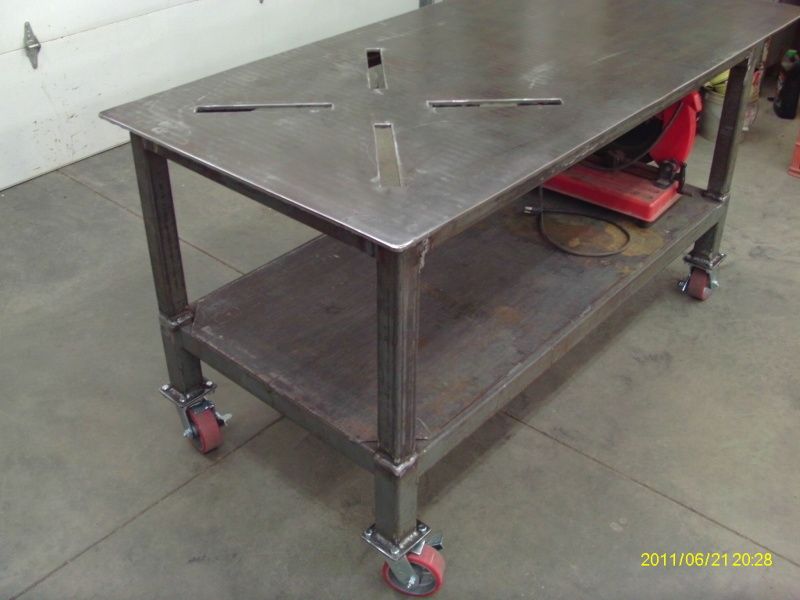
These pics show the clamps (bought at good 'ol Menards) in the slots...

IMAG0348-1.jpg


IMAG0352.jpg


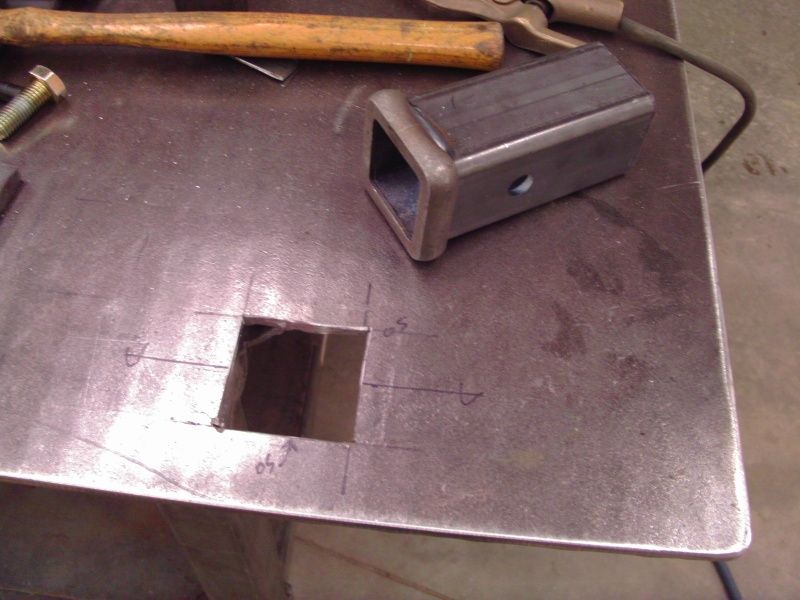
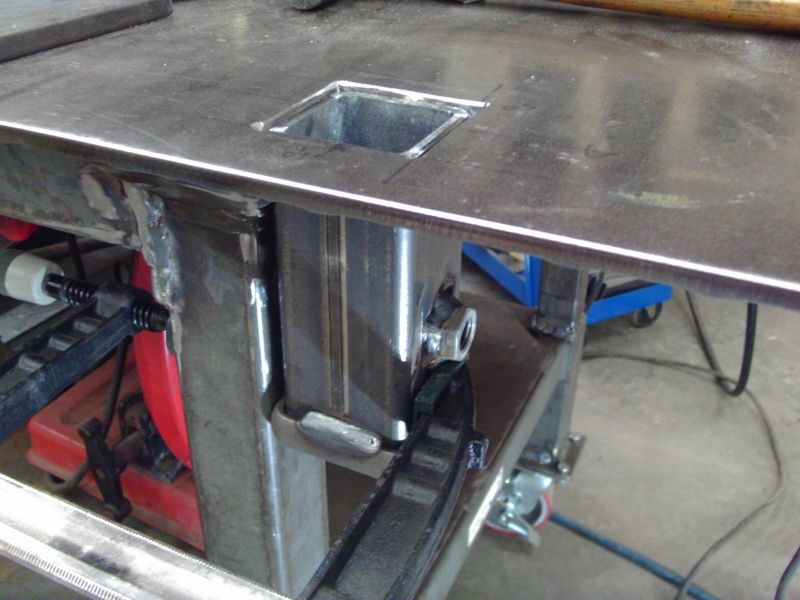
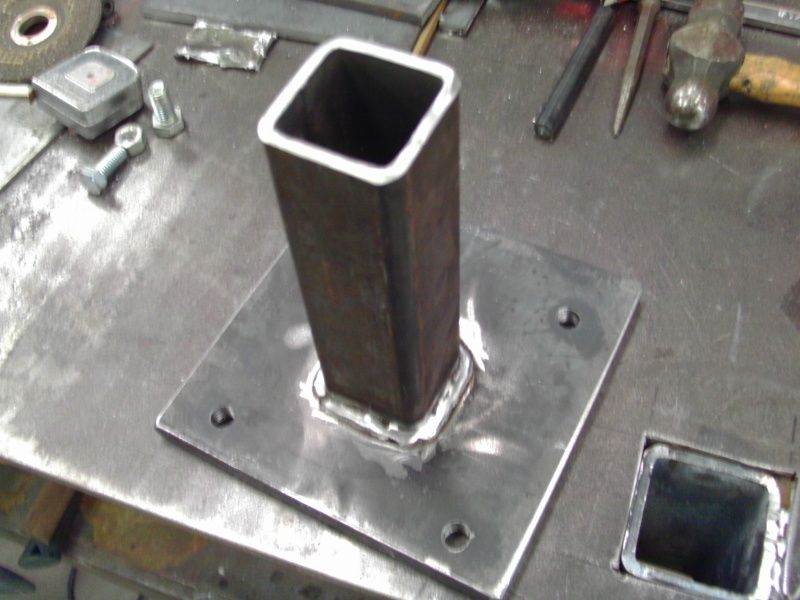
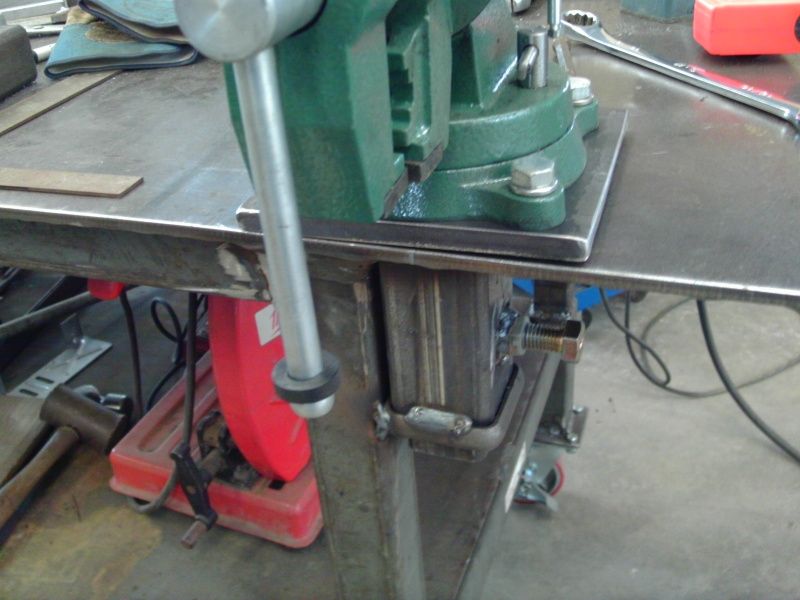
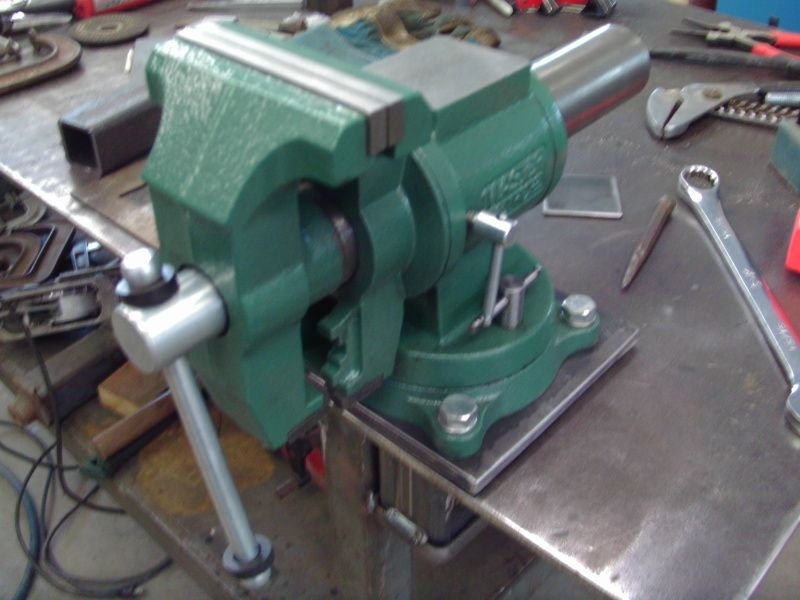
Still have to mount a vise. (thinking strongly on a receiver to make it removable). Also want to add clamp storage, power strip, removable welding screen on back and both ends, etc.

.........................any other ideas?

.
 
Last edited:
To avoid these ads, REGISTER NOW!

goodspeed

Well-known member
Joined
Jul 26, 2012
Messages
305
I like the idea on the slots. I might steal that....as soon as I find a piece of steel for a top I can afford. Lol
 

pmason0

Well-known member
Joined
Nov 12, 2011
Messages
251
Location
East Tennessee
Yes I haven't decided if I was going to that with mine. Was thinking of finding some strong magnetics to come up with some clamping solution.
 

danski0224

Well-known member
Joined
Jan 29, 2005
Messages
13,324
Location
Near Naperville, IL
The rubber covered wheels are nice, but they pick up stuff, which gets embedded into the rubber.

Solid steel wheels would be a better choice for a welding table.

Why an "X" setup and not just one or two parallel slots?
 

thaxboyd

Well-known member
Joined
Apr 14, 2010
Messages
3,864
Location
Utah
The rubber covered wheels are nice, but they pick up stuff, which gets embedded into the rubber.

Solid steel wheels would be a better choice for a welding table.

Why an "X" setup and not just one or two parallel slots?

I have hard plastic wheels and I hate them.... It wants to roll away too easy and gets caught up on any little debris on the floor. Plus the rubber will allow it to semi settle so that it doesn't teeter on three wheels as much. ALTHOUGH... the rubber wheels would really **** in a machine shop with chips all over the floor.
 

akdiesel

Well-known member
Joined
Aug 8, 2008
Messages
2,617
Location
Wasilla, AK
Nice table. Perfect size.
And I would also like to say I welcome all ideas for any project. Bring them.
 
OP
J

just1more

Well-known member
Joined
Jan 30, 2011
Messages
178
thanks guys....

I think the X slot pattern weakens the table top less and gives more clamping options than two parallel slots .Plus, when using the top as a general work top, items your working on are not as likely to drop in the slots, being they are on a diagonal and kind of "bridge" the slot.

As for the rubber on the wheels, each caster is rated at 1.000 lbs. I've had steel before, the rubber is quiter and rolls over small pebbles etc, easier than an all steel wheel. When I apply the brakes, the table doesnt even budge. If I was a shop with metal chips on the floor all the time, I would have considered the all steel.

Time will tell.
 

bad_idea

Well-known member
Joined
Jun 11, 2011
Messages
4,329
Location
Pasquotank, NC
For clamping on the top I plan to drill and tap a shitpot (technical number) of 1/2-13 holes and then make clamps to bolt down to the table. Infinetely adjustable and grossly overkill. Now worries about strength of top or stuff falling in holes (put set screws in hole when not in use)
 
OP
J

just1more

Well-known member
Joined
Jan 30, 2011
Messages
178
How wide are the slots? Is there enough room to fit vice grips or c-grips? I do like it, looks beefy


We made the slots 1 1/4" wide and 11" long. My heavy, 12" C clamps will not turn 90 degrees, but I'm not planning on using them anyway. You certainly could make the slots wider to accomodate them.

As for strength, there is 8" of table between the slot ends. With the 3/8 thick plate steel, I think you could park a car on the center between slots.
 

Honch

Well-known member
Joined
Jul 30, 2011
Messages
401
Location
Danville, IN
I installed a receiver for the vice on my work bench. The fit between the receiver and vice mount is large enough that it would rock quite a bit even with the pin installed. There are numerous ways to fix it, welds, shims etc. I built up the vice mount with welds and fit it to the receiver.

I don't have experience beyond the HF components, maybe higher quality or build your own would work better.
 
OP
J

just1more

Well-known member
Joined
Jan 30, 2011
Messages
178
I just bought a 6" receiver tube for the table. I have mixed emotions on mounting it horizontally , below the top, or cutting it into the top.
I can see advantages/ disadvantages to either..

What would you do and why?
 
To avoid these ads, REGISTER NOW!
OP
J

just1more

Well-known member
Joined
Jan 30, 2011
Messages
178
At first I did think about mounting it right to the top, but I want to make mine removable for a couple of reasons.

First, depending on the project, I can change to a grinder. buffer, vise, etc.

Second, I also will use this as a portable workbench. I have already used the table for laying out some plywood shelving.... nice to be able to lay a complete 4x8 on it.

Eventually, I may put two receivers in, but I'm going to start with the one and go from there.

Right now, I'm leaning towards cutting the receiver into the top.

Nice table as well... I REALLY like the vise!
 
OP
J

just1more

Well-known member
Joined
Jan 30, 2011
Messages
178
If I do the receiver in the top, I think I will mount it below the the surface 1/4" to 3/8". If I wanted , I could make a flush plug to fill the hole if nothing is in the receiver.

Havent quite figured out how to drill the square hole for the insert in the 3/8 plate yet.... Probably drill corner holes and sawzall between?
 

sharkytm

ALLIANCE MEMBER
Joined
May 17, 2008
Messages
596
Location
Pocasset, MA
If I do the receiver in the top, I think I will mount it below the the surface 1/4" to 3/8". If I wanted , I could make a flush plug to fill the hole if nothing is in the receiver.

Havent quite figured out how to drill the square hole for the insert in the 3/8 plate yet.... Probably drill corner holes and sawzall between?

drill/cut, or plasma them. Heck, you could do it with a jigsaw if you wanted, it'll just take some time.
 
OP
J

just1more

Well-known member
Joined
Jan 30, 2011
Messages
178
I like the idea on the slots. I might steal that....as soon as I find a piece of steel for a top I can afford. Lol

ditto ......

Wellllll, I have been using the table almost non-stop for the last 3 weeks and love it! The slots have worked out just as I had planned! The diagonal, X cut slots really dont interfere when using it as a table top, but work great for clamping items!

Still have not added the 2" receiver. Also want to add a power strip and removable spark shields, etc. (Maybe add them to my "Christmas vacation" "To Do List.)

Cant imagine how I got along without it before!
 
OP
J

just1more

Well-known member
Joined
Jan 30, 2011
Messages
178
Will the top of the receiver be level with the table top? Please post pics when you get there. Thanks, Mike


I finally got time to get the receiver cut into the table. I decided to go thru the top itself.


I cut a square hole just large enough to allow the outside of the receiver to go thru.
IMAG0345-2.jpg


I welded a 5/8 nut over the pin hole for a "tightening bolt". Then welded the receiver in place. I left it about 3/16" below the surface. I made a removable plug out of 3/16" steel to cover the opening if nothing is in the receiver.
IMAG0351-1.jpg


I used 1/2" thick plate to make the vise mount. Drilled and tapped it for 1/2" bolts.
IMAG0354.jpg


Welded a 2" tube to the bottom...
IMAG0355.jpg


Bolted the vise ( My Christmas present :) ) to the plate....
IMAG0360.jpg


IMAG0359.jpg


Also made an anvil out of an old rail..
IMAG0366.jpg


IMAG0363.jpg


Next up will be mounts for a grinder and buffer.

.
 
Last edited:

pmason0

Well-known member
Joined
Nov 12, 2011
Messages
251
Location
East Tennessee
I like you welded a nut to the tube. I just have a hole that I put a pin thought, but need a matching hole in what ever I'm mounting in the receiver. The bolt looks like it would work better, just need a weld a handle to it.
 
OP
J

just1more

Well-known member
Joined
Jan 30, 2011
Messages
178
I like you welded a nut to the tube. I just have a hole that I put a pin thought, but need a matching hole in what ever I'm mounting in the receiver. The bolt looks like it would work better, just need a weld a handle to it.

I just leave an old 15/16" box end wrench hang on the bolt threads. I thought about welding a handle to the bolt but I want to mount a double 110v duplex receptacle next to the receiver and a fixed handle could interfere with access to the plug. The box wrench hangs straight down and is always handy.
 
OP
J

just1more

Well-known member
Joined
Jan 30, 2011
Messages
178
Here is a pic of the 15/16" wrench I leave hanging on the bolt...

IMAG03462.jpg


always handy, but can be removed if needed.
 

R.Anderson

Well-known member
Joined
May 26, 2012
Messages
906
Location
Wisconsin
I would make it vertical, the square hole flush on the surface of the table. Then you can use the mount for other tools like benders, rollers, and any thing else you desire. Kinda like the hardie hole on a good anvil.
 

turnpikecrusier

Well-known member
Joined
Nov 21, 2012
Messages
375
Location
roswell nm
Here is my table, its 11.5 x 6 feet made with 1.5 inch top plate with 1/2 inch threaded holes on the top for mounting clamps etc.
 

Attachments

  • photo-1.JPG
    photo-1.JPG
    29 KB · Views: 248

nuttynil

Active member
Joined
Nov 12, 2008
Messages
34
Great table greetings from uk London I work in a ship/ barge building yard in London going to show this to the guys .Neil
 
OP
J

just1more

Well-known member
Joined
Jan 30, 2011
Messages
178
I've been doing a little more work on the table...

Added a couple more receivers to the bottom frame for storing some of the inserts... also added a pair of duplex receptacles right below table top...
IMAG0347-2_zps10301424.jpg


....with anvil and buffer inserts stored...
IMAG0346-2_zps3d33fca4.jpg


I wired the outlets with 25 feet of 12-3 cord. I can reach a wall outlet from center of shop...
IMAG0348-2_zps53e49f35.jpg


welded a metal conduit clamp to back of table to keep excess cord stored out of the way when not needed...
IMAG0349-1_zps5fbf4156.jpg


welded an angle iron to opposite end for clamp storage..
IMAG0350-1_zps5ad5096c.jpg


Not sure if it will ever be completely "done" , but for now, I think its very usable..
IMAG0352-1_zpsb86ba9dc.jpg
 
OP
J

just1more

Well-known member
Joined
Jan 30, 2011
Messages
178
Thought I'd give a quick update. I have been using the "heck" out of the table for the last 3 1/2 months. I like the "drop in" receiver. I'm still thinking of adding one to the left end sometime. I would use the rubber coated casters again as well. They are quiet and roll very easy. The "X" slots are not a problem when working with anything on the top.

I had been thinking/sketching design ideas for over a year before building it. Really dont think I would change a thing if I had to do it over.

Plans are to build some removable sheet metal "curtains" on both sides and the back to controll sparks from grinding and the mess from polishing metal.

Only thing I question is why I didnt build one years ago?
 
Last edited:

BD1

Well-known member
Joined
Mar 18, 2007
Messages
4,602
Location
north side
Nice. That receiver tubing is awesome. I used a aluminium wheel , pipe upright with a receiver tube welded to it . Great for drop in vise, grinder, and throatless shear. So handy, lots of uses.
 

GOOG

Active member
Joined
Dec 18, 2005
Messages
30
Location
Farmingdale, NJ
I just bought a 6" receiver tube for the table. I have mixed emotions on mounting it horizontally , below the top, or cutting it into the top.
I can see advantages/ disadvantages to either..

What would you do and why?

I drilled and tapped three corners of my steel workbench, so I can put the vise in six different locations. It only takes a few minutes with a 3/4" wrench to move or remove the vise all together.
 
To avoid these ads, REGISTER NOW!
Top Bottom