Outlawmws
Well-known member
Use the same gauge as the cord to the wall, unless you have an excessively long cord and needed it to be heavy gauge to minimize voltage drop...

Use the same gauge as the cord to the wall, unless you have an excessively long cord and needed it to be heavy gauge to minimize voltage drop...
Use the same gauge as the cord to the wall, unless you have an excessively long cord and needed it to be heavy gauge to minimize voltage drop...
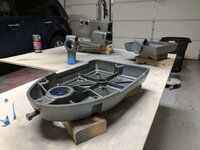
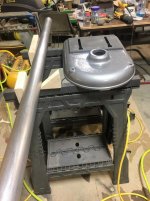
Any reason you didn't tape anything off? I'm thinking dark shadow gray from ford for mine.Well just thought I'd share the progress on my journey of my first restoration. Finally got everything off even the bearings. Took all the cast iron parts to the sand blaster so I can work with a clean canvas and had it primered. I have been sanding and polishing parts by hand and painted some of the small parts. I decided to go with a charcoal grey. It's not to light nor to dark. All in all it's been going very smoothly. Will be starting on the case and tables tomorrow.
The part I am most nervous about its Working on the motor. Never ever done one so fingers crossed. I'll post more as I go and thanks again to everyone who's been helping me.
Exactly. I buy the 9' 14 gauge power tool replacement cord at Home Depot and use pieces of that to replace the internal wiring when needed. Heat shrink tubing is also very handy to repair cracked wiring insulation.
There are several Craftsman motor reconditioning threads on GJ. Use the search function or there are several links in my first two posts.
Any reason you didn't tape anything off? I'm thinking dark shadow gray from ford for mine.
Sent from my Pixel XL using Tapatalk
Makes sense. I got mine primed today. Testing a color right now on the underneath to see if I like it.I didn't tape anything off cause I was short on time. The only blaster in town willing to do it called me last second with and opening so I just took it straight over. He got it all done and back to me in less then 24hrs. So I'll take the effort of wire wheeling everything for quick service..


Makes sense. I got mine primed today. Testing a color right now on the underneath to see if I like it.
Sent from my Pixel XL using Tapatalk
First coat of paint
Sent from my Pixel XL using Tapatalk
Yes. The duplicolor spray paint. I'm going to need at least another can maybe two. I still need to paint the motor housing plus the drill press collar.Man that's going to look sharp. Is that automotive paint?
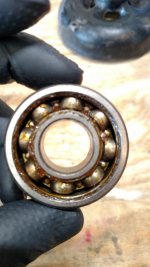
Try thisWell everything came to a grinding halt today. Damaged a bearing while removing it from the main housing spindle. Didn't see it till today. So on that note how do you know what size bearing will fit the 103.0305? The bearings that are on it are marked MRC 204 SF googled it and only one option came up and that was from eBay. I've also seen on other threads that they are 6204. When I google that a lot comes at you I.e. 6204 ZZ, 2rs, Sff etc. So any help in this would be great. Thanks guys
Try this
http://wiki.vintagemachinery.org/ReplacementBearingListCraftsman.ashx
Sent from my Pixel XL using Tapatalk
OK. I looked after. Is the 103.0303 a different press than yours? If not they are probably the same.Thanks rrich1. I saw this one before but it didn't list the DP I have. I am working on a 103.0305
OK. I looked after. Is the 103.0303 a different press than yours? If not they are probably the same.
Sent from my Pixel XL using Tapatalk
I think the model numbers are if they are opened ended like the original. I just ordered motor bearing for mine but got the ZZ model where both ends are closed instead of one exposed.You know not sure. I googled both the 0303 and 0305 and it comes back with images of the same press and some forums showing the press I have labeled under 103.0303. so I guess they are? One guys post shows the exact press as mine (looks to be anyway) says the bearings are 6204. But brings me back to my question. What 6204 are they? If you google it there are a ton of 6204's..Lol.. these came out of mine. One is good and one got damaged when using the puller
That makes sense. I did see the ZZ type. I've never replaced bearings on anything or any tool I've owned so all new to me.. I managed to find a place on eBay who had the exact same ones that are in mine. Sent them photos of mine..
I could use one of the ball bearing decals. The 0303 and 0305 are the same drill press. IIRC, the '42 was 0303, and '43 was 0305 (though it is odd there are more 0305's out there given the restrictions placed on them at the time). There is also the very rare 0304 model, which is the floor model version (same head, larger base).
The 6204 2RS has two rubber seals and is a good idea for that application. When that was built, those weren't available yet, and they used metal shields that weren't really sealed.
I think the model numbers are if they are opened ended like the original. I just ordered motor bearing for mine but got the ZZ model where both ends are closed instead of one exposed.
Sent from my Pixel XL using Tapatalk
That makes sense. I did see the ZZ type. I've never replaced bearings on anything or any tool I've owned so all new to me.. I managed to find a place on eBay who had the exact same ones that are in mine. Sent them photos of mine..
I would recommend sealed bearings if available. Basically bearings come:
- Open
- Shielded one side (not a seal)
- Shielded both sides
- Sealed
bearing tech has generally improved and the seal bearings wil live linger in a dirty environment.
The rare part is the base. The head unit is the same as the 0303 and 0305, so parts are available. I don't think the table is any different either. The 0304 was never in a catalog, and since consumer production ended due to WWII, they never re-offered the design.Thanks Cruzan80. Makes plenty of sense now then why them press comes up when searching both numbers. I can't imagine how hard it must be to restore a 0304 then if it's a rare model.. As soon as the decals come in I'll hit ya up on here and get your mailing address..
The rare part is the base. The head unit is the same as the 0303 and 0305, so parts are available. I don't think the table is any different either. The 0304 was never in a catalog, and since consumer production ended due to WWII, they never re-offered the design.
Sent from my VIVO IV using Tapatalk
IMHO, the best one was the member who got some large casters and mounted them so the column could be laid down on them and freely rotate. He then attached an electric drill to one end and used sandpaper on the column while the drill spun it.


Main pieces are painted, cleared, and on. Still have to paint the table collar and motor and motor pieces. Loving it so far. More pics in my build thread.
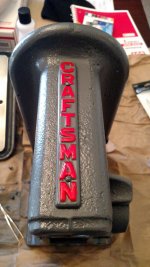
I used this. I buffed too much in one spot and took out some of the sheen. [emoji30] do it by hand and you shouldn't have any issues.Very nice! Great choice on the color!
The head band trim cleaned up nicely. How did you do that?

I used this. I buffed too much in one spot and took out some of the sheen. [emoji30] do it by hand and you shouldn't have any issues.
Sent from my Pixel XL using Tapatalk