
You are using an out of date browser. It may not display this or other websites correctly.
You should upgrade or use an alternative browser.
You should upgrade or use an alternative browser.
Craftsman Drill Press
- Thread starter FrankLee
- Start date


This brings me to a problem I have always had with the electricals of this unit. I am unable to melt the solder or get anything to stick to the original wires using my normal electronic flux and equipment. Is the problem just that a 20w iron is insufficient?
How large of a tip are you using on the iron? What is the iron temperature set to?
A 20W iron may not have enough thermal mass in the tip to keep the tip hot enough to melt that. Try increasing the tip temperature another 20C or so.
I need to check in here before workin on that DP! I contacted American Beuty about upgrading my iron without having to buy a whole new station. They're working on it. In the meantime, I managed to find a 30w woodburner but the tip is still the same 1/8". At this point I am done and now remounting the motor (grunt grunt). Will remember the trick to reflow next time. Thanks @Snip's , @Dh3256 and everyone.

This Craftsman 100 popped up on my FBMP radar a few weeks ago. It was too much, too far away and that wtf motor didn't interest me.
Facebook
 www.facebook.com

Today, when I saw it again, I took a look at the rest of the photos in the ad. The original 115.6962 motor is also there and installed in its normal position.
Then it dawned on me. I surmise that the owner was using the original motor and pulley as a slow-speed idler pulley. When he needed a slower speed, he would attach the belt from the side motor to the large step of the motor pulley. Powering on the side motor and leaving the original motor powered off would achieve this. With the side motor belt removed, it operated as a standard drill press using just the original motor.
Pretty freaking clever. I love this kind of ingenuity!
www.facebook.com
Today, when I saw it again, I took a look at the rest of the photos in the ad. The original 115.6962 motor is also there and installed in its normal position.
Then it dawned on me. I surmise that the owner was using the original motor and pulley as a slow-speed idler pulley. When he needed a slower speed, he would attach the belt from the side motor to the large step of the motor pulley. Powering on the side motor and leaving the original motor powered off would achieve this. With the side motor belt removed, it operated as a standard drill press using just the original motor.
Pretty freaking clever. I love this kind of ingenuity!
Last edited:
CirrusDriver
New member
I was recently luck to obtain a near mint 103.23140 floor model with the OEM speed reducer.
Q: attached is a picture of the depth stop rod with the nuts and fiber washer as I received the unit. Are these correct nuts and are they correctly orientated?
Thanks in advance!
Q: attached is a picture of the depth stop rod with the nuts and fiber washer as I received the unit. Are these correct nuts and are they correctly orientated?
Thanks in advance!
Attachments
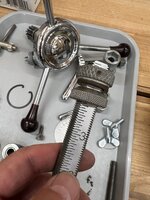
The top nut and fiber washer are correct. The lower nut is upside down.I was recently luck to obtain a near mint 103.23140 floor model with the OEM speed reducer.
Q: attached is a picture of the depth stop rod with the nuts and fiber washer as I received the unit. Are these correct nuts and are they correctly orientated?
Thanks in advance!
The chrome on that hub is amazing. More pictures please.
Finally... Today I was able to "mostly" put my Atlas head and table lift mechanism back together....
I used Valvoline Moly-fortified extreme pressure grease on the gear train...

I nickle plated the crank handle knob and the crank shaft collar to fight rust issues..
It was so easy to plate those items that I'm planning to do the same on the larger shaft collar, column lock handles and the fasteners...


I also did the "FrankLee" bearing flip...

I used Valvoline Moly-fortified extreme pressure grease on the gear train...
I nickle plated the crank handle knob and the crank shaft collar to fight rust issues..
It was so easy to plate those items that I'm planning to do the same on the larger shaft collar, column lock handles and the fasteners...
I also did the "FrankLee" bearing flip...
Last edited:
Very nice! I love the plated parts and looking forward to seeing the lift finished and installed.
I tried to press out the crank knob on my last lift, but I didn't want to crack the arm. I wanted to look for a spinning knob with threads and tap the arm. I always wondered why Atlas didn't do it.
I tried to press out the crank knob on my last lift, but I didn't want to crack the arm. I wanted to look for a spinning knob with threads and tap the arm. I always wondered why Atlas didn't do it.
I also was worried about snapping the cast crank...Very nice! I love the plated parts and looking forward to seeing the lift finished and installed.
I tried to press out the crank knob on my last lift, but I didn't want to crack the arm. I wanted to look for a spinning knob with threads and tap the arm. I always wondered why Atlas didn't do it.
I held the crank and positioned the knob in the palm of my hand while holding a 1/4" diameter drift punch at the same time...
A couple of whacks with my brass dead blow hammer pushed the knob out of the crank...
I used my vise with aluminum soft jaws to push the plated knob back into the crank, before I did the painting, in order to prevent damage...
Hello Fellow Garage Dwellers! I have been lurking on this site for a few weeks. I am on a journey of tooling up my garage. After seeing these Mid Century Craftsman DPs here, I have been on the lookout for one. The other day I saw what seemed to be a very good 103.0305. It was ~100 miles away, but the price was right. I called the seller and arranged a meetup the next day. Come to find out the DP was her recently late husbands.
Seeing the DP in person, I was pretty pleased. A couple of her neighbors helped get the DP into my trunk. The seller was also getting rid of the drill bits, a few measuring/marking tools and a nice little Palmgren drill press vise.
Once I got it home, I fired it up. It seems to run pretty well. A few oddities about this DP. The owner cut off the right tray on the table and drilled a couple holes. He must've attached something to it. Also, every bit of this thing is painted. Lastly, the belt in use seems to be too big. It is using the bottom slot on the quill pulley and the 2nd from the bottom one on the motor pulley. Can anyone tell me what size belt I need for it? I have tried to search and everyone just says to measure the existing belt...
Here are some pics and a video of it running.
Thank you!
IMO, the belt may be the correct length. To me, the motor and mount appear to be very close to the head casting. The motor is set too low on the mount.the belt in use seems to be too big. It is using the bottom slot on the quill pulley and the 2nd from the bottom one on the motor pulley. Can anyone tell me what size belt I need for it? I have tried to search and everyone just says to measure the existing belt...
- Raise the motor on the mount so the top of the pulleys line up. Use a straight edge from the motor pulley to the spindle pulley.
- Then, adjust the motor mount out to tighten the belt.
- If the motor mount rods don't reach their front bores, the belt is too long.
- If the motor pulley rubs on the belt cover, the belt is too long.
If you need a new belt, cogged belts (AXnn) are very good.
The owners manual does not list the belt length.
What are your plans? Get it running right? Or a complete overhaul?
Where are you located?
Last edited:
OK. I see what you're saying. I will attempt to adjust it.IMO, the belt may be the correct length. To me, the motor and mount appear to be very close to the head casting. The motor is set too low on the mount.
314 MADE IN USA 15405 (256D)Are there any markings or part number on the belt?
For now I want to get it running and build a cart for it. Eventually I may do a full restore.What are your plans? Get it running right? Or a complete overhaul?
Where are you located?
I am located in the Sonoran Desert (SoCal).
Finally, thank you for cheking in. I already knew you were a wealth of knowledge and I appreciate the quick response!
Brian
Last edited:
Then, adjust the motor mount out to tighten the belt.
I don't see how to move the mount out. It seems fixed on a hinge attached to two fixed rods.If the motor mount rods don't reach their front bores, the belt is too long.
Here are a couple images to illustrate.
Thank you.
I don't see how to move the mount out. It seems fixed on a hinge attached to two fixed rods.
Here are a couple images to illustrate.
Thank you.
I've had two 0305 drill presses. The first was a refurb in '19, the second was a part-out in '20. I just found this photo from the earlier refurb. It shows a 42" belt.
It also shows the rods with 1/4-20 screws through the rods that secure the mount. Loosen those screws the slide the motor mount.

Yes, I see the rods. I just don't see how they could be in a different position. If I remove the screws and pull the rods out to move the motor mount further out, how would I reattach the rods without moving them back to the original position.I've had two 0305 drill presses. The first was a refurb in '19, the second was a part-out in '20. I just found this photo from the earlier refurb. It shows a 42" belt.
It also shows the rods with 1/4-20 screws through the rods that secure the mount. Loosen those screws the slide the motor mount.
I'll look for that belt though. Thanks!
The rods are threaded for the screws. When tightened, the screws press against the head casting to lock the rods in place. The screws are not threaded into the head casting.Yes, I see the rods. I just don't see how they could be in a different position. If I remove the screws and pull the rods out to move the motor mount further out, how would I reattach the rods without moving them back to the original position.
I like the concept of the pivoting motor mount, but not this execution on the 0305. A 1/4-20 thread through a 1/2" rod just does not seem right to me. IMO, the motor mount is a little more difficult to install and adjust. K-S dropped this feature on early 100's until the newer better design on the late 100's.
Hold off on a new belt. Yours could still work after the adjustments.I'll look for that belt though. Thanks!
The rods are threaded for the screws. When tightened, the screws press against the head casting to lock the rods in place. The screws are not threaded into the head casting.
Ahh. Now I grok it. Thanks again!
I like the concept of the pivoting motor mount, but not this execution on the 0305. A 1/4-20 thread through a 1/2" rod just does not seem right to me. IMO, the motor mount is a little more difficult to install and adjust.
Ok. I tried to move the motor up while attached to the mounting plate, but it was not working so well. So I just removed the whole thing. My gosh. That motor is heavy. I think I'll need help getting it back on. I slid the motor as far up as I could for now.
From what I could tell the rods would have to be about flush in their holes nearest the front of the head. So it seems it should work. I'll let you know how it goes.
Thanks!
My motor seems so much larger than yours.I just found this photo from the earlier refurb. It shows a 42" belt.
Here are a couple pics of my motor.
Note: I have to keep using imgur because attaching pics to these threads does not seem to work for me...
Last edited:
The switch is a General Electric. Perhaps the motor is too. There's just so much paint on it.Yeah, it's pretty big. I'm not sure that it's a Craftsman motor. I can't make out anything on the badge. Is there any other info printed somewhere else?
The bearings are so smooth, I really don't want to mess with it.
") One question on the motor actually. There is no side play, but there is a small amount of play in and out. Is that normal? It is very quiet running without the belt attached.
One question on the motor actually. There is no side play, but there is a small amount of play in and out. Is that normal? It is very quiet running without the belt attached.Thanks
I'd have to check. But if that's the case, the user should be informed, and not just silently fail.How large are your photos? Occasionally, mine are too large and I have to resize them.
I think I see an oil port below the pulley. If so, your motor has sleeve bearings/bushings. Some axial play (parallel to the shaft) is not uncommon. Radial play {perpendicular to the shaft) should be near zero.The bearings are so smooth, I really don't want to mess with it.
Can you point out what you're seeing? And yes, that is how mine is.I think I see an oil port below the pulley. If so, your motor has sleeve bearings/bushings. Some axial play (parallel to the shaft) is not uncommon. Radial play {perpendicular to the shaft) should be near zero.
@FrankLee -- Never mind. I see it. It has a little flip top. This motor seems like it's meant to be mounted parallel to the ground as opposed to perpendicular. What do you think?Can you point out what you're seeing? And yes, that is how mine is.
Outlawmws
Well-known member
They do make those little oil cap things as a right angle fitting.
Sleeve bearing motors are generally used in a horizontal position. However, old Craftsman catalogs specify that many of their sleeve bearing motors can be mounted in any position.@FrankLee -- Never mind. I see it. It has a little flip top. This motor seems like it's meant to be mounted parallel to the ground as opposed to perpendicular. What do you think?
Your motor has obviously been mounted vertically for many years. I would continue to use it and not worry about it. If your going to add oil, just use a few drops in each side maybe every few years. Don't overdo it.
endangeredspecies
Well-known member
Was planning to wait a couple more months to meticulously restore and reassemble my press.
But duty calls, and I need to drill some long, straight holes.
Cleaned off the post with PB Blaster, an 80 grit belt (held by hand), gray scotch-brite; cleaned with actone; followed by Meguiar's Ultra-Cut 105 on a white scotch-brite, buffed with microfiber, cleaned off with isopropyl alcohol.
Since it wasnt perfect and I'll never find the time or energy to truly polish it up, I kinda like the original look, and I'm not going to repaint the base, table, or head - I took a step from my knife-modding days and forced a patina with lemon juice and white vinegar. Should keep the old-timey look, while simultaneously protecting the exposed steel from rust.
Once I was happy with that, I cleaned it off with the isopropyl alcohol, followed by Griot's Garage automotive spray-on waterless wash with wax, then a coat of Meguiars ultra wax.
Here's the Before, as well as a Work-In-Progess, I think after the acetone but before the polish.
More to follow when the pictures agree to get off my phone.
endangeredspecies
Well-known member
I tested the "new" motor on the bench. It started easily, and ran smoothly and pretty quiet.
I have new bearings for it, but not sure if it'll be worth the trouble to swap them out.
I got stuck trying to remove that bracket, in order to mount it to the back of the drill head.
Can hold the nuts in place with an open-end wrench, but no room to spin them.
Someone used a carriage bolt, but there's no matching counter-sink in the part, so I couldn't hold it to loosen. Not sure how they originally tightened the thing!
I spent about 1/2 hr trying to figure out a way to remove it.
Read a thread here from someone with a similar problem - most suggestions ran to nut splitter ( no clearance, and don't have one); plasma cutter (don't have one); hack saw (difficult, time consuming); or sawzall.
A few hours after walking away, and drilling my 4" long 1/2" holes by hand, I needed to cut the head off a 1/2" stainless bolt. Out came the sawzall. So, I tackled those two at the same time.
Diablo "Thick Metal" blade made shockingly quick work of it.
I already have replacement fasteners lined up.
Last edited:
endangeredspecies
Well-known member
Table and Head went on MUCH easier than they came off!!!


Will need to pull multi-speed pully off the old motor, and swap over to this one.
I now need to decide if I want to cut the power cord and utilize the box my wife's Grandpa mounted to the side, or just use the on/off switch on the back of the motor.
New fasteners, belts and bearings, as well as a puller, press, and a few other tools all set to go.
Heavy lifting, which I was dreading, is over.
So the rest is just the tedium of getting all the details right.
Now that my immediate need for big, straight holes has subsided, I've got a ton more to do around the house before getting back to the press. Plus, it would be nice if it cooled down a bit before I need to tackle it. So, I'll probably resume in October timeframe.
Last edited:
Those are great motors, but it can turn into a quagmire with the brittle wire insulation inside. You can remove the bearing covers and add some fresh grease if needed. The bearings are open on the outboard sides.I tested the "new" motor on the bench. It started easily, and ran smoothly and pretty quiet.
I have new bearings for it, but not sure if it'll be worth the trouble to swap them out.
Whatever it takes! The things previous owners did are often baffling.I got stuck trying to remove that bracket, in order to mount it to the back of the drill head.
Can hold the nuts in place with an open-end wrench, but no room to spin them.
Someone used a carriage bolt, but there's no matching counter-sink in the part, so I couldn't hold it to loosen. Not sure how they originally tightened the thing!
I spent about 1/2 hr trying to figure out a way to remove it.
Read a thread here from someone with a similar problem - most suggestions ran to nut splitter ( no clearance, and don't have one); plasma cutter (don't have one); hack saw (difficult, time consuming); or sawzall.
A few hours after walking away, and drilling my 4" long 1/2" holes by hand, I needed to cut the head off a 1/2" stainless bolt. Out came the sawzall. So, I tackled those two at the same time.
Diablo "Thick Metal" blade made shockingly quick work of it.
I already have replacement fasteners lined up.
What is the old motor?Table and Head went on MUCH easier than they came off!!!
Will need to pull multi-speed pully off the old motor, and swap over to this one.
I always(?) remove those handi-boxes and go back to stock. You might consider a foot switch if young kids or large pets are not an issue.I now need to decide if I want to cut the power cord and utilize the box my wife's Grandpa mounted to the side, or just use the on/off switch on the back of the motor.
If you haven't seen any of Jeff's Shop refurb youtube videos (member @11b30b4), you should check them out.New fasteners, belts and bearings, as well as a puller, press, and a few other tools all set to go.
Heavy lifting, which I was dreading, is over.
So the rest is just the tedium of getting all the details right.
Now that my immediate need for big, straight holes has subsided, I've got a ton more to do around the house before getting back to the press. Plus, it would be nice if it cooled down a bit before I need to tackle it. So, I'll probably resume in October timeframe.
Last edited:
endangeredspecies
Well-known member
Thanks, Frank.
Great advice, as always.
Old motor was 1/4hp Dunlap.
As I recall, from 2 years ago when I dessassmbled it, it mostly worked fine. Had a couple failures to start when I flipped the switch, and bogged down once on a particularly big (for me) job.
But I think the 1/3hp is better suited to the full-height drill press.

As far as greasing the bearings - I have white Lithium grease in the tube, and red CV-2 Moly high temp & pressure automotive grease in a tub. Is either of those well suited to this application?
Great advice, as always.
Old motor was 1/4hp Dunlap.
As I recall, from 2 years ago when I dessassmbled it, it mostly worked fine. Had a couple failures to start when I flipped the switch, and bogged down once on a particularly big (for me) job.
But I think the 1/3hp is better suited to the full-height drill press.
As far as greasing the bearings - I have white Lithium grease in the tube, and red CV-2 Moly high temp & pressure automotive grease in a tub. Is either of those well suited to this application?
That Dunlap is a nice motor, but yeah, it's too anemic for that drill press.Thanks, Frank.
Great advice, as always.
Old motor was 1/4hp Dunlap.
As I recall, from 2 years ago when I dessassmbled it, it mostly worked fine. Had a couple failures to start when I flipped the switch, and bogged down once on a particularly big (for me) job.
But I think the 1/3hp is better suited to the full-height drill press.
I'm not too familiar with the various greases, but if you're going to add grease to the bearings, it should be compatible with the existing grease.As far as greasing the bearings - I have white Lithium grease in the tube, and red CV-2 Moly high temp & pressure automotive grease in a tub. Is either of those well suited to this application?

I just noticed that your machine has the original factory pallet. You don't see that very often. I've got two laying around somewhere only because I can't throw anything away.
https://www.garagejournal.com/forum/threads/craftsman-drill-press.227480/page-90#post-8569969
Last edited: