Warped5
Well-known member
You've already grabbed that one, right?

Hi FrankLee,
I just joined GJ and my garage is under construction, I wanted to find a 150, but stumbled across this, what would be a fair price and how hard is it to maintain? I attached some pics. Please tell me what you think or if you have one available.
thx
Jim
Just bought a late model bench 150 with multispeed. Thank you for this great thread. Already got it cleaned up and running with the great information here.
couple questions:
Is there a version of the manual for the late models with internal feed return spring? I assume you pull out the hub and wind it up, but how much?
Also, is Sears still selling the correct feed return spring for the late model 150? Looks about right, but has anyone tried it?
http://www.searspartsdirect.com/part-number/38989/0009/113.html
Also, any good tricks to remove the multispeed from the column?


Frank, I was directed to your thread by Outlaw, and all I can say is THANKS! You're a wealth of knowledge and your walkthrough on disassembly for the head assembly on my press was invaluable. I think it took me about 40 minutes to break it all down.
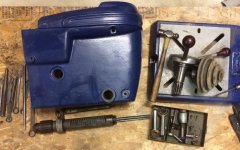
I bought this over the weekend. It's a model 103.23130 with a terrible blue paint job.
Here's how it started:
Like I said, your walkthrough helped to disassemble in no time.
The most difficult part was removing the machine screws that hold the pulley. I was able to get one completely out, but the other was being stubborn. I was able to loosen it enough to remove the pulley. Once the pulley was out, I could look in as see that the other screw was bent worse than the first and had some threads really buggered up. So, I screwed it back in, and was able to cut it off from the inside with a chisel. The rest came out without incident.
Only 1 casualty on a ~70 year old machine... not bad.
Thanks again, and I'm sure I'll be referring back to this thread on a regular basis!
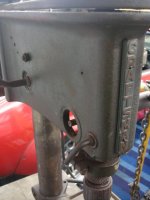
"Before" pictures of my "new" 150 (left). More pix later. Model number is 103.24501
The allen bolt seems to be missing from the multispeed attachment, but it is jammed into the post pretty tight. Thinking about knocking it out from the inside of the post with a pipe?
Yeah, I'd spray it down good over night, give it a few taps from the top to
The allen bolt seems to be missing from the multi-speed attachment, but it is jammed into the post pretty tight. Thinking about knocking it out from the inside of the post with a pipe?
Yeah, Best try that first. Good Point, Frank has done lots of these,That's weird. If you're absolutely sure the lock screw is missing, check for other non-factory fasteners... i.e. set-screw through the column. Use a wrench on the flats of the pulley shaft. If it moves, then yes, punch the assembly out from the other end... preferably with a piece of wood. A 2x2 would be ideal.
One inside end of the column was machined specifically for the installation of the MSA. I suspect that the previous owner installed the column upside-down and jammed the assembly into the too-small end. That happened on my #1 DP and luckily the MSA was not damaged.
I have seen plenty "uniquely engineered" solutions by previous owners that had me shaking my head.
Here are pictures of the donor 150 machine, model 103.24531 with the crown logo on the head band. It was originally gold. I didn't get a picture of the column, but it is probably 8" shorter than my dp above.
So, what spare parts should I keep? What parts do I sell?

Hey Frank, would that depth stop bracket fit on an early 100? If so, I'd be more than willing to take it off your hands.
What are your plans? Stripping? ...chemical? electrolysis? media blast?
What color are you going with?
What parts are missing or need replacing?
Any desire to convert to a floor-standing unit? I can help.

-Current plan is electrolysis for easy/labor free paint/rust removal. I have a large tank already set up.
-Color... that's the tough question, right? I was thinking O.D. Green.
-As far as I know, I'm missing one handle, and another handle is broken and welded back together. So, 2 handles would be nice. Also, the correct pully for the motor. This came with a giant 1.5hp Baldor motor and a dual pulley, but both are the same size. Oh, and the trim piece for the top of the machine is gone.
-I might be interested in converting it to a floor-standing unit if the price is right. Is that just the post, or the base and post?
Here's a pic of the motor that came on it.
This is a good place to post. That looks like a "Mohawk" dp. Made for just a couple of years in early 40's. I have one and love it. As for the cover you will just have to be patient. Check out ebay, CL etc looking for a parts machine. Or if it is a user rather than a restoration project just make something. It is a relatively lightweight guard and can be damaged easily.Good day everyone. New member short time follower. Forgive me if I am posting in the wrong area but this seems to be the only active late model craftsman DP thread still active. I just become the owner of a Craftsman 103.0305 DP and I plan on doing a full restoration. So far what I need is the pulley housing cover. Does anyone know where I can find one or have one to sell? I am sure there will be more parts needed. But at this point this is what I know I need for sure till I get the press in my hands.
This is a good place to post. That looks like a "Mohawk" dp. Made for just a couple of years in early 40's. I have one and love it. As for the cover you will just have to be patient. Check out ebay, CL etc looking for a parts machine. Or if it is a user rather than a restoration project just make something. It is a relatively lightweight guard and can be damaged easily.
Sent from my SM-G900T using Tapatalk
Good day everyone. New member short time follower. Forgive me if I am posting in the wrong area but this seems to be the only active late model craftsman DP thread still active. I just become the owner of a Craftsman 103.0305 DP and I plan on doing a full restoration. So far what I need is the pulley housing cover. Does anyone know where I can find one or have one to sell? I am sure there will be more parts needed. But at this point this is what I know I need for sure till I get the press in my hands.
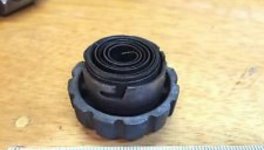
Thank you Captain for the help. I was hoping to restore and be a user. From the video my buddy sent me it purrs like kitten. Just needs some TLC.. I've been reading every single post by you all and it's some serious amount of information that's for sure.. love the fact your all so willing to share knowledge.. hopefully I won't have any issues. The other thing I noticed missing is on the left side of the DP there is a opening that looks like there should be something there and looking at other in comparison it is a circular knob maybe about 1" in diameter. What is it for? See picture attached.
I tried posting on the classifieds for parts but can't untill I reach the magic number 100 post. But will continue to watch eBay and CL. Thanks again sir
That would be where the Quill retractor assembly goes. If you are lucky one from the later King Sealy DP's will fit? Otherwise a tough part to find unless someone parts out a fairly rare mohawk..
Those were introduced while WWII was raging in Europe, and stopped when the US entered the war... Short run...
That's what I thought it was. Thank you for the confirmation. What year King Sealy DP do you think might fit and with this missing would you consider this DP non operational for use?
Sent from my XT1254 using Tapatalk

That quill return spring design more closely resembles an Atlas spring than the later King-Seeley machines. That Craftsman model uses a flat, clock-spring style. The King-Seeleys use a 4" coiled torsion spring.
Honestly, if that were mine, missing the cover and spring, it would be a part-out machine.
Dang really!!? Why would that be if you don't mind me asking? I am new to all this so please forgive me.
Yes, that is similar, but not exactly what was in my Atlas Craftsman above. That was a smaller drill press. The larger/later(?) Atlas machines had a ratcheting mechanism on the spring housing.
Is this what the original return spring assembly looks like?
It certainly appears to be about right. The key will be the diameter of the hole in the head, the mating collar on the "knob", The spring thickness vs the slot width, and the number and diameter of the catch pins, (2 or 3?)
Slip on the spring; wind it up, and hook the knob on the catch pins.
Show your buddy the knob pic an see if that is floating around where the DP is...
I also noticed that your quill lock cylinder is still in the head frame, painted in, and there was only one head frame cylinder in the tray. Get those others out yet?

Seems you don't miss much. I think you may have seen this movie before...
Another 10 minutes tonight and I had everything apart. Everything came apart easily despite the heavy handed coat of blue paint. I'll start trying to make it look good now.
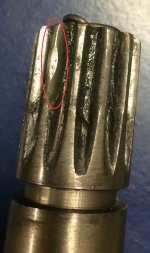
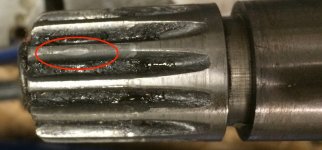
One thing I noticed when I had it all apart was that just one tooth on the pinion gear seemed to have excessive wear. Just one. Have you noticed that on any others?


Your picture shows the tooth that hits the bottom of the quill. Look for another tooth with the same (maybe smaller) wear spot on the opposite corner on the fifth tooth clockwise from the one in your picture.