To avoid these ads, REGISTER NOW!

Craftsman Drill Press

ckadams00

Well-known member
Joined
Sep 12, 2011
Messages
1,273
Location
Seattle, WA
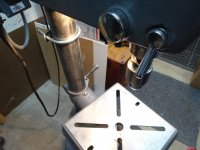
Re: Table Lift, DP #15

Nicely done as always. There is so little information about these lifts available it is good to get everything documented. I read a post here where they show replacing broken gears (and crank I believe) and where to find replacements. If I can find it again perhaps a link could be added for reference.

I'm still not 100% that mine is coming. The deal has been made but it's been 2 days now with no shipping info. Hopefully they aren't having too much trouble removing it from it's current home.

Found one link. https://www.garagejournal.com/forum/showthread.php?t=146096
Pretty sure there was one more somewhere.

Update:
Looks like mine won't be ready to ship until next week (fingers crossed)
-- Still waiting. Hopefully they are working on it this weekend.

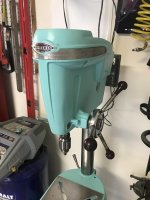
Managed a decent score on ebay. A brand new Pressmate. This is my backup plan... If everything goes well it will be up for sale, if not it will be on my press.

I had that in my watch list I figured someone on here would snag it! I never found the tables that hard to adjust, I really have a problem spending more on these old lifts than I have into my whole DP!
 
To avoid these ads, REGISTER NOW!

68400BIRD

Well-known member
Joined
Nov 14, 2017
Messages
330
Location
Shorewood, MN
Thank you for all of the information included in this thread. I think I have a Craftsman 100 15" DP model 103.24820. I'm working on replacing the 3450 RPM motor that was currently on it. I have a newer Dayton motor with a lower RPM and will run in CW and CCW rotation. I'm confused on what I want to run for a on/off switch. The old motor and switch were hard to get to but I think the switch was in the stock position. It was on the right hand side of the motor base. The new motor does not have a switch. I was thinking of buying a drum switch ($$) so I could operate the drill in fwd and reverse. I would also like to have a small light wired into the drill press. I did a search and did not come up with much for ideas or pictures. Can I get some advice from the members on what they did to their drill press? Thanks Rob
 

lafester

Well-known member
Joined
Mar 1, 2017
Messages
2,191
Location
Northern CO
Thank you for all of the information included in this thread. I think I have a Craftsman 100 15" DP model 103.24820. I'm working on replacing the 3450 RPM motor that was currently on it. I have a newer Dayton motor with a lower RPM and will run in CW and CCW rotation. I'm confused on what I want to run for a on/off switch. The old motor and switch were hard to get to but I think the switch was in the stock position. It was on the right hand side of the motor base. The new motor does not have a switch. I was thinking of buying a drum switch ($$) so I could operate the drill in fwd and reverse. I would also like to have a small light wired into the drill press. I did a search and did not come up with much for ideas or pictures. Can I get some advice from the members on what they did to their drill press? Thanks Rob

There's a link in the first post to some of the switches people have used. I have a Dayton with no switch so I just bought a single plug with a switch and used that at the outlet.


OH and we need pics of your dp.
 
Last edited:
OP
F

FrankLee

Well-known member
Joined
Sep 13, 2010
Messages
3,548
Location
seMI, 48317
Hello and welcome again, Rob!

I have a six foot power strip attached to the I-beam in my basement. It is controlled with a push-button paddle switch. Several of my machines are powered by the strip.

I have a vintage magnetic lamp on an articulating arm stuck to the left side of the head frame. It is also plugged into the strip and turns on with the paddle switch. It's nice to have a light for set-up.

A drum switch would satisfy your rotation requirement, but you'll need to determine a mounting location. I use a foot switch and love it. Of course it's clockwise only.
 

ckadams00

Well-known member
Joined
Sep 12, 2011
Messages
1,273
Location
Seattle, WA
Here is what I did with my 100 I just finished for a switch/light. I had this set up on a previous 150 and decided to keep the design because it works really well.

THE SWITCH
Nothing makes me crankier than seeing people drill a switch into the side of these beautiful machines. Ok, rant over. This is simply a double-switch in a gang box - one switch for the drill, one for the lamp. Wiring is very simply - motor cord to the bottom switch, lamp from the top switch, power cord coming in from the top which runs to a GFI wall socket. There is a 90-degree bracket screwed into the back of the gang box and it is bolted to one of the holes in the motor mount plate. It places the switch in just the right place, doesn't interfere with any of the adjustment handles, and if I want to remove/adjust it it is not mounted permanently to the drill head.
 

Attachments

  • DSC03361.jpg
    DSC03361.jpg
    123.9 KB · Views: 82

ckadams00

Well-known member
Joined
Sep 12, 2011
Messages
1,273
Location
Seattle, WA
I haven't learned how to manage photos since I cancelled my photobucket account - not sure why they turn sideways?

THE LAMP
There is LOTS of dead space inside the head case so rather than an external light I fabricated an internal lamp that shines through the bottom of the case right onto the work.

First, I tapped a small screw into the top of the press on the inside support next to the post. I only tapped about 1/4 inch - this isn't going to hold more than a few oz. of weight. The adjustment bolt is so I can get it nice and snug.
 

Attachments

  • DSC03354.jpg
    DSC03354.jpg
    101.1 KB · Views: 76

ckadams00

Well-known member
Joined
Sep 12, 2011
Messages
1,273
Location
Seattle, WA
Second, I bent a piece of flat steel into a bracket (kind of 'Z' shaped - this is the support arm for the lamp. You can see the previous screw hole from when this was on my 150 - I had to move it a bit because I am using one of JZ's slow speed attachments and I didn't want the screw to rub the pulley).
 

Attachments

  • DSC03355.jpg
    DSC03355.jpg
    116.5 KB · Views: 69

ckadams00

Well-known member
Joined
Sep 12, 2011
Messages
1,273
Location
Seattle, WA
Third, I attached the lamp socket to the bottom of the bracket, and wired it up. *Note: you do not want the leads and screws contacting the bracket it will short. Once I had everything test-fit and wired I wrapped the bracket in electrical tape.
 

Attachments

  • DSC03356.jpg
    DSC03356.jpg
    117.5 KB · Views: 64

ckadams00

Well-known member
Joined
Sep 12, 2011
Messages
1,273
Location
Seattle, WA
Screw the bracket into the tapped screw hole, instal bulb from the bottom. The photos make it look more crowded than it is - it's not as close to the spindle as it looks. There is enough room I can change the bulb from the bottom as needed.
 

Attachments

  • DSC03362.jpg
    DSC03362.jpg
    107.3 KB · Views: 69

ckadams00

Well-known member
Joined
Sep 12, 2011
Messages
1,273
Location
Seattle, WA
Obviously you can't move the light around - but I almost never need more, this works extremely well. There have been times when I also liked being able to check if the drill was under power by simply switching the lamp on for a quick test.
 

Attachments

  • DSC03363.jpg
    DSC03363.jpg
    109 KB · Views: 65

Craptain

Well-known member
Joined
Apr 18, 2013
Messages
4,027
Location
Tampa Bay FL
Re: The Classic Craftsman 100/150 Drill Press

That's a great idea for the light. Such an appropriate location I wonder that craftsman never thought of it.

Sent from my SM-G930T using Tapatalk
 

exmaxima1

Well-known member
Joined
Jun 25, 2011
Messages
6,339
Location
Midwest
Re: The Classic Craftsman 100/150 Drill Press

That's a great idea for the light. Such an appropriate location I wonder that craftsman never thought of it.

They probably didn't know what to do with the cord for the lamp. Most of those drill presses only had a power cord and switch directly on the motor---no factory wiring inside the DP.
 
OP
F

FrankLee

Well-known member
Joined
Sep 13, 2010
Messages
3,548
Location
seMI, 48317
Re: The Classic Craftsman 100/150 Drill Press

That's a great idea for the light. Such an appropriate location I wonder that craftsman never thought of it.

Ditto.


Yes. That would have been a nice factory feature on the 100s and 150s. Emerson finally did think of it for their 2nd gen and later Craftsman drill presses.


sheltonfilms

Well-known member
Joined
May 28, 2014
Messages
157

Attachments

  • IMG_2536.jpg
    IMG_2536.jpg
    86.7 KB · Views: 33
  • IMG_2535.jpg
    IMG_2535.jpg
    84 KB · Views: 30
  • IMG_2534.jpg
    IMG_2534.jpg
    89 KB · Views: 28
  • IMG_2533.jpg
    IMG_2533.jpg
    70.2 KB · Views: 31

BlueHeart

Well-known member
Joined
Jan 2, 2017
Messages
165
Location
Traverse City
I'm still playing Garage Tetris. Hopefully I can make some headway by the weekend. I did take the sander off of the homemade combination stand. The table saw has issues with the tilt adjustment gear. I saw another one listed that I wanted to check out, but the price scared me away.
 

lafester

Well-known member
Joined
Mar 1, 2017
Messages
2,191
Location
Northern CO
Waiting on a good time to take all my parts to my buddies house and sandblast them (he lives like 50 minutes away).

In the meantime I picked up a Homecraft Delta Jointer and Table saw plus a late 40s CM table saw. All for $50
Nice score. I got one of those little saws (companion version) a belt grinder and a big steel bench for $45. Then got my homecraft and 6 in belt sander for $100.

Sent from my ZTE A2017U using Tapatalk
 

sheltonfilms

Well-known member
Joined
May 28, 2014
Messages
157
She's showing a little leg. Still working on head stock.
 

Attachments

  • Photo Mar 10, 9 13 47 PM.jpg
    Photo Mar 10, 9 13 47 PM.jpg
    114.2 KB · Views: 66
OP
F

FrankLee

Well-known member
Joined
Sep 13, 2010
Messages
3,548
Location
seMI, 48317
It's been very slow for me too... especially for the past six weeks while my wife is recovering from surgery.

I did get to a few e-sales and bought this box Friday for a Jackson. It's in pretty good shape, but needed new wheels. I bought a 30" x 18" furniture dolly from HF and modified it to fit the box nicely. I have a non-matching top box for it.

 
To avoid these ads, REGISTER NOW!

slothfryk

ALLIANCE MEMBER
Joined
Jul 10, 2017
Messages
32
Location
Camarillo, CA
Re: The Classic Craftsman 100/150 Drill Press

Sorry to hear that your wife needed surgery. Best wishes for a full recovery, even if it takes a while.

Sent from my Pixel using Tapatalk
 

lafester

Well-known member
Joined
Mar 1, 2017
Messages
2,191
Location
Northern CO
Hope all is well and the recovery is rapid.
I wouldn't have flooded you with pms if I had known that, but maybe it helped ease some anxiety.

Hope to have some pics soon of my atlas lift assembly and install.
 
OP
F

FrankLee

Well-known member
Joined
Sep 13, 2010
Messages
3,548
Location
seMI, 48317
Sorry to hear that your wife needed surgery. Best wishes for a full recovery, even if it takes a while.

Sent from my Pixel using Tapatalk

Frank, Hope your wife recovers fully soon!

Hope all is well and the recovery is rapid.
I wouldn't have flooded you with pms if I had known that, but maybe it helped ease some anxiety.

Hope to have some pics soon of my atlas lift assembly and install.

Thanks guys.


I've got the top box on the roller cab. Both boxes have the cheapo wafer locks, and the key that came with the lower box works for the top box. Bonus!!!, but not a huge surprise.
 

Cjmac

Member
Joined
Mar 19, 2018
Messages
12
Re: The Classic Craftsman 100/150 Drill Press

Thanks FrankLee... I purchased my first DP and used this forum to get my unit in great working order. Much appreciated for all of the good details you have documented.
 
OP
F

FrankLee

Well-known member
Joined
Sep 13, 2010
Messages
3,548
Location
seMI, 48317
Re: The Classic Craftsman 100/150 Drill Press

Thanks FrankLee... I purchased my first DP and used this forum to get my unit in great working order. Much appreciated for all of the good details you have documented.

Welcome! You're welcome! And thanks for your comments.

If you're able, please post some pictures and tell us more about your machine.
 

Cjmac

Member
Joined
Mar 19, 2018
Messages
12
Craftsman king seeley. 10323141 with craftsman motor 115.6962.. purchased from a vehicle service station about 1 month ago. $100. though it was operational .. it was ugly as sin.. when turned on it was surprisingly quiet while under no load.. one attempt at drilling steel plate .. the unit chattered loud noises and locked up!! This DP suffered from what you described as quill stop/ bearing screw failure.. upon inspection I discovered the upper bearing of the spindle had spun hard groove in pulley... 1mm deep!! <——Ouch! Shaft was no longer capable of holding upper bearing... after deep thinking .. I designed a very simple solution to these spun pulley shafts... not sure how to upload pics yet.. but soon as I figure it out.. I will upload the images
 
Last edited:

Cjmac

Member
Joined
Mar 19, 2018
Messages
12
I replaced the original style upper bearing with a 25mm bearing insert..the bearing insert has a much wider inner race (its 27mm wide.. original bearing is 15mm wide) and it locks to the pulley shaft with set screws... then fabricated a new spacer bushing from the old used bearing inner race .the new spacer had to be 14mm. Old bearing race was 15mm,. So I only had to grind off 1mm for a perfect fit. then put on new lower bearing and clip.. bearings are tight with no movement vertically on the shaft .. and the new upper bearing being held by the shaft has no adverse movement side to side or up and down.. though I only needed 1 insert bearing.. this approach could be used for both bearings if shaft is worn in both spots
 

Attachments

  • DA53B0A1-C7FB-4F76-9C51-BD36587992F8.jpeg
    DA53B0A1-C7FB-4F76-9C51-BD36587992F8.jpeg
    133.5 KB · Views: 55
  • 0582D825-1261-48E1-8523-9A8F96EDFE05.jpg
    0582D825-1261-48E1-8523-9A8F96EDFE05.jpg
    148.9 KB · Views: 45
  • 607BA858-4F45-4810-BB0F-4CA2B4EC5585.jpg
    607BA858-4F45-4810-BB0F-4CA2B4EC5585.jpg
    114.6 KB · Views: 54
  • 9FA9E96C-1886-4FE7-BCD4-ABB73973049F.jpg
    9FA9E96C-1886-4FE7-BCD4-ABB73973049F.jpg
    100.8 KB · Views: 51
  • E10DEC92-0288-4416-A558-DFAFD31D8695.jpg
    E10DEC92-0288-4416-A558-DFAFD31D8695.jpg
    99.9 KB · Views: 48
  • B53E641F-C53B-461E-BAEB-5119D707D1B7.jpg
    B53E641F-C53B-461E-BAEB-5119D707D1B7.jpg
    107.4 KB · Views: 48
  • B6E59351-2133-4F24-893C-9F73DC419648.jpg
    B6E59351-2133-4F24-893C-9F73DC419648.jpg
    152.7 KB · Views: 54
Last edited:
OP
F

FrankLee

Well-known member
Joined
Sep 13, 2010
Messages
3,548
Location
seMI, 48317
Craftsman king seeley. 10323141 with craftsman motor 115.6962.. purchased from a vehicle service station about 1 month ago. $100. though it was operational .. it was ugly as sin.. when turned on it was surprisingly quiet while under no load.. one attempt at drilling steel plate .. the unit chattered loud noises and locked up!! This DP suffered from what you described as quill stop/ bearing screw failure.. upon inspection I discovered the upper bearing of the spindle had spun hard groove in pulley... 1mm deep!! <——Ouch! Shaft was no longer capable of holding upper bearing... after deep thinking .. I designed a very simple solution to these spun pulley shafts... not sure how to upload pics yet.. but soon as I figure it out.. I will upload the images

I replaced the original style upper bearing with a 25mm bearing insert..the bearing insert has a much wider inner race (its 27mm wide.. original bearing is 15mm wide) and it locks to the pulley shaft with set screws... then fabricated a new spacer bushing from the old used bearing inner race .the new spacer had to be 14mm. Old bearing race was 15mm,. So I only had to grind off 1mm for a perfect fit. then put on new lower bearing and clip.. bearings are tight with no movement vertically on the shaft .. and the new upper bearing being held by the shaft has no adverse movement side to side or up and down.. though I only needed 1 insert bearing.. this approach could be used for both bearings if shaft is worn in both spots

That is excellent solution to save a badly worn spindle pulley! Thanks for sharing! Who is the manufacturer and what is the part number of that new upper bearing?
 

lafester

Well-known member
Joined
Mar 1, 2017
Messages
2,191
Location
Northern CO
Looks great, nice job fixing the bearing.

Your pic reminds me I have a plain headband with a few dents and dings sitting on my bench. If you or anyone else is interested pm me (will be cheap). Would look nice polished up or engine turned if you have the skills.

I replaced the original style upper bearing with a 25mm bearing insert..the bearing insert has a much wider inner race (its 27mm wide.. original bearing is 15mm wide) and it locks to the pulley shaft with set screws... then fabricated a new spacer bushing from the old used bearing inner race .the new spacer had to be 14mm. Old bearing race was 15mm,. So I only had to grind off 1mm for a perfect fit. then put on new lower bearing and clip.. bearings are tight with no movement vertically on the shaft .. and the new upper bearing being held by the shaft has no adverse movement side to side or up and down.. though I only needed 1 insert bearing.. this approach could be used for both bearings if shaft is worn in both spots
 

Cjmac

Member
Joined
Mar 19, 2018
Messages
12
Frank I sourced these bearings from VXB.com.. the part # is SB205-25 mm bore. The specs of the bearing are 27mm wide inner race.. 15 mm wide bearing and upper race..52 mm outside bearing diameter .. with a 25 mm bore.. I actually measured the bore to be 24.7 mm.. it is designed to fit a 25mm shaft.. it was a snug tight fit sliddding on the pulley .. I’ve seen many cheap bearings in my life.. though I’m not that familiar with VBX they listed the specs of the bearing and had it in stock.. I paid about $10 delivered.. others who are selling this spec bearing their prices were upwards of $40-60 before delivery.. I’m very happy with the bearing that arrived ..it is machined well.. solid and heavy with no adverse movements noted before installing it.. I’d buy from then again .. I’m also confident that accurate bearing would have them.. but they don’t have a website for ordering without calling them..
 

Attachments

  • B79193B6-9A93-40AB-A3DB-27EA28D03C92.jpg
    B79193B6-9A93-40AB-A3DB-27EA28D03C92.jpg
    17.8 KB · Views: 28
Last edited:
OP
F

FrankLee

Well-known member
Joined
Sep 13, 2010
Messages
3,548
Location
seMI, 48317
Frank I sourced these bearings from VXB.com.. the part # is SB205-25 mm bore. The specs of the bearing are 27mm wide inner race.. 15 mm wide bearing and upper race with a 25 mm bore.. I’ve seen many cheap bearings.. though I’m not that familiar with VBX they listed the specs of the bearing and had it in stock.. I paid about $10 delivered.. others who are selling this spec bearing their prices were upwards of $40-60 before delivery.. I’m very happy with the bearing that arrived ..it is machined well.. solid and heavy with no adverse movements noted before installing it.. I’d buy from then again .. I’m also confident that accurate bearing would have them.. but they don’t have a website for ordering with out calling them..

Thanks very much! I'm sure someone can use this info in the future.

http://www.vxb.com/SB205-Bearing-25mm-Bore-Insert-Mounted-Bearings-p/kit12334.htm

kit12334-2.jpg
 

sheltonfilms

Well-known member
Joined
May 28, 2014
Messages
157
Got the headstock painted this weekend. Damn she is pretty. She'll be making milkshakes here pretty soon.

Before and after attached.
 

Attachments

  • IMG_E2870.jpg
    IMG_E2870.jpg
    60.4 KB · Views: 47
  • IMG_E2869.jpg
    IMG_E2869.jpg
    66.2 KB · Views: 48
  • IMG_2867.jpg
    IMG_2867.jpg
    80.3 KB · Views: 57
  • IMG_2868.jpg
    IMG_2868.jpg
    77.9 KB · Views: 51
  • IMG_2866.jpg
    IMG_2866.jpg
    94.3 KB · Views: 53

lafester

Well-known member
Joined
Mar 1, 2017
Messages
2,191
Location
Northern CO
Thank you. Lighting was a little off on the first, and really it still is.

I sometimes catch myself wandering into the garage just to stare at it. :D

Only thing I need now is a feed stop assembly.
I have a 100 gauge and one nut but I do not have the collar.

Sent from my ZTE Axon 7 using Tapatalk
 

lafester

Well-known member
Joined
Mar 1, 2017
Messages
2,191
Location
Northern CO
If I can find a collar I may go with that. PM me a price.

Let me know if you find a collar.. most I see on ebay come with everything but not all.

Decided to pull the quill on my 150 and clean it up, set the spring tension and check the o rings since FrankLee was kind enough to send some. Everything looks like new in there, even the o rings. I went ahead and replaced the big one as it has more cushion. the pulley bearings seem a little dry so I will probably go ahead and replace those at some point. It's nice hearing that solid 'thump' when letting go of the wheel thanks to that thick o ring.

I'm having a heck of a time getting the center pulley to stay put. It keeps twisting around and messing up my belt tension. Doesn't help that my front belt still isn't broken in and has an obvious loose spot from the bend. I tighten it as much as I can and try to keep the set screw near the gap but so far I have been unsuccessful. No idea how I got it to stay last time.
 
OP
F

FrankLee

Well-known member
Joined
Sep 13, 2010
Messages
3,548
Location
seMI, 48317
I brought DP#40 home this evening (Otisville); a 150 floor standing model 113.24511. I've had this one sold to the buyer of DP#23 long before I found it. This one has a Pressmate table lift and another unexpected surprise that I have to investigate tomorrow.

 
To avoid these ads, REGISTER NOW!
Top Bottom