To avoid these ads, REGISTER NOW!

Craftsman Drill Press

Deker

Well-known member
Joined
Feb 24, 2020
Messages
46
Location
Los Angeles, CA
PureLeaf: Yes that was the one. Agree that the price wasn't great, but given what I've seen in the area, it wasn't unreasonable. I plan to keep it so I didn't mind paying a little extra.

FrankLee: Thanks for the great explanation. Much appreciated!
 
To avoid these ads, REGISTER NOW!

oldsfan442

Active member
Joined
Nov 15, 2011
Messages
36
I spotted this Craftsman motor on fbmp this afternoon for a decent price. It was only a few miles away, so I went and grabbed it. It's a 1/2 hp, 1725 rpm, sleeve bearing, model 113.12530, dated 10/75. It'll be perfect for a drill press. The cone pulley was a bonus.

How did you manage to find just a motor? Is that something you search for specifically?

Bryan

Sent from my SM-G955U using Tapatalk
 

gatewaysysop

Well-known member
Joined
Nov 11, 2008
Messages
3,286
Location
Arizona
PureLeaf: Yes that was the one. Agree that the price wasn't great, but given what I've seen in the area, it wasn't unreasonable. I plan to keep it so I didn't mind paying a little extra.

I totally get that sentiment. From the pics you shared, that's a pretty nice and complete setup in good shape. When the last one I bought (my second, both keepers) came up for sale, it was very much over priced. I hadn't seen a nice one for ages and so it was one of those "price be damned" situations. Haven't really seen another decent one since, and now many months later, I'm glad I had no self control that day. :rocker:
 
OP
F

FrankLee

Well-known member
Joined
Sep 13, 2010
Messages
3,547
Location
seMI, 48317
How did you manage to find just a motor? Is that something you search for specifically?

Bryan
It just popped up in my "Today's Picks for You" likely based on my previous fbmp searches. I often see motors on fb, just not so many Craftsman and not this cheap. Those first two photos were the seller's.
 

PureLeaf

Well-known member
Joined
Jul 25, 2014
Messages
1,417
PureLeaf: Yes that was the one. Agree that the price wasn't great, but given what I've seen in the area, it wasn't unreasonable. I plan to keep it so I didn't mind paying a little extra.

FrankLee: Thanks for the great explanation. Much appreciated!

Just use patience and then move extremely fast. I have 3 drill presses. 2 standing and 1 bench top. The most expensive cost me 100 bucks (the bench top), it has no extras and was my first purchase. One of my standing has a vari slo and cost 80 bucks (came out of san diego area), the other standing has an MSA and cost 50 bucks both are 3/4 craftsman original motors. Benchtop and the one standing were out of the LA area.

Unfortunately in the LA area there is some guy who's got a "craigslist business" where he sells drill presses, bench grinders etc he's bought at outrageous prices (like 300-800 dollars depending on the unit), none are even refurbished just in whatever condition he bought it in, just with mark up.

Theres a few bench tops out there right now. One in Lawndale that is listed for 300 dollars but she'll bargain down to 80 (still too much), and one in Santa Maria for 40 bucks. PM'd you a link for a floor model 150 going for 80 bucks.
 
Last edited:

pikapp

Well-known member
Joined
Jun 24, 2018
Messages
75
Location
South Florida
Hi all, just brought home my first drill press yesterday...a Craftsman 103.23140. The seller told me he got it a couple months ago from a man whose father had been the original owner and had recently passed. I've attached some pictures below. First impressions?

Looking forward to taking it apart and cleaning it up, but before I do that I've got a couple questions:

1. The belt broke while the seller was giving me a demo...the belt that broke was a 1/2x45, which is consistent with the info in post #82. But the 1947 owners manual for the 103.23140 lists a 1/2x44. Any idea on which is correct?

2. There's a bit of slop in the headstock lock handle in the direction towards / away from the the head frame...maybe about a 1/2" of movement. Is this normal?

I've got a lot to learn about these units but with the help of this thread I'm well on my way!

Deker,
Beautiful machine! Paint, chrome, headband all appear to be in outstanding condition. Congrats and hope it serves you well for many years to come. Don't sweat the price, trust me, you will be pleased with the history and workmanship of these iconic machines every time you switch it on. That in itself is worth a few bucks. I also live where there aren't too many close at hand and when one does pop up it ain't cheap. I read this thread from start of finish and now I'm gonna start over again for comprehension this time, its quite a journey. Good luck Deker. Thanks FrankLee. Happy New Year guys. :thumbup:
 

Smokeshow69

Well-known member
Joined
Dec 7, 2012
Messages
8,366
Location
Pacific Northwest
Re: dp#96

Well, not only was this machine still for sale since a week ago, but the price was lowered to $75. I couldn't stop myself, went to take a look and brought home DP#96 for $65.


The model information tag is missing, but I believe it's a 103.0305. It's rough and missing only a few bits.


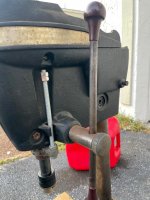
When I first saw the sellers photos, I could tell that there was something up with the spindle/chuck. There was too much spindle visible. I've got it apart already and discovered that a previous owner removed the thrust collar and reinstalled it upside down. That may be a challenge.


12/28/2020


Ok, I removed the upper spindle collar and slid off the quill with bearings. I had to rig up spacers using a couple short pieces of angle iron, but the Jacobs wedges did the job and popped off the chuck. After I got it off, I wire-wheeled it a bit and discovered that it's a Supreme 5T chuck. I suspect that it was a little different than the oe Jacobs chuck and may explain why the thrust collar was reversed.


The pin for the thrust collar came out easy enough and the collar slid right off.


12/30/2020


Well, I got the spindle apart and cleaned. I reinstalled the thrust collar correctly and loosely slipped on the chuck. The chuck fit correctly, so I have no idea what the po's motive was by reversing the collar.


Many other parts were cleaned.


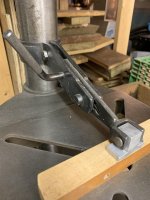
Here's another first. The dog point of the pinion retaining screw appears to have been partially sheered off.


I am glad to have helped instigate your purchase [emoji23] I am glad it is getting some love!


Sent from my iPhone using The Garage Journal mobile app
 

Smokeshow69

Well-known member
Joined
Dec 7, 2012
Messages
8,366
Location
Pacific Northwest
Re: The Classic Craftsman 100/150 Drill Press

I had some time over the break to get some work done on my early model 100 which is a 13.5 model so slightly smaller than the larger 15” version. My model number is 103.23640. I bought it about 1 year ago and it was filthy but complete and the tables were nice with next to no damage. It was filthy and showed rust both on the tables, column and the castings. It evidently spent lots of time in a wood shop based on the amount of sawdust inside the head. I also believe it sat early on in its life based on the nice work tables! It does have the early tilt table function which is something that attracted me to this version. I did use one of franklee’s o ring kits for the clean up process.

Before- the paint is so dirty from years of dirt and grime it looks greenish/ gray
IMG_2008.jpg

Inside of head
IMG_2051.jpg

I had to degrease all the cast iron parts twice with the degreaser- greez off recommend here. It does work well! I did cover the head logo and the data plate with masking tape because I didn’t know if it would remove the paint. I have had that happen with other degreaser in the past... here you can see the difference prior to degreasing of how dirty it was
IMG_2049.jpg


Sent from my iPhone using The Garage Journal mobile app
 

Smokeshow69

Well-known member
Joined
Dec 7, 2012
Messages
8,366
Location
Pacific Northwest
I got the parts all dried and then started polishing the column after I removed the rust on my 3/4 horse block grinder. I had to polish the column to get the finish to be more uniform as the bench grinder left a slightly non uniform finish so as the metal ages, it will look more aged and more uniform. The paint isn’t quite as nice as I would like but it isn’t horrible and I didn’t want to repaint it that’s for sure. You can see my redneck column holder as well[emoji23]

IMG_2059.jpg
IMG_2061.jpg
IMG_2062.jpg
IMG_2064.jpg

Clean head with no grease or sawdust
IMG_2065.jpg

The bearings appear to all be original and were fairly quiet so I just let them sit with oil dripping down inside them

IMG_2066.jpg


Sent from my iPhone using The Garage Journal mobile app
 

Smokeshow69

Well-known member
Joined
Dec 7, 2012
Messages
8,366
Location
Pacific Northwest
Re: The Classic Craftsman 100/150 Drill Press

I started working on the correct low rpm motor I had bought for $5 years ago. It was pretty quiet as well but I opened the bearings up and removed the dried grease and put some oil and super lube inside to help lubricate them. The band on the motor was also rusty so I did the old wd40 and steel wool trick to remove the rust as much as possible. The band is still pitted but at least it will match the machine and at least it was super cheap. If I find another I can always replace but for the price you can’t go wrong
IMG_2067.jpg

Before- band rust
IMG_2069.jpg

After- band rust
63132285361__FDB583D1-DBB9-4A52-A004-28F82F9111C3.jpg

Here is how the machine looks now. I still need to mount the motor and finish a few things but it is close to running!
IMG_2070.jpg
IMG_2076.jpg
IMG_2077.jpg

Franklee- question on the quill bumper rubber washer- this machine didn’t have one like the larger 15” units I have worked on before. It just had the quill- washer and then spindle collar with set screw. Is that normal on these machines?


Sent from my iPhone using The Garage Journal mobile app
 
OP
F

FrankLee

Well-known member
Joined
Sep 13, 2010
Messages
3,547
Location
seMI, 48317
Re: The Classic Craftsman 100/150 Drill Press

I started working on the correct low rpm motor I had bought for $5 years ago. It was pretty quiet as well but I opened the bearings up and removed the dried grease and put some oil and super lube inside to help lubricate them. The band on the motor was also rusty so I did the old wd40 and steel wool trick to remove the rust as much as possible. The band is still pitted but at least it will match the machine and at least it was super cheap. If I find another I can always replace but for the price you can’t go wrong

Before- band rust

After- band rust

Here is how the machine looks now. I still need to mount the motor and finish a few things but it is close to running!

Franklee- question on the quill bumper rubber washer- this machine didn’t have one like the larger 15” units I have worked on before. It just had the quill- washer and then spindle collar with set screw. Is that normal on these machines?
Nice write-up!

I believe it should have both a spindle washer and a quill bumper. Did you see any witness marks on the spindle from the cone-point set screw? Check the Quill and Spindle Issues ere:
https://www.garagejournal.com/forum/showthread.php?p=4880579

Also, did you apply any wax on the head frame paint? It may eliminate some of that blotchiness.
 

Smokeshow69

Well-known member
Joined
Dec 7, 2012
Messages
8,366
Location
Pacific Northwest
Re: The Classic Craftsman 100/150 Drill Press

Nice write-up!


I believe it should have both a spindle washer and a quill bumper. Did you see any witness marks on the spindle from the cone-point set screw? Check the Quill and Spindle Issues ere:

https://www.garagejournal.com/forum/showthread.php?p=4880579


Also, did you apply any wax on the head frame paint? It may eliminate some of that blotchiness.


I did look at the quill it did have a pinned mark for both. I can take the quill out again and put the bumper on there. I was just trying to match what was in there. Also, what wax do you use? On my column and tables I used car wax. Some of the blotches are from me touching the head after I had to pull the quill out to remove lubricant. I put too much on and the quill was having trouble returning correctly. I now have the quill just lubricated with 15-40 oil and it works way better! All the lock cylinders are lubed with super lube


Sent from my iPhone using The Garage Journal mobile app
 
OP
F

FrankLee

Well-known member
Joined
Sep 13, 2010
Messages
3,547
Location
seMI, 48317
Re: The Classic Craftsman 100/150 Drill Press

I did look at the quill it did have a pinned mark for both. I can take the quill out again and put the bumper on there. I was just trying to match what was in there. Also, what wax do you use? On my column and tables I used car wax. Some of the blotches are from me touching the head after I had to pull the quill out to remove lubricant. I put too much on and the quill was having trouble returning correctly. I now have the quill just lubricated with 15-40 oil and it works way better! All the lock cylinders are lubed with super lube
I use Johnson's paste wax in the yellow can.
 

Smokeshow69

Well-known member
Joined
Dec 7, 2012
Messages
8,366
Location
Pacific Northwest
Re: The Classic Craftsman 100/150 Drill Press

I use Johnson's paste wax in the yellow can.


I will try the liquid wax I used on the column. I think it will look better for sure! This casting is a little rougher than my floor model I had so it may be a little more difficult to wax but still worth it!


Sent from my iPhone using The Garage Journal mobile app
 

Smokeshow69

Well-known member
Joined
Dec 7, 2012
Messages
8,366
Location
Pacific Northwest
So I installed the o ring on the quill but the feed stop o ring wasn’t touching the head...
I adjusted the bracket up slightly but now the feed stop depth gauge is off slightly by 1 thread so about 1/16th. If I push down on the top pulley , it moves the quill down slightly and the gauge zeros out. Do I just need to adjust the bracket down slightly? In other words, which bumper o ring is more important to have making contact? The quill bumper or the feed stop bracket? I do know that when I went to remover the top pulley mechanism, I forgot to remove the set screws and broke them off. I examined the bearings and they looked and felt fine. I do know from the top to the bottom bearing there was some slight play in both so perhaps I dislodged one of the bearings slightly and it needs to be reseated to remove the slop?
IMG_2081.jpg
IMG_2082.jpg

Picture from when I bought it.. it looks like the depth gauge o ring isn’t making contact here either but it also was missing the correct quill bumper as well?
IMG_2012.jpg


Sent from my iPhone using The Garage Journal mobile app
 
Last edited:
OP
F

FrankLee

Well-known member
Joined
Sep 13, 2010
Messages
3,547
Location
seMI, 48317
Re: The Classic Craftsman 100/150 Drill Press

So I installed the o ring on the quill but the feed stop o ring wasn’t touching the head...
I adjusted the bracket up slightly but now the feed stop depth gauge is off slightly by 1 thread so about 1/16th. If I push down on the top pulley , it moves the quill down slightly and the gauge zeros out. Do I just need to adjust the bracket down slightly? In other words, which bumper o ring is more important to have making contact? The quill bumper or the feed stop bracket? I do know that when I went to remover the top pulley mechanism, I forgot to remove the set screws and broke them off. I examined the bearings and they looked and felt fine. I do know from the top to the bottom bearing there was some slight play in both so perhaps I dislodged one of the bearings slightly and it needs to be reseated to remove the slop?

Picture from when I bought it.. it looks like the depth gauge o ring isn’t making contact here either but it also was missing the correct quill bumper as well?
OK, a lot going on here...


  1. rubber spindle washer
    The purpose of the rubber spindle washer is to provide pre-load on the bearings.
    Confirm that:
    • the steel washer, rubber washer and collar are present and in the correct order
    • the point of the set screw in the collar is tightened into the divot on the spindle
    https://www.garagejournal.com/forum/showthread.php?p=4880579

  2. bracket/quill bumper
    The spindle pulley should not be moving vertically. If it does, it means that the collar on the spindle is bumping up against it.

    The feed stop bracket MUST be fully seated onto the quill. If not, it will cascade issues up. A fully seated bracket will prevent the collar from bumping the spindle pulley. I use a retaining compound on the quill/bracket in conjunction with the bolt and nut to hold the bracket.
    https://www.garagejournal.com/forum/showthread.php?p=3602221
    https://www.garagejournal.com/forum/showthread.php?p=4880745
    https://www.garagejournal.com/forum/showthread.php?p=8421465

  3. feed stop rod
    The zero mark on the feed stop rod does not have to line up with the guide on the casting. When you are drilling, zero is when the tip of the bit contacts the material. There are many different bit lengths, material thicknesses, and table adjustment heights, so zero on the rod means nothing.
    The scale on the rod is relative to the depth of drilling. If you're drilling a one inch deep hole, note the reading of the scale at the rod guide when the bit contacts the work piece. Move the feed stop nuts to one inch higher than the reading. Then drill.

  4. spindle pulley bearings
    I use a purple low-strength thread locker on the spindle pulley shaft for the inner races of the bearings.


I did get the paint waxed and I am glad I did it! It looks way better and way closer to the original color from when I got it.
Much better!
 
Last edited:

Smokeshow69

Well-known member
Joined
Dec 7, 2012
Messages
8,366
Location
Pacific Northwest
Re: The Classic Craftsman 100/150 Drill Press

OK, a lot going on here...


  1. rubber spindle washer
    The purpose of the rubber spindle washer is to provide pre-load on the bearings.
    Confirm that:
    • the steel washer, rubber washer and collar are present and in the correct order
    • the point of the set screw in the collar is tightened into the divot on the spindle
    https://www.garagejournal.com/forum/showthread.php?p=4880579

  2. bracket/quill bumper
    The spindle pulley should not be moving vertically. If it does, it means that the collar on the spindle is bumping up against it.

    The feed stop bracket MUST be fully seated onto the quill. If not, it will cascade issues up. A fully seated bracket will prevent the collar from bumping the spindle pulley. I use a retaining compound on the quill/bracket in conjunction with the bolt and nut to hold the bracket.
    https://www.garagejournal.com/forum/showthread.php?p=3602221
    https://www.garagejournal.com/forum/showthread.php?p=4880745
    https://www.garagejournal.com/forum/showthread.php?p=8421465

  3. feed stop rod
    The zero mark on the feed stop rod does not have to line up with the guide on the casting. When you are drilling, zero is when the tip of the bit contacts the material. There are many different bit lengths, material thicknesses, and table adjustment heights, so zero on the rod means nothing.
    The scale on the rod is relative to the depth of drilling. If you're drilling a one inch deep hole, note the reading of the scale at the rod guide when the bit contacts the work piece. Move the feed stop nuts to one inch higher than the reading. Then drill.

  4. spindle pulley bearings
    I use a purple low-strength thread locker on the spindle pulley shaft for the inner races of the bearings.


Much better!


This makes sense now. I had installed the preload washer on the quill like we had discussed yesterday and had to adjust the feed stop bracket up as well because I was thinking that both bumpers needed to contact the machine but I wasn’t understanding the role of both. Only the feed stop bracket o ring should contact the head and not the preload o ring on the quill. I will try to get this issue fixed today and report back. I am certainly getting really good at removing the quill on these really quick [emoji15]


Sent from my iPhone using The Garage Journal mobile app
 
To avoid these ads, REGISTER NOW!

Smokeshow69

Well-known member
Joined
Dec 7, 2012
Messages
8,366
Location
Pacific Northwest
Re: The Classic Craftsman 100/150 Drill Press

OK, a lot going on here...


  1. rubber spindle washer
    The purpose of the rubber spindle washer is to provide pre-load on the bearings.
    Confirm that:
    • the steel washer, rubber washer and collar are present and in the correct order
    • the point of the set screw in the collar is tightened into the divot on the spindle
    https://www.garagejournal.com/forum/showthread.php?p=4880579

  2. bracket/quill bumper
    The spindle pulley should not be moving vertically. If it does, it means that the collar on the spindle is bumping up against it.

    The feed stop bracket MUST be fully seated onto the quill. If not, it will cascade issues up. A fully seated bracket will prevent the collar from bumping the spindle pulley. I use a retaining compound on the quill/bracket in conjunction with the bolt and nut to hold the bracket.
    https://www.garagejournal.com/forum/showthread.php?p=3602221
    https://www.garagejournal.com/forum/showthread.php?p=4880745
    https://www.garagejournal.com/forum/showthread.php?p=8421465

  3. feed stop rod
    The zero mark on the feed stop rod does not have to line up with the guide on the casting. When you are drilling, zero is when the tip of the bit contacts the material. There are many different bit lengths, material thicknesses, and table adjustment heights, so zero on the rod means nothing.
    The scale on the rod is relative to the depth of drilling. If you're drilling a one inch deep hole, note the reading of the scale at the rod guide when the bit contacts the work piece. Move the feed stop nuts to one inch higher than the reading. Then drill.

  4. spindle pulley bearings
    I use a purple low-strength thread locker on the spindle pulley shaft for the inner races of the bearings.


Much better!


I am looking at my quill now. I installed the components in the correct order. I am looking at the quill now... it has 2 spots for the set screw to go in. Originally when I took it out, it had just the washer and no rubber bumper so it was on the lower setting. Now, I am assuming it will need to be set on the upper setting? I don’t see anyway I can compress the rubber enough for the lower setting. Have you seen quills with both before?
IMG_2086.jpg


Sent from my iPhone using The Garage Journal mobile app
 
OP
F

FrankLee

Well-known member
Joined
Sep 13, 2010
Messages
3,547
Location
seMI, 48317
Re: The Classic Craftsman 100/150 Drill Press

I am looking at my quill now. I installed the components in the correct order. I am looking at the quill now... it has 2 spots for the set screw to go in. Originally when I took it out, it had just the washer and no rubber bumper so it was on the lower setting. Now, I am assuming it will need to be set on the upper setting? I don’t see anyway I can compress the rubber enough for the lower setting. Have you seen quills with both before?
I've seen many fup'd things on these machines. My dp#95 had FOUR holes in the spindle! I believe only one is original. Your machine is a pretty early model. I can't be sure how it came equipped and can't tell which hole is original. The inner races of the bearing should have some pressure on them. It doesn't have to be a lot.

The '46 owners manual does show a rubber washer.

I recommend to:
  • verify that both quill bearings are fully seated
    I believe they both should be flush with the ends of the quill.
  • remove the set screw
    The set screw should have a cone point.
  • determine which spindle hole should be used
    The spindle hole should be slightly off-center from the collar hole toward the quill.
  • remove the spindle collar
  • run a tap through the collar hole and thoroughly clean off any trace of grease and oil from the threads of the collar and screw
  • use a blue thread locker on the set screw
  • use the lower hole if the set screw point will enter the hole
    You don't have to tighten too much, only enough to apply a little pressure on the o-ring.
  • use the upper hole if the point cannot reach the lower hole.
    Add another steel washer if it does not slightly compress the o-ring.
  • verify the spindle turns ok in the quill
    If it's too tight, you'll know.
 
Last edited:

Smokeshow69

Well-known member
Joined
Dec 7, 2012
Messages
8,366
Location
Pacific Northwest
Re: The Classic Craftsman 100/150 Drill Press

I've seen many fup'd things on these machines. My dp#95 had FOUR holes in the spindle! I believe only one is original. Your machine is a pretty early model. I can't be sure how it came equipped and can't tell which hole is original. The inner races of the bearing should have some pressure on them. It doesn't have to be a lot.

The '46 owners manual does show a rubber washer.

I recommend to:
  • verify that both quill bearings are fully seated
    I believe they both should be flush with the ends of the quill.
  • remove the set screw
    The set screw should have a cone point.
  • determine which spindle hole should be used
    The spindle hole should be slightly off-center from the collar hole toward the quill.
  • remove the spindle collar
  • run a tap through the collar hole and thoroughly clean off any trace of grease and oil from the threads of the collar and screw
  • use a blue thread locker on the set screw
  • use the lower hole if the set screw point will enter the hole
    You don't have to tighten too much, only enough to apply a little pressure on the o-ring.
  • use the upper hole if the point cannot reach the lower hole.
    Add another steel washer if it does not slightly compress the o-ring.
  • verify the spindle turns ok in the quill
    If it's too tight, you'll know.


I went through this and checked everything to make sure it was clean and seated correctly. I also measured my feed bracket and it is 9/32 from the bottom of the quill? If I rotate the quill up all the way, it will contact the bottom of the spindle pulley. I am wondering if perhaps this one always supposed to not have a preload washer?


Sent from my iPhone using The Garage Journal mobile app
 

Smokeshow69

Well-known member
Joined
Dec 7, 2012
Messages
8,366
Location
Pacific Northwest
Ok, I was able to communicate with franklee and he really helped me a lot. We figured out I needed to adjust my feed stop bracket further up the quill so that the preload washer with set screw would not make contact with the spindle pulley assembly! This way I can have the preload washer installed and I can also have the bracket installed correctly! Win on all fronts!

Before picture - note no preload bumper on the top of the quill. (I had removed the preload bumper to test my theory that this is what was hitting the pulley)
IMG_2089.jpg

After- preload washer installed and bracket adjusted correctly
IMG_2092.jpg
IMG_2093.jpg
IMG_2094.jpg

Now I can get back to finishing the ‘46 dated motor and get it installed so I can start drilling with it!


Sent from my iPhone using The Garage Journal mobile app
 

Smokeshow69

Well-known member
Joined
Dec 7, 2012
Messages
8,366
Location
Pacific Northwest
Re: The Classic Craftsman 100/150 Drill Press

I was able to get my early 100 model finished up today...

First I installed a new, grounded power cord. I soldered the wires and drilled and tapped the hole for the ground. I did check the wires coming out of the motor and they looked pretty good. The neutral did have a spot where the insulation was frayed so I just taped it up well and left it. These motors can be a can of worms so I don’t like to open them up more than what I need
IMG_2113.jpg
IMG_2114.jpg
IMG_2115.jpg


Sent from my iPhone using The Garage Journal mobile app
 

Smokeshow69

Well-known member
Joined
Dec 7, 2012
Messages
8,366
Location
Pacific Northwest
During cleaning on this head unit I did notice the lower casting seam in the back is cracked where the 2 sides of the cast iron meet. I don’t think this will be impactful long term. It is all part of it’s story.
IMG_2117.jpg

I got the motor mounted and put a second coat of wax on the paint
IMG_2118.jpg
IMG_2119.jpg
IMG_2120.jpg
IMG_2121.jpg
IMG_2122.jpg


Sent from my iPhone using [IMG_2123.jpg
url=http://r.tapatalk.com/byo?rid=95579]The Garage Journal mobile app[/url]
 

Smokeshow69

Well-known member
Joined
Dec 7, 2012
Messages
8,366
Location
Pacific Northwest
Re: The Classic Craftsman 100/150 Drill Press

IMG_2124.jpg

Before- hard to believe it started out like this when I got it off a wtb Craigslist ad I had posted
IMG_2008.jpg

After- many thanks to franklee for this thread! I have a strong suspicion he is probably responsible for helping members restore hundreds of these great machine! This thread is a great resource for simple questions all the way up to in-depth restorations.
IMG_2122.jpg


Sent from my iPhone using The Garage Journal mobile app
 
OP
F

FrankLee

Well-known member
Joined
Sep 13, 2010
Messages
3,547
Location
seMI, 48317
Very nice work!

Thanks for your comments. But like I always say, this thread wouldn't be what it is without the interest and participation. Thank you all.
 
Last edited:

Smokeshow69

Well-known member
Joined
Dec 7, 2012
Messages
8,366
Location
Pacific Northwest
Very nice work!

Thanks for your comments. But like I always say, this thread wouldn't be what it is without the interest and participation. Thank you all.


One of the things I like most is the index/link page on the front of the thread! It really makes searching things easier. Also the fact that all members are encouraged to participate and to post things helps keep it fresh and also helps to have the most up to date/ inclusive help and information


Sent from my iPhone using The Garage Journal mobile app
 

RHJO51

Well-known member
Joined
Feb 27, 2015
Messages
242
Location
Red Hook, NY 12571
Hey folks, I have a question for you. I have one of the Craftsman "Reversible Variable Speed 1/2 HP Motor on mt DP along with the remote switch. It works very well. What I'm wondering though is what size pulley should be used on the motor in conjunction with the spindle pulley, to reflect the speed on the dial? I know this would not going be accurate but figured there was some kind of guide. I was not able to find any specific information. I'll also mention that I have one of the Cam Lock clamps and that works very well too. Slides up and down on the column and with a twist of the lever, clamps down the work. Thanks
 

Attachments

  • IMG_1378.jpg
    IMG_1378.jpg
    123.3 KB · Views: 65
  • IMG_1379.jpg
    IMG_1379.jpg
    77.6 KB · Views: 60
  • IMG_1380.jpg
    IMG_1380.jpg
    91.9 KB · Views: 57
  • IMG_1381.jpg
    IMG_1381.jpg
    87.9 KB · Views: 53
OP
F

FrankLee

Well-known member
Joined
Sep 13, 2010
Messages
3,547
Location
seMI, 48317
Hey folks, I have a question for you. I have one of the Craftsman "Reversible Variable Speed 1/2 HP Motor on mt DP along with the remote switch. It works very well. What I'm wondering though is what size pulley should be used on the motor in conjunction with the spindle pulley, to reflect the speed on the dial? I know this would not going be accurate but figured there was some kind of guide. I was not able to find any specific information. I'll also mention that I have one of the Cam Lock clamps and that works very well too. Slides up and down on the column and with a twist of the lever, clamps down the work. Thanks
I believe you would need to use the same size pulley on the motor and the spindle to achieve the rpm reading on the dial. Assuming your motor pulley matches the spindle pulley, you could simply flip the motor pulley and use any step.

Chuck Speed Calculator:

1. Divide the diameter of the driving (or motor) pulley step by the corresponding step size of the pulley mounted on the drill press spindle:
2 ÷ 5 = 0.4
3 ÷ 4 = 0.75
4 ÷ 3 = 1.33
5 ÷ 2 = 2.5

2. Then, multiply the motor speed by the results of the above calculation to get the approximate spindle speed at each pulley step:
1725 x 0.4 = 690 rpm
1725 x 0.75 = 1293.75 rpm
1725 x 1.33 = 2294.25 rpm
1725 x 2.5 = 4312.5 rpm
 

ttpete

Well-known member
Joined
Mar 8, 2011
Messages
6,737
Location
Dearborn, MI
I believe you would need to use the same size pulley on the motor and the spindle to achieve the rpm reading on the dial. Assuming your motor pulley matches the spindle pulley, you could simply flip the motor pulley and use any step.

An easier way would be to buy an inexpensive electronic tachometer, put a piece of the reflective tape on the chuck, read rpm directly, and make a chart of belt positions versus rpm.
 

JZiggy

Well-known member
Joined
Dec 1, 2014
Messages
990
Location
Atlanta
Ok, I was able to communicate with franklee and he really helped me a lot. We figured out I needed to adjust my feed stop bracket further up the quill so that the preload washer with set screw would not make contact with the spindle pulley assembly! This way I can have the preload washer installed and I can also have the bracket installed correctly! Win on all fronts!

Before picture - note no preload bumper on the top of the quill. (I had removed the preload bumper to test my theory that this is what was hitting the pulley)
IMG_2089.jpg

After- preload washer installed and bracket adjusted correctly
IMG_2092.jpg
IMG_2093.jpg
IMG_2094.jpg

Now I can get back to finishing the ‘46 dated motor and get it installed so I can start drilling with it!


Sent from my iPhone using The Garage Journal mobile app

Just noticed here that you must have one of the earlier Craftsman 100's that has the extra quill support. My press dated 1951 (as per the motor anyway) and it has that feature. I've not run across any others personally that have that extra boss.
 

11b30b4

Well-known member
Joined
Jul 16, 2020
Messages
1,028
Location
GA
JZiggy, my 100 has the extra quill support and with all the rust I had to deal with on that press, accessing that support and sanding and polishing it was a real chore. My 150 does not have the extra support. I like that design change with the 150 but still prefer the outside look of the 100 series.

RHJO51, I am kind of jealous of that variable speed motor and control. nice and clean look to it.
 

Smokeshow69

Well-known member
Joined
Dec 7, 2012
Messages
8,366
Location
Pacific Northwest
Just noticed here that you must have one of the earlier Craftsman 100's that has the extra quill support. My press dated 1951 (as per the motor anyway) and it has that feature. I've not run across any others personally that have that extra boss.


I didn’t know it had it when I bought it but I am glad it does! All the strength of a full size but it is slightly smaller which fits great on my bench area. I have about 1/2 inch of clearance between the motor and the shelf right behind it so a full size wouldn’t really work.


Looking for the following PLVMB/PROTO dual marked combo wrenches- 1208, 1210, 1212, 1224, 1228, 1230, 1240, 1242, 1244, 1246, 1248, 1252
 

Smokeshow69

Well-known member
Joined
Dec 7, 2012
Messages
8,366
Location
Pacific Northwest
I didn’t know it had it when I bought it but I am glad it does! All the strength of a full size but it is slightly smaller which fits great on my bench area. I have about 1/2 inch of clearance between the motor and the shelf right behind it so a full size wouldn’t really work. I am not sure of the exact age of the machine. The 47’ motor it came with was spray bombed really bad so I can tell it the paint matched the patina for date purposes but in talks with Franklee, he said that was probably the original motor. The one I have on it now is also dated’47 and much nicer

Looking for the following PLVMB/PROTO dual marked combo wrenches- 1208, 1210, 1212, 1224, 1228, 1230, 1240, 1242, 1244, 1246, 1248, 1252


Looking for the following PLVMB/PROTO dual marked combo wrenches- 1208, 1210, 1212, 1224, 1228, 1230, 1240, 1242, 1244, 1246, 1248, 1252
 

pikapp

Well-known member
Joined
Jun 24, 2018
Messages
75
Location
South Florida
Located an 103.23120 model 80 that I'm going back and forth on refurbishing or parting out. Thanks to Bob and Naples, FL. It belonged to his uncle Oscar who had it in a barn. After Oscar passed away Bob used the press to drill out the barrels of custom ball point pens he makes by hand out of various materials. I bought a snazzy new pen he made out of a bottlebrush tree. Thanks Bob, worth twice the price.
Frank I saw your chart on the model number by year for the 100's and 150's, did I miss one for the 80's? The head casting was glued to the post. Guess the cast locks had been overtightened and were stuck in their bores. Are those bolts OEM? I pried the locks back with a bar and it wiggled off after lots of twisting. Extra holes in the top of the head are for a home made looking MSA. You can see the post cap was flattened so the MSA bearing could sit flat.
Got a 2x3'chip in the top edge. Anyone repair anything that big and what did you use?Bondo, epoxy putty? ReadyRod for a feed stop rod and the wrong chuck, works OK but wrong.
 

Attachments

  • 7 Head locks.jpg
    7 Head locks.jpg
    124.7 KB · Views: 33
  • 6 Heritage badge.jpg
    6 Heritage badge.jpg
    72.8 KB · Views: 31
  • 4 Head left close.jpg
    4 Head left close.jpg
    99.3 KB · Views: 35
  • 3 Head right close.jpg
    3 Head right close.jpg
    100.7 KB · Views: 33
  • 2 Left.jpg
    2 Left.jpg
    147.8 KB · Views: 31
  • 1 Shipping.jpg
    1 Shipping.jpg
    142.4 KB · Views: 28
  • 13 Base and table bottom.jpg
    13 Base and table bottom.jpg
    162.8 KB · Views: 33
Last edited:
To avoid these ads, REGISTER NOW!
Top Bottom