To avoid these ads, REGISTER NOW!

Craftsman Drill Press

DwightS

Well-known member
Joined
Oct 11, 2013
Messages
122
Location
Garner, NC
Dwight, did you see the 150 selling on Craigslist near Franklin and Ashville. Some guys is selling several tools and looks like he is willing to deal.
I did see it. While much closer than @Hoorn, it’s 300+ miles and 5 hours away. Gas/wear/time makes Hoorn’s offer to ship much better even paying UPS’s ground rates. I’ve got the steel plate that was covering the table when I bought it. I can use it in the meantime until something pops up close by.

I had considered taking the table to a welding/fab shop to see if they could cut something out and weld it in.
 
To avoid these ads, REGISTER NOW!

Myers B

Well-known member
Joined
Feb 13, 2021
Messages
51
Location
Junction City, KS
Could someone with an original bench top press measure the tube length for me? It's a 1957ish 100 model. I'm going to shorten the replacement tube on my press to return it to it's original bench top configuration.
 

DwightS

Well-known member
Joined
Oct 11, 2013
Messages
122
Location
Garner, NC
Could someone with an original bench top press measure the tube length for me? It's a 1957ish 100 model. I'm going to shorten the replacement tube on my press to return it to it's original bench top configuration.
My bench top 150, built in 1965 has a tube length of 34”.
 

rg171352

Well-known member
Joined
Nov 23, 2016
Messages
74
rg17, is it off the column yet? Or are you asking how to get it off and maintain it?
I have found the following to work for the Atlas lifts I was lucky enough to get. Once the headframe is off, lock the bottom lift collar, and unlock the top. If it easily turns, rotate the handle so that the top collar assembly rises up and once the screw clears the bottom collar, lift it off the column. Then remove the table, then the bottom collar.

If it does not turn freely, remove the four bolts on the upper gearbox and expose the gearbox. You may find 50 years of sawdust, grime and dried grease inside that needs cleaning and then get enough fresh grease, or PB blaster on the gears so that it will freely turn. To be able to then crank it up and off the bottom collar, you will then have to reassemble the gearbox so that the handle and newly cleaned handle gear will re-engage the threaded post gear.

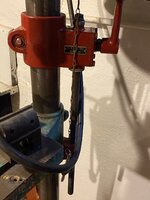
The first attached pic was from a 1940s Atlas made DP I bought with the attached head and table lift. The gears were frozen and opening the gear box showed 70 year old rock hard grease. I used a small pick, and simple green to remove the gunk so that it would turn and could be removed. The second pic shows how I greased up the gears once it was cleaned and going back on.

Frank had a very insightful observation about the thrust bearing you see riding atop the gear box in pics 3 and 4. The lift is actually a "head and table" lift, although most people use it exclusively to move the table up and down and not the head. Because of this, if you plan on primarily lifting only the table up and down, once you have it all apart and begin reassembly, put the thrust bearing on top as it will absorb the weight of the table as you lift it up and down. It's original location inside the gearbox (as shown in pic #1) was to absorb the weight of the entire head frame, motor, spindle assembly, etc. Finally, the 2 lock nuts on top should not be cinched down hard onto the thrust bearing but rather riding on top to allowing ease of turning. They should only be locked onto each other. You see that I have an acorn nut on top instead of the original lock nut. That's because this is easier to turn on and off, and because Frank had one, and because it looks cool.

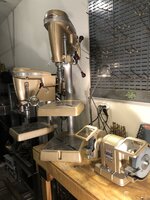
Last picture is the entire Atlas head and table lift, with all the parts visible, the paint is the original color.

Remember to lightly apply super lube or similar along the threads and all points of friction. I used Lucas red and tacky anti-seize grease for the actual gears. Good luck!
Thank you for the advice. Do you use an additional clamp at the lower end of the lift’s travel as the op suggested? Also, what do you use on your post to keep everything moving nicely?
 

Hoorn

Well-known member
Joined
May 19, 2020
Messages
1,140
Location
Glendora, CA
Frank put his safety collar just underneath the farthest point of travel for the bottom lift collar so that in the off chance you crank too far down and beyond the threaded shaft, the bottom lift collar and table does not fall onto the drill press base.
I chose to put mine under the headframe as I'm more concerned about the head possibly becoming loose and falling onto the atlas lift -at this point any atlas lift is worth more than the entire drill press itself.
Boeshield is a great aerosol spray that protects metal and keeps things going smooth. You could also use light paste wax on the column in the area where the bottom lift collar will ride up and down.
 
Last edited:

11b30b4

Well-known member
Joined
Jul 16, 2020
Messages
1,028
Location
GA
Myers B, I don't recall if this has been mentioned before but one end of the column should have a machined lip about 2" inside the column. This is intended to be a rest for a slow speed pulley or very slow pulley system. If you are planning on cutting a column, I would suggest you cut it so that you keep the machined end at the top of your newly sized column.
 

DwightS

Well-known member
Joined
Oct 11, 2013
Messages
122
Location
Garner, NC
There is a sticker on the center of the feed handle hub. Does anyone have a good copy of it? Has anyone made this?
 

Attachments

  • 3BA9D2DB-F087-4EE9-B33E-CF9ABE17D23D.jpeg
    3BA9D2DB-F087-4EE9-B33E-CF9ABE17D23D.jpeg
    380.2 KB · Views: 81

11b30b4

Well-known member
Joined
Jul 16, 2020
Messages
1,028
Location
GA
Wow, i have never seen that sticker on any of the machines I have rebuilt or looked at. Also, I am sure I have over torqued that spring more than 1.5 turns at some point.
 

DwightS

Well-known member
Joined
Oct 11, 2013
Messages
122
Location
Garner, NC
Wow, i have never seen that sticker on any of the machines I have rebuilt or looked at. Also, I am sure I have over torqued that spring more than 1.5 turns at some point.
That may be a later model press “CYA” note. My DP is a 1965 # 113.24501. I think most of your presses are older.
 

Hoorn

Well-known member
Joined
May 19, 2020
Messages
1,140
Location
Glendora, CA
Here is another. Dwight you may be right, I don't recall seeing this on a 100, that's not to say they weren't on there. That's a busy area of the drill press and remarkable that a few made it 55+ years later.

It would have to be for the later DPs without the feed return spring adjustment knob.
 

Attachments

  • Screenshot_20210701-084609~2.png
    Screenshot_20210701-084609~2.png
    2.7 MB · Views: 49
  • Screenshot_20210701-084558~2.png
    Screenshot_20210701-084558~2.png
    2.8 MB · Views: 50
Last edited:

11b30b4

Well-known member
Joined
Jul 16, 2020
Messages
1,028
Location
GA
Hoorn, kind of what i was thinking. The DPs with internal feed return springs and no external adjustment knob. Pulling out the pinion hub a bit then turning it to set the tension. Almost the same method as performed on my Emerson Gen4, plus my Gen4 also warns of improper torque for the return on the hub.
full
 
Last edited:

DwightS

Well-known member
Joined
Oct 11, 2013
Messages
122
Location
Garner, NC
Here’s the first attempt of the decal. It’s a PDF file. The decal diameter is 1.25”. If someone wants to give it a try, feel free. I am probably going to get some printing labels and try. I need to do a little research on the best way to affix the ink from an ink jet printer.
 

Attachments

  • drill press sticker Model (1).pdf
    12.4 KB · Views: 7
  • 2AFB96B2-022D-42D6-8605-155C233A7766.jpeg
    2AFB96B2-022D-42D6-8605-155C233A7766.jpeg
    370.5 KB · Views: 43
  • 130743BA-3FCF-47DB-938D-5369FDE87247.jpeg
    130743BA-3FCF-47DB-938D-5369FDE87247.jpeg
    33.6 KB · Views: 55

PacificaVette

Well-known member
Joined
Nov 30, 2013
Messages
186
Location
Pacifica, CA
Here’s the first attempt of the decal. It’s a PDF file. The decal diameter is 1.25”. If someone wants to give it a try, feel free. I am probably going to get some printing labels and try. I need to do a little research on the best way to affix the ink from an ink jet printer.
Check with MattBlast. He makes awesome labels for Craftsman bench grinders. If you send him a picture, he can probably print you one.
 

Myers B

Well-known member
Joined
Feb 13, 2021
Messages
51
Location
Junction City, KS
Just finished the bench model 100. I’d still like to find an original 57/58 dated motor for it and I need a Chuck key. Otherwise she’s finished.

I didn't mind cutting the column down, it was just a generic pipe, it wasn’t milled in either end for the MSA pulley. I appreciate the help on the measurements.

I would really like to find an original x y axis milling lathe for it, as it is going to be a full time metal worker.
 

Attachments

  • 0CD8CB2A-B02A-41C4-B774-D19AFD735CFA.jpeg
    0CD8CB2A-B02A-41C4-B774-D19AFD735CFA.jpeg
    322.3 KB · Views: 55
  • BD5E7B5A-2C1D-4B26-8D86-54C3FE56262B.jpeg
    BD5E7B5A-2C1D-4B26-8D86-54C3FE56262B.jpeg
    300 KB · Views: 49
  • 190145D3-5D95-46A4-A1AA-3DB9867A8892.jpeg
    190145D3-5D95-46A4-A1AA-3DB9867A8892.jpeg
    331.8 KB · Views: 63
Last edited:

Hoorn

Well-known member
Joined
May 19, 2020
Messages
1,140
Location
Glendora, CA
Myers, that came out fantastic! Love that Long C Powr Panl too, those are tough to find. Quite the vintage Craftsman collection you've got there.
 
To avoid these ads, REGISTER NOW!

Myers B

Well-known member
Joined
Feb 13, 2021
Messages
51
Location
Junction City, KS
Thanks guys! Does anyone have a scan of the pulley speed chart for the MSA? I'd like to find a nice example that I can print and hang on the wall behind the drill press.
 

Kingcliff

New member
Joined
Jul 2, 2021
Messages
2
Can someone tell me how to contact JZiggy about the column pulley he makes for the craftsman 150?

i don’t really have any experience with message boards - so treat me like I’m dumb please
 

Myers B

Well-known member
Joined
Feb 13, 2021
Messages
51
Location
Junction City, KS

Hoorn

Well-known member
Joined
May 19, 2020
Messages
1,140
Location
Glendora, CA
Here ya go!
 

Attachments

  • Screenshot_20210701-092037~3.png
    Screenshot_20210701-092037~3.png
    1.2 MB · Views: 59
  • Screenshot_20210701-092045~3.png
    Screenshot_20210701-092045~3.png
    834.3 KB · Views: 58

Kingcliff

New member
Joined
Jul 2, 2021
Messages
2
This should work for you.


Or just post on his ad

Thanks so much
 

Hoorn

Well-known member
Joined
May 19, 2020
Messages
1,140
Location
Glendora, CA
Does anyone know if there has been a significant drop off in participation/members since the format change? It doesn't seem as if there is as much input on so many threads than the previous, easy to use and figure out format. While some aspects are better, overall, to me, it's nowhere near as user friendly.
 

subroc

Well-known member
Joined
Apr 22, 2017
Messages
781
Location
Dover, NH
I am sure there are stats that the moderators could provide if you asked them.

I have been participating forums for as long as I have had an internet account in one form or another. Forum software changes always drive some away. The reasons vary from lost logins to they just like the old software better and are unwilling to learn the new software to some actually taking the change personally. The reasons are as varied as those who choose to stay or leave. Who can figure what is driving anyone else?

In answer to your question, in the 2 forums I participate in most here (general tools and vintage tools), there does apear to be a bit less activity.
 

Outlawmws

Well-known member
Joined
Aug 9, 2011
Messages
39,107
Location
The Badlands
Some of that is due to the hit or miss notifications for new posts in threads. But some is definitely people walking away.
 

gatewaysysop

Well-known member
Joined
Nov 11, 2008
Messages
3,287
Location
Arizona
Some of that is due to the hit or miss notifications for new posts in threads. But some is definitely people walking away.

I thought it was just me having this problem. I reached out to Ryan about it, maybe others could do likewise? I haven't heard that he found any issue, but it is annoying to find out I've missed a few pages of content every now and then.
 

rg171352

Well-known member
Joined
Nov 23, 2016
Messages
74
Frank put his safety collar just underneath the farthest point of travel for the bottom lift collar so that in the off chance you crank too far down and beyond the threaded shaft, the bottom lift collar and table does not fall onto the drill press base.
I chose to put mine under the headframe as I'm more concerned about the head possibly becoming loose and falling onto the atlas lift -at this point any atlas lift is worth more than the entire drill press itself.
Boeshield is a great aerosol spray that protects metal and keeps things going smooth. You could also use light paste wax on the column in the area where the bottom lift collar will ride up and down.
A new impediment. My drill post has a dimple in it and is kinked out. The lift will not travel over it. What do people usually do about a damaged post?
 

Attachments

  • 0EA8F465-C4A3-4659-AFAF-C9C8E79720CE.jpeg
    0EA8F465-C4A3-4659-AFAF-C9C8E79720CE.jpeg
    220.9 KB · Views: 38
  • 93AE95DA-0B22-452F-846A-776523E734AB.jpeg
    93AE95DA-0B22-452F-846A-776523E734AB.jpeg
    316.2 KB · Views: 35

subroc

Well-known member
Joined
Apr 22, 2017
Messages
781
Location
Dover, NH
A new impediment. My drill post has a dimple in it and is kinked out. The lift will not travel over it. What do people usually do about a damaged post?
Dress the raised area with a small file. Hand working something like that isn't difficult. Just remove what is raised. Don't over do it. Don't go out of your way trying to blend it. Remove the raised area with a small file, wipe it with a scotch-brite pad, call it good. My rule when hand working is to remove as little material as possible that will accomp!ish the task and no more.

Good luck.
 

Outlawmws

Well-known member
Joined
Aug 9, 2011
Messages
39,107
Location
The Badlands

GirdlerMakes

New member
Joined
May 9, 2021
Messages
2
Location
Texas
This past August, there was some discussion in this thread regarding the Emerson Craftsman 2nd-gen quill & spindle assemblies versus the 3rd/4th-gen quill & spindle assemblies. I never really had a chance to compare these assemblies and explore swapping possibilities until recently when I acquired dp#93 and dp#94.

Below is a photo of the two assemblies side-by-side. The assembly on top is the Emerson 2nd-gen; on the bottom, the 3rd/4th-gen.


There is a chart in this post with dimensions of quills and spindles from six different models of Craftsman drill presses.


So, regarding swapping these assemblies...

I installed the 4th-gen assembly into a 2nd-gen head frame casting. Here's what I found:
  • The quill would not raise completely in the head casting because the gear rack did not extend far enough down to the bottom of the quill. There was a 1/4" to 1/2" gap between the quill snap ring and the casting.
    This could be addressed by using a short spacer on the quill.
  • The spindle fed out of the spindle pulley shaft because of the shorter spindle.
    This could be addressed using a permanent feed stop collar toward the top of the feed stop rod.
  • The overall quill feed would be slightly shorter if making this swap.

I did not swap the 2nd-gen assembly into a 3rd/4th-gen machine, but the only issue I see is the longer spindle. This could be addressed by cutting a small hole in the plastic cover or by shortening the spindle. The overall quill feed would be longer making this swap.
Any idea where this chart is? I had seen in previously but can't find it now. trying to verify if a current Ebay assembly would fit my machine.
 

11b30b4

Well-known member
Joined
Jul 16, 2020
Messages
1,028
Location
GA
GirdlerMakes, I believe that is one of the broken links after the forum update and I have no idea where frank got that chart from. It is possible he made it himself. I do remember looking at the chart and if I recall there was differences between most generations. I think it was the spindles tha were the main issues some longer than others. I know that is not much help but thats all I got. I do have a gen 4 and both a 100 and 150 series. I am happy to measure them for you if those would help?
 
To avoid these ads, REGISTER NOW!
Top Bottom