
You are using an out of date browser. It may not display this or other websites correctly.
You should upgrade or use an alternative browser.
You should upgrade or use an alternative browser.
Above 1200 Sq/FT DFB's Garage
- Thread starter D.F.B
- Start date
Wokspaces above 1200 squarefeet.

customh
Well-known member
I want to say rinseless testing but I feel like you'll throw a curveball on what you're using it for.
I want to say rinseless testing but I feel like you'll throw a curveball on what you're using it for.
They are certainly rinse-less products being tested, just not as you'd typically expect.
moab11
Well-known member
rinse less as glass cleaners?
rinse less as glass cleaners?
Maybe....................
customh
Well-known member
Very curious how Absolute does in this application.
My favorite way to use it is mix up a bucket as a door jamb wash rather than using the soap bucket and trying to completely rinse off without overspraying into the vehicle.
My favorite way to use it is mix up a bucket as a door jamb wash rather than using the soap bucket and trying to completely rinse off without overspraying into the vehicle.
Very curious how Absolute does in this application.
It's rating up there so far.
My favorite way to use it is mix up a bucket as a door jamb wash rather than using the soap bucket and trying to completely rinse off without overspraying into the vehicle.
I wipe down the door jambs after every wash, pretty much always with a rinse-less wash mixed up at the water-less ratio. My go-to is Carpro ECH20 because of how it leaves behind some Si02 to make it easy for the following clean and adds some gloss/slickness.
Noticed this high-quality workmanship while out for my walk this afternoon................................. 

I've always refrained from doing that as I know the distain the general public has for leaf blowers, and I really don't feel like giving people a reason to complain. I've had multiple people over the years accuse me of blowing leaves and grass onto the road or into neighbouring properties. But if that person had bothered to actually observe rather just immediately going into attack mode because they see/hear a leaf blower, they would notice that I'm either not finished yet or that it was the wind and not my leaf blower to blame. Like, of course there is some grass in the gutter, you stopped to harass me before I'd finished what I was doing, sometimes before I've started. I'm normally pretty quiet/reserved person, but I get very worked up when people stop me to complain about my workmanship on SOMEONE ELSES property.
I've always refrained from doing that as I know the distain the general public has for leaf blowers, and I really don't feel like giving people a reason to complain. I've had multiple people over the years accuse me of blowing leaves and grass onto the road or into neighbouring properties. But if that person had bothered to actually observe rather just immediately going into attack mode because they see/hear a leaf blower, they would notice that I'm either not finished yet or that it was the wind and not my leaf blower to blame. Like, of course there is some grass in the gutter, you stopped to harass me before I'd finished what I was doing, sometimes before I've started. I'm normally pretty quiet/reserved person, but I get very worked up when people stop me to complain about my workmanship on SOMEONE ELSES property.
Well, I kinda bought a lawn mower shop here.......................

This all came from the lawn mower shop I have spoken about here many times. This shop was my go-to for many years, be that for the purchase of lawn mowers and spare parts, but also for equipment repair. Once it changed hands, I was burnt twice on two repairs with the new owner, which turned into a messy situation and dispute with Victa head office. I have since bought parts and mowers elsewhere, and then fixed stuff myself.
When the business was being sold, the new owners were instructed by an accountant to not include/accept parts more than a year old within the sale. So, boxes and boxes of old parts were taken with the previous owners and have sat in his shed ever since.
Now, a lot of this stuff is going to be completely useless to me. Some of it is suuuuper old, some of it is for larger ride-on engines, some of it I don't even know what it's for. There is everything from replacement valves, thousands of different gaskets, pistons, piston rings, complete carburettors, carburettor kits, governor springs and links, air filters, even two fuel tanks, one of which would have come in handy on a recent project.


The fun part from here will be going through and sorting out what I want to keep, what is worth selling, what is simply better off going in the bin (old foam filters for example). Some of the vintage Briggs & Stratton packaging is worth having just to look at.
This was the same mower shop that I remember going to with my dad to buy parts for the family's ailing Morrison, which we eventually rebuilt together and subsequently taught me how engines work. Every time I would go into that shop, young or old, I'd be gazing beyond the counter and into the spare parts room thinking, geez, I'd love to have a look in there. Now I have a significant collection of parts that would have sat on those shelves the whole time. Some of them decades old.
This all came from the lawn mower shop I have spoken about here many times. This shop was my go-to for many years, be that for the purchase of lawn mowers and spare parts, but also for equipment repair. Once it changed hands, I was burnt twice on two repairs with the new owner, which turned into a messy situation and dispute with Victa head office. I have since bought parts and mowers elsewhere, and then fixed stuff myself.
When the business was being sold, the new owners were instructed by an accountant to not include/accept parts more than a year old within the sale. So, boxes and boxes of old parts were taken with the previous owners and have sat in his shed ever since.
Now, a lot of this stuff is going to be completely useless to me. Some of it is suuuuper old, some of it is for larger ride-on engines, some of it I don't even know what it's for. There is everything from replacement valves, thousands of different gaskets, pistons, piston rings, complete carburettors, carburettor kits, governor springs and links, air filters, even two fuel tanks, one of which would have come in handy on a recent project.
The fun part from here will be going through and sorting out what I want to keep, what is worth selling, what is simply better off going in the bin (old foam filters for example). Some of the vintage Briggs & Stratton packaging is worth having just to look at.
This was the same mower shop that I remember going to with my dad to buy parts for the family's ailing Morrison, which we eventually rebuilt together and subsequently taught me how engines work. Every time I would go into that shop, young or old, I'd be gazing beyond the counter and into the spare parts room thinking, geez, I'd love to have a look in there. Now I have a significant collection of parts that would have sat on those shelves the whole time. Some of them decades old.
DaaavidW
Member
Irritates me when you drive past a large area and they've just blown all the wet clippings over the road. Seems to be common around car dealers near me.Noticed this high-quality workmanship while out for my walk this afternoon.................................
Rare that I end up with that that much waste from my mowing, but if I do, it's roughly swept up, and the residual stuff is just blown back onto the lawn
https://www.garagejournal.com/forum/threads/continental-tire-clean-up-help.550932/DBF could you please look at my post under "Free Parking" and look for
Continental Tire Clean up help.
Let me know if you have an opinion.
Link
Irritates me when you drive past a large area and they've just blown all the wet clippings over the road. Seems to be common around car dealers near me.
Rare that I end up with that that much waste from my mowing, but if I do, it's roughly swept up, and the residual stuff is just blown back onto the lawn
After I cut the edges, I then go around and blow everything back onto the lawn (leaves, grass, dust ect), the lawn mower then ***** it all up. Quite often, I end up blowing leaves and debris for those neighbouring gutters and driveway back onto the lawn I'm cutting, but of course, no one ever notices that. Sometimes I'll need to go back around with the blower, but overall, this method gives a much better finish for all concerned.
I once had a lady comes up to me to ask if could avoid blowing everything onto the road. This is one of those "didn't wait until I had finished" situations. On this job, are two large Eucalyptus sideroxylon on the nature strip. These trees are constantly shedding bark, leaves and gum nuts over the grass, footpath, gutters and road. Again, I go around blowing all this debris back onto the grass. The problem is, there is so much of it spread across the road, often distributed by the traffic, its neither safe nor practical to blow down the entire road. Even so, I carve out a decent arc covering the neighbours' driveways, gutters ect so that I'm not leaving a mess.
And so, what this stupid woman was complaining about was what she assumed was me blowing all of this onto the road and away from the customers property/driveway when it was actually the opposite.
DBF could you please look at my post under "Free Parking" and look for
Continental Tire Clean up help.
Let me know if you have an opinion.
Dawn will make it worse because it actually leaves behind a film. For deep cleaning tyres, you need an alkaline cleaner, then a solvent.
1. Rinse with water, then apply a tyre cleaner such as Shine Supply Wise Guy, Adam's Rubber & Tire Cleaner (extremely good product), Armour Detail Supply Tire Cleaner, Carpro ReTyre (very strong) or Meguiar's Non-Acid Wheel Cleaner.
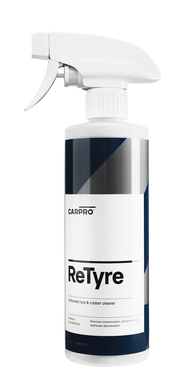
CARPRO ReTyre Tire & Rubber Cleaner 500ml (17oz)
Drivers can refresh the surfaces of their tires and extend their lives with CARPRO ReTyre Tire & Rubber Cleaner 500ml (17oz) from Sky’s The Limit Car Care.
 www.carpro-us.com

Shine Supply Wise Guy Wheel Cleaner — Strong Acid-Free Rim & Wheel Cleaning Spray
Wise Guy is designed to make cleaning tires and wheels quick and easy while delivering awesome results. Pretty smart, huh? Easily strips built-up grime and old dressing from your tire’s surface, leaving it clean and ready to be decked out with dressing. Works excellently for weekly cleaning of...
 www.carsupplieswarehouse.com

Meguiar's Non-Acid Wheel & Tire Cleaner, D143 - 32 oz.
Meguiar's D143 non-Acid Wheel & Tire Cleaner is the professional's choice for fast and effective non-acid based cleaning of OEM factory clear coated & chrome wheels. “The Professional's Choice" Meguiar's Detailer products are the perfect solution for anyone detailing cars at home, on the side or...
 meguiarsdirect.com

Adam's Tire & Rubber Cleaner
Adam's Polishes Tire & Rubber Cleaner is the best product to use while cleaning your brown & dirty tires! Use our Tire & Rubber Cleaner to clean mold release agents & prevent tire blooming. Leaves a FActor black tire finish when dry.
 adamspolishes.com

Armour Detail - Tire Cleaner | The Rag Company
Tire Cleaner is a high-powered solution built for serious grime on rubber and plastic. Its rich foam and strong degreasers cut through blooming, old dressings, and heavy buildup with ease, leaving tires and trim fresh and ready for dressing. Perfect for more than just sidewalls, it also handles...
2. Scrub with the stiff bristle brush.
3. Rinse, inspect, repeat if needed.
4. Ideally, blow dry the wheel and tyre with a leaf blower or compressed air.
5. Using mineral spirits or Stoner Tarminator (this works the best I've found), apply some into a b-grade towel (you will destroy it), then rub the sidewall with medium to firm pressure, reapplying more to the towel as needed. You will notice as the product flashes/evaporates, you see a lovely matte natural rubber finish. Repeat if needed. Never apply direct to the tyre.

STONER Tarminator - 10oz (Aerosol)
Tarminator is the fastest and easiest way to remove difficult road grime. Best of all, it's specially formulated to clean quickly without harming paint, clearcoats, and other finishes. Simply spray it on, and wipe surfaces clean. Quickly removes Tar, Sap, and Asphalt by using Microactive...
www.carsupplieswarehouse.com
6. If you want, apply a dressing, avoiding solvent-based ones as they only make the tyre cling onto dirt and brake dust.
These were brand new tyres with some of the white release agent on the sidewalls. Scrubbed with a tyre cleaner, treated with Stoners, then de-nibbed (for the crazy).


Thanks for the advice. I have read that this white substance is a wax based product Continental uses to protect their tiresDawn will make it worse because it actually leaves behind a film. For deep cleaning tyres, you need an alkaline cleaner, then a solvent.
1. Rinse with water, then apply a tyre cleaner such as Shine Supply Wise Guy, Adam's Rubber & Tire Cleaner (extremely good product), Armour Detail Supply Tire Cleaner, Carpro ReTyre (very strong) or Meguiar's Non-Acid Wheel Cleaner.
CARPRO ReTyre Tire & Rubber Cleaner 500ml (17oz)
Drivers can refresh the surfaces of their tires and extend their lives with CARPRO ReTyre Tire & Rubber Cleaner 500ml (17oz) from Sky’s The Limit Car Care.Shine Supply Wise Guy Wheel Cleaner — Strong Acid-Free Rim & Wheel Cleaning Spray
Wise Guy is designed to make cleaning tires and wheels quick and easy while delivering awesome results. Pretty smart, huh? Easily strips built-up grime and old dressing from your tire’s surface, leaving it clean and ready to be decked out with dressing. Works excellently for weekly cleaning of...Meguiar's Non-Acid Wheel & Tire Cleaner, D143 - 32 oz.
Meguiar's D143 non-Acid Wheel & Tire Cleaner is the professional's choice for fast and effective non-acid based cleaning of OEM factory clear coated & chrome wheels. “The Professional's Choice" Meguiar's Detailer products are the perfect solution for anyone detailing cars at home, on the side or...Adam's Tire & Rubber Cleaner
Adam's Polishes Tire & Rubber Cleaner is the best product to use while cleaning your brown & dirty tires! Use our Tire & Rubber Cleaner to clean mold release agents & prevent tire blooming. Leaves a FActor black tire finish when dry.Armour Detail - Tire Cleaner | The Rag Company
Tire Cleaner is a high-powered solution built for serious grime on rubber and plastic. Its rich foam and strong degreasers cut through blooming, old dressings, and heavy buildup with ease, leaving tires and trim fresh and ready for dressing. Perfect for more than just sidewalls, it also handles...theragcompany.com
2. Scrub with the stiff bristle brush.
3. Rinse, inspect, repeat if needed.
4. Ideally, blow dry the wheel and tyre with a leaf blower or compressed air.
5. Using mineral spirits or Stoner Tarminator (this works the best I've found), apply some into a b-grade towel (you will destroy it), then rub the sidewall with medium to firm pressure, reapplying more to the towel as needed. You will notice as the product flashes/evaporates, you see a lovely matte natural rubber finish. Repeat if needed. Never apply direct to the tyre.
STONER Tarminator - 10oz (Aerosol)
Tarminator is the fastest and easiest way to remove difficult road grime. Best of all, it's specially formulated to clean quickly without harming paint, clearcoats, and other finishes. Simply spray it on, and wipe surfaces clean. Quickly removes Tar, Sap, and Asphalt by using Microactive...
6. If you want, apply a dressing, avoiding solvent-based ones as they only make the tyre cling onto dirt and brake dust.
These were brand new tyres with some of the white release agent on the sidewalls. Scrubbed with a tyre cleaner, treated with Stoners, then de-nibbed (for the crazy).
Jim
Jumped into the parts abyss this morning and WOW, what an interesting exercise!
My goal for today was to look through each box and sort everything into defined collections. For the most part, the seller had already grouped many similar parts together, however not a methodically as I'd like. I also wanted to properly see what I had, which would then allow me to determine what I want to keep, what I'd like to sell, and what would ultimately go into the bin.

The majority of boxed parts were put into large cardboard boxes, which were labeled with a category and a list of contents. In some cases, I also wrote down part numbers. This will help when I work through each box for keep/sell process. Category groups include internal engine parts, fuel system & carb parts, electrical and dipsticks, air filters, governor springs/linkages, crankcase and engine gasket kits, starters and recoil parts, fuel tanks and wheels.


For the smaller stuff, I went and got a collection of containers from Bunnings. These include valve cover gaskets, intake/exhaust/breather gaskets, head gaskets, assorted unknow gaskets, oil seals, bearings, screws and fasteners, assorted hardware.


As mentioned yesterday, there is a lot of random parts here that will never get used by me, many are not even labeled. There are hundreds of head gaskets, most being for flat head engines and will be useful to someone. I do wonder about the paper sump gaskets, some are 40+ years old, so I'm wondering if they would even be usable? The same applies to the crankshaft oil seals, apart from most not being labeled, I do question if the rubber would be serviceable, chime in please if you can help on that front.
Some stuff went into the bin, mostly deteriorated items, but also random parts that would have no use to me or be worth selling.
The funny thing is, I can easily identify many of these parts and where they go on the engine before even reading the part description, which helped massively with my sorting process. I also spotted a variety of parts that I've had to buy in the past, such as gaskets, carb kits, oil seals, fuel tanks, even a complete carburettor. These were diverted into my usual parts store.
From here, I have the notion of creating a spreadsheet to help find out what will fit my engines (and future engines), then help assign part numbers to the stuff I want to sell.
My goal for today was to look through each box and sort everything into defined collections. For the most part, the seller had already grouped many similar parts together, however not a methodically as I'd like. I also wanted to properly see what I had, which would then allow me to determine what I want to keep, what I'd like to sell, and what would ultimately go into the bin.
The majority of boxed parts were put into large cardboard boxes, which were labeled with a category and a list of contents. In some cases, I also wrote down part numbers. This will help when I work through each box for keep/sell process. Category groups include internal engine parts, fuel system & carb parts, electrical and dipsticks, air filters, governor springs/linkages, crankcase and engine gasket kits, starters and recoil parts, fuel tanks and wheels.
For the smaller stuff, I went and got a collection of containers from Bunnings. These include valve cover gaskets, intake/exhaust/breather gaskets, head gaskets, assorted unknow gaskets, oil seals, bearings, screws and fasteners, assorted hardware.
As mentioned yesterday, there is a lot of random parts here that will never get used by me, many are not even labeled. There are hundreds of head gaskets, most being for flat head engines and will be useful to someone. I do wonder about the paper sump gaskets, some are 40+ years old, so I'm wondering if they would even be usable? The same applies to the crankshaft oil seals, apart from most not being labeled, I do question if the rubber would be serviceable, chime in please if you can help on that front.
Some stuff went into the bin, mostly deteriorated items, but also random parts that would have no use to me or be worth selling.
The funny thing is, I can easily identify many of these parts and where they go on the engine before even reading the part description, which helped massively with my sorting process. I also spotted a variety of parts that I've had to buy in the past, such as gaskets, carb kits, oil seals, fuel tanks, even a complete carburettor. These were diverted into my usual parts store.
From here, I have the notion of creating a spreadsheet to help find out what will fit my engines (and future engines), then help assign part numbers to the stuff I want to sell.
Paper gaskets will dry rot/deteriorate in the package. How long does it take? Depends - but in my experience, thin paper gaskets with no rubberized binder tend to get very brittle after ~10-15 years and will shatter rather than bend. Oil seals generally fare better, but they lose their elasticity over time. You can stretch the oil lips by hand and it shouldn't crack and feel pliable.
New carburetor sitting on a shelf for over a decade will probably need a rebuild kit before installing.
New carburetor sitting on a shelf for over a decade will probably need a rebuild kit before installing.
Vale Dame Patricia Routledge.
In Patricia’s own words: “She was grotesque.”
"I had opened the script for a moment at one o'clock in the morning," she said, "I read straight through and Hyacinth leapt off the page. I knew that woman, I knew several of that woman."
"I brought it to an end," she said, "which, of course, the BBC didn’t care for very much."
She thought that Roy Clarke was beginning to recycle ideas and recalled a piece of advice from the comedian, Ronnie Barker.
"He always left with people saying, ‘Oh, aren’t you doing any more?’ she said, rather than people saying, ‘Is that still on?’"
https://www.bbc.com/news/articles/c511ym2r2xpo
A few notable treasures I came across yesterday –
- An oil pan, which is from a 1220-series OHV horizontal shaft engine.

- A flywheel for a vertical 3.5 – 5hp engine.

- Quantum fuel tanks, the red one would have been for an IC engine.

- Lower crank seals for a Victa, being 20mm means they are for a later full-crank 125 and 160cc engines. I can’t find that particular part number online, so I think the wrong number has been put on it.

- Five vintage fuel caps, which would have been fitted to a variety of engines from the 60’s to 80’s, think the 3.5hp engines with the metal fuel tank. Being a spare part, these are bare silver in colour. (Briggs & Stratton paint engines after assembly. That’s why spare parts come in undercoat, unpainted or natural plastic).

- Rocker cover and valve-plate gaskets for the Intek engine I picked up a few weeks ago. I ended up buying these parts, so these come three weeks too late. These two were identified by look alone, then verified by the parts numbers.

- A complete carburettor to fit said Intek above. I’m told these are hard to come by now as they were unique to the Intek, so Quantum equivalents don’t fit. What are the odds.

- I immediately knew what these are for, only because of watching the legendary Taryl Dactal. This little kit consists of a small roll pin and a Teflon washer, which was used to combat warping on the metal fuel tank used on 3.5hp vertical shaft engines. The pin and washer prevent fuel leaking into a specific chamber on the tank that would cause a running issue. Briggs implemented these parts as a repair kit. These would be rarely used today, only for those restoring engines.

- A bag full of replacement points and condensers to suit 2 – 8 hp engines. Again, these would only be of interest to those restoring older engines.

- Two Magnetron kits. These were used to convert an older points and condenser ignition coil to electronic ignition, effectively eliminating the need for points maintenance. Briggs started using Magnetron electronic ignition at some stage in the early to mid- 1980’s, which was a fully integrated system. However, they implemented this retrofit kit for dealers to adapt older coils to the more reliable electronic ignition. Instead of replacing the coil, the module clips over the existing one and new kill wire routed. The points and condenser are disconnected and left in place. No more messing with points.
Again, another Taryl discovery for me.


Now begins the process of collating part numbers.
- An oil pan, which is from a 1220-series OHV horizontal shaft engine.
- A flywheel for a vertical 3.5 – 5hp engine.
- Quantum fuel tanks, the red one would have been for an IC engine.
- Lower crank seals for a Victa, being 20mm means they are for a later full-crank 125 and 160cc engines. I can’t find that particular part number online, so I think the wrong number has been put on it.
- Five vintage fuel caps, which would have been fitted to a variety of engines from the 60’s to 80’s, think the 3.5hp engines with the metal fuel tank. Being a spare part, these are bare silver in colour. (Briggs & Stratton paint engines after assembly. That’s why spare parts come in undercoat, unpainted or natural plastic).
- Rocker cover and valve-plate gaskets for the Intek engine I picked up a few weeks ago. I ended up buying these parts, so these come three weeks too late. These two were identified by look alone, then verified by the parts numbers.
- A complete carburettor to fit said Intek above. I’m told these are hard to come by now as they were unique to the Intek, so Quantum equivalents don’t fit. What are the odds.
- I immediately knew what these are for, only because of watching the legendary Taryl Dactal. This little kit consists of a small roll pin and a Teflon washer, which was used to combat warping on the metal fuel tank used on 3.5hp vertical shaft engines. The pin and washer prevent fuel leaking into a specific chamber on the tank that would cause a running issue. Briggs implemented these parts as a repair kit. These would be rarely used today, only for those restoring engines.
- A bag full of replacement points and condensers to suit 2 – 8 hp engines. Again, these would only be of interest to those restoring older engines.
- Two Magnetron kits. These were used to convert an older points and condenser ignition coil to electronic ignition, effectively eliminating the need for points maintenance. Briggs started using Magnetron electronic ignition at some stage in the early to mid- 1980’s, which was a fully integrated system. However, they implemented this retrofit kit for dealers to adapt older coils to the more reliable electronic ignition. Instead of replacing the coil, the module clips over the existing one and new kill wire routed. The points and condenser are disconnected and left in place. No more messing with points.
Again, another Taryl discovery for me.
Now begins the process of collating part numbers.
Ooops...........................


I had a feeling this would happen. After loading up the parts I took earlier in the week, I told the guy if he found anything else that I'd most likely take that stuff as well. This morning I was sent a bunch of photos and a message asking if I wanted this as well. Is the Pope catholic!? I said I'd take the lot and save him the hassle of listing them and playing the Facebook marketplace game. A win-win for both parties.
The key reason why I WANTED this lot was for the Rover snorkel kits. I think most of them are for Honda GXV engines, which was a popular move for contractors running Honda's to fit these Rover kits for added filtration. I also found a couple of Victa versions.


This is a Rover snorkel kit that would adapt to the Briggs & Stratton 3.5/Sprint/Quattro/Classic engines (see pic). Instead of being an additional filter, these bolted down into the carb throat and replaced the OE filter box and oiled foam element.


For some reason, the mower and engine manufacturers have stopped offering snorkel kits, be that as an optional extra or standard fitment. For residential work, I get it. But for commercial, a snorkel makes a massive difference in keeping the filter clean at the engines intake. It's also a bit cheeky to ask the customer to pay more for this kit on a $2000+ mower. Shorter engine life = you buy something new more often.
The rest will need going through, but I've already found a few gems.
Victa and Rover hub caps.

A collection of mufflers, including this classic cigar type for an early Briggs and a brand-new Quantum dog-leg type.

Chrome Rover hub caps, which will go on my recently acquired Supercut.


Several self-propel drive gear sets.

I literally just bought some of these, now I have 15 of them!

A box full of throttle and drive cables, some of which will fit my Rover ProCut's.

More ****** head gaskets!

Several mower axles, this one is for 18-inch Rover's.

An assortment of Victa parts, including chassis parts, gaskets and carb parts.

These are cork clutch disks for Rover and Scott Bonnar Model 33 and 45 mowers.

And as a little surprise, a Victa ignition coil for a 1988 - 1996 Powertorque engine. A quick search reveals these are worth over $100.

With Rover parts getting harder and harder to find, I'm extremely excited to have landed on this stuff. Again, I'll need to get everything out and sort through it.
I had a feeling this would happen. After loading up the parts I took earlier in the week, I told the guy if he found anything else that I'd most likely take that stuff as well. This morning I was sent a bunch of photos and a message asking if I wanted this as well. Is the Pope catholic!? I said I'd take the lot and save him the hassle of listing them and playing the Facebook marketplace game. A win-win for both parties.
The key reason why I WANTED this lot was for the Rover snorkel kits. I think most of them are for Honda GXV engines, which was a popular move for contractors running Honda's to fit these Rover kits for added filtration. I also found a couple of Victa versions.
This is a Rover snorkel kit that would adapt to the Briggs & Stratton 3.5/Sprint/Quattro/Classic engines (see pic). Instead of being an additional filter, these bolted down into the carb throat and replaced the OE filter box and oiled foam element.
For some reason, the mower and engine manufacturers have stopped offering snorkel kits, be that as an optional extra or standard fitment. For residential work, I get it. But for commercial, a snorkel makes a massive difference in keeping the filter clean at the engines intake. It's also a bit cheeky to ask the customer to pay more for this kit on a $2000+ mower. Shorter engine life = you buy something new more often.
The rest will need going through, but I've already found a few gems.
Victa and Rover hub caps.
A collection of mufflers, including this classic cigar type for an early Briggs and a brand-new Quantum dog-leg type.
Chrome Rover hub caps, which will go on my recently acquired Supercut.
Several self-propel drive gear sets.
I literally just bought some of these, now I have 15 of them!
A box full of throttle and drive cables, some of which will fit my Rover ProCut's.
More ****** head gaskets!
Several mower axles, this one is for 18-inch Rover's.
An assortment of Victa parts, including chassis parts, gaskets and carb parts.
These are cork clutch disks for Rover and Scott Bonnar Model 33 and 45 mowers.
And as a little surprise, a Victa ignition coil for a 1988 - 1996 Powertorque engine. A quick search reveals these are worth over $100.
With Rover parts getting harder and harder to find, I'm extremely excited to have landed on this stuff. Again, I'll need to get everything out and sort through it.
I'm the sort who frets when I don't have everything under control or have a lot in front of me, especially when it comes to my normally well organised garage and the things that go in it. Having just got on top of the first lot of parts but still needing to find a home for it all, the bomb site I created yesterday with the second load made it feel like I'd lost control. So, as you can imagine, I was quite keen to sort out some of the chaotic mess and reclaim my garage.
Because there was soooo much small stuff in this lot, I went out and bought more carboard boxes and parts trays first thing. That meant no double handling, simply a case of picking something up, identifying it, then putting it into the appropriate box or tray. This also needed to be balanced with what I had already sorted through last week, some of which has already been cataloged. That meant having a separate box for those items, basically a temporary measure until they have been logged.
I needed to be somewhat ruthless here, there was just so much random and unlabeled **** that would never be of any use...............it had to go. I ended up filling a large box with stuff to throw out, which included the following -
- While I saved some of the labeled stuff, I threw out thousands of lose/unlabeled paper gaskets and carb diaphragms. With how cheap that stuff is new, and the fact its actually labeled, there was no reason to keep this stuff. Most of it was for small 2-stroke equipment that's long since been thrown in the tip (Talon, Homelite sh.t).
- Random brackets, again not labeled or having a part number.
- Plastic air filter cover for what I think was one of those crappy rebranded Victa trimmers.
- Random electrical wires and connections.
- An old and cracked SupaSwift catcher.
- Plastic tubes from an unknown blower/vac.
- A bunch of corroded, rusty and water damaged height adjuster plates, axles and bearings.
- Two gasket/breather kits for the Victa V40 engine. Victa used that engine on a price-point mower in the mid 2000's, which was basically another generic Chonda. I have no intention of buying a mower with that engine, and I suspect no one is repairing such a thing now. Out they went.
- Old/aged fuel system parts.
- Flexible drive shafts for trimmers. Those can be costly to buy, to the point where a new machine is often the better financial solution, but again, they weren't labeled.
- Two steel mulch plugs that I simply cannot find what they are for. They are labeled but the numbers don't register. No point in keeping them, which is shame because they are very well made.
With the sorting complete, it was then a matter of finding a home for the blue parts bins. All of this is what I've determined worthy of keeping at home, the rest in cardboard boxes will be put into storage.............for now. Those blue bins are two deep on that shelf.


This one of the boxes that will go into storage. This one has a bunch of throttle controllers and cables, most of which are the generic curved plastic items fitted to entry Victa's and Bushranger's. However, I did find two Victa Pro-Control throttle levers, which are quite expensive and much nicer to use than the basic ones. Also, a stack of Victa 2-Stroke cables than run inside the intake tube.

This one has a variety of chassis parts, from axles to springs, handlebars to height adjusters.

This one made my day, a Victa Powertorque muffler.

Briggs & Stratton Super Lo-Tone Quantum muffler.

There was also three large ziplock bags full of Victa specific parts, mostly G4 carburettor parts, blade boss hardware, throttle levers and knobs, ignition parts, spark plug terminals, and the old fashioned spark plug boots. Then these gems, a bunch of vintage fuel caps, of which I was needing for my little 18 Special. Not valuable but nice to see.

There is a bunch of these, I'm told these are governor vacuum tube pick up points for the G4 carb.


Victa fuel filters................

That's on top of two trays full of blades, bolts and bushings. Some much needed Rover axle bushings, and two large assorted hardware bins.
I've still a bit to do, and that's before I start trying to sell some it. But I'm also feeling more in control of the situation.
Because there was soooo much small stuff in this lot, I went out and bought more carboard boxes and parts trays first thing. That meant no double handling, simply a case of picking something up, identifying it, then putting it into the appropriate box or tray. This also needed to be balanced with what I had already sorted through last week, some of which has already been cataloged. That meant having a separate box for those items, basically a temporary measure until they have been logged.
I needed to be somewhat ruthless here, there was just so much random and unlabeled **** that would never be of any use...............it had to go. I ended up filling a large box with stuff to throw out, which included the following -
- While I saved some of the labeled stuff, I threw out thousands of lose/unlabeled paper gaskets and carb diaphragms. With how cheap that stuff is new, and the fact its actually labeled, there was no reason to keep this stuff. Most of it was for small 2-stroke equipment that's long since been thrown in the tip (Talon, Homelite sh.t).
- Random brackets, again not labeled or having a part number.
- Plastic air filter cover for what I think was one of those crappy rebranded Victa trimmers.
- Random electrical wires and connections.
- An old and cracked SupaSwift catcher.
- Plastic tubes from an unknown blower/vac.
- A bunch of corroded, rusty and water damaged height adjuster plates, axles and bearings.
- Two gasket/breather kits for the Victa V40 engine. Victa used that engine on a price-point mower in the mid 2000's, which was basically another generic Chonda. I have no intention of buying a mower with that engine, and I suspect no one is repairing such a thing now. Out they went.
- Old/aged fuel system parts.
- Flexible drive shafts for trimmers. Those can be costly to buy, to the point where a new machine is often the better financial solution, but again, they weren't labeled.
- Two steel mulch plugs that I simply cannot find what they are for. They are labeled but the numbers don't register. No point in keeping them, which is shame because they are very well made.
With the sorting complete, it was then a matter of finding a home for the blue parts bins. All of this is what I've determined worthy of keeping at home, the rest in cardboard boxes will be put into storage.............for now. Those blue bins are two deep on that shelf.
This one of the boxes that will go into storage. This one has a bunch of throttle controllers and cables, most of which are the generic curved plastic items fitted to entry Victa's and Bushranger's. However, I did find two Victa Pro-Control throttle levers, which are quite expensive and much nicer to use than the basic ones. Also, a stack of Victa 2-Stroke cables than run inside the intake tube.
This one has a variety of chassis parts, from axles to springs, handlebars to height adjusters.
This one made my day, a Victa Powertorque muffler.
Briggs & Stratton Super Lo-Tone Quantum muffler.
There was also three large ziplock bags full of Victa specific parts, mostly G4 carburettor parts, blade boss hardware, throttle levers and knobs, ignition parts, spark plug terminals, and the old fashioned spark plug boots. Then these gems, a bunch of vintage fuel caps, of which I was needing for my little 18 Special. Not valuable but nice to see.
There is a bunch of these, I'm told these are governor vacuum tube pick up points for the G4 carb.
Victa fuel filters................
That's on top of two trays full of blades, bolts and bushings. Some much needed Rover axle bushings, and two large assorted hardware bins.
I've still a bit to do, and that's before I start trying to sell some it. But I'm also feeling more in control of the situation.
The fitment of snorkels on push-mowers is not really done in other countries. You never see mowers from the US or UK with them, so the OEM’s don’t really offer them. In our dusty climate though, there is most certainly a need for them. This led companies like Victa, Rover, Honda and Masport to design (or have designed) snorkel kits to suit engines supplied by Briggs, Kohler and Honda. I say this because Honda themselves never made engines with snorkels in mind, it was done after the fact. Briggs & Stratton and Victa did though.
In particular to Honda, dealers offered snorkel kits as an upsell, even on their commercial mowers. As I said the other day, I find this quite a cheeky move considering the price of their top spec models. Again, this stems from Honda the OEM not offering these parts on a global scale, so it was up to dealers to fit these after manufacture. Further to this, there seems to be two different ways to go about this.
The “official” Honda version has a replacement airbox with integrated snorkel outlet, which is a much better finished way of doing it. Victa and Briggs did the same thing. I’m fairly sure these are no longer offered or available to purchase (same applies to Briggs and Victa).

Briggs did offer an amended filter cover for snorkels on the old Quantum and Intek engines, but they no longer do so for any of their push mower engines, even the commercial ones. From memory, the very last one was the rebranded DOV Vanguard, as used on the Victa Commercial range for a while there.

This second is what is labelled a “Buzz Box”, in this case to suit a Honda GXV160 engine. It would appear that this is an aftermarket solution and not a Honda-branded kit. I have something similar fitted on Rover with a Kohler, but was a factory fit solution.
These kits require a hole to be drilled into the existing airbox and an elbow adaptor installed. The kit includes a block off plate to plug the airbox inlet and force the engine to draw from the snorkel. In this kit, they have used a Victa Hi-Zone filter housing and Victa 2-Stroke filter element, my Rover uses the Rover housing and long filter. For the Honda, there is supposed to be a replacement carburettor jet, but its missing from the kit (the bag was opened, so the jet was probably pinched for something else).


What I find strange is that our climate didn’t suddenly become less dusty, so surely commercial customers would still want a snorkel. As mentioned the other day, I’d say the emission thing is what stopped Honda AU from being associated with these retrofit kits, even with a different fuel jet. Put it this way, Honda doesn't make special engines just for us.
In particular to Honda, dealers offered snorkel kits as an upsell, even on their commercial mowers. As I said the other day, I find this quite a cheeky move considering the price of their top spec models. Again, this stems from Honda the OEM not offering these parts on a global scale, so it was up to dealers to fit these after manufacture. Further to this, there seems to be two different ways to go about this.
The “official” Honda version has a replacement airbox with integrated snorkel outlet, which is a much better finished way of doing it. Victa and Briggs did the same thing. I’m fairly sure these are no longer offered or available to purchase (same applies to Briggs and Victa).
Briggs did offer an amended filter cover for snorkels on the old Quantum and Intek engines, but they no longer do so for any of their push mower engines, even the commercial ones. From memory, the very last one was the rebranded DOV Vanguard, as used on the Victa Commercial range for a while there.
This second is what is labelled a “Buzz Box”, in this case to suit a Honda GXV160 engine. It would appear that this is an aftermarket solution and not a Honda-branded kit. I have something similar fitted on Rover with a Kohler, but was a factory fit solution.
These kits require a hole to be drilled into the existing airbox and an elbow adaptor installed. The kit includes a block off plate to plug the airbox inlet and force the engine to draw from the snorkel. In this kit, they have used a Victa Hi-Zone filter housing and Victa 2-Stroke filter element, my Rover uses the Rover housing and long filter. For the Honda, there is supposed to be a replacement carburettor jet, but its missing from the kit (the bag was opened, so the jet was probably pinched for something else).
What I find strange is that our climate didn’t suddenly become less dusty, so surely commercial customers would still want a snorkel. As mentioned the other day, I’d say the emission thing is what stopped Honda AU from being associated with these retrofit kits, even with a different fuel jet. Put it this way, Honda doesn't make special engines just for us.
Finally got back into some detailing today. I've been focused elsewhere recently, and had a very busy mowing run this week, so it was nice to roll out the buckets and pressure washer hose today.
With the erratic spring weather of late, I've had to delay attending to the Wildtrak several times, so it was very much in need of a decent wash. Today was a Koch Chemie day. Starting with Active Foam for the pre-wash, which easily dealt with the baked-on road film and bugs prior to the contact wash. Active Foam has been my go-to for this task for a while now, I love how it performs and love the fragrance. I followed with Carpro Reset for the contact wash.
Inspired by a recent TRC video, I decided to have a little fun with Koch Chemie Ceramic Effect Shampoo (CES).

 www.waxit.com.au
 theragcompany.com
Using CES is not how I typically contact wash. Firstly, you need to rely on the bucket solution to administer the soap as it doesn't foam. Secondly, CES probably doesn't have the greatest cleaning power, hence washing with Reset first. It doesn't really suds up either. Having said that, it's extremely slick, amazingly free rinsing and the "berry-almond" scent is delightful.
On this car, after rinsing off the Reset, I then went back over the now clean paint with CES.
1. Mix 50-ml of CES into 10-litres of water and add a fresh wash mitt or pad.
2. Working in manageable sections, glide the mitt across the surface, then rinse.
3. Continue working around the car, making sure to rinse adjoining panels. I wouldn't let this dry on the paint either, hence working in sections.
4. Finish off with a final rinse to remove any remaining residue.
That might sound like a lot of added work, and I guess it is if you need to wash the car with a stronger soap first. And it's also not how I prefer to bucket wash. But the pain is worth the gain, your reward being a hydrophobic and highly slick feel to the paint. Followed with a little Quick & Shine as a drying aid, these two produce a very satisfying look and feel.

CES is said to last up to about 3-months, so it's great if you want to add some protection without much effort, or as a coating topper as I did here.
Continuing the Koch Chemie theme, lately I've been sampling a bunch of rinse-less wash products as glass cleaners, RRW included. In fact, Rapid Rinse-less Wash was a clear standout among the 10 I tested. Mixed at 128:1, this stuff seems to perform better than a typical IPA-based glass cleaner. A full comparison test will follow, but RRW could very well be my new glass cleaner benchmark.......................and one that only costs $0.70c per 500ml.

Finally, I decided to replace the windscreen wiper blades. Despite these Motorcraft items being the "genuine" Ford part, I don't like how bulky they are and the less precise fit than what the car came with from the factory. Because these are a multi-fit part with different adaptors, they will never have that clean/flush look and fit of a dedicated item, which is annoying as you would think that's the key reason to buy OEM. Not happy, but at least they were cheap.

 www.jeffersonfordparts.com.au

With the erratic spring weather of late, I've had to delay attending to the Wildtrak several times, so it was very much in need of a decent wash. Today was a Koch Chemie day. Starting with Active Foam for the pre-wash, which easily dealt with the baked-on road film and bugs prior to the contact wash. Active Foam has been my go-to for this task for a while now, I love how it performs and love the fragrance. I followed with Carpro Reset for the contact wash.
Inspired by a recent TRC video, I decided to have a little fun with Koch Chemie Ceramic Effect Shampoo (CES).
Koch Chemie Ceramic Effect Shampoo | SiO₂ Car Wash Shampoo & Wax
A pH neutral car wash shampoo with SiO₂ protection. Koch Chemie CES adds gloss, UV resistance, and water-beading while cleaning paint, glass, and plastic. Shop now!
Koch-Chemie - Ceramic Effect Shampoo (Ces) | The Rag Company
Ceramic Effect Shampoo is the care shampoo with sealing effect for hand washing. It cleans and seals surfaces for a long time in just one step. The preservation technology consists of a new combination of cleaning and care formulation and therefore creates a smooth, haptically soft and highly...
Using CES is not how I typically contact wash. Firstly, you need to rely on the bucket solution to administer the soap as it doesn't foam. Secondly, CES probably doesn't have the greatest cleaning power, hence washing with Reset first. It doesn't really suds up either. Having said that, it's extremely slick, amazingly free rinsing and the "berry-almond" scent is delightful.
On this car, after rinsing off the Reset, I then went back over the now clean paint with CES.
1. Mix 50-ml of CES into 10-litres of water and add a fresh wash mitt or pad.
2. Working in manageable sections, glide the mitt across the surface, then rinse.
3. Continue working around the car, making sure to rinse adjoining panels. I wouldn't let this dry on the paint either, hence working in sections.
4. Finish off with a final rinse to remove any remaining residue.
That might sound like a lot of added work, and I guess it is if you need to wash the car with a stronger soap first. And it's also not how I prefer to bucket wash. But the pain is worth the gain, your reward being a hydrophobic and highly slick feel to the paint. Followed with a little Quick & Shine as a drying aid, these two produce a very satisfying look and feel.
CES is said to last up to about 3-months, so it's great if you want to add some protection without much effort, or as a coating topper as I did here.
Continuing the Koch Chemie theme, lately I've been sampling a bunch of rinse-less wash products as glass cleaners, RRW included. In fact, Rapid Rinse-less Wash was a clear standout among the 10 I tested. Mixed at 128:1, this stuff seems to perform better than a typical IPA-based glass cleaner. A full comparison test will follow, but RRW could very well be my new glass cleaner benchmark.......................and one that only costs $0.70c per 500ml.
Finally, I decided to replace the windscreen wiper blades. Despite these Motorcraft items being the "genuine" Ford part, I don't like how bulky they are and the less precise fit than what the car came with from the factory. Because these are a multi-fit part with different adaptors, they will never have that clean/flush look and fit of a dedicated item, which is annoying as you would think that's the key reason to buy OEM. Not happy, but at least they were cheap.
Genuine Ford Windscreen Wiper Blade Left + RH Everest Ranger
Buy Genuine Ford Windscreen Wiper Blade Left + RH Everest Ranger online. Authentic parts ensure optimal performance. In stock & Australia-wide shipping.
Glass Cleaning With Rinse-less Wash
One of the key attributes of a rinse-less wash concentrate is their versatility. I was late to the rinse-less wash party, mainly because I just didn’t understand and therefore trust this type of washing. Over time I have become more comfortable with this alternative wash method, to the point where it’s now a valuable skill set to have. However, I probably use these products more for their alternative uses than I do for actual rinse-less washing. And that’s why I have been championing these products, they cover so many bases and do so for very little outlay.
In addition to rinse-less and water-less washing (they are different processes, I promise), you can use these products for the following roles –
- Clay Lubricant (Handy because you tend use a lot of this when claying, so you can mix up as much as you need for minimal outlay)
- Interior Cleaning
- Quick Detailer
- Drying Aid
- Water Softener
- Pad Lubricant
- Windscreen Washer Additive
- Waterless Wash for cleaning door jambs, engine bays, bird dropping removal
- Glass Cleaning
And its that last point I want to expand on, glass cleaning.
I HATE cleaning glass, there, I said it! For that reason, I want a chemical and towel combo that just works, no tick-tac-toe special treatments, no special towels, no overpriced junk that makes the situation worse, no 14-step processes. Just spray, wipe, buff, done. I also have a big problem with products that require kid gloves to make work, cough, Carpro ClarifyPhobic, cough, Bilt Hamber Traceless.
So how would a basic, cheap and very safe product like a rinse-less wash perform as a glass cleaner? After all, most of them on the market suggest glass cleaning as a potential use. That’s what I aim to find out.

The Test -
The following test was spread across a few weeks, multiple cars and multiple ambient temperatures. Some rinse-less products provide suggested dilution ratios for glass, others don’t so I had to pick an appropriate number. I also did not buy any specific product for this test, rather I used what was already on hand. Some of these products are surfactant based, some polymer based, some with Si02. Each was mixed using distilled water for consistency, and each used with my preferred TRC Dry Me A River glass towels. The control product was my go-to, never-fail…………..Stoner’s Invisible Glass in liquid form (there is an aerosol version as well. At the end, I calculated a per 500ml cost, which includes the product mixed with demineralized water purchased at $5.49 per 5-litre bottle.
Here are my findings –
Armour Detail Supply Hero – This is the product that spurred the comparison, mainly because I was hearing so much positive comment about using Hero as a glass cleaner. This product is a hybrid non-residue surfactant/polymer/Si02 based rinse-less wash, and the key attribute that matters here being the "non-streak formula".
In use, Hero doesn’t quite flash as quickly as a IPA-based glass cleaner, but it's not far behind. I was actually surprised at how it flashed away with ease, and you also get a lovely slick finished result. Some feedback that I have come across suggests 128:1 to 256:1 is the sweet spot for glass, I'm told the 64:1 waterless rate can be a little streaky.
NOTE – Unlike some, Hero is safe for use on interior glass and tint. Bradley from ADS provided me the following quote -
“……yes totally (fine) as there is no SiO2 left behind with Hero. The SiO2 in Hero is bonded to the surfactants and it's made to boost cleaning and slickness. The only thing left behind by Hero is a slight polymer film that evaporates in a few days…............…”
In regard to other rinse-less products with a level of “protection” in them, this is what he has to say about them being used on interior glass -
“………I think as long as you aren't using them every day, you'll be fine with any (rinse-less product), especially at the 128:1 to 256:1 dilutions, there's very little activity in that level of solution……..”
Type – Hybrid Polymer/Surfactant
Protection – Non-durable Si02
Suggested Dilution Ratio – Not stated, but 128:1 seems to be the consensus
Tested Dilution Ratio – 128:1
Flash Factor – 4/5
DFB Score – 4/5

Bowden’s Dry Spell – This is a surfactant-based rinse-less wash, basically the only one you can guy in a bricks and mortar store in Australia.
As a rinse-less wash, its ok but nothing special. The same plays out on glass. Actually, Dry Spell was the only major disappointment of the bunch. The first wipes basically push the liquid around, it then requires considerably more wiping to deliver a dry/clear surface. It’s also one of the more expensive per 500ml. Not a product I can recommend in any application.
Type – Surfactant-based
Protection – Nil
Suggested Dilution Ratio – Not Stated
Tested Dilution Ratio – 150:1
Flash Factor – Minimal
DFB Score – 1/5

Carpro ECH20 – This has been a favourite of mine for quite a while now, primarily mixed at the water-less rate for cleaning/drying door jambs and engine bays. It’s primary benefit is the slick, glossy finish it leaves behind. ECH20 is another hybrid, utilizing an Si02 and carnauba wax additives to increase slickness and gloss. But how does that translate to glass cleaning?
In my case, knowing this product can be a little streaky at the usual 15:1 to 25:1 dilutions, I pushed out to a 100:1 ratio. For context, the rinse-less ratio is suggested at 200:1. I have to say, ECH20 has been highly impressive as a glass cleaner. A few sprays to prime the towel, then a light mist onto the glass, the initial wipes spread easily and begin to flash, the final wipes with the dry side of the towel finish it off to a lovely slick feel. And streak free too, which is the whole point after all.
NOTE – I’m not entirely sure you should use this product on interior glass surfaces, especially those that are tinted. See the notes provided with Hero above.
Type – Hybrid Si02
Protection – Mild, Si02 and carnauba wax
Suggested Dilution Ratio – Not stated
Tested Dilution Ratio – 100:1
Flash Factor – Excellent
DFB Score – 5/5

DIY Detail Rinse-less Wash – Despite my dislike of the brands antics, I’ve always liked this product. Out of the others here, DIY aligns with other surfactant-based products such as N-914 and Dry Spell. According to DIY, you can also foam this product, which is permitted by its surfactant base. But who is going to foam a rinse-less wash, you may as well just use soap. If you do want to try it like this, compared to the usual 30ml to 7.5-litres of water in a bucket, you need 120ml-150ml for foaming, which is ridiculous from a cost point of view.
So, how does DIY stack up as a glass cleaner? Being one of the last to try, I was expecting DIY to perform like the other surfactant-based products on test (N-914 and Dry Spell). And yet, it was the complete opposite. For this test, I opted for 128:1 dilution ratio. Where the other two need more wiping to achieve streak free results, DIY seems to flash off very nicely. The only mark against DIY is the lack of slickness when compared directly to the likes of ECH20 or Eco Wash, but then those tend to overachieve on that metric.
Overall, DIY used for glass cleaning exceeded my expectations. A very impressive and surprising result.
NOTE – For this test I used v1 and not the updated v2 formula.
Type – Surfactant
Protection – Nil
Suggested Dilution Ratio – Not stated
Tested Dilution Ratio – 128:1
Flash Factor – 5/5
DFB Score – 5/5

Gyeon Eco Wash – A relative late comer to the rinse-less wash arena, Eco Wash has gone largely unnoticed. For rinse-less washing, I prefer this product over many for its fine mix of lubrication and slickness it leaves behind. The classic Gyeon scent wins me over as well. Where most on the market focus on cleaning, I’ve found Eco Wash to be very similar to Carpro ECH20 in that it probably leans more towards waterless washing and quick-detailer roles.
On glass, Eco Wash is impressive! Like ECH20, I was expecting this to be a little streaky. However, at 100:1 I found it to be surprisingly forgiving. I also love that slick feeling towards the end of the secondary wipes. A very underrated product.
Type – Undetermined
Protection – Yes, Si02
Suggested Dilution Ratio – Not stated
Tested Dilution Ratio – 100:1
Flash Factor – Good
DFB Score – 4.5/5

Koch Chemie Rapid Rinse-less Wash RRW – KCx were late to the rinse-less party, which considering how flooded the market is for these products, I suspect many overlook RRW. Compared to most rinse-less wash concentrates, RRW is acid leaning with a pH of 4.0, however it does move to pH neutral when diluted. I also really like how this product smells, not that it influences the performance, but it's certainly a pleasant difference to others on the market.
So, how does RRW perform on glass. One word, impressive! I had no expectations for this product, but almost instantly I knew this was going to be vying for top spot here. What makes it a winner is how nicely it flashes away, the majority being on those initial wipes before flipping the towel for the final buff. So impressed, RRW ended up being the control product, allowing me to gauge the performance of the other rinse-less products on test.
RRW is known to be one of the stronger rinse-less wash products in terms of outright cleaning ability. That would cause me to caution its use for interior work. However, I’ve been told following –
“A pH of 4 isn't bad, it’s probably closer to neutral once it's diluted down. Interior surfaces like to stay around 4-5 pH………”
Either way, RRW became the biggest surprise of this test.
Type – Hybrid Si02
Protection – Yes, Si02
Suggested Dilution Ratio – Not stated
Tested Dilution Ratio – 128:1
Flash Factor – Excellent, the best on test
DFB Score – 5/5

McKee’s N-914 – For quite a while there, N-914 was the go-to rinse-less product. However, with the massive growth in the rinse-less sector in recent years, I suspect McKee’s have lost ground as the fresher products have hit the market. That doesn’t mean it's not worth buying, just that we now have a flooded market.
For whatever reason, I was expecting more from N-914. Can you use it for glass cleaning, for sure. Is it the best option for glass cleaning, not really. The main problem is the slower flash rate and need for additional wipes. This would be a “in a pinch” type situation with N-914, whereas ECH20 and RRW could easily replace a dedicated glass cleaner.
NOTE – For this test I used v1 and not the updated v2 formula, I doubt it would have made much difference.
Type – Surfactant-based
Protection – Nil
Suggested Dilution Ratio – 128:1
Tested Dilution Ratio – 128:1
Flash Factor – Slow
DFB Score – 2/5

P&S Absolute – This is the product that won me over to rinse-less washing, mainly because of the super slick feeling under the towel, which gave me the confidence to trust the process. I will say, you have to work with a few certain quirks, such as the gloopy nature of the concentrate, and its preference for warm rather than cold water. However, the benefits outweigh the negatives. Team it with a little Bead Maker during the drying step and you will have the slickest and glossiest car on the road!
On glass, Absolute proved to be an excellent option. The “flash factor” is there, and as on paint, the finished result is a lovely slick feel. In my case, I used the 256:1 dilution ratio, I’d probably bump it to 128:1 for a little extra flash and slickness. Along with ONR, Absolute would be one of the safer options for interior glass.
Not the standout here, but the cheapest on test and a worthy option on glass.
Type – Polymer
Protection – Nil
Suggested Dilution Ratio – Not stated
Tested Dilution Ratio – 256:1
Flash Factor – Good
DFB Score – 4/5

Optimum No Rinse – The OG rinse-less wash that has gone through several revisions since it was launched in 2006, each subtly improving the formula. While revision 6 is current, I’m still working through v4 and v5.
Of all of the products here, I was expecting ONR to be the strong performer on glass. And yet, I found it mid-pack average. That’s not to say ONR is a subpar product, rather it just didn’t really meet my expectations here. While I used it at the suggested 256:1, I found that less is more on glass, a very light mist on the surface and a slightly primed towel. Like Absolute, ONR for interior glass cleaning would be a safe bet. A workable product overall, just not excellent for glass.
Type – Polymer
Protection – Nil
Suggested Dilution Ratio – 256:1
Tested Dilution Ratio – 256:1
Flash Factor – Minimal
DFB Score – 2/5

Opti-Coat No Rinse – This is the Opti-Coat version of classic ONR, which differs in that it’s been tailored for use on Opti-Coat coatings. There are also wax infused versions of ONR, and the recently introduced Foaming No Rinse. This Si02 "yellow ONR" is the best of the range.
On glass, this version of ONR performed about the same of the normal type. Again, less is more, but even then, I felt it needed more towel strokes to get to that steak free finish. Not terrible, but not great either.
NOTE - What annoys me about Opti-Coat maintenance line is the lack of information included with the product descriptions. For the considerable price premium, it’s a little rude to make the customer trawl the internet trying to figure out dilution ratios and usage instructions. Granted, some of this is on the bottle, but none of it printed online, which must surely cost them sales as customers put it in the too hard basket. A shame because there are some gems in the range.
Type – Polymer
Protection – Yes, Si02
Suggested Dilution Ratio – No stated
Tested Dilution Ratio – 256:1
Flash Factor – Minimal
DFB Score – 3/5

Cost Considerations -
Probably the most notable aspect of this test was the cost equation. I knew these products would be cheaper than a traditional glass cleaner, I just didn’t expect the gap to be as pronounced as it turned out to be. The following numbers are an average across the 10 products tested, which includes demineralized water -
Average Product Used – 3.18 ml
Average Product Cost Per Bottle Of Concentrate – $0.11c per ml
Average Product Cost Per Dilution - $0.17c per ml
Average Water Used – 496 ml
Average Water Cost Per ml - $0.0011c
Average Water Cost Per Dilution – $0.55c per ml
Total Average Cost - $0.67c per 500ml
For context, this is how Invisible Glass shapes up -
Average Cost - $18.95 for 946-ml bottle
Average Cost Per ml – $0.02c
Average Cost Per 500 ml - $10.03
So, Invisible Glass is on average over 15 times more expensive than a rinse-less wash mixture. I’m all for setting fire to cash when it comes to detailing products, but that price difference is remarkable.
Glass Cleaning Notes –
- When it comes to “cleaning” exterior glass, I’m not sure how much “cleaning” is going on. In that I mean the glass will have been cleaned during the wash phase, so realistically, we are simply using a glass cleaner product to ensure a streak free surface.
- For interior glass, yes, glass will need periodic “cleaning” to remove a build up of film, usually from off-gassing plastics, oily fingerprints and nicotine haze. In these instances, you may need to clean twice, once to remove the bulk, then a second time with fresh towels for a streak free finish.
- If you do end up needing to clean glass between washes, I’d wager you will get a better “clean” from using these rinse-less wash products instead of IPA-based products, which are basically just IPA and water with a colour and/or scent added. The rinse-less products break down and encapsulate contamination for safer/easier removal.
- I think you would still follow basic glass cleaning rules when using the above products. That would include working out of the sun with cool-to-touch glass, using dense/low pile towels, and working with the box method. For interior glass, never apply directly, always into the towel.
- With the rinse-less products, I found less is more. After an initial priming of a fresh towel, one light mist onto each section of glass is usually enough product to achieve the desired streak-free result.
- Don't be the **** who thinks cleaning glass with newspaper is some sort of magical solution. Originally, petroleum-based newspaper ink provided a light polishing effect on glass, leaving a bright and glossy finish. However, those inks have not been used since the early 90's, so you are better off just using a towel. You also don't waste money buying newspapers.
- There is one product missing from this test, Labocosmetica Idrosave. I have reason to believe my bottle came from a batch that was defective. The first time I used this product, well it ended in tears. After some feedback, its possible my bottle came from a known bad batch. As such, I don’t dare touch it again. I’m sure you will understand.
The Standouts -
Carpro ECH20 – As mentioned earlier, I had expected this to struggle on glass, but I came away very impressed. At the usual water-less/quick detailer rate, it may well have streaked. But at 100:1, ECH20 was nothing but delightful. As on paint, you are left with a lovely slick surface.
Gyeon Eco Wash – In reality, what I said about ECH20 applies here too. However, I feel like this product is worth highlighting as it appears to be slept on. It's way slicker than most products mentioned here, be that on paint or glass. It’s super easy to work with and smells lovely too. While many products listed here I wouldn’t buy again, Eco Wash has earnt my respect for repeat purchases.
DIY Detail – Considering how the traditional polymer and surfactant-based rinse-less products struggled on test, I wasn’t expecting much from DIY. And yet, it became the biggest surprise here. The question I now have is, does the performance of the newer v2 version match the original tested here?
The Winner -
Koch Chemie RRW – This was my favourite on test. Actually, I think it performed better than the control product, Invisible Glass. I just love how easily it flashes away and the slick surface it creates. A surprise winner.

One of the key attributes of a rinse-less wash concentrate is their versatility. I was late to the rinse-less wash party, mainly because I just didn’t understand and therefore trust this type of washing. Over time I have become more comfortable with this alternative wash method, to the point where it’s now a valuable skill set to have. However, I probably use these products more for their alternative uses than I do for actual rinse-less washing. And that’s why I have been championing these products, they cover so many bases and do so for very little outlay.
In addition to rinse-less and water-less washing (they are different processes, I promise), you can use these products for the following roles –
- Clay Lubricant (Handy because you tend use a lot of this when claying, so you can mix up as much as you need for minimal outlay)
- Interior Cleaning
- Quick Detailer
- Drying Aid
- Water Softener
- Pad Lubricant
- Windscreen Washer Additive
- Waterless Wash for cleaning door jambs, engine bays, bird dropping removal
- Glass Cleaning
And its that last point I want to expand on, glass cleaning.
I HATE cleaning glass, there, I said it! For that reason, I want a chemical and towel combo that just works, no tick-tac-toe special treatments, no special towels, no overpriced junk that makes the situation worse, no 14-step processes. Just spray, wipe, buff, done. I also have a big problem with products that require kid gloves to make work, cough, Carpro ClarifyPhobic, cough, Bilt Hamber Traceless.
So how would a basic, cheap and very safe product like a rinse-less wash perform as a glass cleaner? After all, most of them on the market suggest glass cleaning as a potential use. That’s what I aim to find out.
The Test -
The following test was spread across a few weeks, multiple cars and multiple ambient temperatures. Some rinse-less products provide suggested dilution ratios for glass, others don’t so I had to pick an appropriate number. I also did not buy any specific product for this test, rather I used what was already on hand. Some of these products are surfactant based, some polymer based, some with Si02. Each was mixed using distilled water for consistency, and each used with my preferred TRC Dry Me A River glass towels. The control product was my go-to, never-fail…………..Stoner’s Invisible Glass in liquid form (there is an aerosol version as well. At the end, I calculated a per 500ml cost, which includes the product mixed with demineralized water purchased at $5.49 per 5-litre bottle.
Here are my findings –
Armour Detail Supply Hero – This is the product that spurred the comparison, mainly because I was hearing so much positive comment about using Hero as a glass cleaner. This product is a hybrid non-residue surfactant/polymer/Si02 based rinse-less wash, and the key attribute that matters here being the "non-streak formula".
In use, Hero doesn’t quite flash as quickly as a IPA-based glass cleaner, but it's not far behind. I was actually surprised at how it flashed away with ease, and you also get a lovely slick finished result. Some feedback that I have come across suggests 128:1 to 256:1 is the sweet spot for glass, I'm told the 64:1 waterless rate can be a little streaky.
NOTE – Unlike some, Hero is safe for use on interior glass and tint. Bradley from ADS provided me the following quote -
“……yes totally (fine) as there is no SiO2 left behind with Hero. The SiO2 in Hero is bonded to the surfactants and it's made to boost cleaning and slickness. The only thing left behind by Hero is a slight polymer film that evaporates in a few days…............…”
In regard to other rinse-less products with a level of “protection” in them, this is what he has to say about them being used on interior glass -
“………I think as long as you aren't using them every day, you'll be fine with any (rinse-less product), especially at the 128:1 to 256:1 dilutions, there's very little activity in that level of solution……..”
Type – Hybrid Polymer/Surfactant
Protection – Non-durable Si02
Suggested Dilution Ratio – Not stated, but 128:1 seems to be the consensus
Tested Dilution Ratio – 128:1
Flash Factor – 4/5
DFB Score – 4/5
Bowden’s Dry Spell – This is a surfactant-based rinse-less wash, basically the only one you can guy in a bricks and mortar store in Australia.
As a rinse-less wash, its ok but nothing special. The same plays out on glass. Actually, Dry Spell was the only major disappointment of the bunch. The first wipes basically push the liquid around, it then requires considerably more wiping to deliver a dry/clear surface. It’s also one of the more expensive per 500ml. Not a product I can recommend in any application.
Type – Surfactant-based
Protection – Nil
Suggested Dilution Ratio – Not Stated
Tested Dilution Ratio – 150:1
Flash Factor – Minimal
DFB Score – 1/5
Carpro ECH20 – This has been a favourite of mine for quite a while now, primarily mixed at the water-less rate for cleaning/drying door jambs and engine bays. It’s primary benefit is the slick, glossy finish it leaves behind. ECH20 is another hybrid, utilizing an Si02 and carnauba wax additives to increase slickness and gloss. But how does that translate to glass cleaning?
In my case, knowing this product can be a little streaky at the usual 15:1 to 25:1 dilutions, I pushed out to a 100:1 ratio. For context, the rinse-less ratio is suggested at 200:1. I have to say, ECH20 has been highly impressive as a glass cleaner. A few sprays to prime the towel, then a light mist onto the glass, the initial wipes spread easily and begin to flash, the final wipes with the dry side of the towel finish it off to a lovely slick feel. And streak free too, which is the whole point after all.
NOTE – I’m not entirely sure you should use this product on interior glass surfaces, especially those that are tinted. See the notes provided with Hero above.
Type – Hybrid Si02
Protection – Mild, Si02 and carnauba wax
Suggested Dilution Ratio – Not stated
Tested Dilution Ratio – 100:1
Flash Factor – Excellent
DFB Score – 5/5
DIY Detail Rinse-less Wash – Despite my dislike of the brands antics, I’ve always liked this product. Out of the others here, DIY aligns with other surfactant-based products such as N-914 and Dry Spell. According to DIY, you can also foam this product, which is permitted by its surfactant base. But who is going to foam a rinse-less wash, you may as well just use soap. If you do want to try it like this, compared to the usual 30ml to 7.5-litres of water in a bucket, you need 120ml-150ml for foaming, which is ridiculous from a cost point of view.
So, how does DIY stack up as a glass cleaner? Being one of the last to try, I was expecting DIY to perform like the other surfactant-based products on test (N-914 and Dry Spell). And yet, it was the complete opposite. For this test, I opted for 128:1 dilution ratio. Where the other two need more wiping to achieve streak free results, DIY seems to flash off very nicely. The only mark against DIY is the lack of slickness when compared directly to the likes of ECH20 or Eco Wash, but then those tend to overachieve on that metric.
Overall, DIY used for glass cleaning exceeded my expectations. A very impressive and surprising result.
NOTE – For this test I used v1 and not the updated v2 formula.
Type – Surfactant
Protection – Nil
Suggested Dilution Ratio – Not stated
Tested Dilution Ratio – 128:1
Flash Factor – 5/5
DFB Score – 5/5
Gyeon Eco Wash – A relative late comer to the rinse-less wash arena, Eco Wash has gone largely unnoticed. For rinse-less washing, I prefer this product over many for its fine mix of lubrication and slickness it leaves behind. The classic Gyeon scent wins me over as well. Where most on the market focus on cleaning, I’ve found Eco Wash to be very similar to Carpro ECH20 in that it probably leans more towards waterless washing and quick-detailer roles.
On glass, Eco Wash is impressive! Like ECH20, I was expecting this to be a little streaky. However, at 100:1 I found it to be surprisingly forgiving. I also love that slick feeling towards the end of the secondary wipes. A very underrated product.
Type – Undetermined
Protection – Yes, Si02
Suggested Dilution Ratio – Not stated
Tested Dilution Ratio – 100:1
Flash Factor – Good
DFB Score – 4.5/5
Koch Chemie Rapid Rinse-less Wash RRW – KCx were late to the rinse-less party, which considering how flooded the market is for these products, I suspect many overlook RRW. Compared to most rinse-less wash concentrates, RRW is acid leaning with a pH of 4.0, however it does move to pH neutral when diluted. I also really like how this product smells, not that it influences the performance, but it's certainly a pleasant difference to others on the market.
So, how does RRW perform on glass. One word, impressive! I had no expectations for this product, but almost instantly I knew this was going to be vying for top spot here. What makes it a winner is how nicely it flashes away, the majority being on those initial wipes before flipping the towel for the final buff. So impressed, RRW ended up being the control product, allowing me to gauge the performance of the other rinse-less products on test.
RRW is known to be one of the stronger rinse-less wash products in terms of outright cleaning ability. That would cause me to caution its use for interior work. However, I’ve been told following –
“A pH of 4 isn't bad, it’s probably closer to neutral once it's diluted down. Interior surfaces like to stay around 4-5 pH………”
Either way, RRW became the biggest surprise of this test.
Type – Hybrid Si02
Protection – Yes, Si02
Suggested Dilution Ratio – Not stated
Tested Dilution Ratio – 128:1
Flash Factor – Excellent, the best on test
DFB Score – 5/5
McKee’s N-914 – For quite a while there, N-914 was the go-to rinse-less product. However, with the massive growth in the rinse-less sector in recent years, I suspect McKee’s have lost ground as the fresher products have hit the market. That doesn’t mean it's not worth buying, just that we now have a flooded market.
For whatever reason, I was expecting more from N-914. Can you use it for glass cleaning, for sure. Is it the best option for glass cleaning, not really. The main problem is the slower flash rate and need for additional wipes. This would be a “in a pinch” type situation with N-914, whereas ECH20 and RRW could easily replace a dedicated glass cleaner.
NOTE – For this test I used v1 and not the updated v2 formula, I doubt it would have made much difference.
Type – Surfactant-based
Protection – Nil
Suggested Dilution Ratio – 128:1
Tested Dilution Ratio – 128:1
Flash Factor – Slow
DFB Score – 2/5
P&S Absolute – This is the product that won me over to rinse-less washing, mainly because of the super slick feeling under the towel, which gave me the confidence to trust the process. I will say, you have to work with a few certain quirks, such as the gloopy nature of the concentrate, and its preference for warm rather than cold water. However, the benefits outweigh the negatives. Team it with a little Bead Maker during the drying step and you will have the slickest and glossiest car on the road!
On glass, Absolute proved to be an excellent option. The “flash factor” is there, and as on paint, the finished result is a lovely slick feel. In my case, I used the 256:1 dilution ratio, I’d probably bump it to 128:1 for a little extra flash and slickness. Along with ONR, Absolute would be one of the safer options for interior glass.
Not the standout here, but the cheapest on test and a worthy option on glass.
Type – Polymer
Protection – Nil
Suggested Dilution Ratio – Not stated
Tested Dilution Ratio – 256:1
Flash Factor – Good
DFB Score – 4/5
Optimum No Rinse – The OG rinse-less wash that has gone through several revisions since it was launched in 2006, each subtly improving the formula. While revision 6 is current, I’m still working through v4 and v5.
Of all of the products here, I was expecting ONR to be the strong performer on glass. And yet, I found it mid-pack average. That’s not to say ONR is a subpar product, rather it just didn’t really meet my expectations here. While I used it at the suggested 256:1, I found that less is more on glass, a very light mist on the surface and a slightly primed towel. Like Absolute, ONR for interior glass cleaning would be a safe bet. A workable product overall, just not excellent for glass.
Type – Polymer
Protection – Nil
Suggested Dilution Ratio – 256:1
Tested Dilution Ratio – 256:1
Flash Factor – Minimal
DFB Score – 2/5
Opti-Coat No Rinse – This is the Opti-Coat version of classic ONR, which differs in that it’s been tailored for use on Opti-Coat coatings. There are also wax infused versions of ONR, and the recently introduced Foaming No Rinse. This Si02 "yellow ONR" is the best of the range.
On glass, this version of ONR performed about the same of the normal type. Again, less is more, but even then, I felt it needed more towel strokes to get to that steak free finish. Not terrible, but not great either.
NOTE - What annoys me about Opti-Coat maintenance line is the lack of information included with the product descriptions. For the considerable price premium, it’s a little rude to make the customer trawl the internet trying to figure out dilution ratios and usage instructions. Granted, some of this is on the bottle, but none of it printed online, which must surely cost them sales as customers put it in the too hard basket. A shame because there are some gems in the range.
Type – Polymer
Protection – Yes, Si02
Suggested Dilution Ratio – No stated
Tested Dilution Ratio – 256:1
Flash Factor – Minimal
DFB Score – 3/5
Cost Considerations -
Probably the most notable aspect of this test was the cost equation. I knew these products would be cheaper than a traditional glass cleaner, I just didn’t expect the gap to be as pronounced as it turned out to be. The following numbers are an average across the 10 products tested, which includes demineralized water -
Average Product Used – 3.18 ml
Average Product Cost Per Bottle Of Concentrate – $0.11c per ml
Average Product Cost Per Dilution - $0.17c per ml
Average Water Used – 496 ml
Average Water Cost Per ml - $0.0011c
Average Water Cost Per Dilution – $0.55c per ml
Total Average Cost - $0.67c per 500ml
For context, this is how Invisible Glass shapes up -
Average Cost - $18.95 for 946-ml bottle
Average Cost Per ml – $0.02c
Average Cost Per 500 ml - $10.03
So, Invisible Glass is on average over 15 times more expensive than a rinse-less wash mixture. I’m all for setting fire to cash when it comes to detailing products, but that price difference is remarkable.
Glass Cleaning Notes –
- When it comes to “cleaning” exterior glass, I’m not sure how much “cleaning” is going on. In that I mean the glass will have been cleaned during the wash phase, so realistically, we are simply using a glass cleaner product to ensure a streak free surface.
- For interior glass, yes, glass will need periodic “cleaning” to remove a build up of film, usually from off-gassing plastics, oily fingerprints and nicotine haze. In these instances, you may need to clean twice, once to remove the bulk, then a second time with fresh towels for a streak free finish.
- If you do end up needing to clean glass between washes, I’d wager you will get a better “clean” from using these rinse-less wash products instead of IPA-based products, which are basically just IPA and water with a colour and/or scent added. The rinse-less products break down and encapsulate contamination for safer/easier removal.
- I think you would still follow basic glass cleaning rules when using the above products. That would include working out of the sun with cool-to-touch glass, using dense/low pile towels, and working with the box method. For interior glass, never apply directly, always into the towel.
- With the rinse-less products, I found less is more. After an initial priming of a fresh towel, one light mist onto each section of glass is usually enough product to achieve the desired streak-free result.
- Don't be the **** who thinks cleaning glass with newspaper is some sort of magical solution. Originally, petroleum-based newspaper ink provided a light polishing effect on glass, leaving a bright and glossy finish. However, those inks have not been used since the early 90's, so you are better off just using a towel. You also don't waste money buying newspapers.
- There is one product missing from this test, Labocosmetica Idrosave. I have reason to believe my bottle came from a batch that was defective. The first time I used this product, well it ended in tears. After some feedback, its possible my bottle came from a known bad batch. As such, I don’t dare touch it again. I’m sure you will understand.
The Standouts -
Carpro ECH20 – As mentioned earlier, I had expected this to struggle on glass, but I came away very impressed. At the usual water-less/quick detailer rate, it may well have streaked. But at 100:1, ECH20 was nothing but delightful. As on paint, you are left with a lovely slick surface.
Gyeon Eco Wash – In reality, what I said about ECH20 applies here too. However, I feel like this product is worth highlighting as it appears to be slept on. It's way slicker than most products mentioned here, be that on paint or glass. It’s super easy to work with and smells lovely too. While many products listed here I wouldn’t buy again, Eco Wash has earnt my respect for repeat purchases.
DIY Detail – Considering how the traditional polymer and surfactant-based rinse-less products struggled on test, I wasn’t expecting much from DIY. And yet, it became the biggest surprise here. The question I now have is, does the performance of the newer v2 version match the original tested here?
The Winner -
Koch Chemie RRW – This was my favourite on test. Actually, I think it performed better than the control product, Invisible Glass. I just love how easily it flashes away and the slick surface it creates. A surprise winner.
Slowly chipping away at creating a parts inventory spreadsheet. While I know the role of each part, identifying what part goes with what engine is another thing entirely. In other words, putting a name to a face.
Each storage box will ultimately have a contents list. Rather than rifling through boxes, this inventory will quickly determine if I have a part in stock, or if I need to place an order. I can then use it to mark off what has been used or sold. This will mostly apply to the stuff that will go into storage, potentially saving time looking for something doesn't exist.
Have I mentioned I like a good spreadsheet?
In January 2022, I bought these Nike Pegasus Trail 3 Gore-Tex runners in a quest for something more comfortable in summer than the Bogs thermal rubber boots I had been using. While not totally waterproof, the Trail 3 proved vastly more comfortable and actually gripped better on Swisstrax due to their trail/hiking focus.


Those Trail 3's have been the hardest wearing pair of runners I've ever owned, so while they cost me a lot, they have certainly been worth the outlay over the long run. After nearly four years and many, many miles, it was time for a new set. I didn't consider any other brand, I wanted another set of Nike's, again with the semi-waterproof Gore-Tex material.
This time I went with Pegasus Trail 5 in Fir-Clay Green, which had 20% off from Nike direct. Green is probably not for everyone, but I quite like it as a point of difference. And yes, a lot of money for a pair of shoes, but as I said, the last pair have outlasted the price-point junk sold in discount stores and the usual clothing outlets.


The old pair are very much still wearable, I just wanted a fresh set for detailing. I tend to demote runners to wear through spring and summer at work. I know, I should be wearing boots, but I've never liked leather boots, especially the steel cap variety. With the amount of walking up and down I do when mowing, foot comfort is highly valued. So, these will promptly be ruined by grass clippings, dirt and dust.

The Gore-Tex element of these trail shoes has proven to be the best balance for me. The rubber boots being thermally insulated become extremely uncomfortable in summer, like you are roasting your feet in an oven. I also hate having wet feet, so washing cars bare foot or with thongs doesn't appeal. Here's hoping these new ones last as long.
Those Trail 3's have been the hardest wearing pair of runners I've ever owned, so while they cost me a lot, they have certainly been worth the outlay over the long run. After nearly four years and many, many miles, it was time for a new set. I didn't consider any other brand, I wanted another set of Nike's, again with the semi-waterproof Gore-Tex material.
This time I went with Pegasus Trail 5 in Fir-Clay Green, which had 20% off from Nike direct. Green is probably not for everyone, but I quite like it as a point of difference. And yes, a lot of money for a pair of shoes, but as I said, the last pair have outlasted the price-point junk sold in discount stores and the usual clothing outlets.
The old pair are very much still wearable, I just wanted a fresh set for detailing. I tend to demote runners to wear through spring and summer at work. I know, I should be wearing boots, but I've never liked leather boots, especially the steel cap variety. With the amount of walking up and down I do when mowing, foot comfort is highly valued. So, these will promptly be ruined by grass clippings, dirt and dust.
The Gore-Tex element of these trail shoes has proven to be the best balance for me. The rubber boots being thermally insulated become extremely uncomfortable in summer, like you are roasting your feet in an oven. I also hate having wet feet, so washing cars bare foot or with thongs doesn't appeal. Here's hoping these new ones last as long.
Over the years, I've found a variety of oddities hiding in gardens, but this is a new one for me...................

A set of dinner plates that had been deposited over a fence and into a garden bed, and yet remained completely intact.......................although they broke in half when I threw them in the bin. Very odd.
A set of dinner plates that had been deposited over a fence and into a garden bed, and yet remained completely intact.......................although they broke in half when I threw them in the bin. Very odd.
I had planned to wash the Jaaaaag last Saturday but ended up having to work, better late than never I guess.
The stars of the show today....................................


Tyres - Shine Supply Wise Guy, NV Onyx
Wheels - P&S Brake Buster, Carpro Hydr02, Bead Maker
Rotors - Bilt Hamber Atom Mac
Paint - Koch Chemie GSF + TRC Cyclone Pad
Topper - ADS Ceramic Spray Sealant
Glass - Opti-Coat Clean & Protect (exterior) + Koch Chemie RRW (interior)
Interior Clean - ADS Pilot

The stars of the show today....................................
Tyres - Shine Supply Wise Guy, NV Onyx
Wheels - P&S Brake Buster, Carpro Hydr02, Bead Maker
Rotors - Bilt Hamber Atom Mac
Paint - Koch Chemie GSF + TRC Cyclone Pad
Topper - ADS Ceramic Spray Sealant
Glass - Opti-Coat Clean & Protect (exterior) + Koch Chemie RRW (interior)
Interior Clean - ADS Pilot
Went out for a midday walk with my best buddy. It was warm out, sunny, perfect spring day. I have two places we like to go, the first one takes us down to the lake, which backs onto bushland and the river. This spot is usually busy with plenty of people and their pets. The second spot is much quieter and surround by bushland and the river. Today we did the lake trip.
As is a frequent occurrence, I have to stop and wait for the little guy to sniff something, I usually walk ahead a little then turn around. Well, I turned around and was startled to see a tiger snake crossing the path about 2 metres behind us. I jumped and abruptly pulled on the lead. This snake had basically watched me walk past then took off across the path behind me. If it had been an Eastern Brown, my sudden movement would likely have caused it to charge at us.
This happened in a heavily trafficked area of the lake, lots of noise, lots of people, lots of dogs. Not far away was two mothers and their kids having lunch on the grass, another couple sitting and talking on a bench. They normally like to be away from noise. This is the second tiger I've seen in the same area this season.
Going green today for the Wildtrak's wash today..............................

Tyres - P&S Brake Buster, Carpro Perl (1:1)
Wheels - P&S Brake Buster
Paint - Carpro Reset + TRC Cyclone 10X Pad
Drying Aid - Meguiar's Hybrid Ceramic Detailer + TRC Gauntlet
Glass - Gyeon Eco-Wash (100:1, exterior) + ADS Hero (128:1, interior)
Interior Clean - ADS Pilot
Leather Clean - Koch Chemie Pol Star (8:1, foam bottle)
Leather Conditioner - ColourLock Leather Protector
One of the more interesting discovers sifting through the boxes of new-old-stock parts was finding several Briggs & Stratton 2-stroke parts. I knew Briggs had dabbled in 2-strokes, but I wasn't aware they were making them right up into the early 2000's. The parts that I've come across are for the vertical shaft 095700 and 096700 series made from 1988 to 1991. With a 141cc capacity, these were made under contract with Komatsu Zenoah. Featuring a cast-iron cylinder, they were marketed as an Industrial Commercial (I/C) engine for lawn mowers. There was also a horizontal shaft version for snow blowers.

A couple of months ago, I came across a listing for one of these engines that didn't actually refer to it being a 2-stroke. I just assumed it was a Quantum, but I was thrown because the muffler and carburettor were revered, as was the fuel cap. After finding several parts for these engines, then doing a little research, what I was seeing in the photos made more sense.
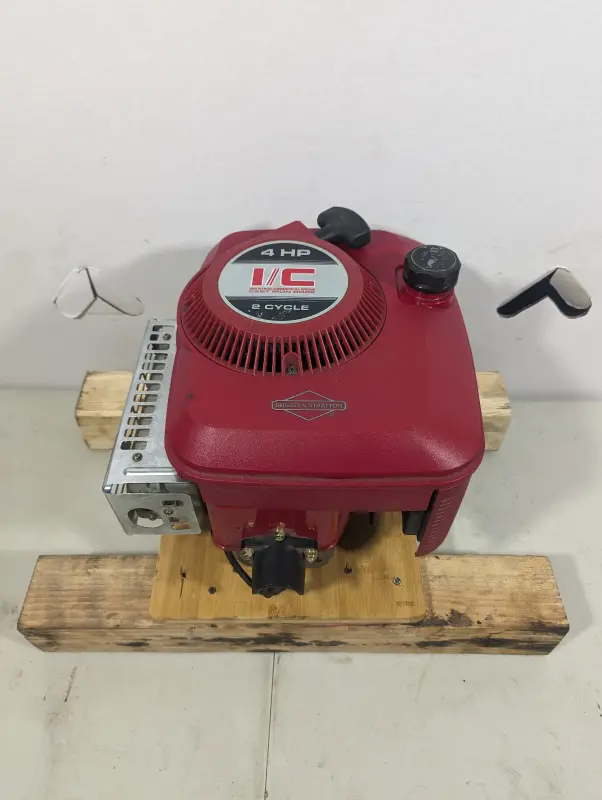
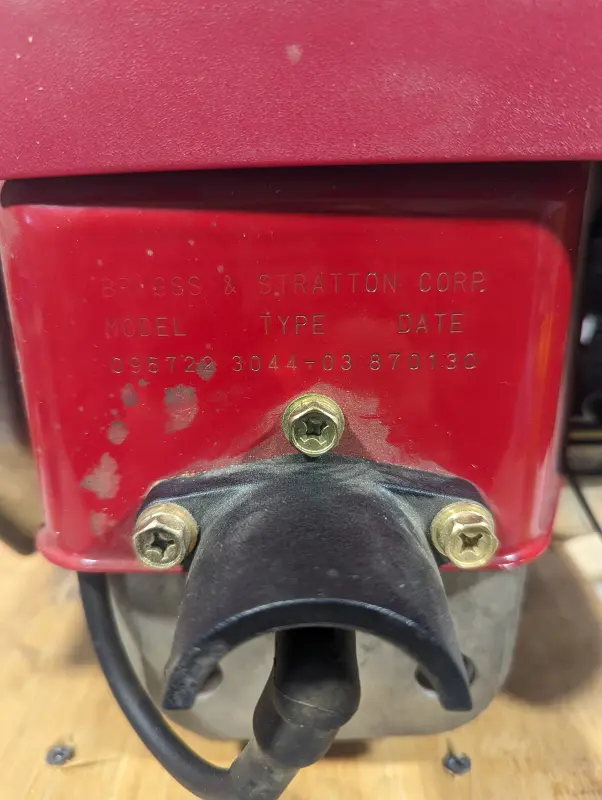
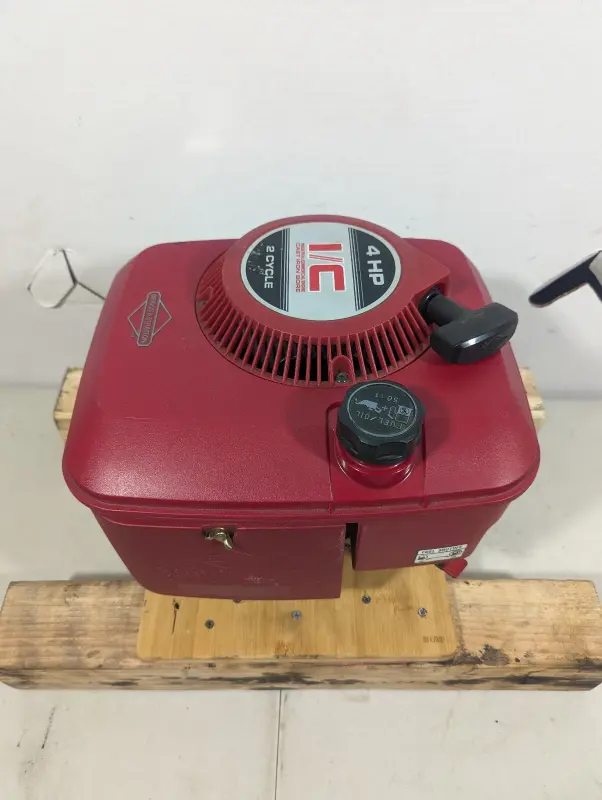
Check out the size of the muffler, no doubt an attempt to curtail some of the inherent noise from the 2-stroke design.
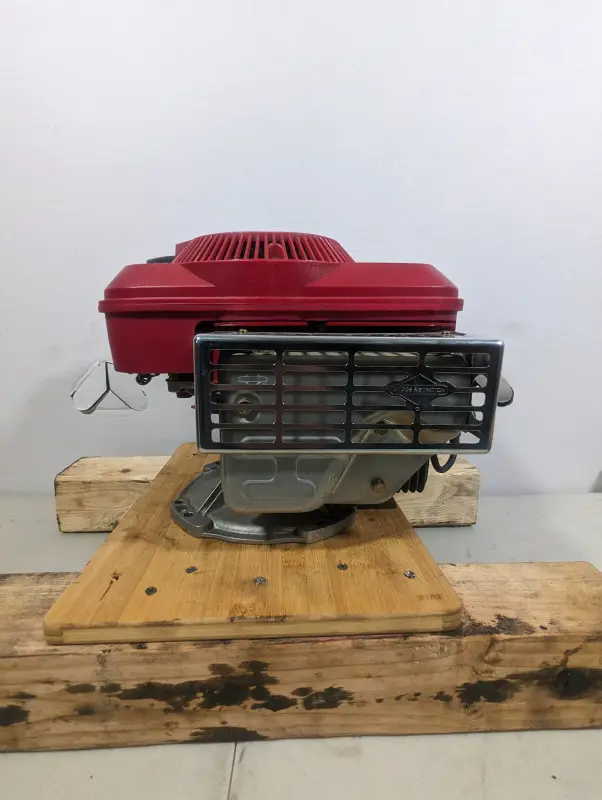
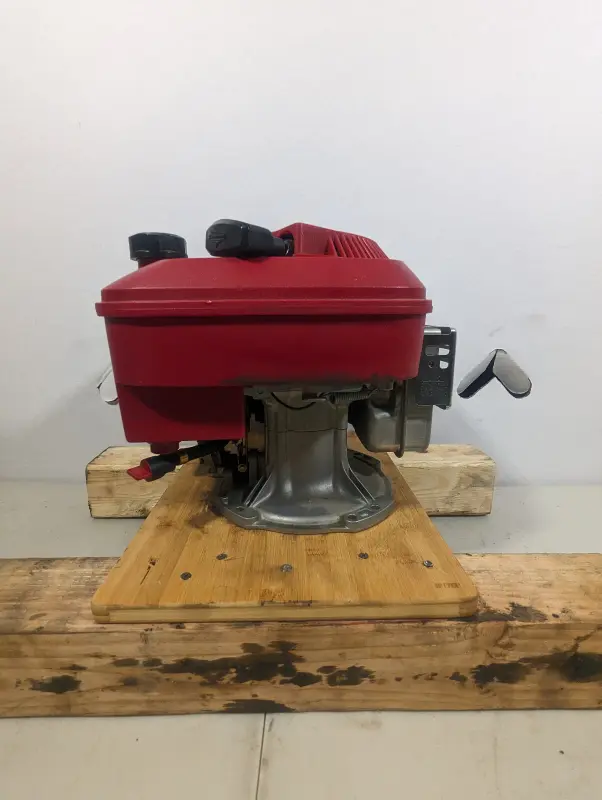
These used a Quantum-style float carburettor, pleated paper filter and mechanical governor. The similar capacity 148cc L-Head 4-stroke used a diaphragm carburettor, oil-soaked foam filter, and air vane governor. And unlike the Victa Powertorque, these were a full crankshaft design, which combined with the conventional carburettor, made them smoother, more responsive to the throttle and had a more stable idle.
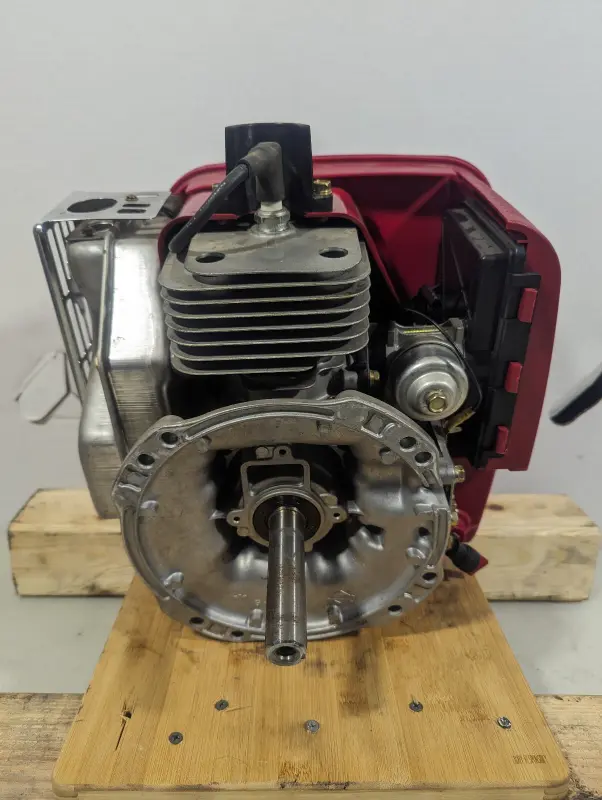
So there you go, always interesting to learn new things.
A couple of months ago, I came across a listing for one of these engines that didn't actually refer to it being a 2-stroke. I just assumed it was a Quantum, but I was thrown because the muffler and carburettor were revered, as was the fuel cap. After finding several parts for these engines, then doing a little research, what I was seeing in the photos made more sense.
Check out the size of the muffler, no doubt an attempt to curtail some of the inherent noise from the 2-stroke design.
These used a Quantum-style float carburettor, pleated paper filter and mechanical governor. The similar capacity 148cc L-Head 4-stroke used a diaphragm carburettor, oil-soaked foam filter, and air vane governor. And unlike the Victa Powertorque, these were a full crankshaft design, which combined with the conventional carburettor, made them smoother, more responsive to the throttle and had a more stable idle.
So there you go, always interesting to learn new things.
Mellow yellow...................................

The Ranger was borrowed yesterday to help move a pile of waste timber. Upon return, the tray was full of dirt, grass and leaves, the windscreen and bumper peppered with bugs. Oh, and they parked close to a sprinkler, so it was covered in water-spots too. Great!
Tyres - P&S Undressed, 3D Ceramic Matte Tire
Wheels - P&S Brake Buster, ADS Amplify
Pre-Wash - Koch Chemie Active Foam
Contact Wash - Koch Chemie GSF + TRC Cyclone 10X Pad
Drying Aid - Gyeon EcoWash (20:1)
Tray - Carpro Release
Glass - Koch Chemie RRW (128:1, interior and exterior)
Interior Clean - ADS Pilot
Scent - Angelwax Bliss


Back to spec and much happier.
The Ranger was borrowed yesterday to help move a pile of waste timber. Upon return, the tray was full of dirt, grass and leaves, the windscreen and bumper peppered with bugs. Oh, and they parked close to a sprinkler, so it was covered in water-spots too. Great!
Tyres - P&S Undressed, 3D Ceramic Matte Tire
Wheels - P&S Brake Buster, ADS Amplify
Pre-Wash - Koch Chemie Active Foam
Contact Wash - Koch Chemie GSF + TRC Cyclone 10X Pad
Drying Aid - Gyeon EcoWash (20:1)
Tray - Carpro Release
Glass - Koch Chemie RRW (128:1, interior and exterior)
Interior Clean - ADS Pilot
Scent - Angelwax Bliss
Back to spec and much happier.
Gyeon EcoWash
Gyeon was a late arrival to the rinse-less/water-less crowd when it introduced its contender in mid-2024, EcoWash. And yet, for a variety of reasons, this product has flown under the radar in what is now a very crowded market segment. Which is a shame as I think EcoWash is a fine product.

What -
EcoWash was primarily designed to work with the Gyeon ceramic coating range, with a focus on water-less washing, spot cleaning and drying aid/detail spray duties. Apart from having Si02 within its formulation, Gyeon don’t provide much technical information on EcoWash. As such, it’s hard to know if this is a polymer, surfactant or hybrid formulation. The way it feels gives me the impression that its polymer based, but I’m happy to be corrected.
In many ways, EcoWash is closely aligned with Carpro ECH20. In that I mean both lean towards water-less washing rather than rinse-less. The similarities continue with a high level of lubrication, a lovely slick and glossy finish, and a delightful scent. I’d also say that both lack outright cleaning power when compared to others in this space. On the flip side, in addition to the aforementioned high gloss and slickness levels, EcoWash mixes easily (unlike some) and the lack of colourant doesn't pose the risk of staining.
Dilutions –
Like any rinse-less wash concentrate, EcoWash can be diluted to serve multiple roles.
Waterless Wash - 15:1 to 10:1
Rinse-less Wash – 256:1 to 150:1
Drying aid – 20:1
Glass – 100:1
Usage Notes –
I use EcoWash in three ways –
Rinse-less Washing –
My first use of EcoWash was in rinse-less mode, and it didn’t impress. However, it was a particularly cold and damp day, which had hampered the drying ability. Subsequent uses proved far more successful, to the point where EcoWash is now a strong favourite. I love the lubricated feel during the wash phase, and the wipe off is easy due to how it flashes away in all but truly cold conditions. While probably not at ECH20 levels, the final result after using EcoWash is a lovely slick, glossy finish.
While Gyeon recommends a dilution between 150:1 and 256:1, I’ve mostly used it at the later. I use the multiple towel method with EcoWash.

Glass Cleaning –
This is a recent discovery, one that really surprised me. Gyeon don’t specifically recommend using EcoWash as a glass cleaner, but after trying 10 similar products like this, EcoWash was at the pointy end of the field, scoring 4.5/5 overall. And it’s the ability to flash during the wipe off that made it a winner on glass. Cheap too, a 500ml mix only costing $0.70c!
“On glass, Eco Wash is impressive! Like ECH20, I was expecting this to be a little streaky. However, at 100:1 I found it to be surprisingly forgiving. I also love that slick feeling towards the end of the secondary wipes.”
For glass, I mixed EcoWash at 100:1 using demineralized water, and teamed with a waffle weave towel.

Drying Aid –
During the initial launch of EcoWash, Gyeon made a point to highlight its use as a drying aid. In the past, I haven't been wowed by using a rinse-less wash product mixed at a drying aid dilution, so I never bothered to try EcoWash like this. However, after the glass cleaner discovery, I felt compelled to give it a try. And it didn’t disappoint, the wipe off is easy and satisfying, again the reward being a slick and glossy end result.
The difference between the water-less and drying aid dilutions is not that far apart, so you could probably use EcoWash at any of the three recommended rates. In my case, I’ve been using 20:1.

Limitations -
The following are my observations as to why EcoWash hasn’t taken off.
Limited Size Options – Despite the official Gyeon website suggesting EcoWash being available in 500ml, 1-litre and 4-litre sizes, I’ve only ever seen the 1-litre being offered in the US and Australia, Canada is the exception. So, for heavy rinse-less wash users who buy in gallon/4-litre sizes, the cost equation may not be as favourable as the competition. Having said that, its price in 1-litre bottles is comparable to key competitors such as P&S Absolute and KCx RRW, and its actually about $10 cheaper than ECH20.
Lack of Availability – For whatever reason, I’ve noticed not all Gyeon retailers carry EcoWash. Even some of the larger companies have left it off the table.
Apparent Lack of Cleaning Power – To be honest, I can’t fully comment on this as my rinse-less wash threshold is extremely low. But from what I have read and my own natural intuition, I suggest those needing a high level of cleaning power may be left wanting. That doesn’t mean EcoWash is a bad product, it just leans a certain way that may not meet your requirements.
A Focus on Water-less – Despite EcoWash being a concentrate, the marketing material and product labelling puts a focus on waterless washing. Most associate water-less wash being a pre-mixed RTU such as P&S Epic, ADS Adapt or DIY Water-less. I suspect this puts some buyers off as they feel like they have no use for a water-less, especially one they have to mix themselves. And that’s despite EcoWash being as versatile as other rinse-less wash products.

Final Thoughts –
EcoWash is a product many are sleeping on. No, it won’t out-clean some of the more potent rinse-less products on the market, but then it doesn’t claim to. EcoWash counters by being one of the slickest and glossiest. For me, its been one of those surprise winners in anything I’ve used it for. Well worth a try.
Gyeon was a late arrival to the rinse-less/water-less crowd when it introduced its contender in mid-2024, EcoWash. And yet, for a variety of reasons, this product has flown under the radar in what is now a very crowded market segment. Which is a shame as I think EcoWash is a fine product.
What -
EcoWash was primarily designed to work with the Gyeon ceramic coating range, with a focus on water-less washing, spot cleaning and drying aid/detail spray duties. Apart from having Si02 within its formulation, Gyeon don’t provide much technical information on EcoWash. As such, it’s hard to know if this is a polymer, surfactant or hybrid formulation. The way it feels gives me the impression that its polymer based, but I’m happy to be corrected.
In many ways, EcoWash is closely aligned with Carpro ECH20. In that I mean both lean towards water-less washing rather than rinse-less. The similarities continue with a high level of lubrication, a lovely slick and glossy finish, and a delightful scent. I’d also say that both lack outright cleaning power when compared to others in this space. On the flip side, in addition to the aforementioned high gloss and slickness levels, EcoWash mixes easily (unlike some) and the lack of colourant doesn't pose the risk of staining.
Dilutions –
Like any rinse-less wash concentrate, EcoWash can be diluted to serve multiple roles.
Waterless Wash - 15:1 to 10:1
Rinse-less Wash – 256:1 to 150:1
Drying aid – 20:1
Glass – 100:1
Usage Notes –
I use EcoWash in three ways –
Rinse-less Washing –
My first use of EcoWash was in rinse-less mode, and it didn’t impress. However, it was a particularly cold and damp day, which had hampered the drying ability. Subsequent uses proved far more successful, to the point where EcoWash is now a strong favourite. I love the lubricated feel during the wash phase, and the wipe off is easy due to how it flashes away in all but truly cold conditions. While probably not at ECH20 levels, the final result after using EcoWash is a lovely slick, glossy finish.
While Gyeon recommends a dilution between 150:1 and 256:1, I’ve mostly used it at the later. I use the multiple towel method with EcoWash.
Glass Cleaning –
This is a recent discovery, one that really surprised me. Gyeon don’t specifically recommend using EcoWash as a glass cleaner, but after trying 10 similar products like this, EcoWash was at the pointy end of the field, scoring 4.5/5 overall. And it’s the ability to flash during the wipe off that made it a winner on glass. Cheap too, a 500ml mix only costing $0.70c!
“On glass, Eco Wash is impressive! Like ECH20, I was expecting this to be a little streaky. However, at 100:1 I found it to be surprisingly forgiving. I also love that slick feeling towards the end of the secondary wipes.”
For glass, I mixed EcoWash at 100:1 using demineralized water, and teamed with a waffle weave towel.
Drying Aid –
During the initial launch of EcoWash, Gyeon made a point to highlight its use as a drying aid. In the past, I haven't been wowed by using a rinse-less wash product mixed at a drying aid dilution, so I never bothered to try EcoWash like this. However, after the glass cleaner discovery, I felt compelled to give it a try. And it didn’t disappoint, the wipe off is easy and satisfying, again the reward being a slick and glossy end result.
The difference between the water-less and drying aid dilutions is not that far apart, so you could probably use EcoWash at any of the three recommended rates. In my case, I’ve been using 20:1.
Limitations -
The following are my observations as to why EcoWash hasn’t taken off.
Limited Size Options – Despite the official Gyeon website suggesting EcoWash being available in 500ml, 1-litre and 4-litre sizes, I’ve only ever seen the 1-litre being offered in the US and Australia, Canada is the exception. So, for heavy rinse-less wash users who buy in gallon/4-litre sizes, the cost equation may not be as favourable as the competition. Having said that, its price in 1-litre bottles is comparable to key competitors such as P&S Absolute and KCx RRW, and its actually about $10 cheaper than ECH20.
Lack of Availability – For whatever reason, I’ve noticed not all Gyeon retailers carry EcoWash. Even some of the larger companies have left it off the table.
Apparent Lack of Cleaning Power – To be honest, I can’t fully comment on this as my rinse-less wash threshold is extremely low. But from what I have read and my own natural intuition, I suggest those needing a high level of cleaning power may be left wanting. That doesn’t mean EcoWash is a bad product, it just leans a certain way that may not meet your requirements.
A Focus on Water-less – Despite EcoWash being a concentrate, the marketing material and product labelling puts a focus on waterless washing. Most associate water-less wash being a pre-mixed RTU such as P&S Epic, ADS Adapt or DIY Water-less. I suspect this puts some buyers off as they feel like they have no use for a water-less, especially one they have to mix themselves. And that’s despite EcoWash being as versatile as other rinse-less wash products.
Final Thoughts –
EcoWash is a product many are sleeping on. No, it won’t out-clean some of the more potent rinse-less products on the market, but then it doesn’t claim to. EcoWash counters by being one of the slickest and glossiest. For me, its been one of those surprise winners in anything I’ve used it for. Well worth a try.
Rover ProCut 560 – Spring Service
It’s now been a year since I found this beauty, and its been working hard!
When the Rover came to me, it was in remarkable condition for a 10-year-old mower. The previous owner had inherited the machine after his father passed away, both clearly kept it well maintained. Even still, I did a reset on it by changing the oil, plug and air filter. I also had to refresh some of the drive system parts, but overall, I had a near new ProCut 560 for half the price I paid for one new in 2015.

After a busy 2024/2025 spring/summer, in February this year I gave it an oil change and a set of new blades. I also replaced the useless fuel tap with a fuel filter. Now that the weather has warmed up and the grass is growing again, I want this mower in top condition for the season ahead. Look after your tools and they will look after you……………………..

Blades –
The current set of blades have been on the mower since February, and while they looked ok at a glance, I had been noticing a decline in cut quality. On closer inspection, they were well worth replacing.


As per most Rover stuff now, finding OEM has become hard. I’ve noticed that when I’ve put the OEM Rover blades on the mower, they seem to last longer than the aftermarket stuff from GA Spares or Jak Max. Depending on where you get them, they will come pre-packaged or drawn from bulk lots of blades and hardware. The Rover branded ones come pre-packaged in sets of two. In this case, I’m using the Jak Max versions.
Rover OE Part Numbers -
333-100-0002 (Blade & Bolt Kit)
742-04413 (Blades only)
712-0130 (Nuts only)
736-04618 (Tension washers only)
738-04547 (Bolts only)
787-02071 (D Plates only)
GA Spares -
BNC7881 (Blade & Bolt Set)
BBN443 (Bolt, Nut, Washer Set)
BLH277D (D-Washer)
The orientation of the blade-bolt-washer-plate is critical for the blades to function as intended, as in swinging away from obstacles, but without being too sloppy. Do it wrong and you end up with poor cutting, increased noise or damage the blade carrier and deck.

Despite acquiring a box full of blades and hardware in the NOS parts haul, none of the blades were suitable for a ProCut. Actually, I’ve since found four sets of mounting hardware, which consists of a bolt, nyloc nut and spring washer, so I’ve gone and ordered the corresponding number of blades without hardware. I’ll have healthy supply of blades going forward.
Deck –
While I had the blade carrier off, I took the opportunity to scrape off the accumulation of dirt and grass. Nothing special or glamorous here, just a paint scraper, wire brush………………….. and a giant mess afterwards.

Oil Change –
Briggs normally specify SAE 30 oil, which I use in their older engines or for break-in. Otherwise, I’m using Penrite 10W-30 semi-synthetic. For the big block 850-series, you need 590 – 600ml of oil.
If Penrite is good enough for a Bathurst win last weekend, its good enough for my lawn mowers. …………………

I normally drain or **** the oil out via the dipstick tube. On this occasion, with the blade carrier removed, I decided to remove the sump plug instead. I’ve actually never done it this way, in fact Briggs & Stratton have removed the drain plug from their engines in recent years.

Victa’s fitted with this engine are pressure lubricated via an oil pump, which is ran through an external oil filter. Those little filters are extremely expensive at $19.95 each, twice the price of some automotive filters. For the ProCut, Rover went for the basic splash lubrication, which saves me $20 per service.
Cleaning –
With the oil change finished and the blade carrier reinstalled, I decided to give the unit a clean. Shine Supply Wise Guy was sprayed on, left to soak, then rinsed with the pressure washer. A little Hydr02 for the deck, and some Hyper Dressing for the plastics, I then used my blower to dry it off.

Spark Plug –
The plug was last changed 12-months ago when I got the mower. I could have just cleaned it, but I had them in stock so just went ahead with a new one. I went with the Champion plug.
Champion – RC12YC
NGK - BCPR5ES

Air Filter –
For whatever reason, finding OEM Briggs parts is hit and miss in Australia. Most shops and online suppliers stock the aftermarket Stens, GA Spares or Jak Max equivalents. What’s frustrating is how they use OEM product images, then have “non-genuine” or “quality aftermarket replacement” in the fine print. That’s not to say the aftermarket parts are junk, just be careful to read each product description to avoid paying OE prices for AM parts. In my case, I’m using the Stens-branded item.
Stens –
Early Models (Long-type) - 100-673 (Filter + Pre-Filter)
Late Models (Triangle-type) – 320-012 (Filter + Pre-Filter)
Briggs & Stratton -
Early Models (Long-type) – 795066 (Filter) + 796254 (Pre-Filter)
Late Models (Triangle-type) – 595853 (Filter) + 597266 (Pre-Filter)
I’m actually a little disappointed in myself for not checking the filter sooner. I normally tap them out weekly, but for whatever reason I had let it go. No wonder the engine was running rich.


Fuel Filter –
With these, you need to make sure you have the correct one. The white 75-micron filters are for engines with a fuel pump, the red 75-micron ones are for gravity fed. The red ones are universal, but the white ones need a fuel pump to draw through the finer filtration material. These pancake filters use a metal screen, which is superior to the paper cartridge style filters that can sometimes break down and send filter material into the carburettor. Both are unidirectional for ease of installation.
Briggs & Stratton – 298090S
Stens - 120-188
OEM vs Aftermarket –
I touched on this earlier, but I feel like its worth expanding on. Where possible, there are a few instances where staying with the OEM part is beneficial.
Fuel Filters – Quite often, the super-cheap aftermarket filters found on Amazon don’t provide a micron rating, so how does one gauge the effectiveness? So, even though you put a new filter on, it may not be doing its job. Evidence suggests that the cheap aftermarket filters often fail prematurely and allow filter material to pass through into carburettor. The trap here being the AM part is often half the price of the OEM or Stens branded equivalent.
Air Filters – The quality and quantity of oil, and the fitment and condition of the air filter determines how long your engine will last. From what I have seen and heard, the ultra-cheap aftermarket air filters do not fit properly and compromise the effectiveness. This is especially so on the smaller OHV Briggs mower engines with the oval shaped white paper filters, the rubber throat doesn’t seal tightly against the intake. So, where possible, I stick with OEM or Stens branded air filters.
Carburettors – Aftermarket replacement carburettors are hit and miss. Sometimes, they will work right out of the box and solve your running issue. But more often than not, they will need tedious fine adjustments, and that’s if you actually get the engine running. If you don’t stick with OEM, I would suggest looking at the HIPA brand, they seem to be the pick of the bunch.
Quite often, the above parts come packaged together in carburettor kits found on Amazon and eBay. There is a reason why these kits are cheap, and its not because the seller is being generous.
Service Cost –
Below is the parts cost to complete this service. If I add my labour rate to that, it would come out at about $177. So I saved about $90 - $100 by doing it myself.
Blade Kit - $39.95
Oil (590ml) - $7.45
Spark Plug - $8.95
Air Filters - $19.30
Fuel Filter - $9.95
Shop Supplies (Towels, Carb Spray) - $2.00
TOTAL - $87.60

Ready for Work –
A quick test fire and the ProCut is ready for the peak mowing season.


This mower also represents the beginning of a massive change to my daily life. I went to pick this mower up on the first day of my long-service leave, and what a sigh of relief that was. In the two weeks leading up to leave, I had a very upsetting and uncalled for interaction at work. I held it together and forged on, so walking out on my last day and the little road trip to buy this mower was the beginning of a new life. Two weeks later, my new car arrived. A month later I landed in hospital, no doubt my body finally giving in, the recovery ate up a month of my leave. Another month on and I resigned, finally putting end to a long running and constant drain on my mental health.
So, every time I use this mower, I’m reminded of how it was the catalyst for change and the feeling of freedom.
It’s now been a year since I found this beauty, and its been working hard!
When the Rover came to me, it was in remarkable condition for a 10-year-old mower. The previous owner had inherited the machine after his father passed away, both clearly kept it well maintained. Even still, I did a reset on it by changing the oil, plug and air filter. I also had to refresh some of the drive system parts, but overall, I had a near new ProCut 560 for half the price I paid for one new in 2015.
After a busy 2024/2025 spring/summer, in February this year I gave it an oil change and a set of new blades. I also replaced the useless fuel tap with a fuel filter. Now that the weather has warmed up and the grass is growing again, I want this mower in top condition for the season ahead. Look after your tools and they will look after you……………………..
Blades –
The current set of blades have been on the mower since February, and while they looked ok at a glance, I had been noticing a decline in cut quality. On closer inspection, they were well worth replacing.
As per most Rover stuff now, finding OEM has become hard. I’ve noticed that when I’ve put the OEM Rover blades on the mower, they seem to last longer than the aftermarket stuff from GA Spares or Jak Max. Depending on where you get them, they will come pre-packaged or drawn from bulk lots of blades and hardware. The Rover branded ones come pre-packaged in sets of two. In this case, I’m using the Jak Max versions.
Rover OE Part Numbers -
333-100-0002 (Blade & Bolt Kit)
742-04413 (Blades only)
712-0130 (Nuts only)
736-04618 (Tension washers only)
738-04547 (Bolts only)
787-02071 (D Plates only)
GA Spares -
BNC7881 (Blade & Bolt Set)
BBN443 (Bolt, Nut, Washer Set)
BLH277D (D-Washer)
The orientation of the blade-bolt-washer-plate is critical for the blades to function as intended, as in swinging away from obstacles, but without being too sloppy. Do it wrong and you end up with poor cutting, increased noise or damage the blade carrier and deck.
Despite acquiring a box full of blades and hardware in the NOS parts haul, none of the blades were suitable for a ProCut. Actually, I’ve since found four sets of mounting hardware, which consists of a bolt, nyloc nut and spring washer, so I’ve gone and ordered the corresponding number of blades without hardware. I’ll have healthy supply of blades going forward.
Deck –
While I had the blade carrier off, I took the opportunity to scrape off the accumulation of dirt and grass. Nothing special or glamorous here, just a paint scraper, wire brush………………….. and a giant mess afterwards.
Oil Change –
Briggs normally specify SAE 30 oil, which I use in their older engines or for break-in. Otherwise, I’m using Penrite 10W-30 semi-synthetic. For the big block 850-series, you need 590 – 600ml of oil.
If Penrite is good enough for a Bathurst win last weekend, its good enough for my lawn mowers. …………………
I normally drain or **** the oil out via the dipstick tube. On this occasion, with the blade carrier removed, I decided to remove the sump plug instead. I’ve actually never done it this way, in fact Briggs & Stratton have removed the drain plug from their engines in recent years.
Victa’s fitted with this engine are pressure lubricated via an oil pump, which is ran through an external oil filter. Those little filters are extremely expensive at $19.95 each, twice the price of some automotive filters. For the ProCut, Rover went for the basic splash lubrication, which saves me $20 per service.
Cleaning –
With the oil change finished and the blade carrier reinstalled, I decided to give the unit a clean. Shine Supply Wise Guy was sprayed on, left to soak, then rinsed with the pressure washer. A little Hydr02 for the deck, and some Hyper Dressing for the plastics, I then used my blower to dry it off.
Spark Plug –
The plug was last changed 12-months ago when I got the mower. I could have just cleaned it, but I had them in stock so just went ahead with a new one. I went with the Champion plug.
Champion – RC12YC
NGK - BCPR5ES
Air Filter –
For whatever reason, finding OEM Briggs parts is hit and miss in Australia. Most shops and online suppliers stock the aftermarket Stens, GA Spares or Jak Max equivalents. What’s frustrating is how they use OEM product images, then have “non-genuine” or “quality aftermarket replacement” in the fine print. That’s not to say the aftermarket parts are junk, just be careful to read each product description to avoid paying OE prices for AM parts. In my case, I’m using the Stens-branded item.
Stens –
Early Models (Long-type) - 100-673 (Filter + Pre-Filter)
Late Models (Triangle-type) – 320-012 (Filter + Pre-Filter)
Briggs & Stratton -
Early Models (Long-type) – 795066 (Filter) + 796254 (Pre-Filter)
Late Models (Triangle-type) – 595853 (Filter) + 597266 (Pre-Filter)
I’m actually a little disappointed in myself for not checking the filter sooner. I normally tap them out weekly, but for whatever reason I had let it go. No wonder the engine was running rich.
Fuel Filter –
With these, you need to make sure you have the correct one. The white 75-micron filters are for engines with a fuel pump, the red 75-micron ones are for gravity fed. The red ones are universal, but the white ones need a fuel pump to draw through the finer filtration material. These pancake filters use a metal screen, which is superior to the paper cartridge style filters that can sometimes break down and send filter material into the carburettor. Both are unidirectional for ease of installation.
Briggs & Stratton – 298090S
Stens - 120-188
OEM vs Aftermarket –
I touched on this earlier, but I feel like its worth expanding on. Where possible, there are a few instances where staying with the OEM part is beneficial.
Fuel Filters – Quite often, the super-cheap aftermarket filters found on Amazon don’t provide a micron rating, so how does one gauge the effectiveness? So, even though you put a new filter on, it may not be doing its job. Evidence suggests that the cheap aftermarket filters often fail prematurely and allow filter material to pass through into carburettor. The trap here being the AM part is often half the price of the OEM or Stens branded equivalent.
Air Filters – The quality and quantity of oil, and the fitment and condition of the air filter determines how long your engine will last. From what I have seen and heard, the ultra-cheap aftermarket air filters do not fit properly and compromise the effectiveness. This is especially so on the smaller OHV Briggs mower engines with the oval shaped white paper filters, the rubber throat doesn’t seal tightly against the intake. So, where possible, I stick with OEM or Stens branded air filters.
Carburettors – Aftermarket replacement carburettors are hit and miss. Sometimes, they will work right out of the box and solve your running issue. But more often than not, they will need tedious fine adjustments, and that’s if you actually get the engine running. If you don’t stick with OEM, I would suggest looking at the HIPA brand, they seem to be the pick of the bunch.
Quite often, the above parts come packaged together in carburettor kits found on Amazon and eBay. There is a reason why these kits are cheap, and its not because the seller is being generous.
Service Cost –
Below is the parts cost to complete this service. If I add my labour rate to that, it would come out at about $177. So I saved about $90 - $100 by doing it myself.
Blade Kit - $39.95
Oil (590ml) - $7.45
Spark Plug - $8.95
Air Filters - $19.30
Fuel Filter - $9.95
Shop Supplies (Towels, Carb Spray) - $2.00
TOTAL - $87.60
Ready for Work –
A quick test fire and the ProCut is ready for the peak mowing season.
This mower also represents the beginning of a massive change to my daily life. I went to pick this mower up on the first day of my long-service leave, and what a sigh of relief that was. In the two weeks leading up to leave, I had a very upsetting and uncalled for interaction at work. I held it together and forged on, so walking out on my last day and the little road trip to buy this mower was the beginning of a new life. Two weeks later, my new car arrived. A month later I landed in hospital, no doubt my body finally giving in, the recovery ate up a month of my leave. Another month on and I resigned, finally putting end to a long running and constant drain on my mental health.
So, every time I use this mower, I’m reminded of how it was the catalyst for change and the feeling of freedom.
jon72vega
Well-known member
That's a very cool picture!

Well, this is something you rarely hear about regarding Subaru's, or any Japanese vehicle for that matter.
You'll have seen this Subaru many times getting the DFB treatment....................

With just on 110,00 km (62,000 miles) on the clock, a dropped valve wiped out the whole engine today. Two weeks ago, we had been discussing a potential replacement for the vehicle and whether to keep servicing it at the dealer. The last visit to the dealer was a ridiculous $1200 for a basic service. It's also out of warranty. I said do at least one more service there, mainly because Subaru would most likely look after you if something went wrong so soon out of warranty. So............................
The dealer is repairing the engine free of charge. But.....................there are 5 other Forester's in line at this dealer waiting for the same repair.
I don't mention all of this to be sour on Subaru, rather to highlight that even the most reliable and well-made car brands have their issues as well. It's popular to sh.t on European/British/American-made vehicles for a variety of mechanical/quality/reliability problems. And yet, even the most respected brands fail too.
You'll have seen this Subaru many times getting the DFB treatment....................
With just on 110,00 km (62,000 miles) on the clock, a dropped valve wiped out the whole engine today. Two weeks ago, we had been discussing a potential replacement for the vehicle and whether to keep servicing it at the dealer. The last visit to the dealer was a ridiculous $1200 for a basic service. It's also out of warranty. I said do at least one more service there, mainly because Subaru would most likely look after you if something went wrong so soon out of warranty. So............................
The dealer is repairing the engine free of charge. But.....................there are 5 other Forester's in line at this dealer waiting for the same repair.
I don't mention all of this to be sour on Subaru, rather to highlight that even the most reliable and well-made car brands have their issues as well. It's popular to sh.t on European/British/American-made vehicles for a variety of mechanical/quality/reliability problems. And yet, even the most respected brands fail too.
12-months today.......................


A lot has changed since that day, it's been 12-months since I worked for you know who. Although they probably suspected it, but I walked out at the end of my last day before LSL knowing in my heart and head it would be the last time. Two weeks prior I had been verbally assaulted with an audience, a situation that keeps running through my scarred mind. I held it together for those two weeks, knowing the end was in sight. By that stage, my body was functioning on adrenalin alone. A few weeks later I was in hospital, the recovery eating a months' worth of my leave. By end of December, I'd officially quit, which also coincided with the imminent passing of my workplace grandmother. The funeral was civil but extremely awkward.
In many ways, the funeral was the final hurdle to clear before gaining my freedom. I now sleep at night, which in itself has been a revelation. My near entire life is no longer a constant state of dread, fear and anxiety.
So that car above represents both pleasure and pain. The pain I went through prior to its arrival, but also the pleasure of being free of the asylum.
A few favourite shots of the Mustang....................
ajohno
Well-known member
Car looking good mate.
A little follow up work on the SuperCut Turbo Thrust today……………………….
First up, a little history lesson…………………..
Briggs used three different cold start assist methods over the life of the Quantum / 190cc L-Head series engines.
1. In the early years, from very late 80’s to the mid 90’s, they used a carburettor with a built-in choke. My Rover Combat uses this method.
2. From the mid 90’s till mid 2000’s, they used a primer bulb system. This meant a move from a steel air filter base to plastic, which also integrated the primer bulb and delivery channel. Unlike the smaller Classic/Sprint/Quattro engines, this design was not connected to a fuel supply, instead it draws pressure across the carburettor jet to syphon fuel up and into the intake throat. This is why these primers have a hole in them, the Classic/Sprint/Quattro are sealed.
3. From the mid 2000’s, Briggs deleted the primer bulb and went to an automatic choke design. These used a temperature sensitive module to open and close the choke automatically. With the engine dead cold, the choke is held in the closed position. When the heat from the muffler melts the wax within the module, the choke is opened. Simple and effective, eliminating the need to engage a manual choke or pressing a primer bulb.
The above relates to the Intek as well. Intek’s didn’t enter production until the mid-90’s, so only methods 2 and 3 apply. Only very late Intek’s got the auto-choke before Briggs went to the new 850-Series engines. Being a 1999 engine, mine has the primer bulb.
Primer Bulb & Gasket Replacement -
When I had the airbox backing plate off the engine a few weeks ago, the gasket between it and the carburettor was pretty suspect. For those that don’t know, the gasket plays a role in how well the primer functions, the circuit needs to be airtight to deliver enough pressure to lift the fuel into the intake tract. You also need to ensure the delivery channel is free and clear. Considering the replacement would require removal of the backing plate, I decided to replace the bulb while I was at it.
Removal this time did in fact tear the gasket, which needed to be lightly scraped off both the plastic backing plate and aluminium carburettor. The removal of the primer bulb is a fiddly operation using two flat head screw drivers to release the two plastic locking tabs. Once free, clean behind where it was seated and blow compressed air through the passage. The new primer bulb is then driven into place using a deep socket until the tabs click into place.
Gasket – 692667 (Briggs) or 485-220 (Stens)
Primer Bulb – 694395 (Briggs) or 120-174 (Stens)

Briggs actually makes special tools for this job to make the process easier and reduce the likelihood of causing damage. The removal pliers are part no. 19461, but no one sells them in Australia, and having them sent from the US takes the price from $54.99 to $154.99. The same applies to the install tool, part no. 19462, the price goes from $37.99 to $101.99. Yey for Australia!
NOTE – While Quantum and Intek shared a similar air filter backing plate, the backing plate and gaskets are different part numbers, the primer is the same though. In particular, the location of the carburettor mounting -
Intek –

Quantum –

Wheel Bearing Replacement –
I’d noticed the mower was quite shaky on its feet. Originally, I thought it might have been the axle bushings. However, I had already replaced the fronts, so they were good and tight. The rears I haven’t touched but appear to be fine. So, it had to be the wheels.
There was excessive movement from each wheel, both side to side and up and down on the axle. With the hub caps removed, the retaining washers were tight enough, but each wheel wobbled and rattled. So, the bearings were stuffed.
Now, you can still get these wheels new from several places. They are also quite reasonably priced at about $35 each, but that works out at $140, more than I paid for this mower. If or when I sell this mower, I wouldn’t get that money in return. So, I went looking for replacement bearings. Again, these are still available, either OEM or aftermarket. I ordered the Rover bearings but didn’t buy enough. (More on that shortly)
Replacing the bearings involves removing the wheels. That involves getting those stupid retaining washers off the axle, which I’ve always hated. I’ve found a sharp blow from the top with a flat punch opens them up on the base, which then allows you to get a large flat screwdriver underneath to lever it off the axle. Sounds simple, and sometimes it is, sometimes they are a right pain in the ar.e!


Apart from one that was stuck on the axle, the old bearings didn’t put up much of a fight. And boy, were they super sloppy and noisy!
There’s your problem!


With the wheel and bearings removed, I scuffed up the axles with a scotch pad, cleaned with WD-40, then applied some Stihl branded gearhead grease. The rear dust cap was also cleaned.

As mentioned earlier, I had to go out and buy two additional bearings. For whatever reason, I didn’t think about each wheel having two bearings, so I ordered six, four replacements, two for spare parts. Thankfully, the local bearing shop had exactly what I needed, I didn't bother wasting time with the useless mower shops in town. That actually made my day, the guy took one look at them, then went and grabbed them off the shelf. He literally saved the day!
So, I took ten of them, two to complete this job, then eight for spares. Cost wise, the list price of the OEM Rover parts was actually cheaper, but then I had to pay shipping on top of that, so the price would have been lineball.


With the bearings installed and the wheel slid back onto the axle, the hard part is re-installing the new retaining washer. For this, you need to have the wheel off the ground, I then drive them down with an old ½-inch socket extension that fits over the axle.
All but one of the hub caps were cracked, so I gifted the mower a set of NOS items I picked up a few weeks ago. This should help keep the dust out of the bearings, or at least reduce it.
OEM Bearings - A03353
NBR Bearings – UGB0818F
Retaining Washer - 726-04052
Hub Caps - A03414 (which came from the NOS parts haul)

Below is what I’ve spent on this machine so far. Now, if you were doing this to make a profit, realistically you wouldn’t be spending that much money on an old mower. I do it because I enjoy the thrill of the chase, and the fact I can see value in a well built and strong older Rover like this. If you were doing this to make money, you’d probably skip the wheel bearings and hub caps, primer bulb and two oil changes.
Another way to look at, where would $300 take you on a new mower? Shopping Rover, nope, you need at least $729 for a re-branded MTD Hi-Wheeler piece of junk. The cheapest Masport is the Lawn Martial, complete with a 123cc China-motor and a 16-inch cut. The cheapest Victa is the horrid Corvette V127 for $369, complete with a bar blade, 16-inch cut, a 127cc Chinese engine and a terrible catcher. The lowest price Bushranger at least comes with an ex-Rover 18-inch chassis, catcher, and blade system...........but costs $459 and comes with a crappy 139cc Loncin engine. Bunning's will happily sell you a $199 Sprinter with a 16-inch cut, 123cc engine, a bar blade and a chassis made from the thinnest Chinese steel going. Same applies to the 127cc Cheetah for $264.
None of those mowers will cut with ease, in fact they will make the job as hard as possible. None will last as long as this 26-year old Rover that's cost me less than $300, and it's got another 26-years left in it.

After the wheel bearing replacement, the mower feels extremely solid, tight as a drum. Those bearings were totally shot, so it now rolls smoothly with no slop………………….like new!
First up, a little history lesson…………………..
Briggs used three different cold start assist methods over the life of the Quantum / 190cc L-Head series engines.
1. In the early years, from very late 80’s to the mid 90’s, they used a carburettor with a built-in choke. My Rover Combat uses this method.
2. From the mid 90’s till mid 2000’s, they used a primer bulb system. This meant a move from a steel air filter base to plastic, which also integrated the primer bulb and delivery channel. Unlike the smaller Classic/Sprint/Quattro engines, this design was not connected to a fuel supply, instead it draws pressure across the carburettor jet to syphon fuel up and into the intake throat. This is why these primers have a hole in them, the Classic/Sprint/Quattro are sealed.
3. From the mid 2000’s, Briggs deleted the primer bulb and went to an automatic choke design. These used a temperature sensitive module to open and close the choke automatically. With the engine dead cold, the choke is held in the closed position. When the heat from the muffler melts the wax within the module, the choke is opened. Simple and effective, eliminating the need to engage a manual choke or pressing a primer bulb.
The above relates to the Intek as well. Intek’s didn’t enter production until the mid-90’s, so only methods 2 and 3 apply. Only very late Intek’s got the auto-choke before Briggs went to the new 850-Series engines. Being a 1999 engine, mine has the primer bulb.
Primer Bulb & Gasket Replacement -
When I had the airbox backing plate off the engine a few weeks ago, the gasket between it and the carburettor was pretty suspect. For those that don’t know, the gasket plays a role in how well the primer functions, the circuit needs to be airtight to deliver enough pressure to lift the fuel into the intake tract. You also need to ensure the delivery channel is free and clear. Considering the replacement would require removal of the backing plate, I decided to replace the bulb while I was at it.
Removal this time did in fact tear the gasket, which needed to be lightly scraped off both the plastic backing plate and aluminium carburettor. The removal of the primer bulb is a fiddly operation using two flat head screw drivers to release the two plastic locking tabs. Once free, clean behind where it was seated and blow compressed air through the passage. The new primer bulb is then driven into place using a deep socket until the tabs click into place.
Gasket – 692667 (Briggs) or 485-220 (Stens)
Primer Bulb – 694395 (Briggs) or 120-174 (Stens)
Briggs actually makes special tools for this job to make the process easier and reduce the likelihood of causing damage. The removal pliers are part no. 19461, but no one sells them in Australia, and having them sent from the US takes the price from $54.99 to $154.99. The same applies to the install tool, part no. 19462, the price goes from $37.99 to $101.99. Yey for Australia!
NOTE – While Quantum and Intek shared a similar air filter backing plate, the backing plate and gaskets are different part numbers, the primer is the same though. In particular, the location of the carburettor mounting -
Intek –
Quantum –
Wheel Bearing Replacement –
I’d noticed the mower was quite shaky on its feet. Originally, I thought it might have been the axle bushings. However, I had already replaced the fronts, so they were good and tight. The rears I haven’t touched but appear to be fine. So, it had to be the wheels.
There was excessive movement from each wheel, both side to side and up and down on the axle. With the hub caps removed, the retaining washers were tight enough, but each wheel wobbled and rattled. So, the bearings were stuffed.
Now, you can still get these wheels new from several places. They are also quite reasonably priced at about $35 each, but that works out at $140, more than I paid for this mower. If or when I sell this mower, I wouldn’t get that money in return. So, I went looking for replacement bearings. Again, these are still available, either OEM or aftermarket. I ordered the Rover bearings but didn’t buy enough.
(More on that shortly)Replacing the bearings involves removing the wheels. That involves getting those stupid retaining washers off the axle, which I’ve always hated. I’ve found a sharp blow from the top with a flat punch opens them up on the base, which then allows you to get a large flat screwdriver underneath to lever it off the axle. Sounds simple, and sometimes it is, sometimes they are a right pain in the ar.e!
Apart from one that was stuck on the axle, the old bearings didn’t put up much of a fight. And boy, were they super sloppy and noisy!
There’s your problem!
With the wheel and bearings removed, I scuffed up the axles with a scotch pad, cleaned with WD-40, then applied some Stihl branded gearhead grease. The rear dust cap was also cleaned.
As mentioned earlier, I had to go out and buy two additional bearings. For whatever reason, I didn’t think about each wheel having two bearings, so I ordered six, four replacements, two for spare parts. Thankfully, the local bearing shop had exactly what I needed, I didn't bother wasting time with the useless mower shops in town. That actually made my day, the guy took one look at them, then went and grabbed them off the shelf. He literally saved the day!
So, I took ten of them, two to complete this job, then eight for spares. Cost wise, the list price of the OEM Rover parts was actually cheaper, but then I had to pay shipping on top of that, so the price would have been lineball.
With the bearings installed and the wheel slid back onto the axle, the hard part is re-installing the new retaining washer. For this, you need to have the wheel off the ground, I then drive them down with an old ½-inch socket extension that fits over the axle.
All but one of the hub caps were cracked, so I gifted the mower a set of NOS items I picked up a few weeks ago. This should help keep the dust out of the bearings, or at least reduce it.
OEM Bearings - A03353
NBR Bearings – UGB0818F
Retaining Washer - 726-04052
Hub Caps - A03414 (which came from the NOS parts haul)
Below is what I’ve spent on this machine so far. Now, if you were doing this to make a profit, realistically you wouldn’t be spending that much money on an old mower. I do it because I enjoy the thrill of the chase, and the fact I can see value in a well built and strong older Rover like this. If you were doing this to make money, you’d probably skip the wheel bearings and hub caps, primer bulb and two oil changes.
Another way to look at, where would $300 take you on a new mower? Shopping Rover, nope, you need at least $729 for a re-branded MTD Hi-Wheeler piece of junk. The cheapest Masport is the Lawn Martial, complete with a 123cc China-motor and a 16-inch cut. The cheapest Victa is the horrid Corvette V127 for $369, complete with a bar blade, 16-inch cut, a 127cc Chinese engine and a terrible catcher. The lowest price Bushranger at least comes with an ex-Rover 18-inch chassis, catcher, and blade system...........but costs $459 and comes with a crappy 139cc Loncin engine. Bunning's will happily sell you a $199 Sprinter with a 16-inch cut, 123cc engine, a bar blade and a chassis made from the thinnest Chinese steel going. Same applies to the 127cc Cheetah for $264.
None of those mowers will cut with ease, in fact they will make the job as hard as possible. None will last as long as this 26-year old Rover that's cost me less than $300, and it's got another 26-years left in it.
After the wheel bearing replacement, the mower feels extremely solid, tight as a drum. Those bearings were totally shot, so it now rolls smoothly with no slop………………….like new!